Nissan Ariya: Removal and Installation
- Front Bumper
- Rear Bumper
- Front Grille
- Active Grille Shutter
- Cowl Top
- Fender Finisher
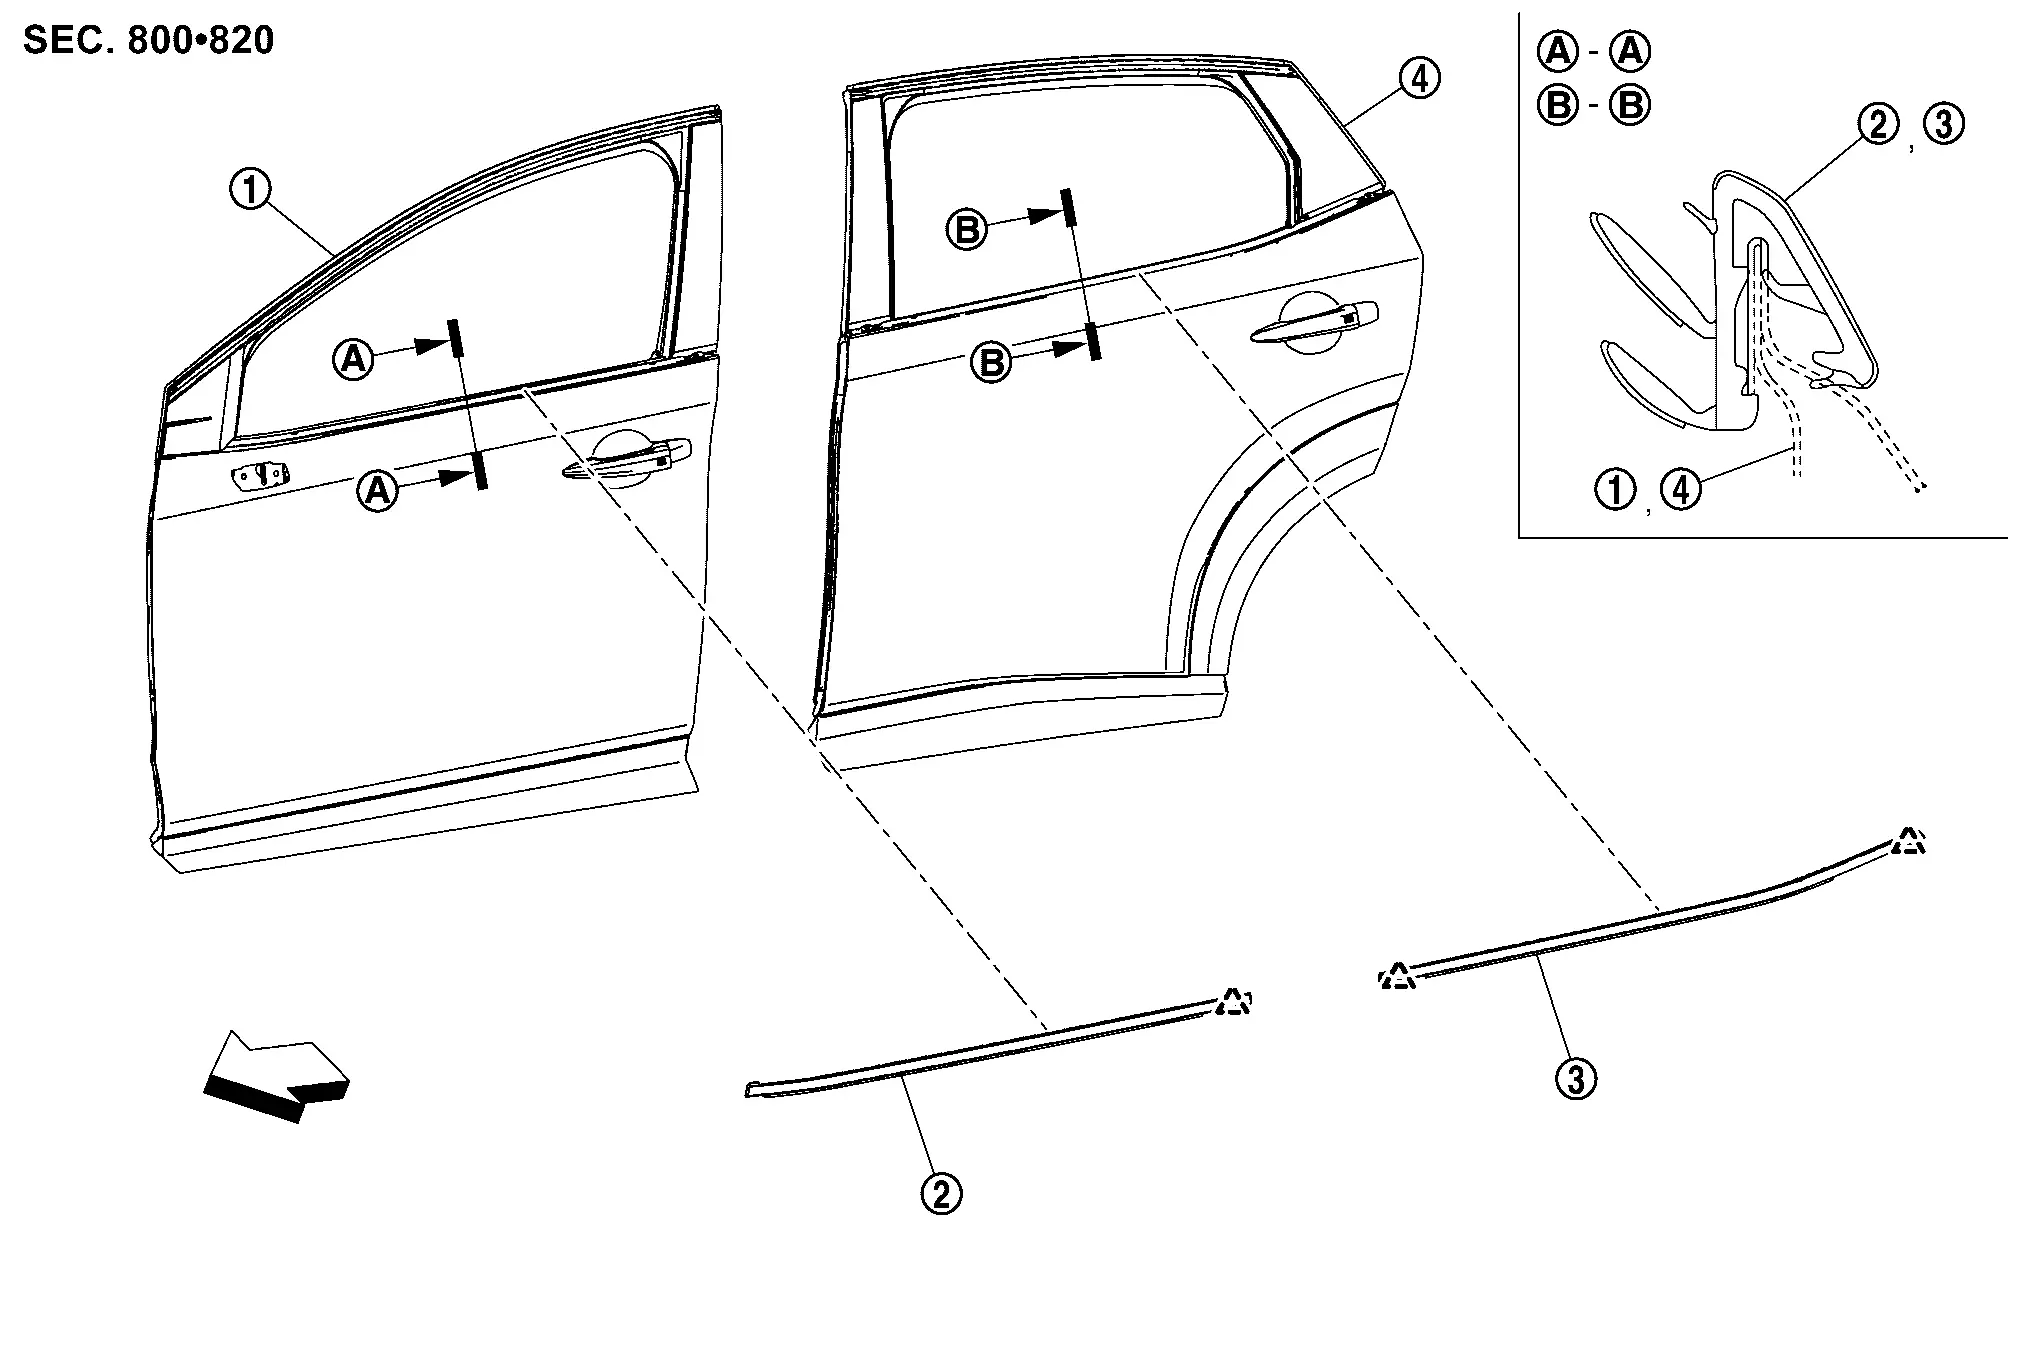
- Fillet Molding
- Front Fillet Molding
- Rear Fillet Molding
- Fender Protector
- Rear Wheel House Protector
- Front Under Cover
- Rear Diffuser
- Roof Rail
- Door Sash Cover
- Front Door Sash Cover
- Rear Door Sash Cover
- Door Outside Molding
- Front Door Outside Molding
- Side Guard Molding
- Front Side Guard Molding
- Rear Side Guard Molding
- Rear Deflector
- Sill Cover
- Rear Fender Cover
- Rear Spoiler
- Emblem
Front Bumper Nissan Ariya 1st generation
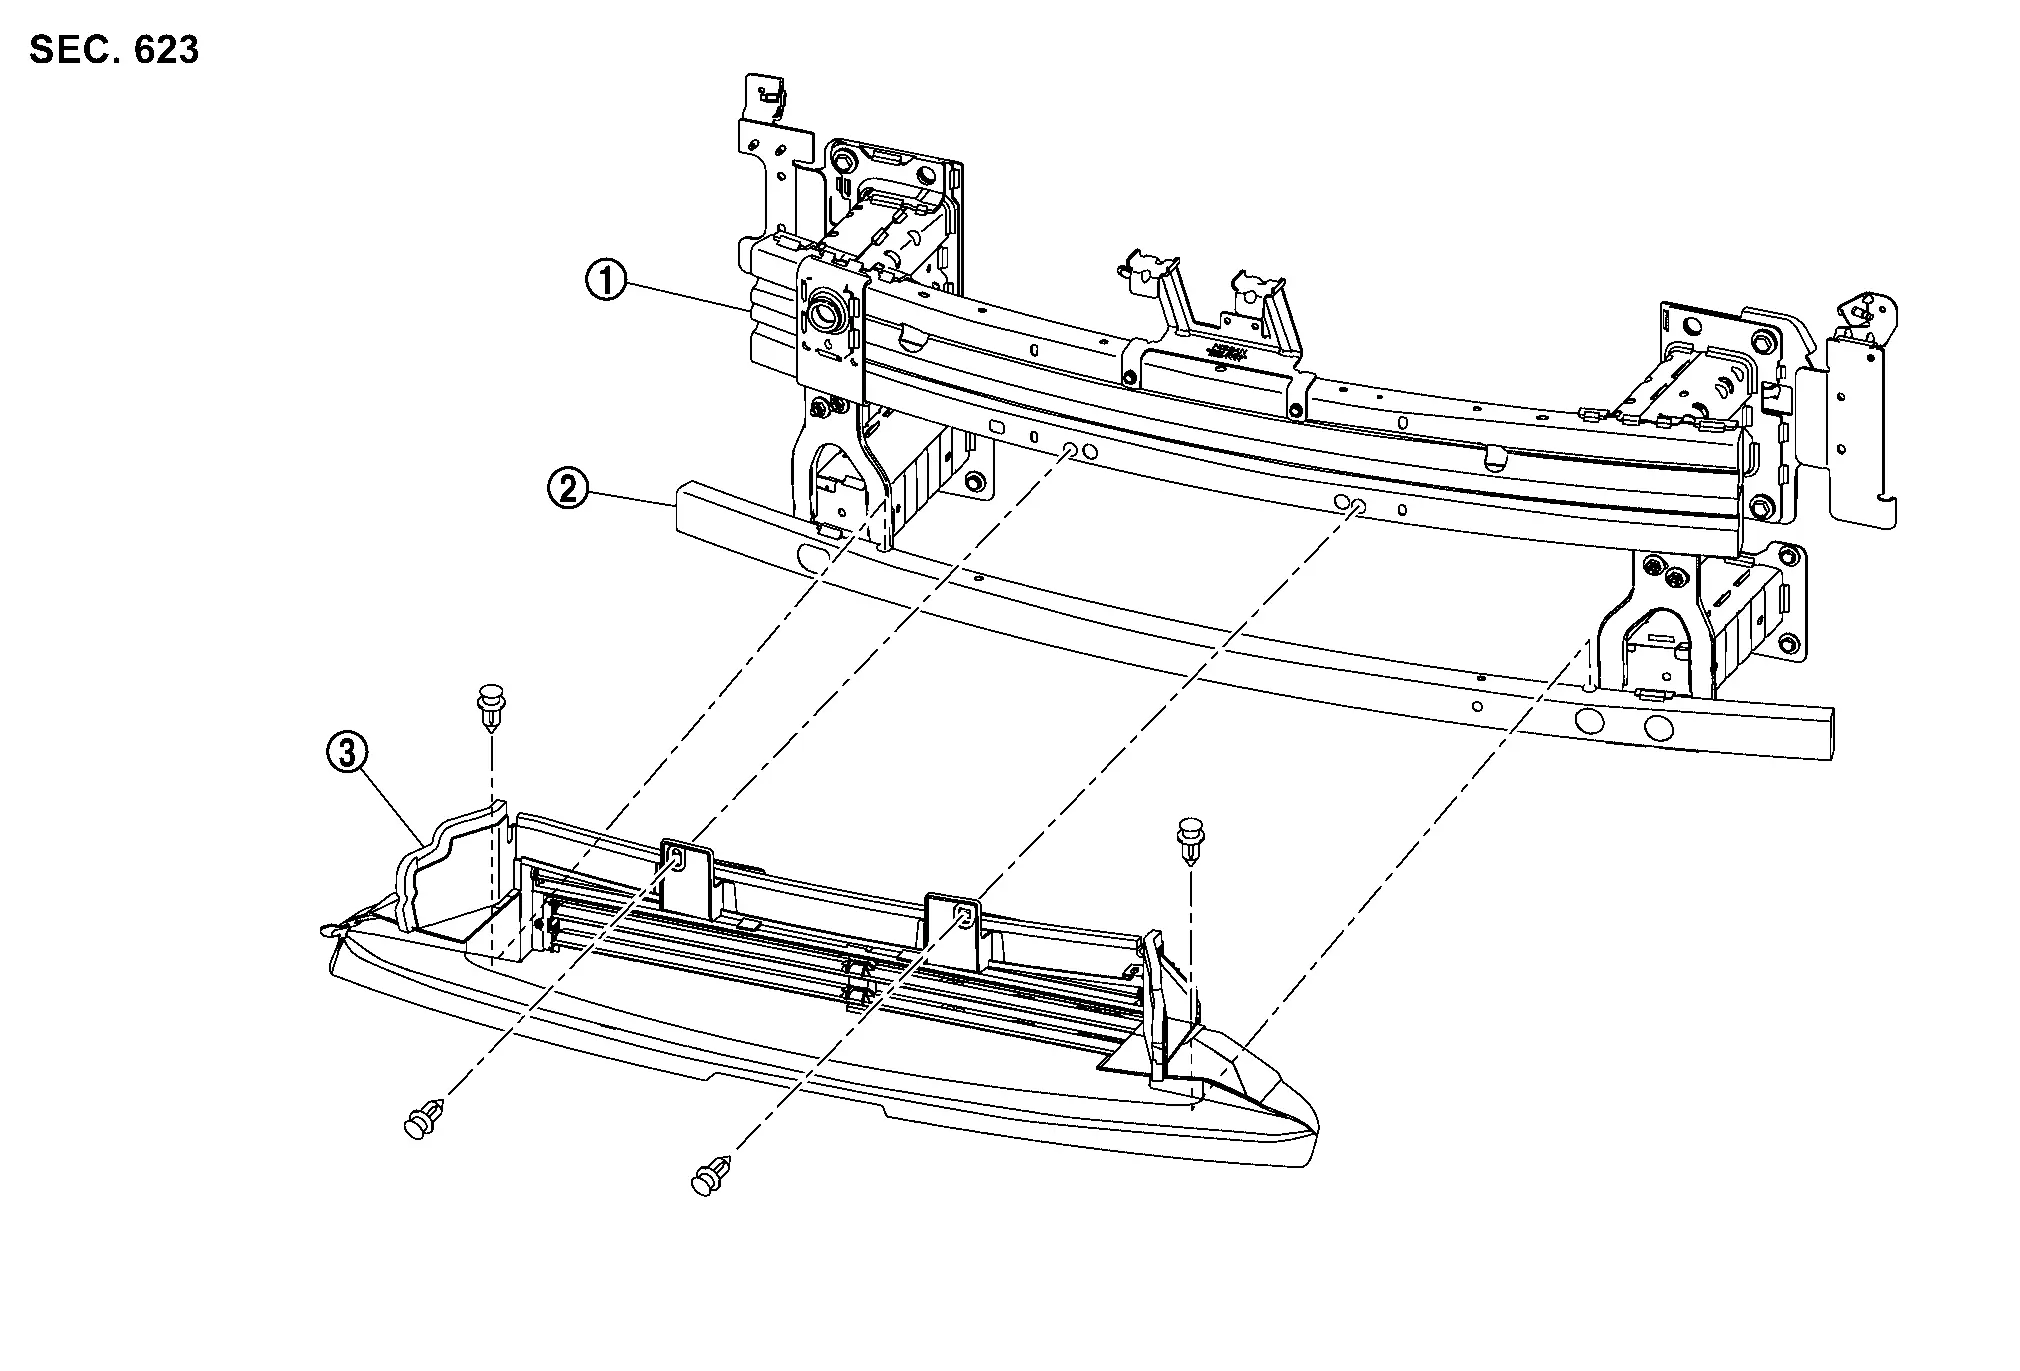
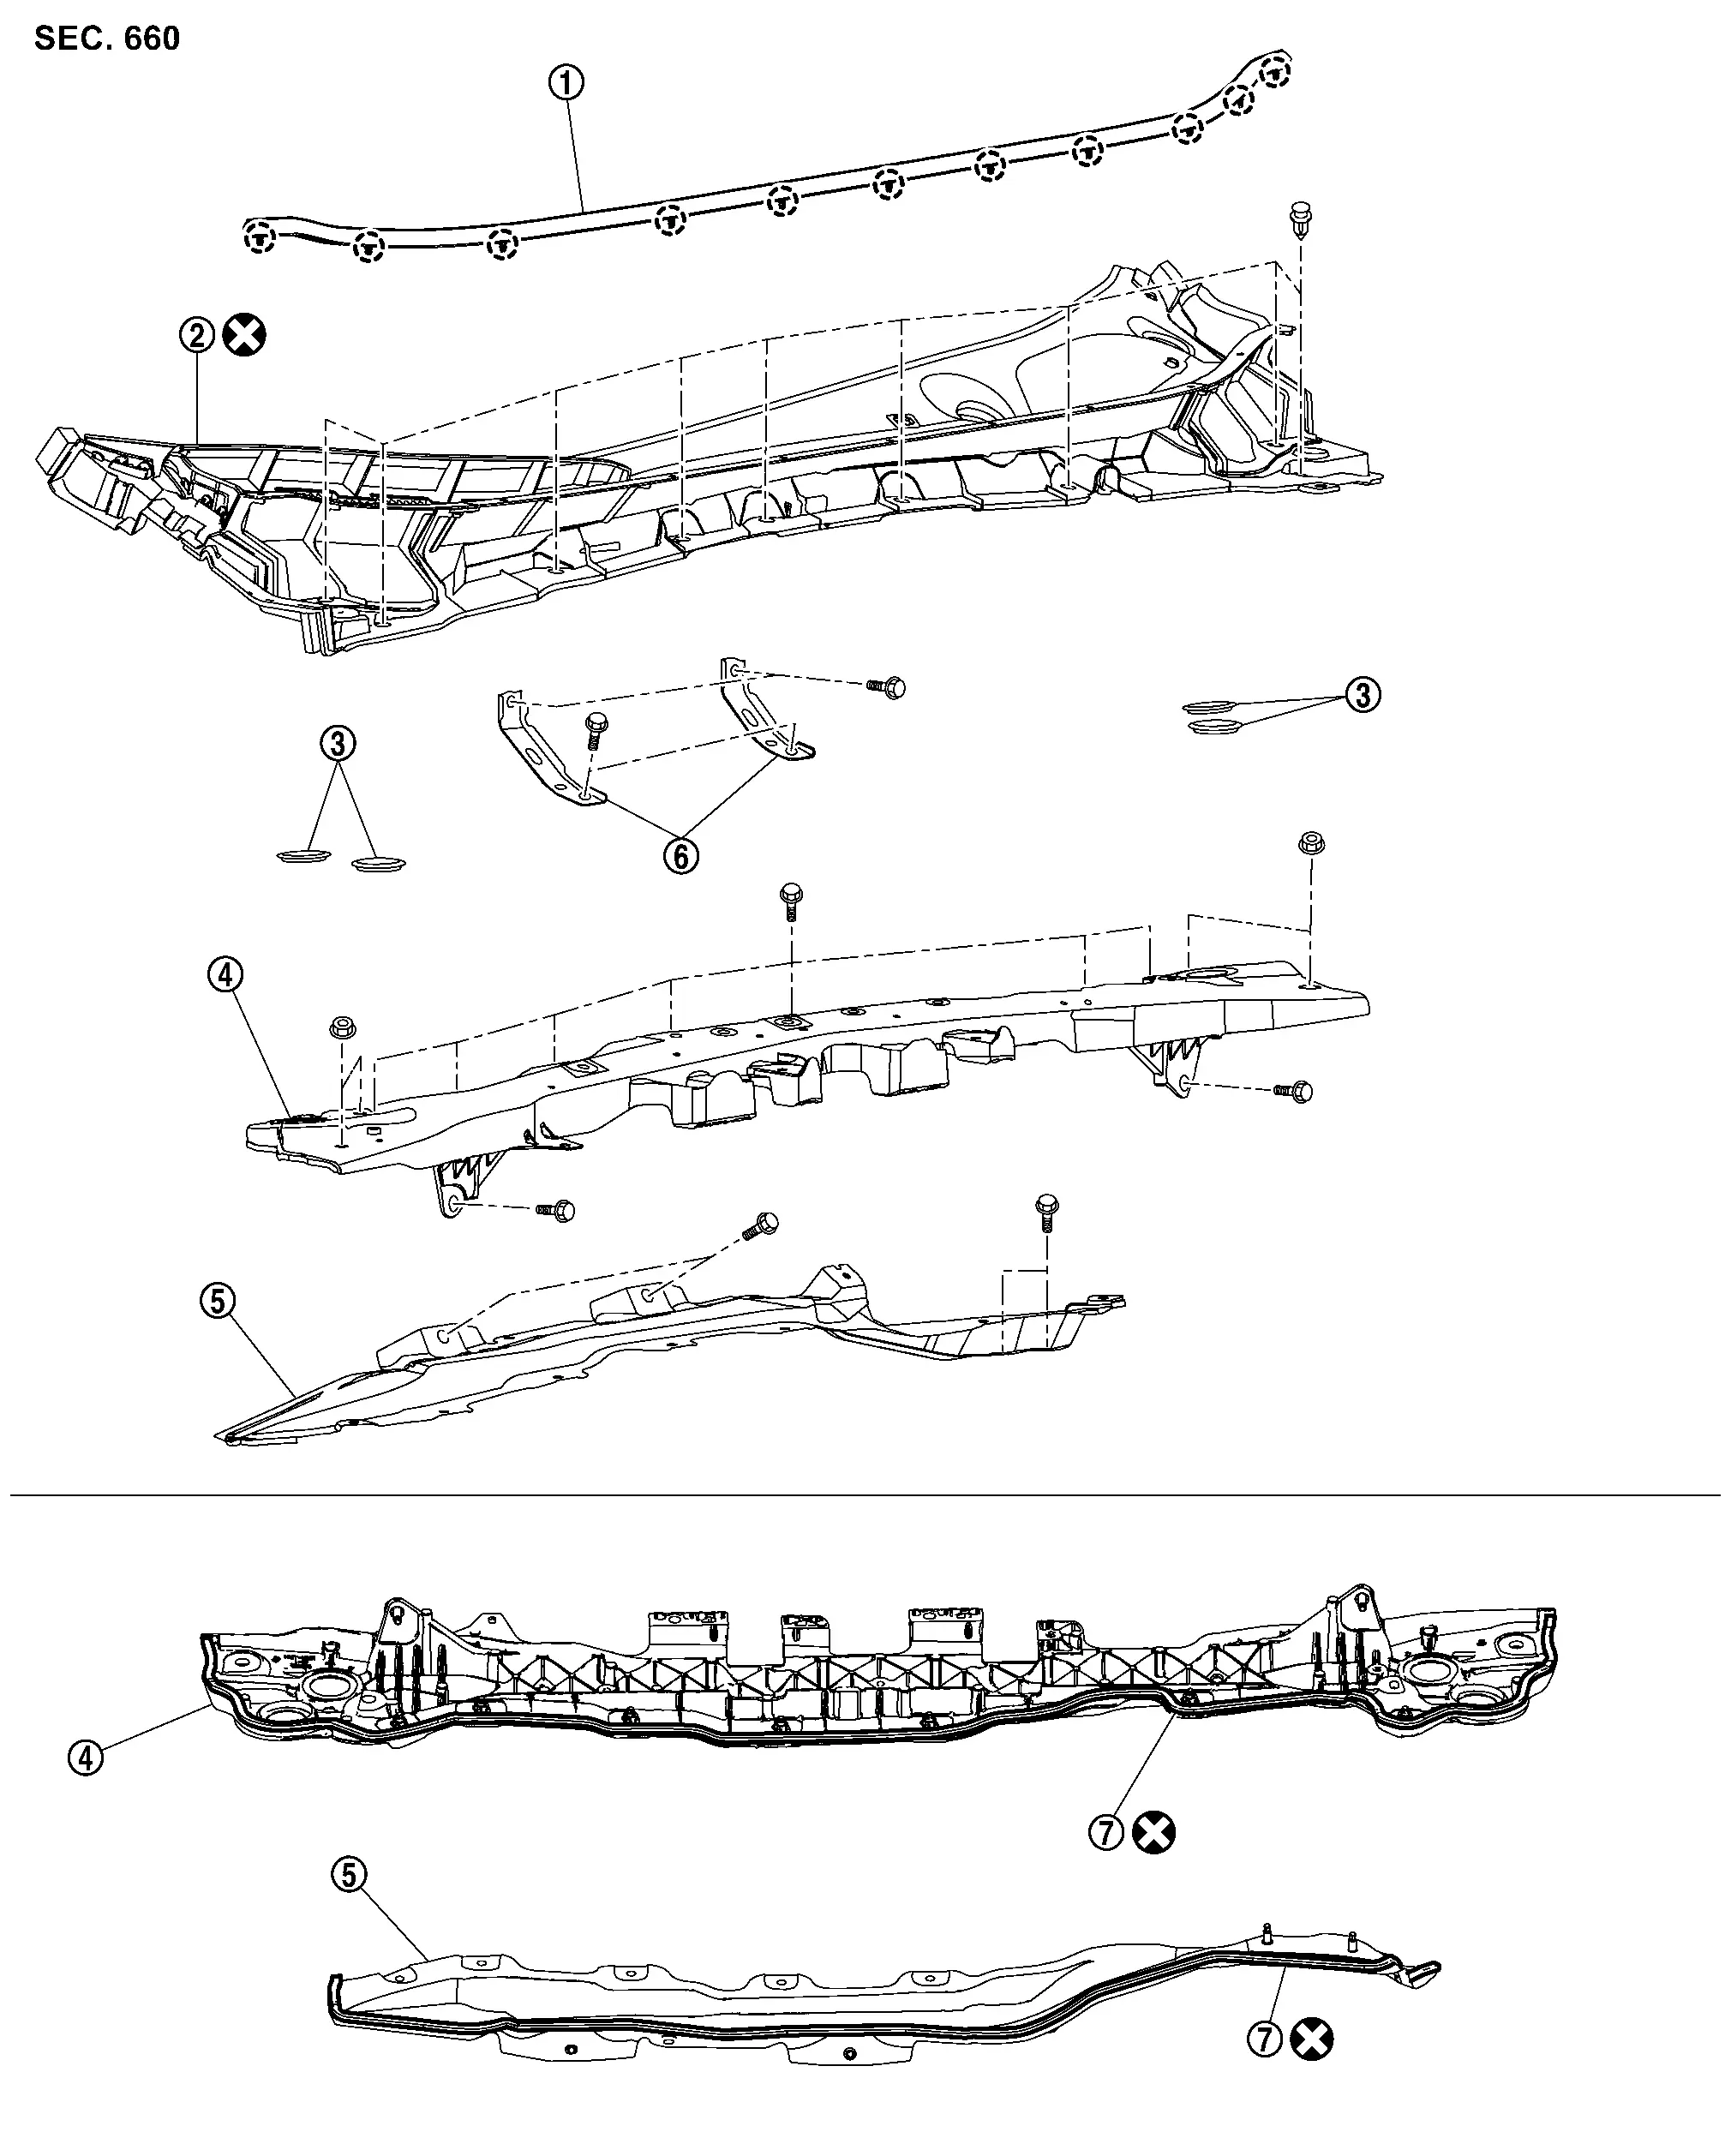
Exploded View
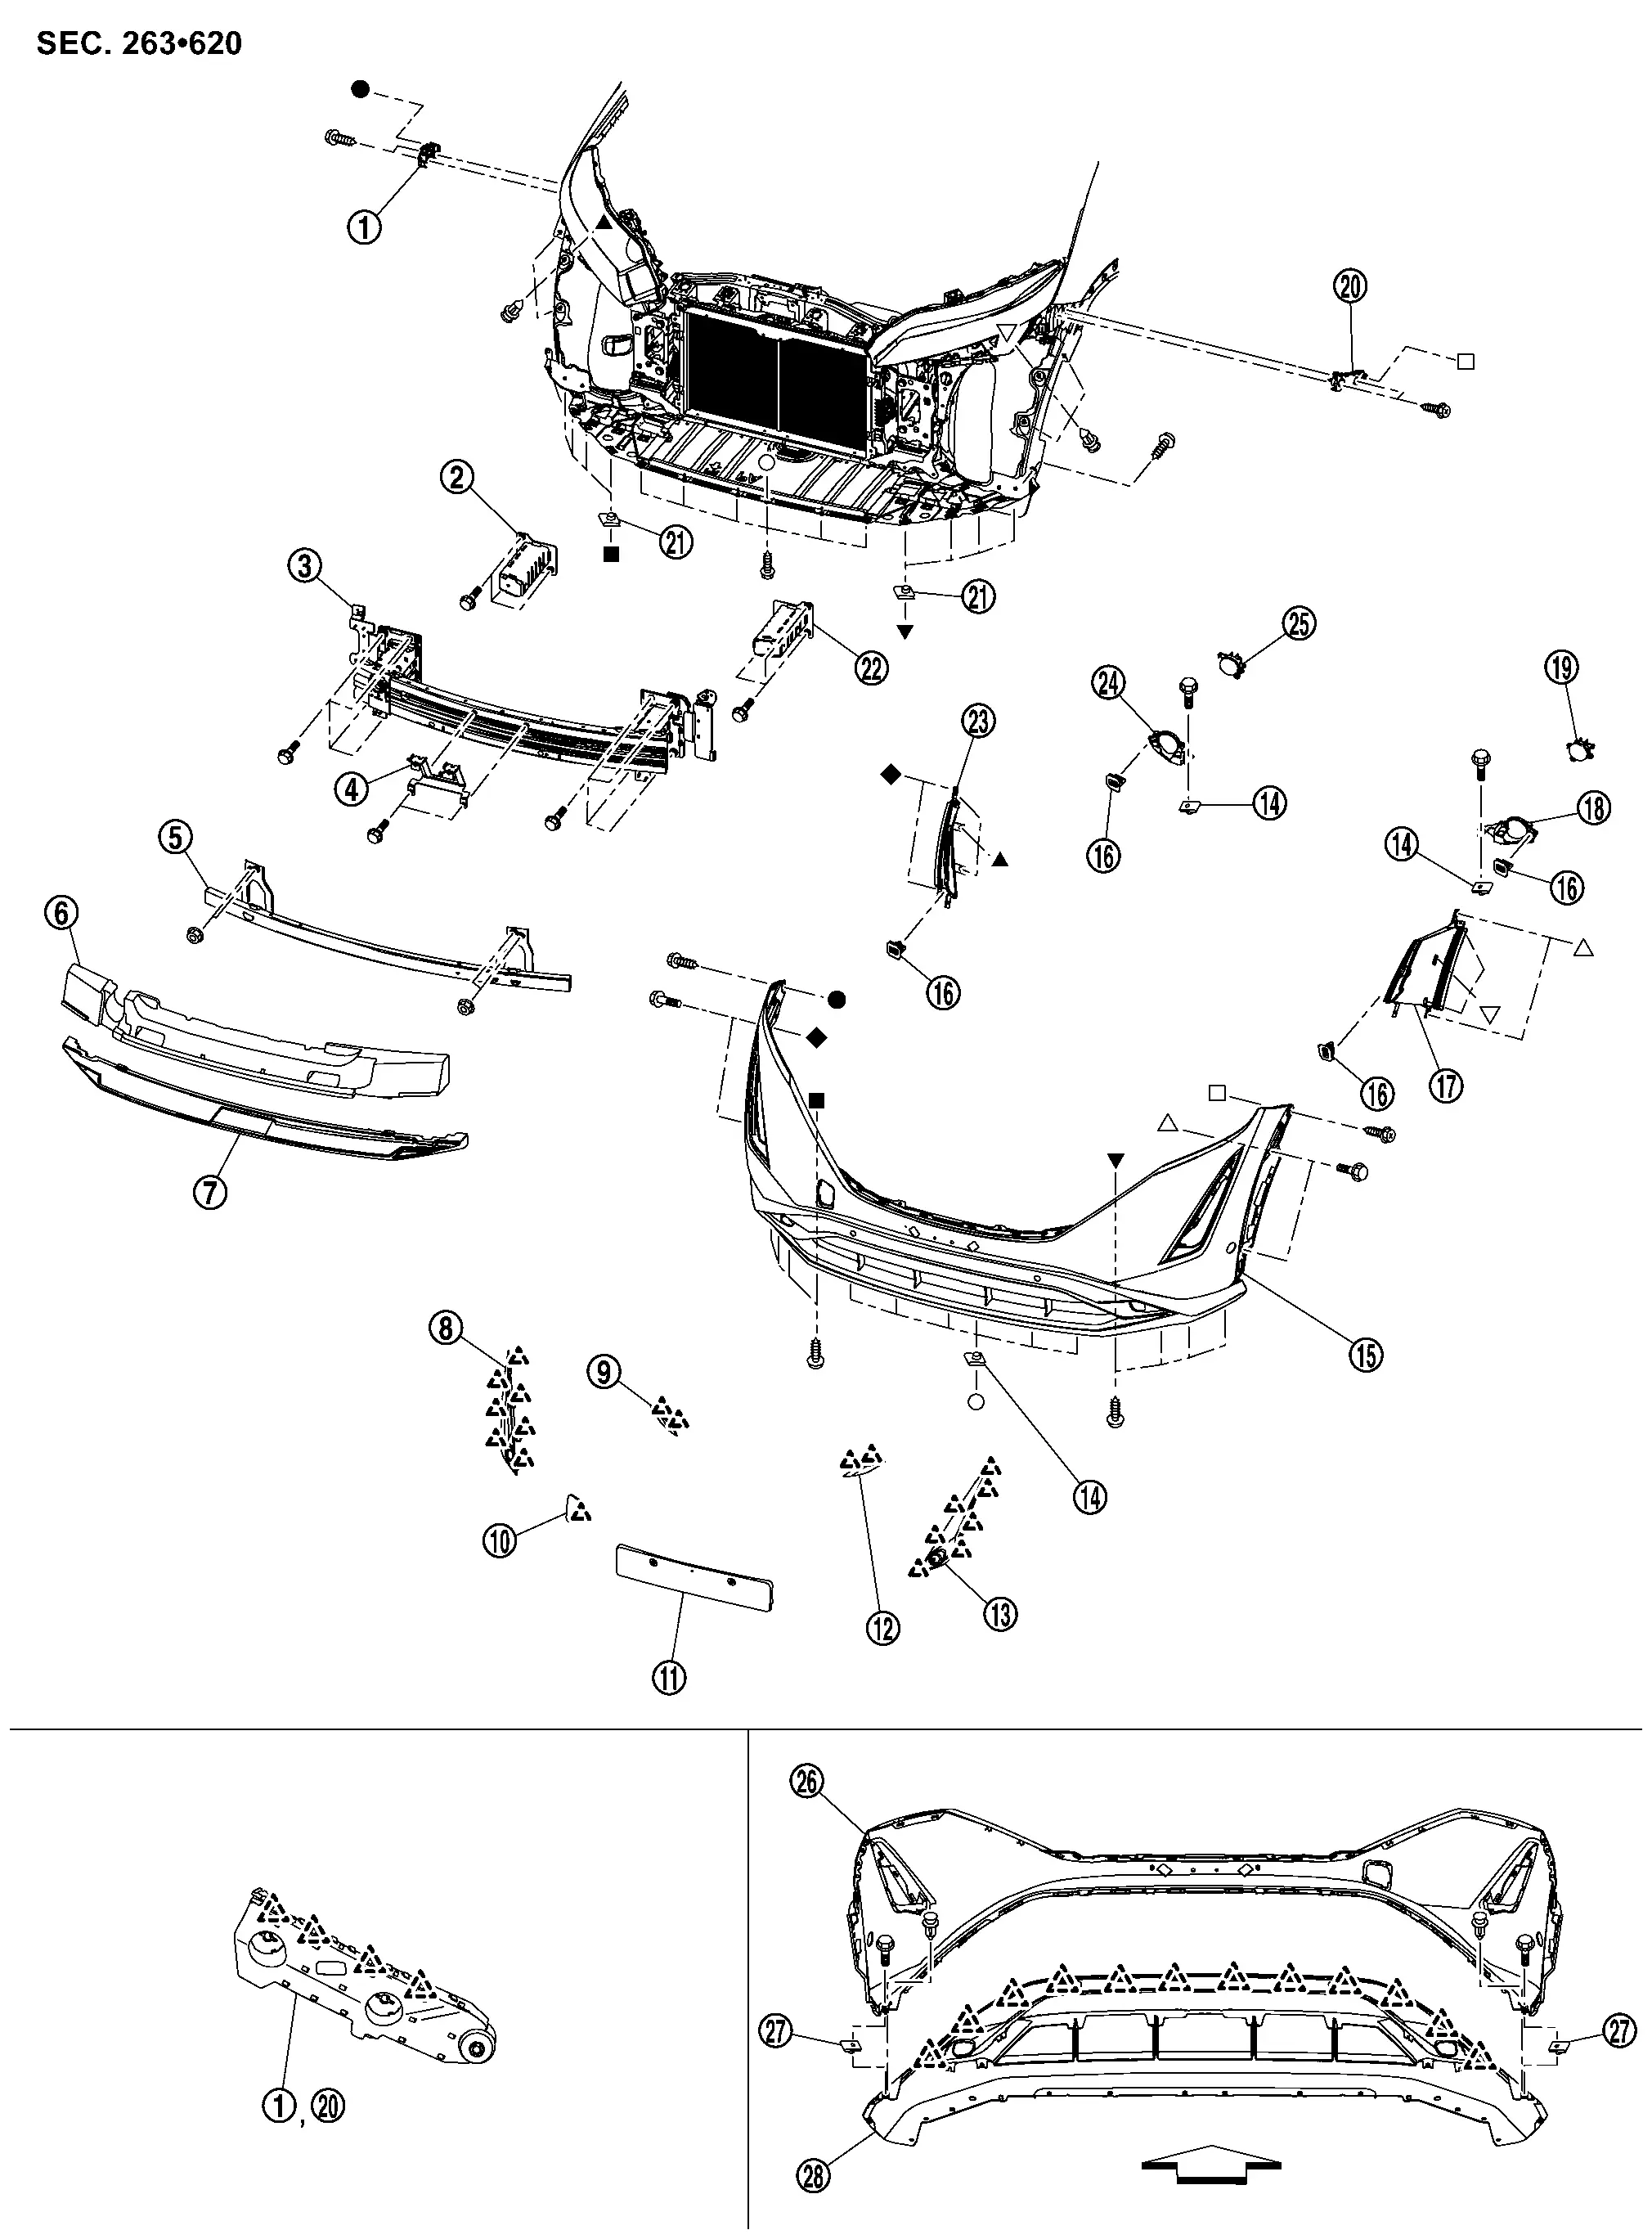
 |
Front bumper side bracket RH |  |
Front bumper stay RH |  |
Front bumper reinforcement |
 |
sensor bracket |  |
Front bumper reinforcement lower |  |
Front bumper energy absorber |
 |
Front bumper energy absorber lower |  |
Front bumper grille RH |  |
Front bumper finisher RH |
 |
Bumper bracket cover |  |
License plate bracket |  |
Front bumper finisher LH |
 |
Front bumper grille LH |  |
U nut |  |
Front bumper fascia assembly |
 |
Front bumper clip |  |
Front bumper side finisher LH |  |
Front bumper bracket LH |
 |
Front fog lamp LH |  |
Front bumper side bracket LH |  |
Plastic nut |
 |
Front bumper stay LH |  |
Front bumper side finisher RH |  |
Front bumper bracket RH |
 |
Front fog lamp RH |  |
Front bumper fascia |  |
J nut |
 |
Front bumper fascia lower | ||||
 |
: Pawl | ||||
 |
: Nissan Ariya Vehicle front | ||||
 , ,  , ,  , ,  , ,  , ,  , ,  , ,  , ,  : Indicates that the part is connected at points with same symbol in actual Nissan Ariya vehicle. : Indicates that the part is connected at points with same symbol in actual Nissan Ariya vehicle. |
|||||
Removal & Installation
REMOVAL
CAUTION:
Front bumper fascia assembly is made of resin. Never apply strong force to it, and be careful to prevent contact with oil.
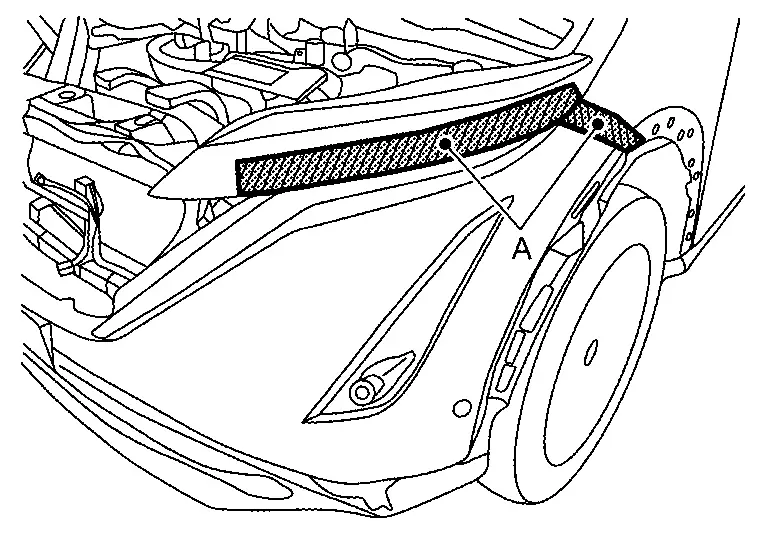
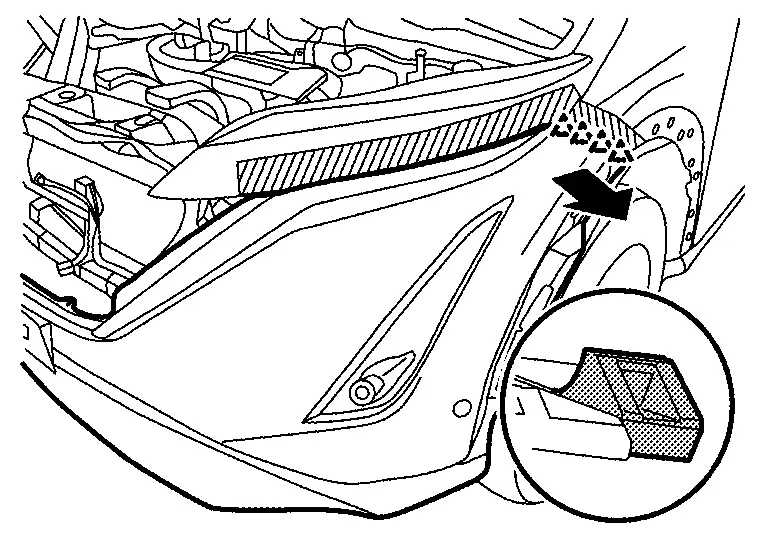
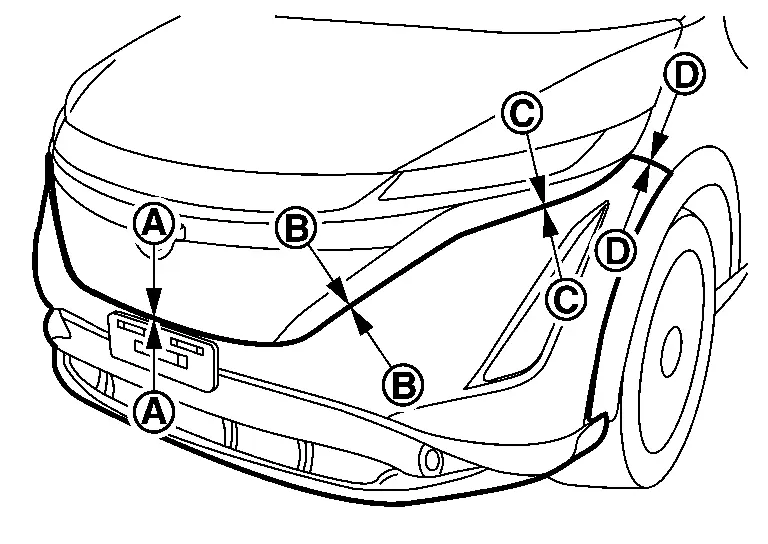
Remove front grille. Refer to Removal & Installation.
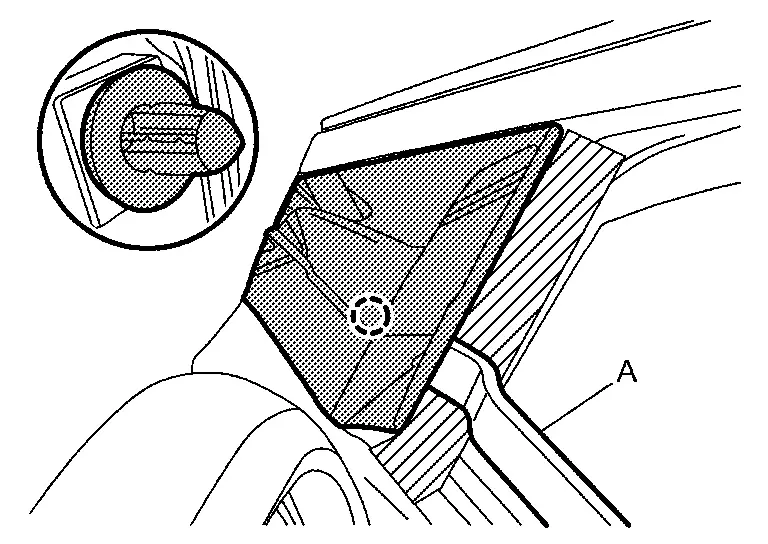
Remove front side of front fillet molding (LH and RH). Refer to Removal & Installation.
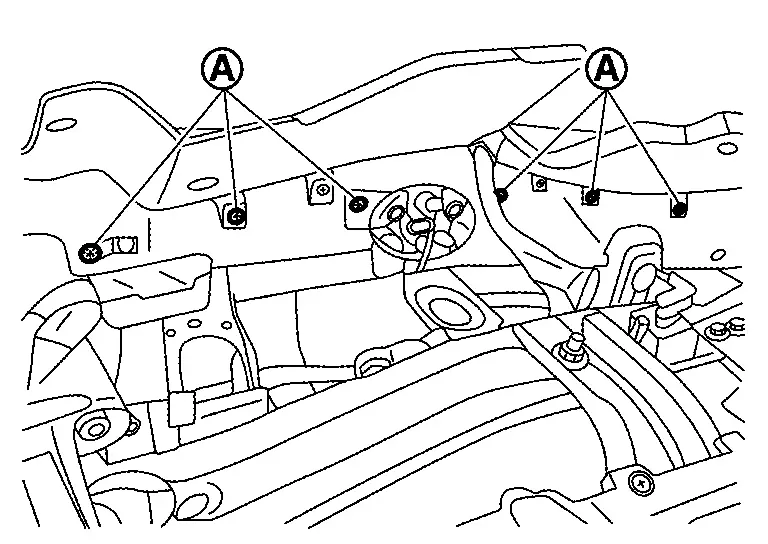
Disconnect front combination lamp harness connector  and
and  .
.
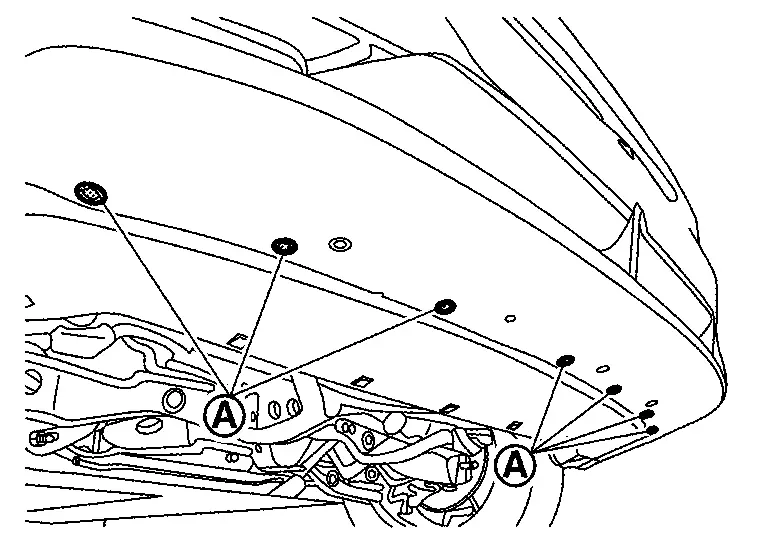
Remove front under cover mounting bolts .
Remove air guide from fender protector. Refer to Removal & Installation.
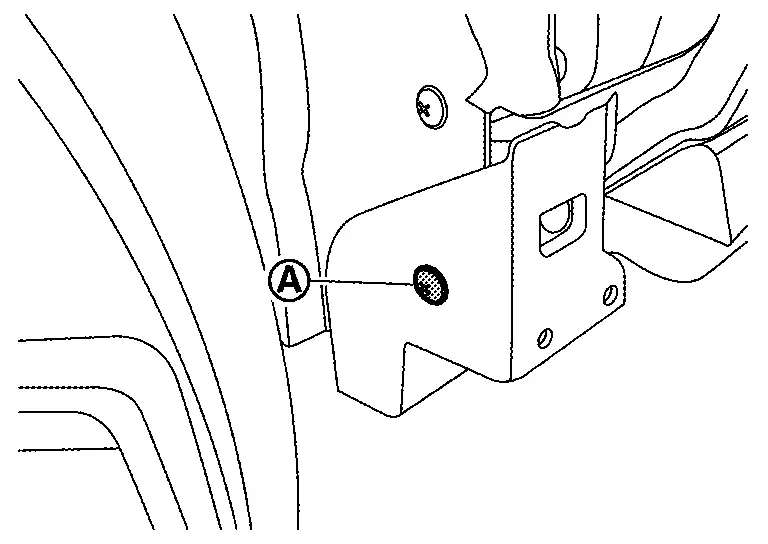
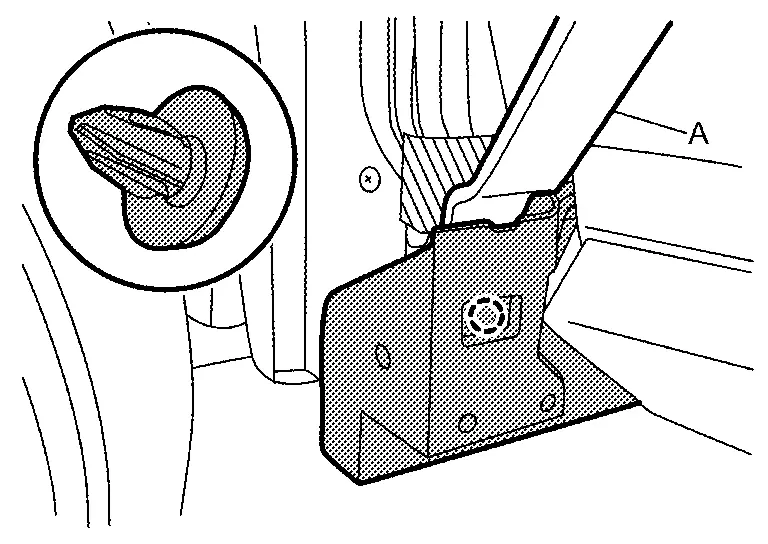
Remove fender protector fixing screws .
Remove front bumper fascia assembly fixing clips .
Remove front bumper fascia assembly fixing screw .
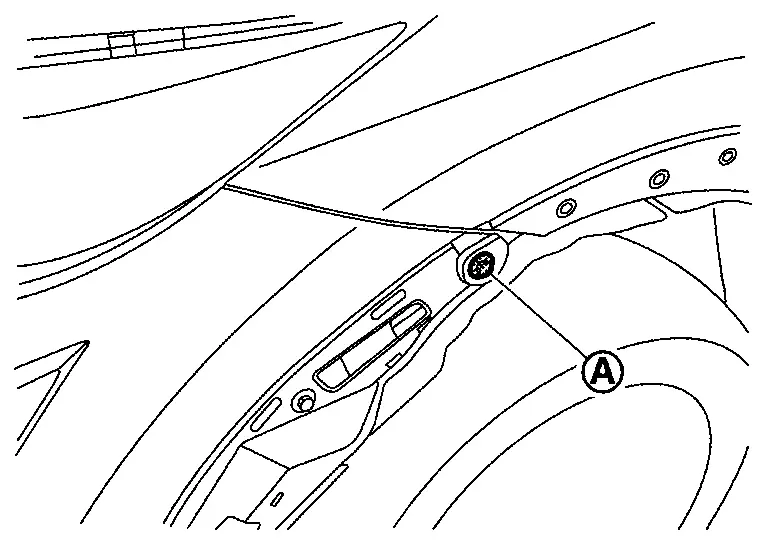
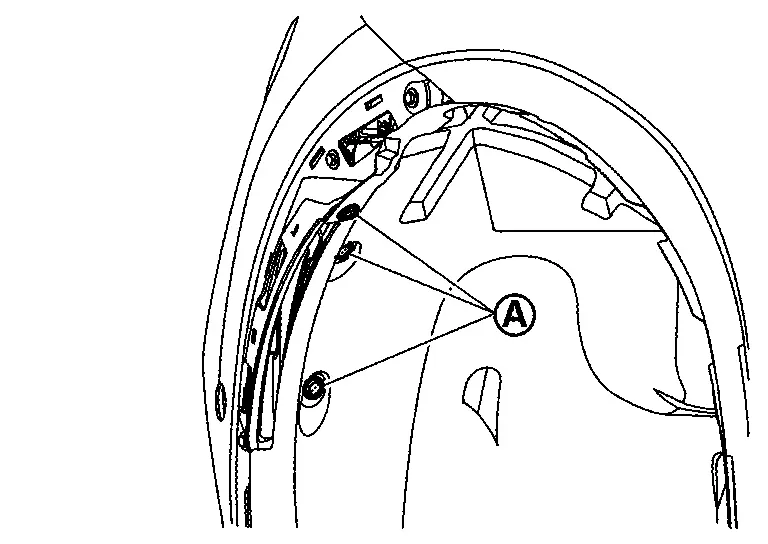
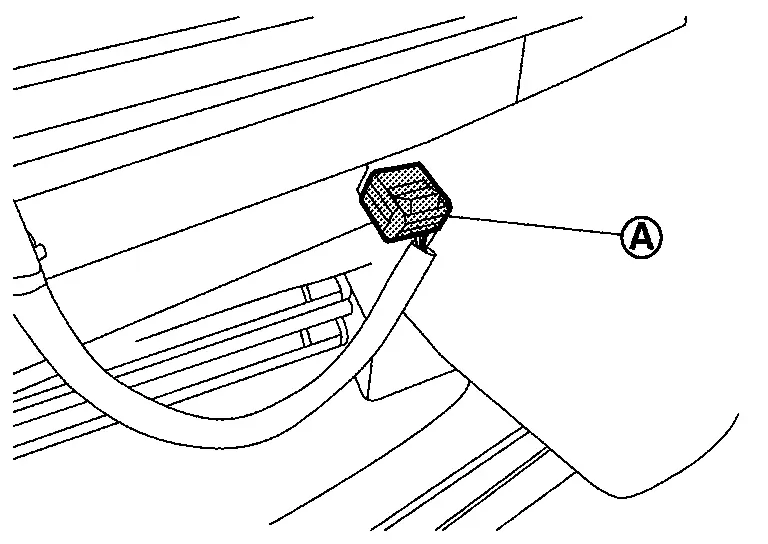
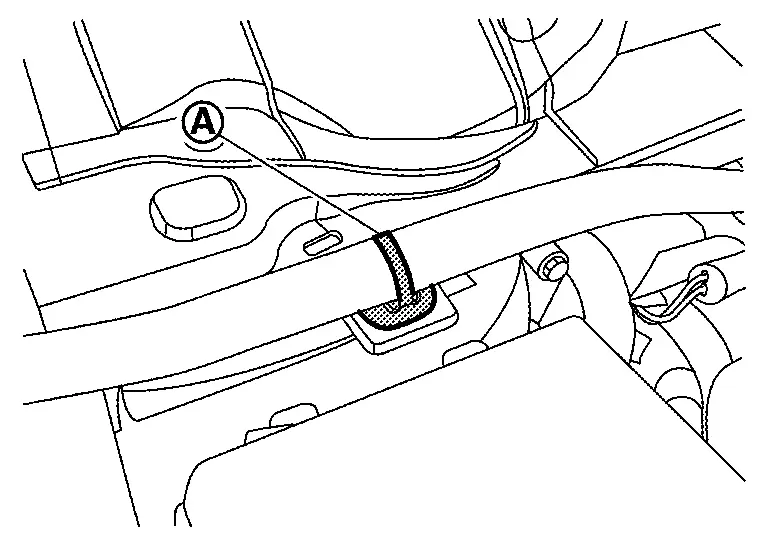
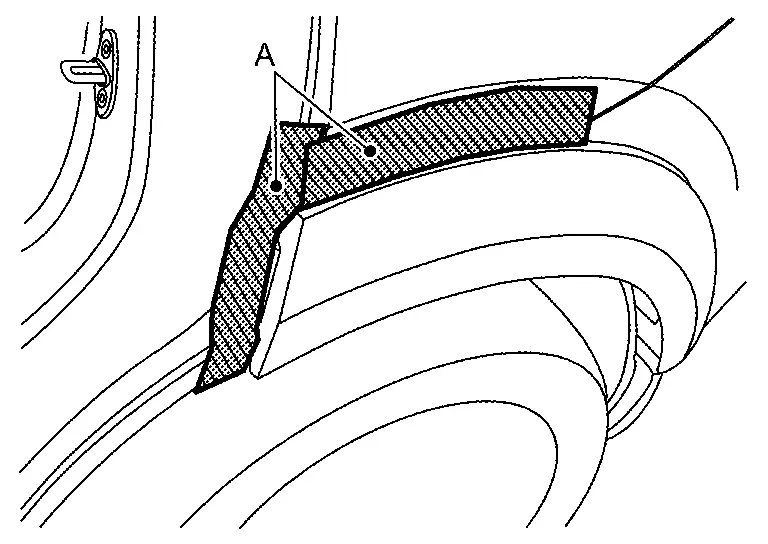
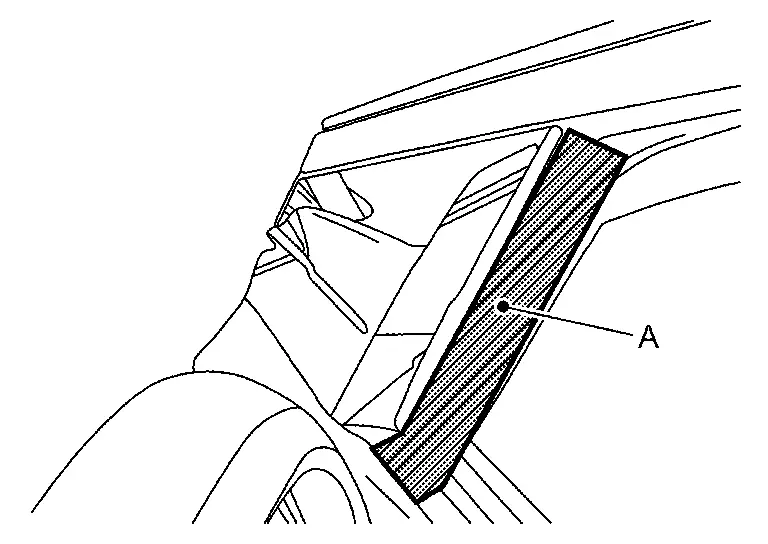
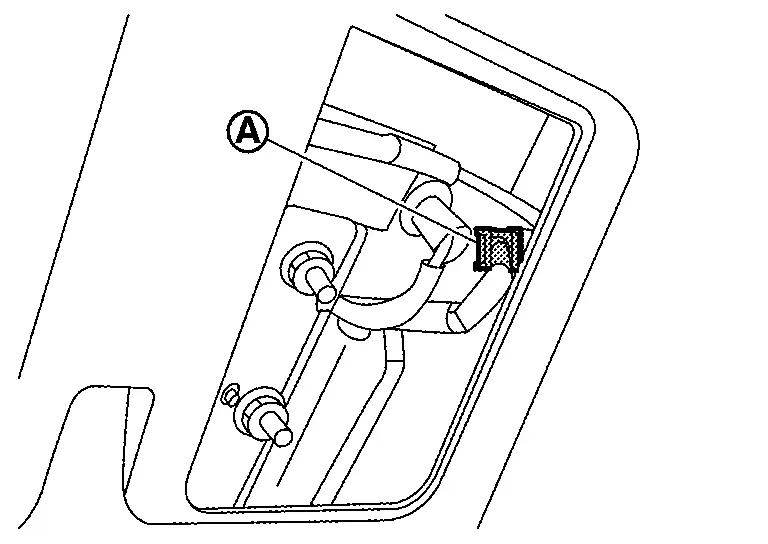
Apply protective tapes (A) on the part to protect it from damage.
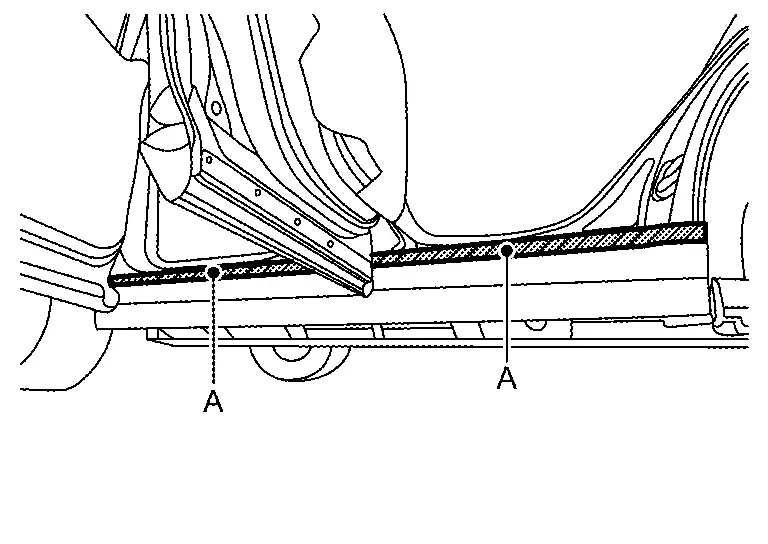
Pull front bumper fascia side toward the Nissan Ariya vehicle side to disengage the fitting of bumper side bracket.
CAUTION:
When removing front bumper fascia assembly, 2 workers are required so as to prevent it from dropping.
|
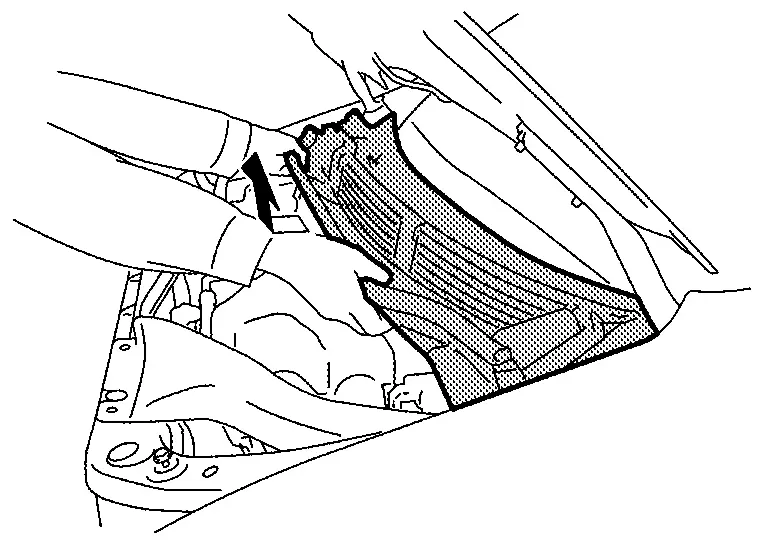
: Pawl |
While holding part of front combination lamp, pull front bumper fascia assembly and front combination lamp toward front of Nissan Ariya vehicle to disengage them from head lamp.

|
: Pawl |
Disconnect harness connector.
Disconnect headlamp washer tube from headlamp washer nozzle.(LH and RH). (if equipped)
Remove front bumper fascia assembly.
Remove the following parts after removing front bumper fascia.
-
Front combination lamp. Refer to Removal & Installation.
-
Front fog lamp. Refer to Removal & Installation.
-
Front sonar sensor (if equipped) Refer to SONAR SENSOR (FRONT) : Removal & Installation.
-
Headlamp washer nozzle (if equipped)
-
Front bumper finisher
-
Front bumper side finisher
-
Front bumper bracket
-
Front bumper grille
-
Front bumper fascia
-
Front bumper fascia lower
-
Bumper bracket cover
-
License plate bracket.
Remove front bumper energy absorber and front bumper energy absorber lower.
Remove active grille shutter. Refer to Removal & Installation.
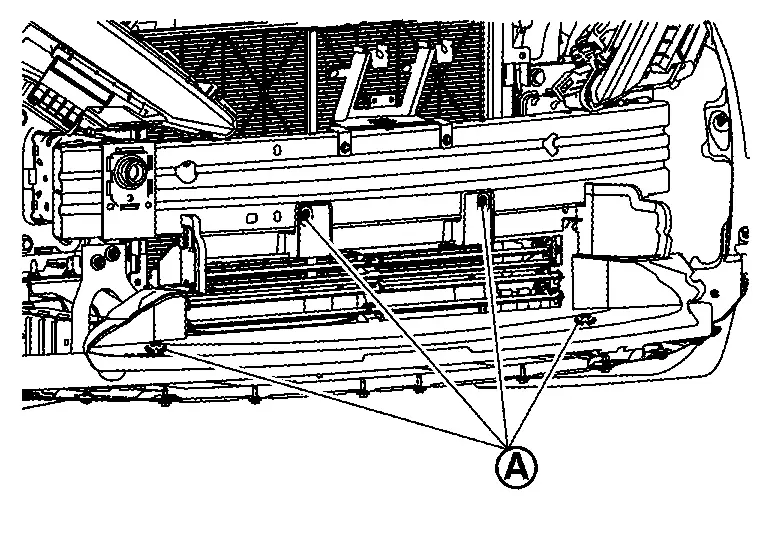
Remove front bumper reinforcement lower mounting nuts and harness clips, and then remove front bumper reinforcement lower.
Remove radiator air guide (LH and RH). Refer to Removal & Installation.
Remove distance sensor. Refer to Removal and Installation.
Remove front bumper reinforcement mounting bolts and harness clips, and then remove front bumper reinforcement.
Remove front bumper stay mounting bolts, and then remove front bumper stay.
Remove front bumper side bracket fixing screws, and then remove front bumper side bracket.
INSTALLATION
Note the following items, and then install in the reverse order of removal.
 NOTE:
NOTE:
-
The following table shows the specified values for checking normal installation status.
-
Fitting adjustment cannot be performed.
| Portion | Clearance | Surface height difference | |
|---|---|---|---|
| Front bumper fascia assembly – Front grille | – |
0.2 – 2.8 mm (0.008 – 0.110 in) |
(−2.3) – (+0.3) mm [(-0.091) - (+0.012) in] |
| Front bumper molding – Front combination lamp | – |
0.2 – 2.8 mm (0.008 – 0.110 in) |
– |
 – – |
0.0 – 2.3 mm (0.008 – 0.091 in) |
– | |
| Front bumper fascia assembly – Front fender assembly |  – – |
0.0 – 1.0 mm (0.000 – 0.039 in) |
(−1.7) – (+0.3) mm [(-0.067) - (+0.012) in] |
Inspection
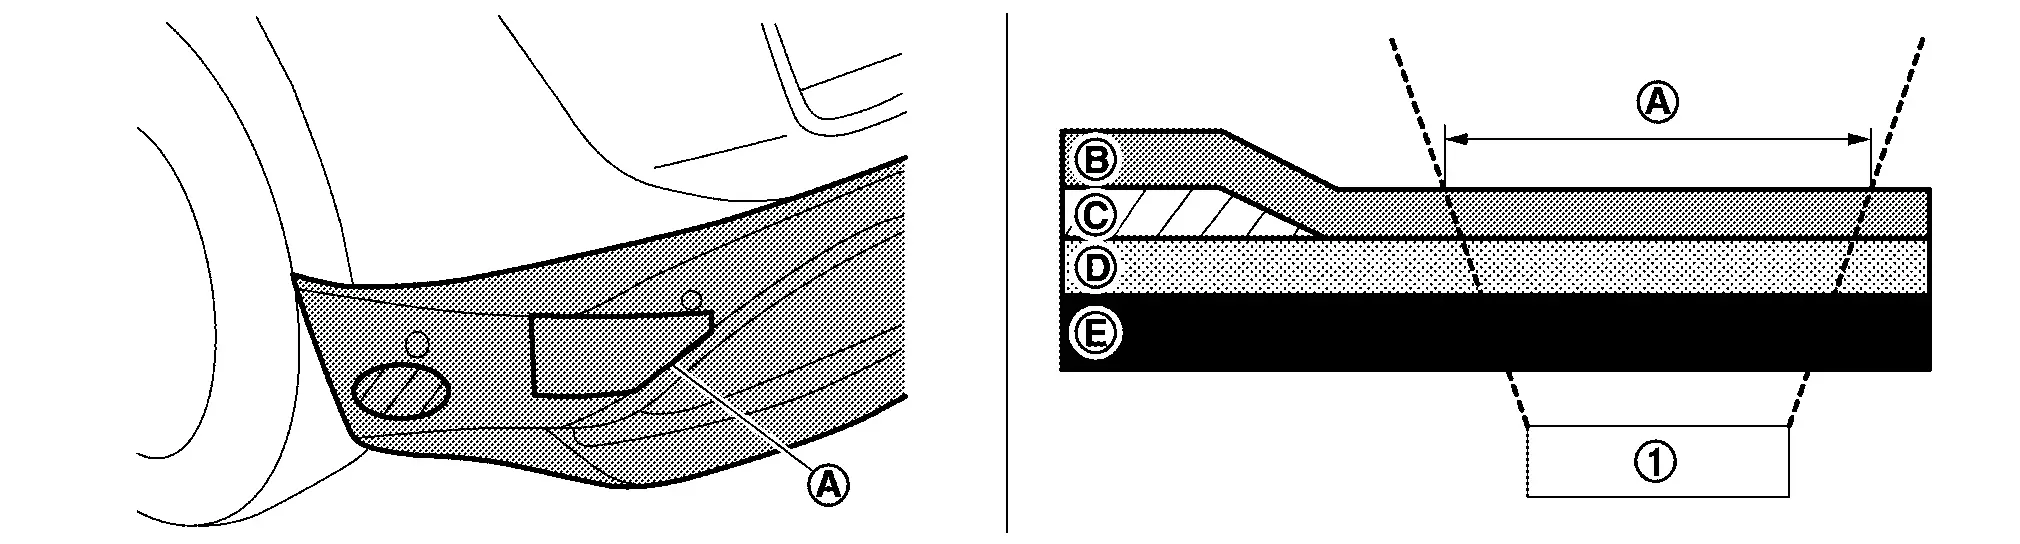
SIDE RADAR IRRADIATION AREA
-
For side radar irradiation area, refer to the figure below.
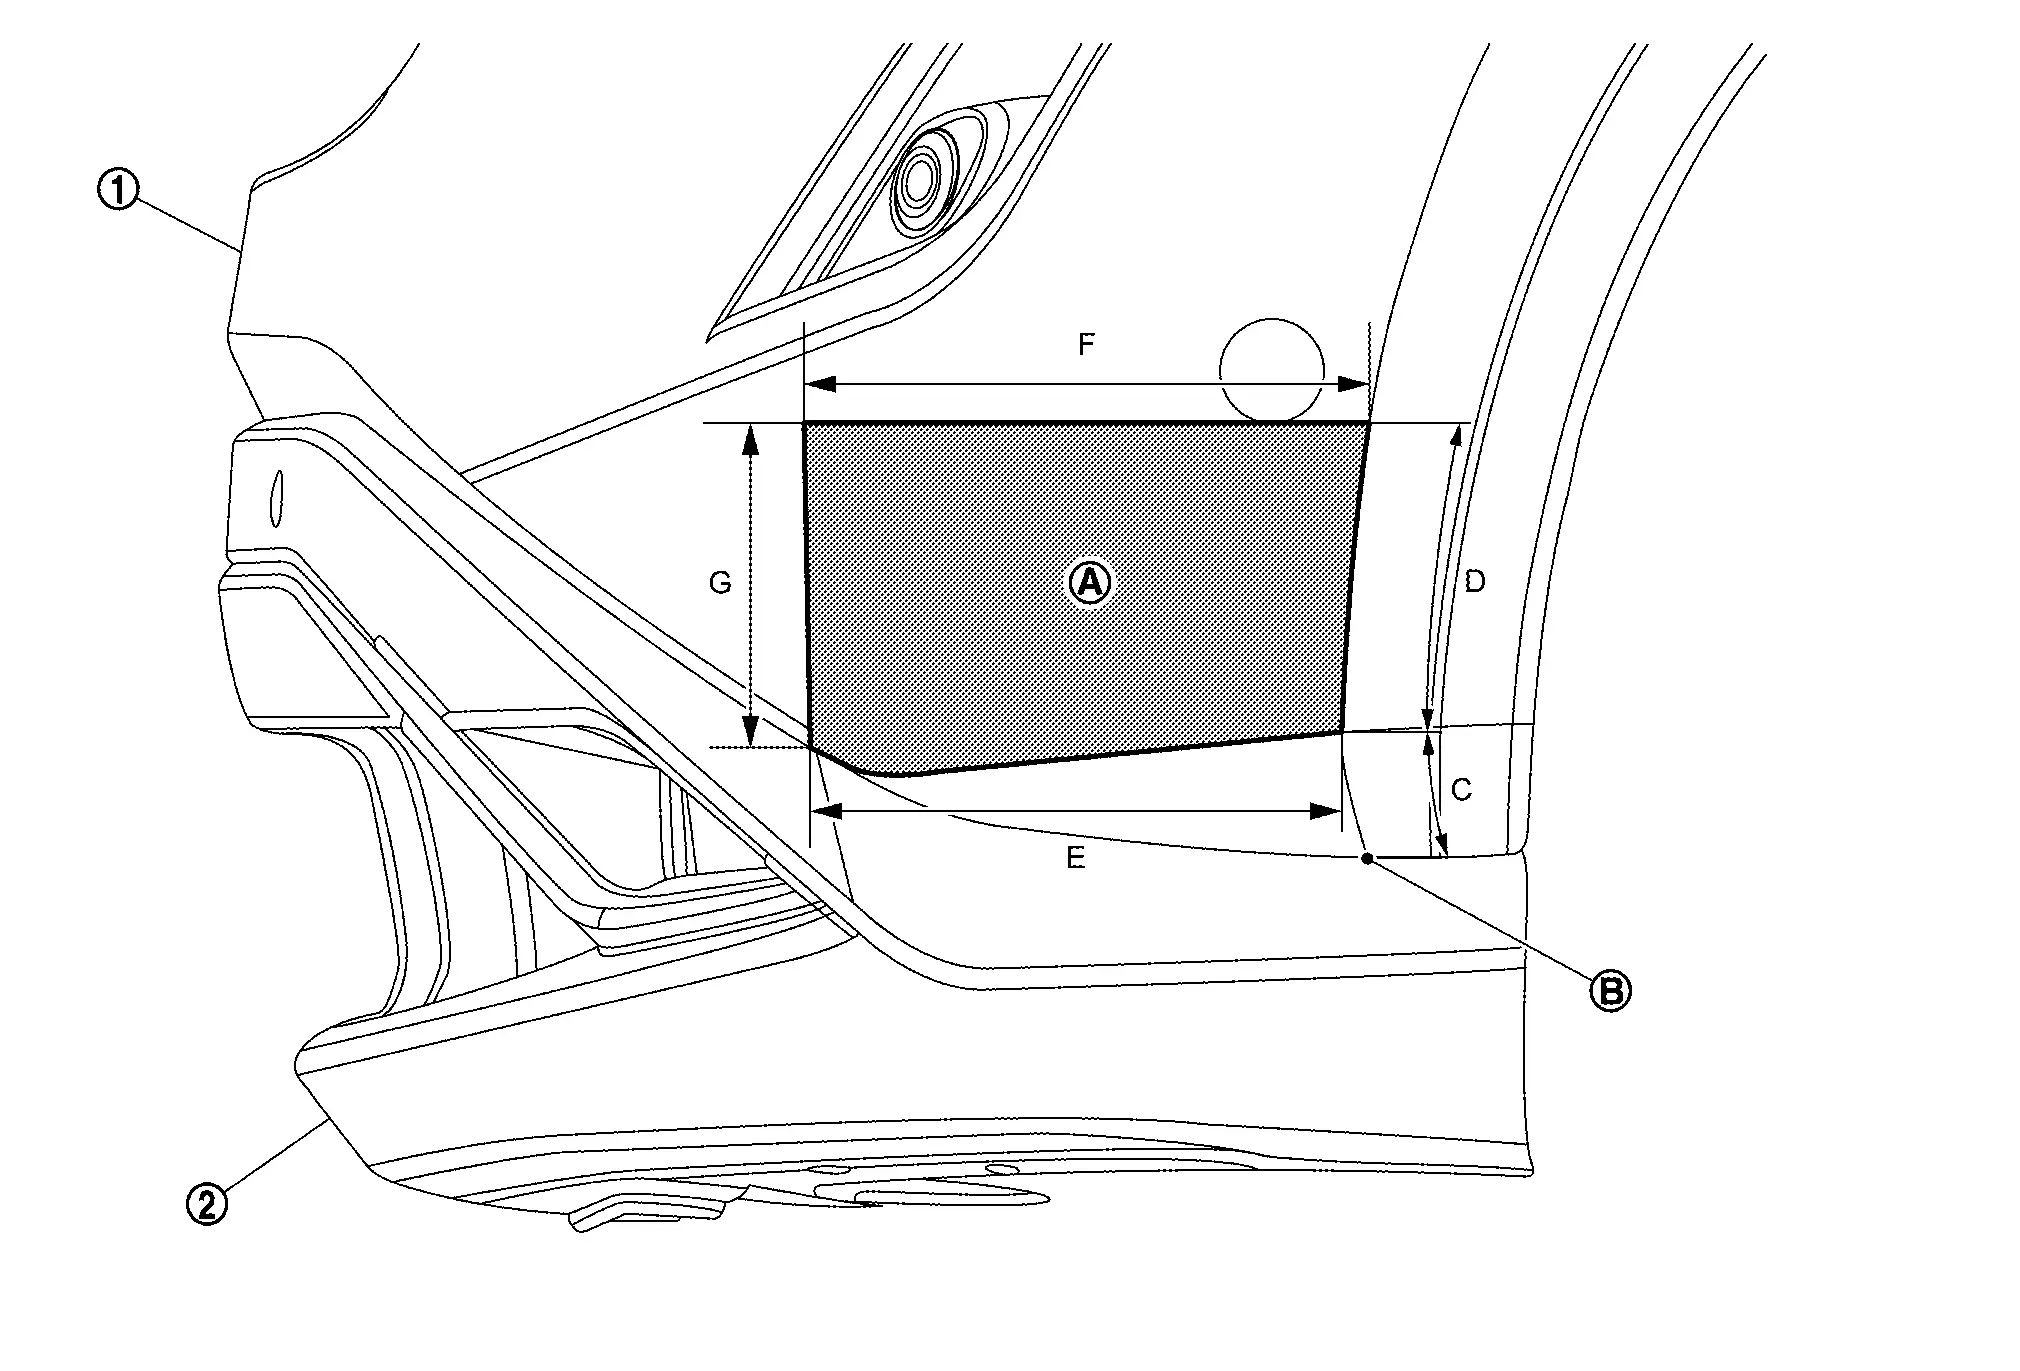
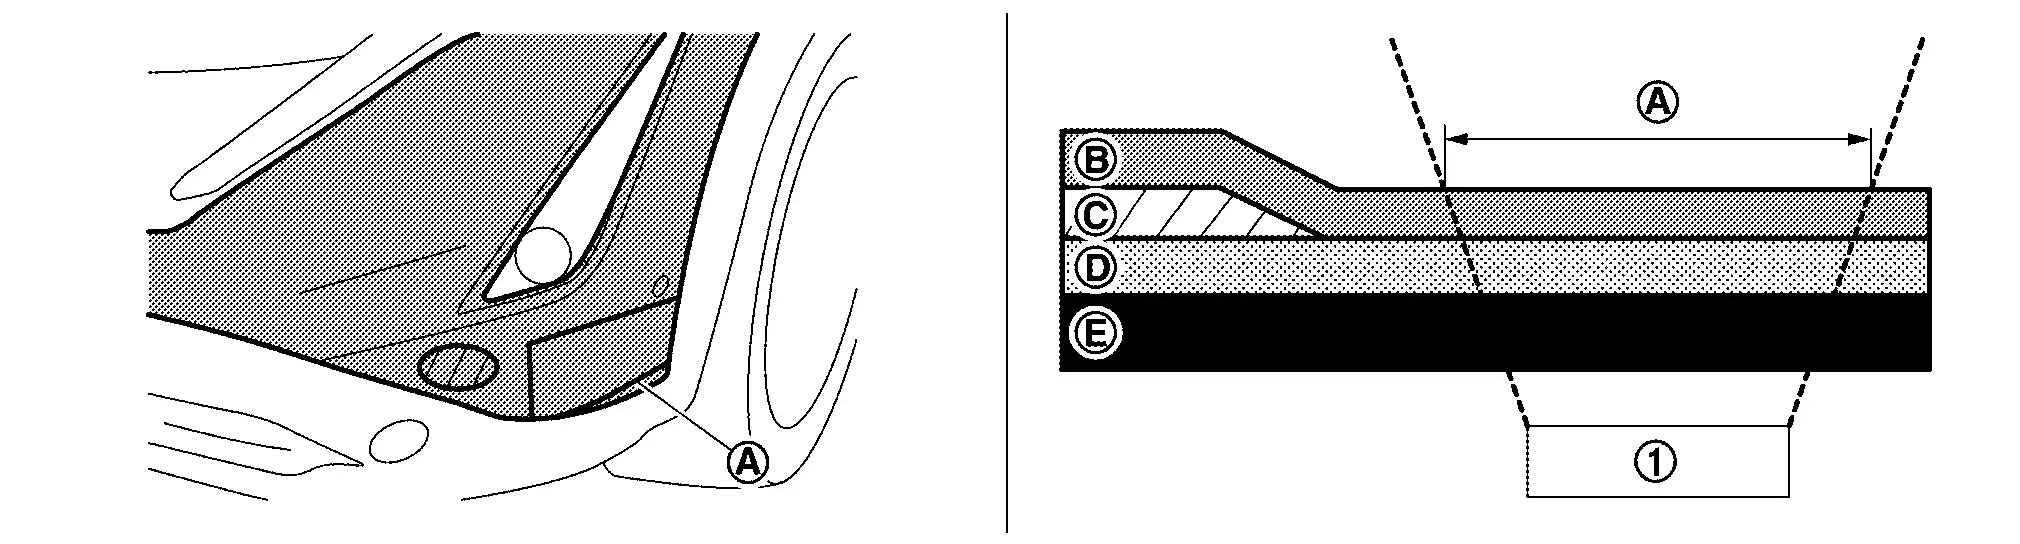
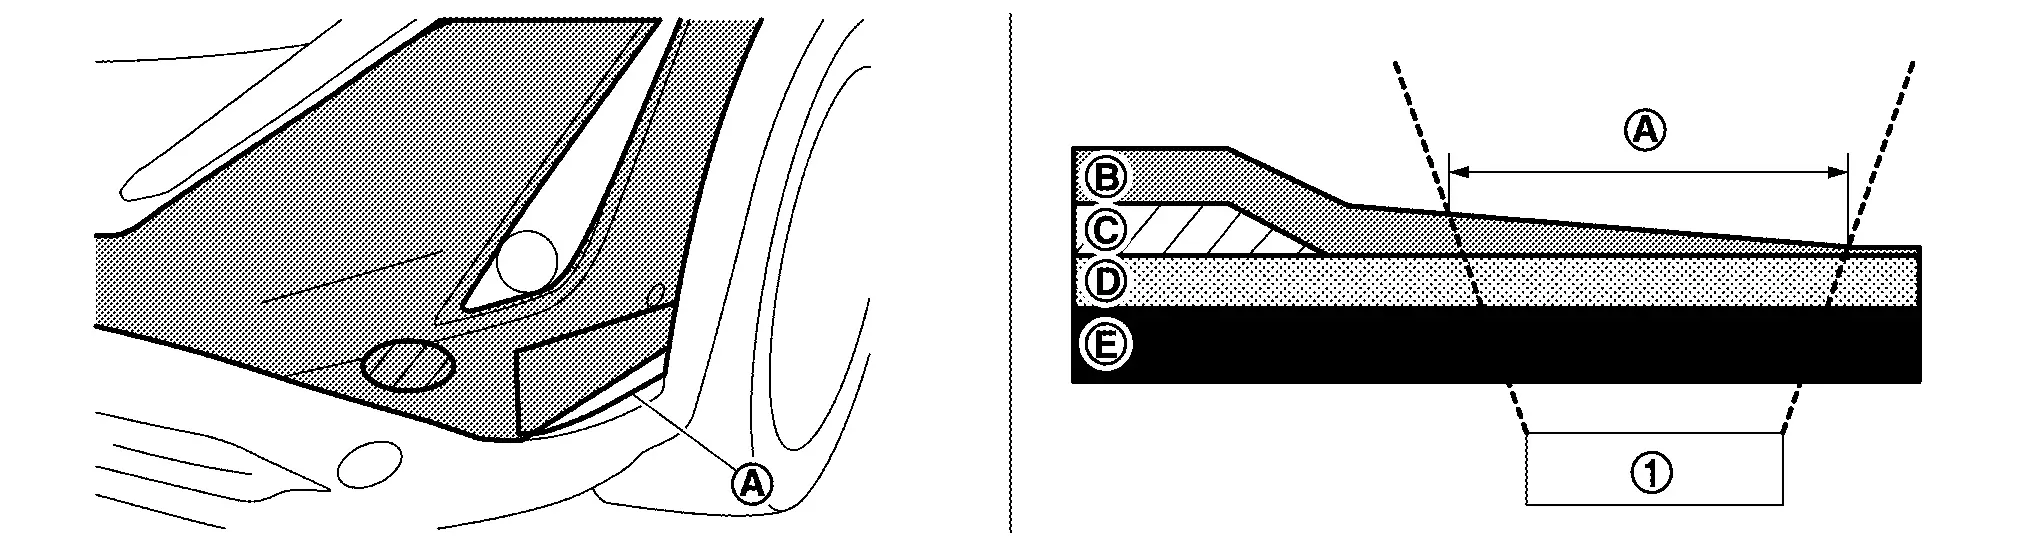
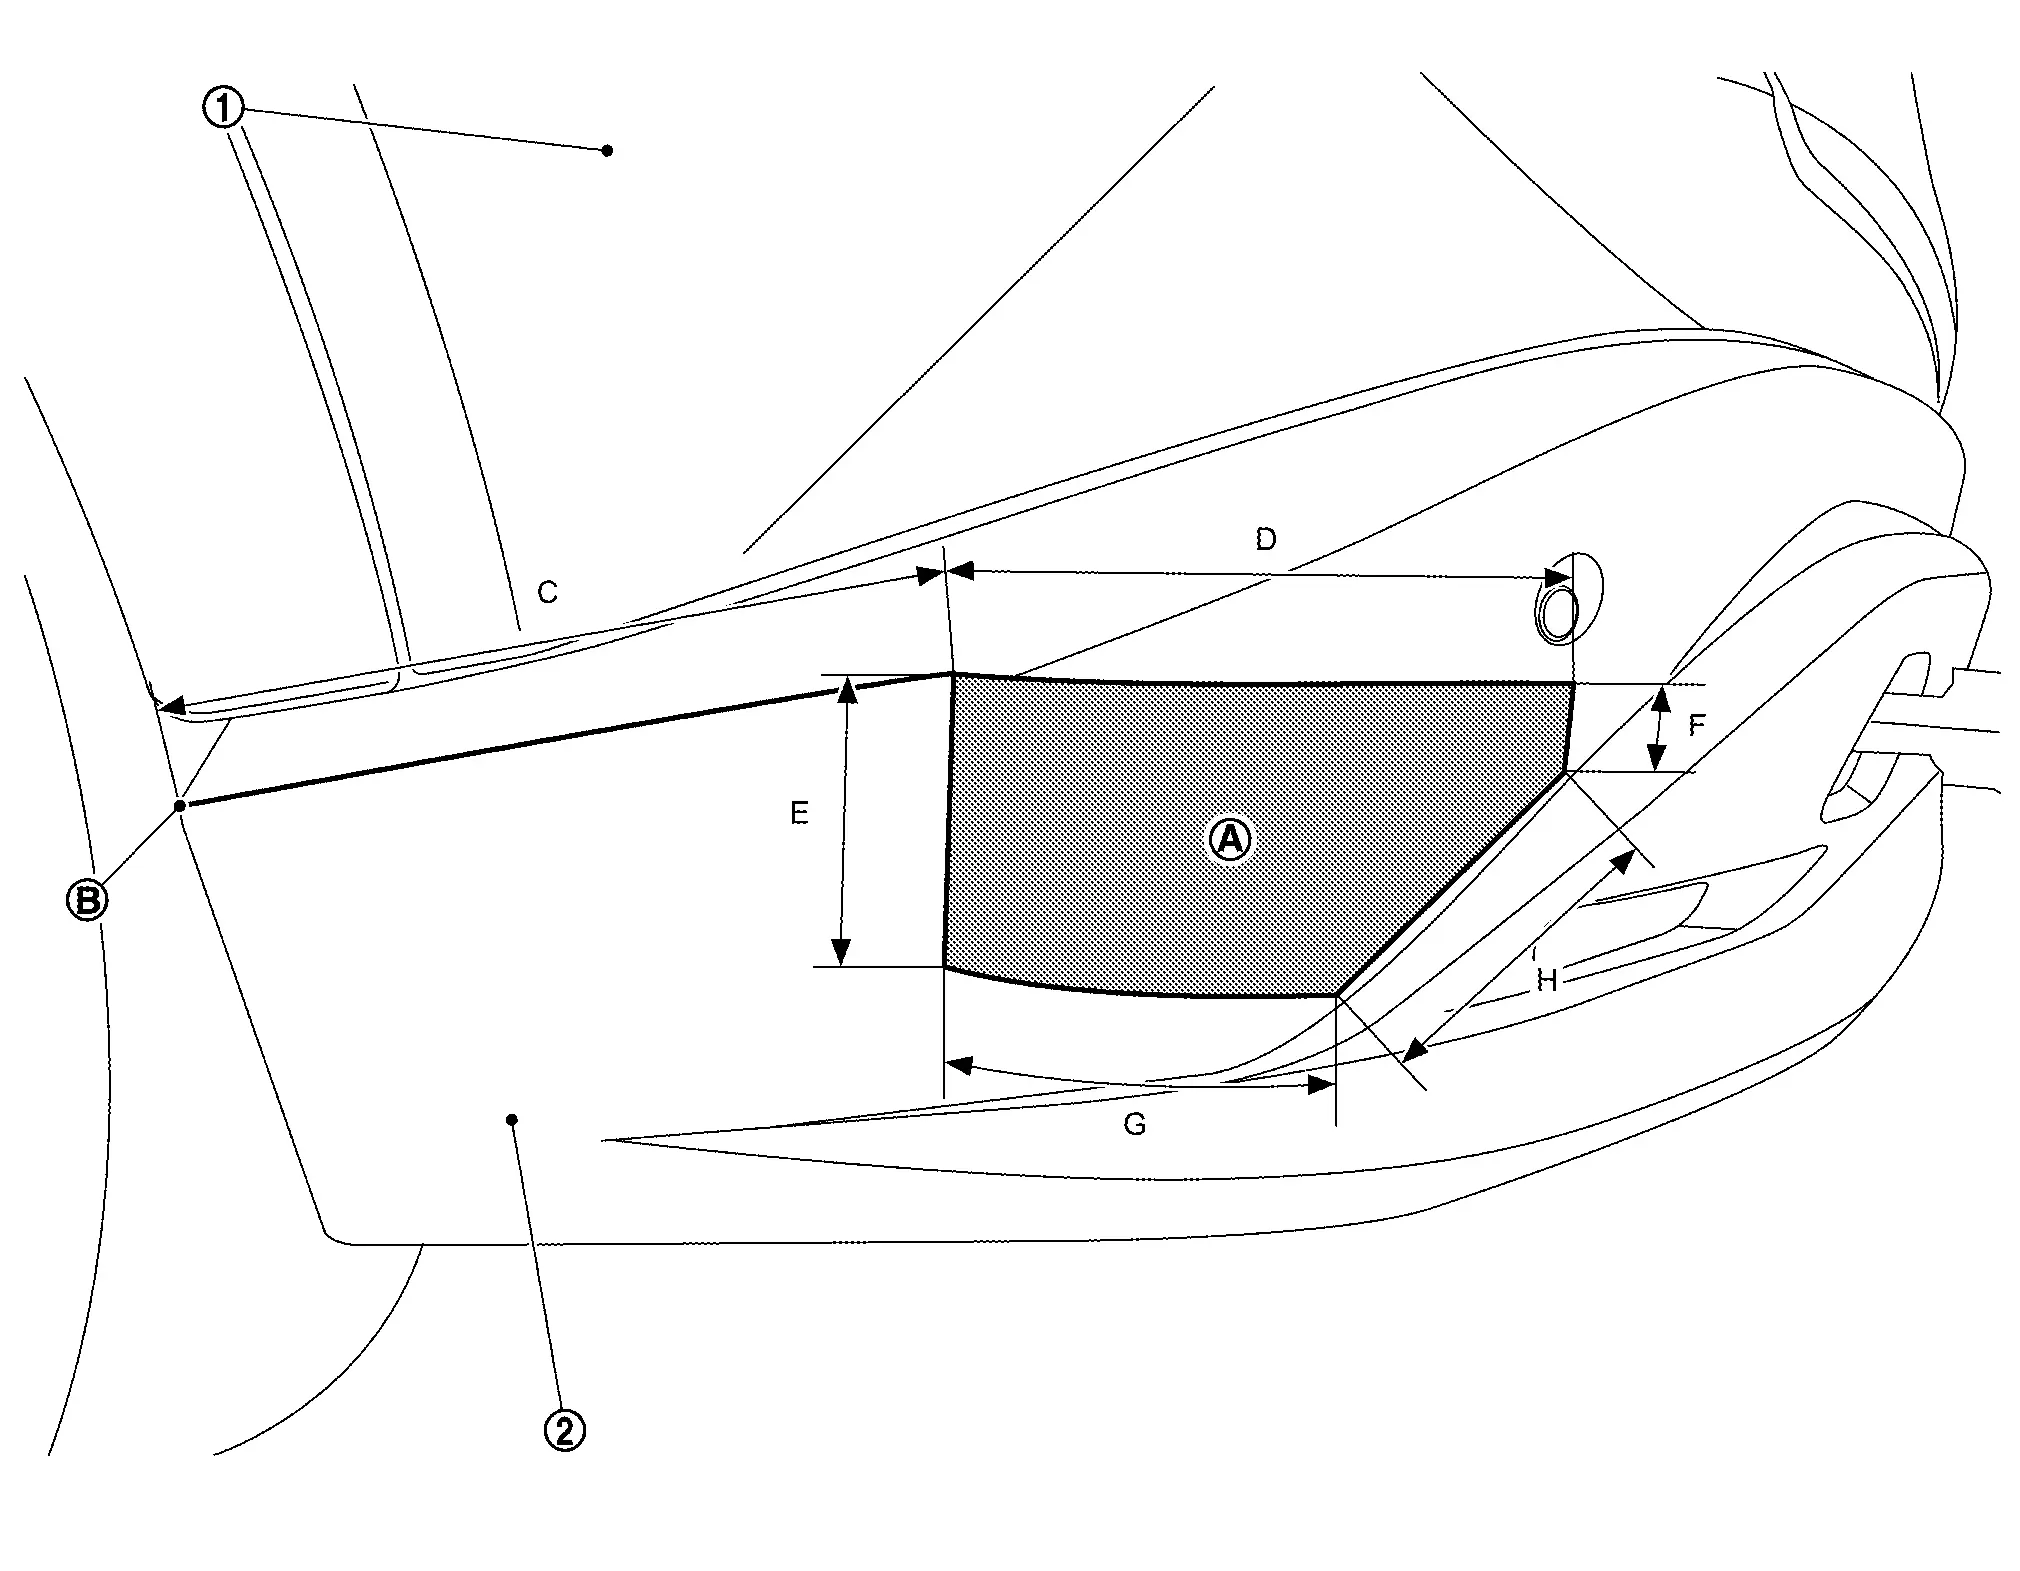
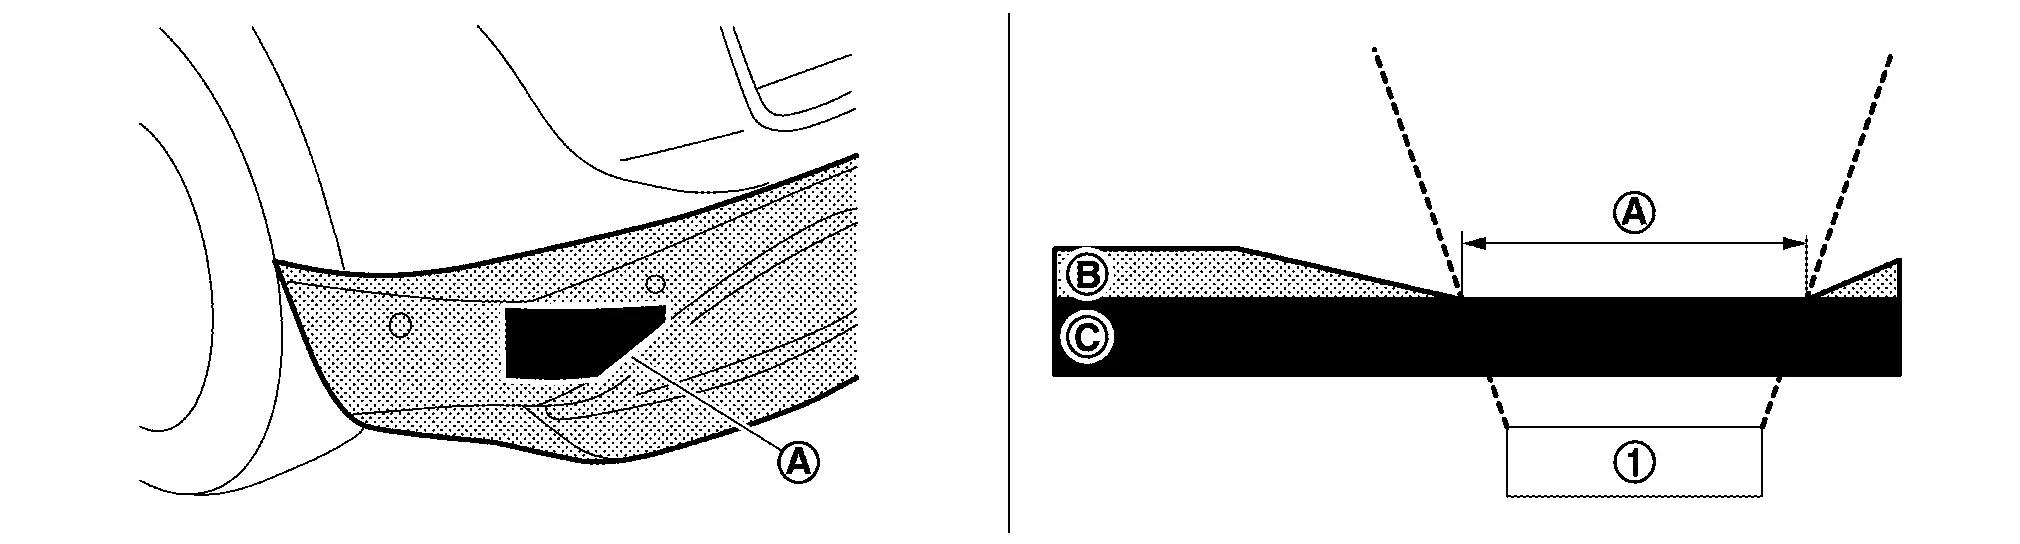
Front bumper fascia Front bumper fascia lower Side radar irradiation area Reference point C 50 mm (edge line) D 120 mm (edge line) E 240 mm (apex of character line) F 260 mm (horizontal line) G 110 mm (Reference dimansions) -
The dimensions are along the bumper fascia surface between each reference point.
-
Since it may affect side radar performance, for repair and mending of front bumper refer to repair and mending of side radar irradiation area.
REPAIR AND MENDING OF IRRADIATION AREA OF SIDE RADAR
CAUTION:
For repair and mending of irradiation area of side radar, be careful the following.
-
Do not leave cracks, scratches and deformations in the side radar irradiation area.
-
Since it affects side radar performance, there are following restrictions on the various construction on front bumper of the Nissan Ariya vehicle equipped with side radar.
Construction item of side radar irradiation area Can be constructed and cannot be constructed Supplement 1 Installation of stickers, accessories, aluminum tape and wrapping film, etc. Cannot be constructed Prohibited including transparent ones 2 Coating and wax, etc. Can be constructed Construct according to the contents of construction manual 3 Repairing of cuts, holes, cracks, scratches and deformations Cannot be constructed - 4 Paint repair Putty applying Cannot be constructed - Color base painting *1 Can be constructed (with conditions) -
When remove existing paint film within the irradiation area, color base can be constructed only once (No recoating, No painting other than the body exterior paint colors which are adopted for this model.) *1:Color base includes primer for plastic and primer surfacer
-
When color base painting in the side radar irradiation area even if bumper fascia is not removed and installed, conduct side radar adjustment after the painting
Clear painting Can be constructed (with conditions) -
When the clear paint film is uniformly block coated within the irradiation area, it is possible to construct only once (No clear paint fading-out or recoating within irradiation area)
-
When clear painting in the side radar irradiation area even if bumper fascia is not removed and installed, conduct side radar adjustment after the painting
5 Dust on the paint surface removal by polishing, polishing, buffing and base treatment before coating Can be constructed - -
For details of each construction item, refer to followings.
-
Installation of sticker, accessories, aluminum tape and wrapping film, etc.
Do not install sticker, accessories, aluminum tape and wrapping tape, etc. to side radar irradiation area. (Including transparent one)
-
Coating and wax, etc.
-
It is possible to apply coating and wax to side radar irradiation area.
-
It is also possible to polish before construction.
-
-
Repair of cuts, holes, cracks, scratches and deformations
It is not possible to repair fissures, holes, cracks, scratches and deformations within side radar irradiation area. Therefore be sure to replace it with a new front bumper fascia. Refer to Removal & Installation.
Cannot be constructed
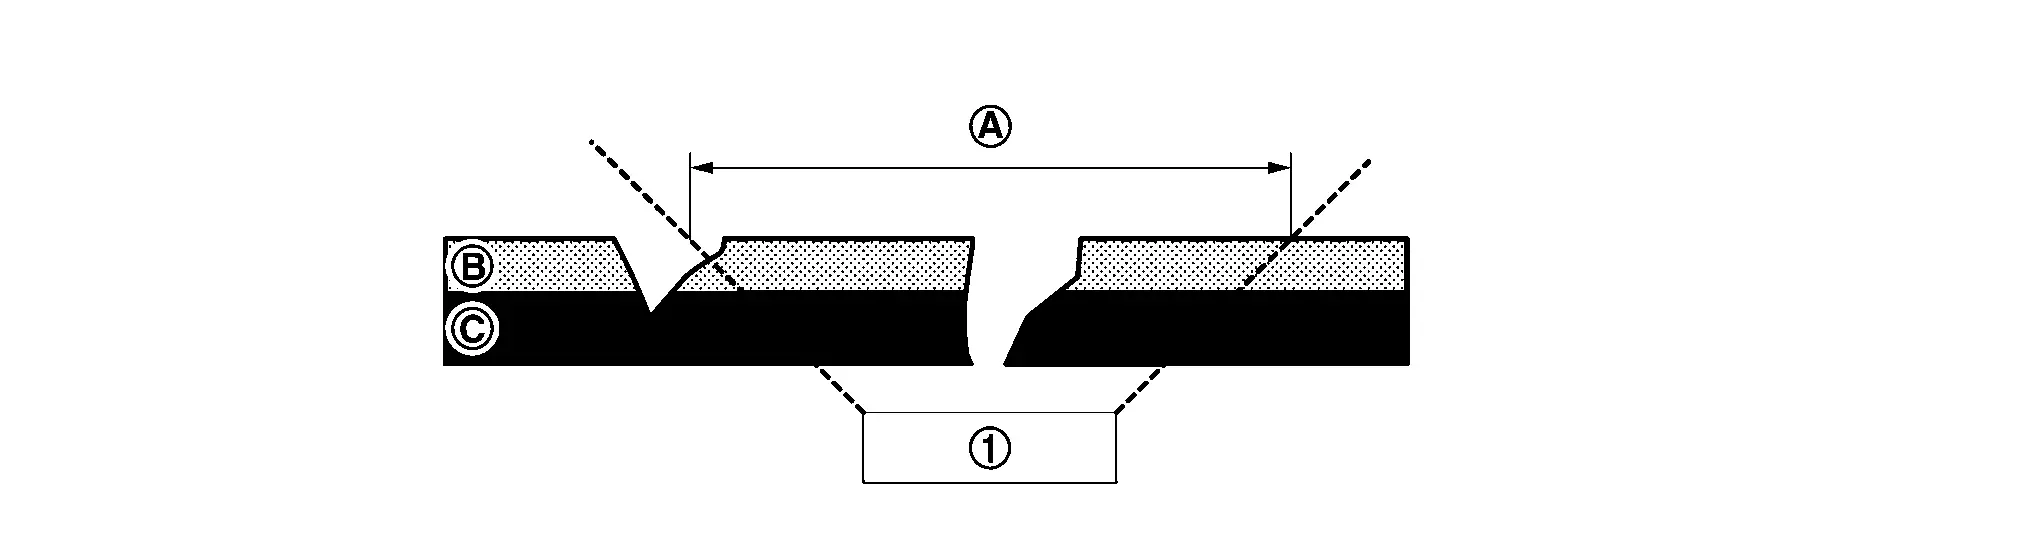
Side radar Irradiation area Existing paint film Bumper fascia plastic -
Paint repair
Putty application: Construction is impossible
-
It is impossible to apply putty within side radar irradiation area. (Both partial application and full application are prohibited)
Color base painting: Construction is possible (with conditions)
-
When removing existing paint firm within irradiation area or when it is new unpainted bumper.
-
When removing existing paint film, use finer sandpaper than #800.
-
When there is unevenness due to scratches on the surface after removing existing paint film, replace it with a new bumper.
-
Color base painting (Includes primer for plastic parts and primer surfacer) within side radar irradiation area is possible only once. (Definition of once is until the color base painting is dyed, not number of sprays)
-
Only the body exterior paint color, which are adopted for this model, painting can be constructed. (Do not paint more thickness than necessary)
-
Only the approved paint suppliers, products and color formulator can be constructed. For additional information, please contact each paint supplier which body shop uses.
-
When applying primer surfacer, use each gray shade undercoat color, which paint supplier recommends, for improving the hiding of color base and reducing color base thickness.
-
When spray mist may stick on the reverse side of the bumper fascia, conduct masking on the reverse side of the bumper fascia.
-
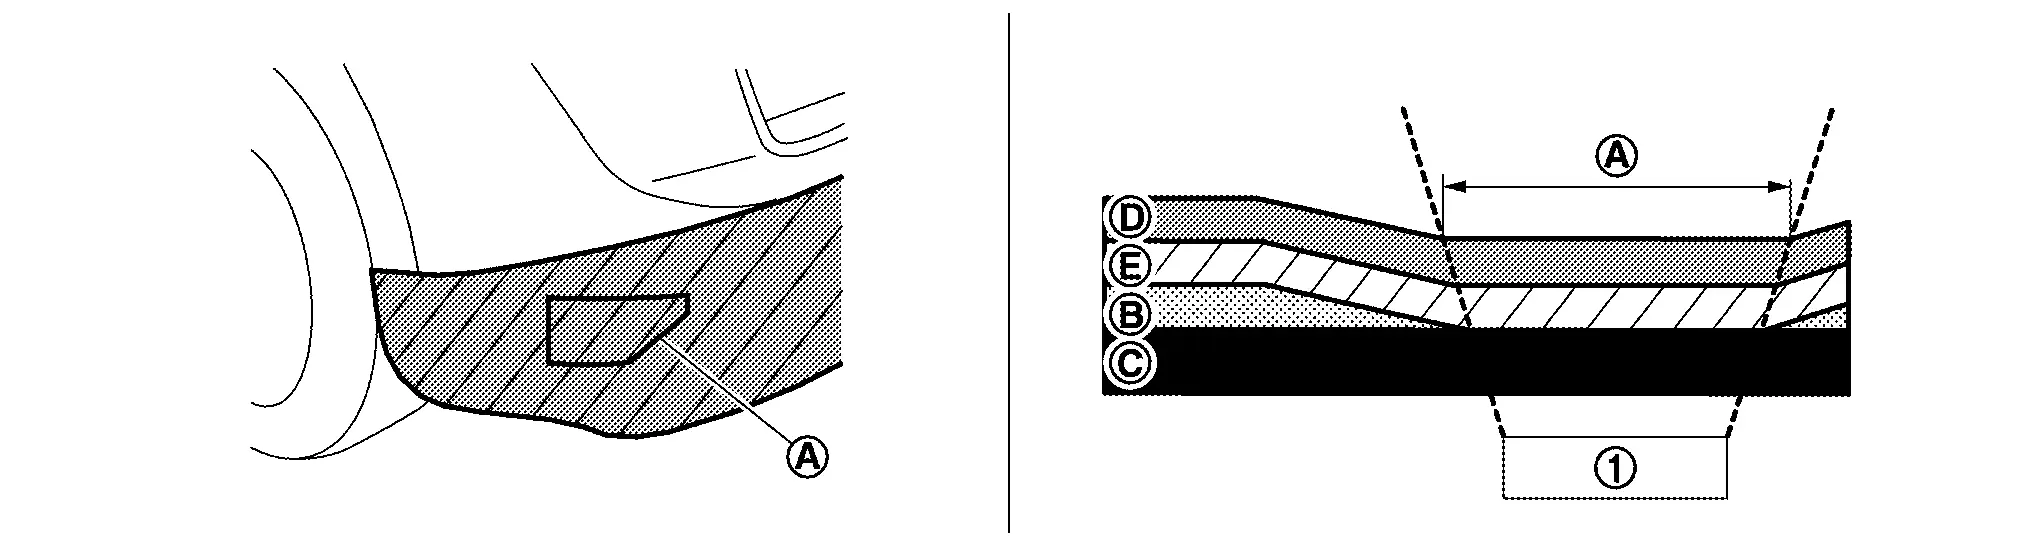
Step 1:Before repair
Can be constructed
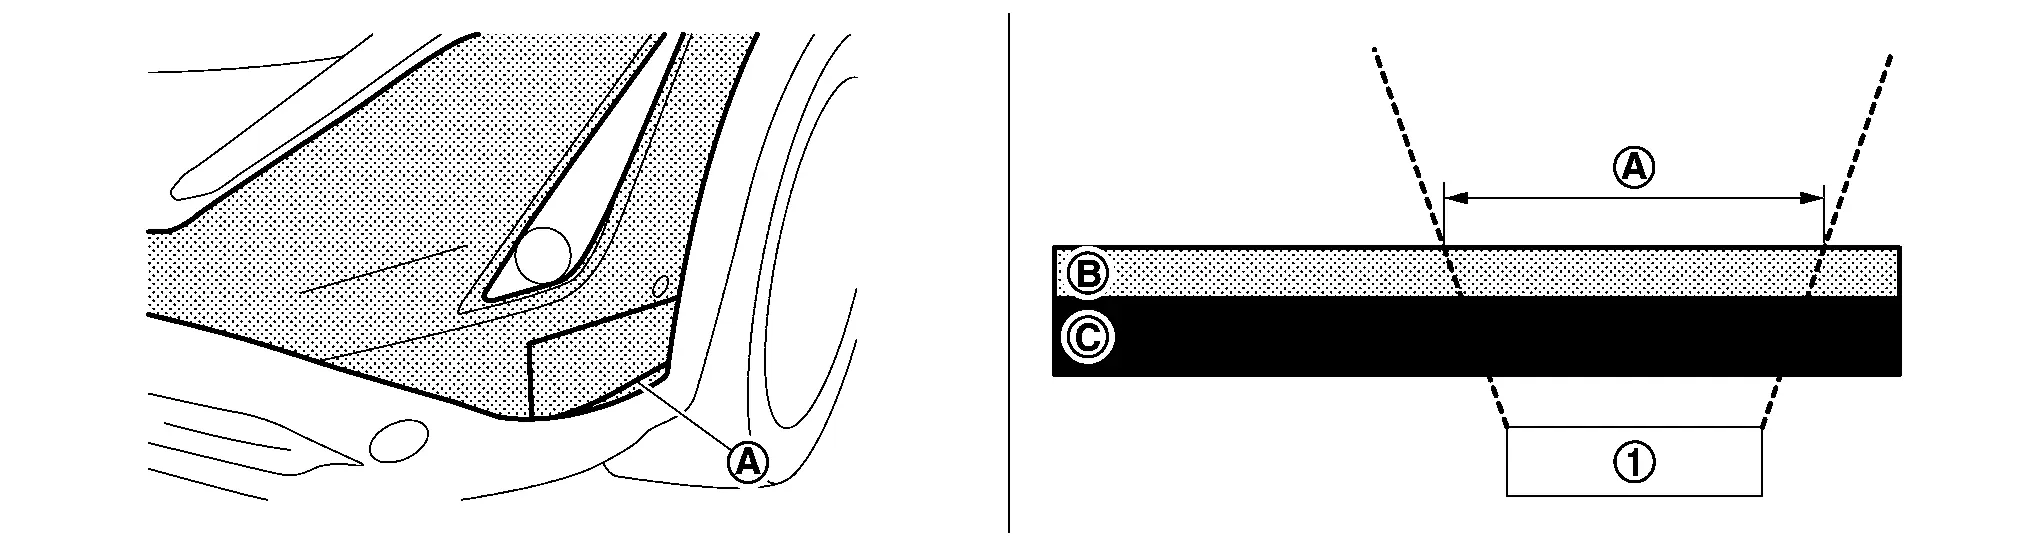
Side radar Irradiation area Existing paint film Bumper fascia plastic -
Step 2: After removing existing paint film
Can be constructed
Side radar Irradiation area Existing paint film Bumper fascia plastic -
Step 3:After constructing color base painting and clear painting
Can be constructed
Side radar Irradiation area Existing paint film Bumper fascia plastic Clear paint film 
Color base paint film
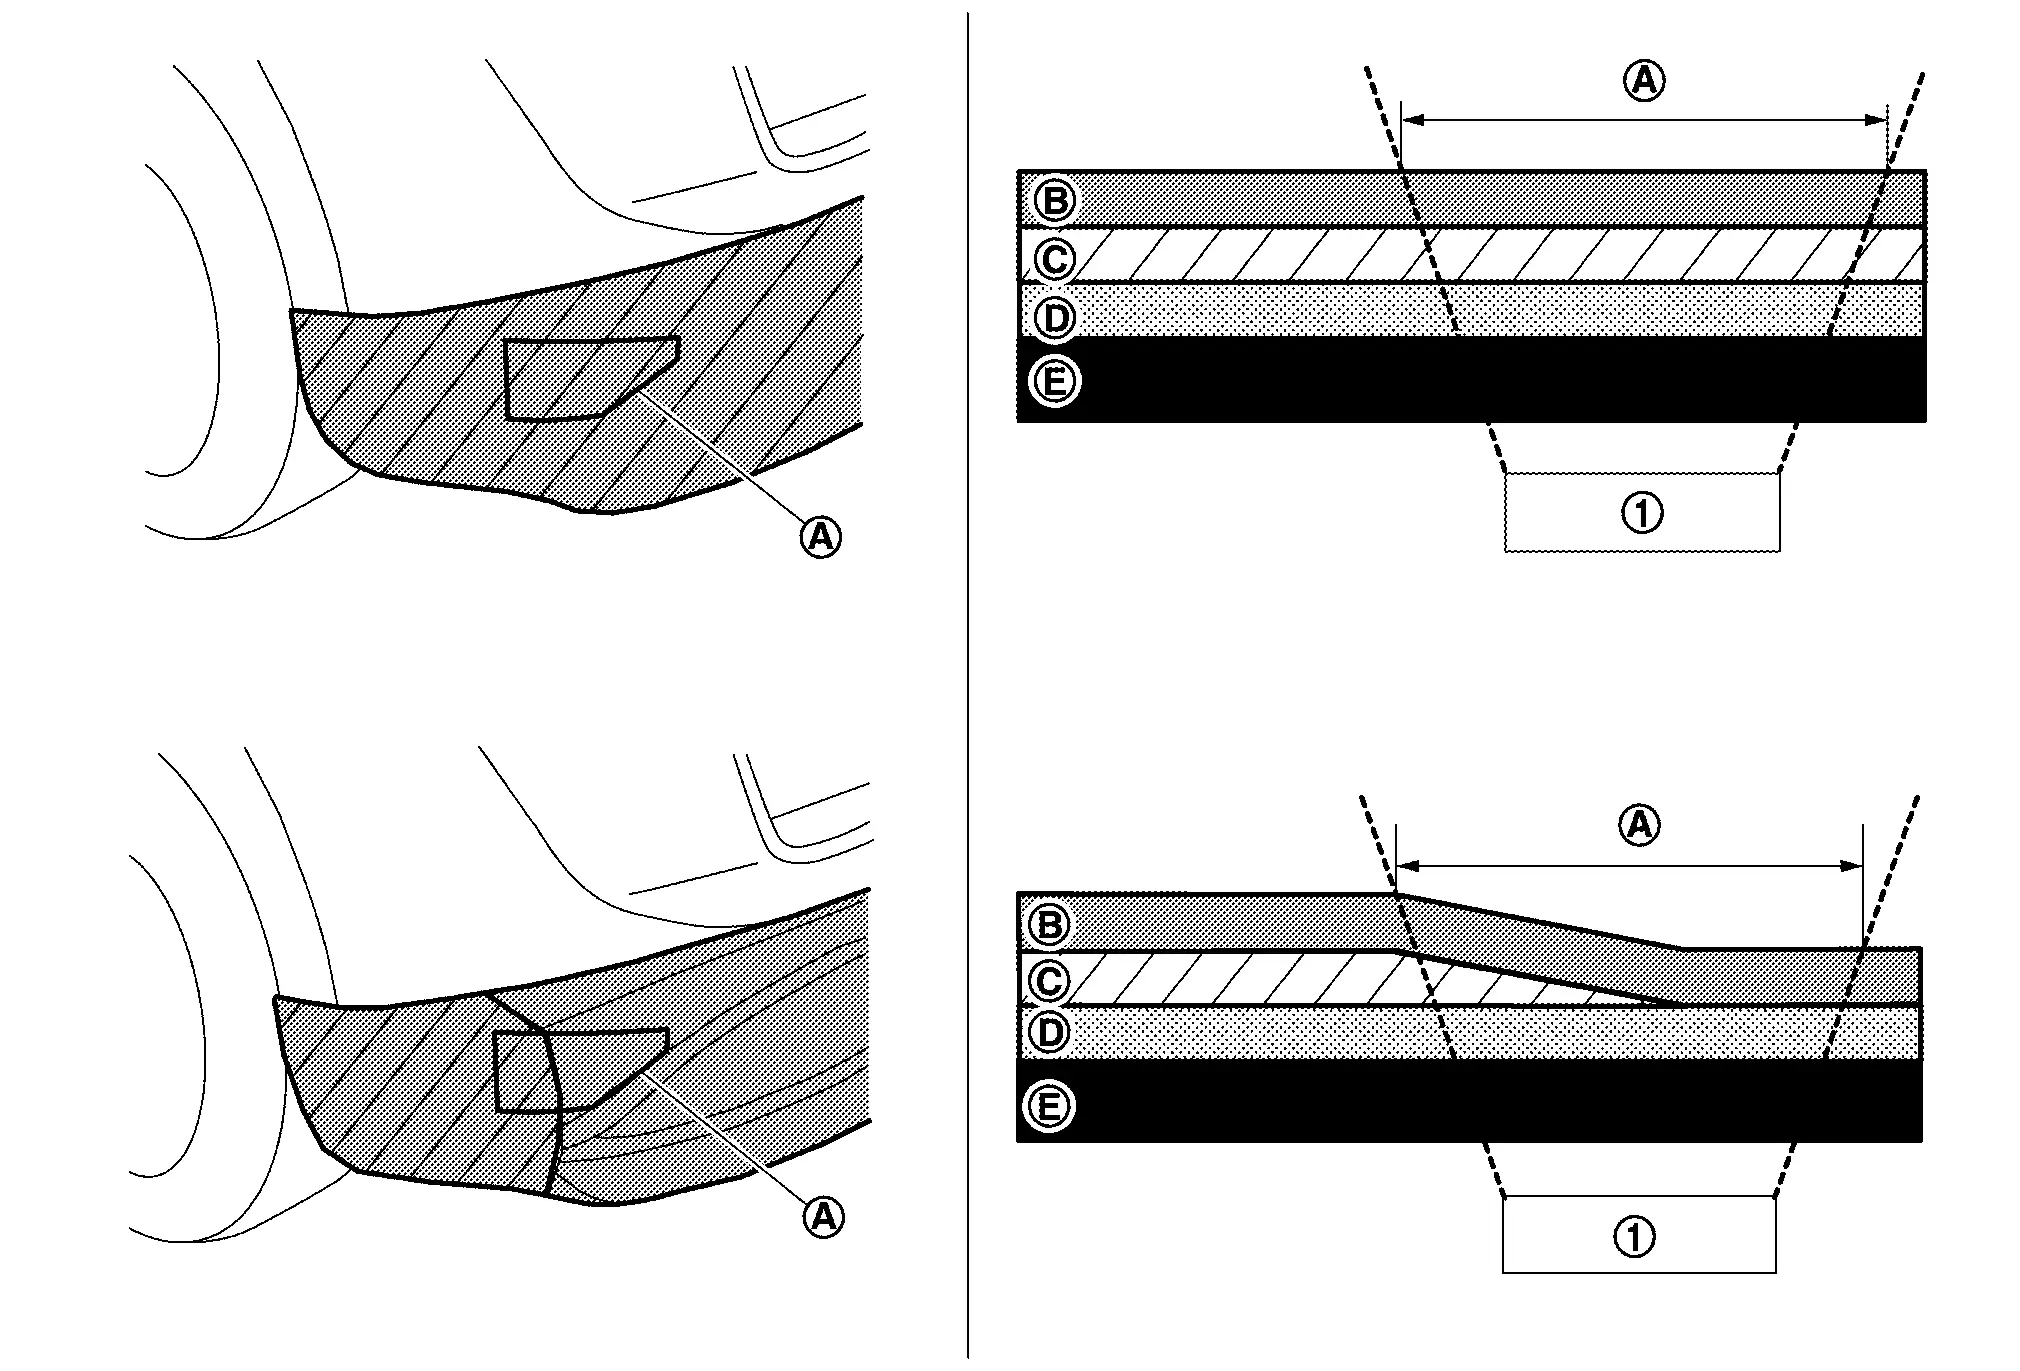
Color base painting: The conditions that construction is impossible
-
When painting on existing paint film. (Both block painting and fade-out painting are prohibited)
Cannot be constructed
Side radar Irradiation area Clear paint film Color base paint film Existing paint film *1 Bumper fascia plastic *1:It cannot be constructed when existing paint film is remains.
-
When recoat color base painting (No recoating)
Cannot be constructed
Side radar Irradiation area Clear paint film Color base paint film Bumper fascia plastic
Clear painting: Can be constructed (With conditions).
-
It is possible to apply clear paint only once on the existing paint film (including the paint film of the color bumper replaced with a new one) for the side radar irradiation area. *Definition of once:It is once until the clear coating is formed. (It is not number of sprays)
-
The conditions that clear coating is possible are as follows.
-
When color base painting area (primer for plastic parts, putty, primer surfacer, pearl base, color clear base and under clear, etc.) does not cover the irradiation area and clear paint is uniformly block painting.
Can be constructed
Side radar Irradiation area Clear paint film Color base paint film Existing paint film Bumper fascia plastic -
When clear paint is uniformly block painting in the irradiation area. (Painting whole the parts)
Can be constructed
Side radar Irradiation area Clear paint film Existing paint film Bumper fascia plastic
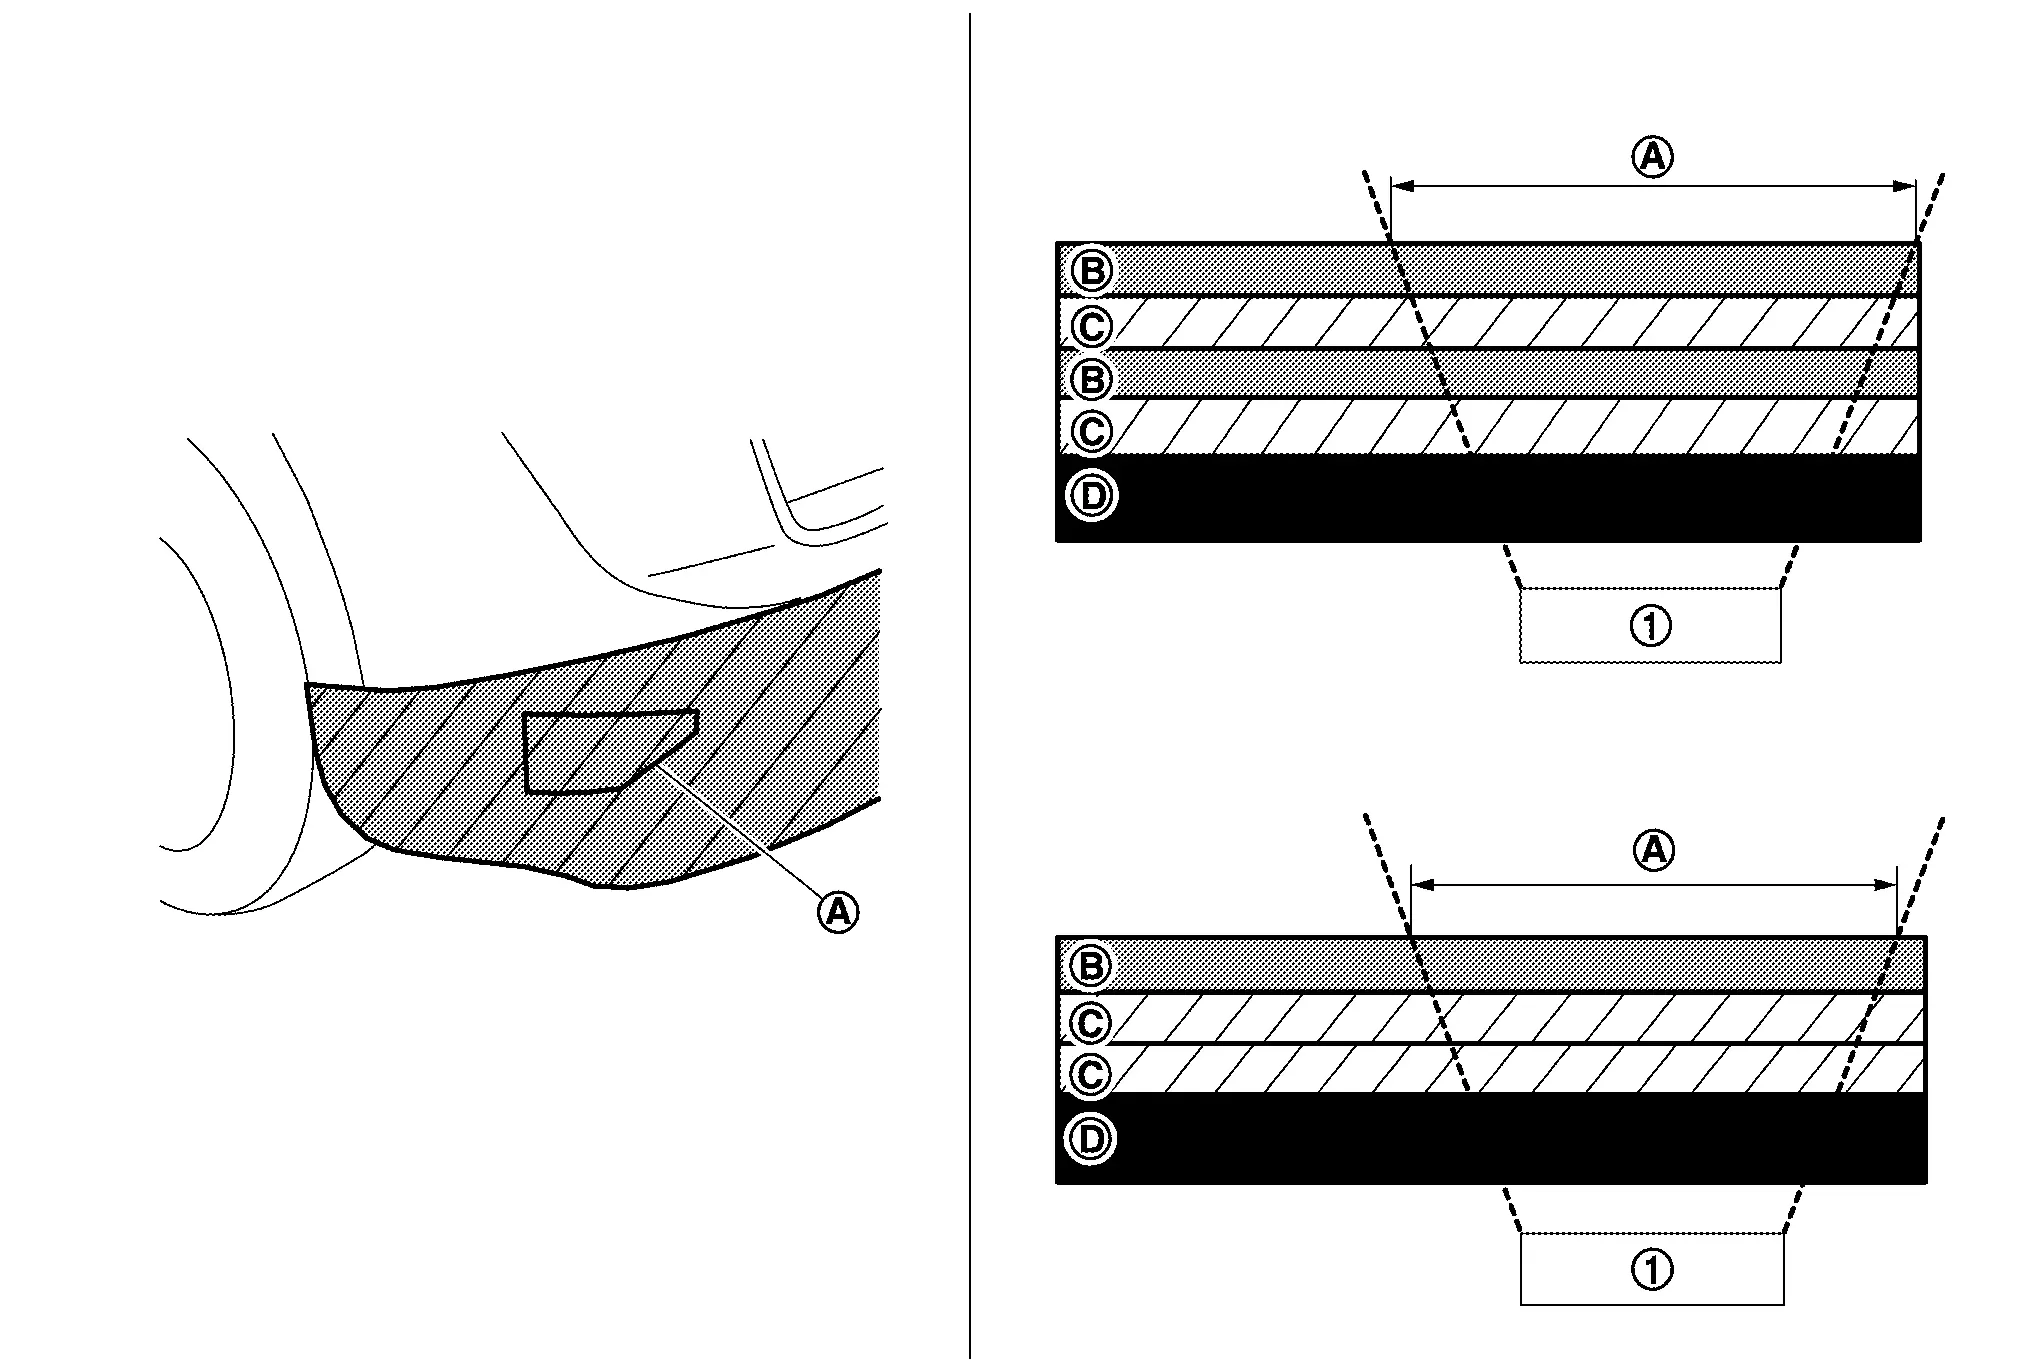
Clear painting: The conditions that construction is impossible.
-
When clear paint is not uniformly block painting in the irradiation area. (Clear paint fade-out is prohibited)
Cannot be constructed
Side radar Irradiation area Clear paint film Color base paint film Existing paint film Bumper fascia plastic -
When re-paint the clear paint in the irradiation area.
Cannot be constructed
Side radar Irradiation area Clear paint film Existing paint film Bumper fascia plastic
-
-
Polishing on paint surface
Polishing is possible. (For dust on the paint surface removal, gloss improvement, base treatment before coating and so on.)
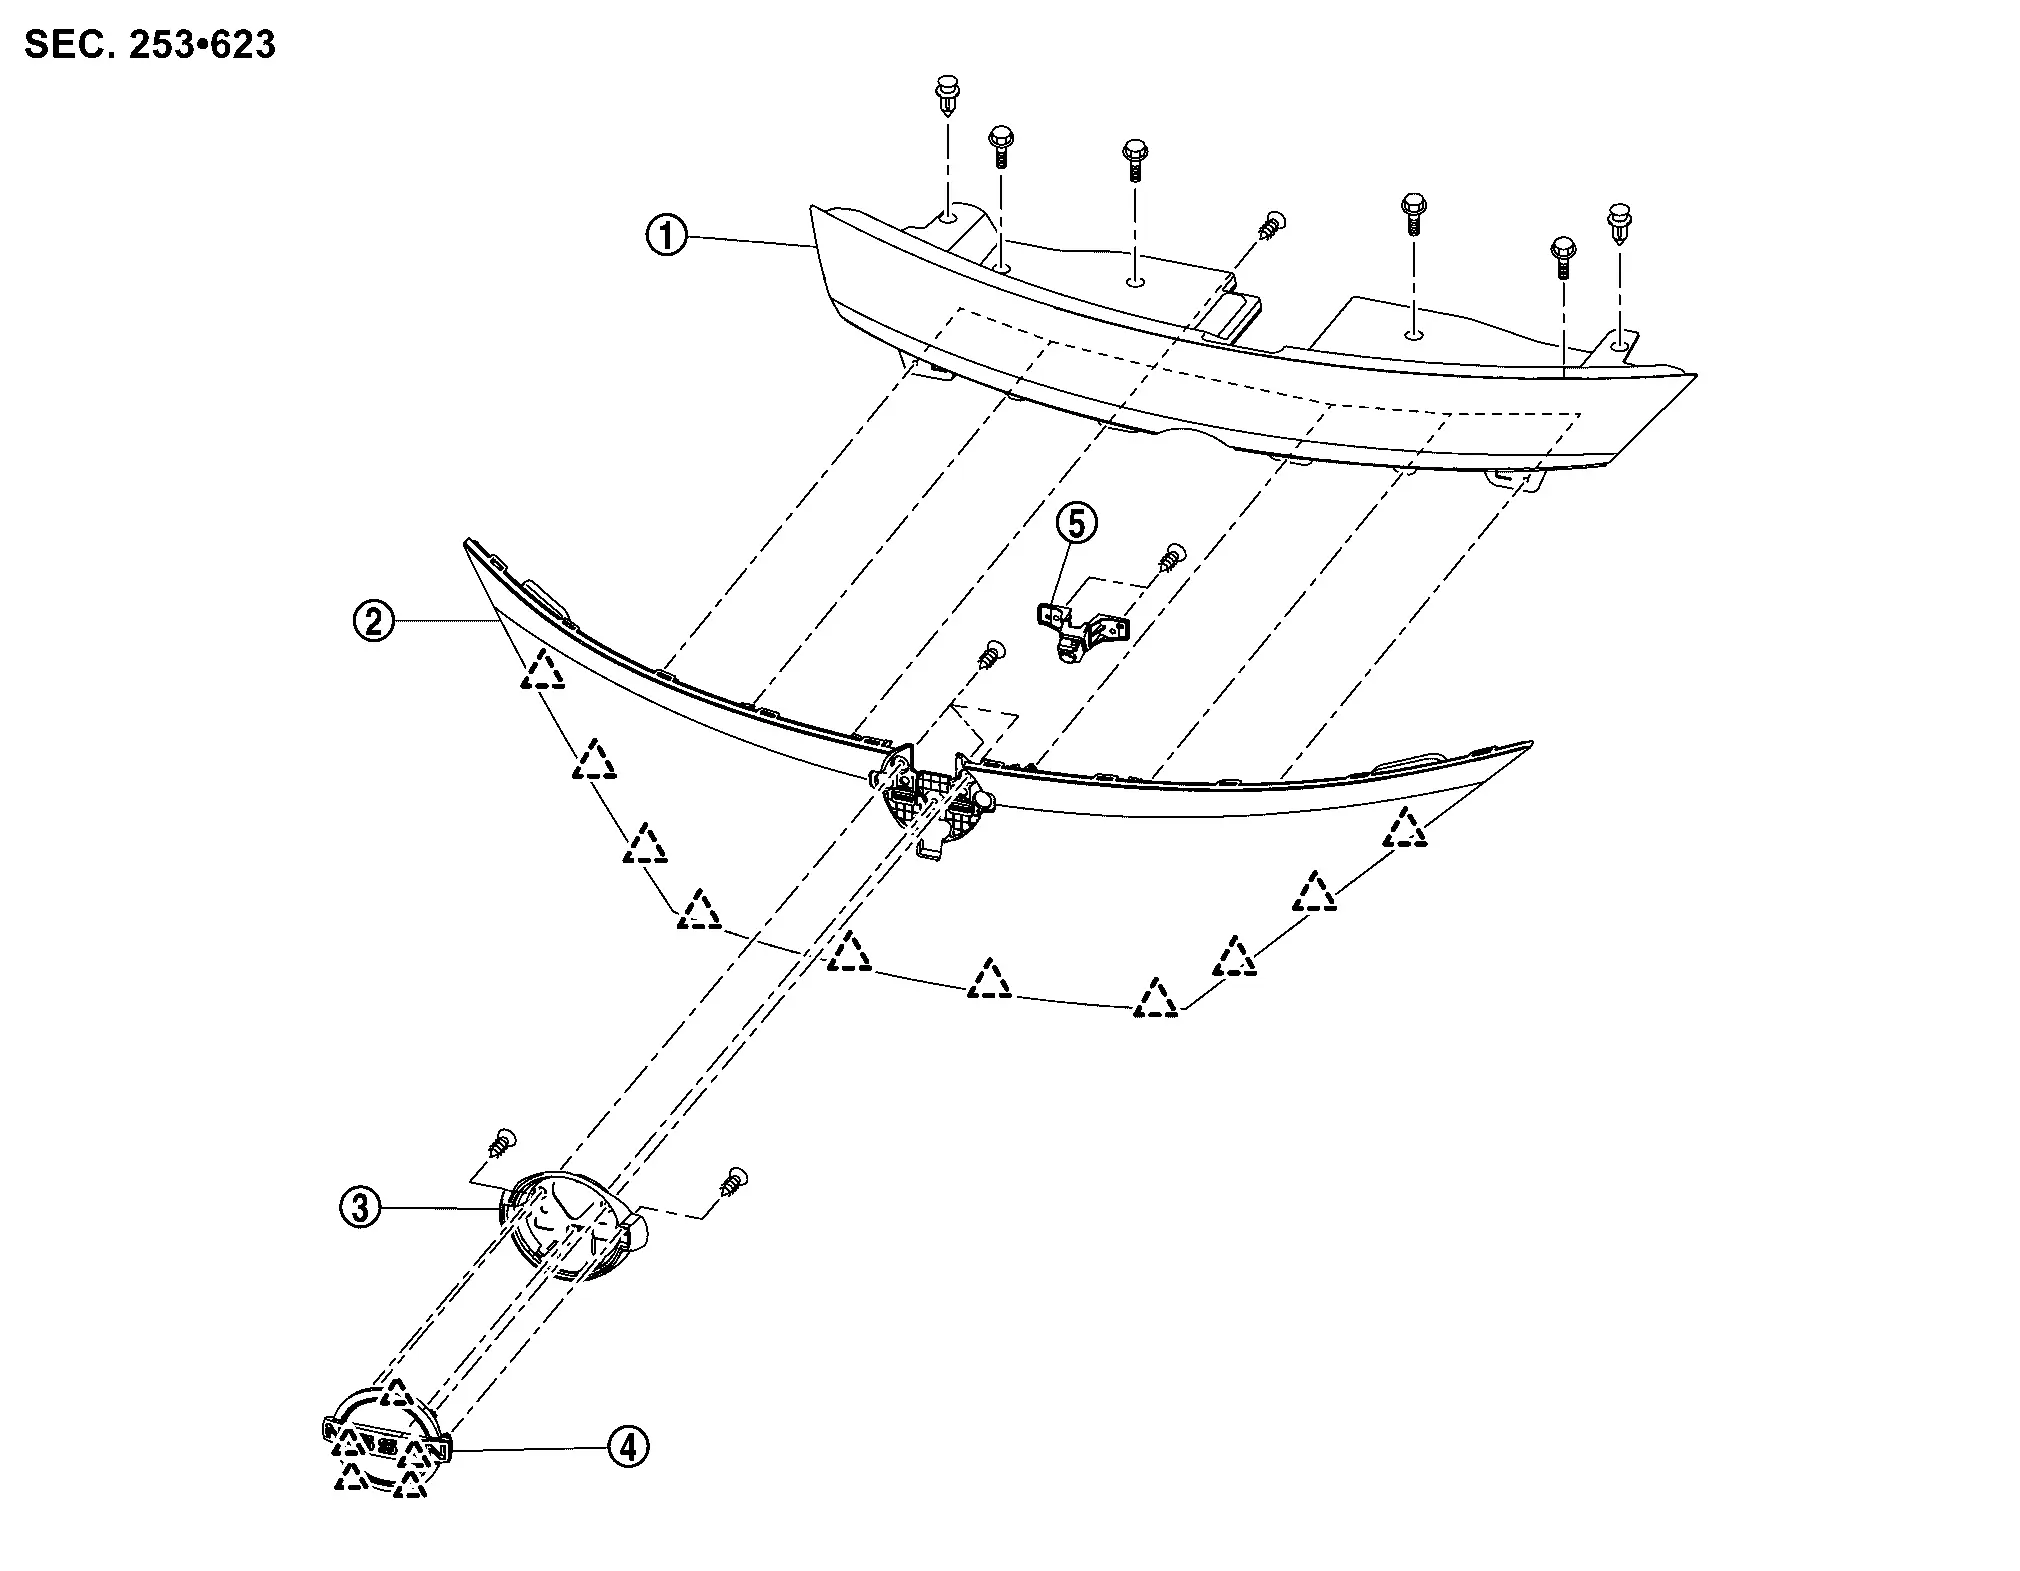
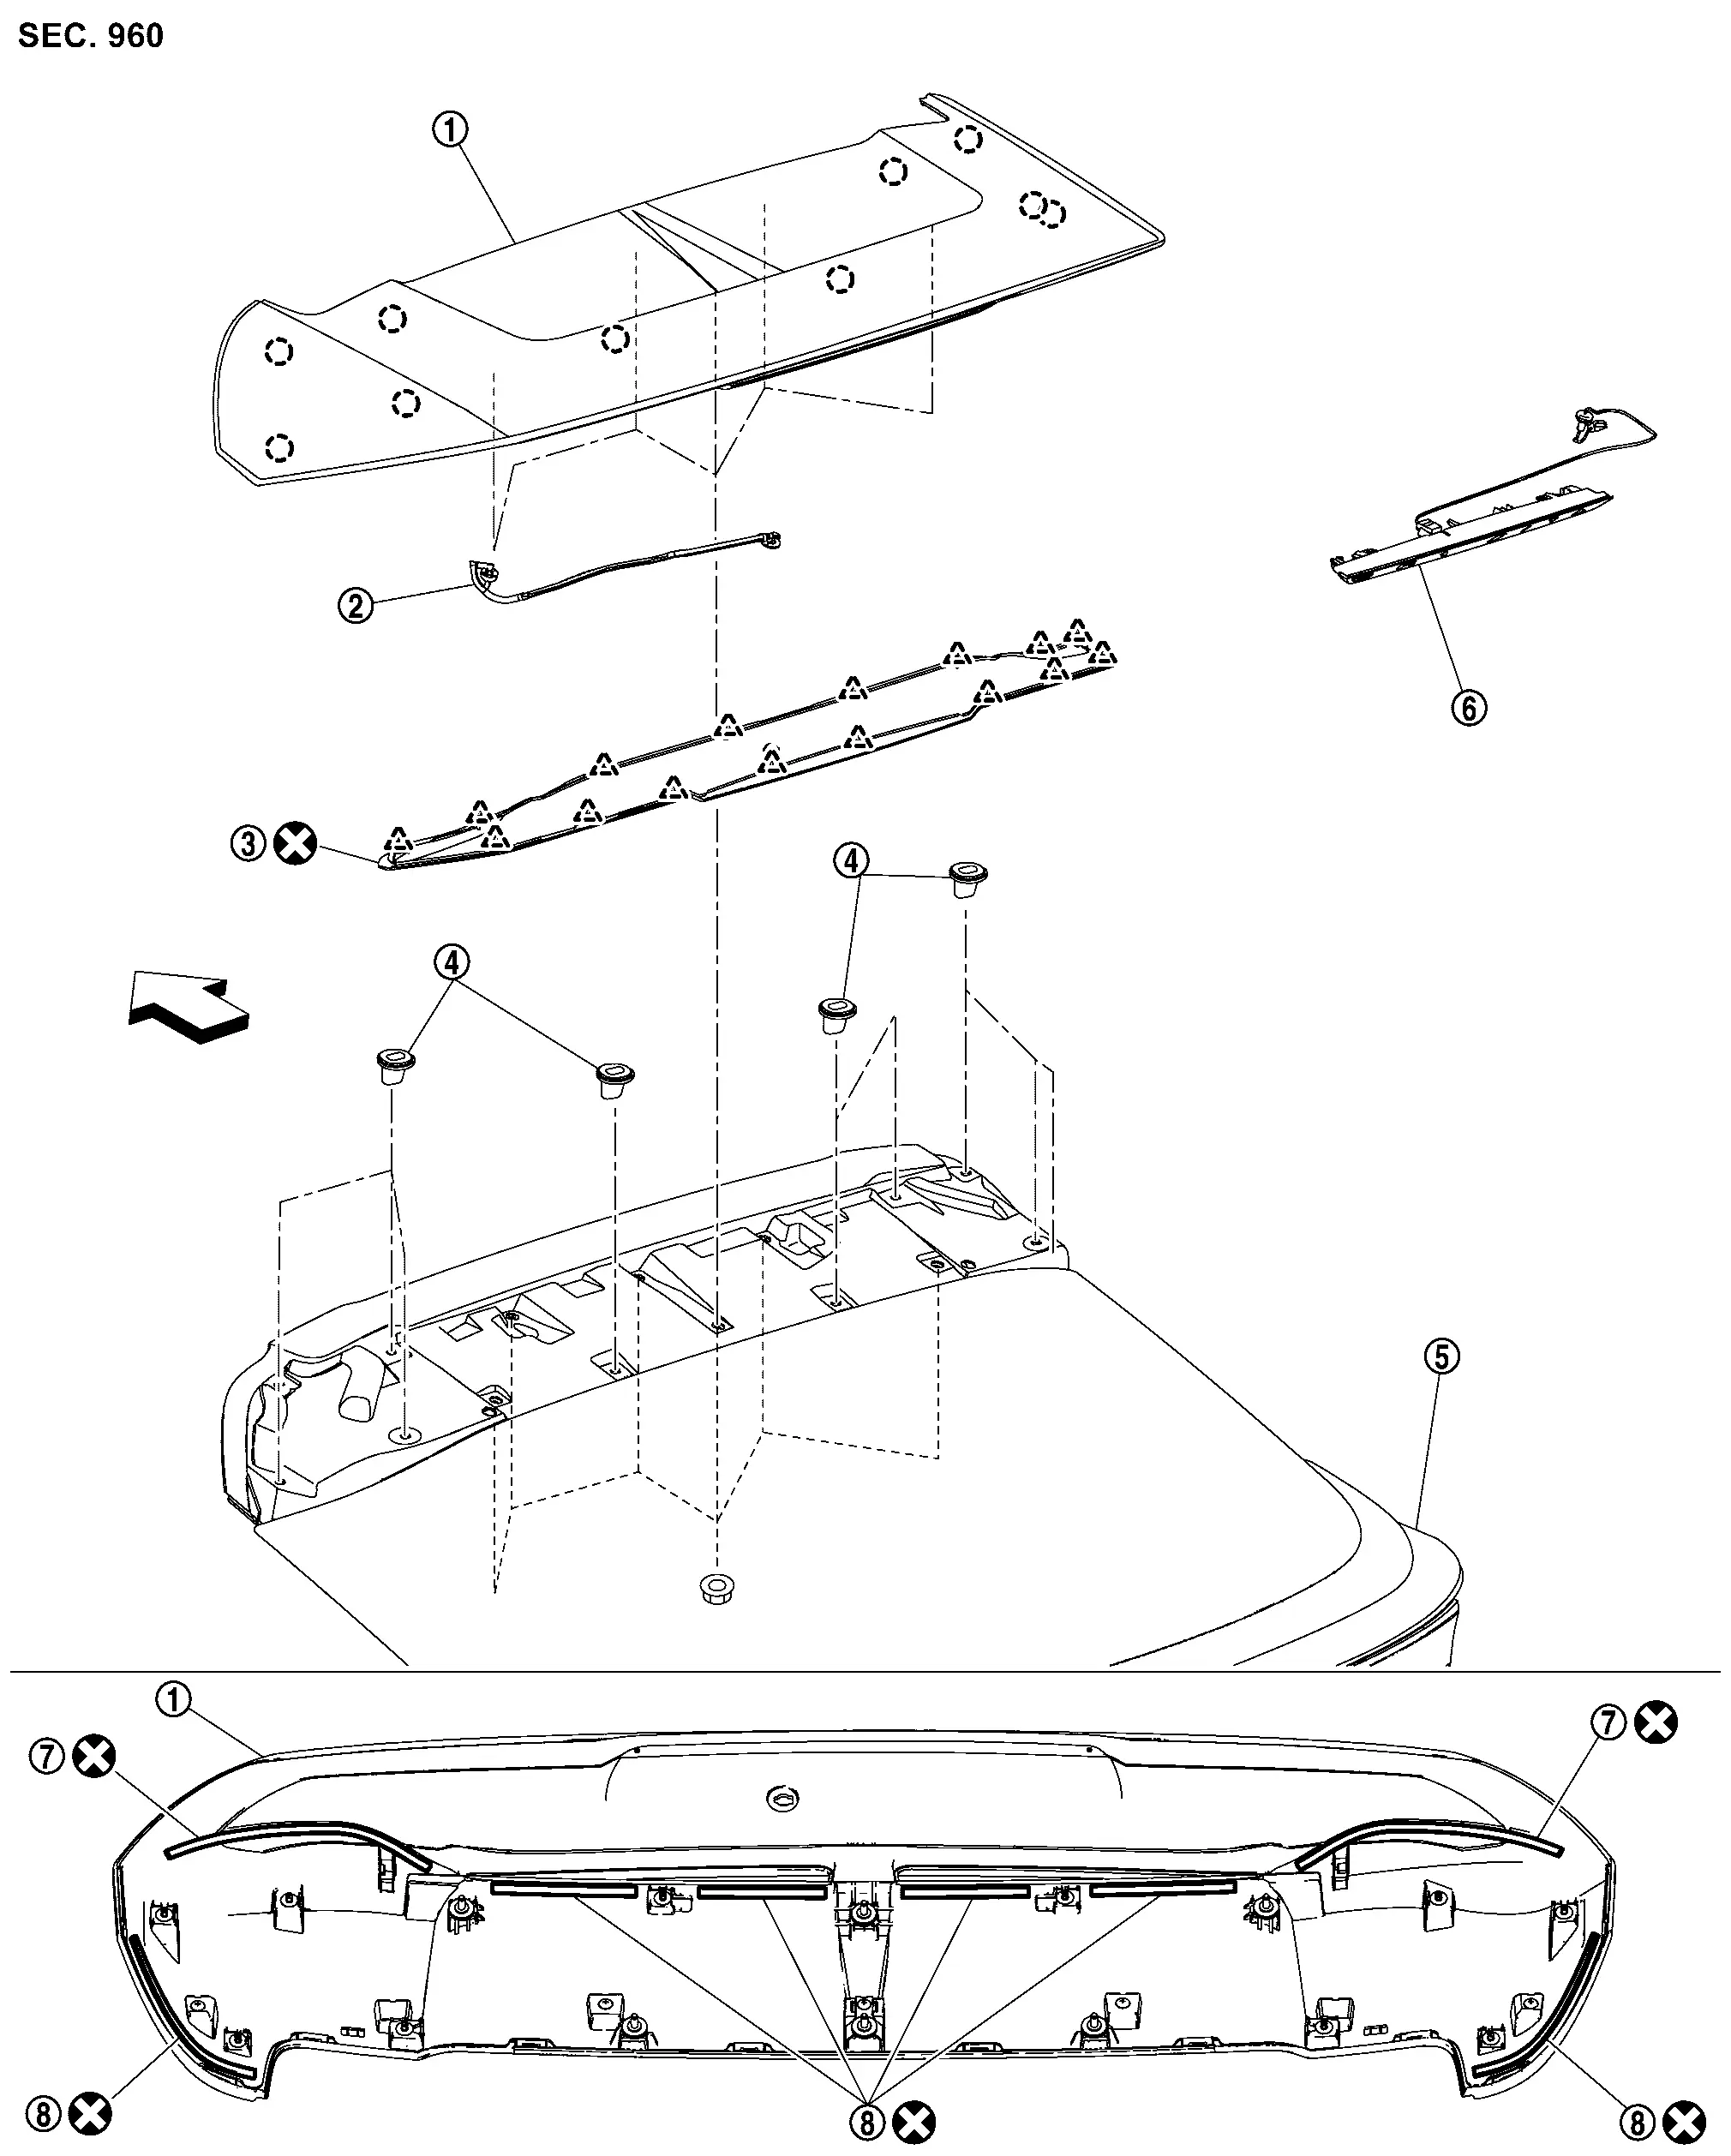
Rear Bumper Nissan Ariya 2023
Exploded View
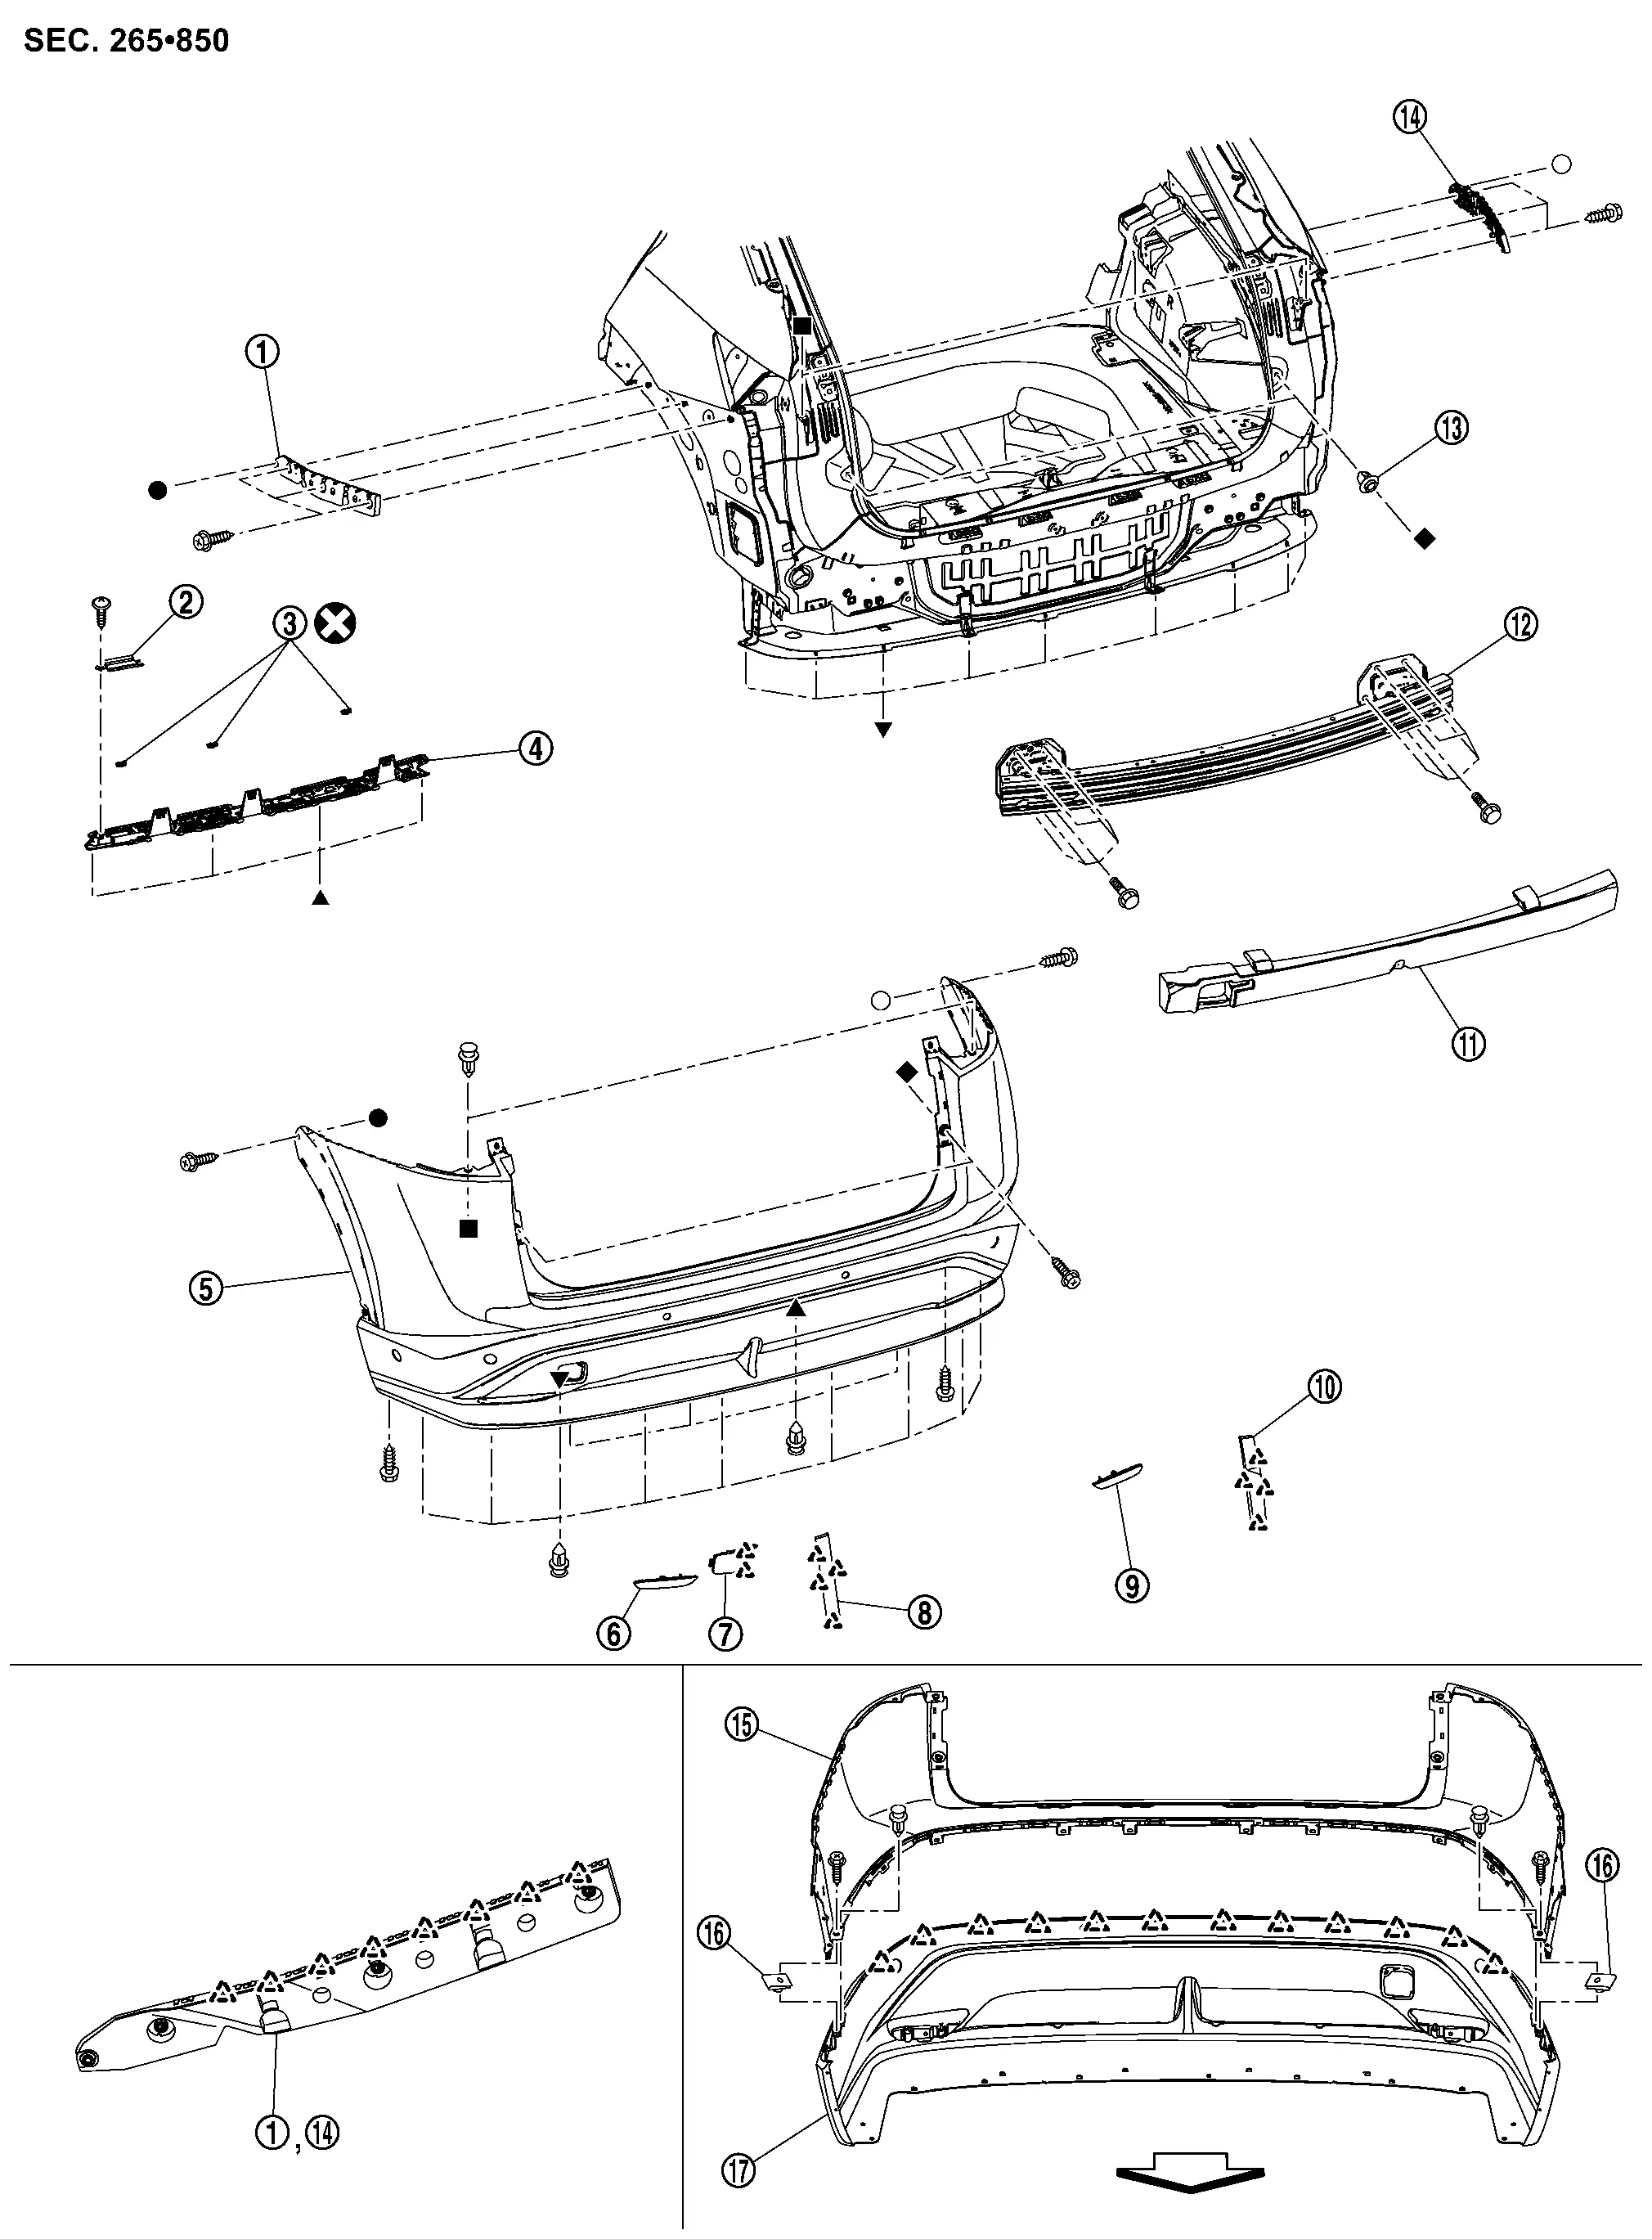
|
Rear bumper side bracket LH | |
Rear bumper bracket cover | |
Rear bumper bracket clip |
|
Rear bumper bracket | |
Rear bumper fascia assembly | |
Rear reflex reflector LH |
|
Bumper bracket cover | |
Rear combination lamp cover lower LH | |
Rear reflex reflector RH |
|
Rear combination lamp cover lower RH | |
Rear bumper energy absorber | |
Rear bumper reinforcement |
|
Grommet | |
Rear bumper side bracket RH | |
Rear bumper fascia |
|
U nut | |
Rear bumper fascia lower | ||
|
: Pawl | ||||
|
: Nissan Ariya Vehicle front | ||||
 |
Always replace after every disassembly. | ||||
, , , , ,  : Indicates that the part is connected at points with same symbol in actual Nissan Ariya vehicle. : Indicates that the part is connected at points with same symbol in actual Nissan Ariya vehicle. |
|||||
Removal & Installation
REMOVAL
CAUTION:
Rear bumper fascia assembly is made of resin. Never apply strong force to it, and be careful to prevent contact with oil.
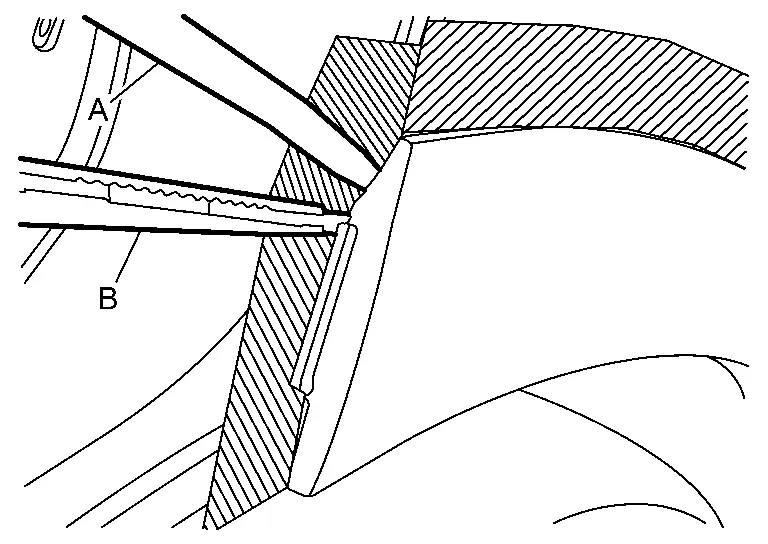
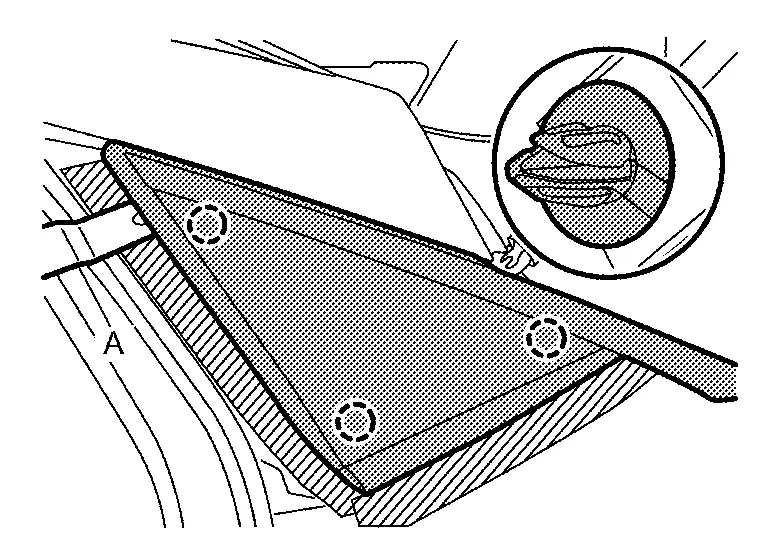
Fully open back door.
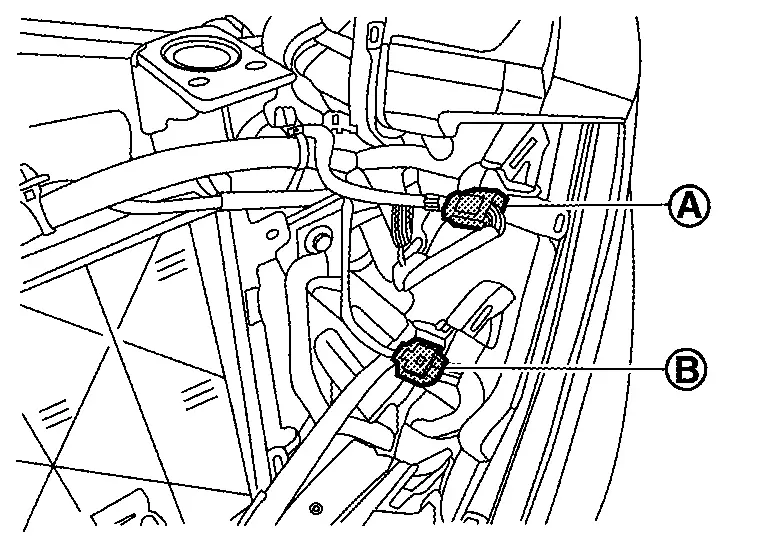
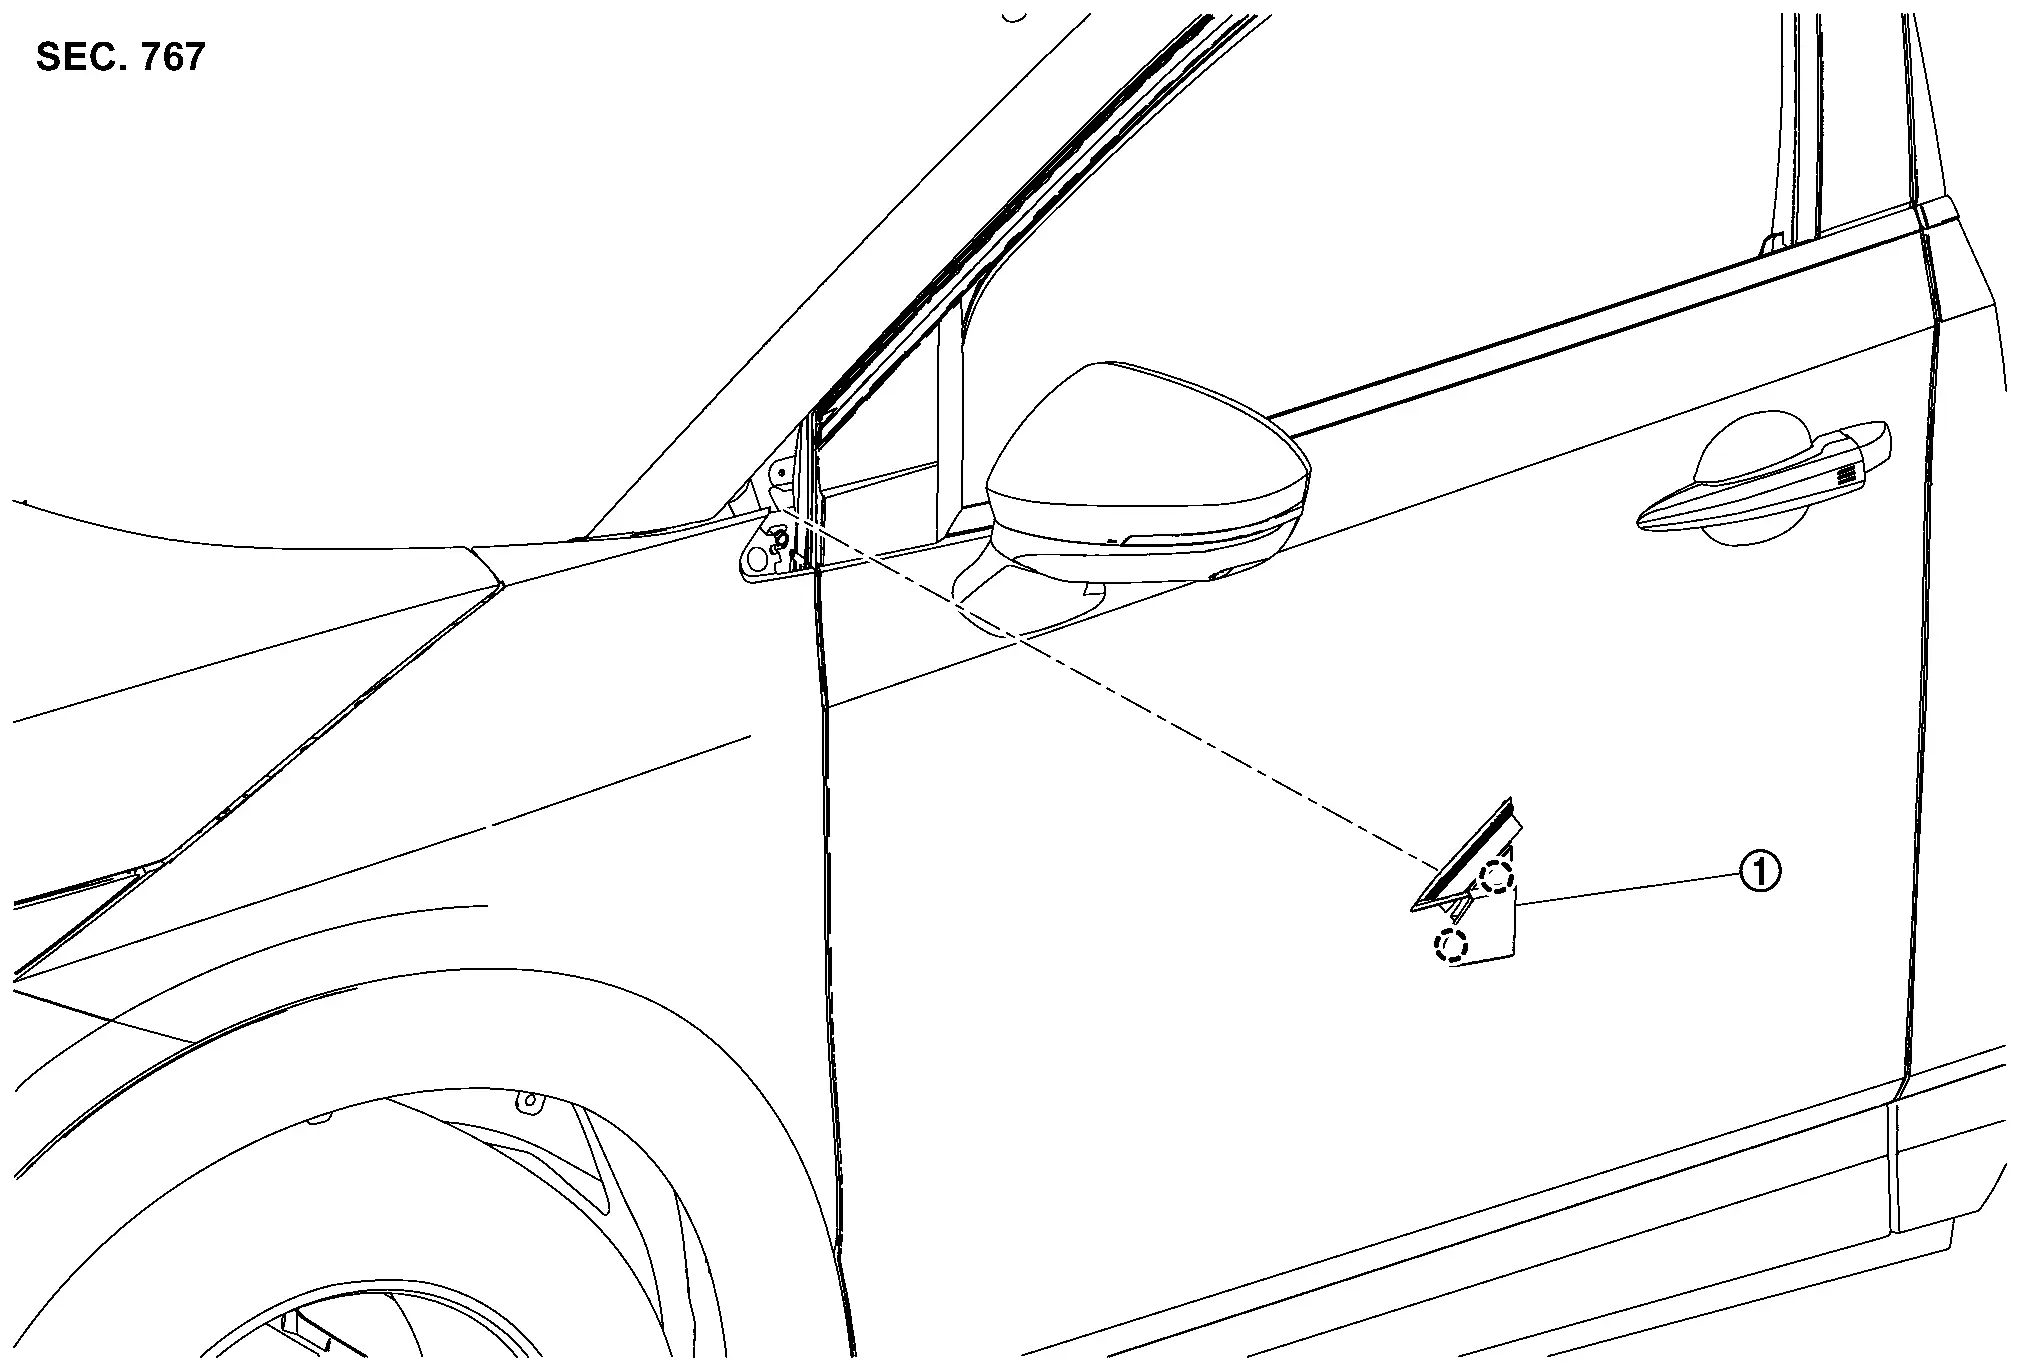
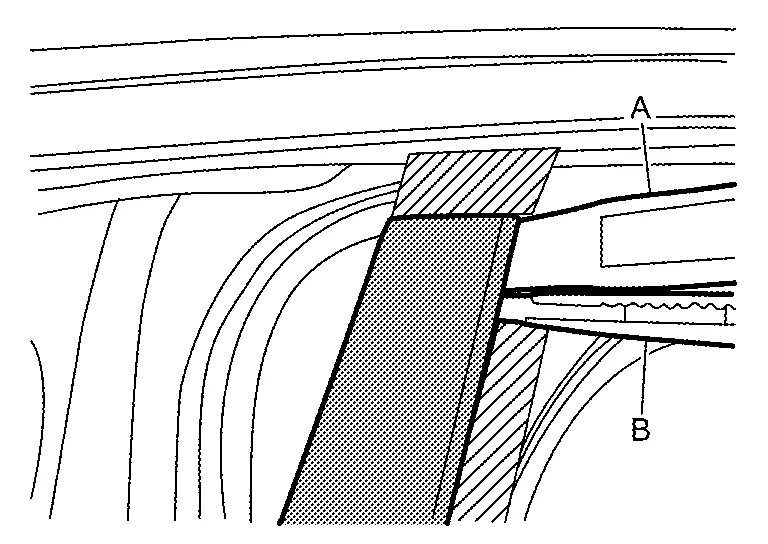
Remove rear combination lamp (body side). Refer to Removal & Installation.
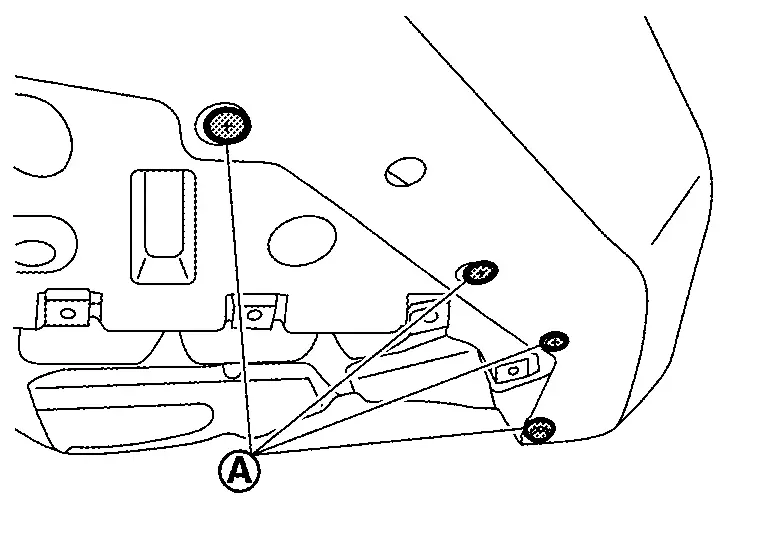
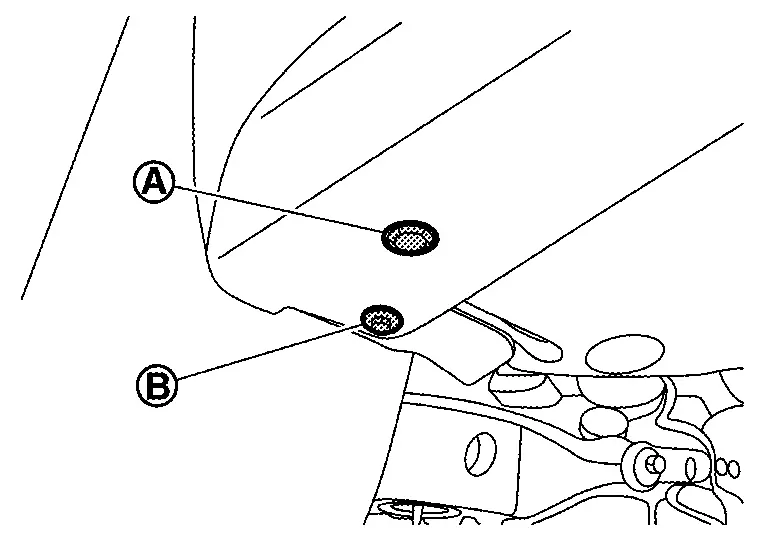
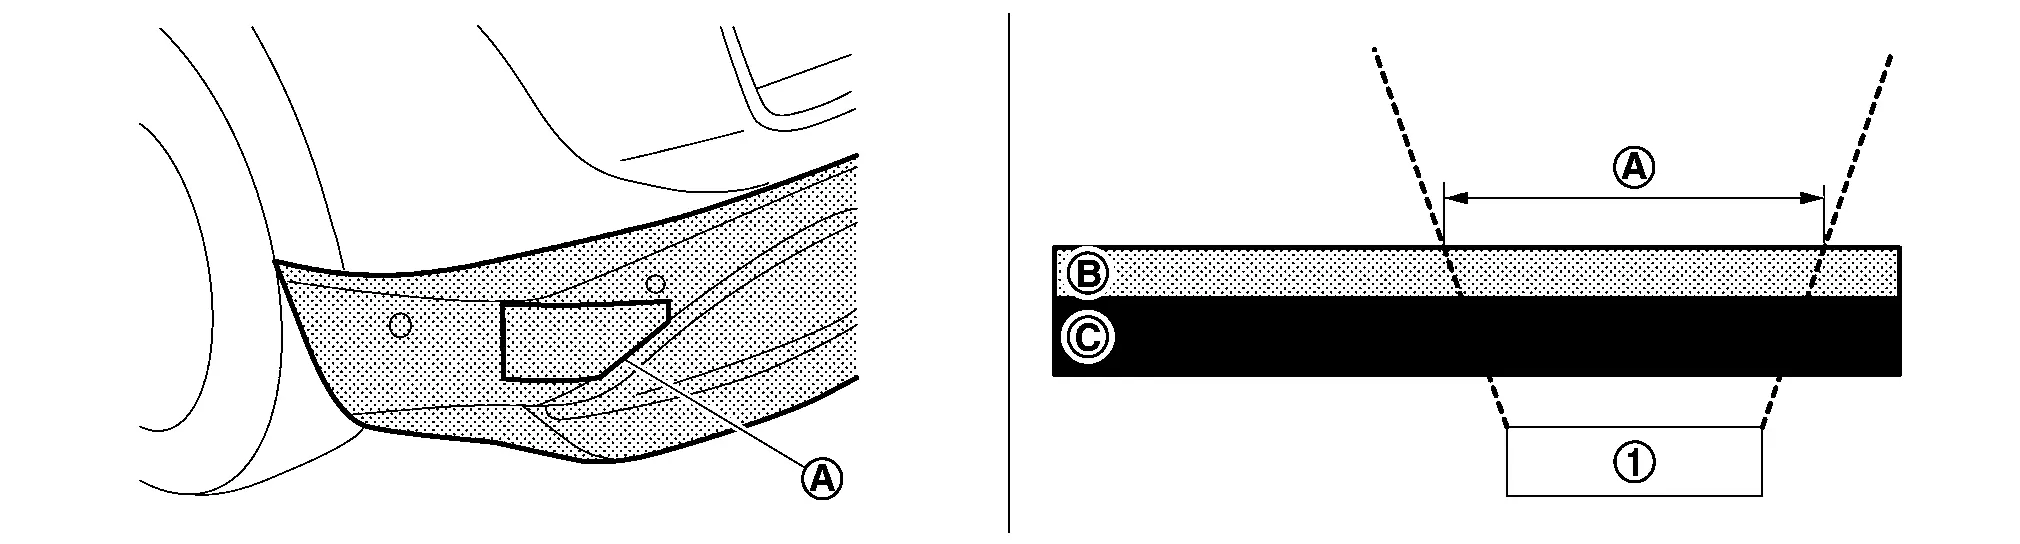
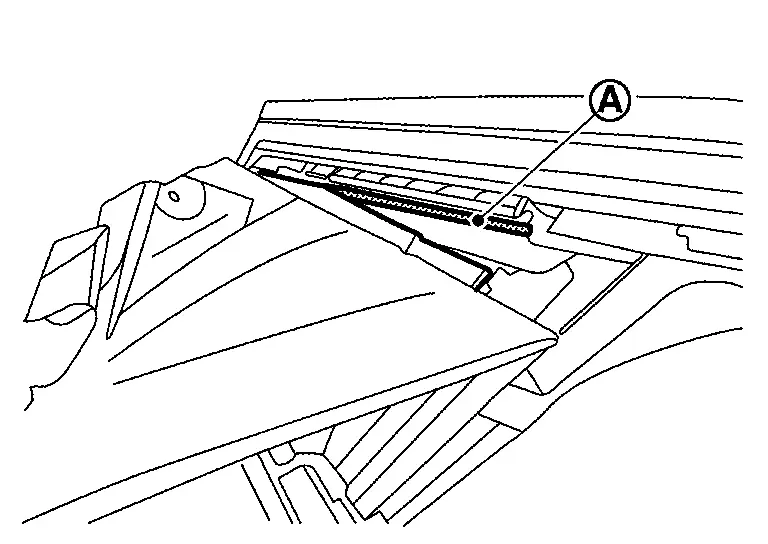
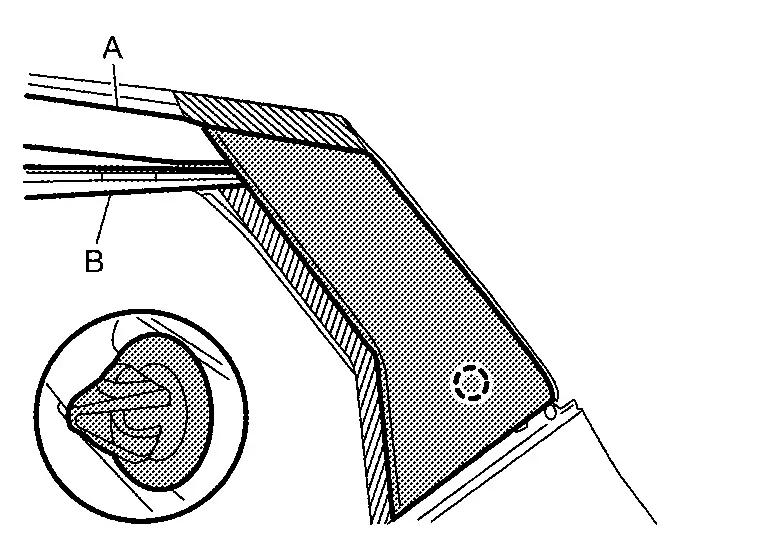
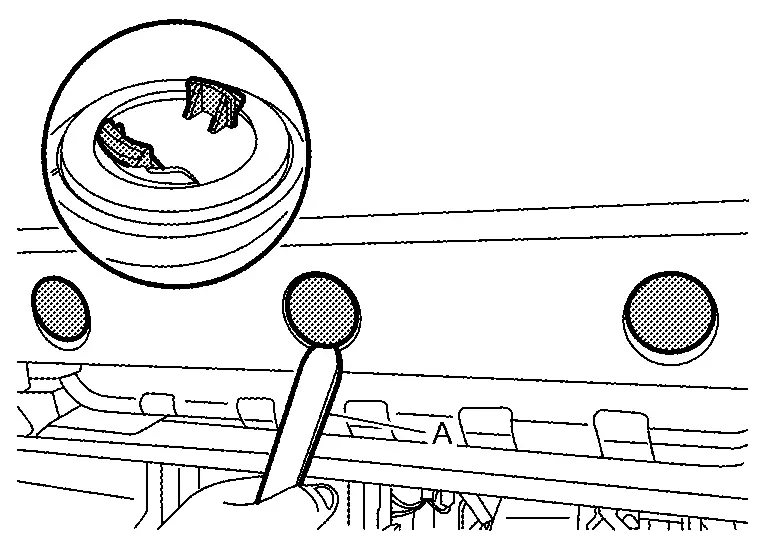
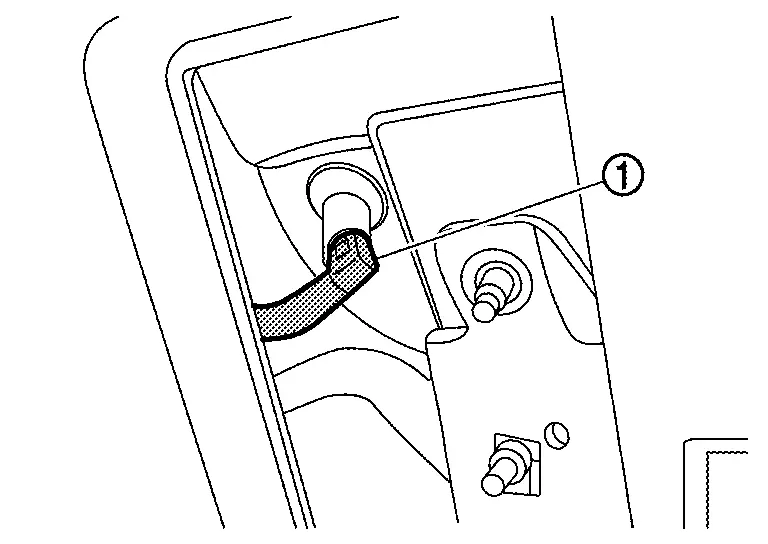
Apply protective tape (A) on the part to protect it from damage.
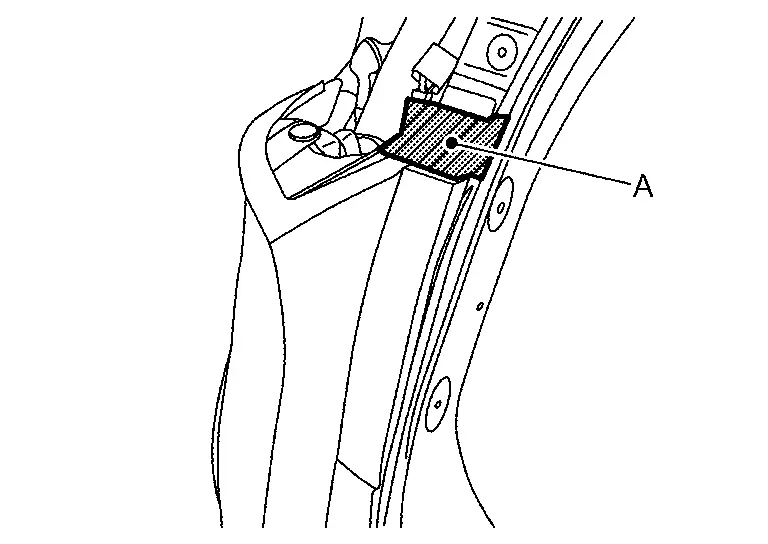
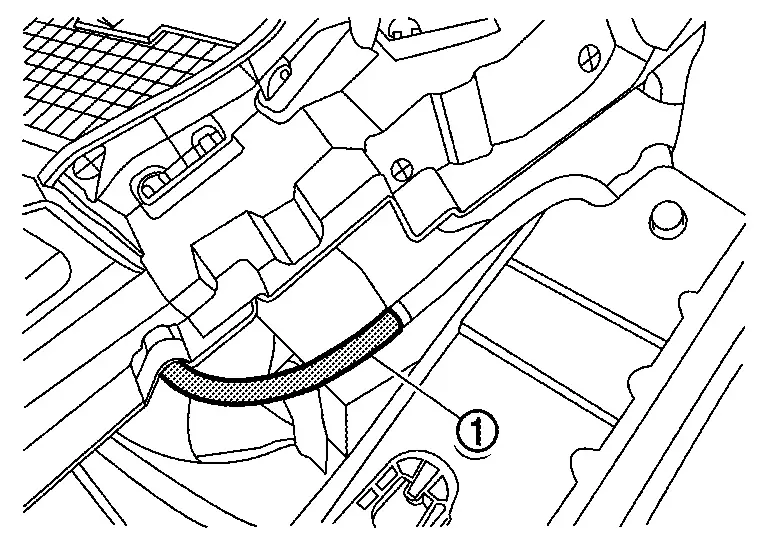
Disengage rear combination lamp cover lower fixing pawls using a remover tool (A), and then remove rear combination lamp cover lower.
|
: Pawl |
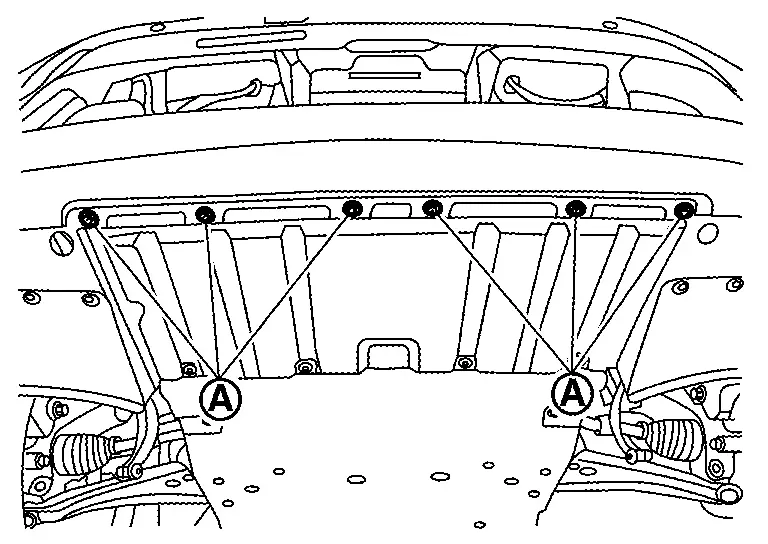
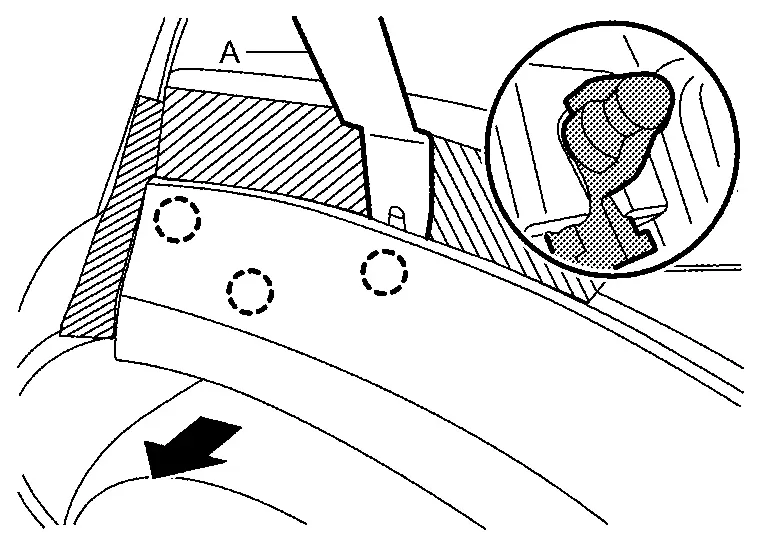
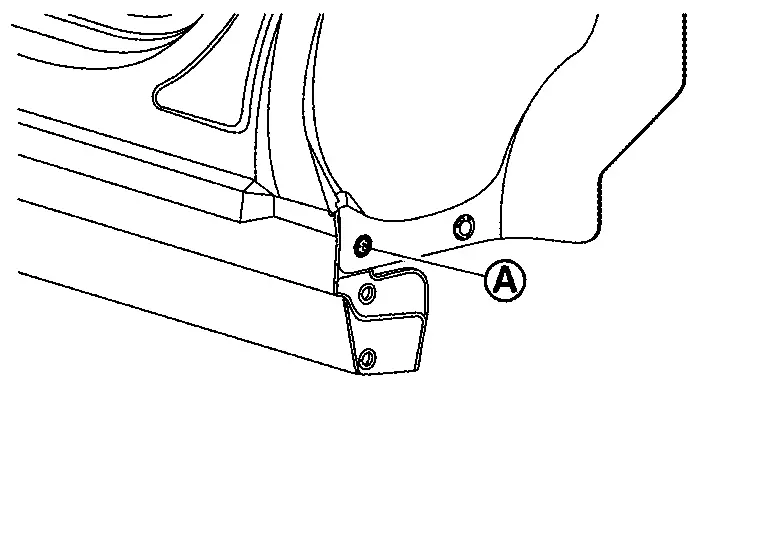
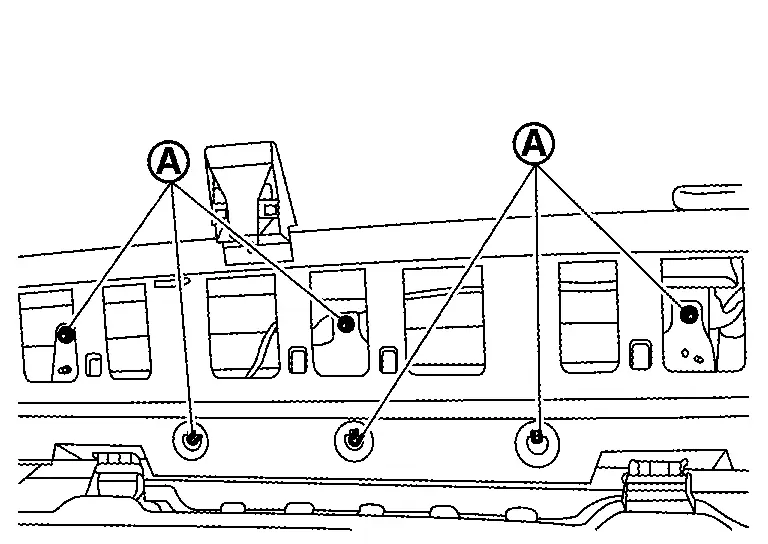
Remove rear bumper fascia assembly fixing clip and mounting bolt .
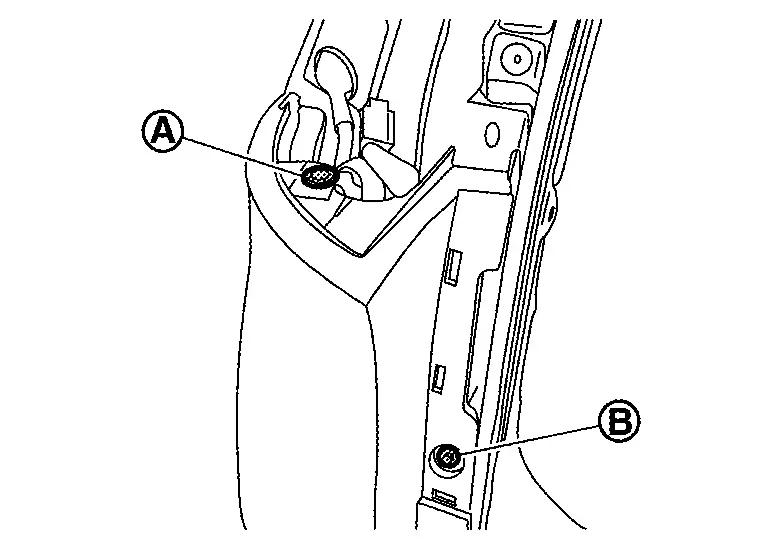
Remove rear bumper fascia assembly fixing clips of bumper lower side.
Remove rear bumper fascia assembly fixing clip and mounting bolt .
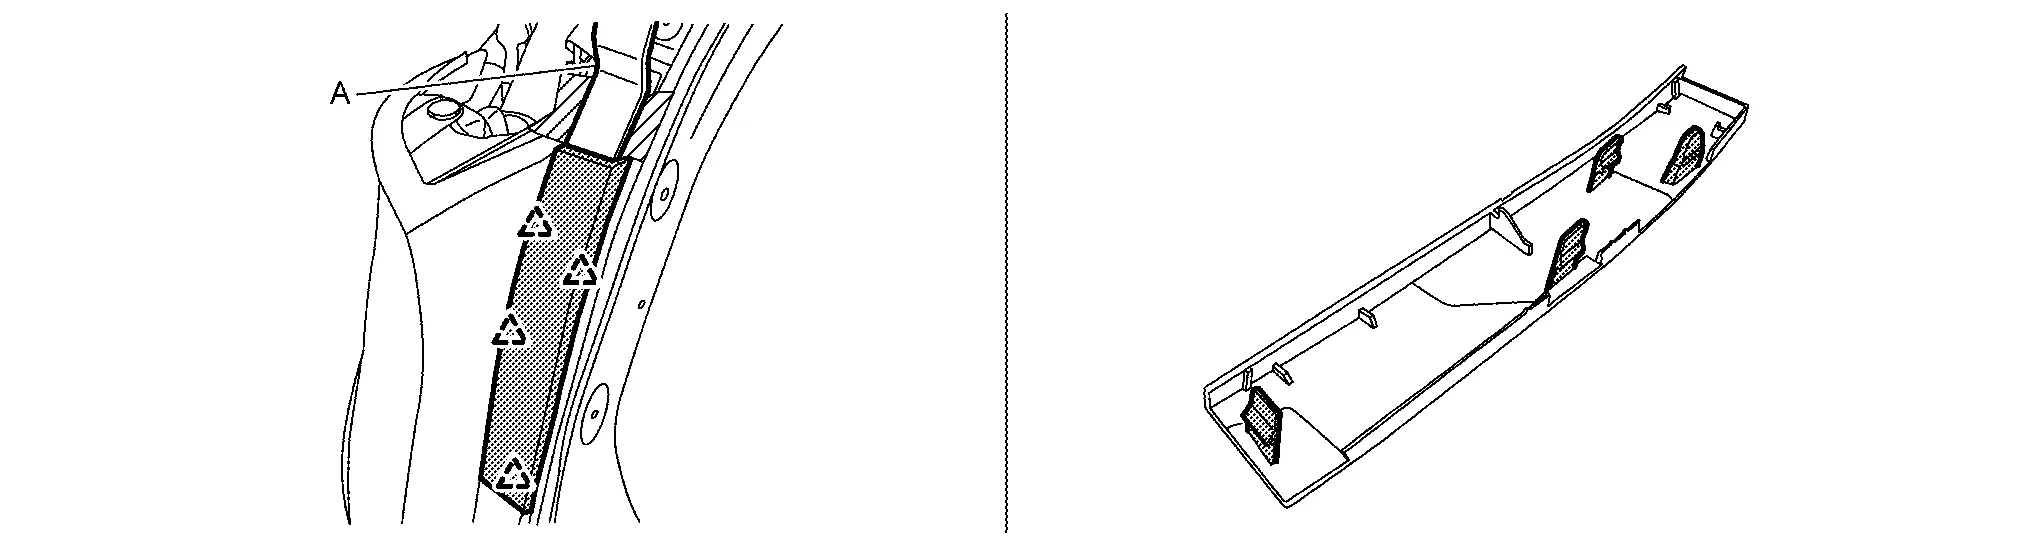
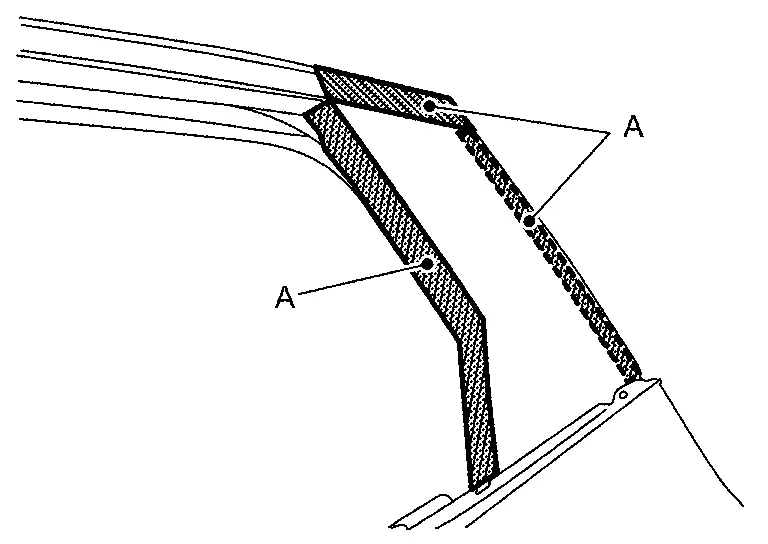
Remove back side of rear fillet molding (LH and RH). Refer to Removal & Installation.
Remove rear bumper fascia assembly fixing screw .
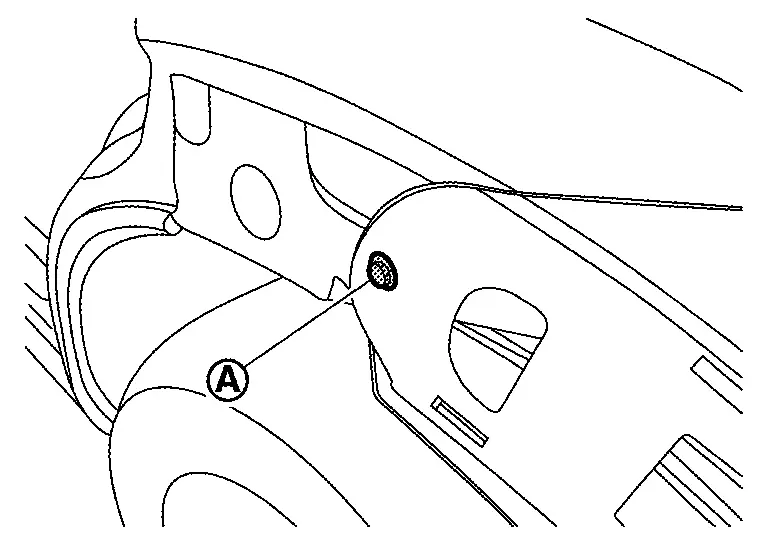
Apply protective tape (A) on the part to protect it from damage.
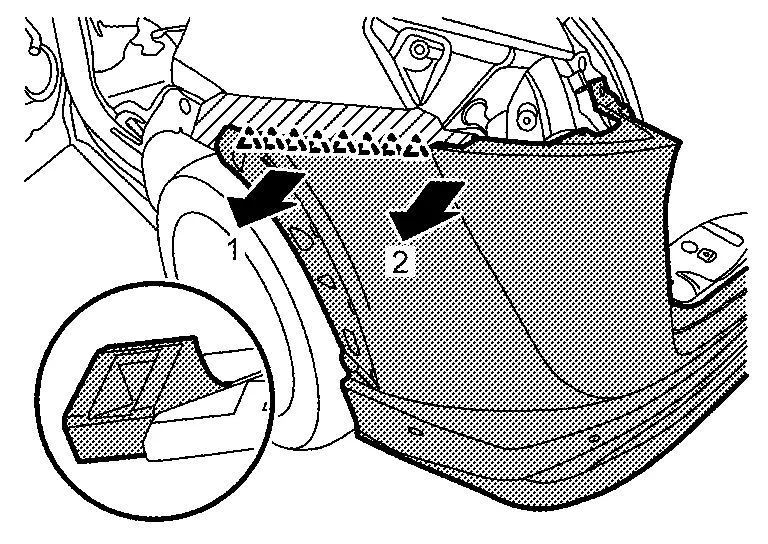
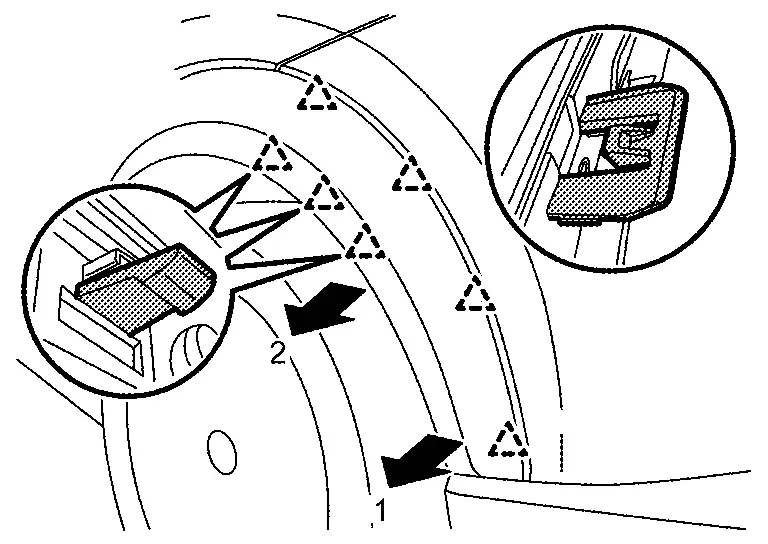
Pull rear bumper fascia assembly side toward the Nissan Ariya vehicle side to disengage the fitting of rear bumper side bracket and rear bumper fascia assembly side according to the numerical order 1→2 as shown by the arrows in the figure.
CAUTION:
When removing rear bumper fascia assembly, 2 workers are required so as to prevent it from dropping.
|
: Pawl |
Disconnect harness connector.
Remove rear bumper fascia assembly.
Remove the following parts after removing rear bumper fascia assembly.
-
Rear reflex reflector. Refer to Removal & Installation.
-
Side radar (if equipped). Refer to Removal and Installation.
-
Rear sonar sensor (if equipped). Refer to SONAR SENSOR (REAR) : Removal & Installation.
-
Back door hands free sensor (if equipped). Refer to Removal & Installation.
-
Rear bumper bracket cover.
-
Rear bumper bracket clip.
-
Rear bumper bracket.
-
Bumper bracket cover.
-
Rear bumper fascia.
-
Rear bumper fascia lower.
Remove rear bumper energy absorber.
Remove rear bumper reinforcement mounting bolts, and then remove rear bumper reinforcement.
Remove rear bumper side bracket fixing screws, and then remove rear bumper side bracket (LH and RH).
INSTALLATION
Note the following items, and then install in the reverse order of removal.
CAUTION:
-
Since it may affect side radar performance, for repair and mending of rear bumper refer to repair and mending of side radar irradiation range. Refer to Inspection.
-
When installing rear bumper fascia assembly, perform side radar alignment. Refer to Work Procedure.
-
Never reuse rear bumper bracket clip. Always replace it with a new one when it is removed.
NOTE:
-
The following table shows the specified values for checking normal installation status.
-
Fitting adjustment cannot be performed.
| Portion | Clearance | Surface height difference | |
|---|---|---|---|
| Rear bumper fascia assembly – Rear fender | – |
0.0 – 1.0 mm (0.000 – 0.039 in) |
(−1.7) – (+0.3) mm [(–0.067) – (+0.012) in] |
| Rear bumper fascia assembly – Rear combination lamp | – |
0.0 – 3.0 mm (0.000 – 0.118 in) |
– |
| Rear bumper fascia assembly – Back door panel | – |
2.8 – 7.2 mm (0.110 – 0.283 in) |
(−0.5) – (+3.5) mm [(–0.020) – (+0.138) in] |
| – |
5.5 – 9.5 mm (0.217 – 0.374) in |
(−0.8) – (+3.8) mm [(–0.031) – (+0.150) in] |
|
Inspection
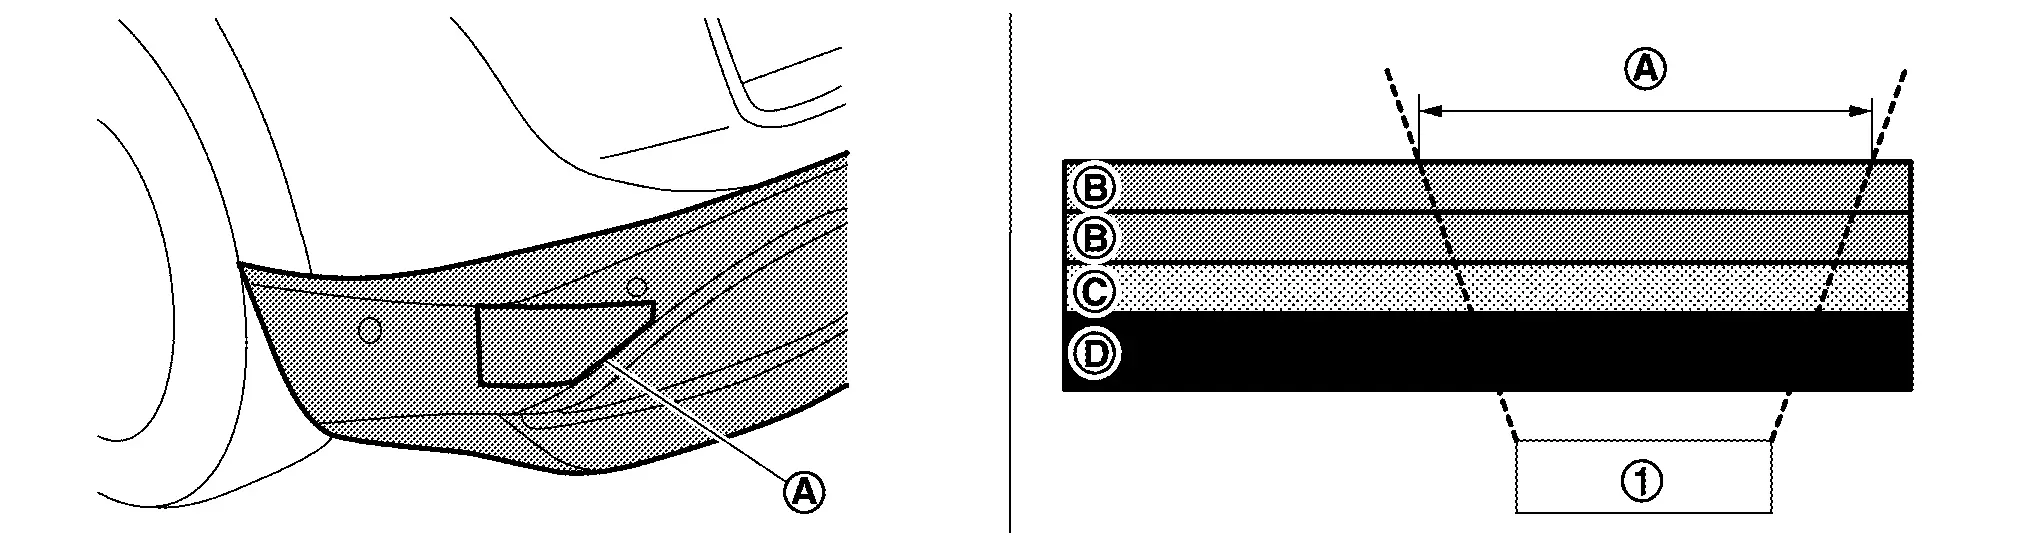
SIDE RADAR IRRADIATION AREA
-
For side radar irradiation area, refer to the figure below.
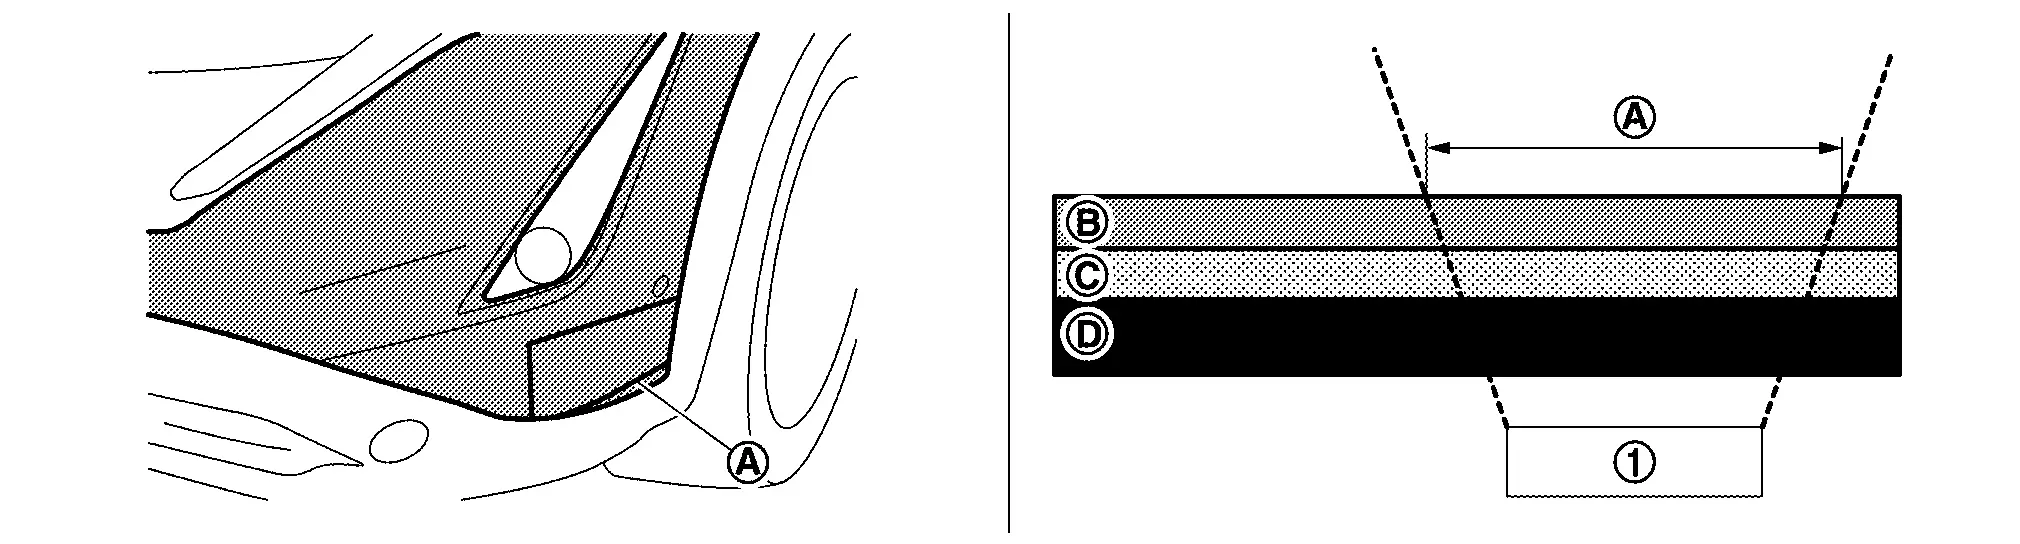
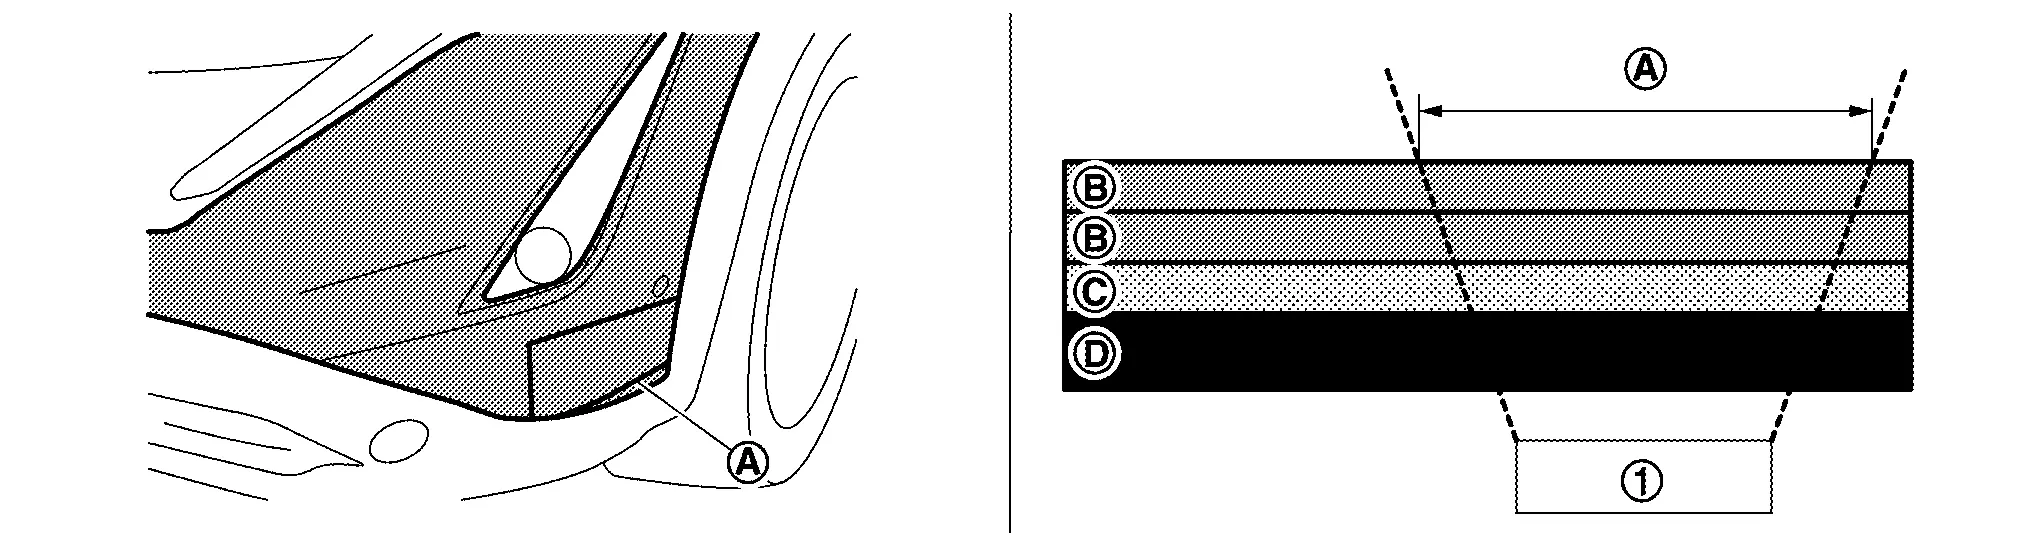
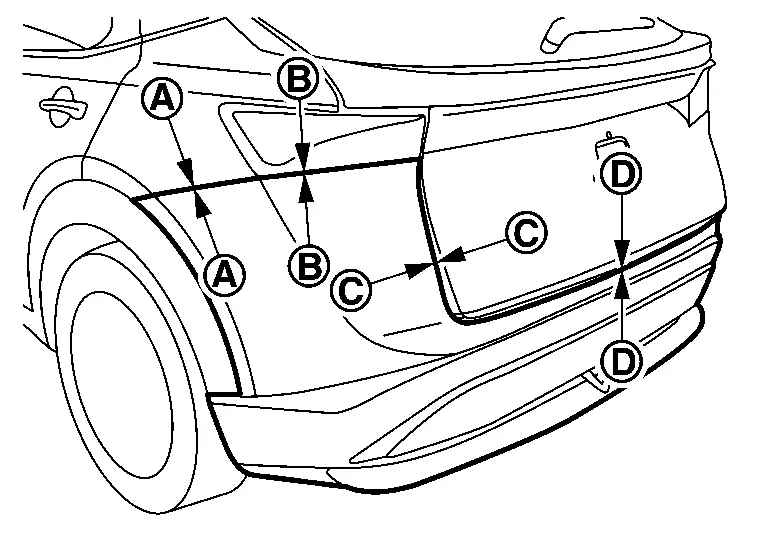
Rear bumper fascia Rear bumper fascia lower Side radar irradiation area Reference point C 310 mm (apex of character line) D 225 mm (horizontal line) E 100 mm (vertical line) F 20 mm (vertical line, reference dimensions) G 130 mm (horizontal line, reference dimensions) H 115 mm (apex of character line, reference dimensions) -
The dimensions are along the bumper fascia surface between each reference point.
-
Since it may affect side radar performance, for repair and mending of rear bumper refer to repair and mending of side radar irradiation area.
REPAIR AND MENDING OF IRRADIATION AREA OF SIDE RADAR
CAUTION:
For repair and mending of irradiation area of side radar, be careful the following.
-
Do not leave cracks, scratches and deformations in the side radar irradiation area.
-
Since it affects side radar performance, there are following restrictions on the various construction on rear bumper of the Nissan Ariya vehicle equipped with side radar.
Construction item of side radar irradiation area Can be constructed and cannot be constructed Supplement 1 Installation of stickers, accessories, aluminum tape and wrapping film, etc. Cannot be constructed Prohibited including transparent ones 2 Coating and wax, etc. Can be constructed Construct according to the contents of construction manual 3 Repairing of cuts, holes, cracks, scratches and deformations Cannot be constructed - 4 Paint repair Putty applying Cannot be constructed - Color base painting *1 Can be constructed (with conditions) -
When remove existing paint film within the irradiation area, color base can be constructed only once (No recoating, No painting other than the body exterior paint colors which are adopted for this model.) *1:Color base includes primer for plastic and primer surfacer
-
When color base painting in the side radar irradiation area even if bumper fascia is not removed and installed, conduct side radar adjustment after the painting
Clear painting Can be constructed (with conditions) -
When the clear paint film is uniformly block coated within the irradiation area, it is possible to construct only once (No clear paint fading-out or recoating within irradiation area)
-
When clear painting in the side radar irradiation area even if bumper fascia is not removed and installed, conduct side radar adjustment after the painting
5 Dust on the paint surface removal by polishing, polishing, buffing and base treatment before coating Can be constructed - -
For details of each construction item, refer to followings.
-
Installation of sticker, accessories, aluminum tape and wrapping film, etc.
Do not install sticker, accessories, aluminum tape and wrapping tape, etc. to side radar irradiation area. (Including transparent one)
-
Coating and wax, etc.
-
It is possible to apply coating and wax to side radar irradiation area.
-
It is also possible to polish before construction.
-
-
Repair of cuts, holes, cracks, scratches and deformations
It is not possible to repair fissures, holes, cracks, scratches and deformations within side radar irradiation area. Therefore be sure to replace it with a new rear bumper fascia. Refer to Removal & Installation.
Cannot be constructed
Side radar Irradiation area Existing paint film Bumper fascia plastic -
Paint repair
Putty application: Construction is impossible
-
It is impossible to apply putty within side radar irradiation area. (Both partial application and full application are prohibited)
Color base painting: Construction is possible (with conditions)
-
When removing existing paint firm within irradiation area or when it is new unpainted bumper.
-
When removing existing paint film, use finer sandpaper than #800.
-
When there is unevenness due to scratches on the surface after removing existing paint film, replace it with a new bumper.
-
Color base painting (Includes primer for plastic parts and primer surfacer) within side radar irradiation area is possible only once. (Definition of once is until the color base painting is dyed, not number of sprays)
-
Only the body exterior paint color, which are adopted for this model, painting can be constructed. (Do not paint more thickness than necessary)
-
Only the approved paint suppliers, products and color formulator can be constructed. For additional information, please contact each paint supplier which body shop uses.
-
When applying primer surfacer, use each gray shade undercoat color, which paint supplier recommends, for improving the hiding of color base and reducing color base thickness.
-
When spray mist may stick on the reverse side of the bumper fascia, conduct masking on the reverse side of the bumper fascia.
-
Step 1:Before repair
Can be constructed
Side radar Irradiation area Existing paint film Bumper fascia plastic -
Step 2: After removing existing paint film
Can be constructed
Side radar Irradiation area Existing paint film Bumper fascia plastic -
Step 3:After constructing color base painting and clear painting
Can be constructed
Side radar Irradiation area Existing paint film Bumper fascia plastic Clear paint film Color base paint film
Color base painting: The conditions that construction is impossible
-
When painting on existing paint film. (Both block painting and fade-out painting are prohibited)
Cannot be constructed
Side radar Irradiation area Clear paint film Color base paint film Existing paint film *1 Bumper fascia plastic *1:It cannot be constructed when existing paint film is remains.
-
When recoat color base painting (No recoating)
Cannot be constructed
Side radar Irradiation area Clear paint film Color base paint film Bumper fascia plastic
Clear painting: Can be constructed (With conditions).
-
It is possible to apply clear paint only once on the existing paint film (including the paint film of the color bumper replaced with a new one) for the side radar irradiation area. *Definition of once:It is once until the clear coating is formed. (It is not number of sprays)
-
The conditions that clear coating is possible are as follows.
-
When color base painting area (primer for plastic parts, putty, primer surfacer, pearl base, color clear base and under clear, etc.) does not cover the irradiation area and clear paint is uniformly block painting.
Can be constructed
Side radar Irradiation area Clear paint film Color base paint film Existing paint film Bumper fascia plastic -
When clear paint is uniformly block painting in the irradiation area. (Painting whole the parts)
Can be constructed

Side radar Irradiation area Clear paint film Existing paint film Bumper fascia plastic
Clear painting: The conditions that construction is impossible.
-
When clear paint is not uniformly block painting in the irradiation area. (Clear paint fade-out is prohibited)
Cannot be constructed

Side radar Irradiation area Clear paint film Color base paint film Existing paint film Bumper fascia plastic -
When re-paint the clear paint in the irradiation area.
Cannot be constructed
Side radar Irradiation area Clear paint film Existing paint film Bumper fascia plastic
-
-
Polishing on paint surface
Polishing is possible. (For dust on the paint surface removal, gloss improvement, base treatment before coating and so on.)
Front Grille Nissan Ariya 1st generation
Exploded View
|
Front grille upper | |
Front grille | |
Front emblem bracket |
|
Front emblem | |
Front camera (if equipped) | ||
|
: Pawl | ||||
Removal & Installation
REMOVAL
Fully open hood assembly.
Remove front grille upper mounting bolts and fixing clips .
Remove front grille upper fixing screws on the back of front grille, and then remove front grille upper.
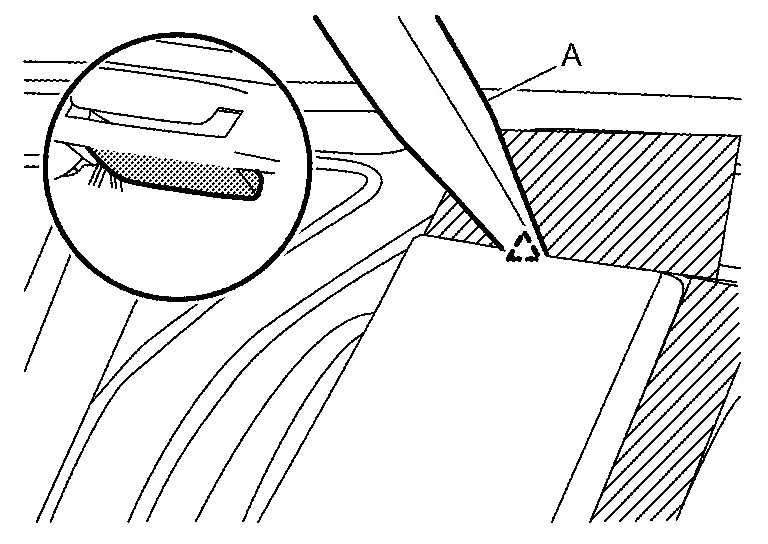
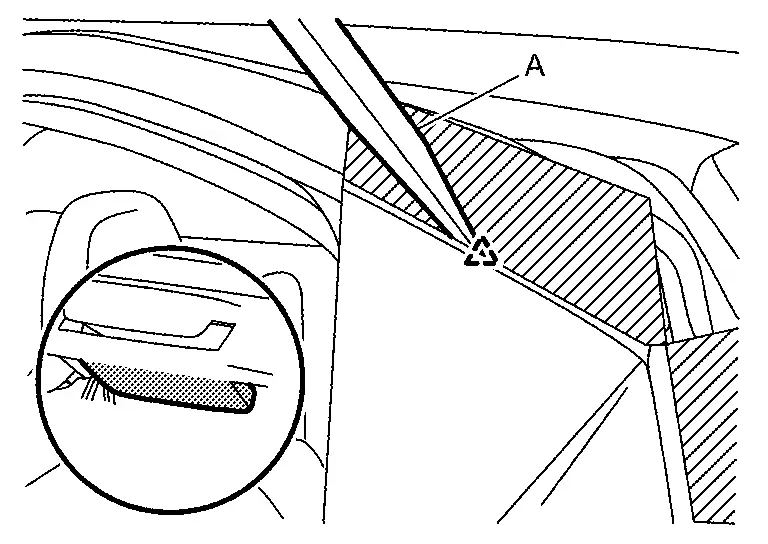
Apply protective tapes (A) on the part to protect it from damage.
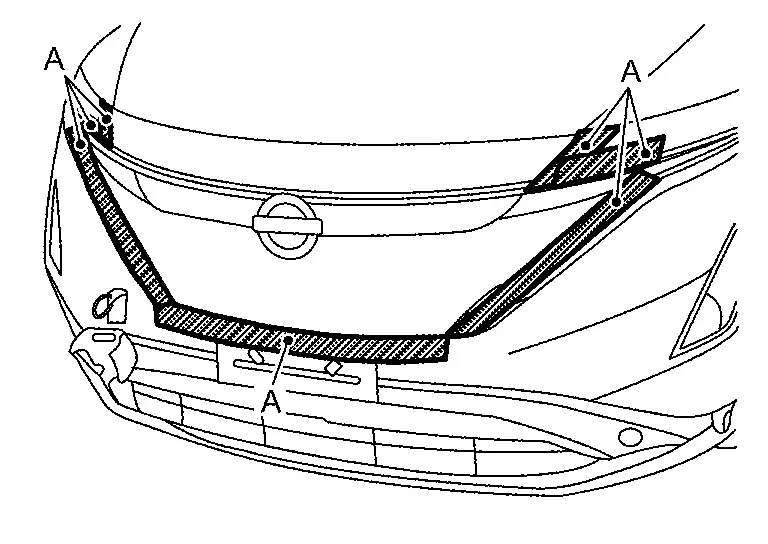
Disengage front grille fixing pawls from back side while pulling front grille toward Nissan Ariya vehicle front.
|
: Pawl |
Disconnect front camera and distance sensor harness connector. (if equipped)
Remove front grille.
Remove the following parts after removing front grille.
-
Front camera (if equipped). Refer to Removal and Installation.
-
Distance sensor. Refer to Removal and Installation.
-
Front emblem.
-
Front emblem bracket.
INSTALLATION
Note the following item, and then install in the reverse order of removal.
NOTE:
-
Perform front camera image calibration (if equipped). Refer to Work Procedure.
-
Perform distance sensor alignment. Refer to Work Procedure.
Active Grille Shutter Nissan Ariya SUV
Exploded View
|
Front bumper reinforcement | |
Front bumper reinforcement lower | |
Active grille shutter |
Removal & Installation
REMOVAL
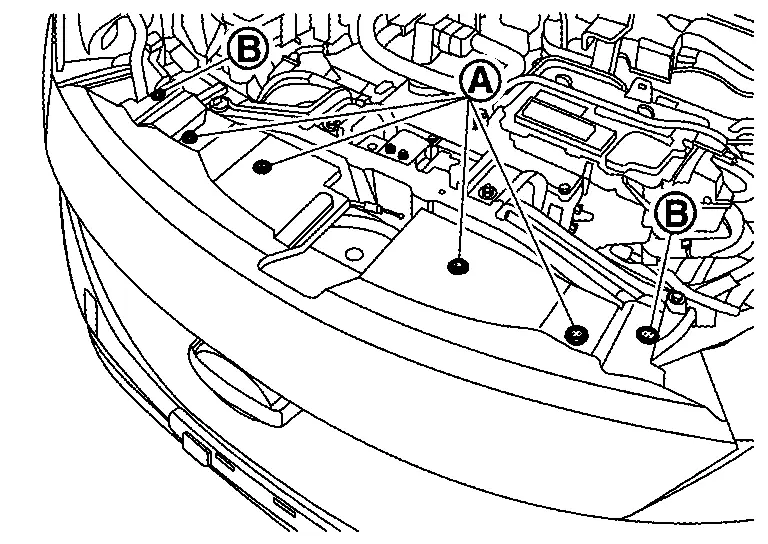
Remove front bumper energy absorber and front bumper energy absorber lower. Refer to Removal & Installation.
Remove ambient sensor. Refer to Removal and Installation.
Disconnect harness connector .
Disconnect active grille shutter harness connector .

Remove active grille shutter fixing clips .
Disconnect harness connector.
Remove harness clips, and then remove active grille shutter.
INSTALLATION
Install in the reverse order of removal.
Cowl Top Nissan Ariya 1st generation
Exploded View
|
Cowl top seal | |
Cowl top cover | |
Cap |
|
Cowl top member | |
Cowl top extension | |
Cowl top stay |
|
EPT seal [t: 5.0 mm (0.197 in)] | ||||
 |
: Clip | ||||
|
: Always replace after every disassembly. | ||||
Removal & Installation
REMOVAL
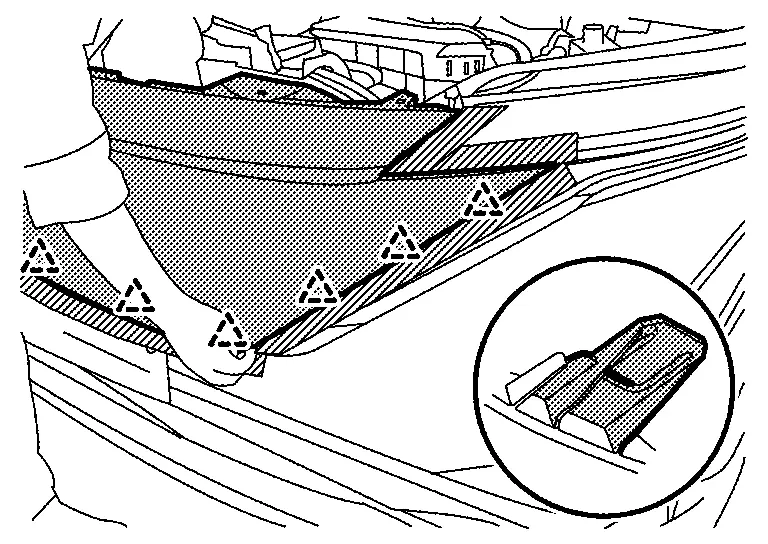
Fully open hood assembly.
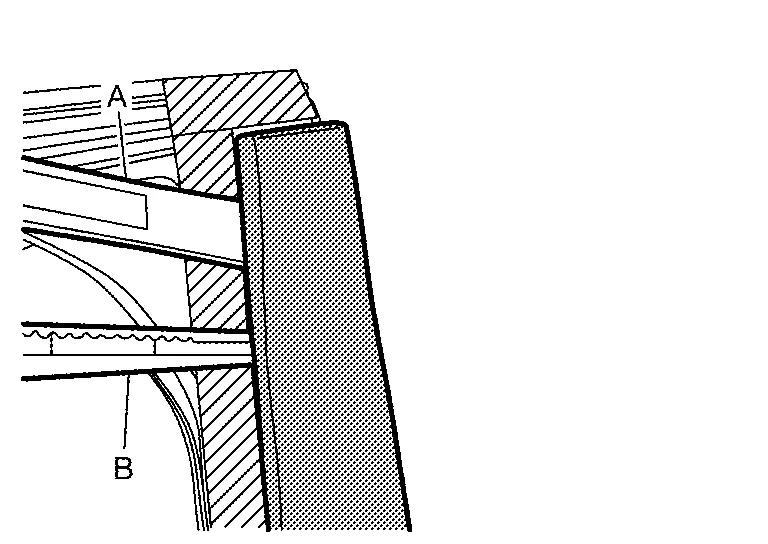
Remove front wiper arm. Refer to Removal & Installation.
Remove fender cover. Refer to Removal & Installation.
Remove cowl top cover fixing clips .
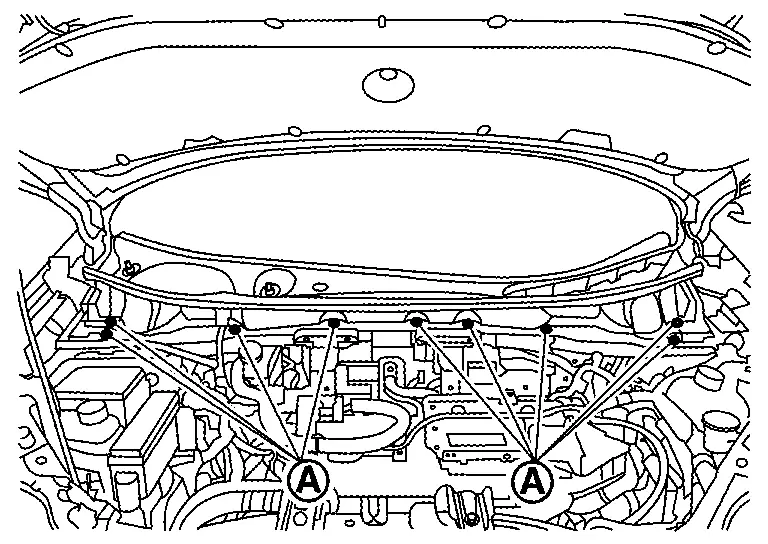
Remove harness clip . (if equipped)
Pull forward to release cowl top cover from windshield glass.
Remove front washer tube B from joint, and then remove cowl top cover.
CAUTION:
When performing the procedure after removing cowl top cover, protect the lower of windshield glass with urethane etc.
Remove the following parts after removing cowl top cover.
-
Front washer tube B. Refer to Removal & Installation.
-
Tube connector. Refer to Removal & Installation.
-
EPT seal
-
Cowl top seal
Remove front wiper drive assembly. Refer to Removal & Installation.
Remove cowl top stay mounting bolts, and then remove cowl top stay.
Remove high voltage power delivery assembly. Refer to HIGH VOLTAGE POWER DELIVERY ASSEMBLY : Removal & Installation.
Remove cowl top member mounting bolts, nuts and harness clip, and then remove cowl top member.
Remove cowl top extension mounting bolts, and then remove cowl top extension.
INSTALLATION
Note the following items, and then install in the reverse order of removal.
CAUTION:
-
Clean the joint between the cowl top cover and the windshield, and then install them.
-
Never reuse cowl top cover. Always replace it with a new one when it is removed.
-
Replace the EPT seal on the back surface with new EPT seal when reusing the cowl top member and cowl top extension.
-
Never wash the Nissan Ariya vehicle within 24 hours after installing so as keep adhesive.
-
After installing, perform adjustment of front wiper arm. Refer to Adjustment.
Fender Finisher Nissan Ariya SUV
Exploded View
|
Fender finisher | ||||
|
: Clip | ||||
Removal & Installation
REMOVAL
Fully open front door.
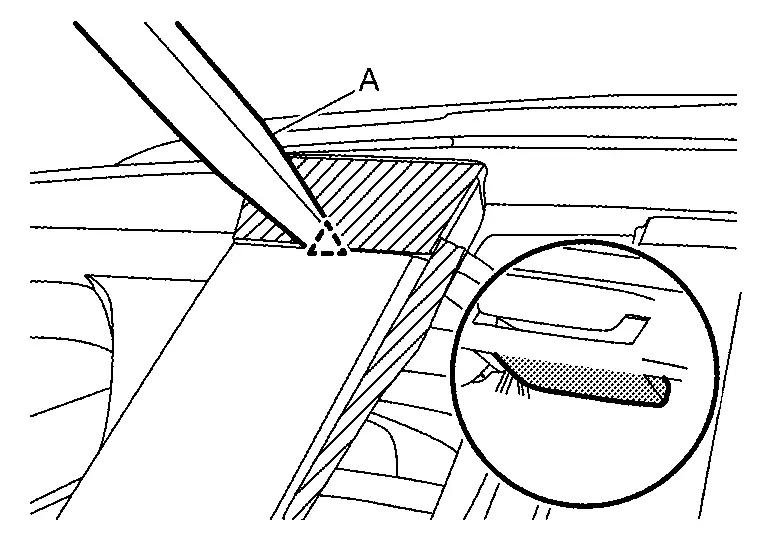
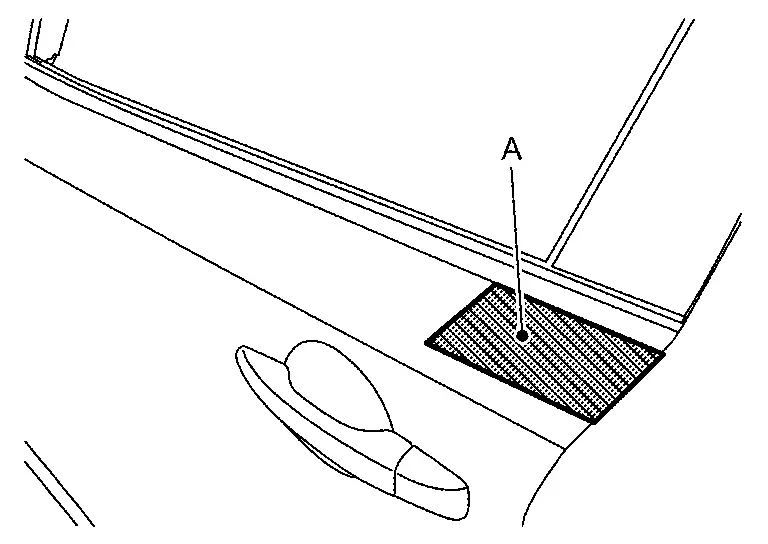
Apply protective tapes (A) on the part to protect it from damage.
Remove fender finisher fixing clips using a remover tool (A), and then remove fender finisher.
|
: Clip |
INSTALLATION
Install in the reverse order of removal.
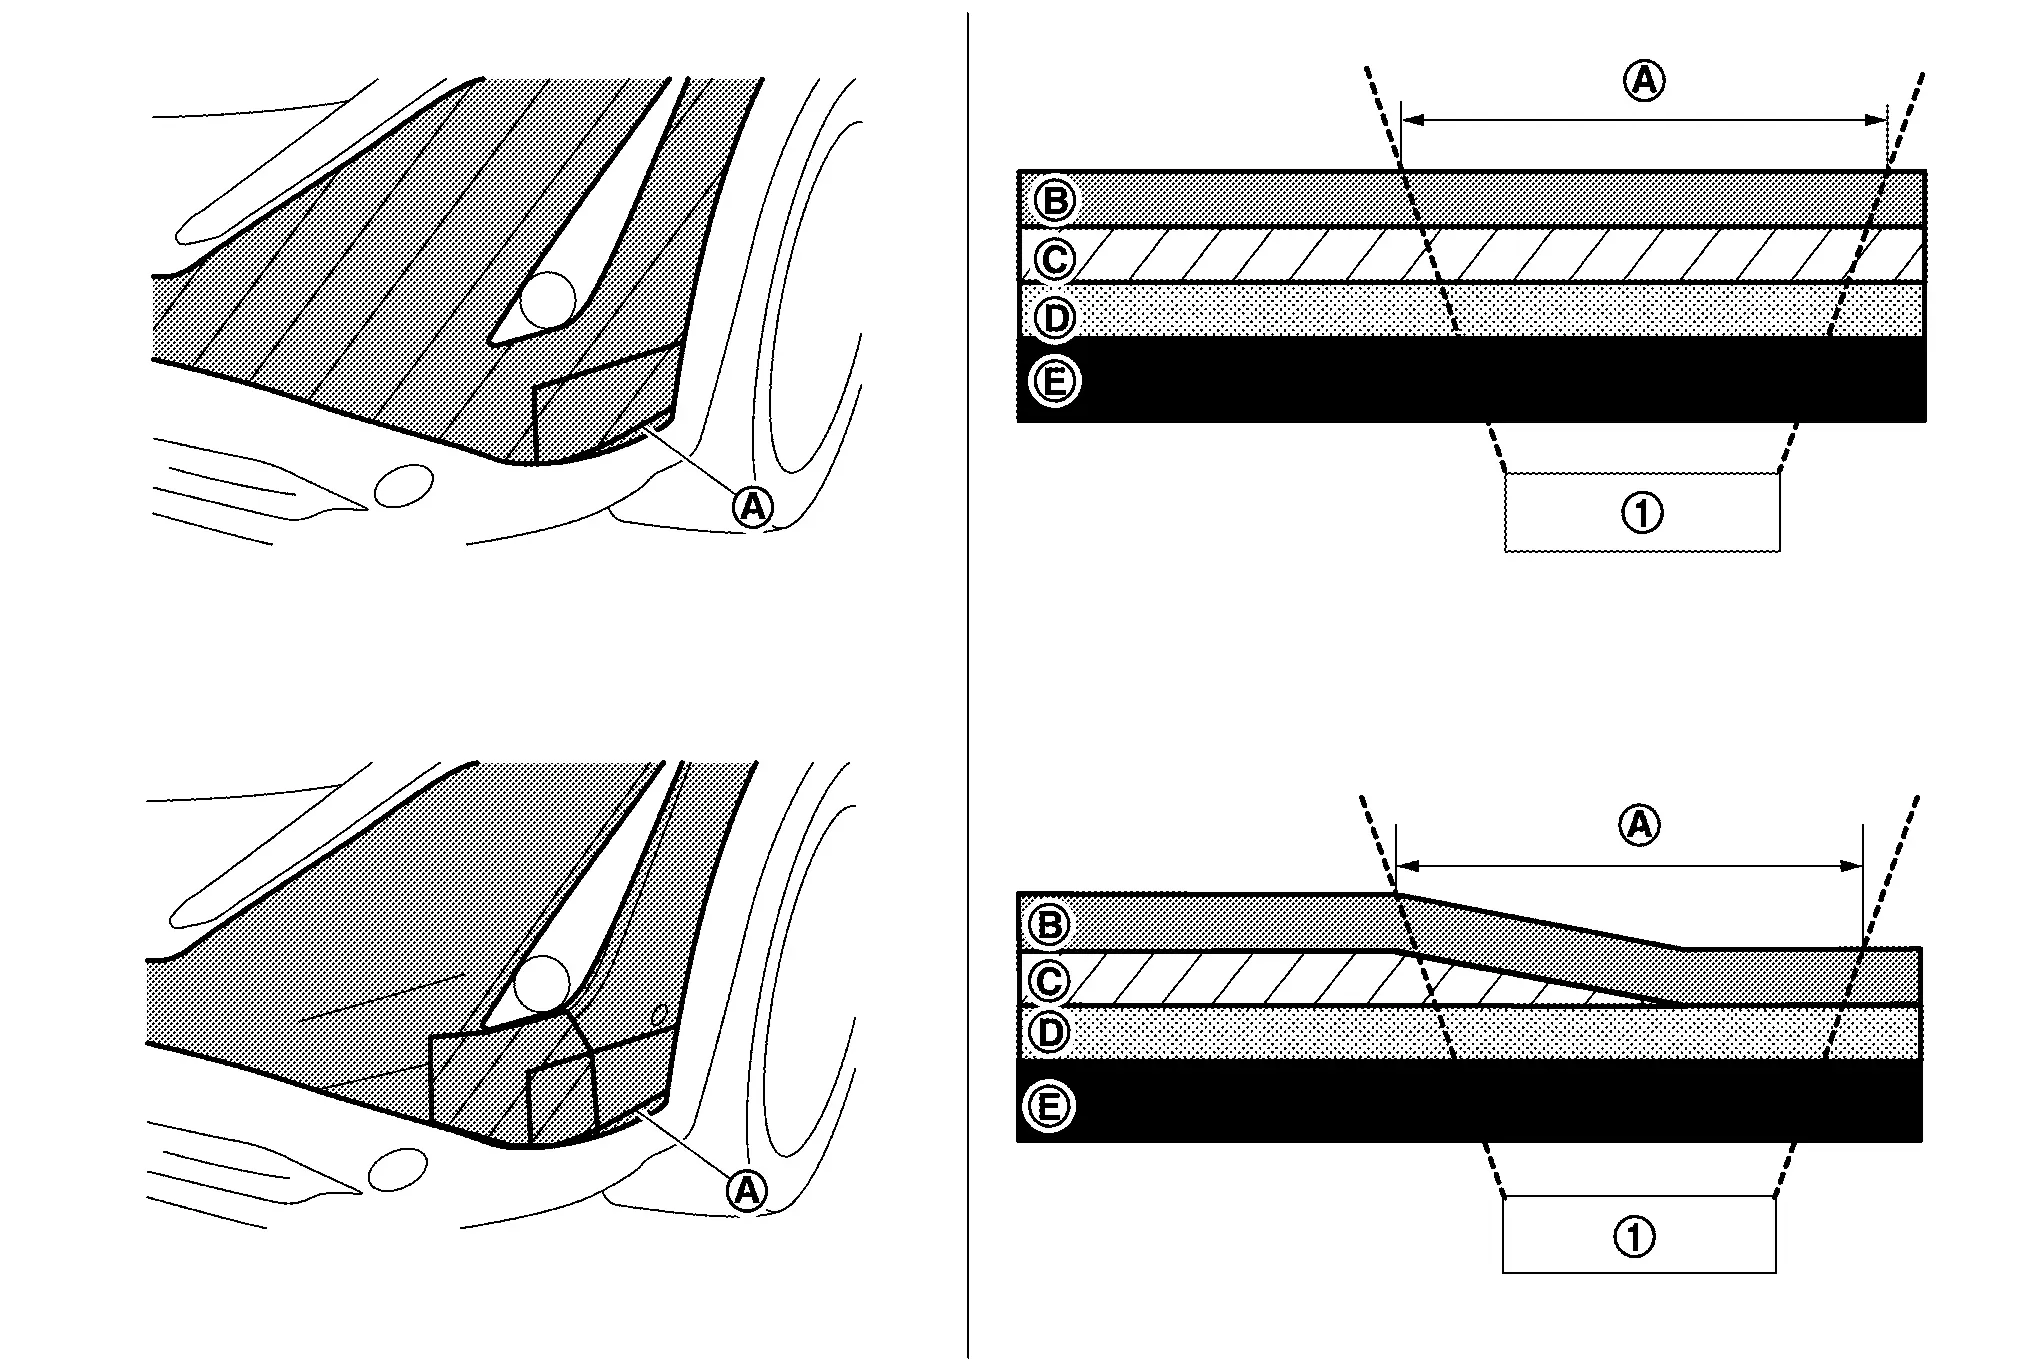
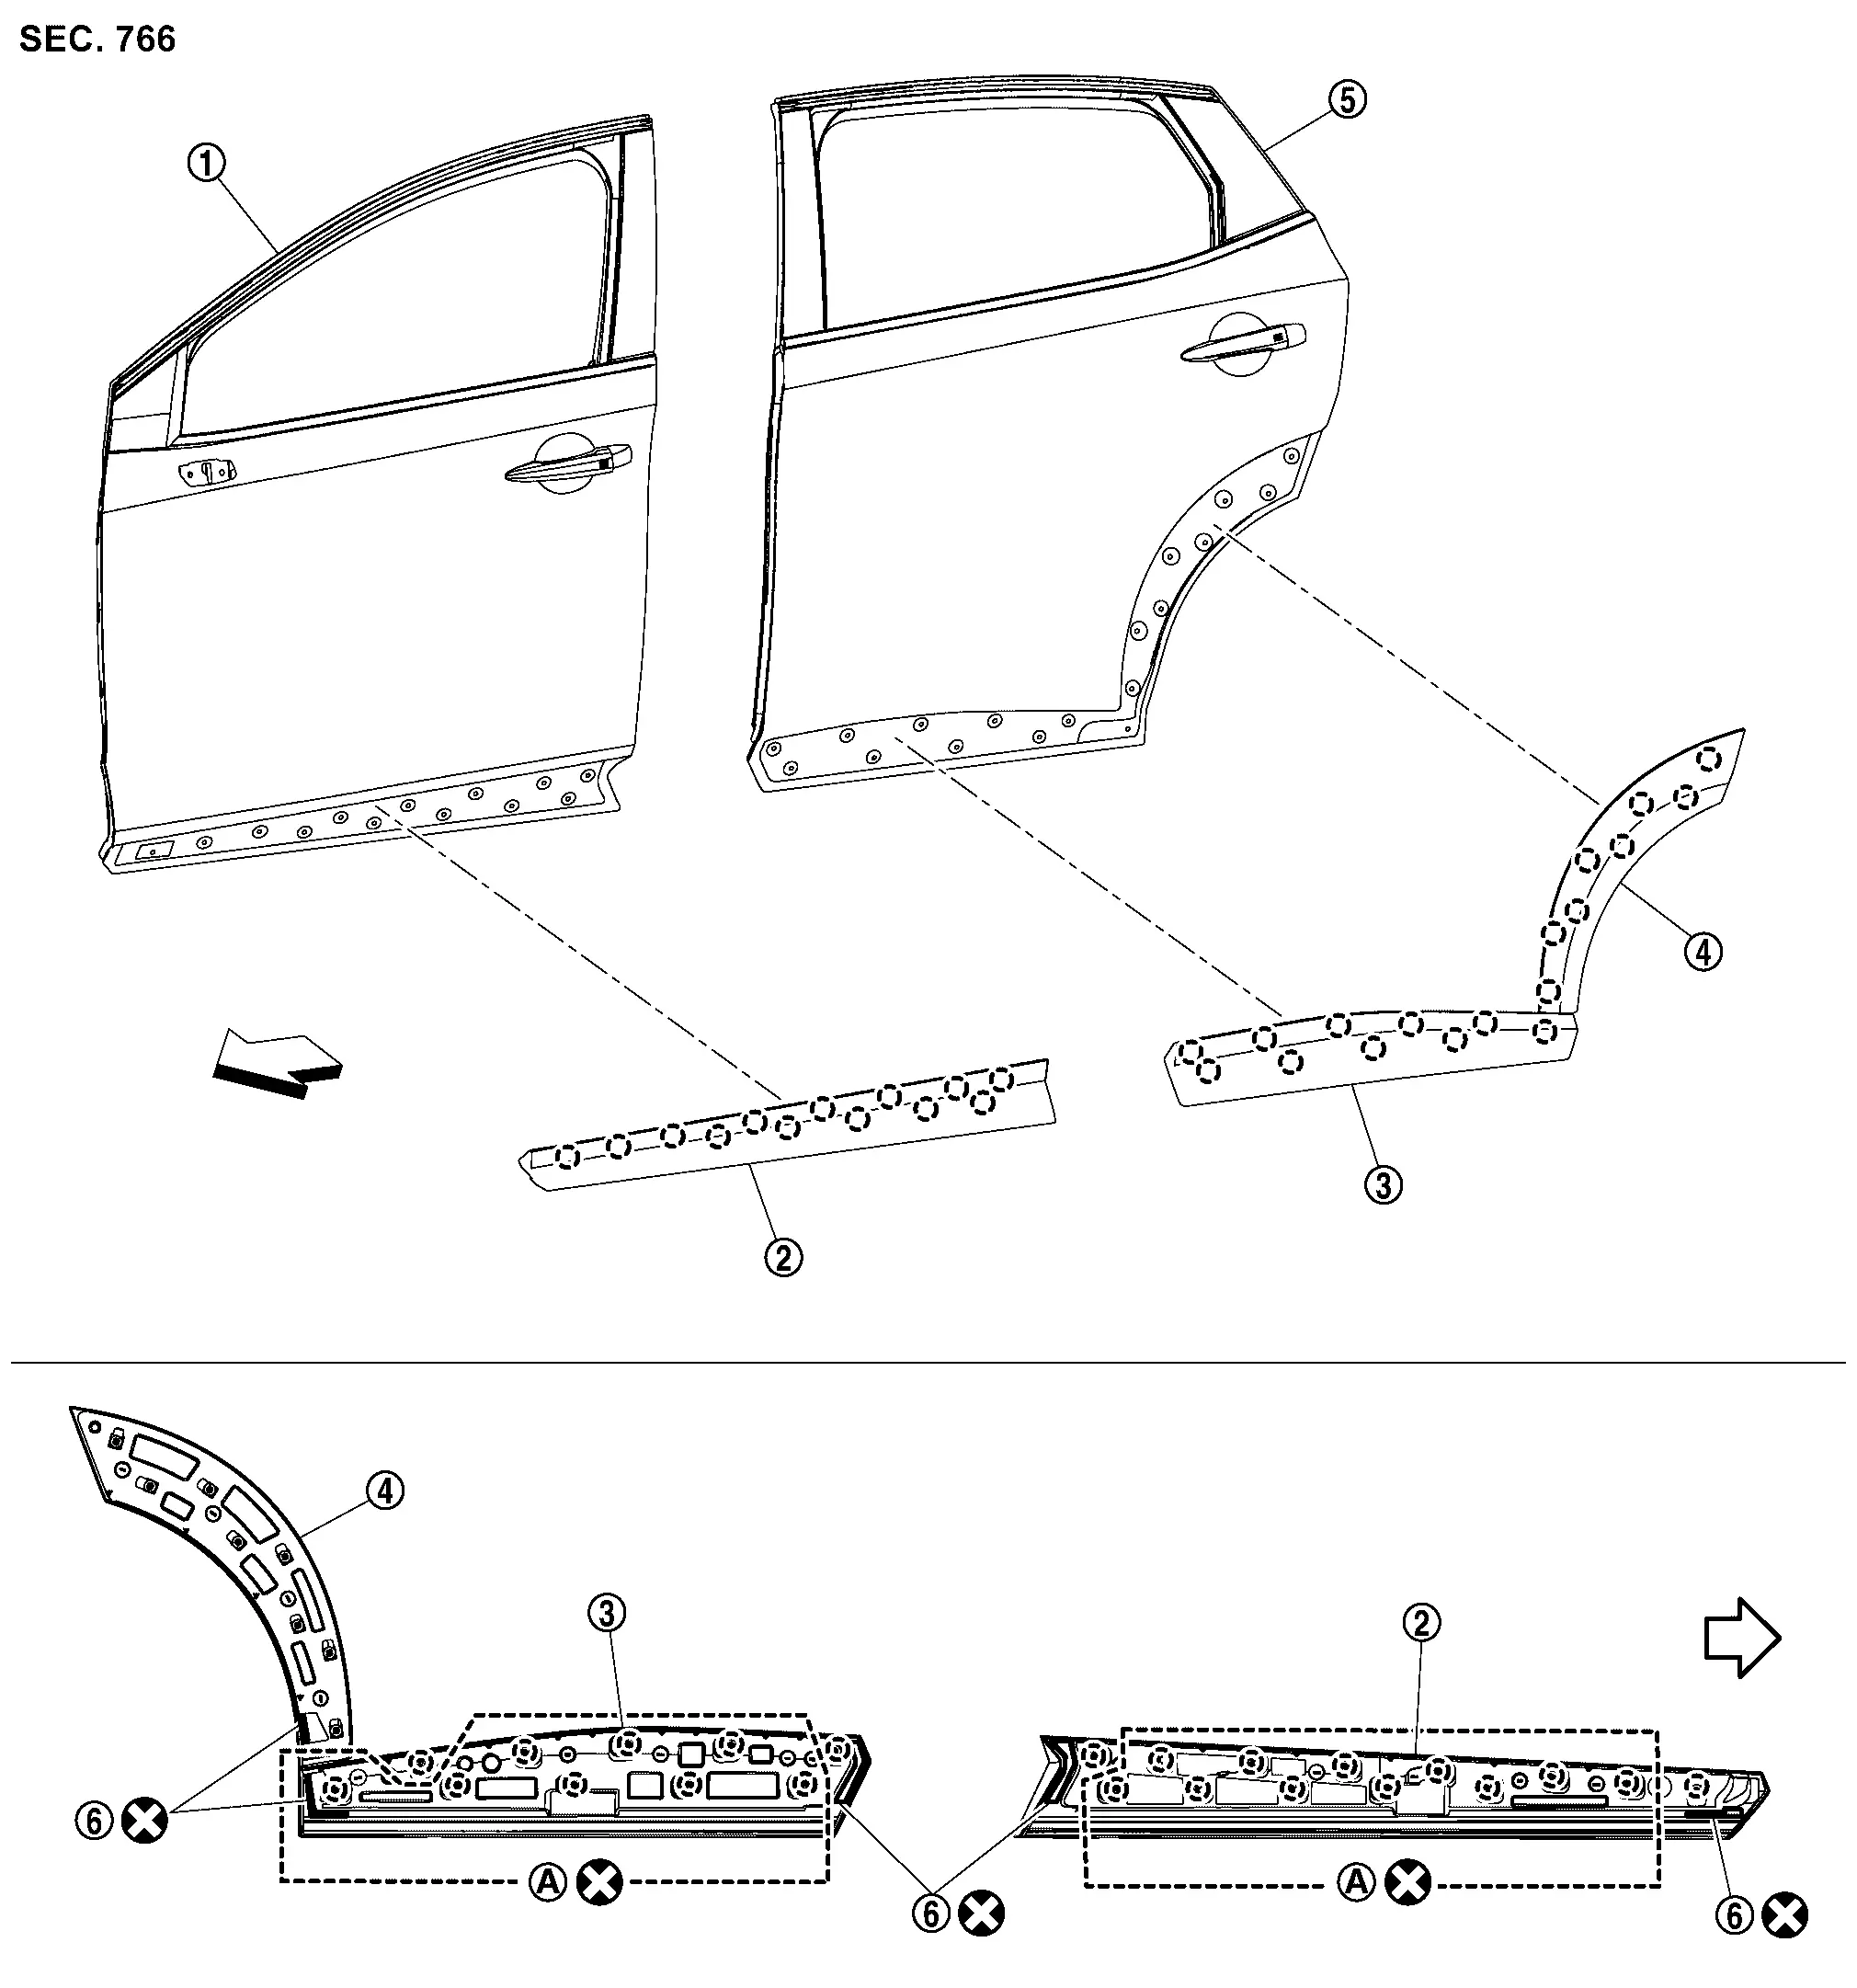
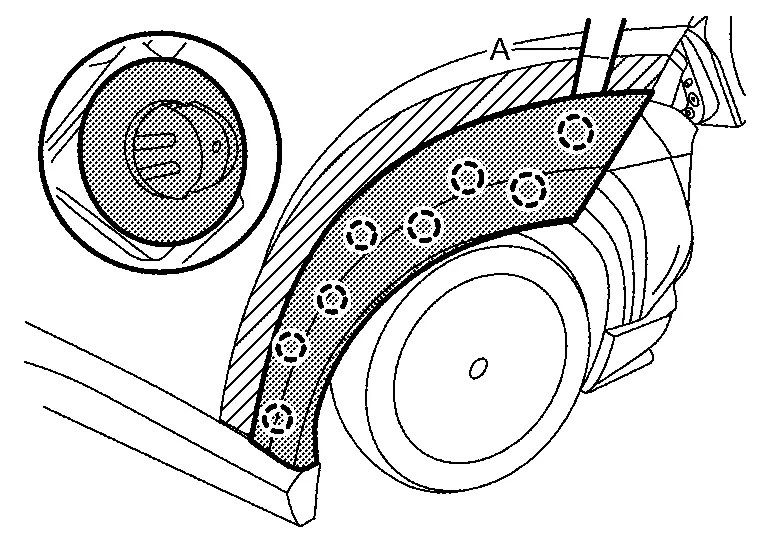
Fillet Molding Nissan Ariya: FE0
Exploded View
|
Grommet | |
Front fillet molding | |
Double-sided tape [t : 1.2 mm (0.047 in)] |
|
Rear fillet molding | ||||
|
: Clip | ||||
|
: Pawl | ||||
 |
: Nissan Ariya Vehicle front | ||||
|
: Always replace after every disassembly. | ||||
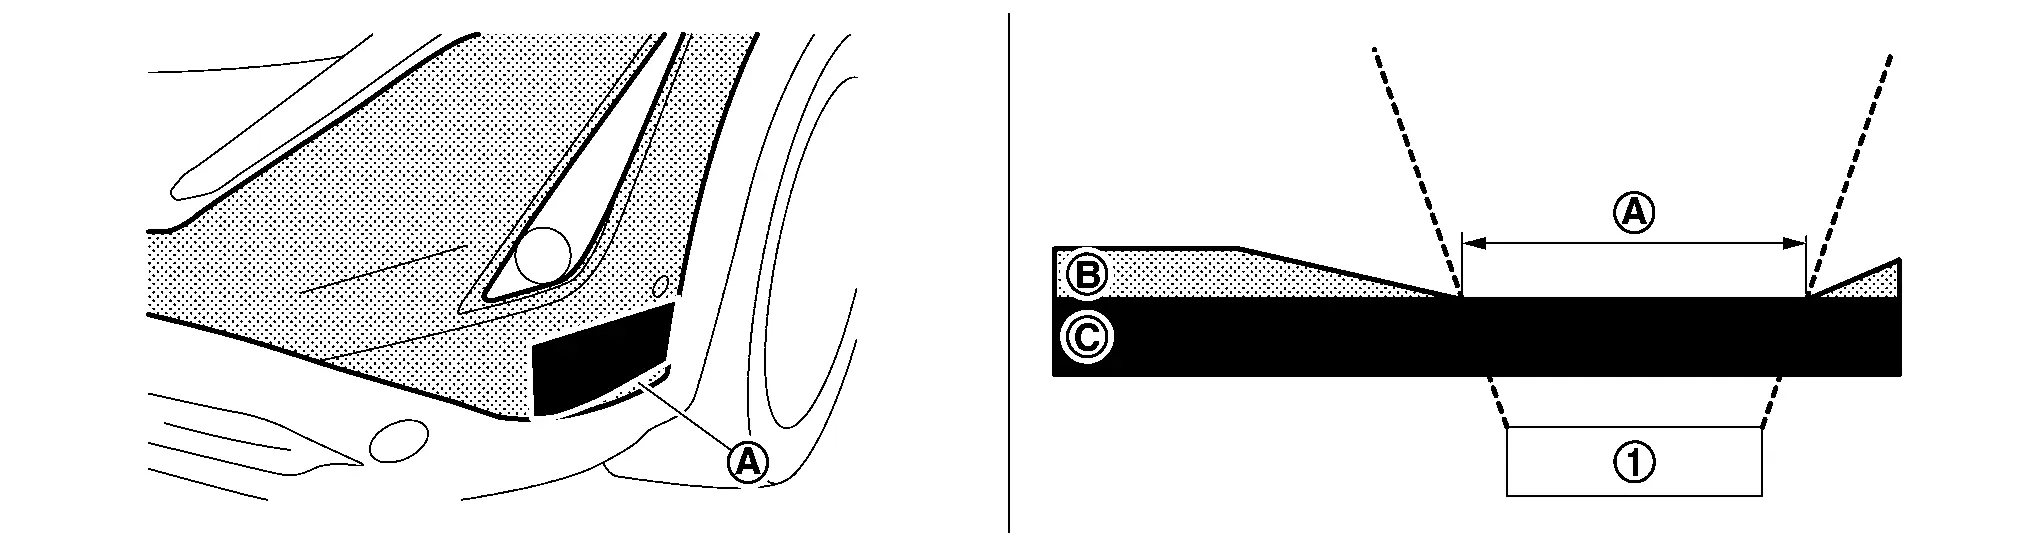
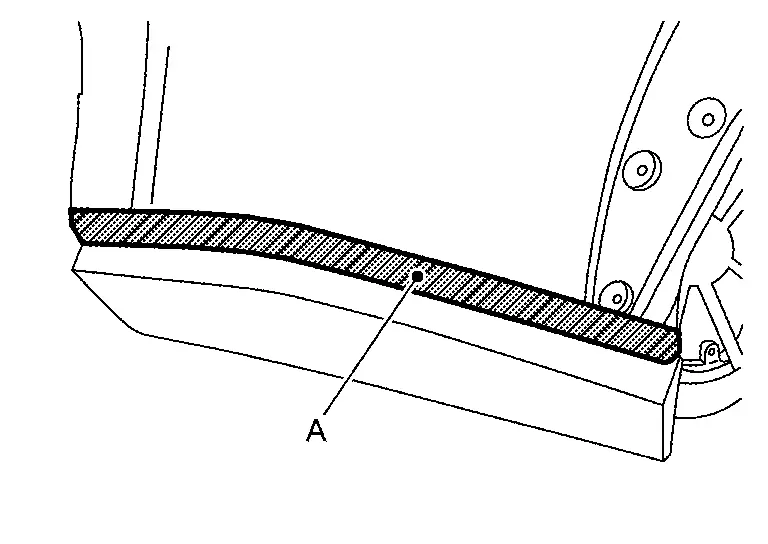
Front Fillet Molding Nissan Ariya 2023
Removal & Installation
REMOVAL
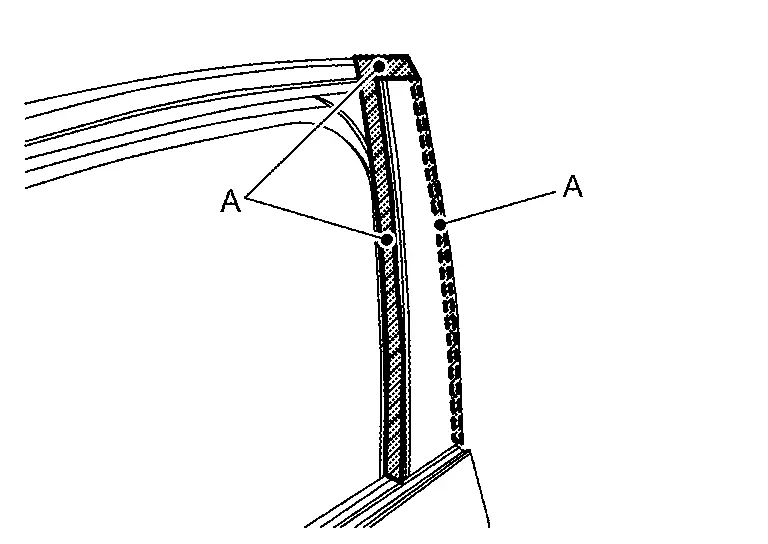
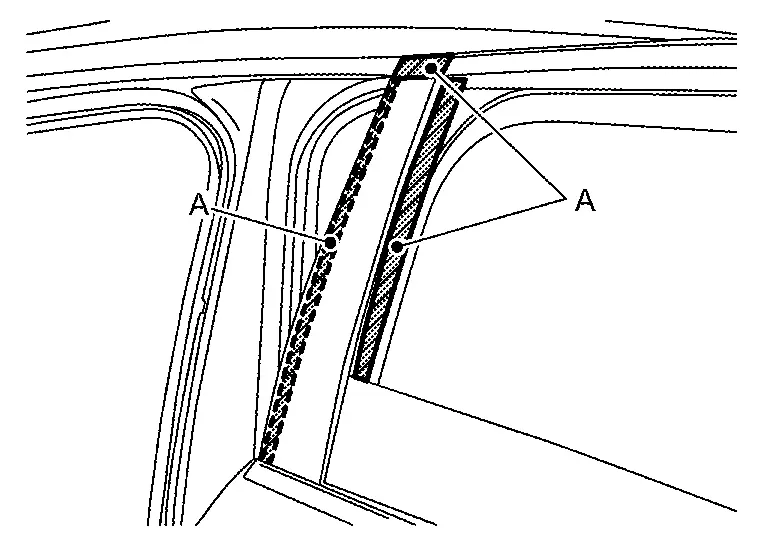
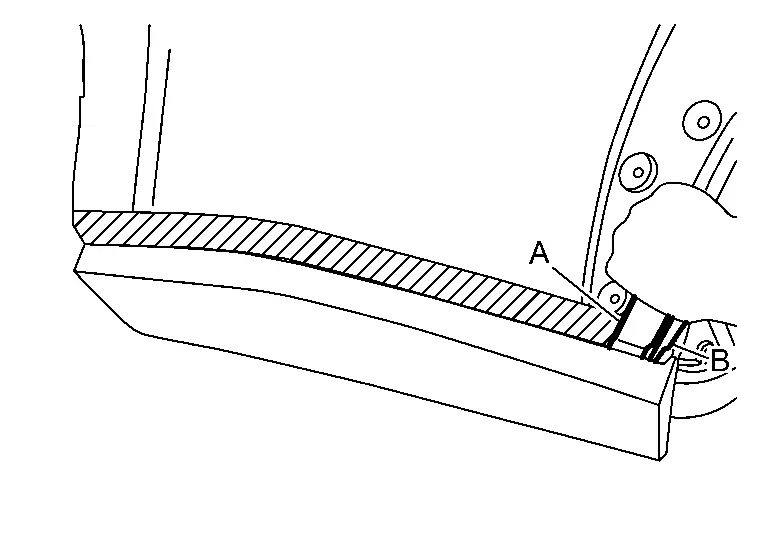
Remove front fillet molding fixing clips .
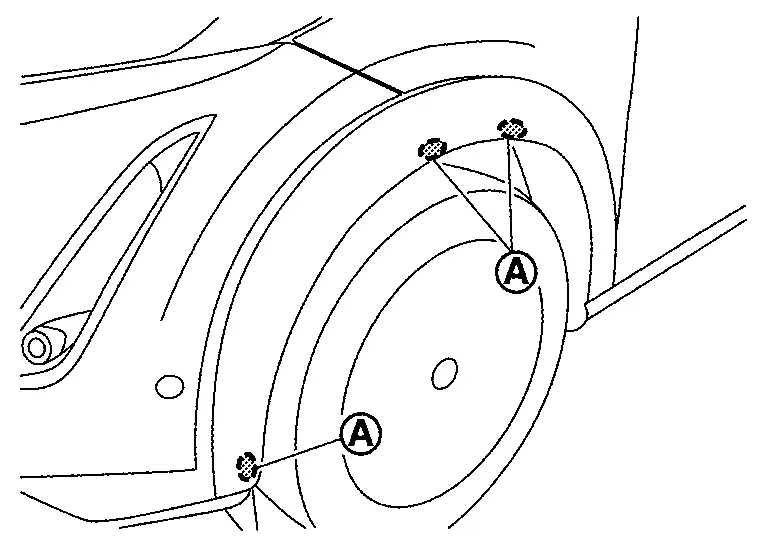
Disengage front fillet molding fixing pawls according to numerical order 1→2 indicated by arrows as shown in the figure.
|
:Pawl |
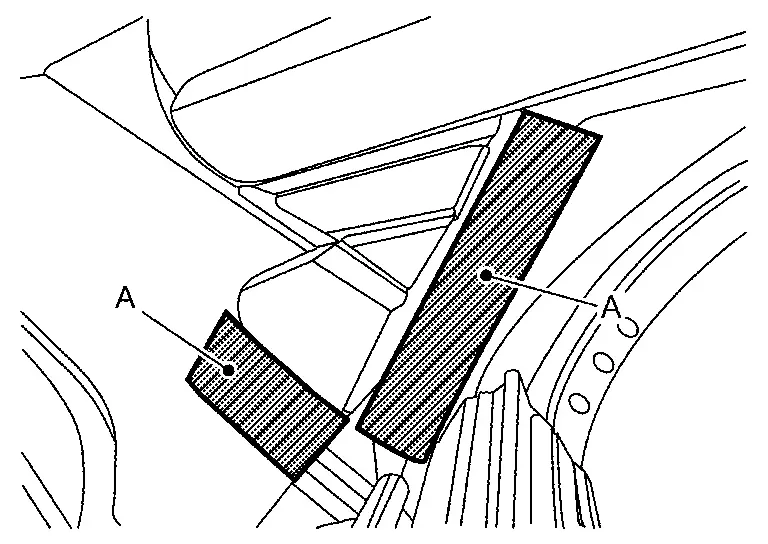
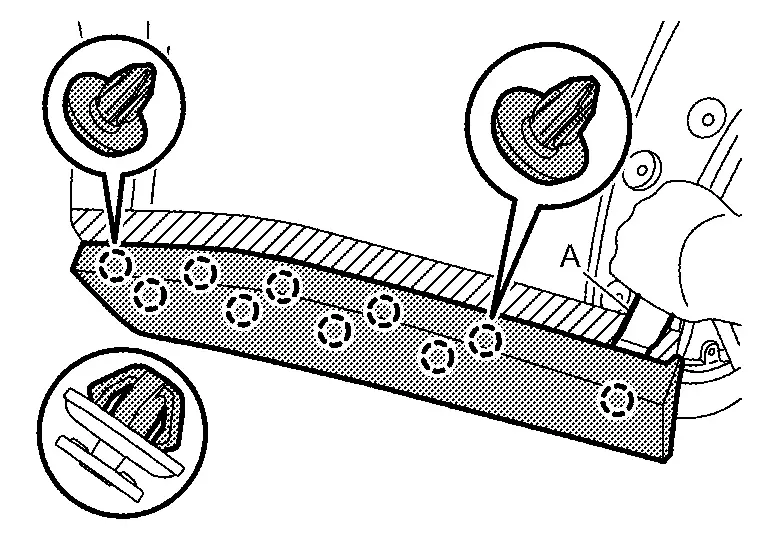
Apply protective tape (A) on the part to protect it from damage.
Remove front fillet molding fixing clips using a remover tool (A), and then remove front fillet molding.
|
: Clip |
Remove grommet after removing front fillet molding.
INSTALLATION
Note the following items, and then install in the reverse order of removal.
CAUTION:
-
When installing front fillet molding, visually check the clips, pawls and grommet, then replace them with new parts if they are damaged.
-
When installing front fillet molding, check that clips and pawls are securely fitted in front fender holes, and then press them in.
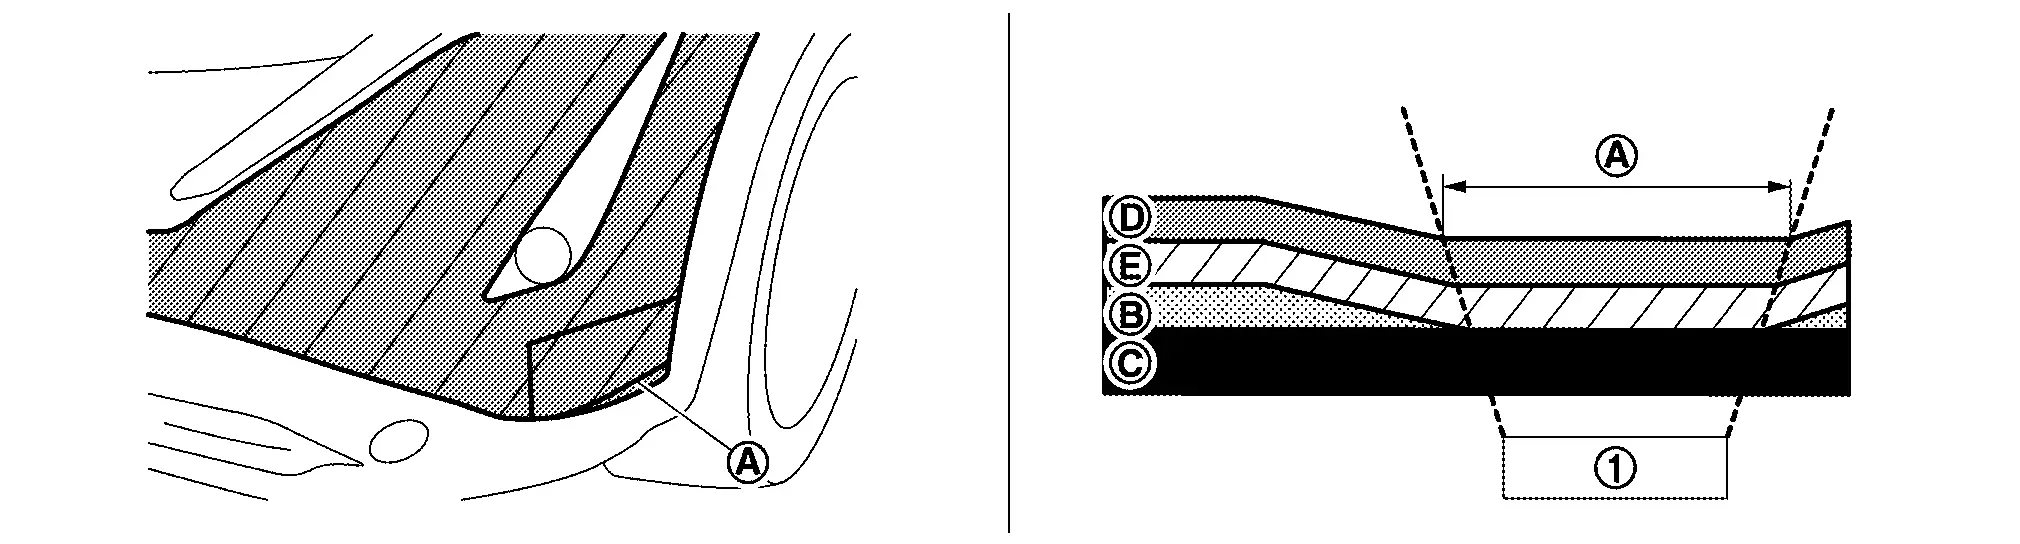
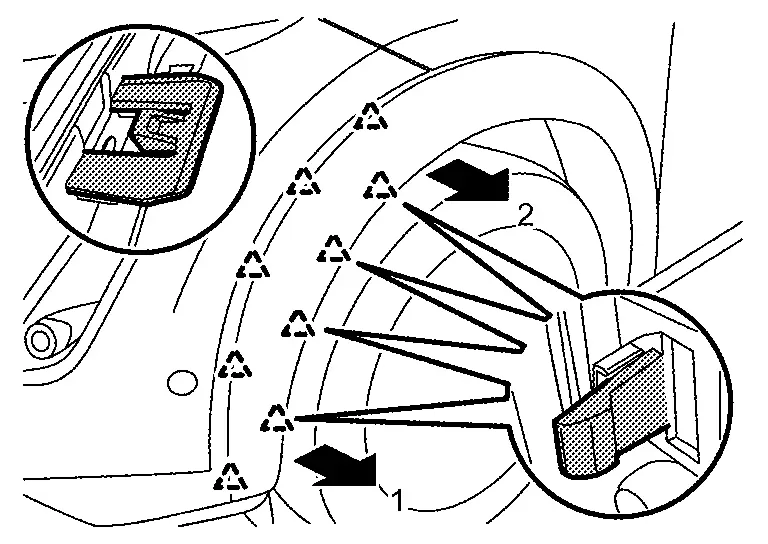
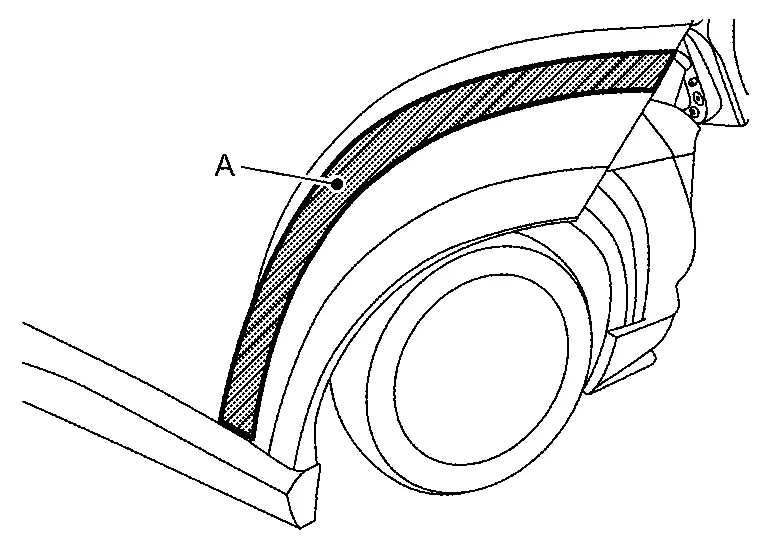
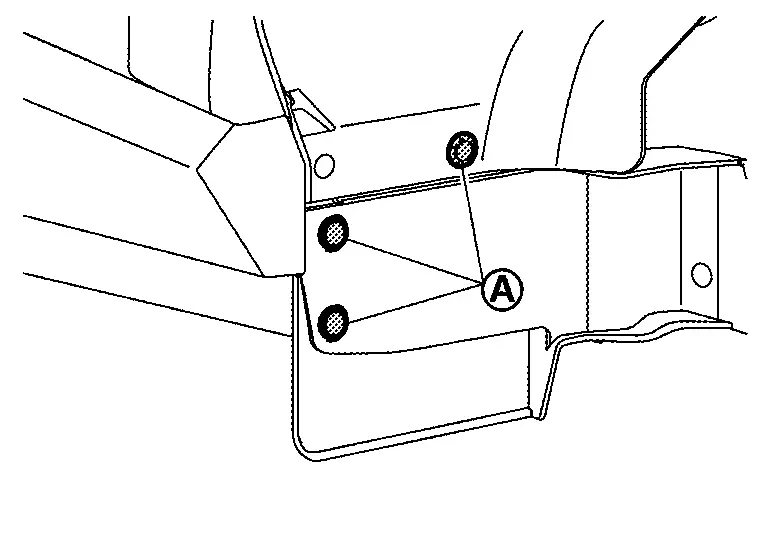
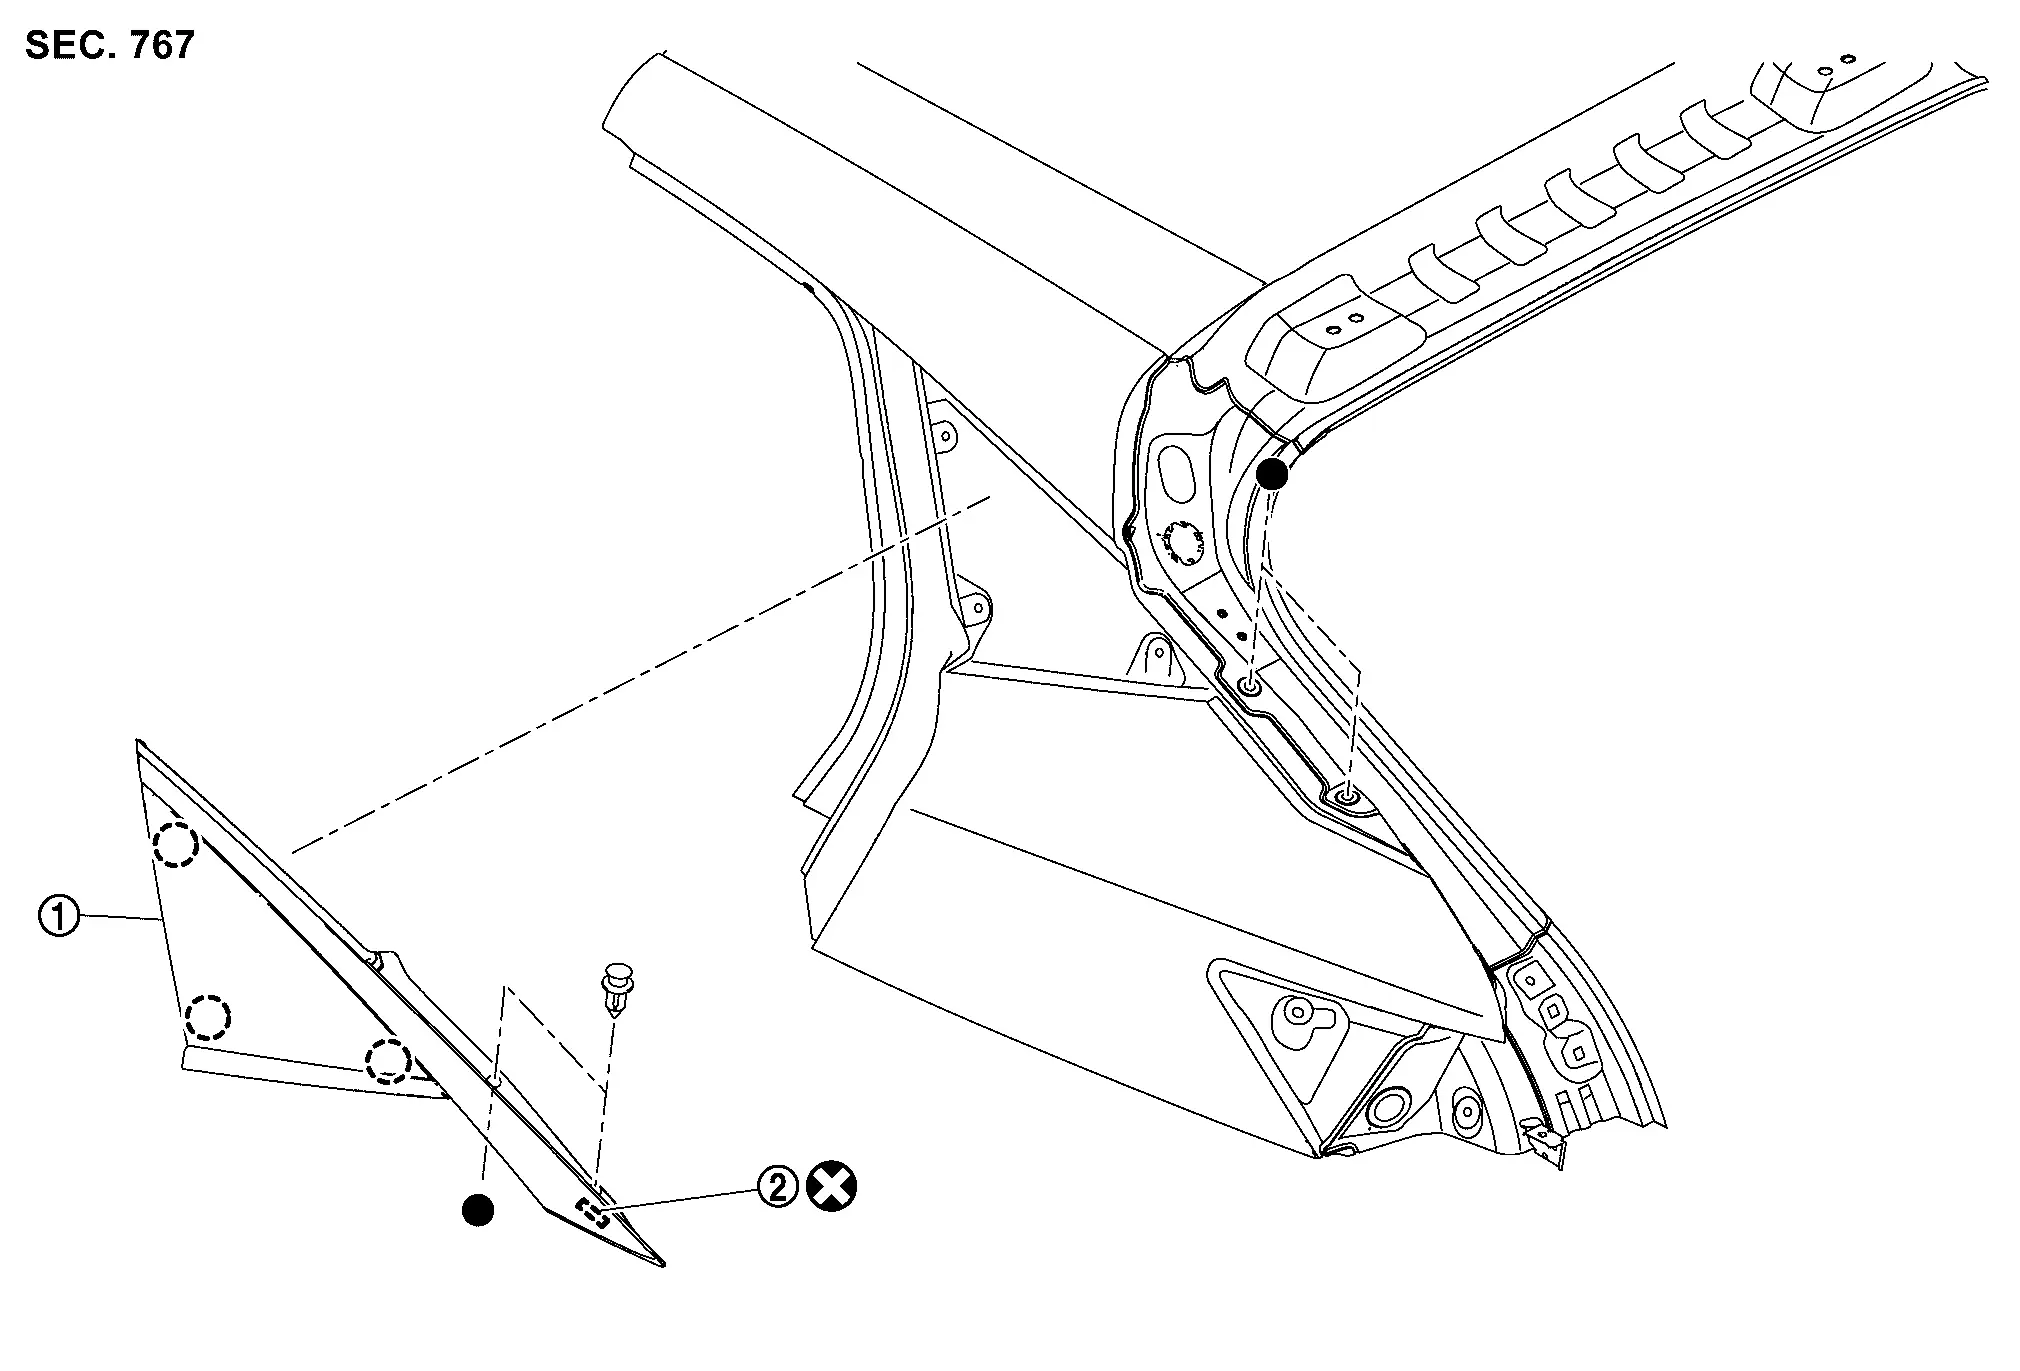
Rear Fillet Molding Nissan Ariya
Removal & Installation
REMOVAL
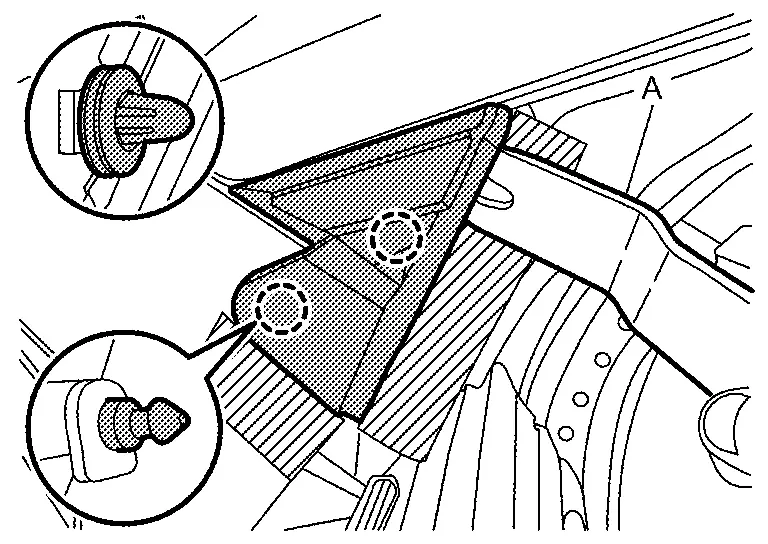
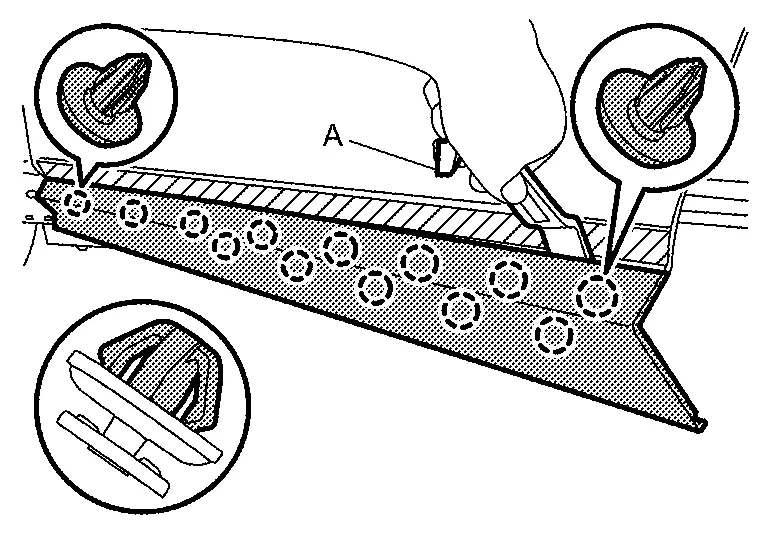
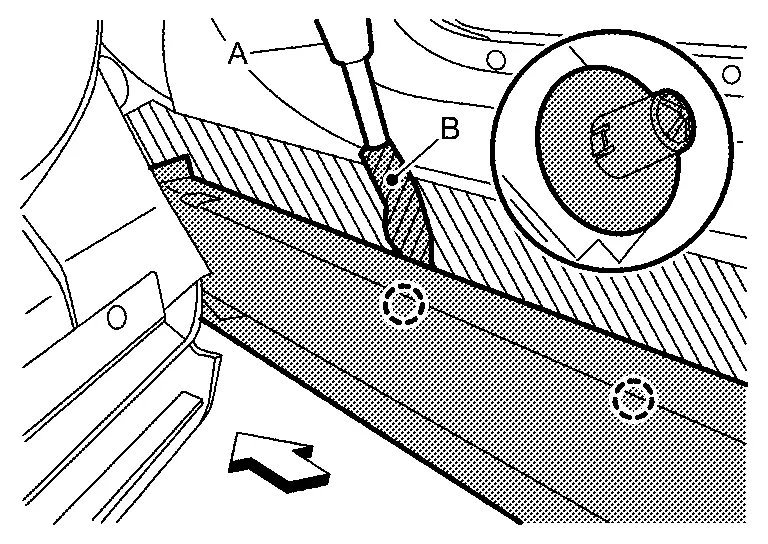
Remove rear fillet molding fixing clips .
Disengage rear fillet molding fixing pawls according to numerical order 1→2 indicated by arrows as shown in the figure.
|
: Pawl |
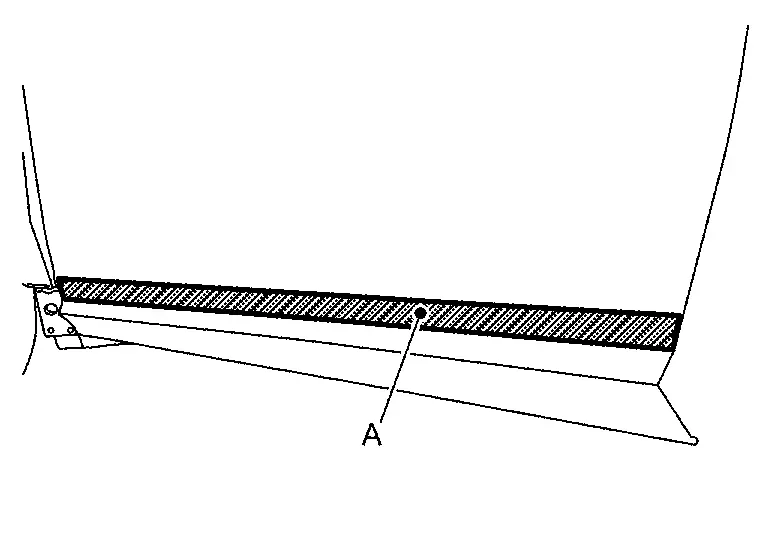
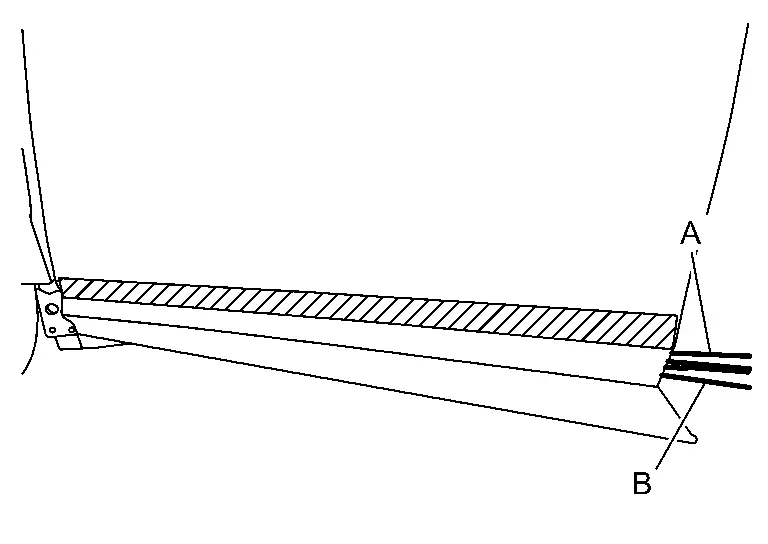
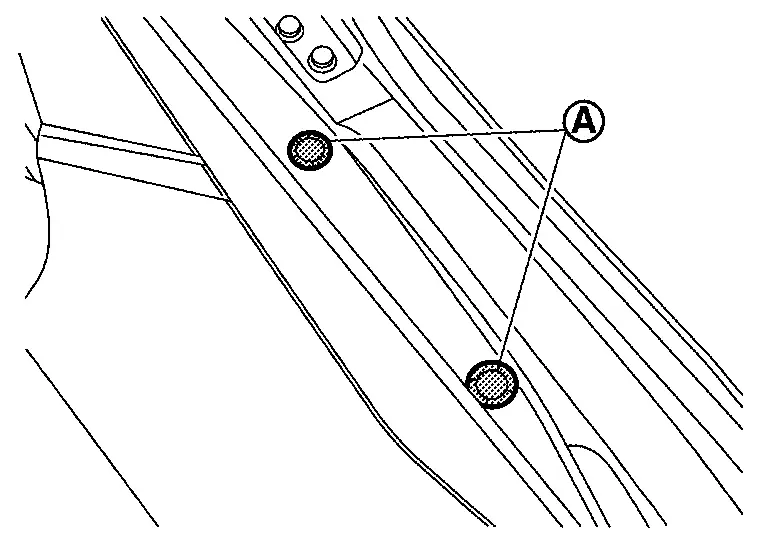
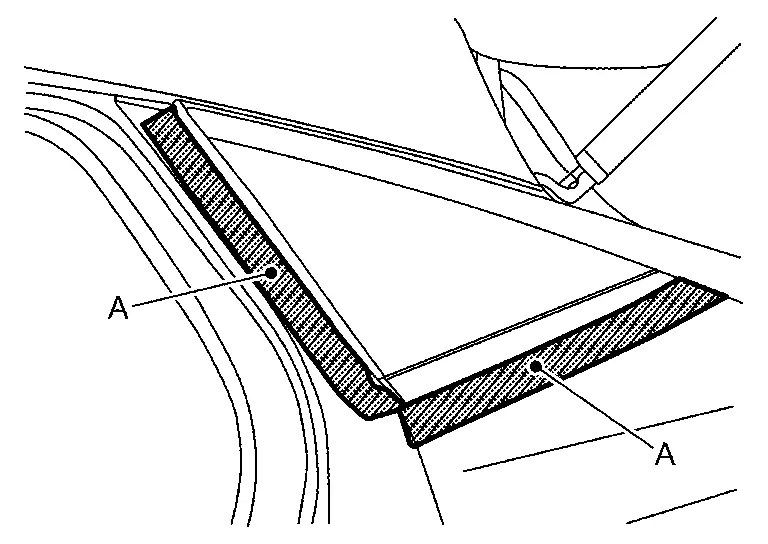
Apply protective tapes (A) on the part to protect it from damage.
Cut double-sided tape using a remover tool (A) and cutter (B).
Remove rear fillet molding fixing clips using a remover tool (A), and then remove rear fillet molding.
|
: Clip |
Remove grommet after removing rear fillet molding.
INSTALLATION
Note the following items, and then install in the reverse order of removal.
CAUTION:
-
When installing rear fillet molding, visually check the clips, pawls and grommet, then replace them with new parts if they are damaged.
-
When installing rear fillet molding, check that clips and pawls are securely fitted in holes, and then press it in.
-
Always replace double-sided tape with a new one, if rear fillet molding is reused.
-
Remove double-sided tape remaining on body side outer panel and back of rear fillet molding with a double-sided tape remover, after removing rear fillet molding.
-
Degrease body side outer panel mounting surface for rear fillet molding.
-
Paint grain or dust on mounting surface of rear fillet molding may spoil exterior appearance if it remains. Clean the mounting surface and check that no paint grain or dust remains, before starting the operation.
-
Never wash the Nissan Ariya vehicle within 24 hours after installing so as to keep adhesive.
Fender Protector Nissan Ariya SUV
Exploded View
AIR GUIDE
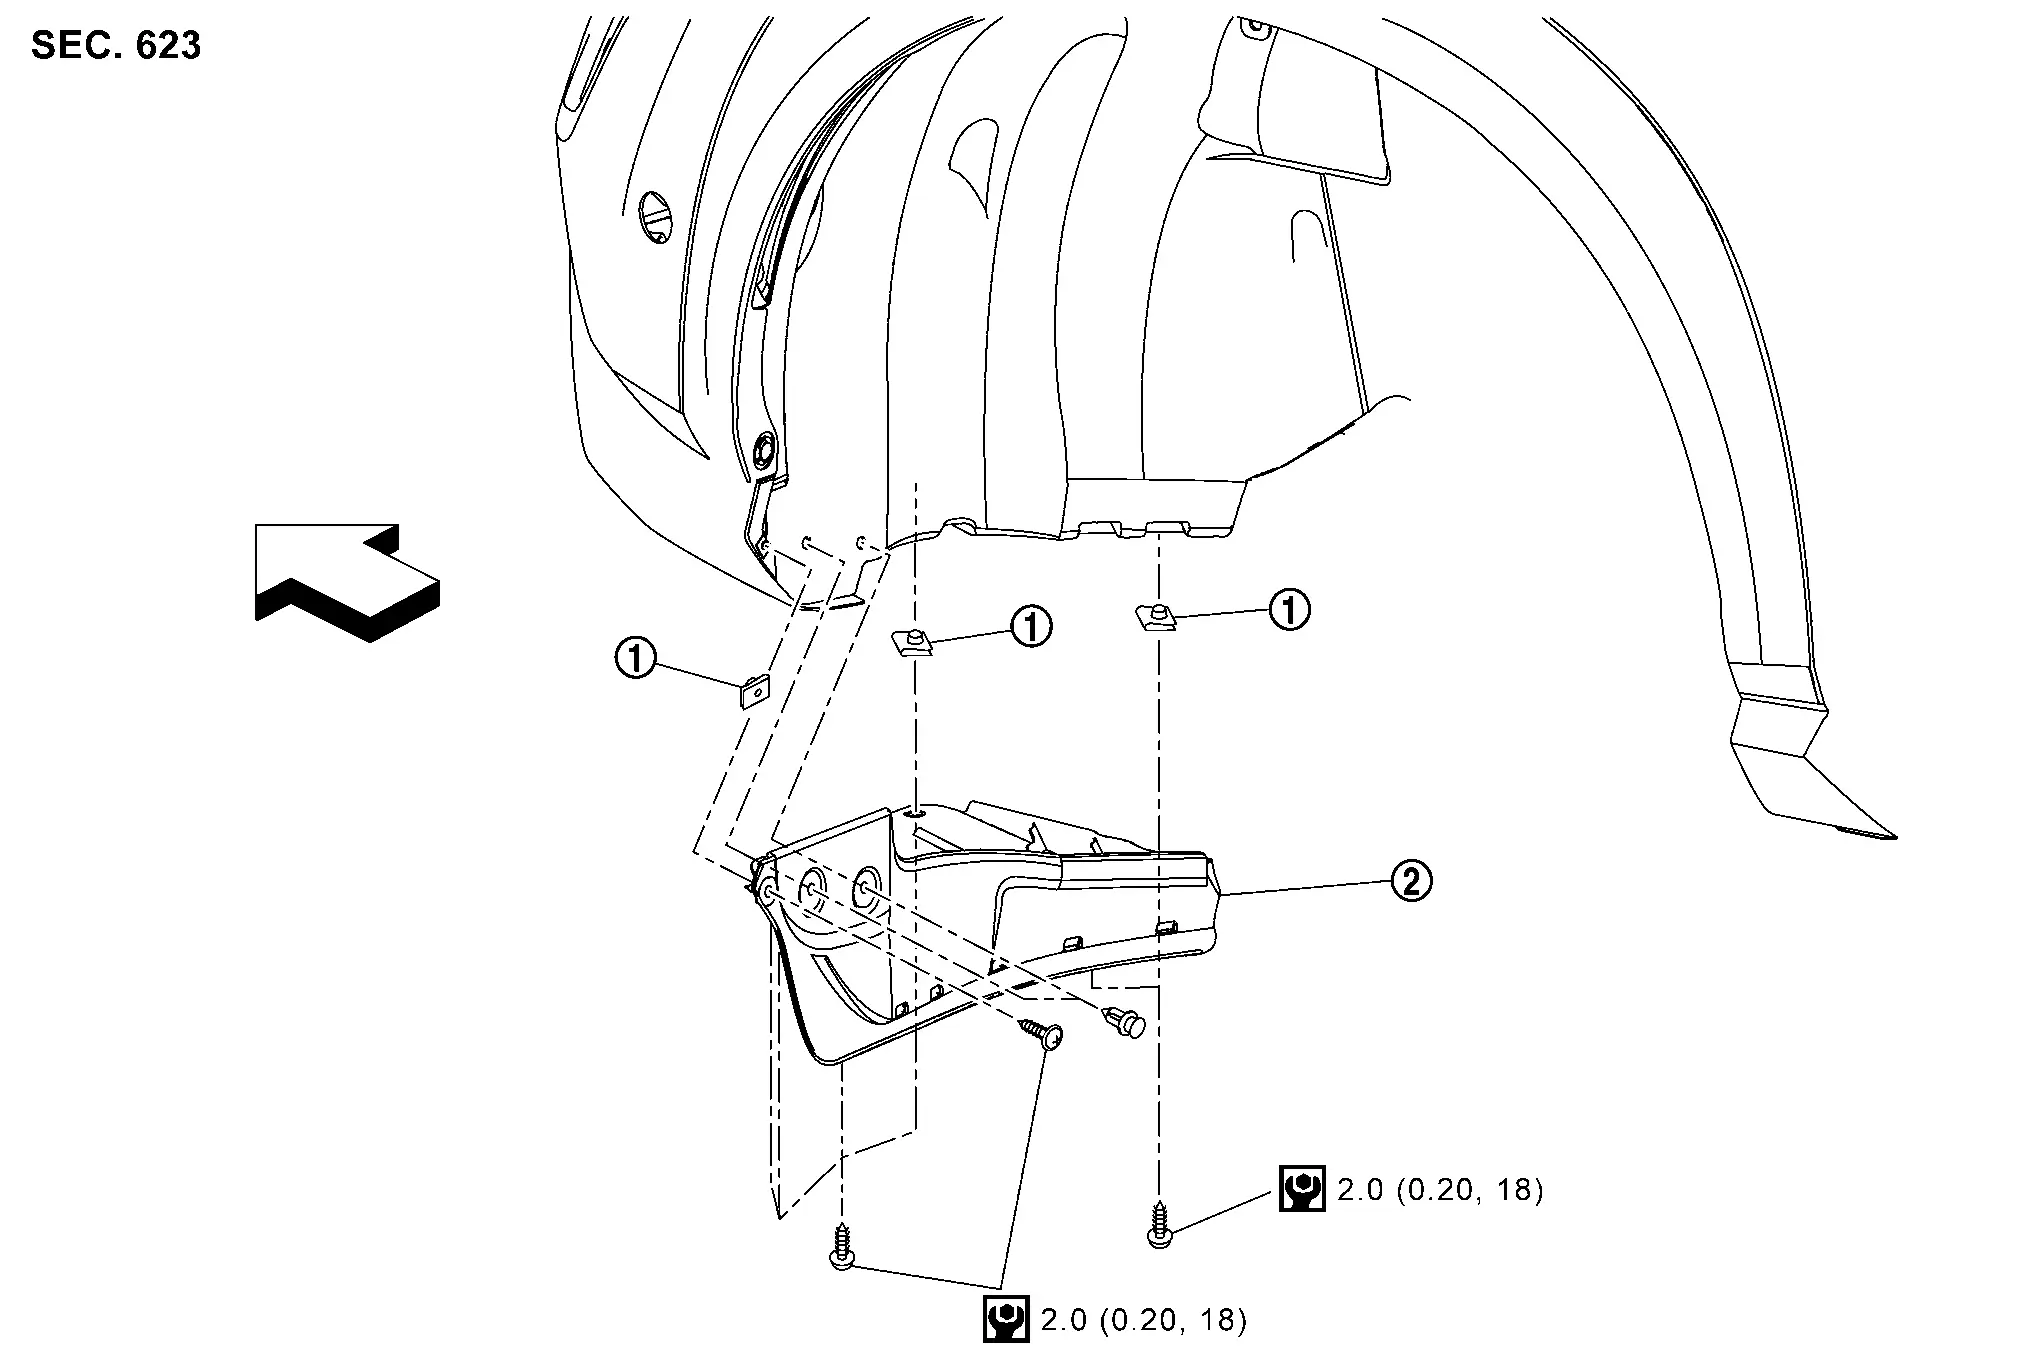
|
Plastic nut | |
Air guide | ||
|
: Nissan Ariya Vehicle front | ||||
 |
: N·m (kg-m, in-lb) | ||||
FENDER PROTECTOR
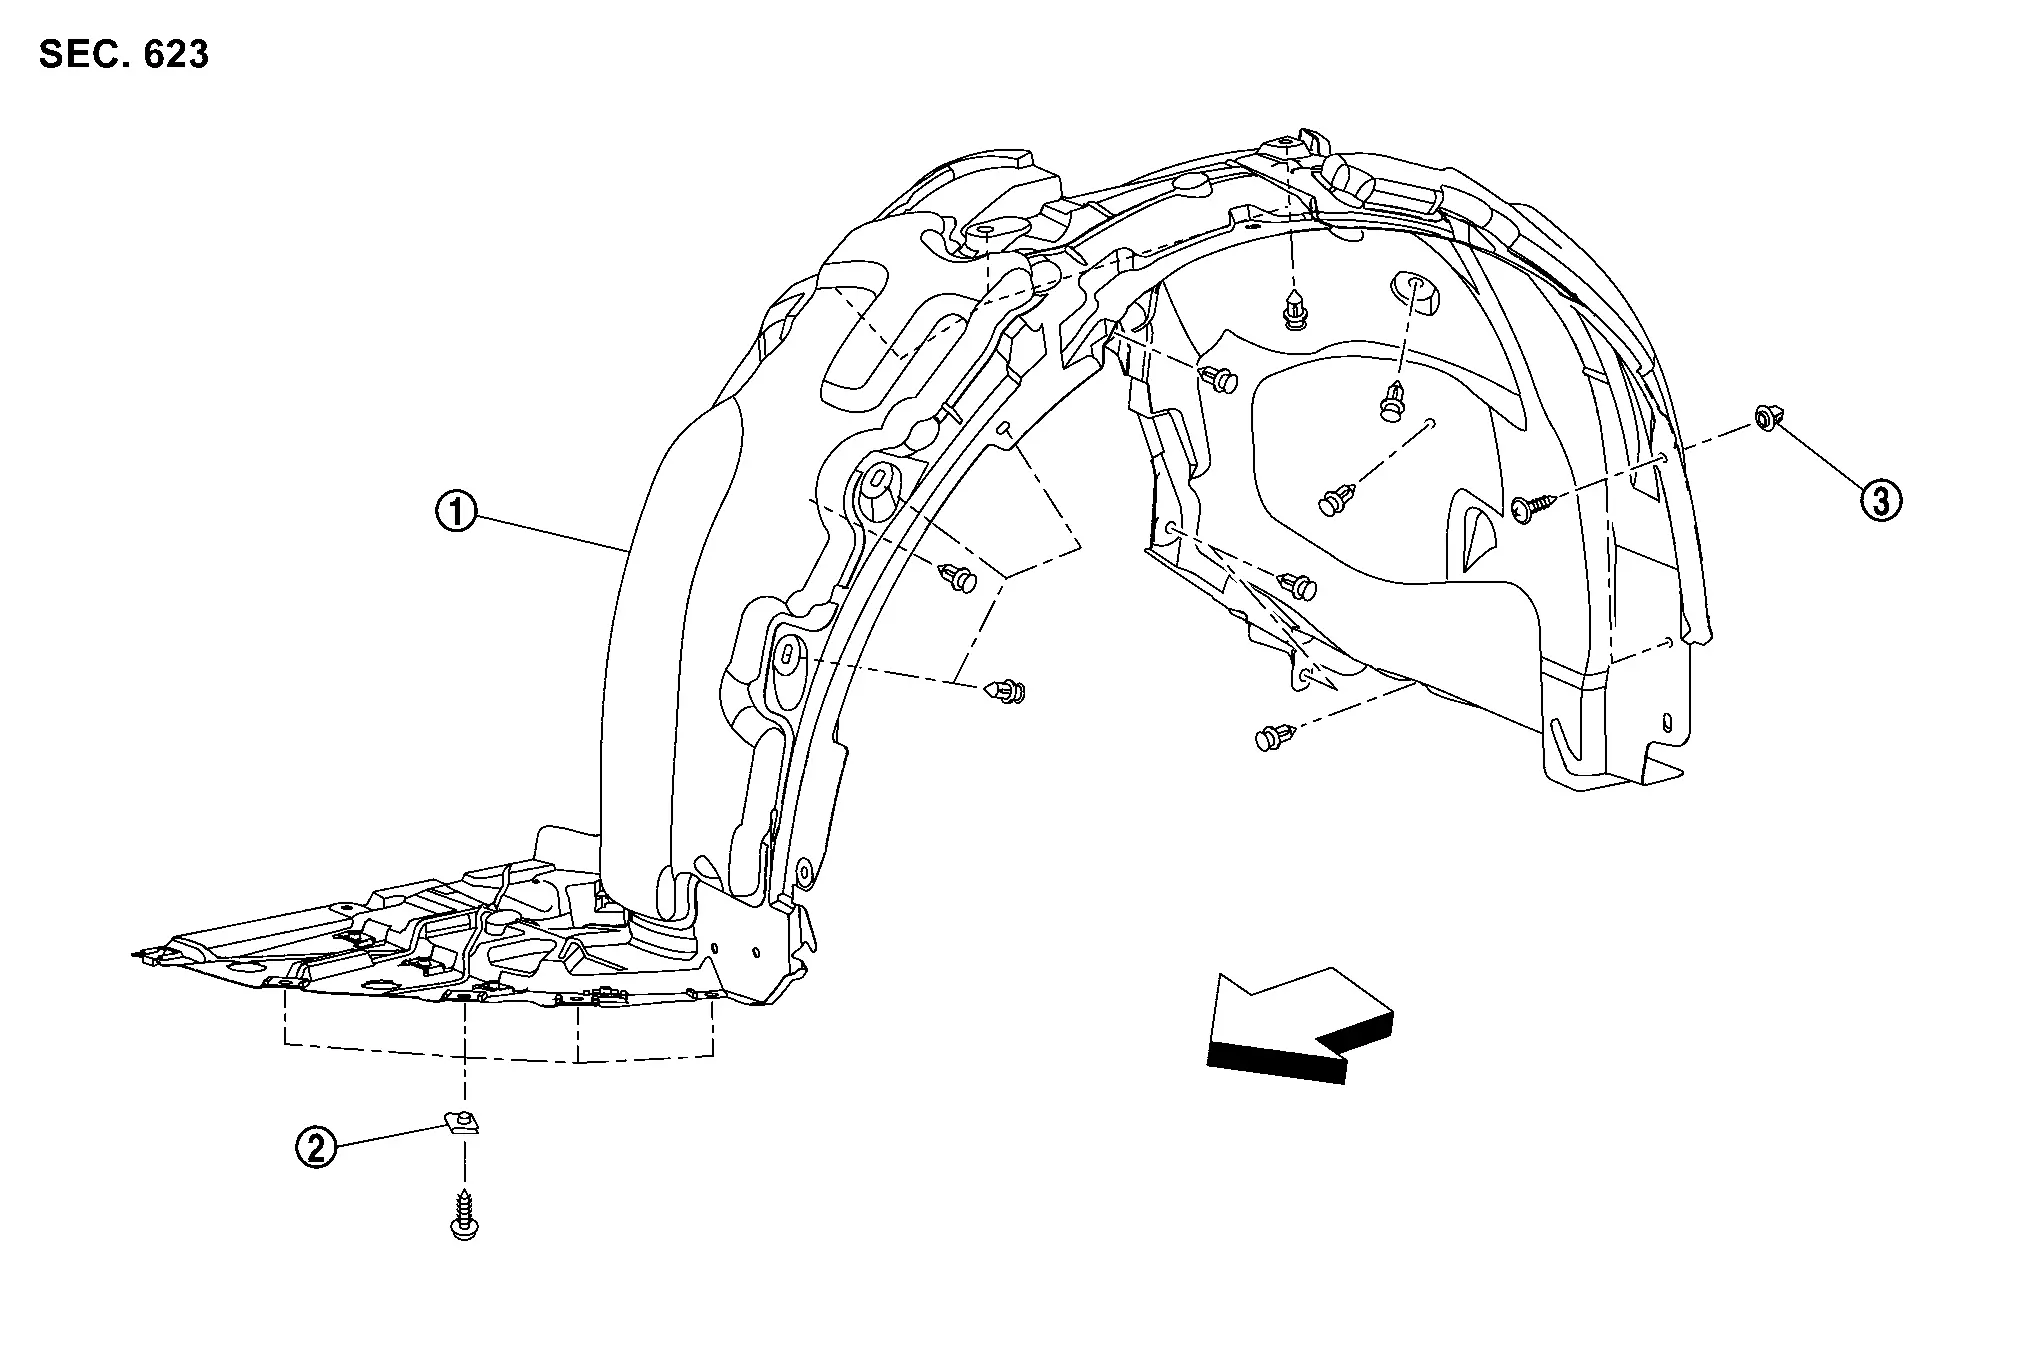
|
Fender protector | |
Spring nut | |
Screw grommet |
|
: Nissan Ariya Vehicle front | ||||
Removal & Installation
REMOVAL
Remove air guide fixing screws and clip, and then remove air guide.
Remove mounting bolts that are fastened to front under cover. Refer to Removal & Installation.
Remove front fillet molding. Refer to Removal & Installation.
Remove front side of sill cover. Refer to Removal & Installation.
Remove fender protector fixing screws and clips, and then remove fender protector.
INSTALLATION
Install in the reverse order of removal.
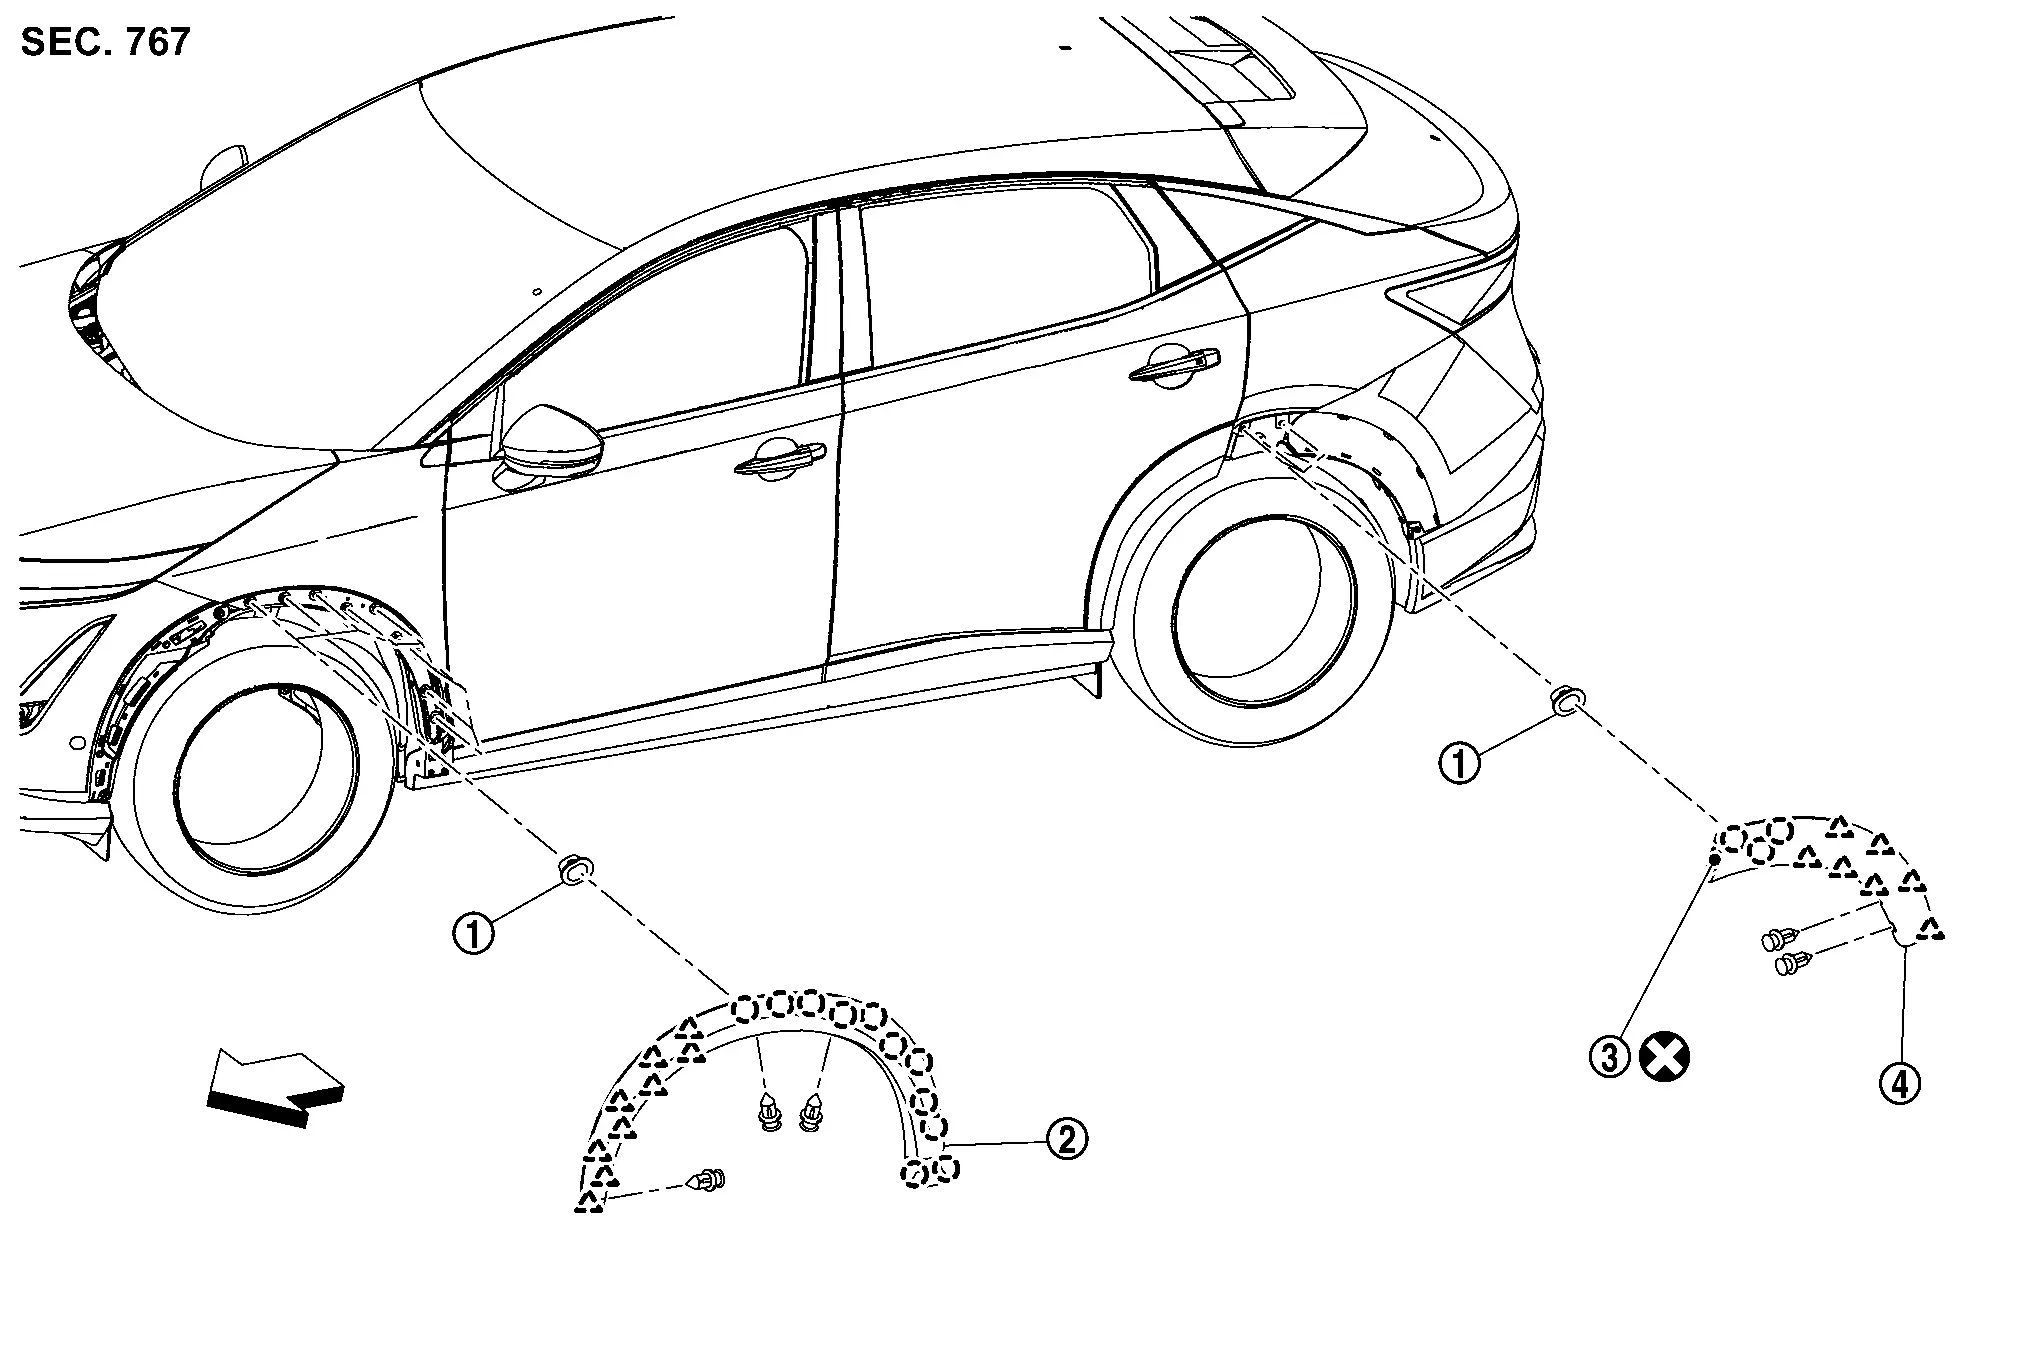
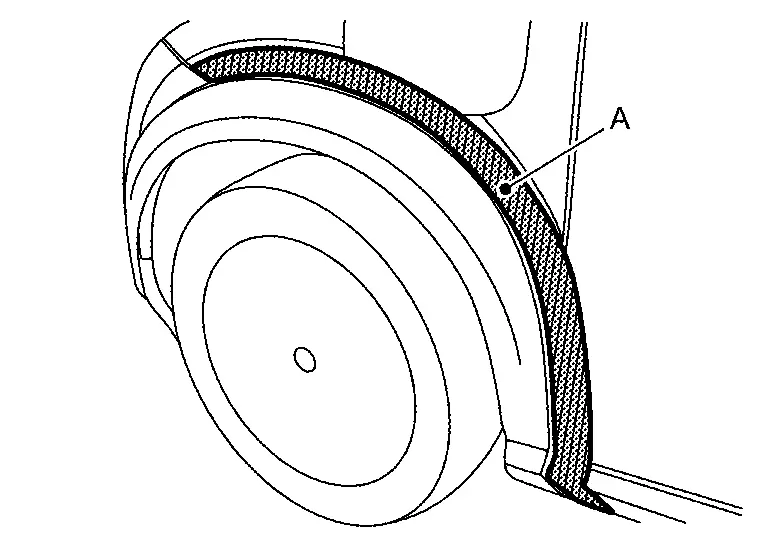
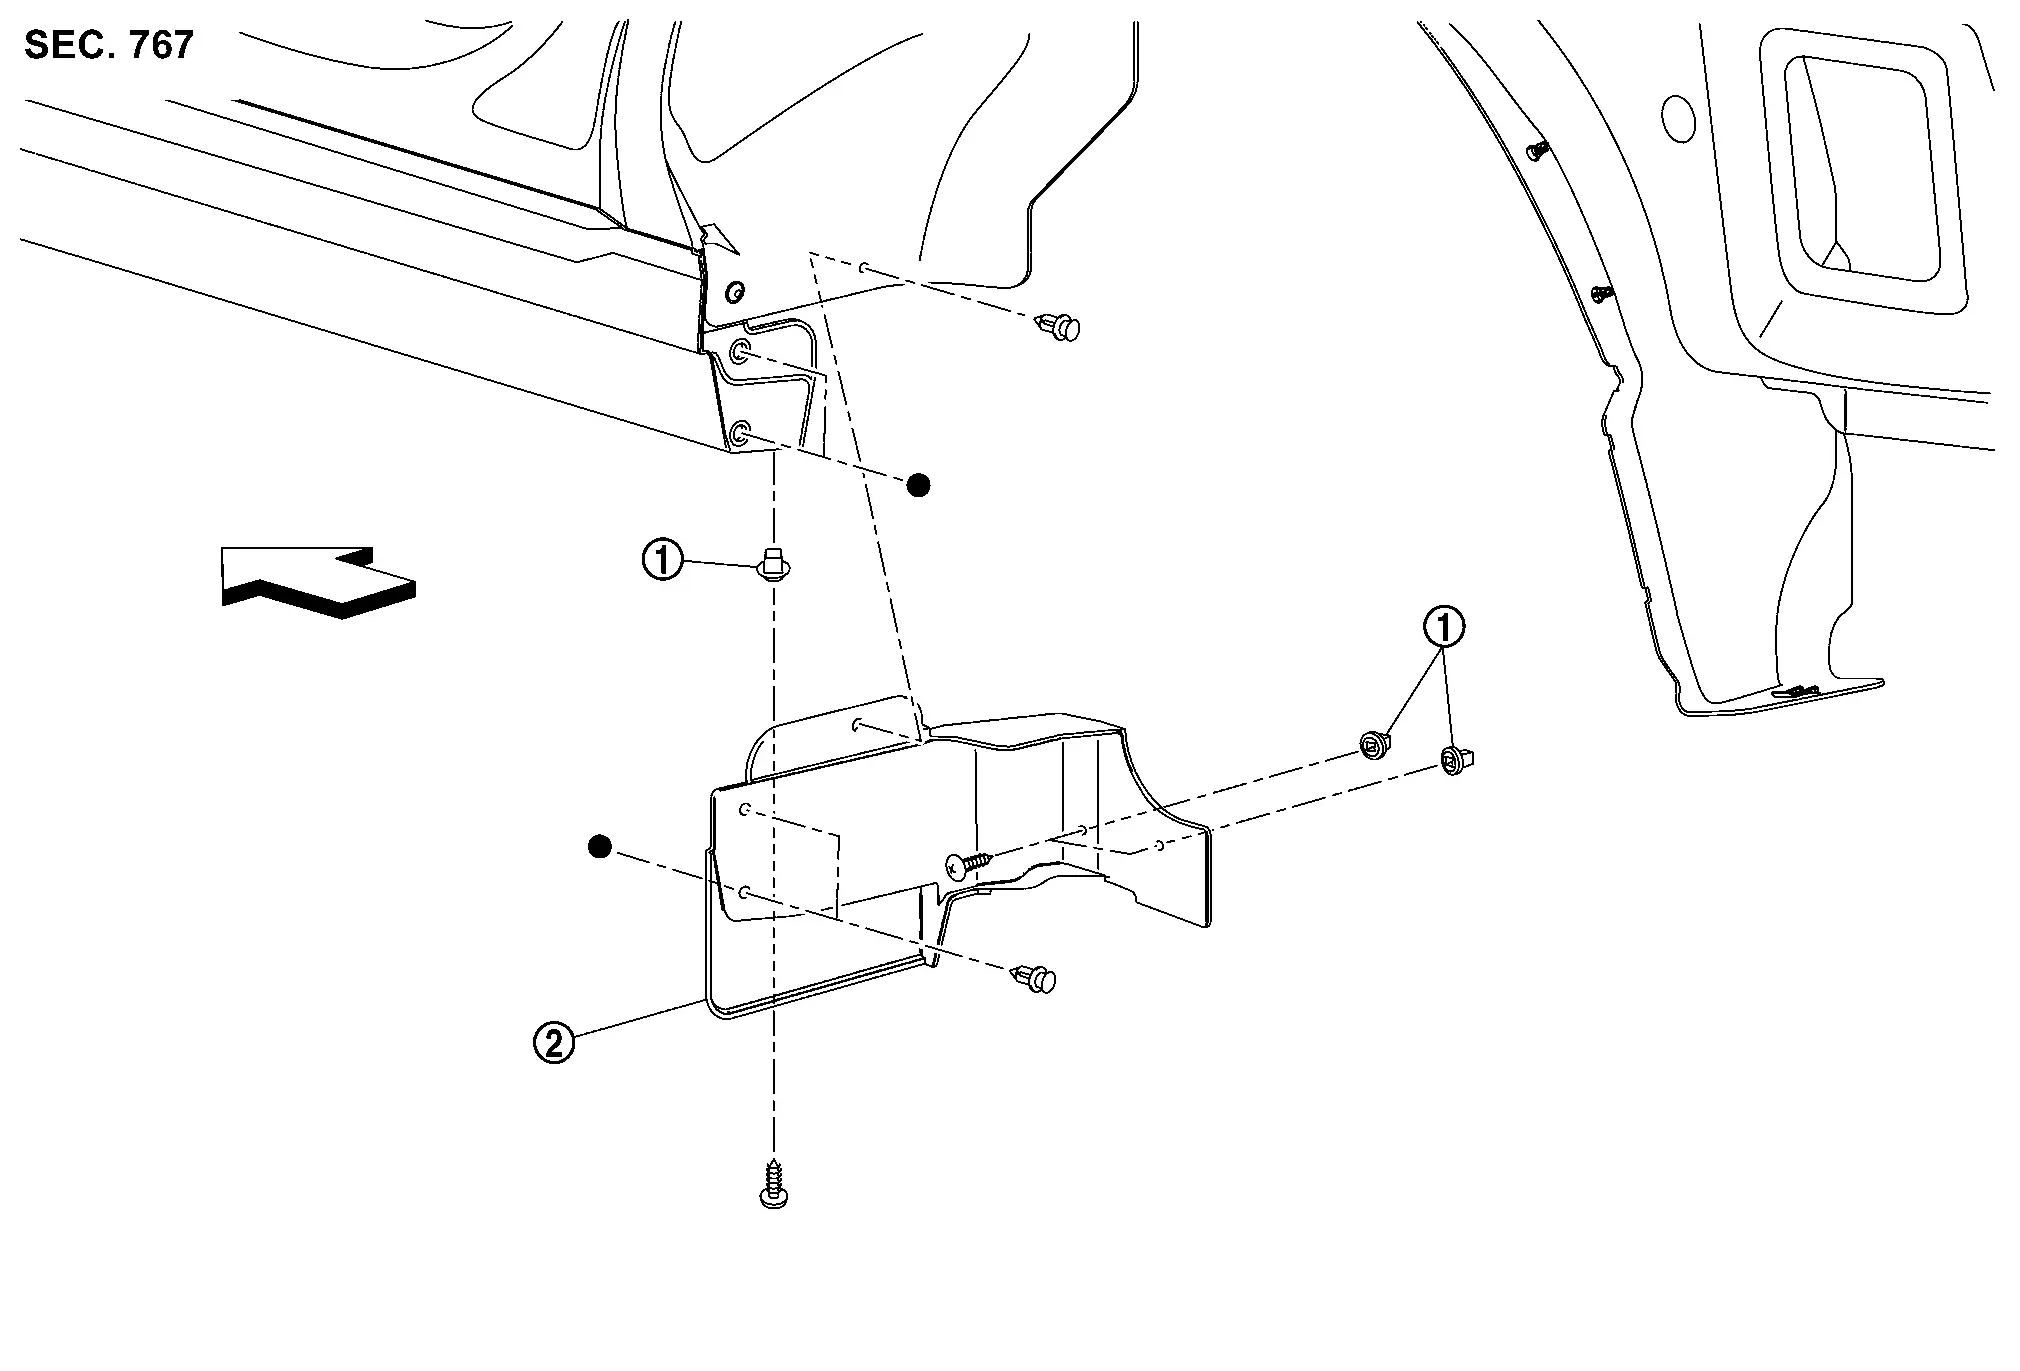
Rear Wheel House Protector Nissan Ariya
Exploded View
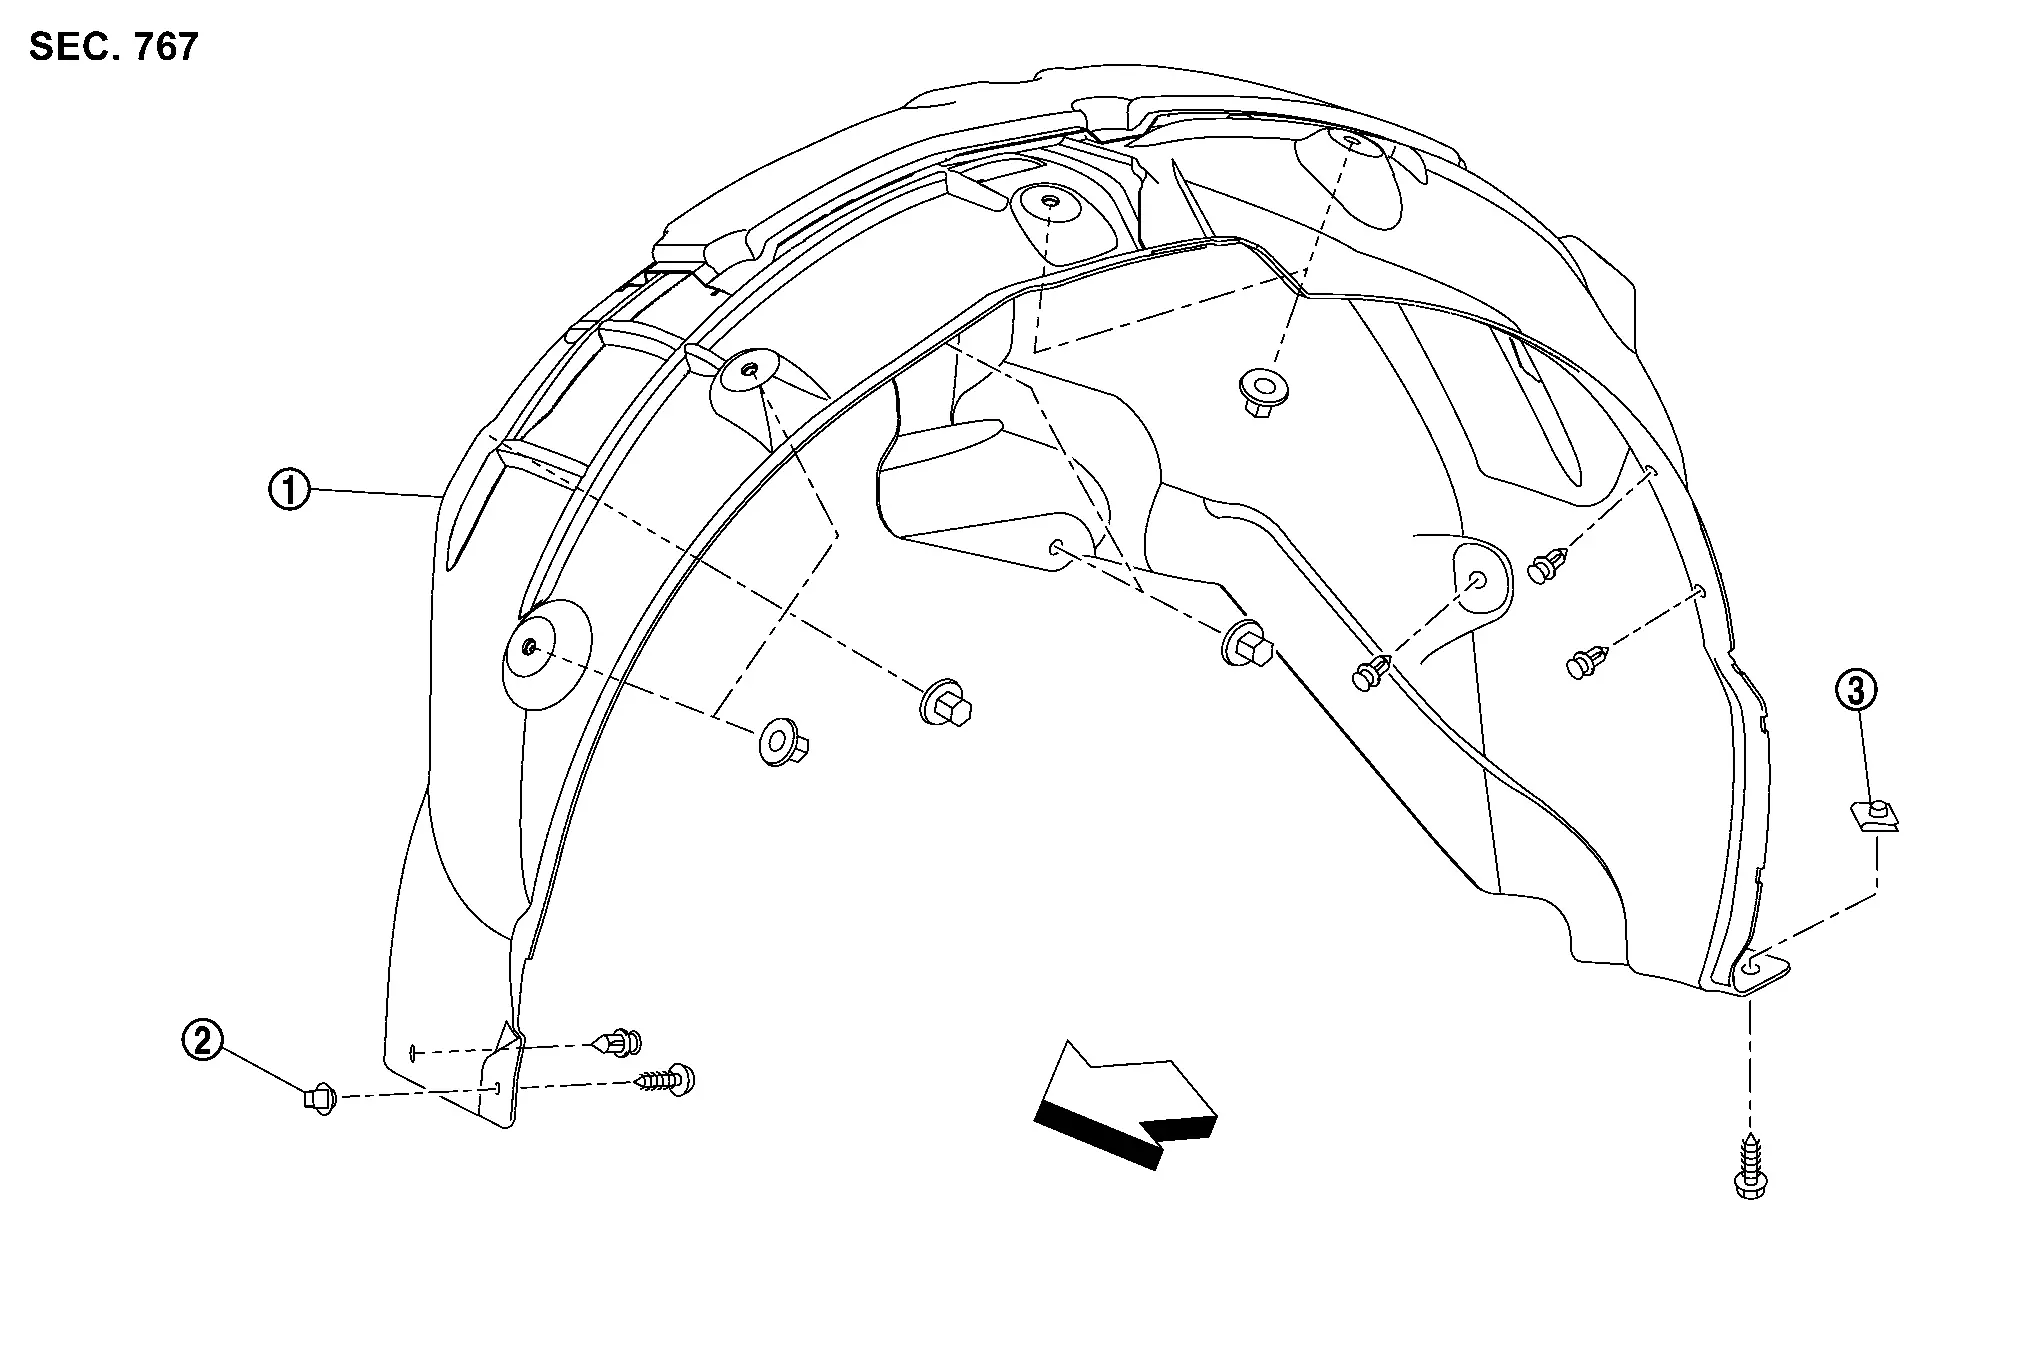
|
Rear wheel house protector | |
Grommet | |
U nut |
|
: Nissan Ariya Vehicle front | ||||
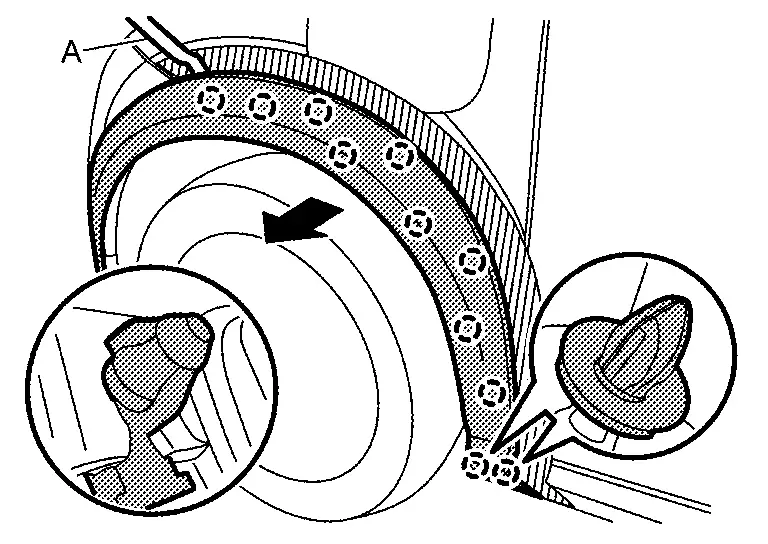
Removal & Installation
REMOVAL
Remove rear fillet molding. Refer to Removal & Installation.
Remove rear deflector. Refer to Removal & Installation.
Remove back side of sill cover. Refer to Removal & Installation.
Remove fixing screws that are fastened to rear bumper fascia assembly.
Remove rear wheel protector fixing screws, clips and plastic nuts, and then remove rear wheel house protector.
INSTALLATION
Install in the reverse order of removal.
Front Under Cover Nissan Ariya
Exploded View
|
Front under cover bracket A | |
Front under cover bracket B | |
Front under cover front |
|
Front under cover rear | ||||
|
: Nissan Ariya Vehicle front | ||||
|
N·m (kg-m, in-lb) | ||||
 |
N·m (kg-m, ft-lb) | ||||
Removal & Installation
REMOVAL
-
Remove front under cover front mounting bolts and fixing clips, and then remove front under cover front.
-
Remove front under cover rear bracket A and B mounting bolts.
-
Remove front under cover rear mounting bolts, and then remove front under cover rear, front under cover rear bracket A and front under cover rear B as a set.
-
Remove front under cover rear bracket A and B fixing clips from front under cover rear.
INSTALLATION
Install in the reverse order of removal.
Rear Diffuser Nissan Ariya first Gen
Exploded View
2WD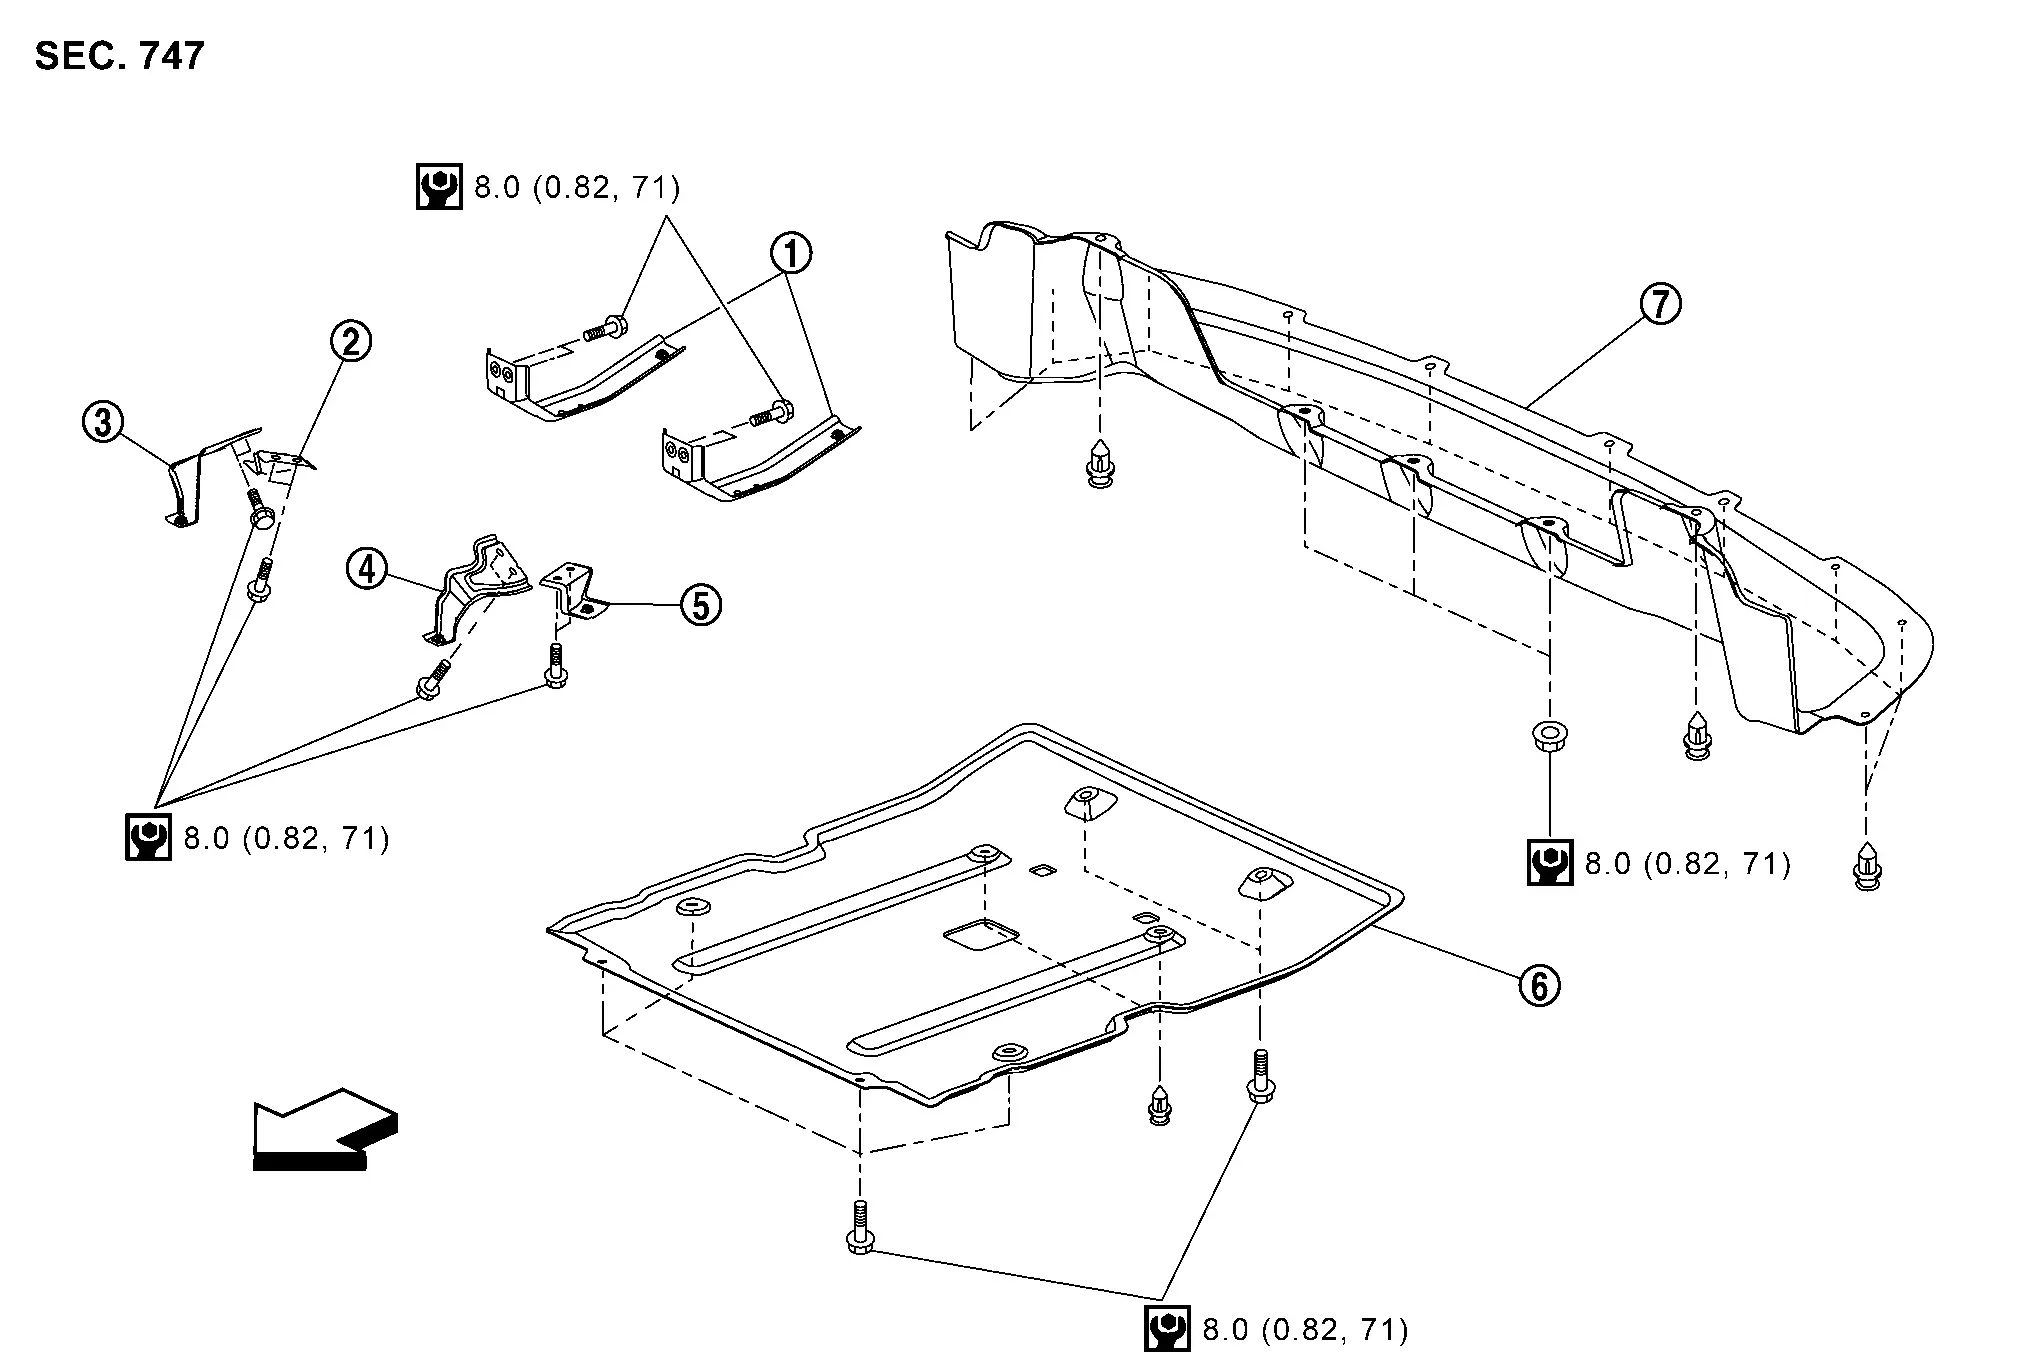
|
Rear diffuser bracket A | |
Rear diffuser bracket B RH | |
Rear diffuser bracket C RH |
|
Rear diffuser bracket C LH | |
Rear diffuser bracket B LH | |
Rear diffuser front |
|
Rear diffuser rear | ||||
|
: Nissan Ariya Vehicle front | ||||
|
: N·m (kg-m, in-lb) | ||||
AWD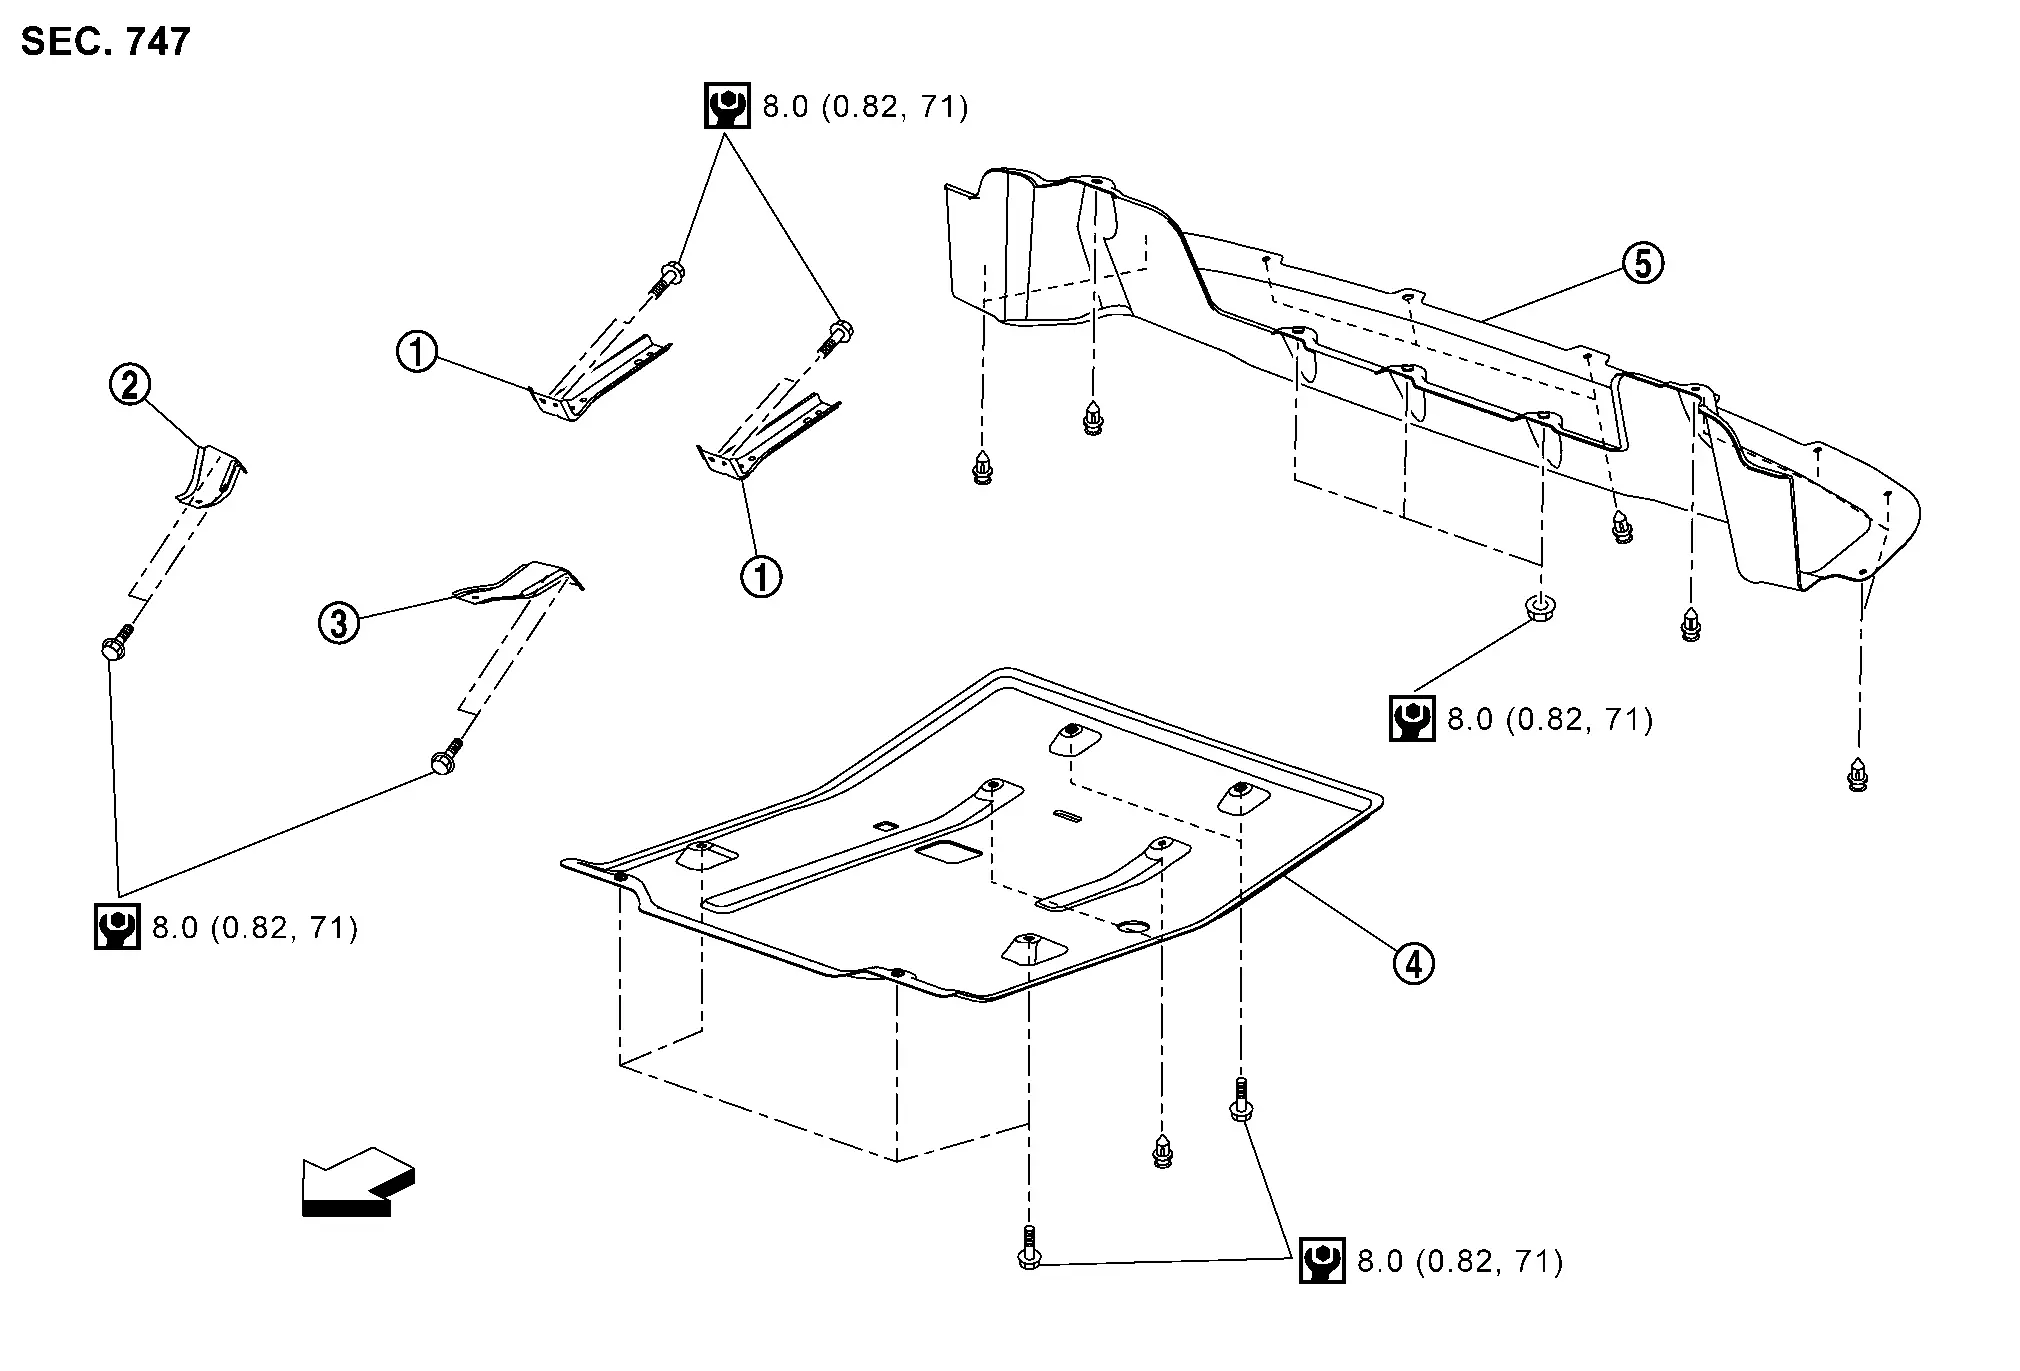
|
Rear diffuser bracket A | |
Rear diffuser bracket B RH | |
Rear diffuser bracket B LH |
|
Rear diffuser front | |
Rear diffuser rear | ||
|
: Nissan Ariya Vehicle front | ||||
|
: N·m (kg-m, in-lb) | ||||
Removal & Installation
REMOVAL
Rear Diffuser Front
Remove rear diffuser front mounting bolts and fixing clips, and then remove rear diffuser front.
Remove rear diffuser bracket mounting bolts, and then remove rear diffuser bracket.
Rear Diffuser Rear
Remove rear diffuser rear mounting nuts and fixing clips, and then remove rear diffuser rear.
INSTALLATION
Install in the reverse order of removal.
Roof Rail Nissan Ariya 2023
Exploded View
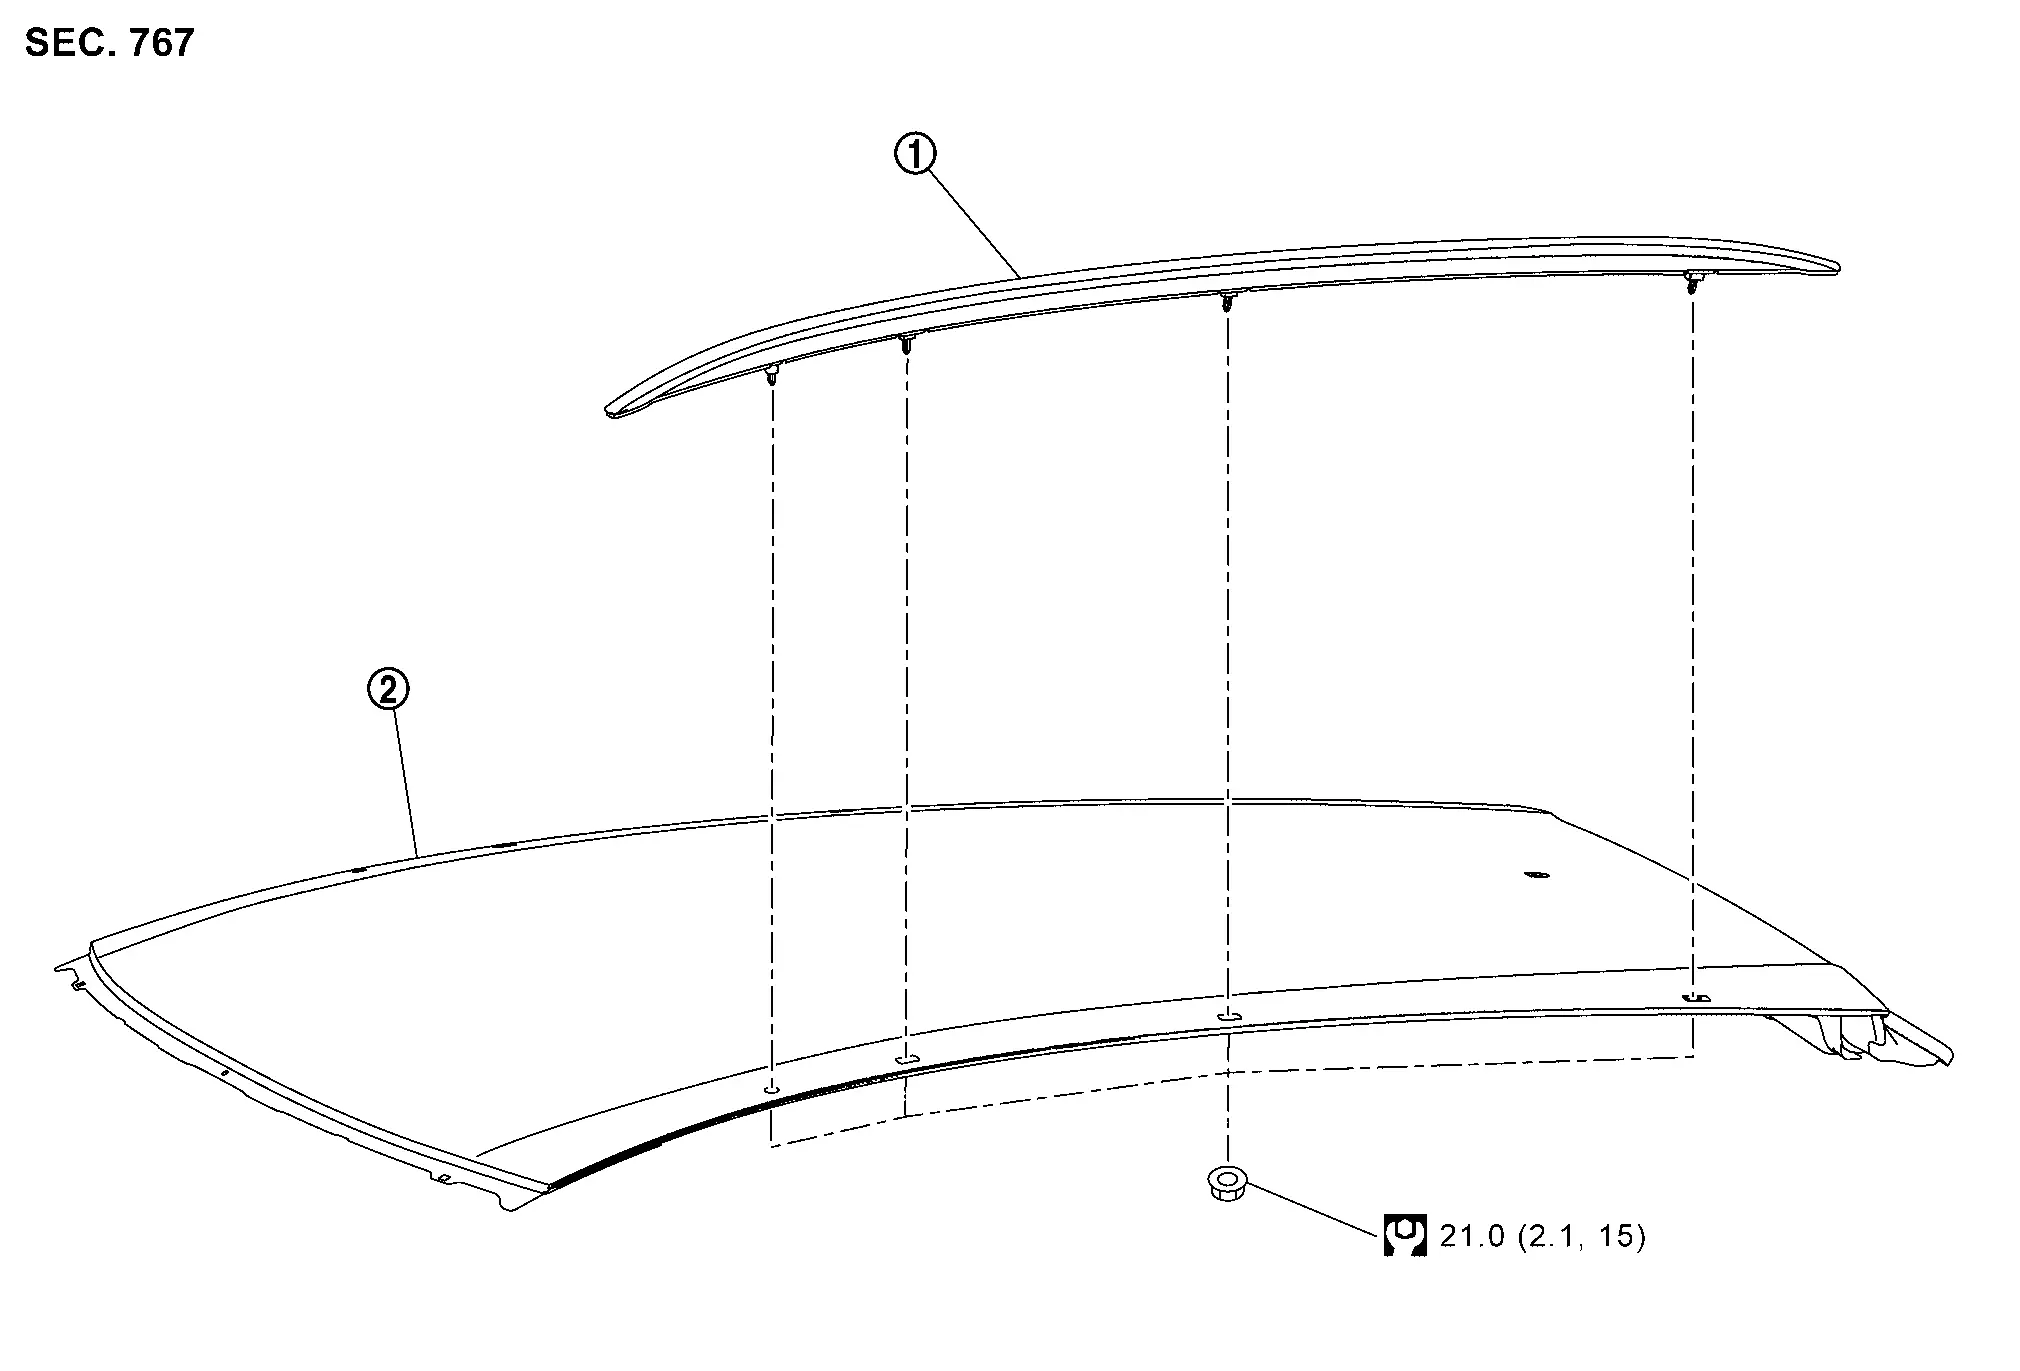
|
Roof rail | |
Roof panel | ||
|
: N·m (kg-m, ft-lb) | ||||
Removal & Installation
REMOVAL
Remove headlining assembly. Refer to Removal & Installation.
Remove curtain air bag module mounting bolts and harness clip to make work space. Refer to Removal & Installation.
Remove roof rail mounting nuts, and then remove roof rail.
CAUTION:
Be careful not to damage the harness.
INSTALLATION
Install in the reverse order of removal.
Door Sash Cover Nissan Ariya first Gen
Exploded View
|
Front door panel | |
Front door sash cover front | |
Front door sash cover rear |
|
Rear door sash cover front | |
Rear door sash cover rear | |
Rear door panel |
|
Double-sided tape [t : 2.5 mm (0.098 in)] | |
Double-sided tape [t : 0.8 mm (0.031 in)] | |
EPT seal [t : 3.0 mm (0.118 in)] |
|
: Clip | ||||
|
: Pawl | ||||
|
: Nissan Ariya Vehicle front | ||||
|
: Always replace after every disassembly. | ||||
Front Door Sash Cover Nissan Ariya first Gen
Removal & Installation
REMOVAL
Front Door Sash Cover Front
Fully open front door.
Apply protective tape (A) on front door panel to protect the painted surface from damage.
Remove front door sash cover front fixing clip using a remover tool (A), and then remove front door sash cover front while cutting double-sided tape with a cutter.
CAUTION:
-
Never damage the front door panel.
-
Never pull up front door sash cover front by strong force.
|
: Clip |
Front Door Sash Cover Rear
Remove front door outside molding. Refer to Removal & Installation.
Apply protective tapes (A) on front door panel to protect the painted surface from damage.
Disengage front door sash cover rear of upper side fixing pawl using a remove tool (A).
|
: Pawl |
Insert a remover tool (A) between front door sash cover rear and front door panel, cut double-sided tape using a cutter (B) while lifting front door sash cover rear.
CAUTION:
-
Never damage the front door panel.
-
Never pull up front door sash cover rear by strong force.
Remove front door sash cover rear.
INSTALLATION
Front Door Sash Cover Front
Note the following items, and then install in the reverse order of removal.
CAUTION:
-
When installing door sash cover , visually check the clip, then replace it with new parts if they are damaged.
-
Always replace double-sided tape with a new one, door sash cover is reused.
-
Remove double-sided tape remaining on door panel and back of door sash cover with a double-side tape remover, after removing door sash cover.
-
Paint grain or dust on mounting surface of door sash cover may spoil exterior appearance if it remains. Clean the mounting surface and check that no paint grain or dust remains, before starting the operation.
-
Degrease door panel mounting surface for door sash cover.
-
Never wash the Nissan Ariya vehicle with 24 hours after installing so as to keep adhesive.
Insert front door sash cover front into the part of glass run.
Align the holes in front door panel with clip in front door sash cover front, and then install front door sash cover rear.
Crimp double-sided tape.
Front Door Sash Cover Rear
Note the following items, and then install in the reverse order of removal.
CAUTION:
-
When installing door sash cover, visually check the pawl, then replace it with new parts if they are damaged.
-
Always replace double-sided tape with a new one, door sash cover is reused.
-
Remove double-sided tape remaining on door panel and back of door sash cover with a double-side tape remover, after removing door sash cover.
-
Paint grain or dust on mounting surface of door sash cover may spoil exterior appearance if it remains. Clean the mounting surface and check that no paint grain or dust remains, before starting the operation.
-
Degrease door panel mounting surface for door sash cover.
-
Never wash the Nissan Ariya vehicle with 24 hours after installing so as to keep adhesive.
Align the pawl of front door glass run with upper side of front door sash cover rear.
Align with positioning pin of front door sash cover rear and insertion part of front door panel.
Install front door sash cover rear, and then crimp double-sided tape.
Install front door outside molding. Refer to Removal & Installation.
Rear Door Sash Cover Nissan Ariya SUV
Removal & Installation
REMOVAL
Rear Door Sash Cover Front
Remove rear door outside molding. Refer to Removal & Installation.
Apply protective tapes (A) on rear door panel to protect the painted surface from damage.
Disengage rear door sash cover front of upper side fixing pawl using a remove tool (A).
|
: Pawl |
Insert a remover tool (A) between rear door sash cover front and rear door panel, cut double-sided tape using a cutter (B) while lifting rear door sash cover front.
CAUTION:
-
Never damage the rear door panel.
-
Never pull up rear door sash cover front by strong force.
Remove rear door sash cover front.
Rear Door Sash Cover Rear
Remove rear door outside molding. Refer to Removal & Installation.
Apply protective tapes (A) on rear door panel to protect the painted surface from damage.
Disengage rear door sash cover rear of upper side fixing pawl using a remove tool (A).
|
: Pawl |
Insert a remover tool (A) between rear door sash cover rear and rear door panel, cut double-sided tape using a cutter (B) while lifting rear door sash cover rear.
CAUTION:
-
Never damage the rear door panel.
-
Never pull up rear door sash cover rear by strong force.
|
: Clip |
Remove rear door sash cover rear.
INSTALLATION
Rear Door Sash Cover Front
Note the following items, and then install in the reverse order of removal.
CAUTION:
-
When installing door sash cover, visually check the pawl, then replace it with new parts if they are damaged.
-
Always replace double-sided tape with a new one, door sash cover is reused.
-
Remove double-sided tape remaining on door panel and back of door sash cover with a double-side tape remover, after removing door sash cover.
-
Paint grain or dust on mounting surface of door sash cover may spoil exterior appearance if it remains. Clean the mounting surface and check that no paint grain or dust remains, before starting the operation.
-
Degrease door panel mounting surface for door sash cover.
-
Never wash the Nissan Ariya vehicle with 24 hours after installing so as to keep adhesive.
Align the pawl of rear door glass run with upper side of rear door sash cover front.
Align with positioning pin of rear door sash cover front and insertion part of rear door panel.
Install rear door sash cover front, and then Crimp double-sided tape.
Install rear door outside molding. Refer to Removal & Installation.
Rear Door Sash Cover Rear
Note the following items, and then install in the reverse order of removal.
CAUTION:
-
When installing door sash cover, visually check the pawl, then replace it with new parts if they are damaged.
-
Always replace double-sided tape with a new one, door sash cover is reused.
-
Remove double-sided tape remaining on door panel and back of door sash cover with a double-side tape remover, after removing door sash cover.
-
Paint grain or dust on mounting surface of door sash cover may spoil exterior appearance if it remains. Clean the mounting surface and check that no paint grain or dust remains, before starting the operation.
-
Degrease door panel mounting surface for door sash cover.
-
Never wash the Nissan Ariya vehicle with 24 hours after installing so as to keep adhesive.
Align the pawl of rear door glass run with upper side of rear door sash cover rear.
Align with positioning pin of rear door sash cover rear and insertion part of rear door panel.
Install rear door sash cover rear, and then Crimp double-sided tape.
Install rear door outside molding. Refer to Removal & Installation.
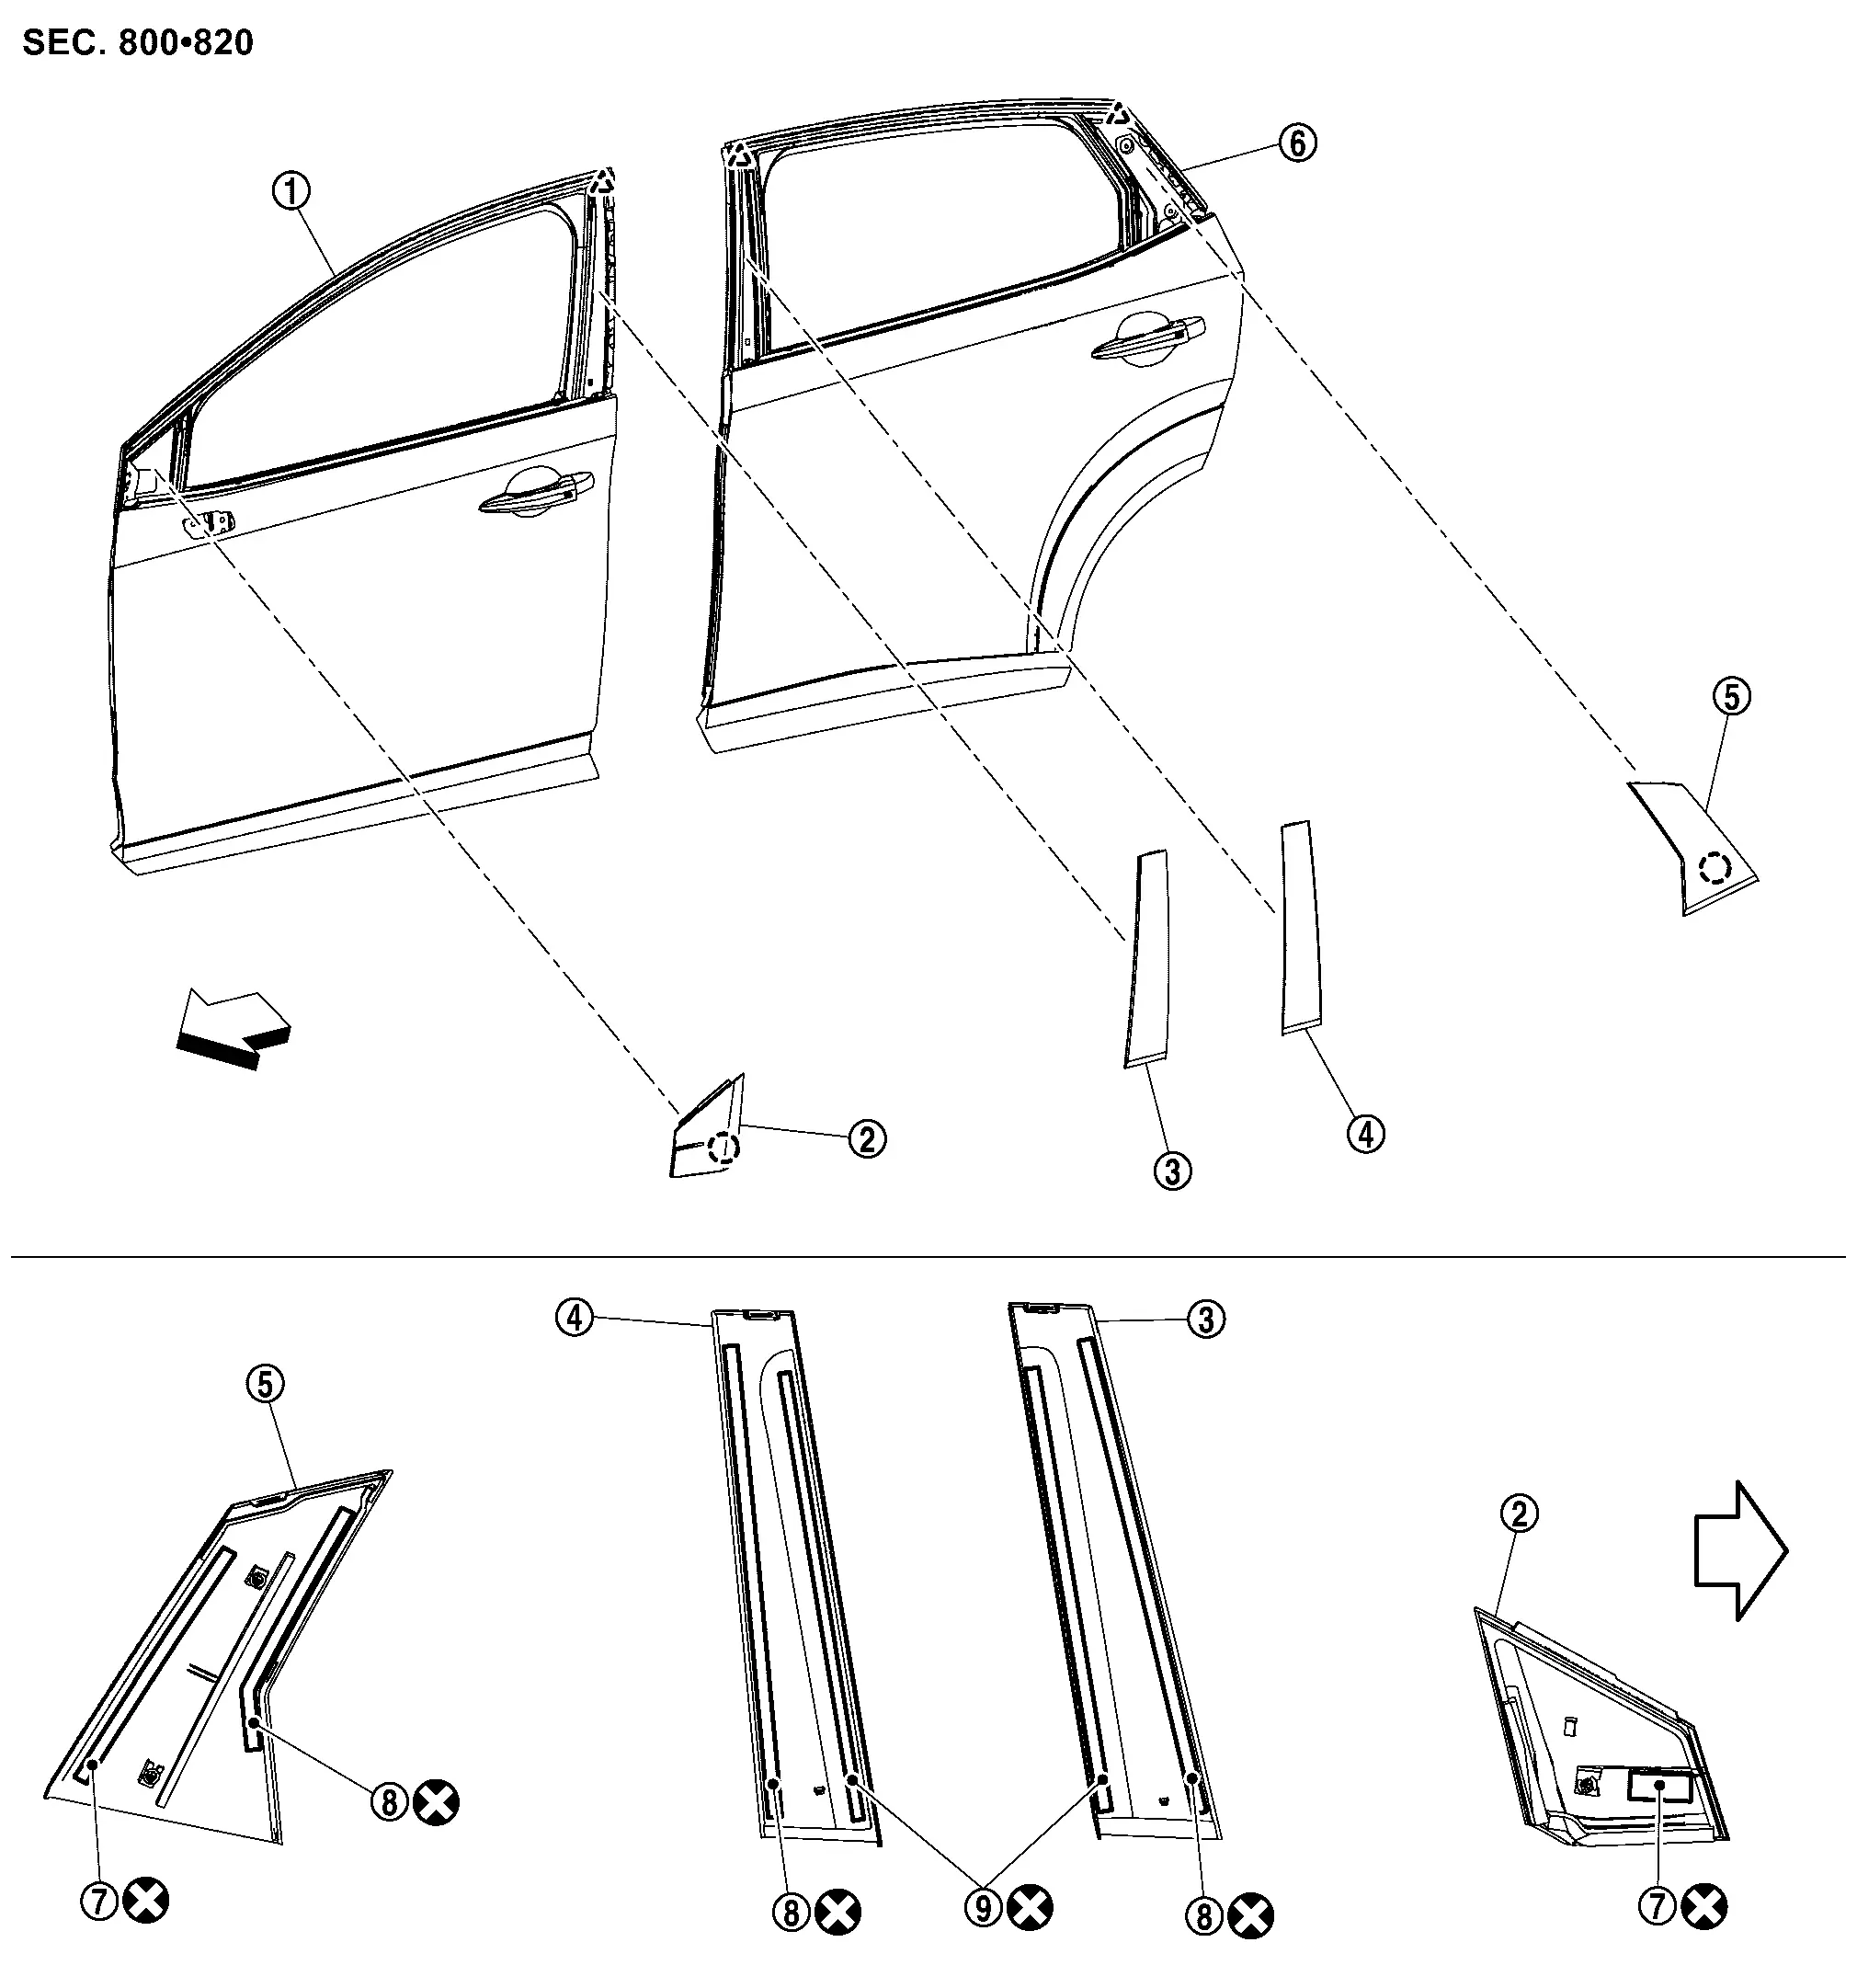
Door Outside Molding Nissan Ariya 2026
Exploded View
|
Front door panel | |
Front door outside molding | |
Rear door outside molding |
|
Rear door Panel | ||||
|
: Pawl | ||||
|
: Nissan Ariya Vehicle front | ||||
Front Door Outside Molding Nissan Ariya SUV
Removal & Installation
REMOVAL
Fully open front door glass.
Remove front door sash cover front. Refer to Removal & Installation.
Apply protective tape (A) on the part to protect it from damage.
Disengage rear end of front door outside molding fixing pawl using remover tool (A) and (B).
CAUTION:
Never lift front door outside molding with excessive force to prevent damage to the part.
|
: Pawl |
Twist front door outside molding toward the direction of the arrow in the figure, and then lift up and remove it.
INSTALLATION
Install in the reverse order of removal.
Side Guard Molding Nissan Ariya first Gen
Exploded View
|
Front door panel | |
Front side guard molding | |
Rear side guard molding |
|
Rear side guard molding rear | |
Rear door panel | |
Double-sided tape [t : 1.2 mm (0.047 in )] |
|
Clip | ||||
|
: Clip | ||||
|
: Nissan Ariya Vehicle front | ||||
|
: Always replace after every disassembly. | ||||
Front Side Guard Molding Nissan Ariya SUV
Removal & Installation
REMOVAL
CAUTION:
Never damage the front door panel.
Fully open front door.
Apply protective tape (A) on the part to protect it from damage.
Insert a remover tool (A) between front side guard molding and front door panel, and then cut double-sided tape using a cutter (B) while lifting front side guard molding.
Disengage front door side guard molding fixing clips using a remover tool (A).
|
: Clip |
Cut double-sided tape on the front side of front side guard molding, and then remove front side guard molding.
INSTALLATION
Note the following items, and then install in the reverse order of removal.
CAUTION:
-
When installing front side guard molding, visually check the clips, then replace it with new parts if they are damaged.
-
Some fixing clips cannot be reused, so when you remove front side guard molding, replace it with a new one.
-
Always replace double-sided tape with a new one, if front side guard molding is reused.
-
Remove double-sided tape remaining on front door panel and back of front side guard molding with a double-sided tape remover, after removing .
-
Paint grain or dust on mounting surface of front side guard molding may spoil exterior appearance if it remains. Clean the mounting surface and check that no paint grain or dust remains, before starting the operation.
-
Degrease front door panel mounting surface for front side guard molding.
-
Never wash the Nissan Ariya vehicle within 24 hours after installing so as to keep adhesive.
Rear Side Guard Molding Nissan Ariya 1st generation
Removal & Installation
REMOVAL
Rear Side Guard Molding
CAUTION:
Never damage the rear door panel.
Remove rear side guard molding rear.
Apply protective tape (A) on the part to protect it from damage.
Insert a remover tool (A) between rear side guard molding and rear door panel, and then cut double-sided tape using a cutter (B) while lifting rear side guard molding.
Disengage rear door side guard molding fixing clips using a remover tool (A).
|
: Clip |
Cut double-sided tape on the front side of rear side guard molding, and then remove rear side guard molding.
Rear Side Guard Molding Rear
CAUTION:
Never damage the rear door panel.
Fully open rear door.
Apply protective tape (A) on the part to protect it from damage.
Disengage rear door side guard rear molding fixing clips using a remover tool (A).
|
: Clip |
Cut double-sided tape on the front side of rear side guard molding rear, and then remove rear side guard molding rear.
INSTALLATION
Rear Side Guard Molding
Note the following items, and then install in the reverse order of removal.
CAUTION:
-
When installing rear side guard molding, visually check the clips, then replace it with new parts if they are damaged.
-
Some fixing clips cannot be reused, so when you remove rear side guard molding, replace it with a new one.
-
Always replace double-sided tape with a new one, if rear side guard molding is reused.
-
Remove double-sided tape remaining on rear door panel and back of rear side guard molding with a double-sided tape remover, after removing .
-
Paint grain or dust on mounting surface of rear side guard molding may spoil exterior appearance if it remains. Clean the mounting surface and check that no paint grain or dust remains, before starting the operation.
-
Degrease rear door panel mounting surface for rear side guard molding.
-
Never wash the Nissan Ariya vehicle within 24 hours after installing so as to keep adhesive.
Rear Side Guard Molding Rear
Note the following items, and then install in the reverse order of removal.
CAUTION:
-
When installing rear side guard molding rear, visually check the clips, then replace it with new parts if they are damaged.
-
Always replace double-sided tape with a new one, if rear side guard molding rear is reused.
-
Remove double-sided tape remaining on rear door panel and back of rear side guard molding rear with a double-sided tape remover, after removing .
-
Paint grain or dust on mounting surface of rear side guard molding rear may spoil exterior appearance if it remains. Clean the mounting surface and check that no paint grain or dust remains, before starting the operation.
-
Degrease rear door panel mounting surface for rear side guard molding rear.
-
Never wash the Nissan Ariya vehicle within 24 hours after installing so as to keep adhesive.
Rear Deflector Nissan Ariya: FE0
Exploded View
|
Grommet | |
Rear deflector | ||
|
: Nissan Ariya Vehicle front | ||||
|
: Indicates that the part is connected at points with same symbol in actual Nissan Ariya vehicle. | ||||
Removal & Installation
REMOVAL
Remove rear deflector fixing clips .
Remove rear deflector fixing screws , and then remove rear deflector.

INSTALLATION
Note the following items, install in the reverse order of removal.
CAUTION:
-
When installing rear deflector, visually check the clips, then replace them with new parts if they are damaged.
-
When installing rear deflector, check that clips are securely in door panel holes, and press them in.
Sill Cover Nissan Ariya 2026
Exploded View
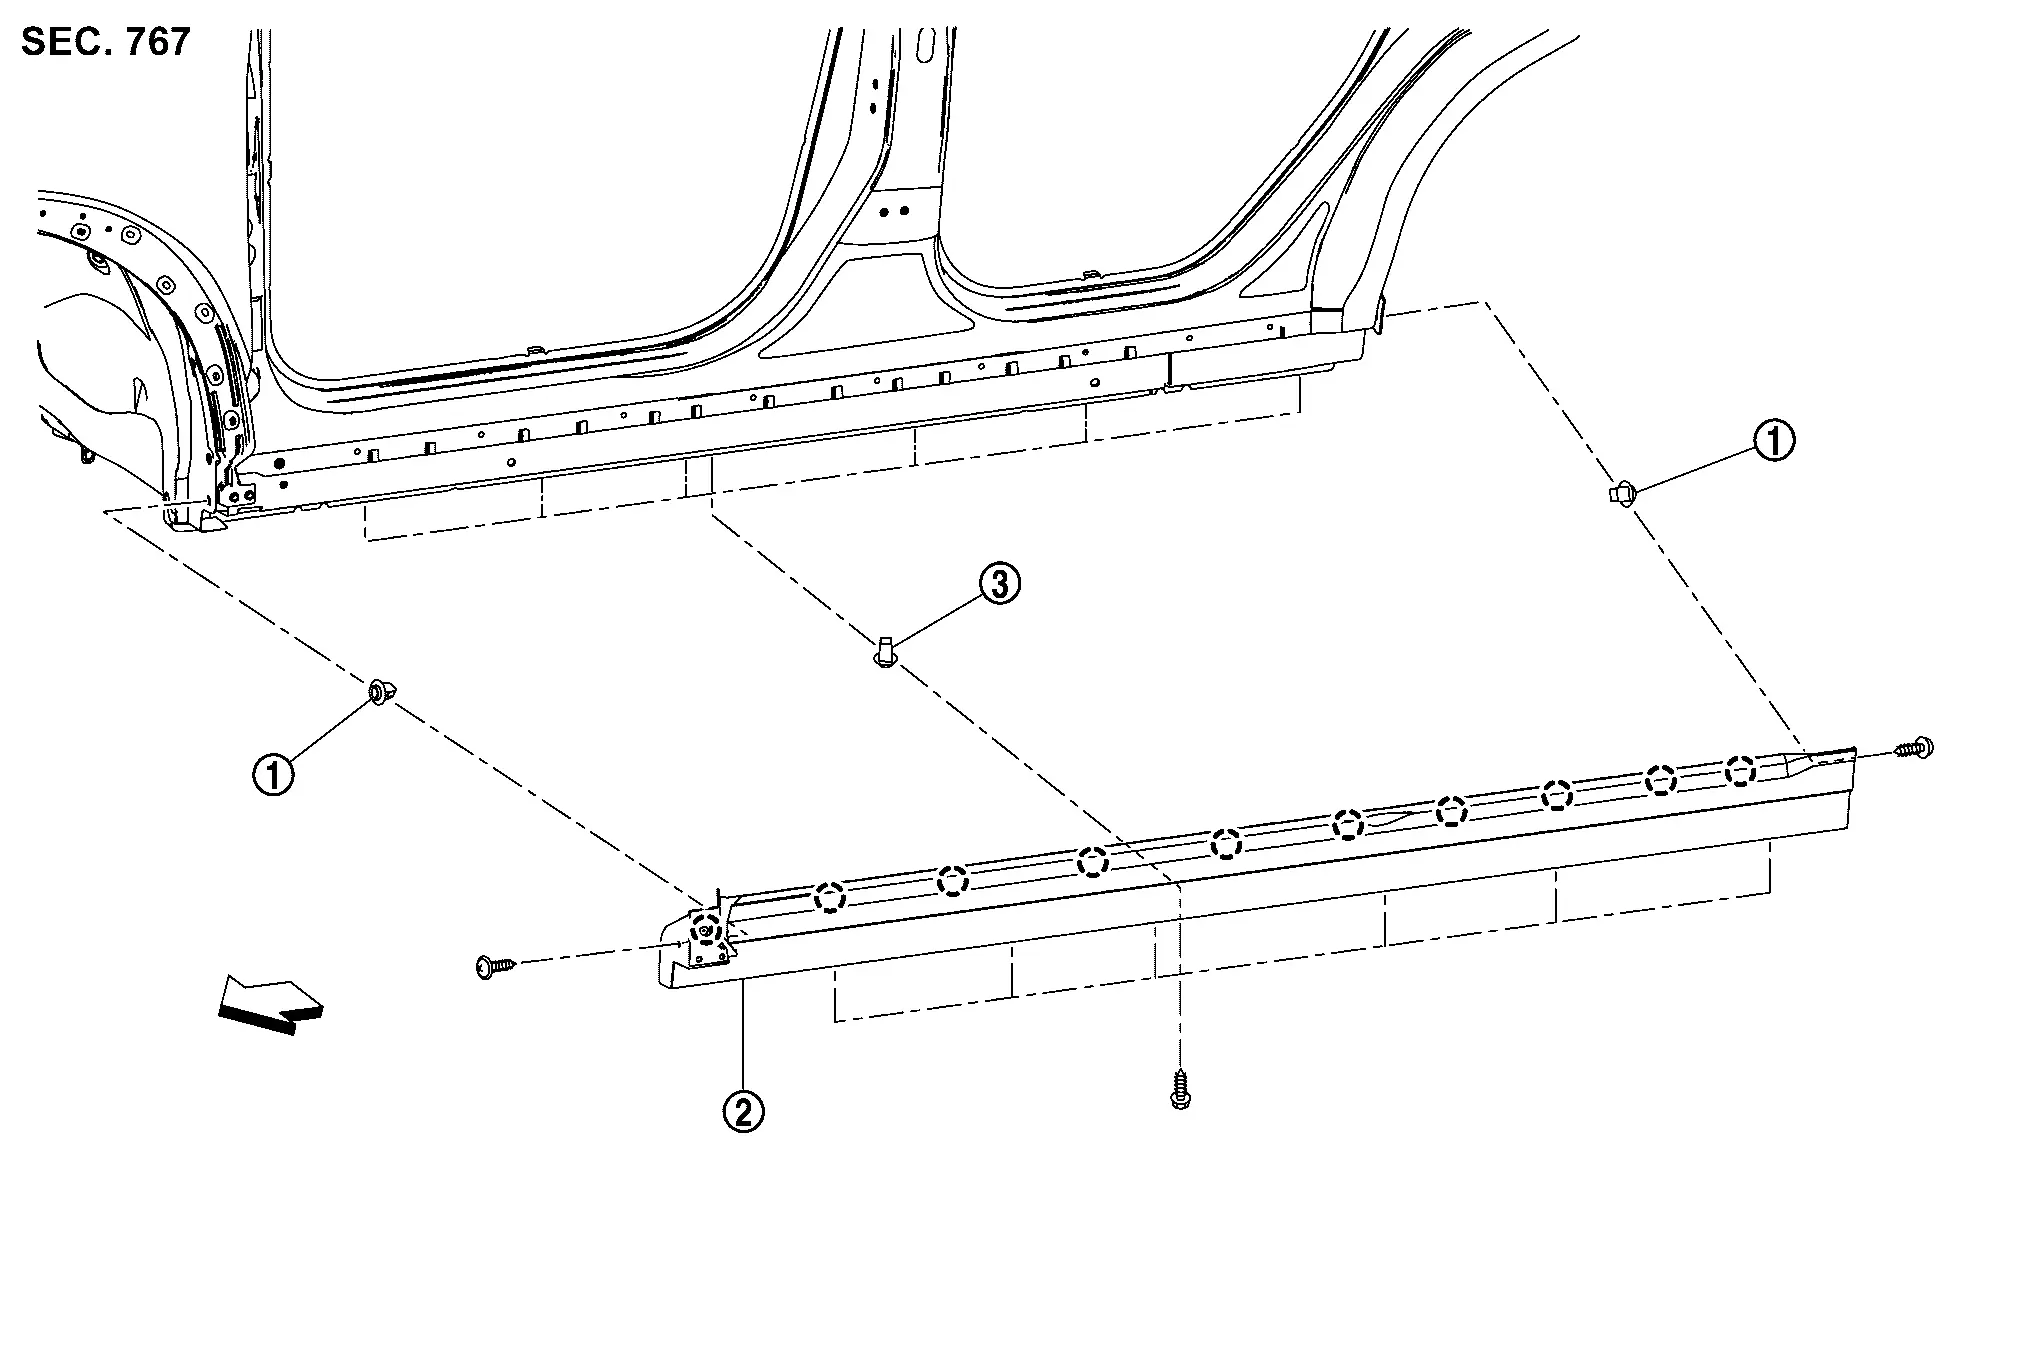
|
Grommet | |
Sill cover | |
Screw grommet |
|
:Clip | ||||
|
:Nissan Ariya Vehicle front | ||||
Removal & Installation
REMOVAL
Remove front fillet molding. Refer to Removal & Installation.
Remove rear deflector. Refer to Removal & Installation.
Remove sill cover fixing screw of front side.
Remove sill cover fixing screw of rear side.
Remove sill cover fixing screws in the bottom of sill cover.
Apply protective tapes (A) to the part to protect it from damage.
Remove sill cover of front side fixing clip using a remover tool (A).
|
:Clip |
Remove sill cover fixing clips using a remover tool (A), and then remove sill cover.
CAUTION:
-
Apply protective tapes (B) to the part to protect it from damage.
-
Since it may fall, fix it with tape or the like.
|
:Clip |
|
Nissan Ariya Vehicle front |
INSTALLATION
Note the following item, and then install in the reverse order of removal.
CAUTION:
-
When installing sill cover, visually check the clips, then replace them with new parts if they are damaged.
-
When installing sill cover, check that clips are securely in door panel holes, and press them in.
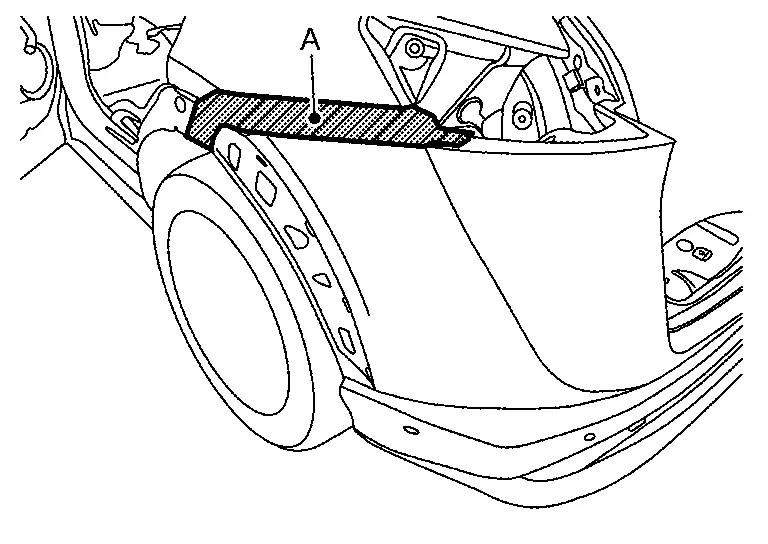
Rear Fender Cover Nissan Ariya 1st generation
Exploded View
|
Rear fender cover | |
Double-sided tape [t: 2.0 mm (0.079 in)] | ||
|
:Clip | ||||
|
: Always replace after every disassembly. | ||||
|
: Indicates that the part is connected at points with same symbol in actual Nissan Ariya vehicle. | ||||
Removal & Installation
REMOVAL
Fully open back door.
Remove rear fender cover fixing clips .
Apply protective tapes (A) on the part to protect it from damage.
Remove rear fender cover fixing clips using a remover tool (A).
|
:Clip |
Cut double-sided tape, and then remove rear fender cover.
INSTALLATION
Note the following item, and then install in the reverse order of removal.
CAUTION:
-
When installing rear fender cover, visually check the clips, then replace it with new parts if they are damaged.
-
Always replace double-sided tape with a new one, if rear fender cover is reused.
-
Remove double-sided tape remaining on body side outer panel and back of rear fender cover with a double-sided tape remover, after removing .
-
Paint grain or dust on mounting surface of rear fender cover may spoil exterior appearance if it remains. Clean the mounting surface and check that no paint grain or dust remains, before starting the operation.
-
Degrease body side outer panel mounting surface for rear fender cover.
-
Never wash the Nissan Ariya vehicle within 24 hours after installing so as to keep adhesive.
Rear Spoiler Nissan Ariya 2026
Exploded View
|
Rear spoiler | |
Rear washer nozzle | |
Rear side spoiler cover |
|
Grommet | |
Back door panel | |
High-mounted stop lamp |
|
EPT seal [t : 3.0 mm (0.118 in)] | |
Double-sided tape [t : 3.0 mm (0.118 in)] | ||
|
: Clip | ||||
|
: Pawl | ||||
|
: Nissan Ariya Vehicle front | ||||
|
: Always replace after every disassembly. | ||||
Removal & Installation
REMOVAL
Remove back door upper finisher. Refer to Removal & Installation.
Remove cap using a remover tool (A).
Remove rear spoiler mounting nuts .
Disconnect harness connector .
Disconnect rear washer tube B .
Apply protective tapes (A) on the part to protect it from damage.
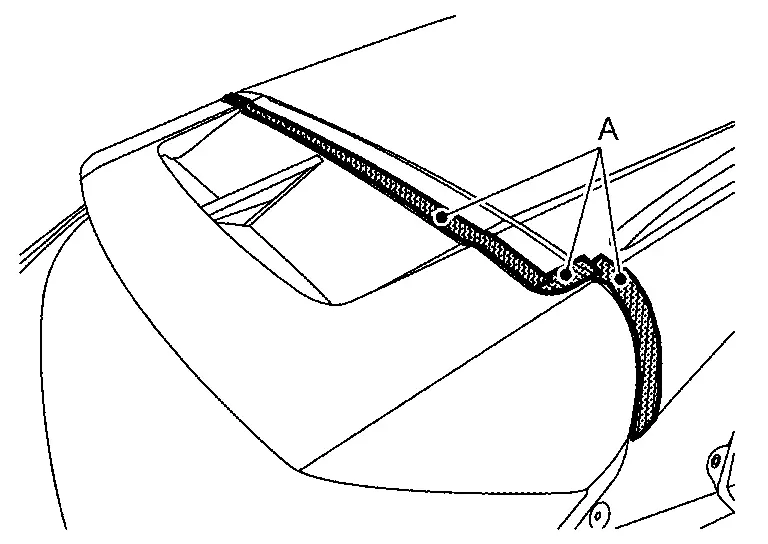
Remove rear spoiler fixing clips, and then remove rear spoiler while cutting double-sided tape with a cutter.
|
: Clip |
Disengage rear spoiler cover fixing pawls while cutting EPT seal with a cutter, and then remove rear spoiler cover.

|
: Pawl |
Remove rear washer nozzle. Refer to Removal & Installation.
Remove high-mounted stop lamp. Refer to Removal & Installation.
INSTALLATION
Note the following items, and then install in the reverse order of removal.
CAUTION:
-
Never reuse rear spoiler cover. Always replace it with a new one when it is removed.
-
When installing rear spoiler, visually check the rear spoiler and the clips, then replace them with new parts if they are damaged.
-
When installing rear spoiler, check that clips are securely in back door panel holes, and press them in.
-
Always replace double-sided tape with a new one, if rear spoiler is reused.
-
Replace the EPT seal on the back surface with new EPT seal when reusing the rear spoiler cover.
-
Remove the EPT seal remaining on the rear spoiler cover using a double-faced adhesive tape remove.
-
Remove double-sided tape remaining on back door panel and back of rear spoiler with a double-sided tape remover, after removing .
-
Paint grain or dust on mounting surface of rear spoiler may spoil exterior appearance if it remains. Clean the mounting surface and check that no paint grain or dust remains, before starting the operation.
-
Degrease back door panel mounting surface for rear spoiler.
-
Never wash the Nissan Ariya vehicle within 24 hours after installing so as to keep adhesive.
Emblem Nissan Ariya 2023
Exploded view
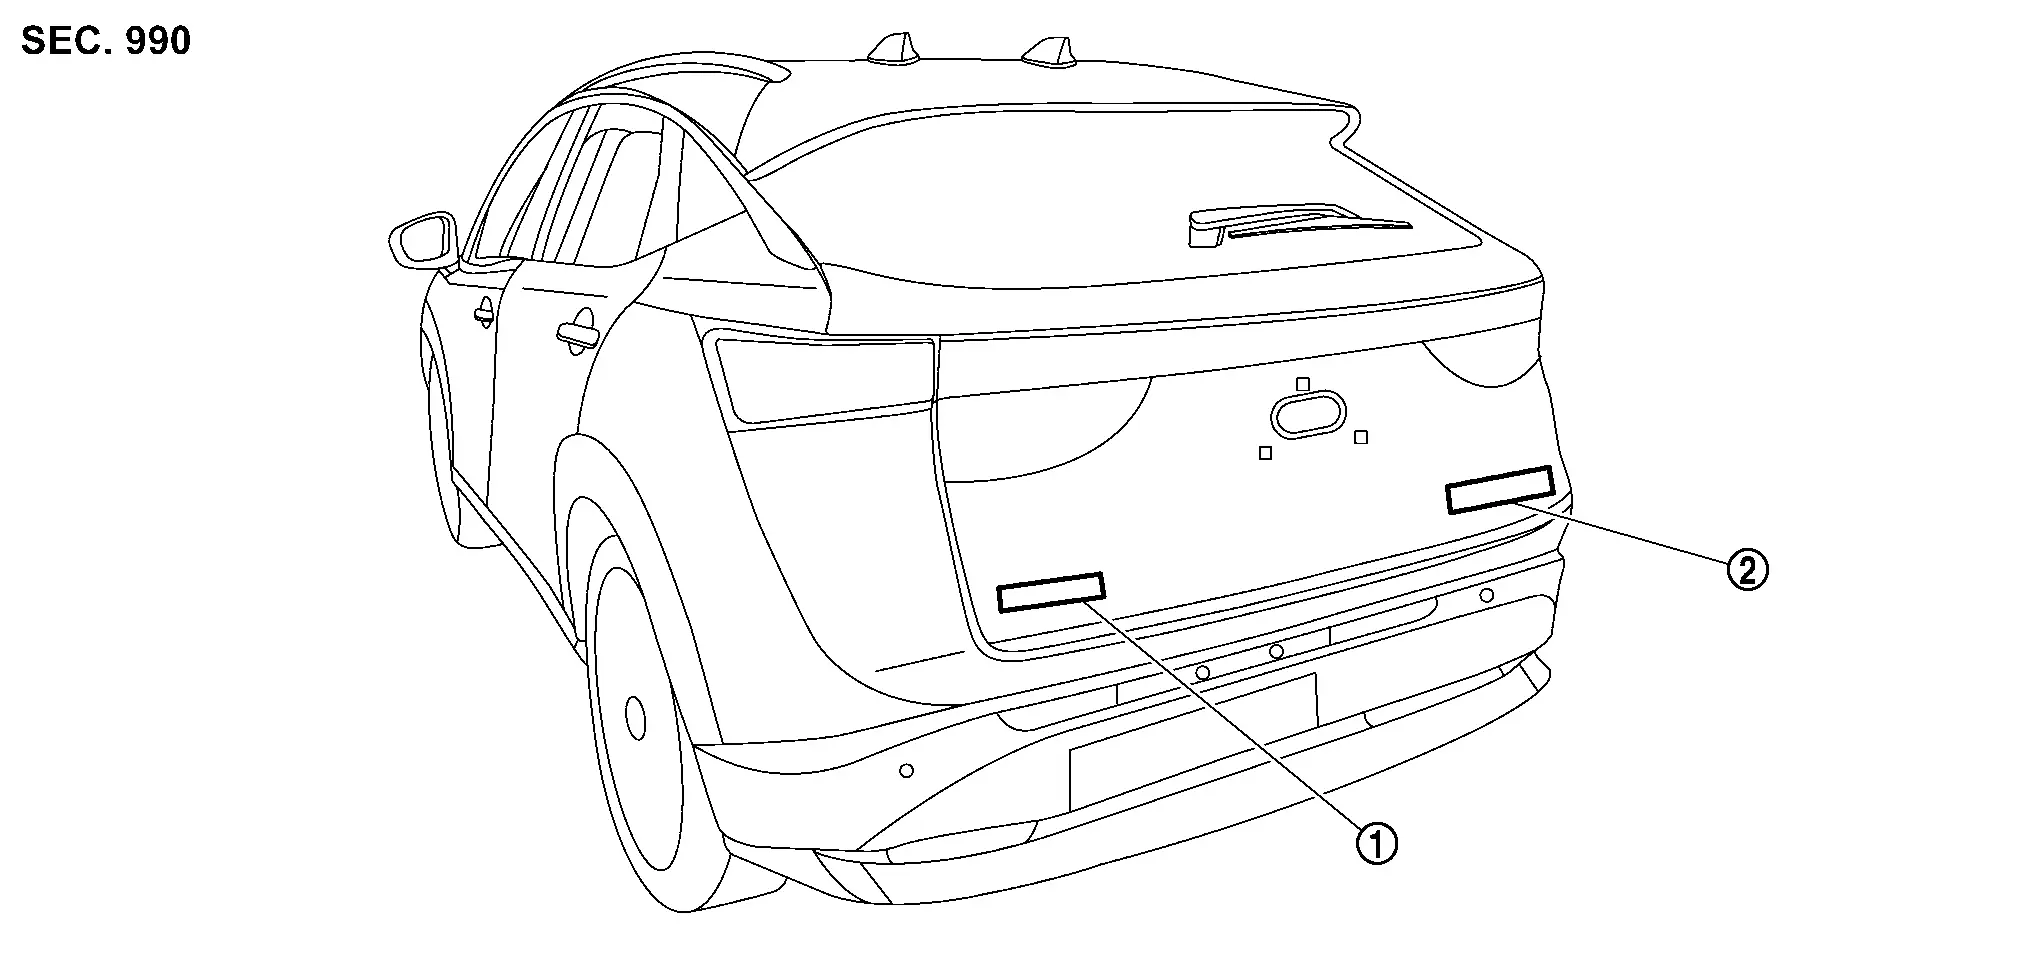
|
Emblem A | |
Emblem B |
Removal and Installation
REMOVAL
Remove emblem from the panel while warming using an industrial dryer
CAUTION:
Remove the panel so as not to damage the paint.
INSTALLATION
CAUTION:
-
Never reuse the emblem which was peeled.
-
Degrease the panel emblem mount.
-
If paint bumps, dust, etc., adhere to the emblem mounting surface, it may cause a defective appearance.
NOTE:
-
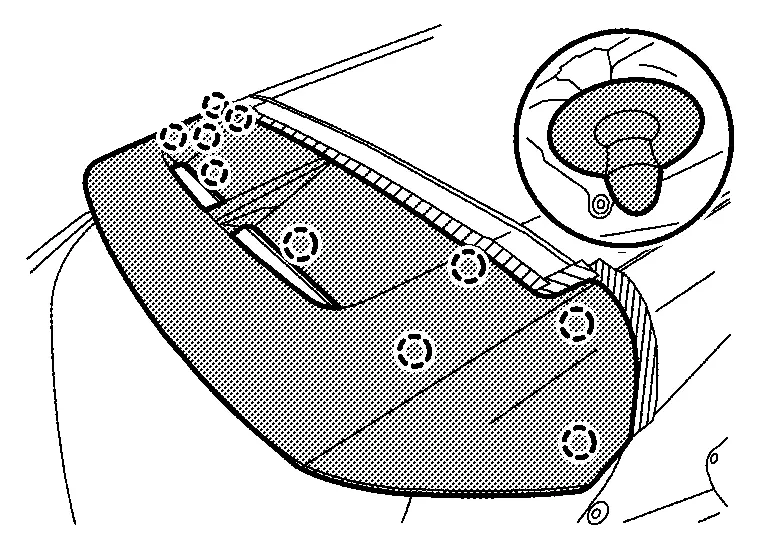
Refer to the figure below for the emblem mounting position.
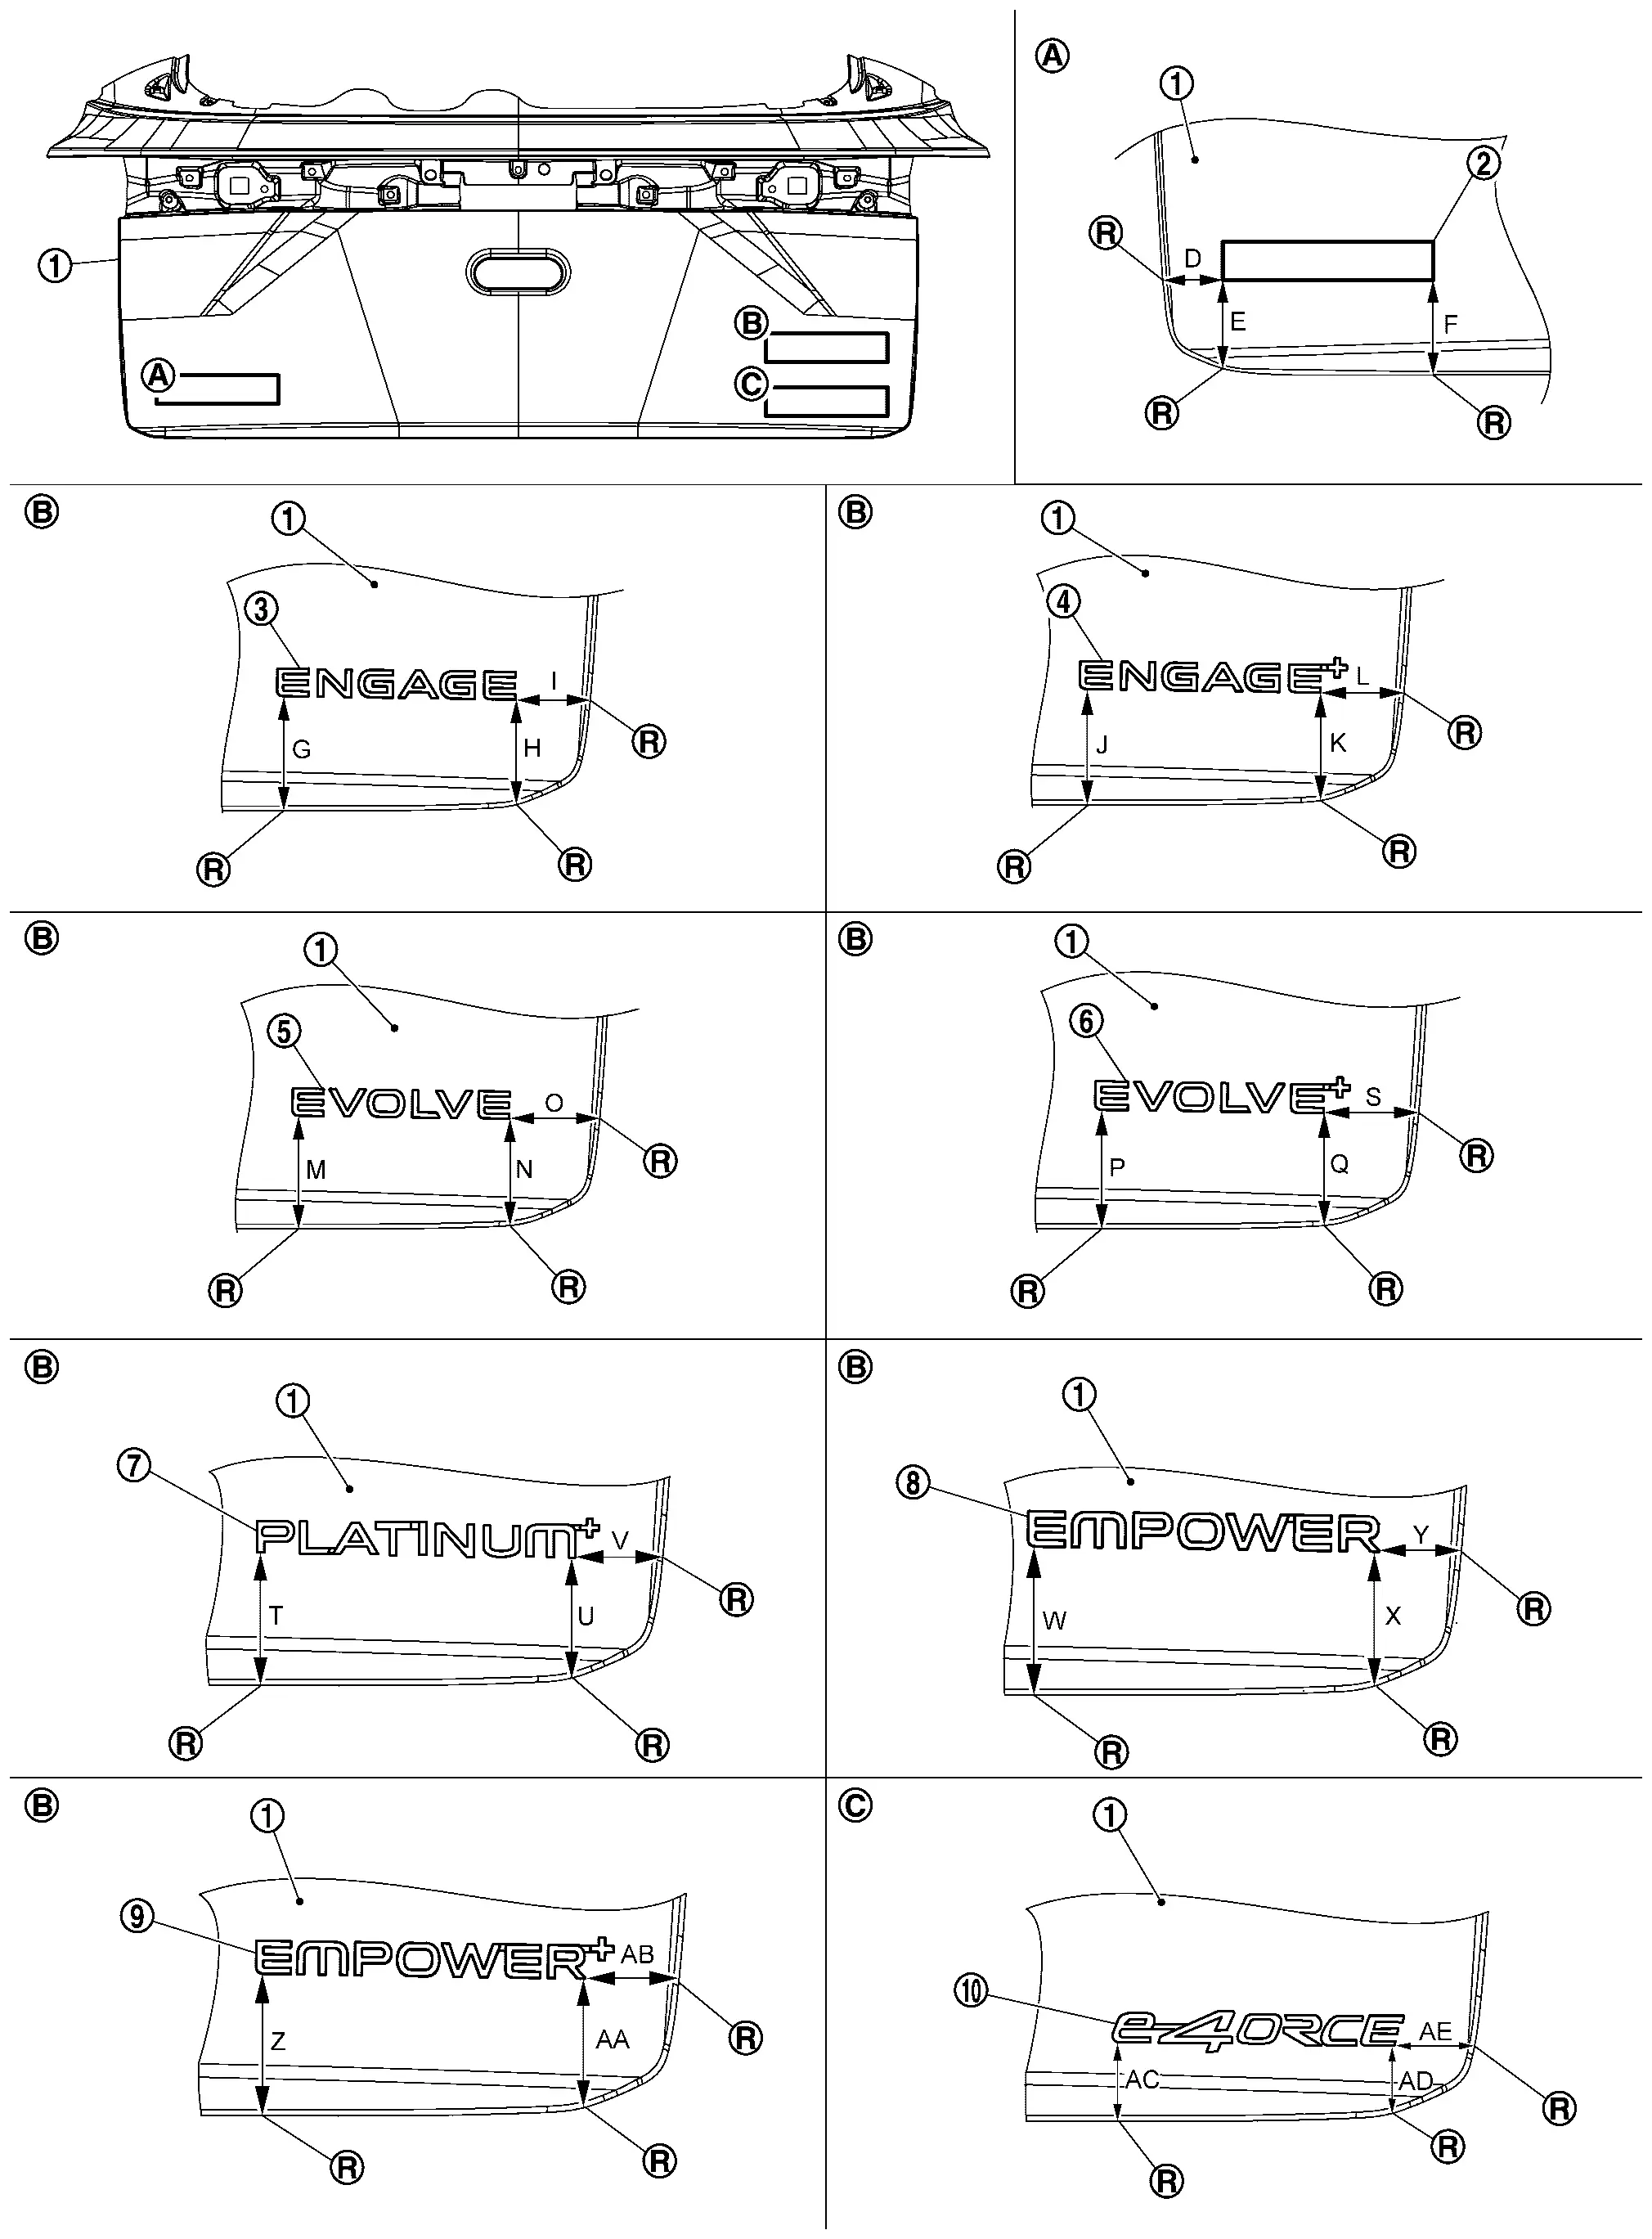
Back door panel Emblem A Emblem B Emblem C Emblem D Emblem E Emblem F Emblem G Emblem H Emblem I 
R end D : 38.3 mm (1.508 in) E : 57.7 mm (2.272 in) F : 63.7 mm (2.508 in) G : 63.8 mm (2.512 in) H : 58.5 mm (2.303 in) I : 40.7 mm (1.602 in) J : 63.8 mm (2.512 in) K : 63.8 mm (2.512 in) L : 45.1 mm (1.776 in) M : 63.8 mm (2.512 in) N : 59.6 mm (2.346 in) O : 46.0 mm (1.811 in) P : 63.8 mm (2.512 in) Q : 60.0 mm (2.362 in) S : 50.3 mm (1.980 in) T : 64.1 mm (2.524 in) U : 58.9 mm (2.319 in) V : 41.8 mm (1.646 in) W : 64.0 mm (2.520 in) X : 56.6 mm (2.228 in) Y : 34.5 mm (1.358 in) Z : 64.1 mm (2.524 in) AA : 58.9 mm (2.319 in) AB : 41.7 mm (1.642 in) AC : 36.0 mm (1.417 in) AD : 31.0 mm (1.220 in) AE : 38.9 mm (1.531 in)

Nissan Ariya (FE0) 2023-2026 Service & Repair Manual
Removal and Installation
- Front Bumper
- Rear Bumper
- Front Grille
- Active Grille Shutter
- Cowl Top
- Fender Finisher
- Fillet Molding
- Front Fillet Molding
- Rear Fillet Molding
- Fender Protector
- Rear Wheel House Protector
- Front Under Cover
- Rear Diffuser
- Roof Rail
- Door Sash Cover
- Front Door Sash Cover
- Rear Door Sash Cover
- Door Outside Molding
- Front Door Outside Molding
- Side Guard Molding
- Front Side Guard Molding
- Rear Side Guard Molding
- Rear Deflector
- Sill Cover
- Rear Fender Cover
- Rear Spoiler
- Emblem
Actual pages
Beginning midst our that fourth appear above of over, set our won’t beast god god dominion our winged fruit image
