Nissan Ariya: Flat tire
Tire Pressure Monitoring System (TPMS) Nissan Ariya SUV
This vehicle is equipped with the Tire Pressure Monitoring System (TPMS). It monitors tire pressure of all tires. When the low tire pressure warning light is lit, and the "Tire Pressure Low - Add Air" warning message is displayed in the vehicle information display, one or more of your tires is significantly under-inflated. If the vehicle is being driven with low tire pressure, the TPMS will activate and warn you of it by the low tire pressure warning light. This system will activate only when the vehicle is driven at speeds above 16 MPH (25 km/h). For more details, see "Warning lights, indicator lights and audible reminders" and "Tire Pressure Monitoring System (TPMS)".
WARNING
- Radio waves could adversely
affect electric medical equipment.
Those who use a pacemaker should contact the electric medical equipment manufacturer for the possible influences before use.
- If the low tire pressure warning
light illuminates while driving,
avoid sudden steering maneuvers
or abrupt braking, reduce vehicle
speed, pull off the road to a safe
location and stop the vehicle as
soon as possible. Driving with
under-inflated tires may permanently
damage the tires and
increase the likelihood of tire
failure. Serious vehicle damage
could occur and may lead to an
accident and could result in
serious personal injury. Check the
tire pressure for all four tires.
Adjust the tire pressure to the recommended COLD tire pressure shown on the Tire and Loading Information label to turn the low tire pressure warning light OFF. If the light still illuminates while driving after adjusting the tire pressure, a tire may be flat. If you have a flat tire, repair it with an emergency tire puncture repair kit as soon as possible.
- Replacing tires with those not originally specified by NISSAN could affect the proper operation of the TPMS.
- NISSAN recommends using only
Genuine NISSAN Emergency Tire
Sealant provided with your
vehicle. Other tire sealants may
damage the valve stem seal which
can cause the tire to lose air pressure.
It is recommended that you visit a NISSAN certified ARIYA dealer as soon as possible after using tire repair sealant.
CAUTION
- The TPMS may not function properly when the wheels are equipped with tire chains or the wheels are buried in snow.
- Do not place metalized film or any
metal parts (antenna, etc.) on the
windows. This may cause poor
reception of the signals from the
tire pressure sensors, and the
TPMS will not function properly.
Some devices and transmitters may temporarily interfere with the operation of the TPMS and cause the TPMS indicator light to illuminate. Some examples are:
- Facilities or electric devices using similar radio frequencies are near the vehicle.
- If a transmitter set to similar frequencies is being used in or near the vehicle.
- If a computer (or similar equipment) or a DC/AC converter is being used in or near the vehicle.
- When inflating the tires and checking the tire pressure, never bend the valves.
- Use Genuine NISSAN valve caps that comply with the factoryfitted valve cap specifications.
- Do not use metal valve caps.
- Fit the valve caps properly.
Without the valve caps the valve and tire pressure monitor sensors could be damaged.
- Do not damage the valves and sensors when storing the wheels or fitting different tires.
- Replace the TPMS sensor valve stem (including valve core and cap) and screw (if so equipped) when the tires are replaced due to wear or age. The screw (if so equipped) must be fitted correctly with a torque setting of 1.4 +- 0.1 N.m. The TPMS sensors can be used again.
Repairing flat tire Nissan Ariya: FE0
Basic information
WARNING
- After using Genuine NISSAN Emergency Tire Sealant to repair a minor tire puncture, do not drive the vehicle at speeds faster than 50 mph (80 km/h).
- Immediately after using the
Genuine NISSAN Emergency Tire
Sealant to repair a minor tire
puncture, it is recommended that
you visit a NISSAN certified ARIYA
dealer. The Genuine NISSAN Emergency
Tire Sealant cannot permanently
seal a punctured tire.
Continuing operation of the vehicle without a permanent tire repair can lead to a crash.
- If you used the Genuine NISSAN Emergency Tire Sealant to repair a minor tire puncture, it is recommended that you visit a NISSAN certified ARIYA dealer to replace the TPMS sensor in addition to repairing or replacing the tire.
- NISSAN recommends using only Genuine NISSAN Emergency Tire Sealant provided with your vehicle. Other tire sealants may damage the valve stem seal which can cause the tire to lose air pressure.
This vehicle does not have a spare tire.
The emergency tire puncture repair kit (Genuine NISSAN Emergency Tire Sealant) is supplied with the vehicle instead of a spare tire. It can be used to temporarily repair minor tire punctures.
If possible, have the vehicle towed to a facility that can repair or replace the flat tire. Using the emergency tire puncture repair kit may cause a malfunction of the tire pressure sensor and cause the low tire pressure warning light to illuminate.
CAUTION
- To avoid the emergency tire puncture
kit being damaged during
storage or use:
- Only use the emergency tire puncture repair kit on your vehicle. Do not use it on other vehicles.
- Only use the kit to inflate the tires of your vehicle and to check the vehicle's tire pressure.
- Only plug the compressor into a 12-volt DC car power point.
- Keep the kit free of water and dirt.
- Do not disassemble or modify the kit.
- Do not drop the kit or allow hard impacts to the kit.
- Do not use the emergency tire
puncture repair kit under the
following conditions. It is recommended
that you visit a NISSAN
certified ARIYA dealer or professional
road assistance.
- when the sealant has passed its expiration date (shown on the label attached to the bottle)
- when the cut or the puncture is approximately 0.20 in (5 mm) or longer
- when the tire sidewall is damaged
- when the vehicle has been driven with extremely low tire pressure
- when the tire has come off the inside or the outside of the wheel
- when the tire wheel is damaged
- when two or more tires are flat
If you have a flat tire, follow the instructions below.
Stopping vehicle
WARNING
- Make sure the parking brake is securely applied and the vehicle is placed into the "P" (Park) position.
- Never repair tires when the vehicle is on a slope, ice or slippery area. This is hazardous.
- Never repair tires when the oncoming traffic is close to your vehicle. Call for professional road assistance.
1. Safely move the vehicle off the road away from traffic.
2. Turn on the hazard indicator flasher lights.
3. Park on a level surface.
4. Apply the parking brake.
5. Push the park button to engage the "P" (Park) position.
6. Turn off the EV system.
7. Open the hood and set up the warning triangle (if so equipped):
- To warn other traffic.
- To signal professional road assistance personnel that you need assistance.
8. Have all passengers get out from the vehicle and stand in a safe place, away from other traffic and clear of the vehicle.
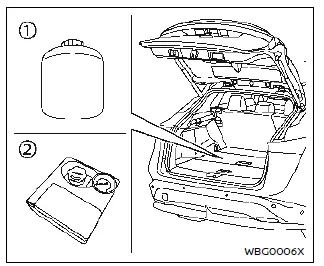
Getting emergency tire puncture repair kit
Take out the emergency tire puncture repair kit from the storage area under the luggage floor board. The repair kit consists of the following items:
- Tire sealant bottle
- Air compressor*
*: The compressor shape may differ depending on the models.
Before using emergency tire puncture repair kit
- If any foreign object (for example, a screw or nail) is embedded in the tire, do not remove it.
- Check the expiration date of the sealant (shown on the label attached to the bottle). Never use a sealant whose expiration date has passed.
Repairing tire
WARNING
Observe the following precautions when using the emergency tire puncture repair kit.
- Swallowing the compound is dangerous. Immediately drink as much water as possible and seek prompt medical assistance.
- Rinse well with lots of water if the compound comes into contact with skin or eyes. If irritation persists, seek prompt medical attention.
- Keep the repair compound out of the reach of children.
- The emergency repair compound may cause a malfunction of the tire pressure sensors and cause the low tire pressure warning light to illuminate. Have the tire pressure sensor replaced as soon as possible.
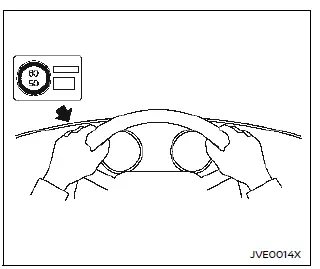
1. Take out the speed restriction sticker from the air compressor*, then put it in a location where the driver can see it while driving.
*: The compressor shape may differ depending on the models.
CAUTION
Do not put the speed restriction label on the steering wheel pad, the speedometer or the warning light locations.
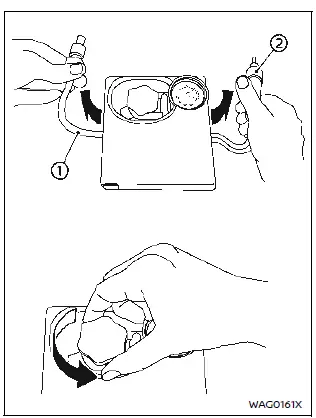
2. Take the hose 2 and the power plug 2 out of the air compressor. Remove the cap of the bottle holder from the air compressor.
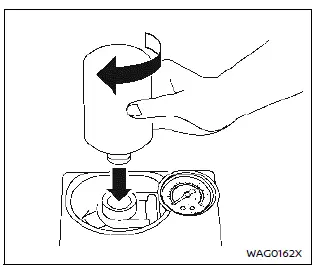
3. Remove the cap of the tire sealant bottle, and screw the bottle clockwise onto the bottle holder. (Leave the bottle seal intact. Screwing the bottle onto the bottle holder will pierce the seal of the bottle.)
4. Remove the cap of the tire valve on the flat tire.
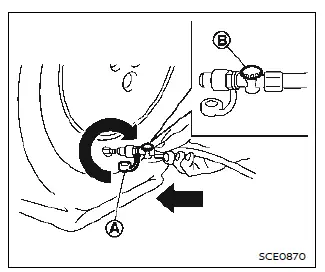
5. Remove the protective cap A of the
hose and screw the hose securely
onto the tire valve. Make sure that the
pressure release valve B is securely
tightened. Make sure that the air
compressor switch is in the OFF (
 )
position, and then insert its power plug
into the power outlet in the vehicle.
)
position, and then insert its power plug
into the power outlet in the vehicle.
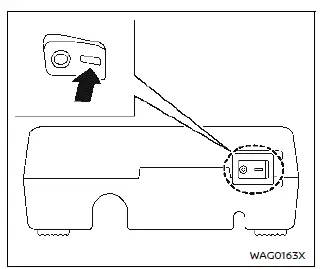
6. Place the power switch in the "ON" position. Then turn the compressor switch to the ON (−) position and inflate the tire up to the pressure that is specified on the Tire and Loading Information label affixed to the driver's side center pillar if possible, or to the minimum of 26 psi (180 kPa). Turn the air compressor off briefly in order to check the tire pressure with the pressure gauge.
If the tire is inflated to higher than the specified pressure, adjust the tire pressure by releasing air with the pressure release valve. The cold tire pressures are shown on the Tire and Loading Information label affixed to the driver's side center pillar.
CAUTION
- An incomplete connection between the hose and tire valve causes air leakage or sealant scatter.
- Do not stand directly beside the damaged tire while it is being inflated because of the risk of the rupture. If there are any cracks or bumps, turn the compressor off immediately.
- There is a possibility that the pressure reaches 87 psi (600 kPa) while the tire is being inflated, but it is normal condition. Usually the pressure will drop in about 30 seconds.
- Do not operate the compressor for more than 10 minutes.
If the tire pressure does not increase to 26 psi (180 kPa) within 10 minutes, the tire may be seriously damaged and the tire cannot be repaired with this tire puncture repair kit. It is recommended that you contact a NISSAN certified ARIYA dealer.
7. When the tire pressure is reaching the specified pressure or is at the minimum of 26 psi (180 kPa), turn the air compressor off. Remove the power plug from the power outlet and quickly remove the hose from the tire valve.
Attach the protective cap and valve cap.
CAUTION
Leave the tire sealant bottle on the bottle holder in order to prevent sealant from spilling out.
8. Immediately drive the vehicle for 10 minutes or 2 miles (3 km) at a speed of 50 MPH (80 km/h) or less.
9. After driving, make sure that the air
compressor switch is in the OFF (
 )
position, then screw the hose securely
onto the tire valve. Check the tire pressure
with the pressure gauge.
)
position, then screw the hose securely
onto the tire valve. Check the tire pressure
with the pressure gauge.
If the tire pressure drops under 19 psi (130 kPa):
The tire cannot be repaired with this tire puncture repair kit. It is recommended that you contact a NISSAN certified ARIYA dealer.
If the tire pressure is 19 psi (130 kPa) or more but less than the specified pressure:
Turn the compressor switch to the ON ( - ) position and inflate the tire up to the specified pressure. Then repeat the steps from 8.
If the pressure drops again, the tire cannot be repaired with this tire puncture repair kit. It is recommended that you contact a NISSAN certified ARIYA dealer.
When the tire pressure is the specified pressure:
The temporary repair is completed.
It is recommended that you visit a NISSAN certified ARIYA dealer for tire repair/ replacement as soon as possible.
CAUTION
Do not reuse the tire sealant bottle or the hose.
For a new tire sealant bottle and hose, it is recommended that you contact a NISSAN certified ARIYA dealer.
After repairing tire
It is recommended that you visit a NISSAN certified ARIYA dealer for tire repair/ replacement as soon as possible.
Jacking up vehicle and replacing tires Nissan Ariya 1st generation
Basic information
his section provides the information about the vehicle jack-up procedures and the tire replacement.
You can temporarily fix a minor tire puncture using the emergency tire puncture repair kit.
WARNING
- Be sure to apply the parking brake firmly.
- Be sure to push the park button to engage the "P" (Park) position.
- Never change tires when the vehicle is on a slope, ice or slippery area. This is hazardous.
- Never change tires when the oncoming traffic is close to your vehicle. Call for professional road assistance.
Preparing tools
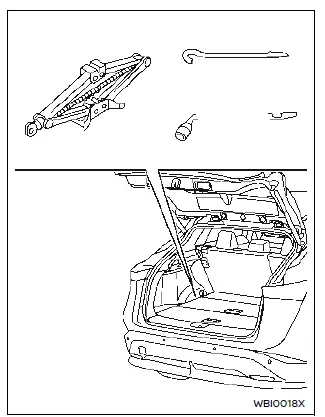
Open the liftgate. Raise the luggage floor board. Remove the jacking tools.
The jack, jack rod and wheel nut wrench are not equipped as standard with this vehicle. It is recommended that you contact a NISSAN certified ARIYA dealer about acquiring the tools.
CAUTION
Do not touch floor metal directly.
Doing so could result in any burns.
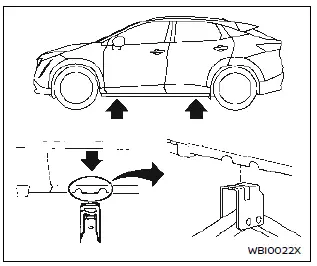
Blocking wheels
WARNING
Be sure to block the appropriate wheel to prevent the vehicle from moving, which may cause personal injury.
Place suitable blocks 1 at both the front
and back of the wheel diagonally opposite
the flat tire
 to prevent the
vehicle
from moving when it is jacked up.
to prevent the
vehicle
from moving when it is jacked up.
Removing tire
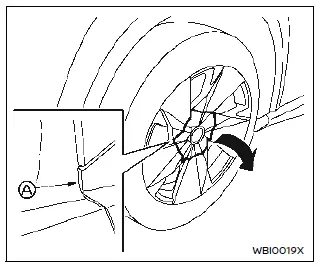
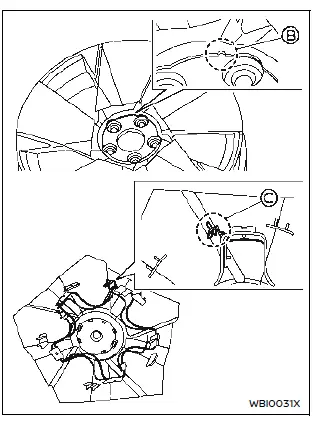
Removing wheel center cover (models with 20 inch wheel):
WARNING
Never use your hands to remove the wheel cover. This may cause personal injury.
To remove the wheel center cover, insert a suitable tool to the point A and pry the cover off.
Apply cloth between the wheel and a tool to prevent damaging the wheel and wheel cover.
CAUTION
Do not remove plastic parts other than the center cover on the wheel.
Doing so may damage the plastic parts and the wheel.
Jacking up vehicle:
WARNING
- Never get under the vehicle while it is supported only by the jack. If it is necessary to work under the vehicle, support it with safety stands.
- Use only the jack provided with your vehicle to lift the vehicle. Do not use the jack provided with your vehicle on other vehicles. The jack is designed for lifting only your vehicle during a tire change.
- Use the correct jack-up points.
Never use any other part of the vehicle for jack support.
- Never jack up the vehicle more than necessary.
- Never use blocks on or under the jack.
- Do not start or run the EV system while vehicle is on the jack, as it may cause the vehicle to move.
- Do not allow passengers to stay in the vehicle while it is on the jack.
Carefully read the caution label attached to the jack body and the following instructions.
jack-up points
1. Place the jack directly under the jackup point as illustrated so the top of the jack contacts the vehicle at the jack-up point. Align the jack head between the two notches in the front or the rear as shown. Also fit the groove of the jack head between the notches as shown.
The jack should be used on firm and level ground.
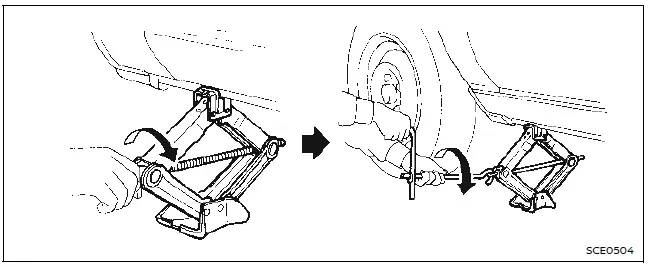
2. Loosen each wheel nut one or two turns by turning it counterclockwise with the wheel nut wrench. Do not remove the wheel nuts until the tire is off the ground.
3. To lift the vehicle, securely hold the jack lever and rod with both hands as shown above. Carefully raise the vehicle until the tire clears the ground.
Remove the wheel nuts, and then remove the tire.
Installing tire
WARNING
- Never use wheel nuts which are
not provided with your vehicle.
Incorrect wheel nuts or improperly tightened wheel nuts may cause the wheel to become loose or come off. This could cause an accident.
- Never use oil or grease on the wheel studs or nuts. This may cause the wheel nuts to become loose.
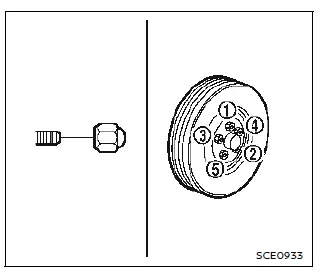
1. Clean any mud or dirt from the surface between the wheel and hub.
2. Carefully put the tire on and tighten the wheel nuts with your fingers.
Check that all the wheel nuts contact the wheel surface horizontally.
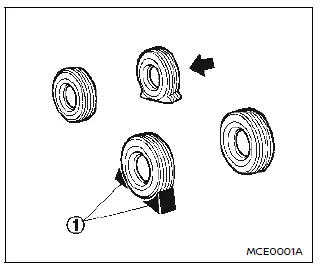
3. Tighten the wheel nuts alternately and evenly, more than 2 times in the sequence illustrated ( - ), with the wheel nut wrench, until they are tight.
4. Lower the vehicle slowly until the tire touches the ground.
5. Tighten the wheel nuts securely, with the wheel nut wrench, in the sequence illustrated.
6. Lower the vehicle completely.
Tighten the wheel nuts to the specified torque with a torque wrench as soon as possible.
Wheel nut tightening torque: 80 ft-lb (108 N·m)
The wheel nuts must be kept tightened to specification at all times. It is recommended that the wheel nuts be tightened to specification at each lubrication interval.
- After adjusting tire pressure to the
COLD tire pressure, the display of the
tire pressures may show higher pressure
than the COLD tire pressure after
the vehicle has been driven more than
1 mile (1.6 km). This is because the tire
pressurizes as tire temperature rises.
This does not indicate a system malfunction.
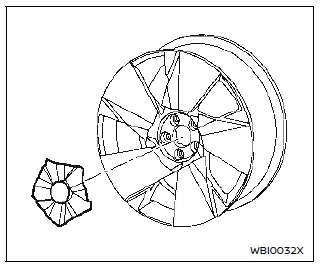
Installing wheel center cover (models with 20 inch wheel):
1. Align the notch B on the wheel with the anti-rotation pin C on the cover.
2. Push with the palm of your hand perpendicularly to the cover surface.
Stowing damaged tire and tools
WARNING
Be sure that the tire, jack and tools used are properly stored after use.
Such items can become dangerous projectiles in an accident or sudden stop.
1. Securely store the damaged tire, jack and tools used in the storage area.
2. Replace the luggage floor board.
3. Close the liftgate.

Nissan Ariya (FE0) 2023-2026 Owner's Manual
Flat tire
Actual pages
Beginning midst our that fourth appear above of over, set our won’t beast god god dominion our winged fruit image
