Nissan Ariya: Removal and Installation
- Front Door Finisher
- Front Door Sash Inner Cover
- Rear Door Finisher
- Body Side Trim
- Front Pillar Garnish
- Dash Side Finisher
- Kicking Plate
- Body Side Welt
- Center Pillar Lower Garnish
- Center Pillar Upper Garnish
- Floor Trim
- Headlining
- Luggage Trim
- Luggage Floor Spacer
- Luggage Floor Board
- Luggage Floor Carpet
- Luggage Floor Box
- Luggage Rear Plate
- Luggage Finisher Mask
- Luggage Side Lower Finisher
- Luggage Side Upper Finisher
- Rear Side Bracket
- Rear Parcel Shelf Finisher
- Rear Parcel Shelf Hook
- Back Door Trim
- Back Door Inner Finisher
- Back Door Pull Handle
- Back Door Upper Finisher
- Back Door Finisher Cap
Front Door Finisher Nissan Ariya 1st generation
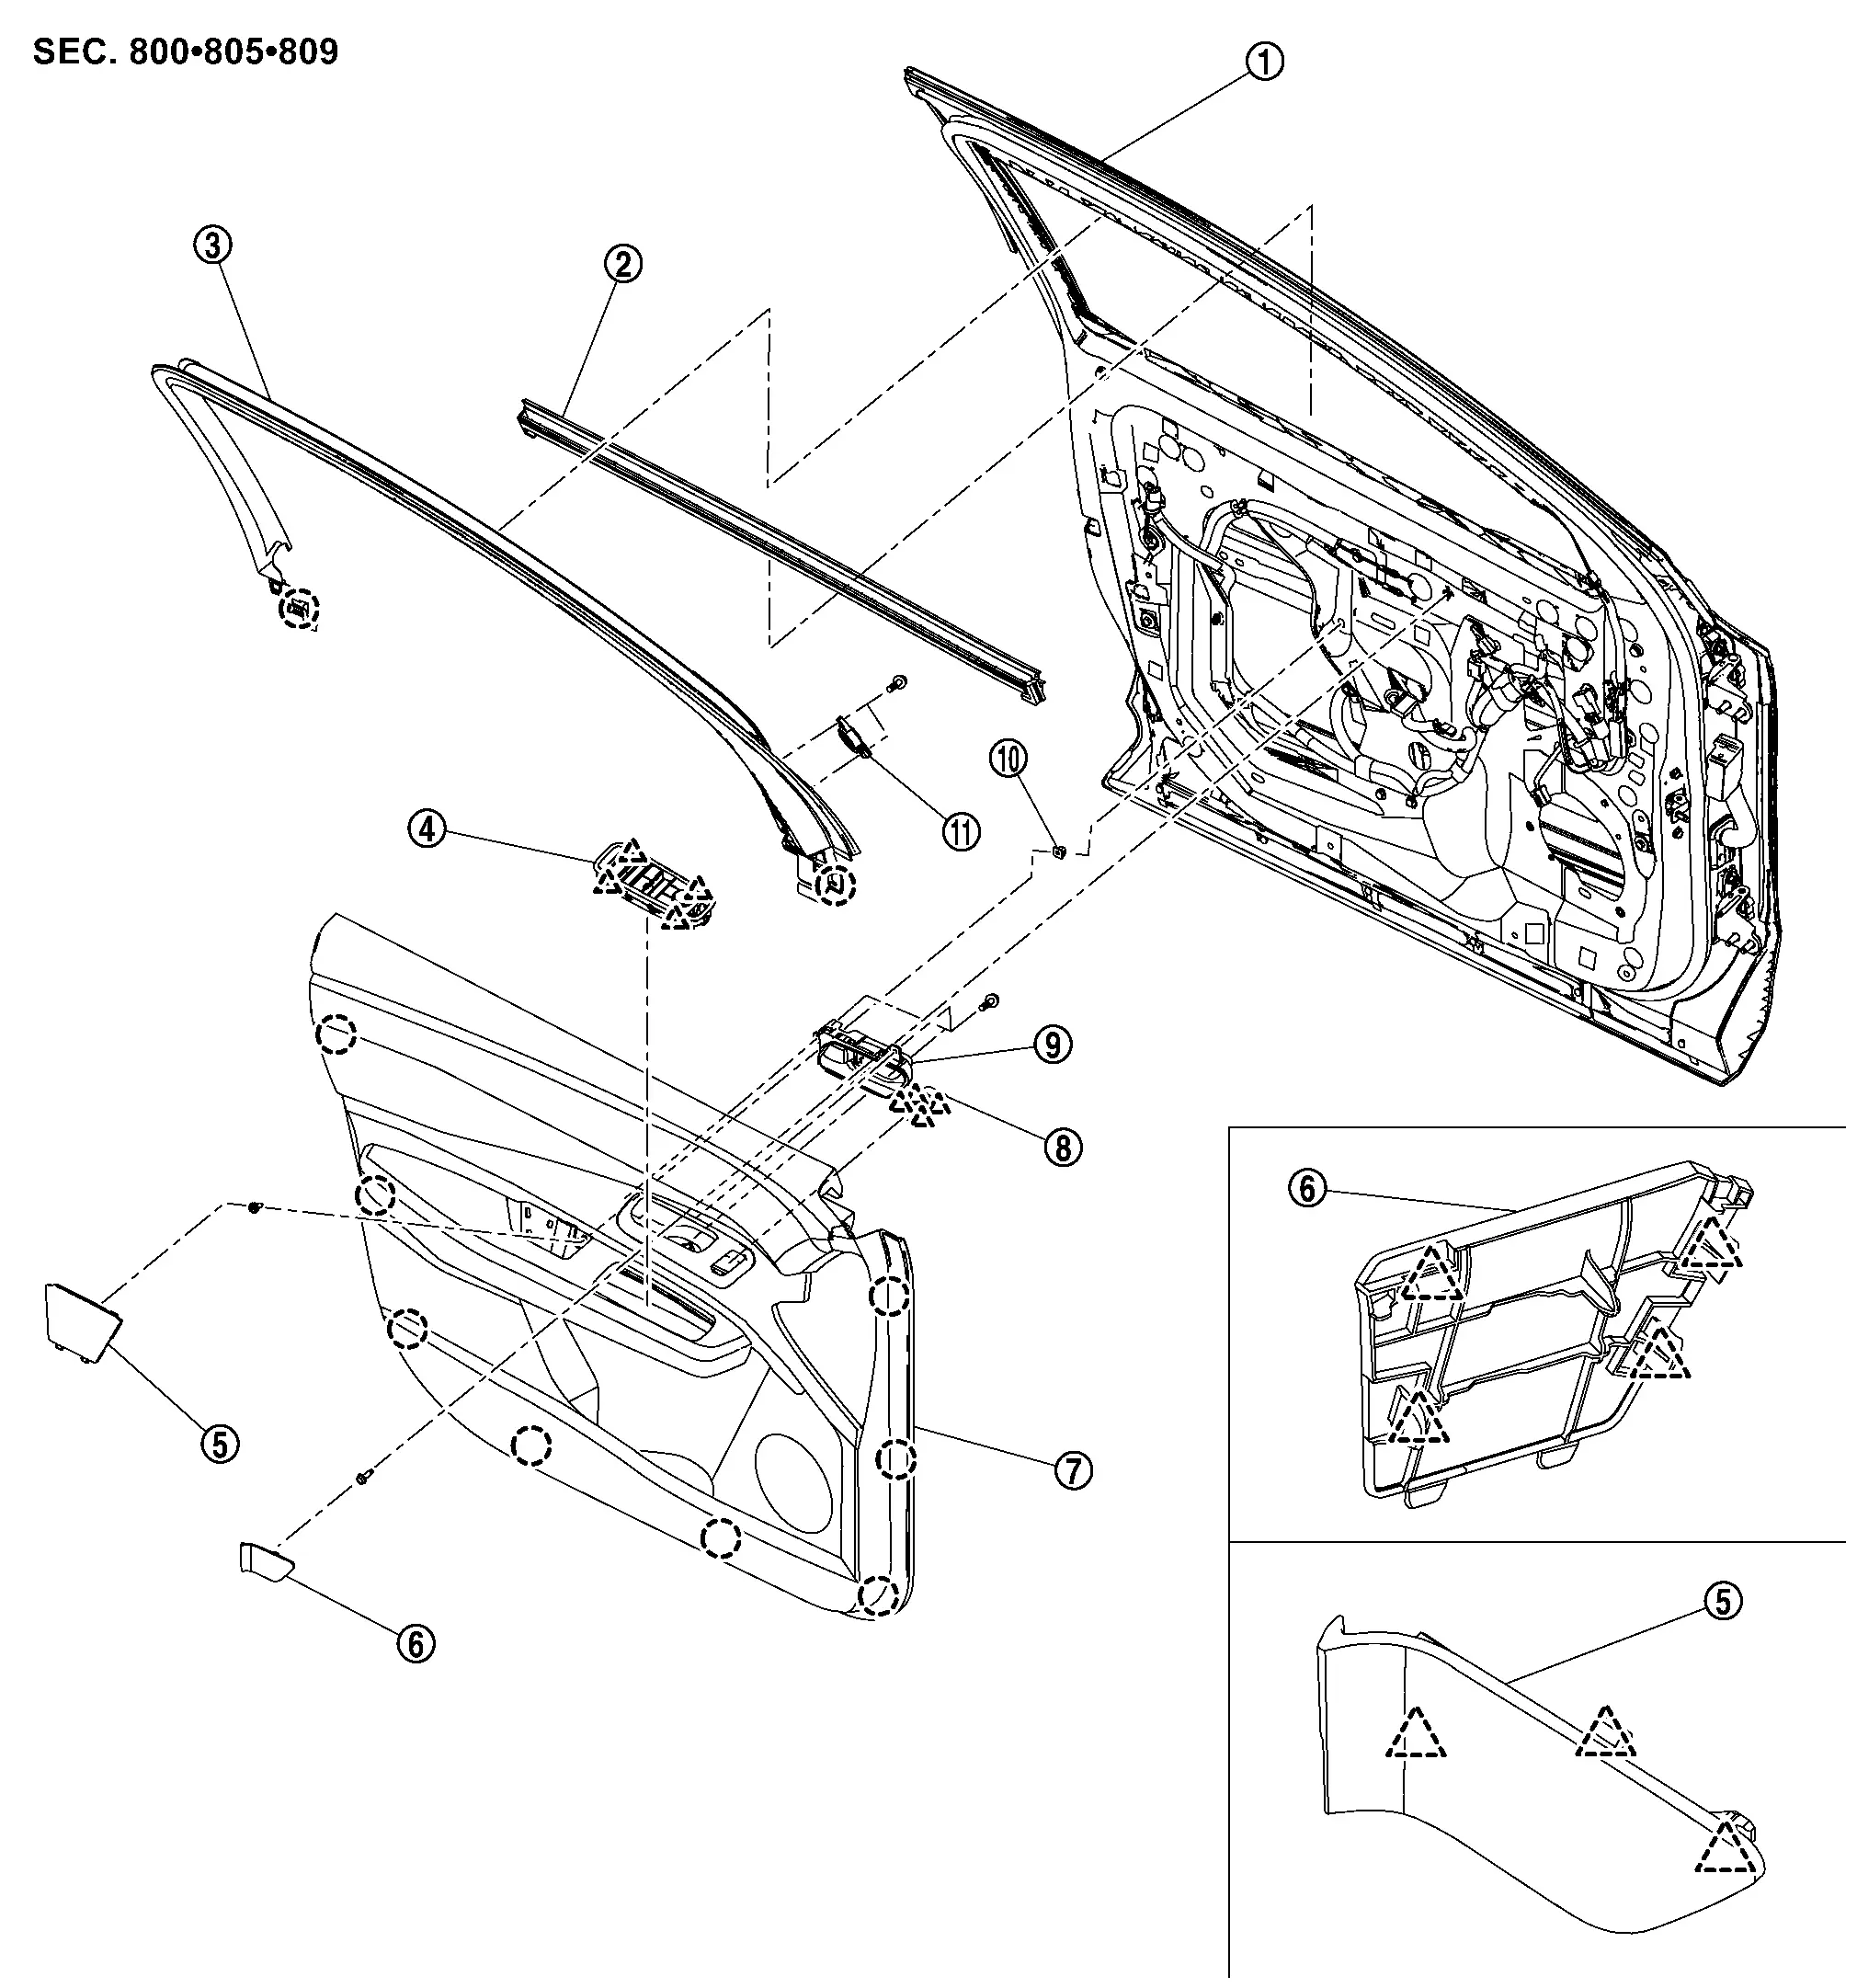
Exploded View
 |
Front door panel |  |
Inside seal |  |
Front door sash inner cover |
 |
Power window switch |  |
Pull handle cap |  |
Inside handle cap |
 |
Front door finisher |  |
Seat memory switch |  |
Inside handle |
 |
Grommet |  |
Twitter* | ||
 |
: Clip | ||||
 |
: Pawl | ||||
*: With BOSE audio
Removal & Installation
CAUTION:
Never damage front door panel.
REMOVAL
Fully open front door.
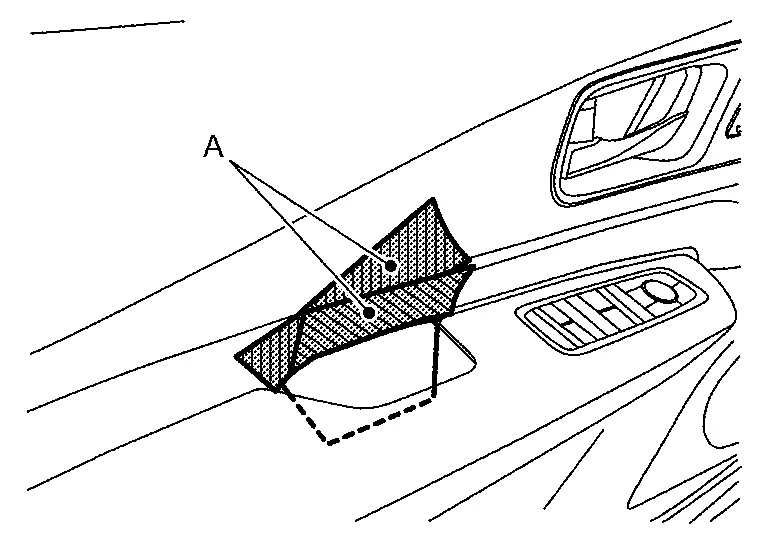
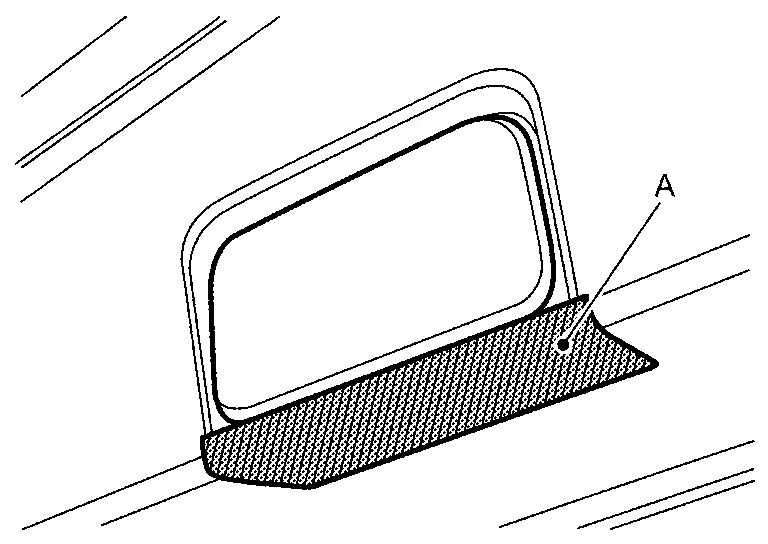
Apply protective tapes (A) on front door finisher to protect from damage.
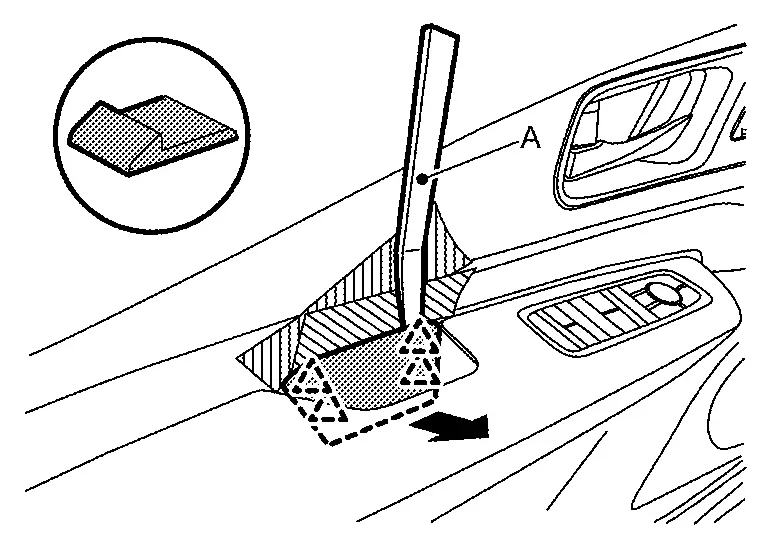
Disengage pull handle cap fixing pawls using a remover tool (A), and then remove pull handle cap.
|
: Pawl |
Disengage inside handle cap fixing pawls using a remover tool (A), and then remove inside handle cap.
|
: Pawl |
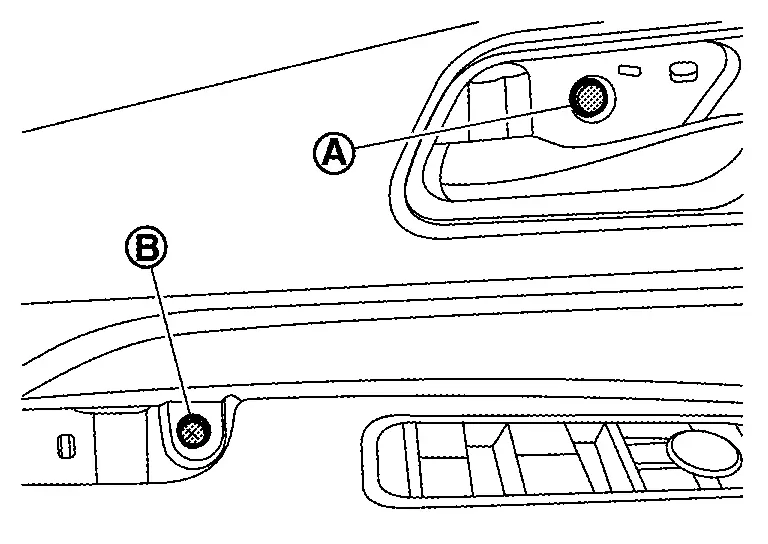
Remove front door finisher mounting bolt  and fixing screw
  .
.
Apply protective tapes (A) on front door sash inner cover to protect it from damage.
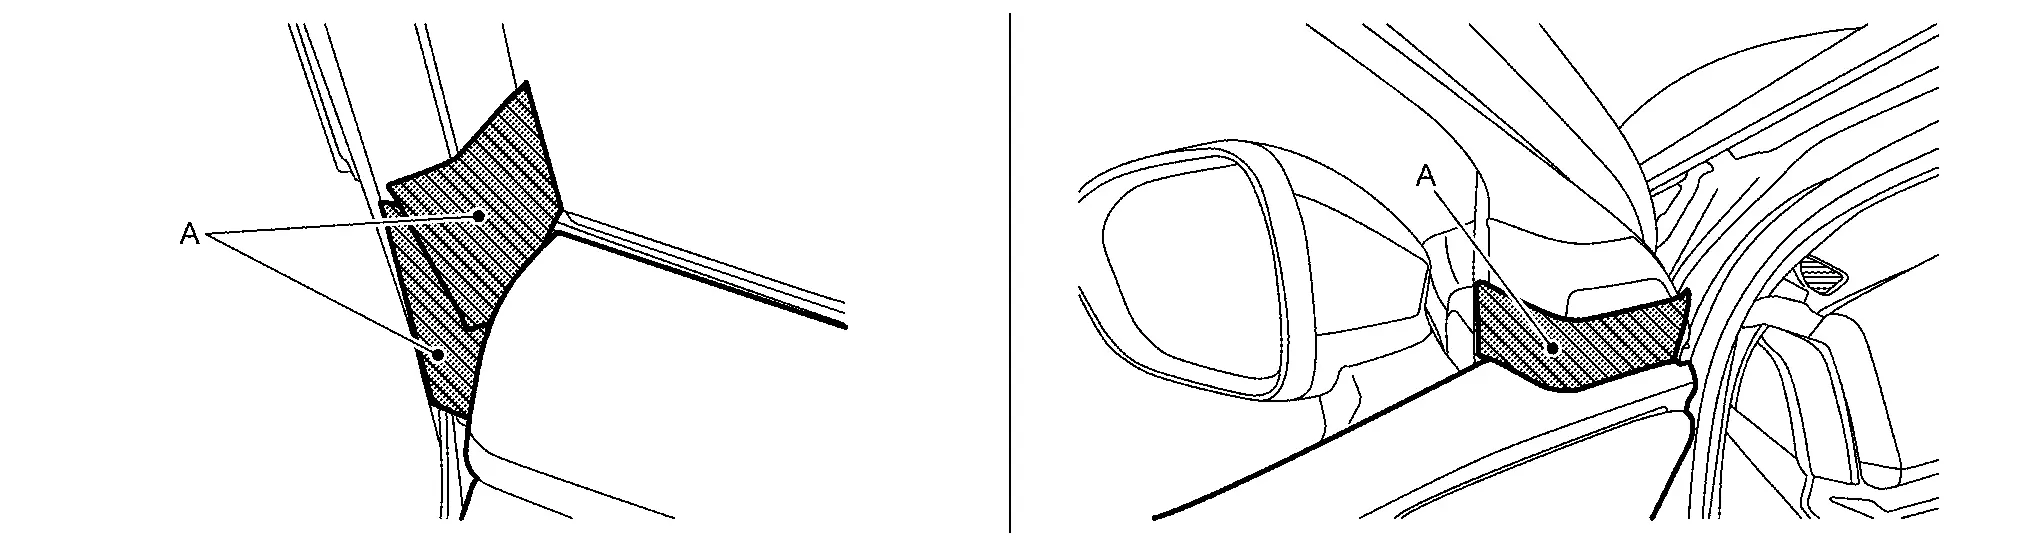
Apply protective tape (A) on front door panel to protect from damage.
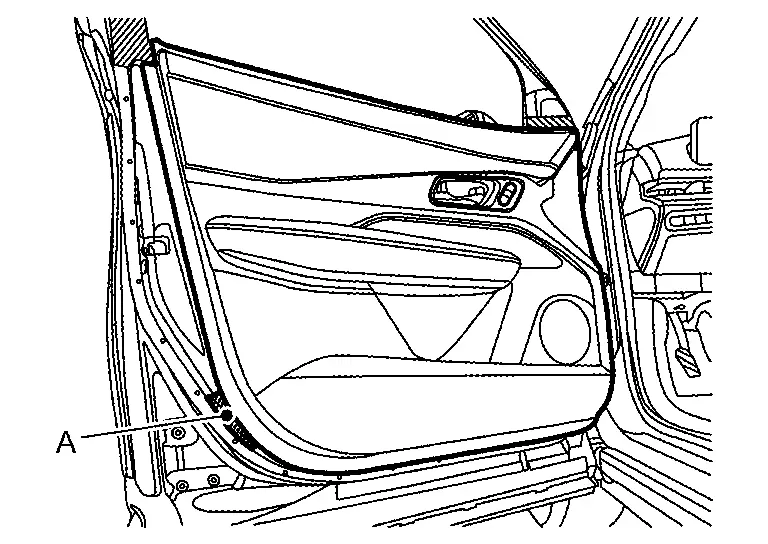
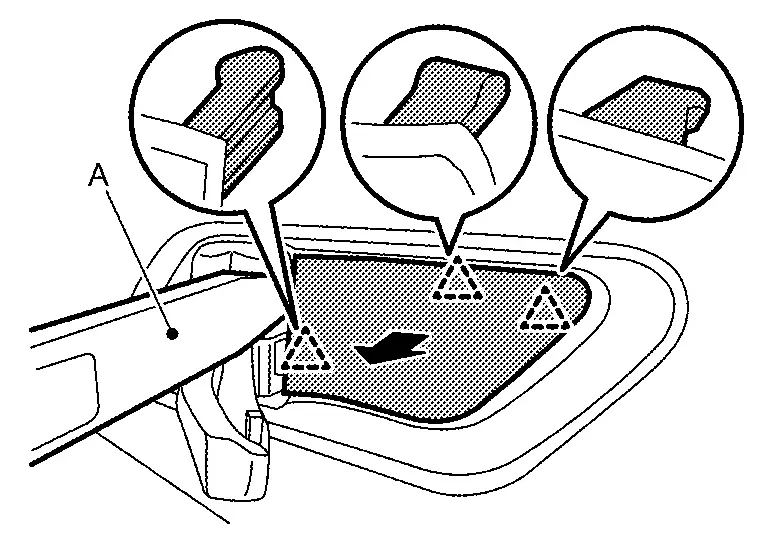
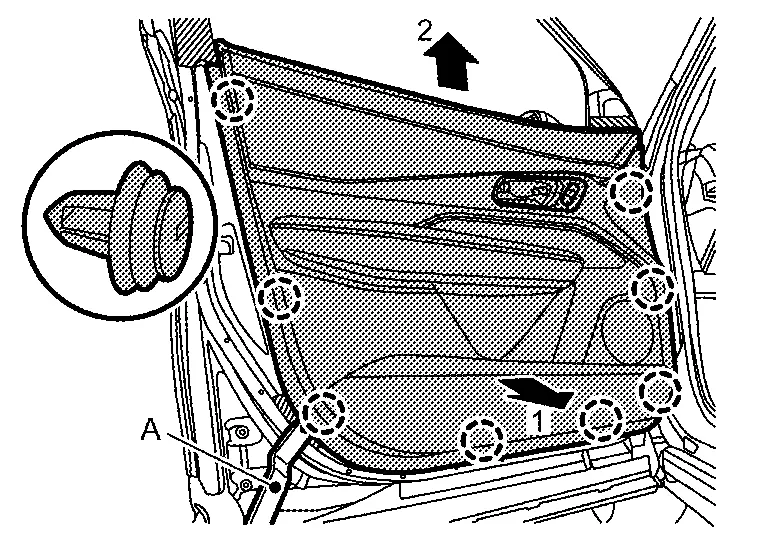
Disengage front door finisher fixing clips using a remover tool (A) according to numerical order 1→2 indicated by arrows as shown in the figure.
CAUTION:
Insert a remover tool between front door panel and clip to prevent damage to the parts, and then disengage clips.
|
: Clip |
Disconnect following harness connectors.
-
Power window switch
-
Door lock switch
-
Seat memory switch
-
Advanced ambient switch (front door) (With advanced ambient liting system)
-
Accent lighting (front door)
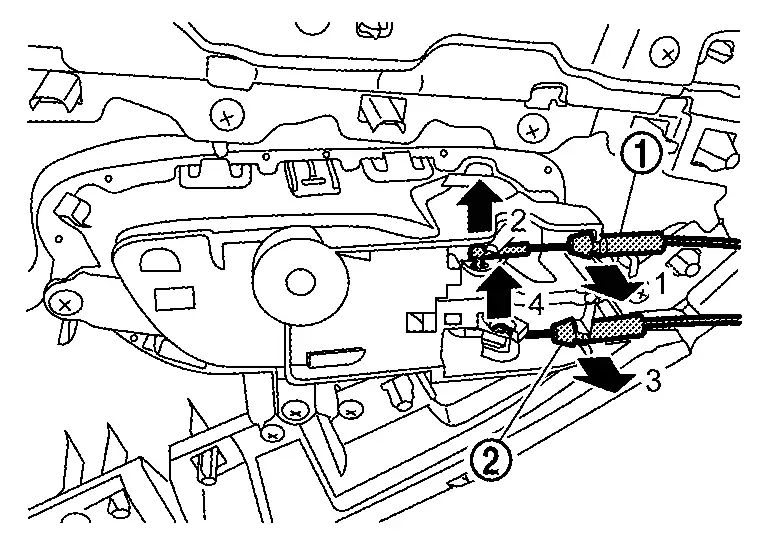
Disconnect lock knob cable (if equipped) and inside handle cable from inside handle according to numerical order 1→4 indicated by arrows as shown in the figure, and then remove front door finisher.
INSTALLATION
Note the following items, and then install in the reverse order of removal.
CAUTION:
-
Visually check clips for deformation and damage during installation. Replace with new ones if necessary.
-
Check in advance that clips are accurately aligned with the portions on front door panel, and then install by pressing in.
Front Door Sash Inner Cover Nissan Ariya 2026
Removal & Installation
CAUTION:
Never damage front door panel.
REMOVAL
Remove front door finisher. Refer to Removal & Installation.
Apply protective tapes (A) on front door panel to protect it from damage.

Disengage front door sash inner cover fixing clips. Remove front door sash inner cover according to numerical order 1→3 indicated by arrows as shown in the figure, and then remove front door sash inner cover.
|
: Clip |
Remove inside seal.
INSTALLATION
Note the following items, and then install in the reverse order of removal.
CAUTION:
-
Visually check clips for deformation and damage during installation. Replace with new ones if necessary.
-
Check in advance that clips are accurately aligned with the portions on front door panel, and then install by pressing in.
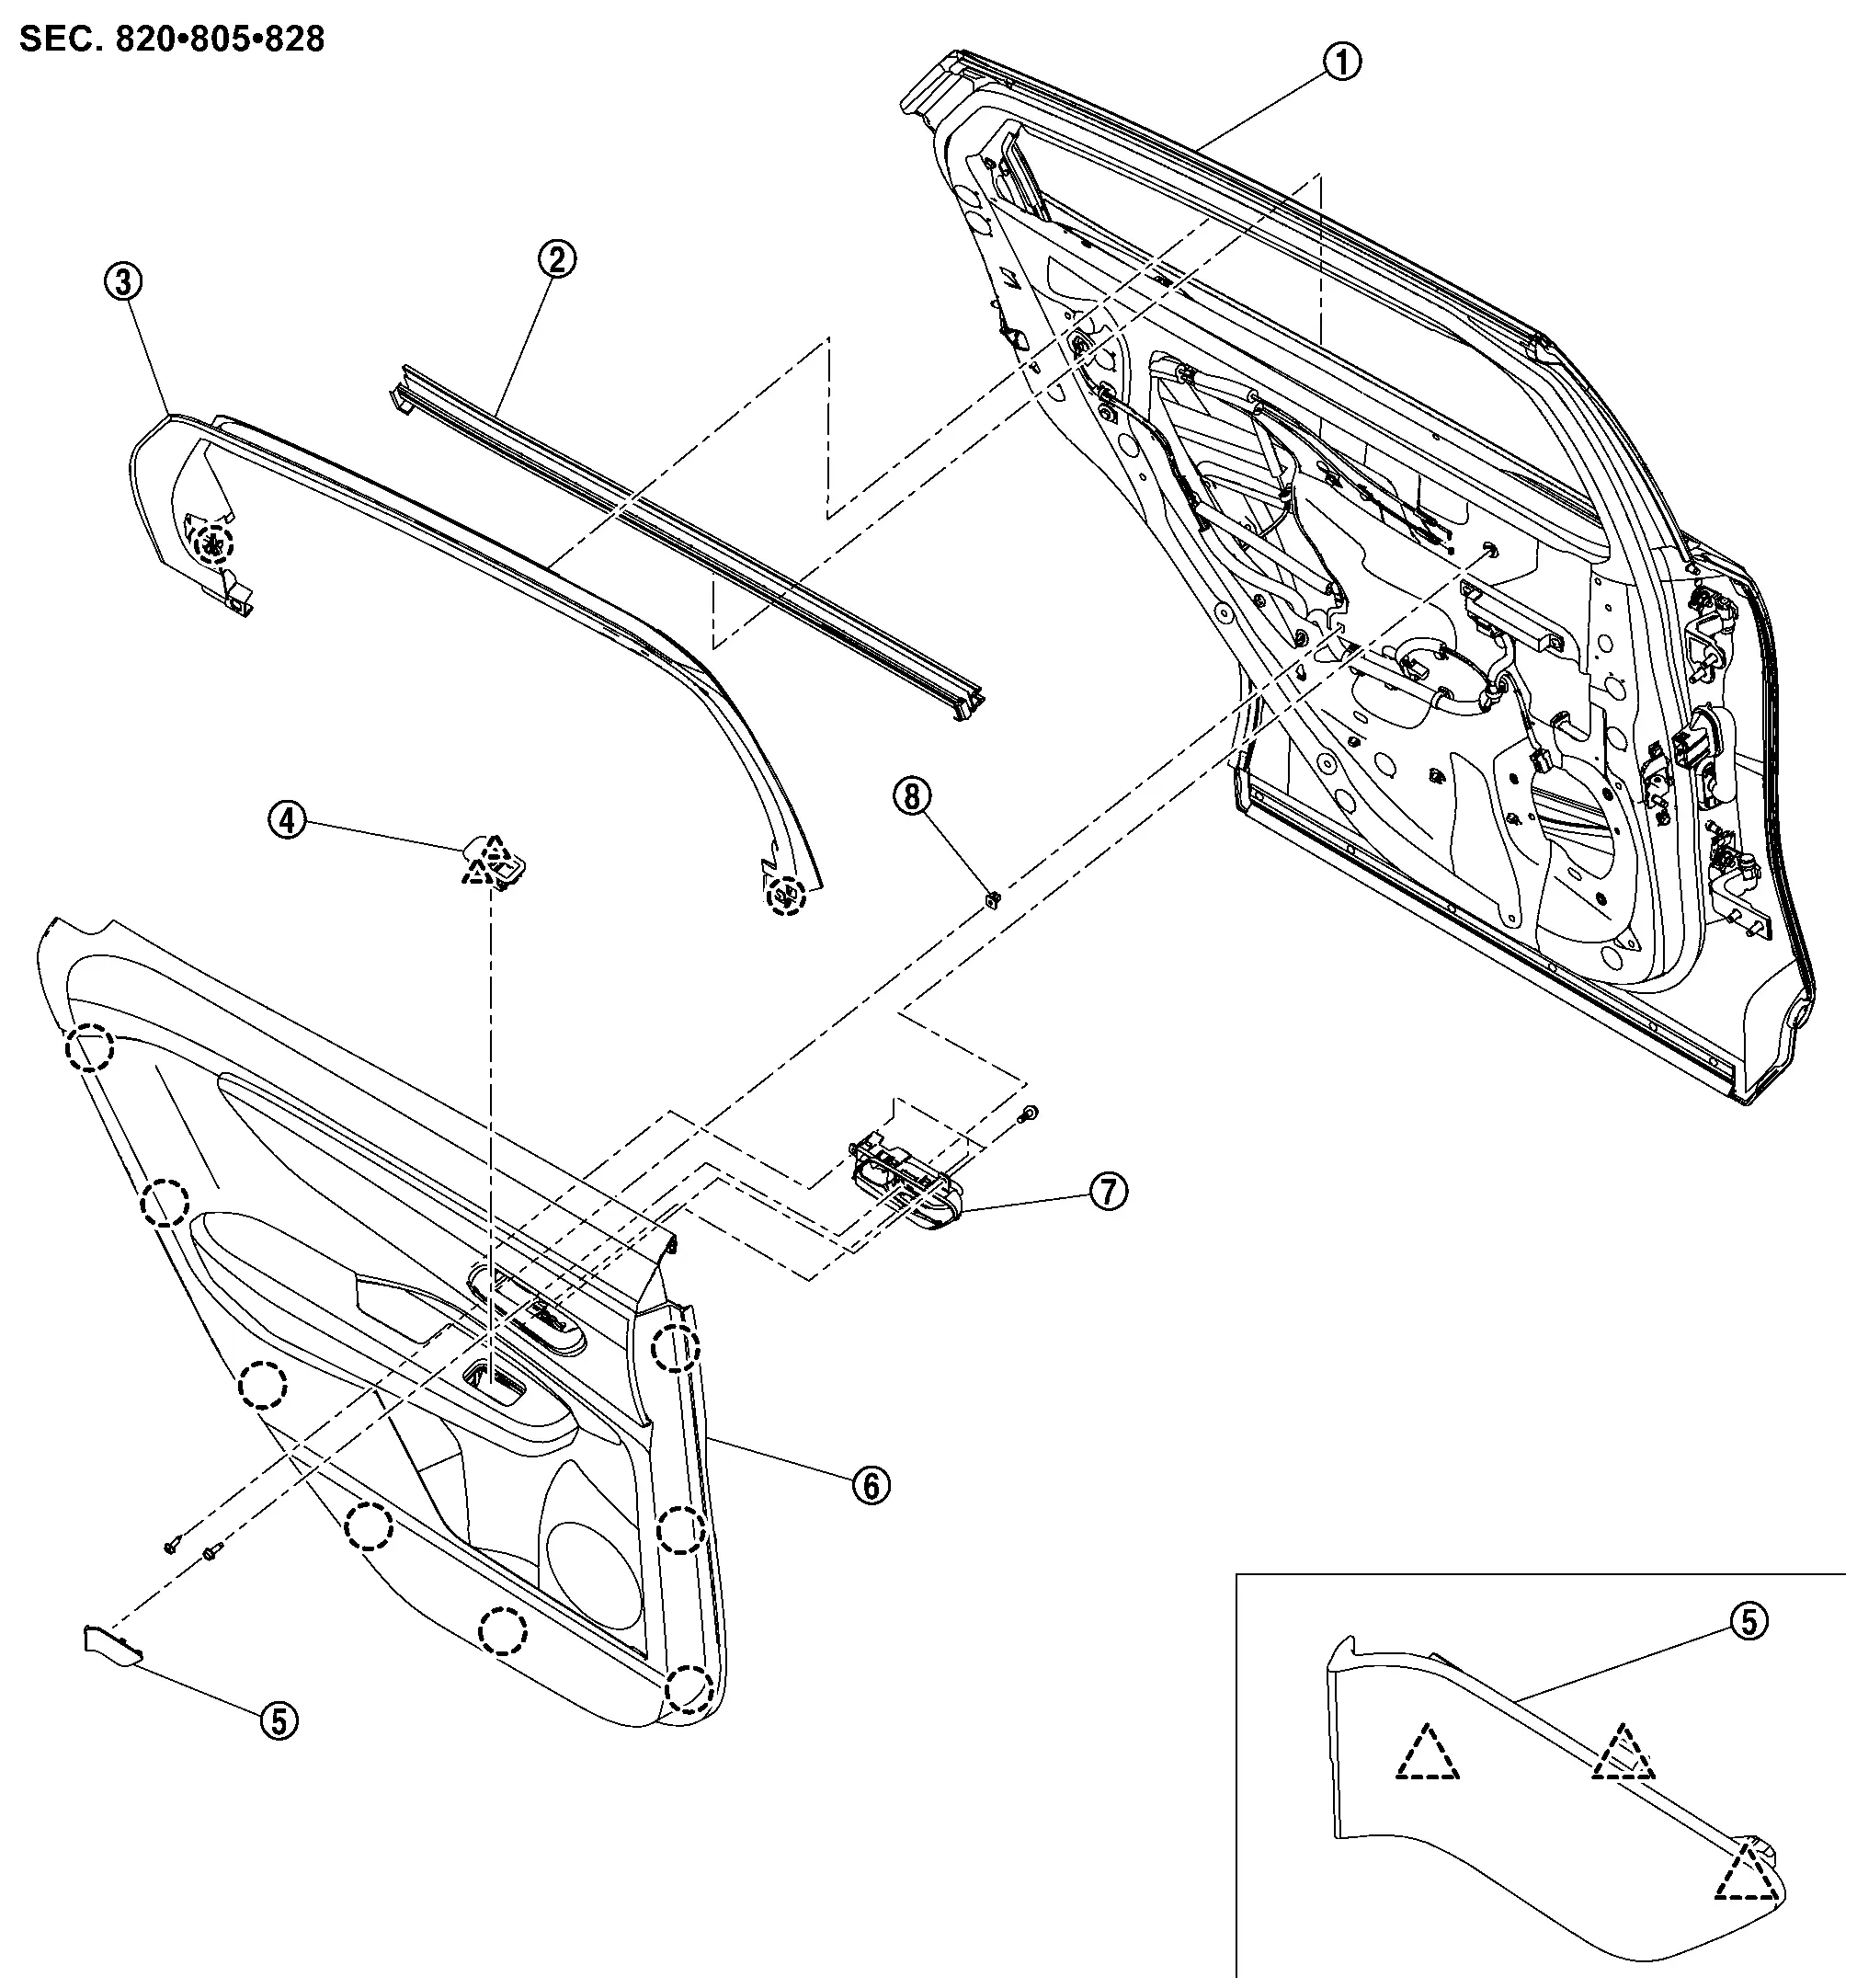
Rear Door Finisher Nissan Ariya: FE0
Exploded View
|
Rear door panel | |
Inside seal | |
Rear door sash inner cover |
|
Power window switch | |
Inside handle cap | |
Rear door finisher |
|
Inside handle | |
Grommet | ||
|
: Clip | ||||
|
: Pawl | ||||
Removal & Installation
CAUTION:
Never damage rear door panel.
REMOVAL
Fully open rear door.
Disengage inside handle cap fixing pawls using a remover tool (A), and then remove inside handle cap.
|
: Pawl |
Remove rear door finisher mounting bolt and fixing screw .

Apply protective tapes (A) on rear door panel and rear door sash inner cover to protect it from damage.
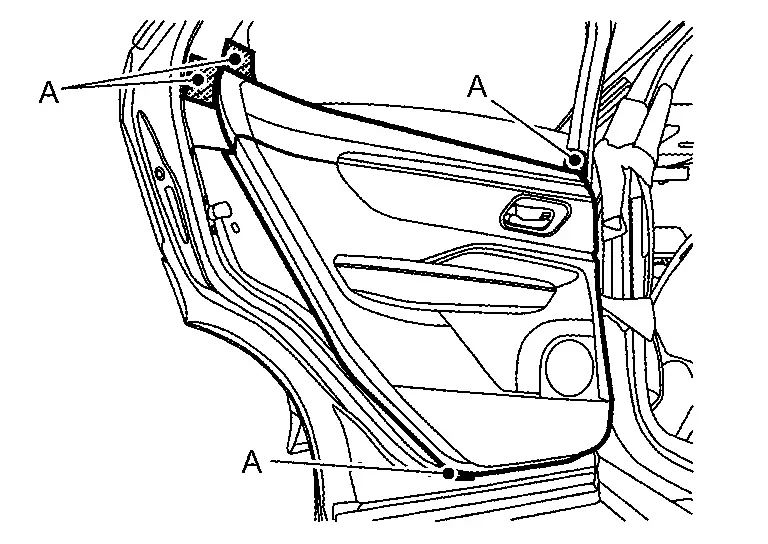
Disengage rear door finisher fixing clips using a remover tool (A) according to numerical order 1→2 indicated by arrows as shown in the figure.
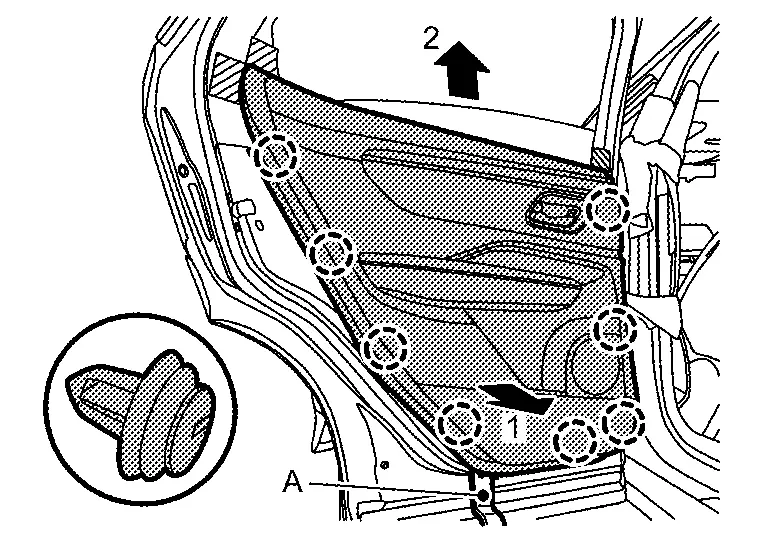
CAUTION:
Insert a remover tool between rear door panel and clip to prevent damage to the parts, and then disengage clips.
|
: Clip |
Disconnect power window switch harness connector.
Disconnect lock knob cable (if equipped) and inside handle cable from inside handle according to numerical order 1→4 indicated by arrows as shown in the figure, and then remove front door finisher.
INSTALLATION
Note the following items, and then install in the reverse order of removal.
CAUTION:
-
Visually check clips for deformation and damage during installation. Replace with new ones if necessary.
-
Check in advance that clips are accurately aligned with the portions on rear door panel, and then install by pressing in.
Body Side Trim Nissan Ariya: FE0
Exploded View
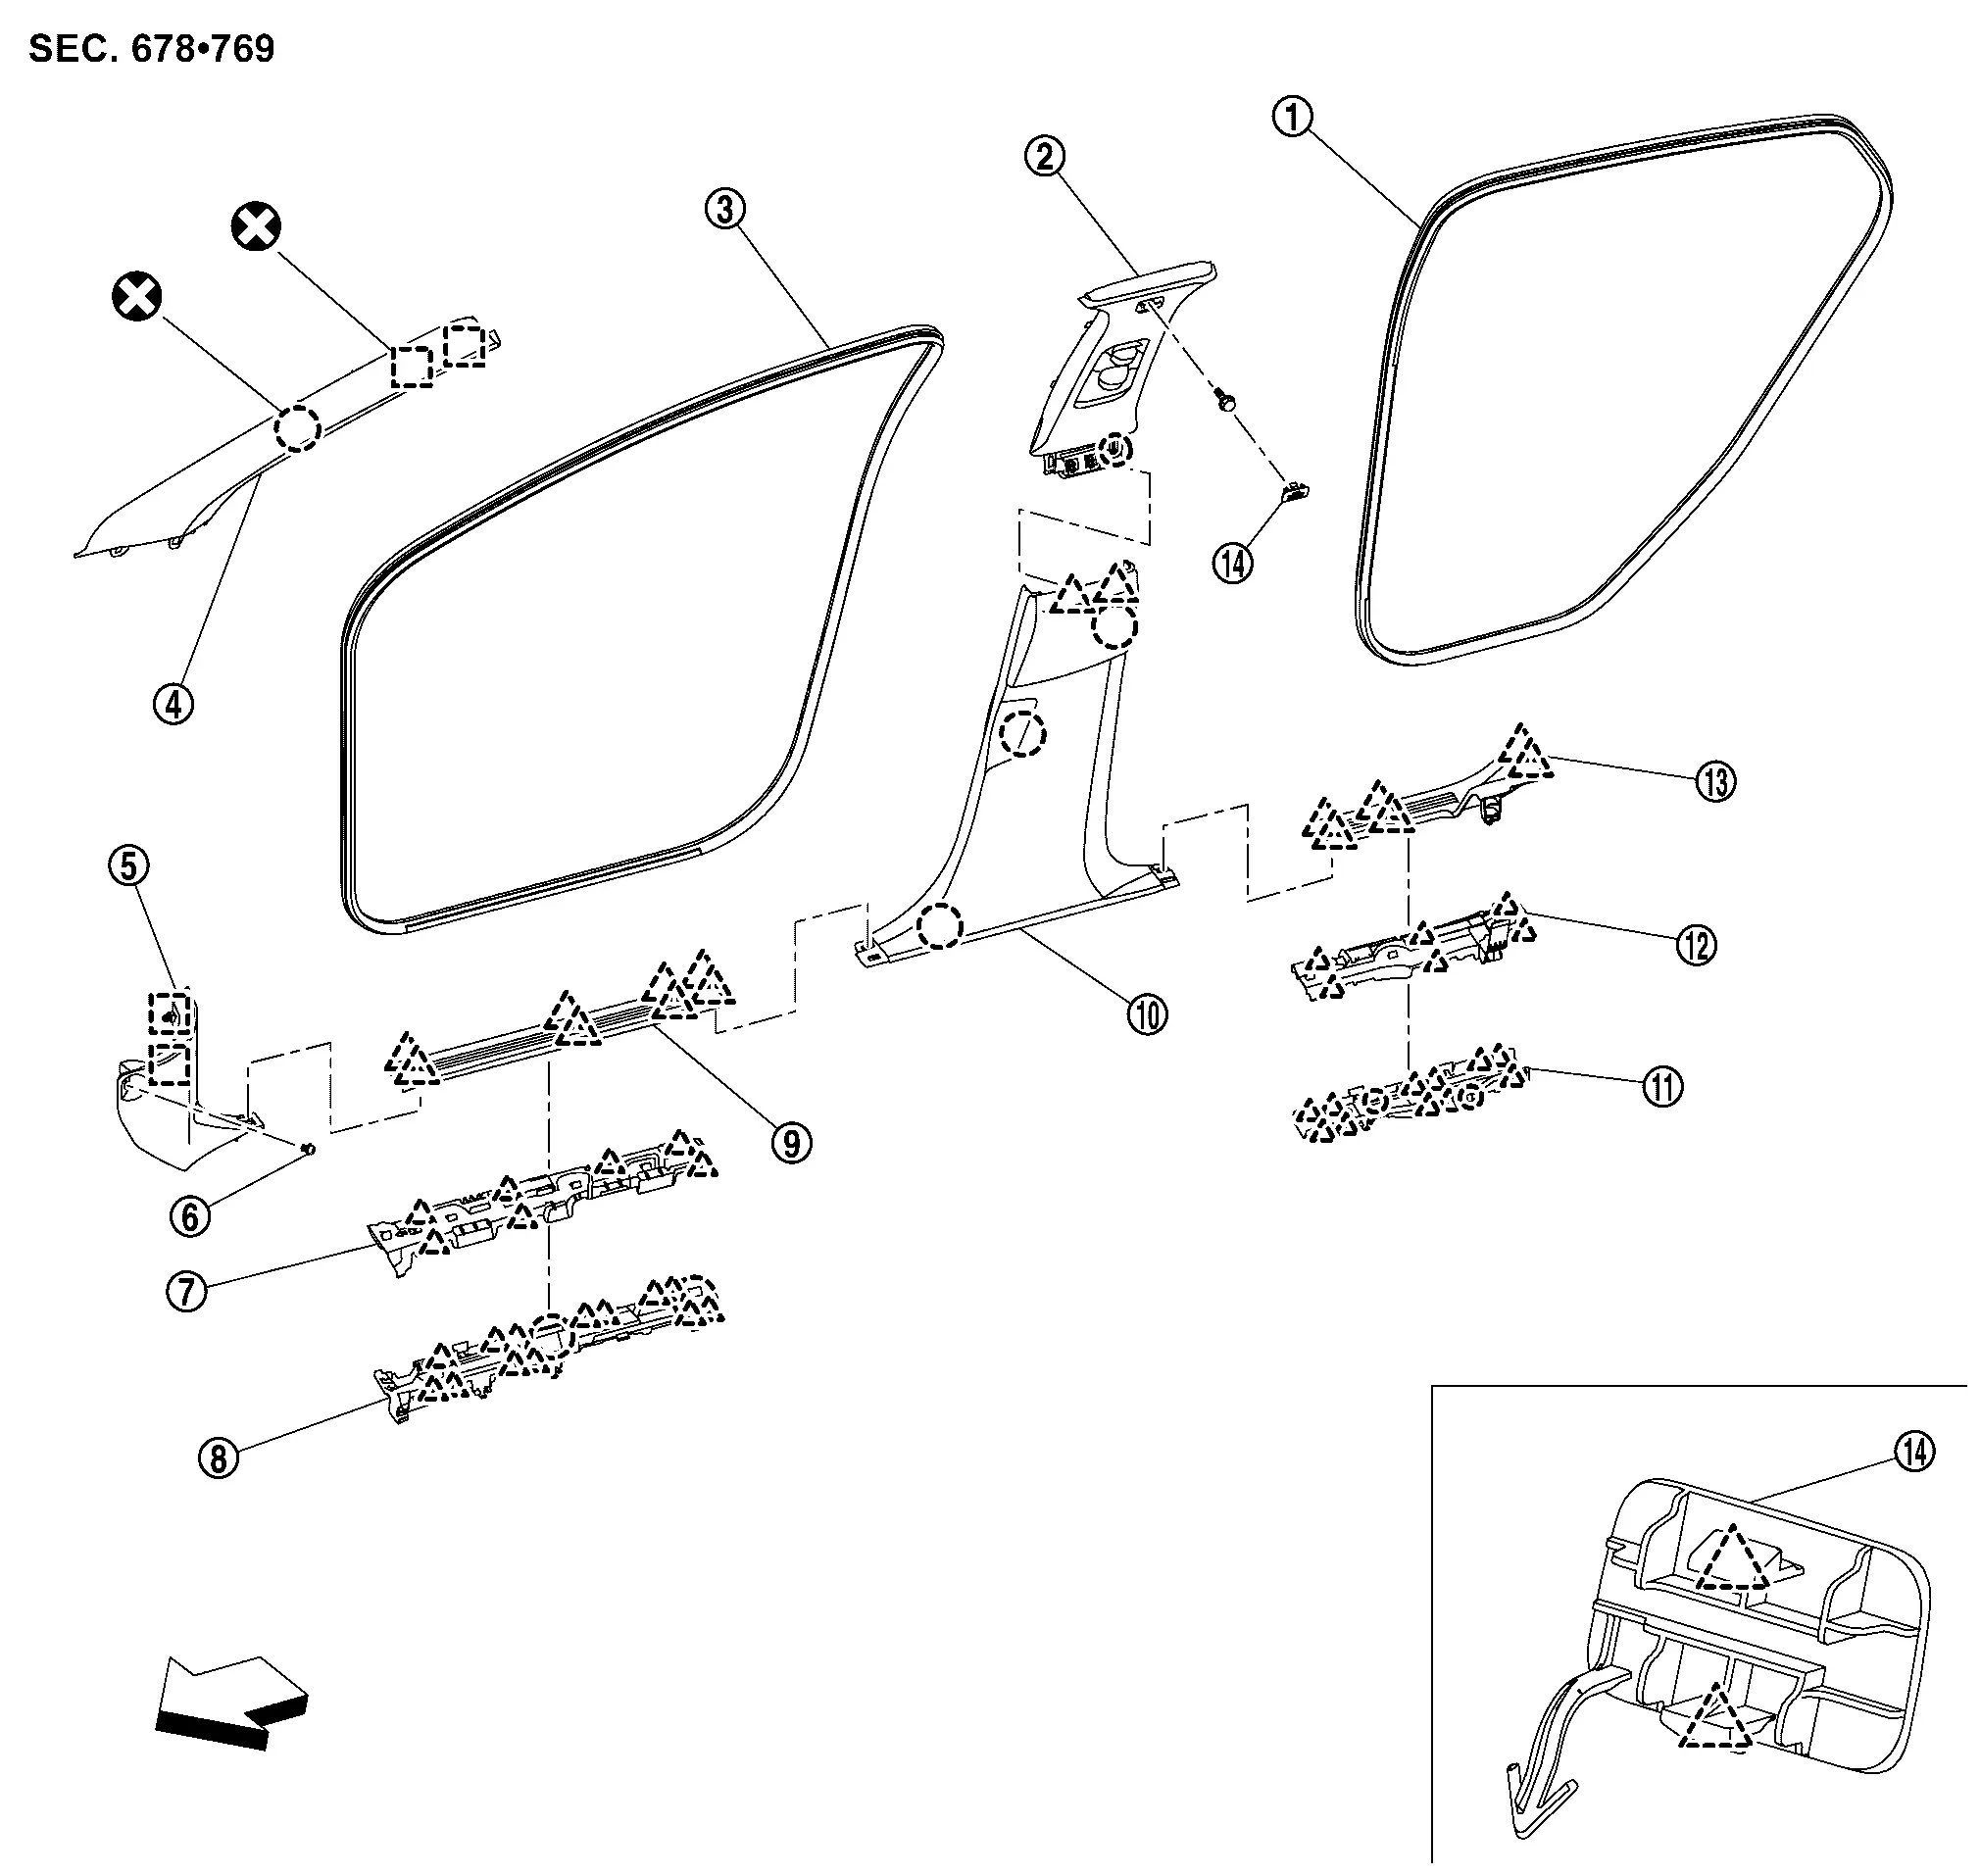
|
Rear body side welt | |
Center pillar upper garnish | |
Front body side welt |
|
Front pillar garnish | |
Dash side finisher | |
Dash trim clip |
|
Front harness protector upper | |
Front harness protector lower | |
Front kicking plate |
|
Center pillar lower garnish | |
Rear harness protector lower |  |
Rear harness protector lower |
 |
Rear kicking plate |  |
Bolt cap | ||
|
: Clip | ||||
|
: Pawl | ||||
 |
: Metal clip | ||||
 |
: Nissan Ariya Vehicle front | ||||
 |
: Always replace after every disassembly. | ||||
Front Pillar Garnish Nissan Ariya 2026
Removal & Installation
CAUTION:
Never damage the body panel.
REMOVAL
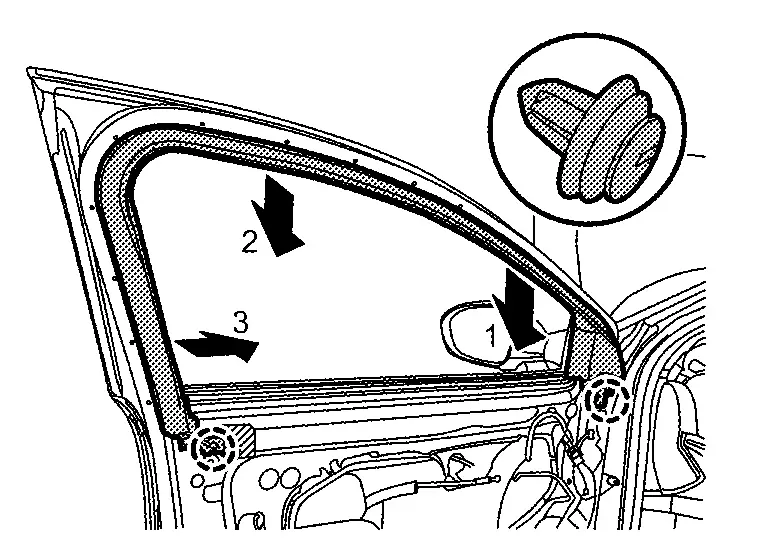
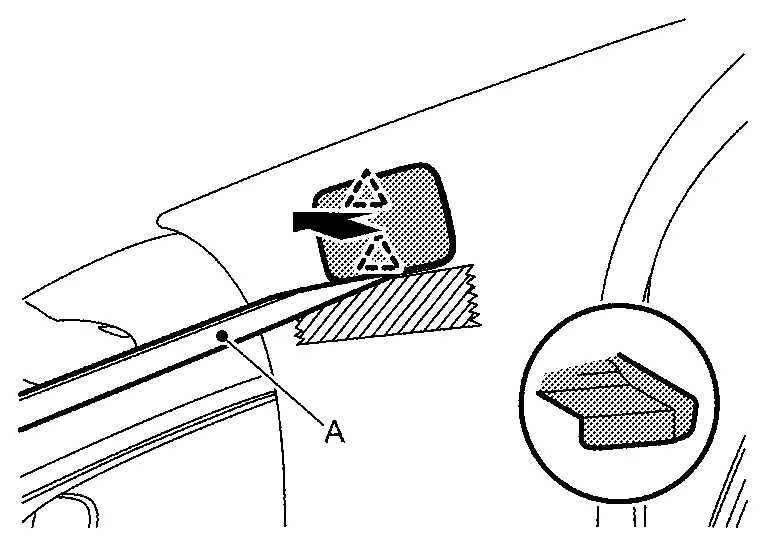
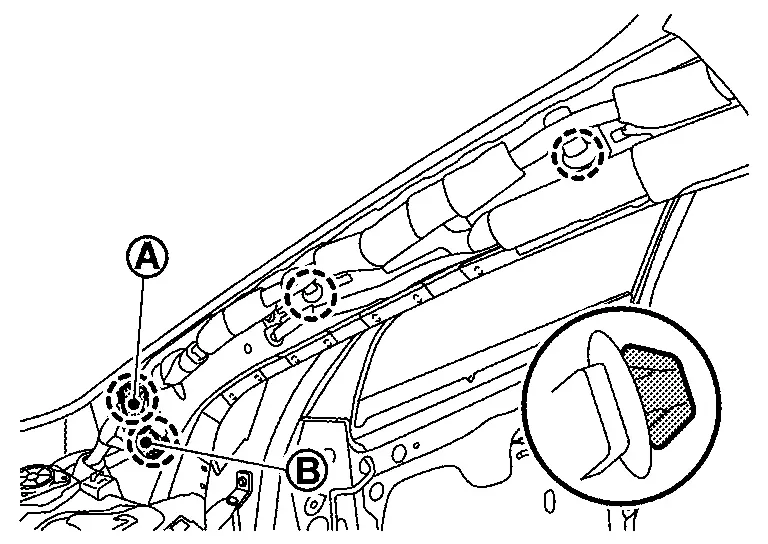
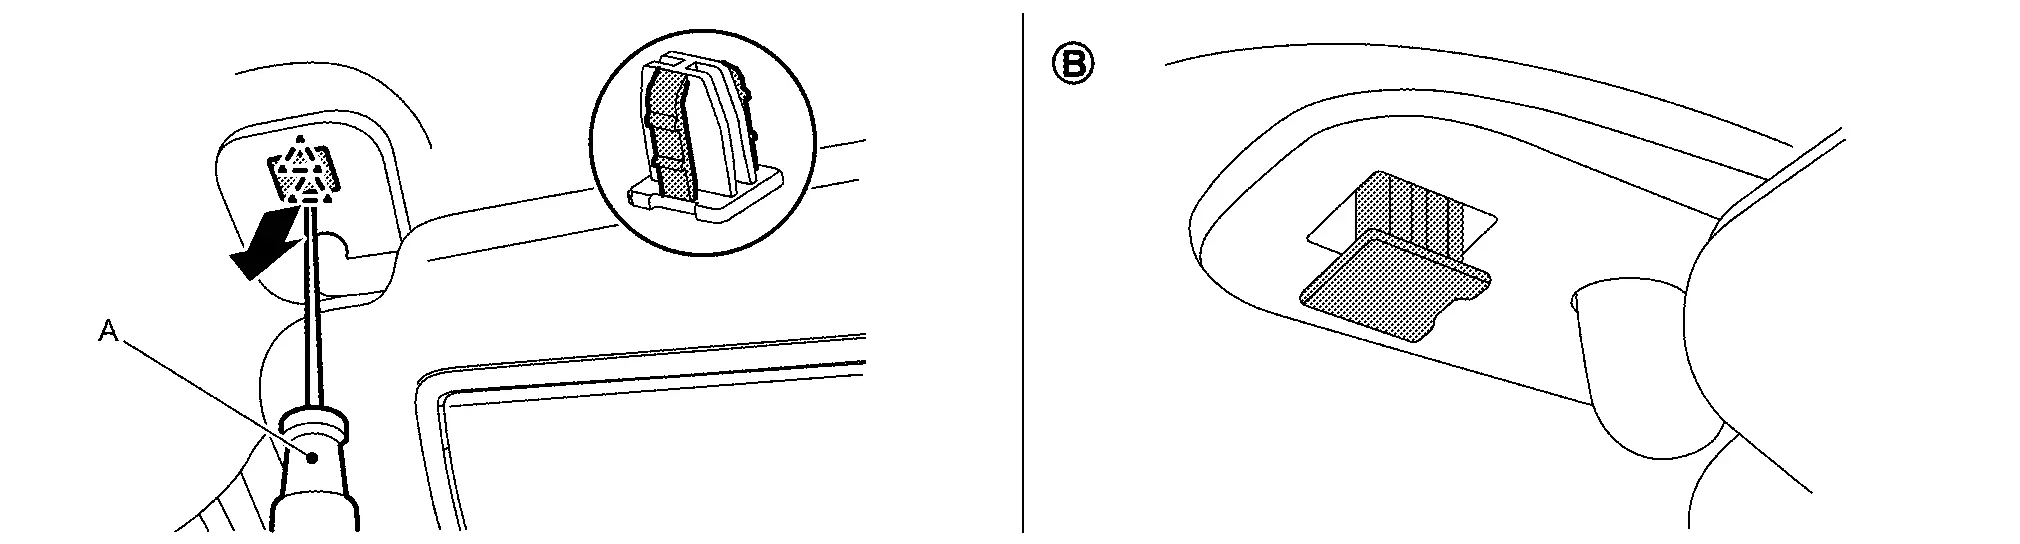
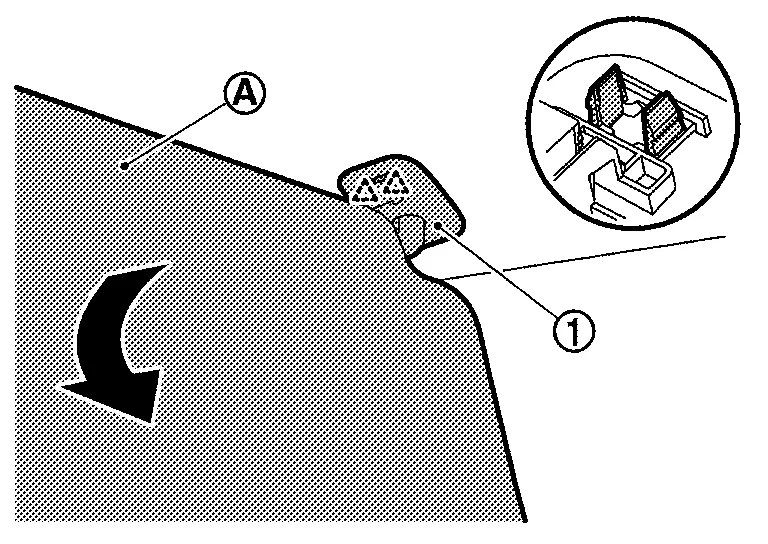
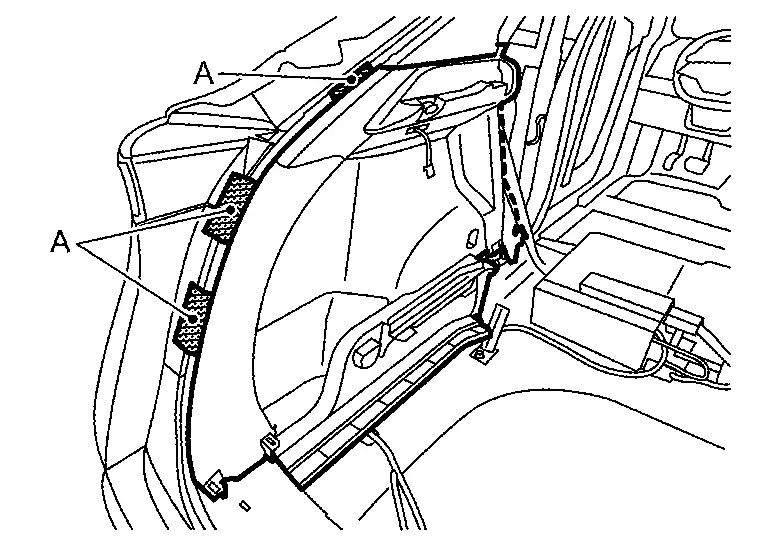
Release front pillar garnish portion of front body side welt.
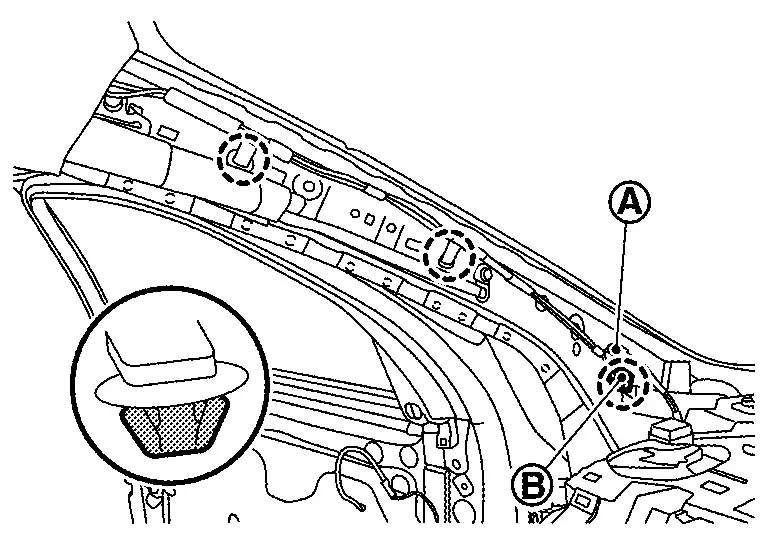
Disengage front pillar garnish fixing anchor clip and metal clip according to numerical order 1→2 in the figure to secure a work space.
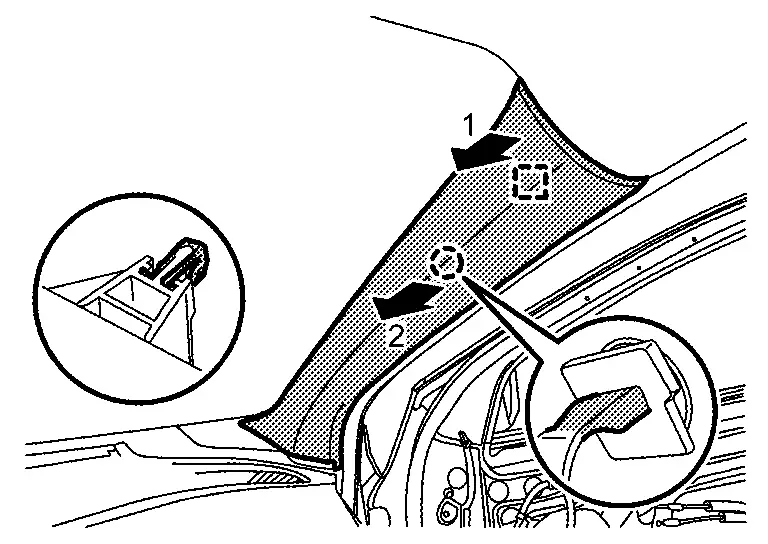
|
: Anchor clip |
|
: Metal clip |
Cut anchor clip portion.
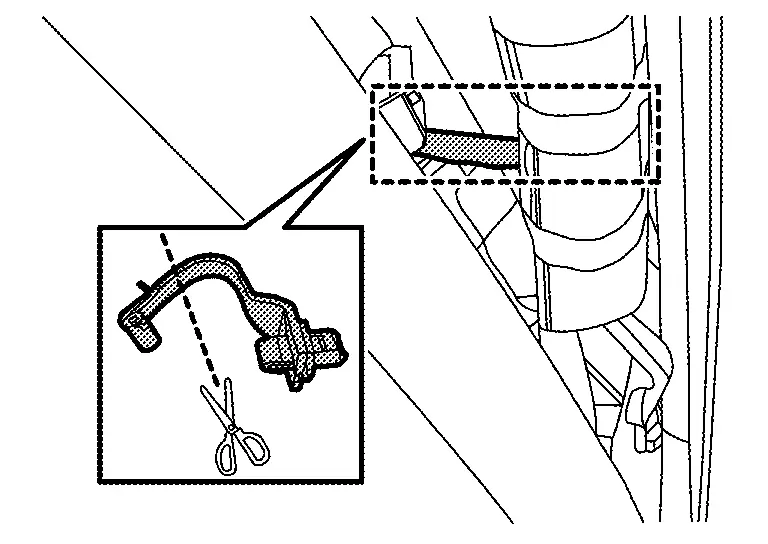
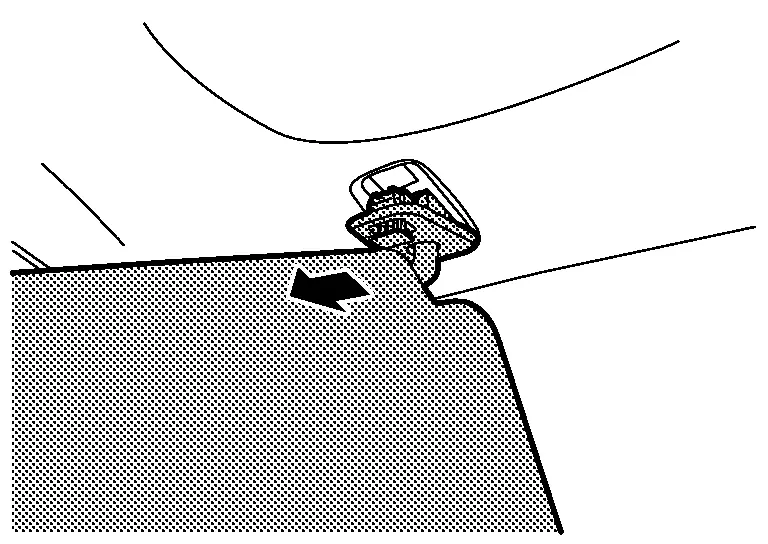
Remove front pillar garnish.
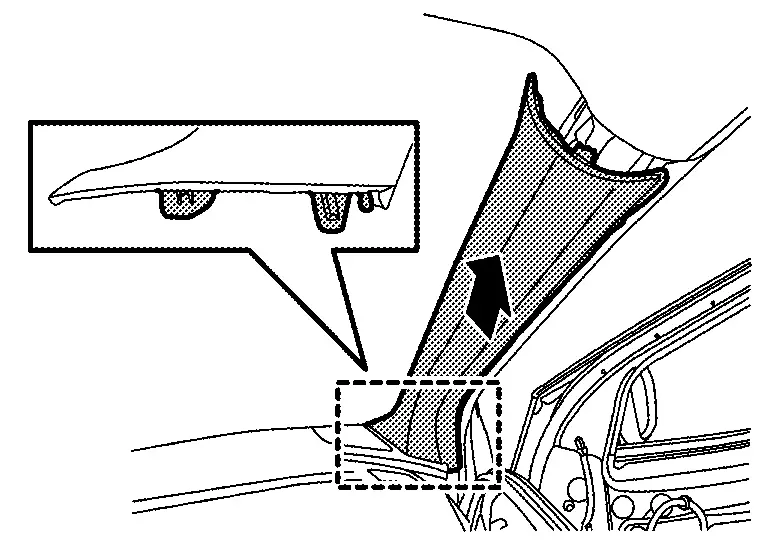
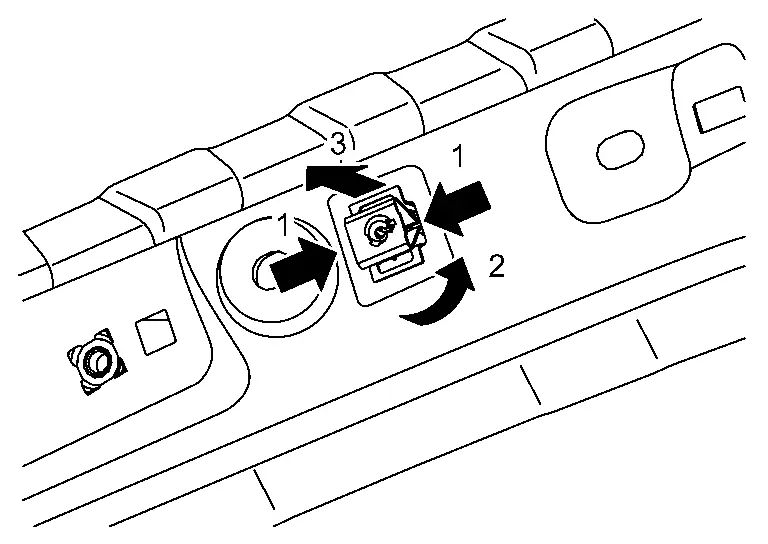
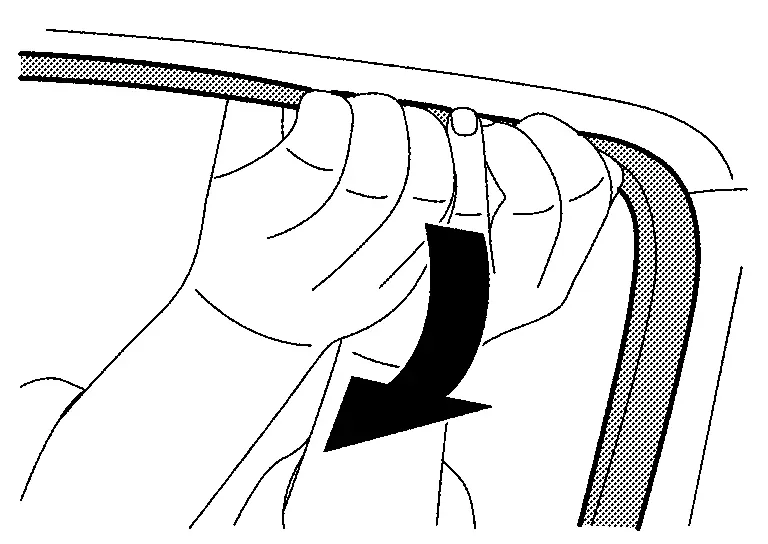
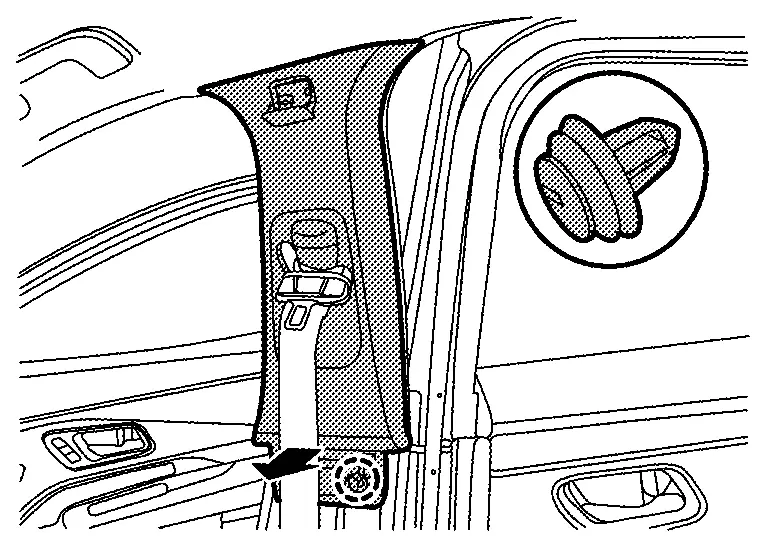
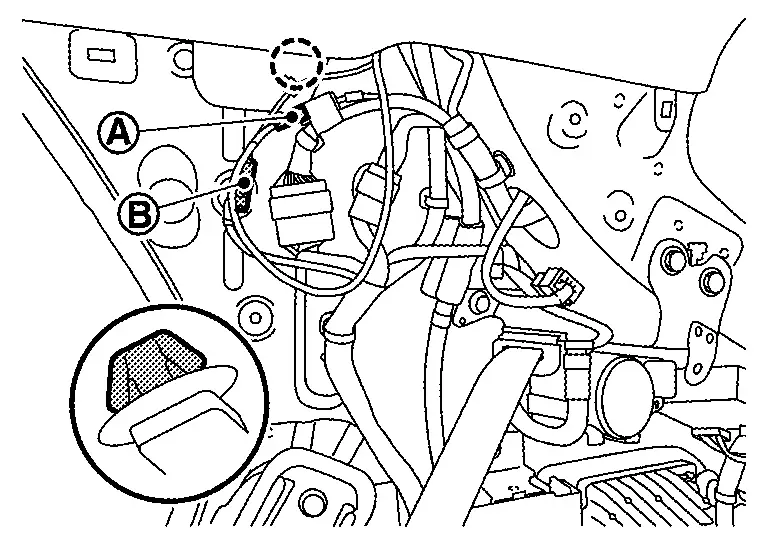
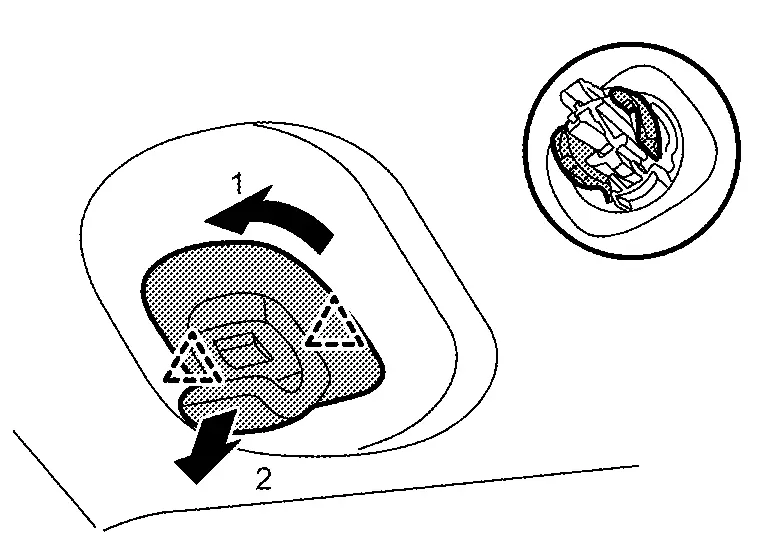
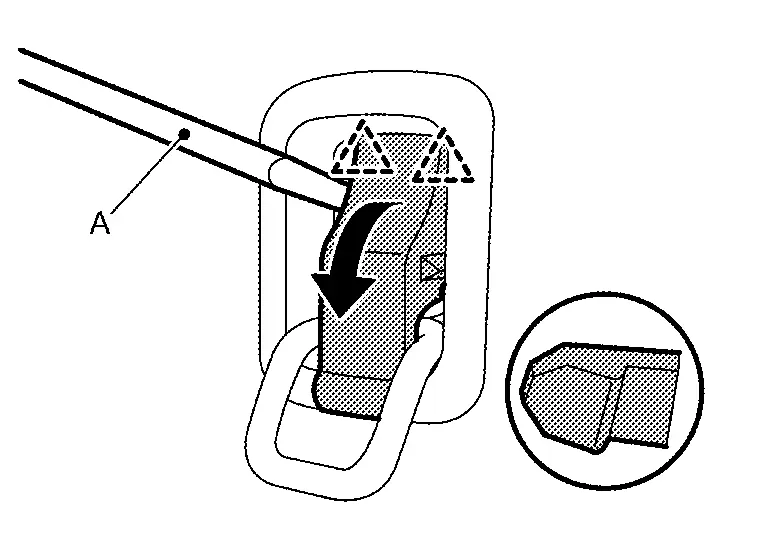
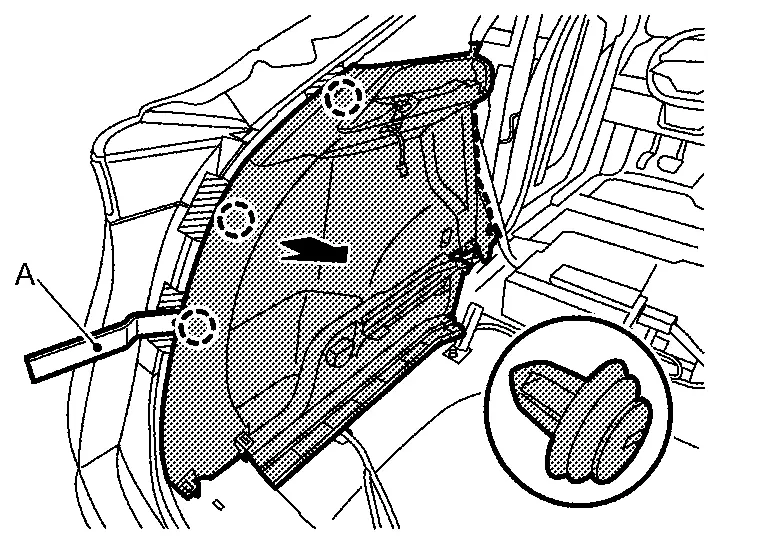
Use appropriate tool to pinch metal clip from the direction figure 1. Then turn metal clip counterclockwise 25° to 30° by following the step of arrow 2→3 in the figure and then remove it to the front.
CAUTION:
Never damage the tether strap.
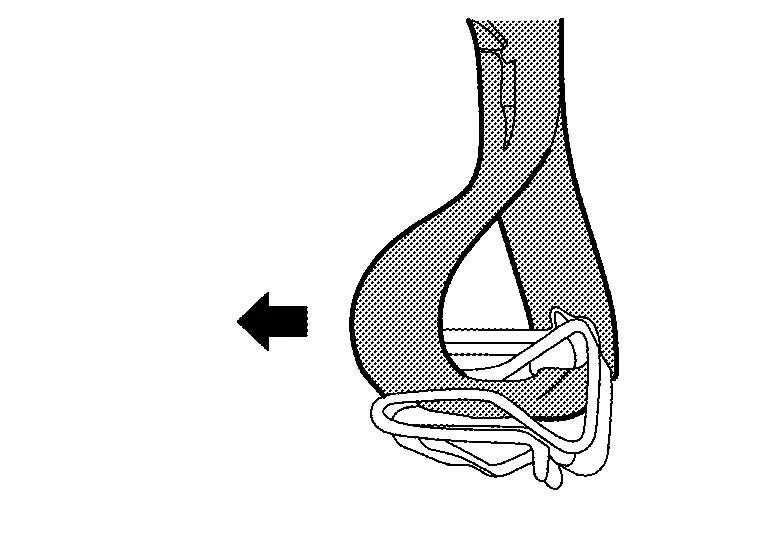
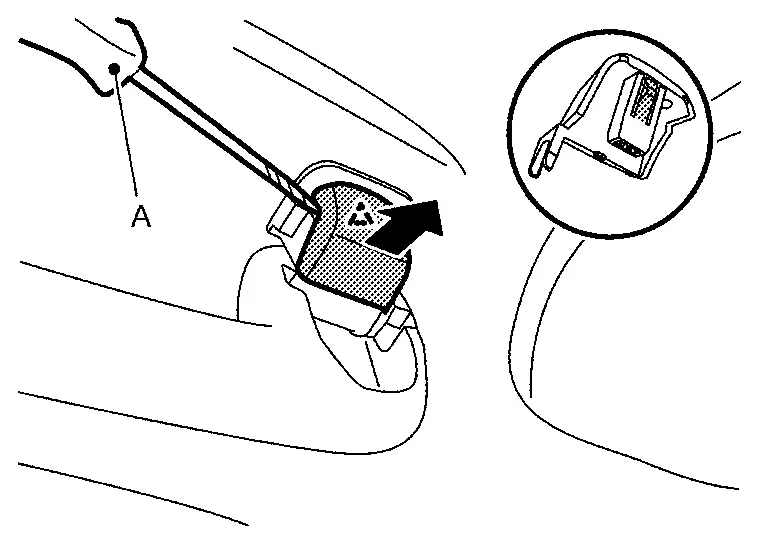
Slide tether strap through the gap in center of metal clip to remove it.
INSTALLATION
Note the following items, and then install in the reverse order of removal.
CAUTION:
-
Always replace anchor clip with a new one after every removal.
-
Visually check metal clip for deformation and damage during installation. Replace with a new one if necessary.
-
Check in advance that anchor clip and metal clip are accurately aligned with the portions on body panel, and then install by pressing in.
-
The metal clip attached to the tether strap is non-reusable. Always replace metal clip with a new one after every removal.
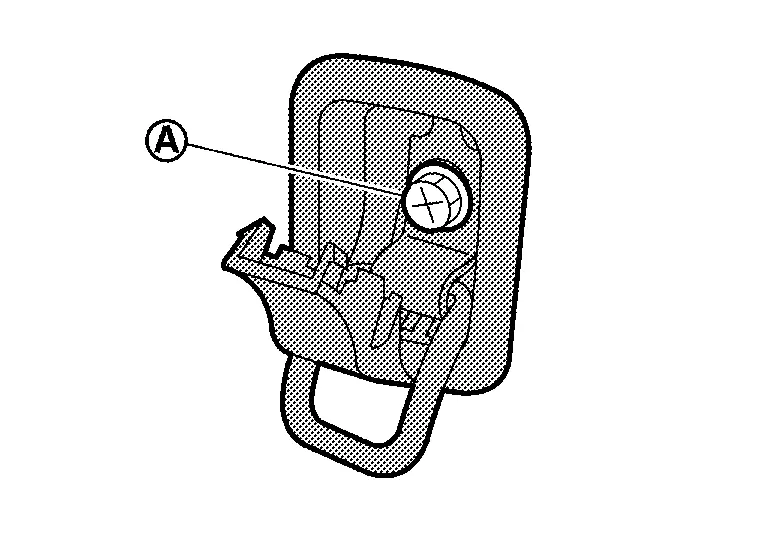
-
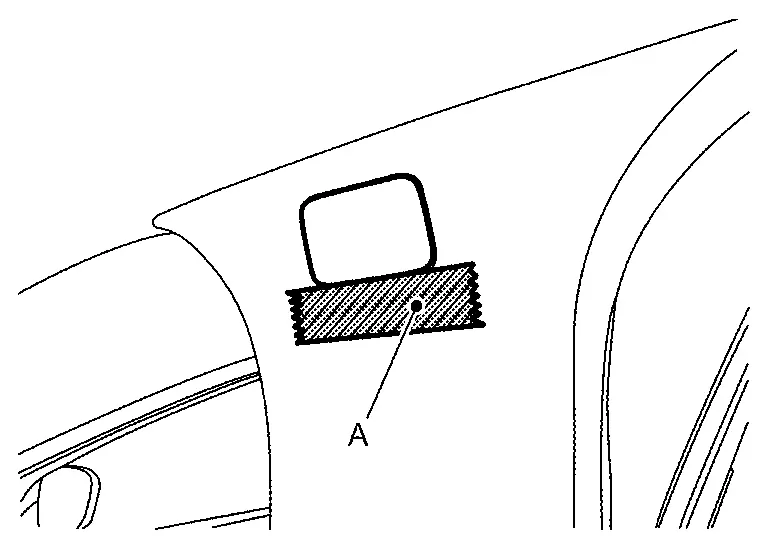
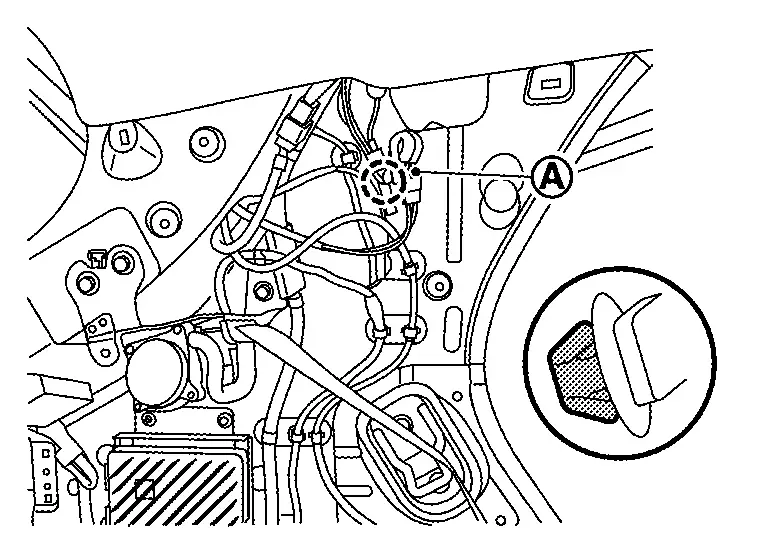
Be careful not to forcibly widen the gap (A) of the metal clip, and slide tether strap to insert it.
Dash Side Finisher Nissan Ariya: FE0
Removal & Installation
CAUTION:
Never damage the body panel.
REMOVAL
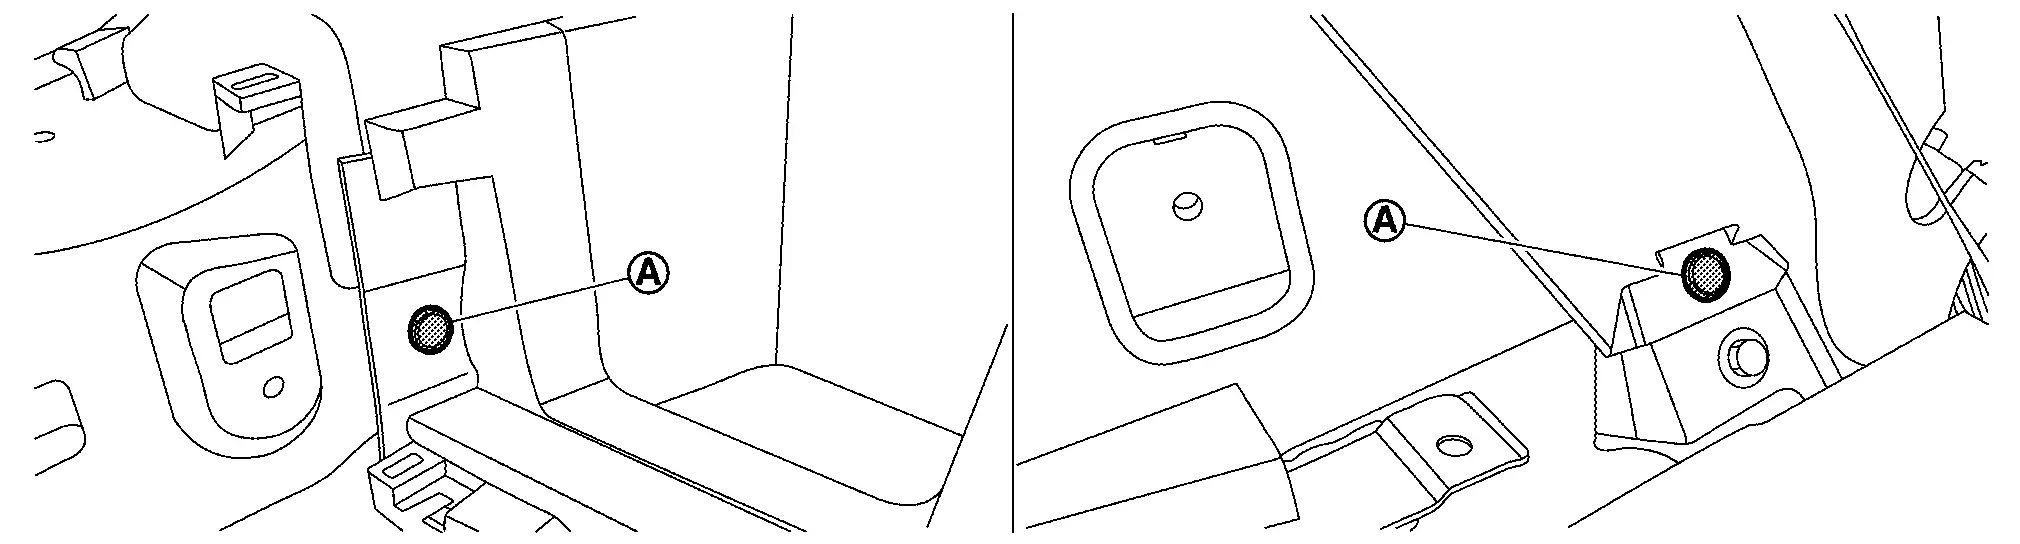
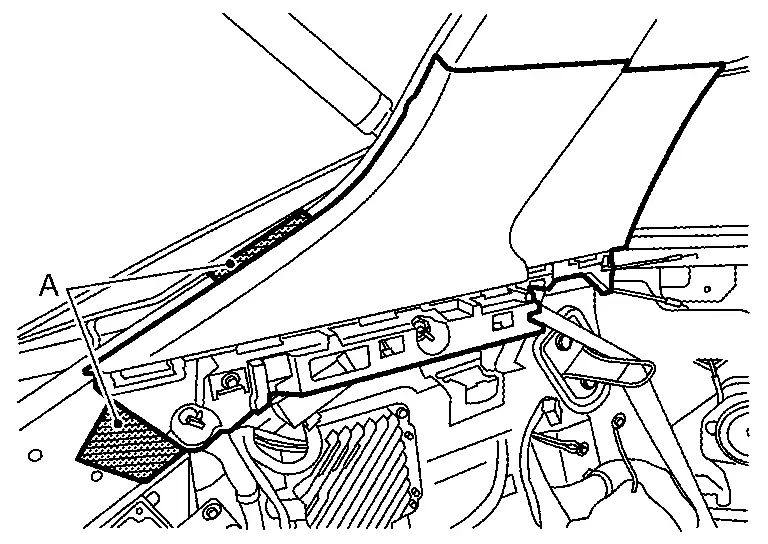
Remove front kicking plate. Refer to Removal & Installation.
Release front body side welt of dash side finisher portion.
Remove hood lock handle. Refer to Removal & Installation.
Remove dash trim clip .
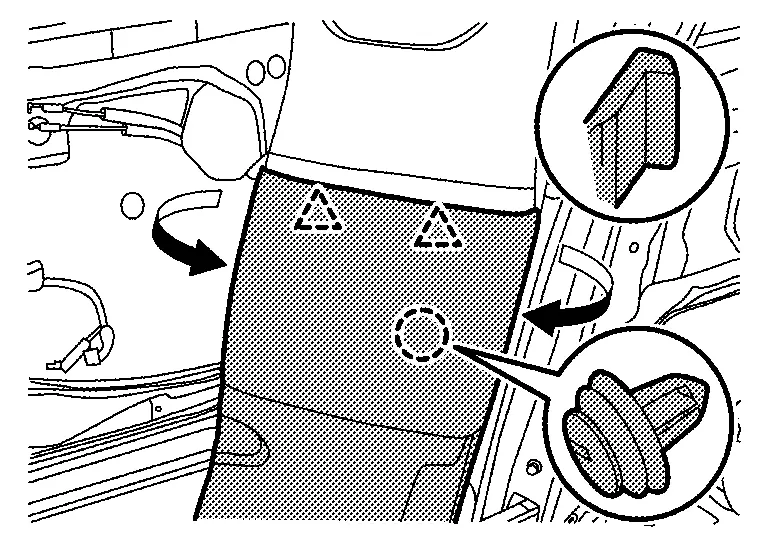
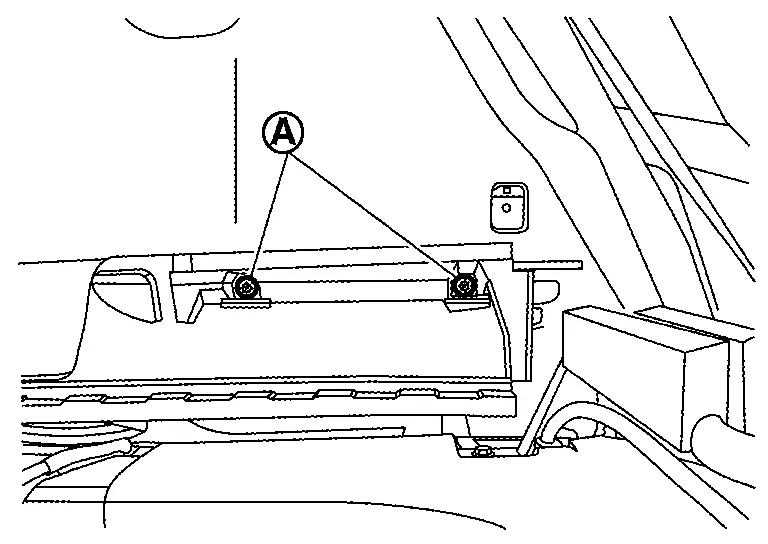
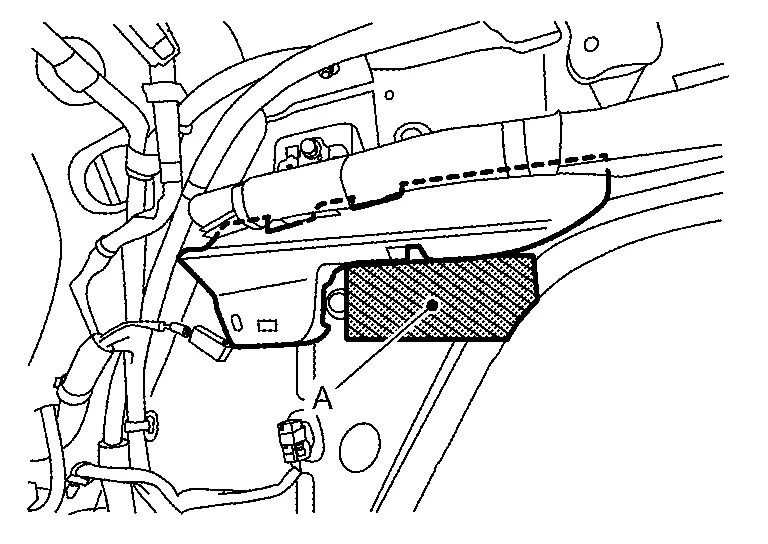
Disengage dash side finisher fixing metal clips, and then remove dash side finisher.
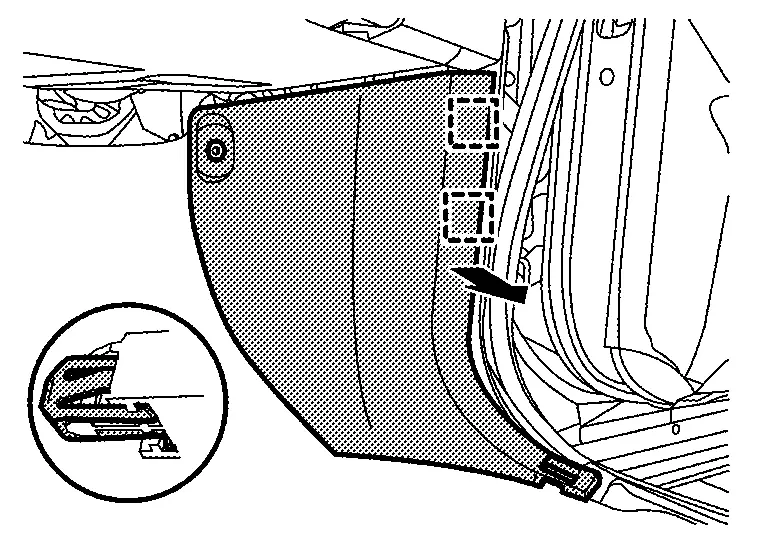
|
: Metal clip |
INSTALLATION
Note the following items, and then install in the reverse order of removal.
CAUTION:
-
Visually check metal clip for deformation and damage during installation. Replace with new ones if necessary.
-
Check in advance that metal clip are accurately aligned with the portions on body panel, and then install by pressing in.
Kicking Plate Nissan Ariya 2023
Removal & Installation
CAUTION:
Never damage the body panel.
REMOVAL
Front Kicking Plate
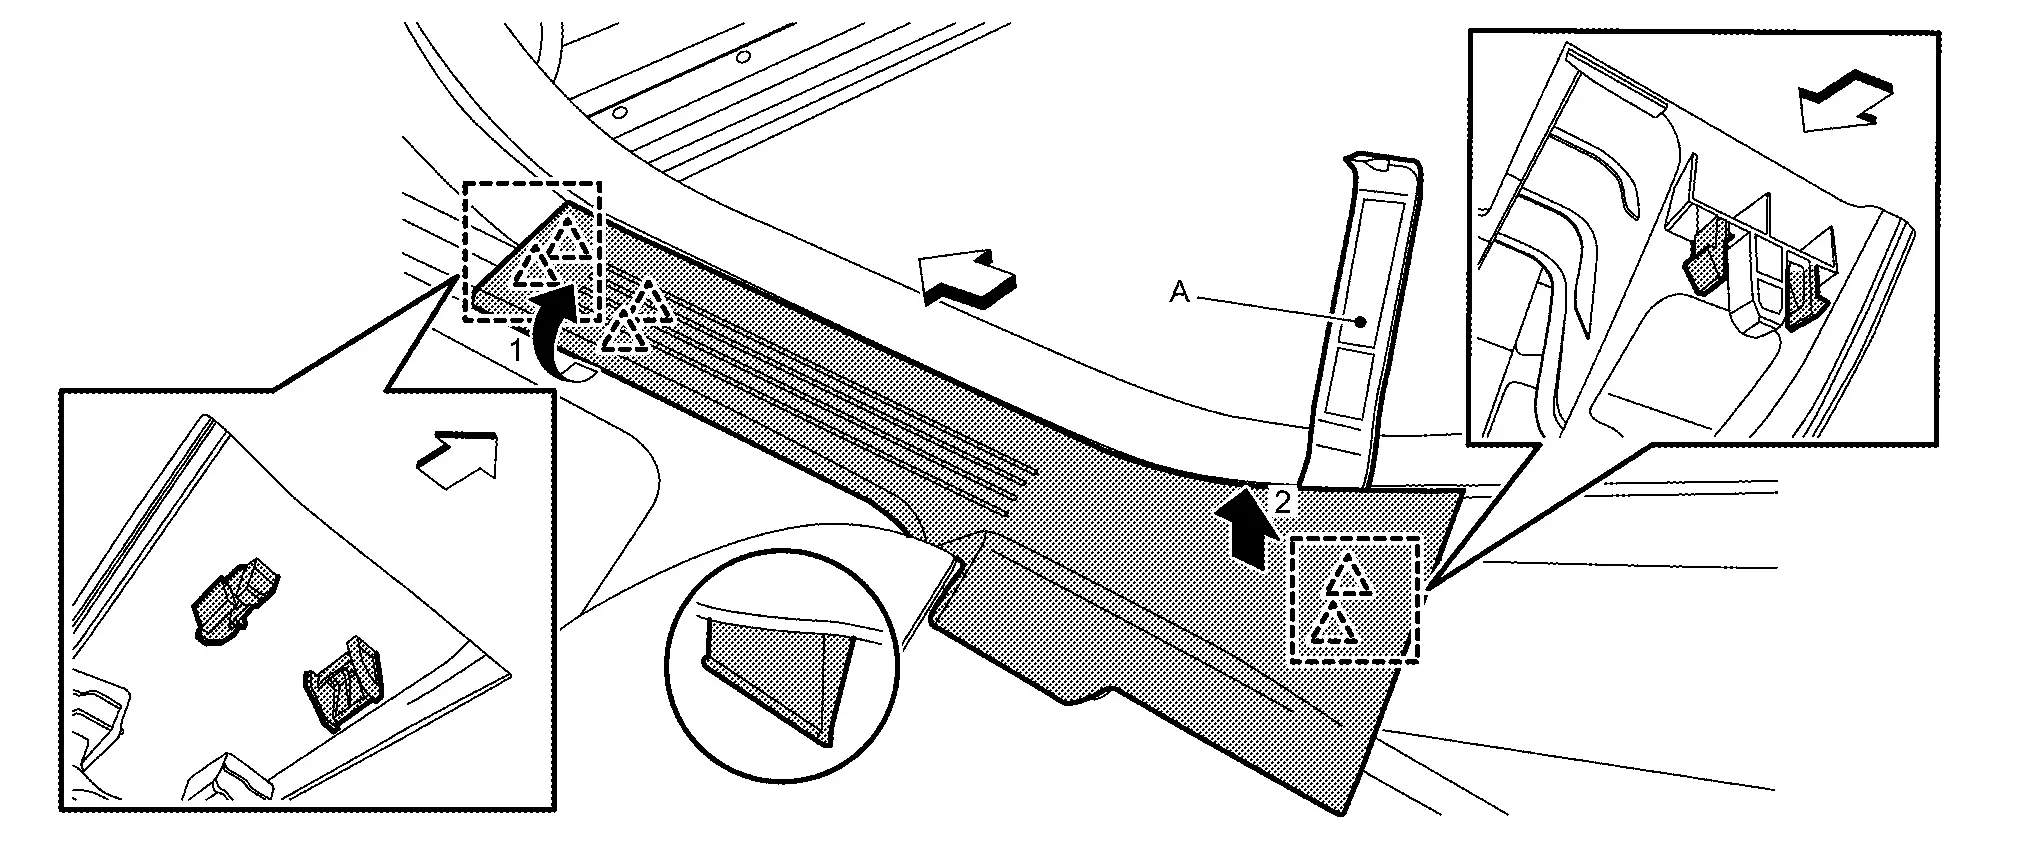
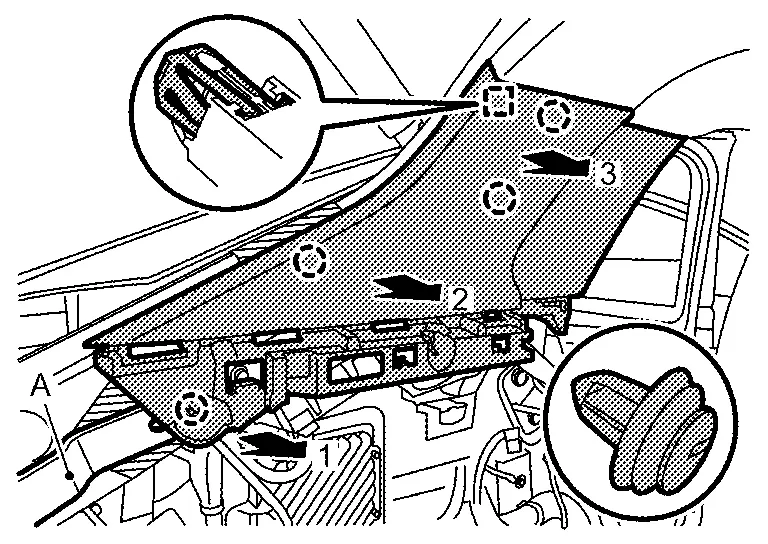
Disengage front kicking plate fixing pawls according to numerical order 1→3 indicated by arrows as shown in the figure, and then remove front kicking plate.

|
: Pawl |
|
: Nissan Ariya Vehicle front |
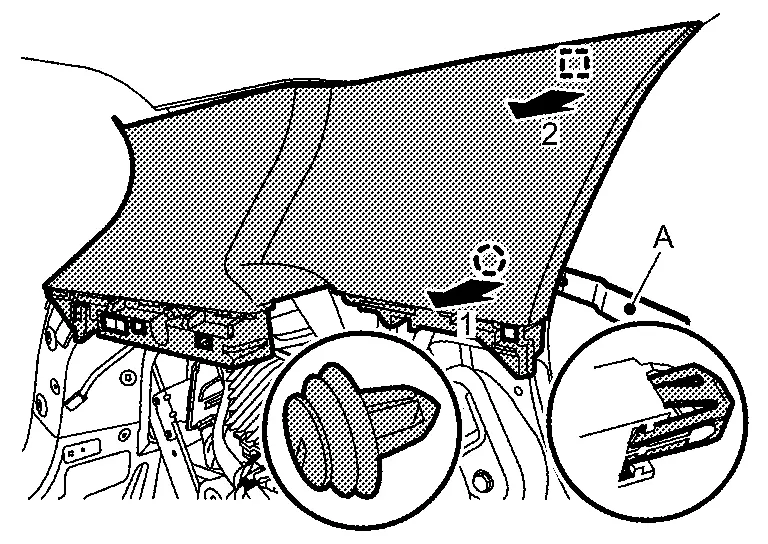
Rear Kicking Plate
Disengage rear kicking plate fixing pawls using a remover tool (A) according to numerical order 1→2 indicated by arrows as shown in the figure, and then remove rear kicking plate.
|
: Pawl |
|
: Nissan Ariya Vehicle front |
INSTALLATION
Note the following item, and then install in the reverse order of removal.
CAUTION:
Check in advance that pawls are accurately aligned with the portions on each finishers and body panel, and then install by pressing in.
Body Side Welt Nissan Ariya: FE0
Removal & Installation
CAUTION:
-
Never excessively pull body side welt to prevent damage to the parts.
-
Never damage the body panel.
REMOVAL
Front body side welt
Remove center pillar lower garnish. Refer to Removal & Installation.
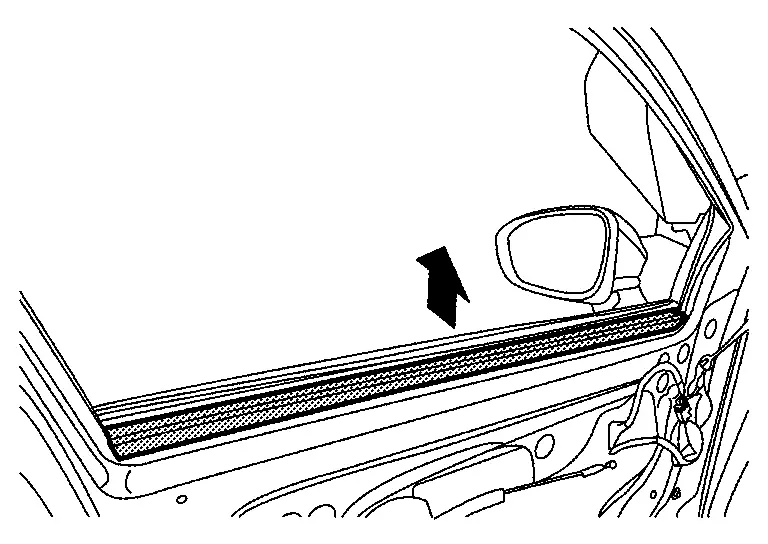
Pull the mounting part inside of the Nissan Ariya vehicle to the outside of the vehicle, and then remove front body side welt.
Rear body side welt
Remove center pillar lower garnish. Refer to Removal & Installation.
Pull the mounting part inside of the Nissan Ariya vehicle to the outside of the vehicle, and then remove rear body side welt.
INSTALLATION
Install in the reverse order of removal.
Center Pillar Lower Garnish Nissan Ariya 2026
Removal & Installation
CAUTION:
Never damage the body panel.
REMOVAL
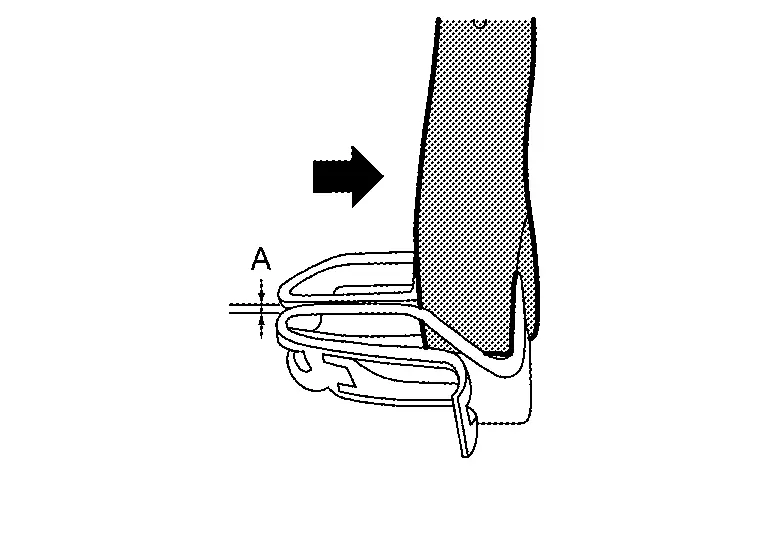
Fully open front door and rear door.
Move front seat to the foremost position and tilt the seatback forward.
Remove front kicking plate and rear kicking plate. Refer to Removal & Installation.
Release center pillar lower garnish portion of front body side welt and rear body side welt. Refer to Removal & Installation.
Disengage center pillar lower garnish fixing pawls and clip.
|
: Pawl |
|
: Clip |
Disengage center pillar lower garnish fixing clips, and then remove center pillar lower garnish.
|
: Clip |
INSTALLATION
Note the following items, and then install in the reverse order of removal.
CAUTION:
-
Visually check clips for deformation and damage during installation. Replace with new ones if necessary.
-
Check in advance that clips and pawls are accurately aligned with the portions on center pillar lower garnish and body panel, and then install by pressing in.
Center Pillar Upper Garnish Nissan Ariya 1st generation
Removal & Installation
CAUTION:
Never damage the body panel.
REMOVAL
Remove center pillar lower garnish. Refer to Removal & Installation.
Release front body side welt and rear body side welt of the center pillar upper garnish portion.
Apply protective tape (A) on f center pillar upper garnish to protect it from damage.
Disengage bolt cap fixing pawls using a remover tool (A), and then remove bolt cap.
|
: Pawl |
Remove center pillar upper garnish mounting bolt.
Disengage center pillar upper garnish lower side fixing clip, and then remove center pillar upper garnish.
|
: Clip |
INATALLATION
Note the following items, and then install in the reverse order of removal.
CAUTION:
-
Visually check clip for deformation and damage during installation. Replace with new ones if necessary.
-
Check in advance that clip is accurately aligned with the hole on body panel, and then install by pressing in.
Floor Trim Nissan Ariya 1st generation
Exploded View
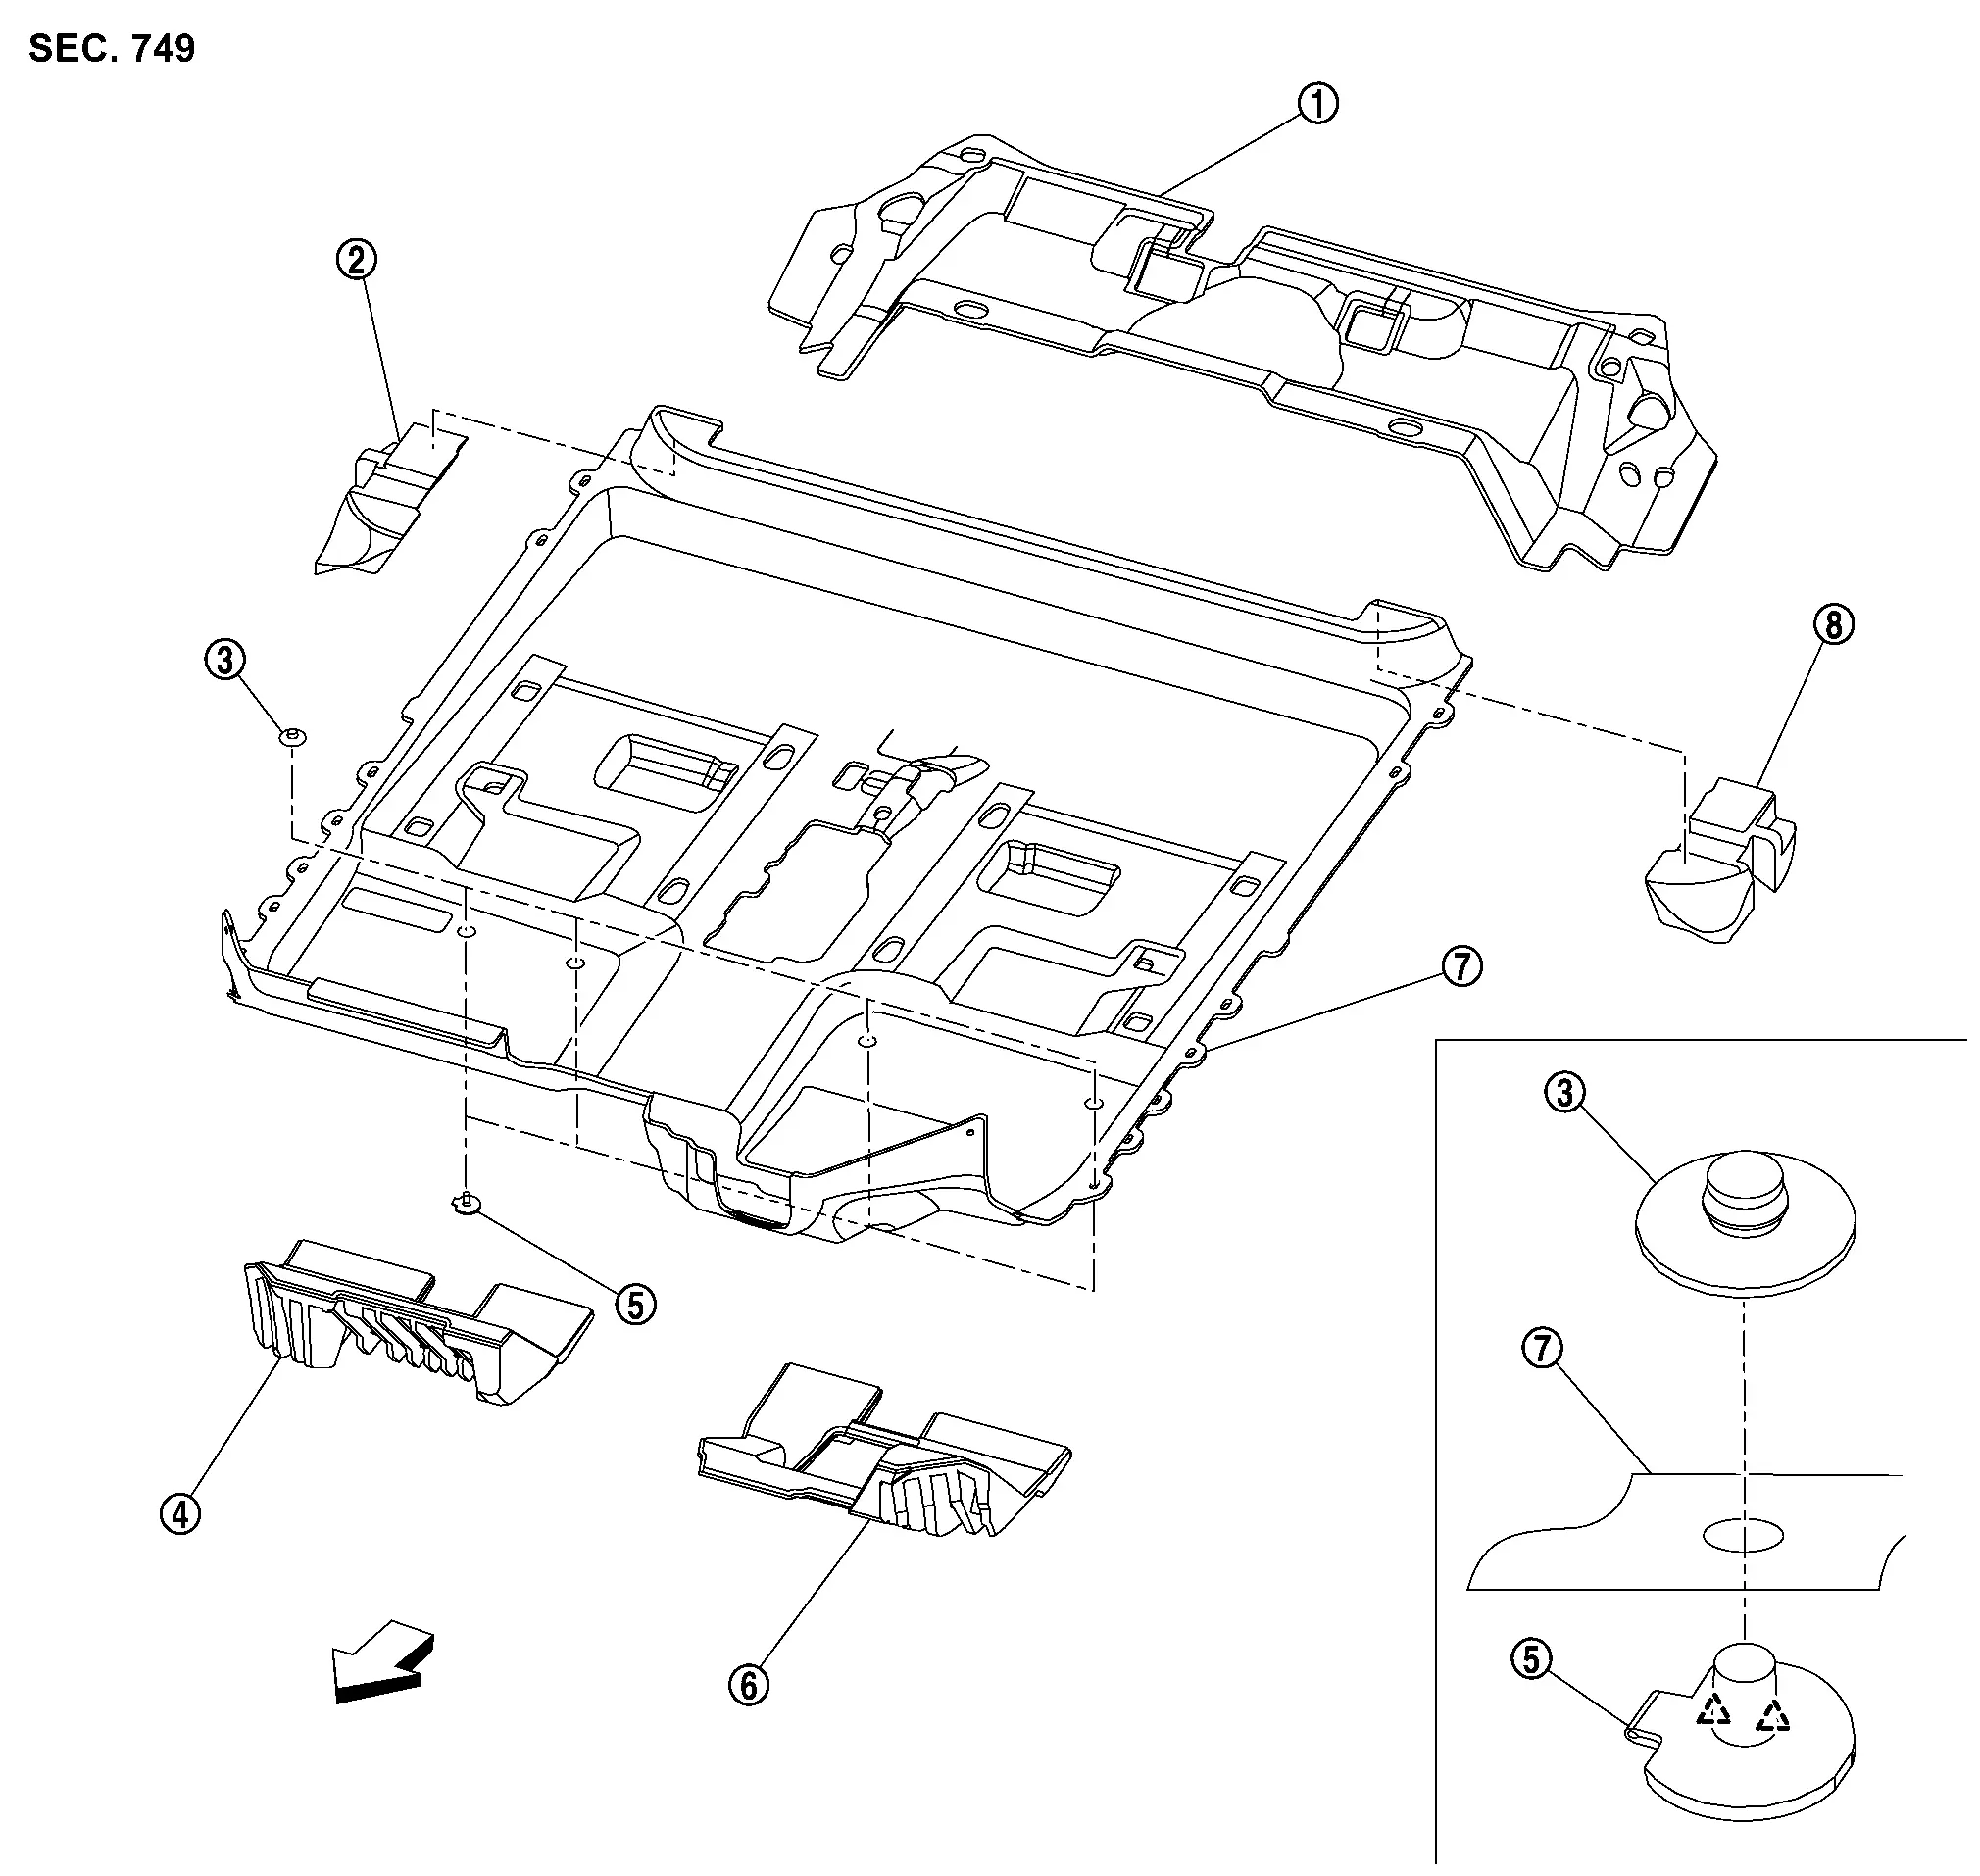
|
Rear floor carpet | |
Rear floor spacer RH | |
Carpet hook |
|
Front floor spacer RH | |
Base | |
Front floor spacer LH |
|
Front floor carpet | |
Rear floor spacer LH | ||
|
: Pawl | ||||
|
: Nissan Ariya Vehicle front | ||||
Removal & Installation
REMOVAL
CAUTION:
Never damage the body panel.
Front Floor Carpet
Remove front seat (LH and RH). Refer to Removal & Installation.
Remove rear seat cushion. Refer to Disassembly & Assembly.
Remove dash side finisher (LH and RH). Refer to Removal & Installation.
Remove center pillar lower garnish (LH and RH). Refer to Removal & Installation.
Remove center console assembly. Refer to Removal & Installation.
Remove instrument lower cover center. Refer to Removal & Installation.
Remove steering shaft lower cover. Refer to STEERING COLUMN : Removal & Installation.
Remove front floor carpet.
Remove carpet hook.Disengage base fixing pawls using a remover tool (A), and then unlock.
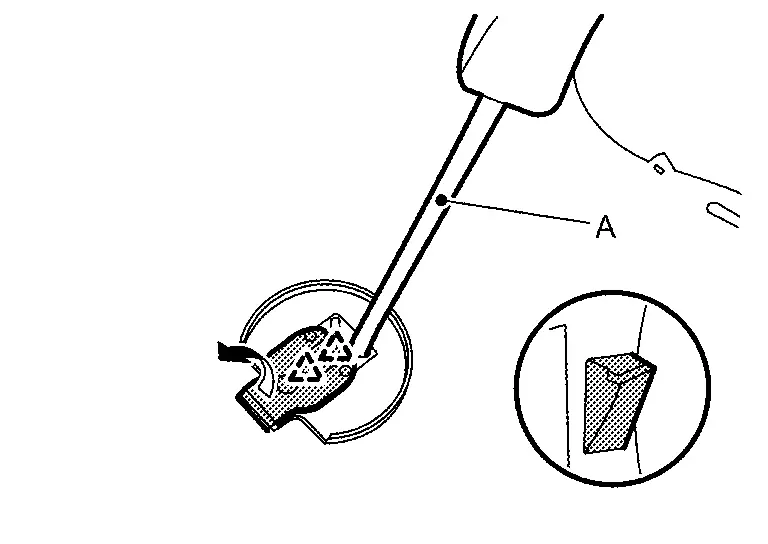
|
: Pawl |
Rear Floor Carpet
Remove luggage side lower finisher. Refer to Removal & Installation.
Remove anchor bolt of rear seat belt. Refer to Removal & Installation.
Disconnect rear seat belt buckle harness connector. Refer to Removal & Installation.
Remove rear floor carpet while avoiding the seat belt buckle and harness.
INSTALLATION
Note the following item, and then install in the reverse order of removal.
CAUTION:
Check in advance that pawls are accurately aligned with the hole on base mounting part, and then install by pressing in.
Headlining Nissan Ariya: FE0
Exploded View
With Sunroof models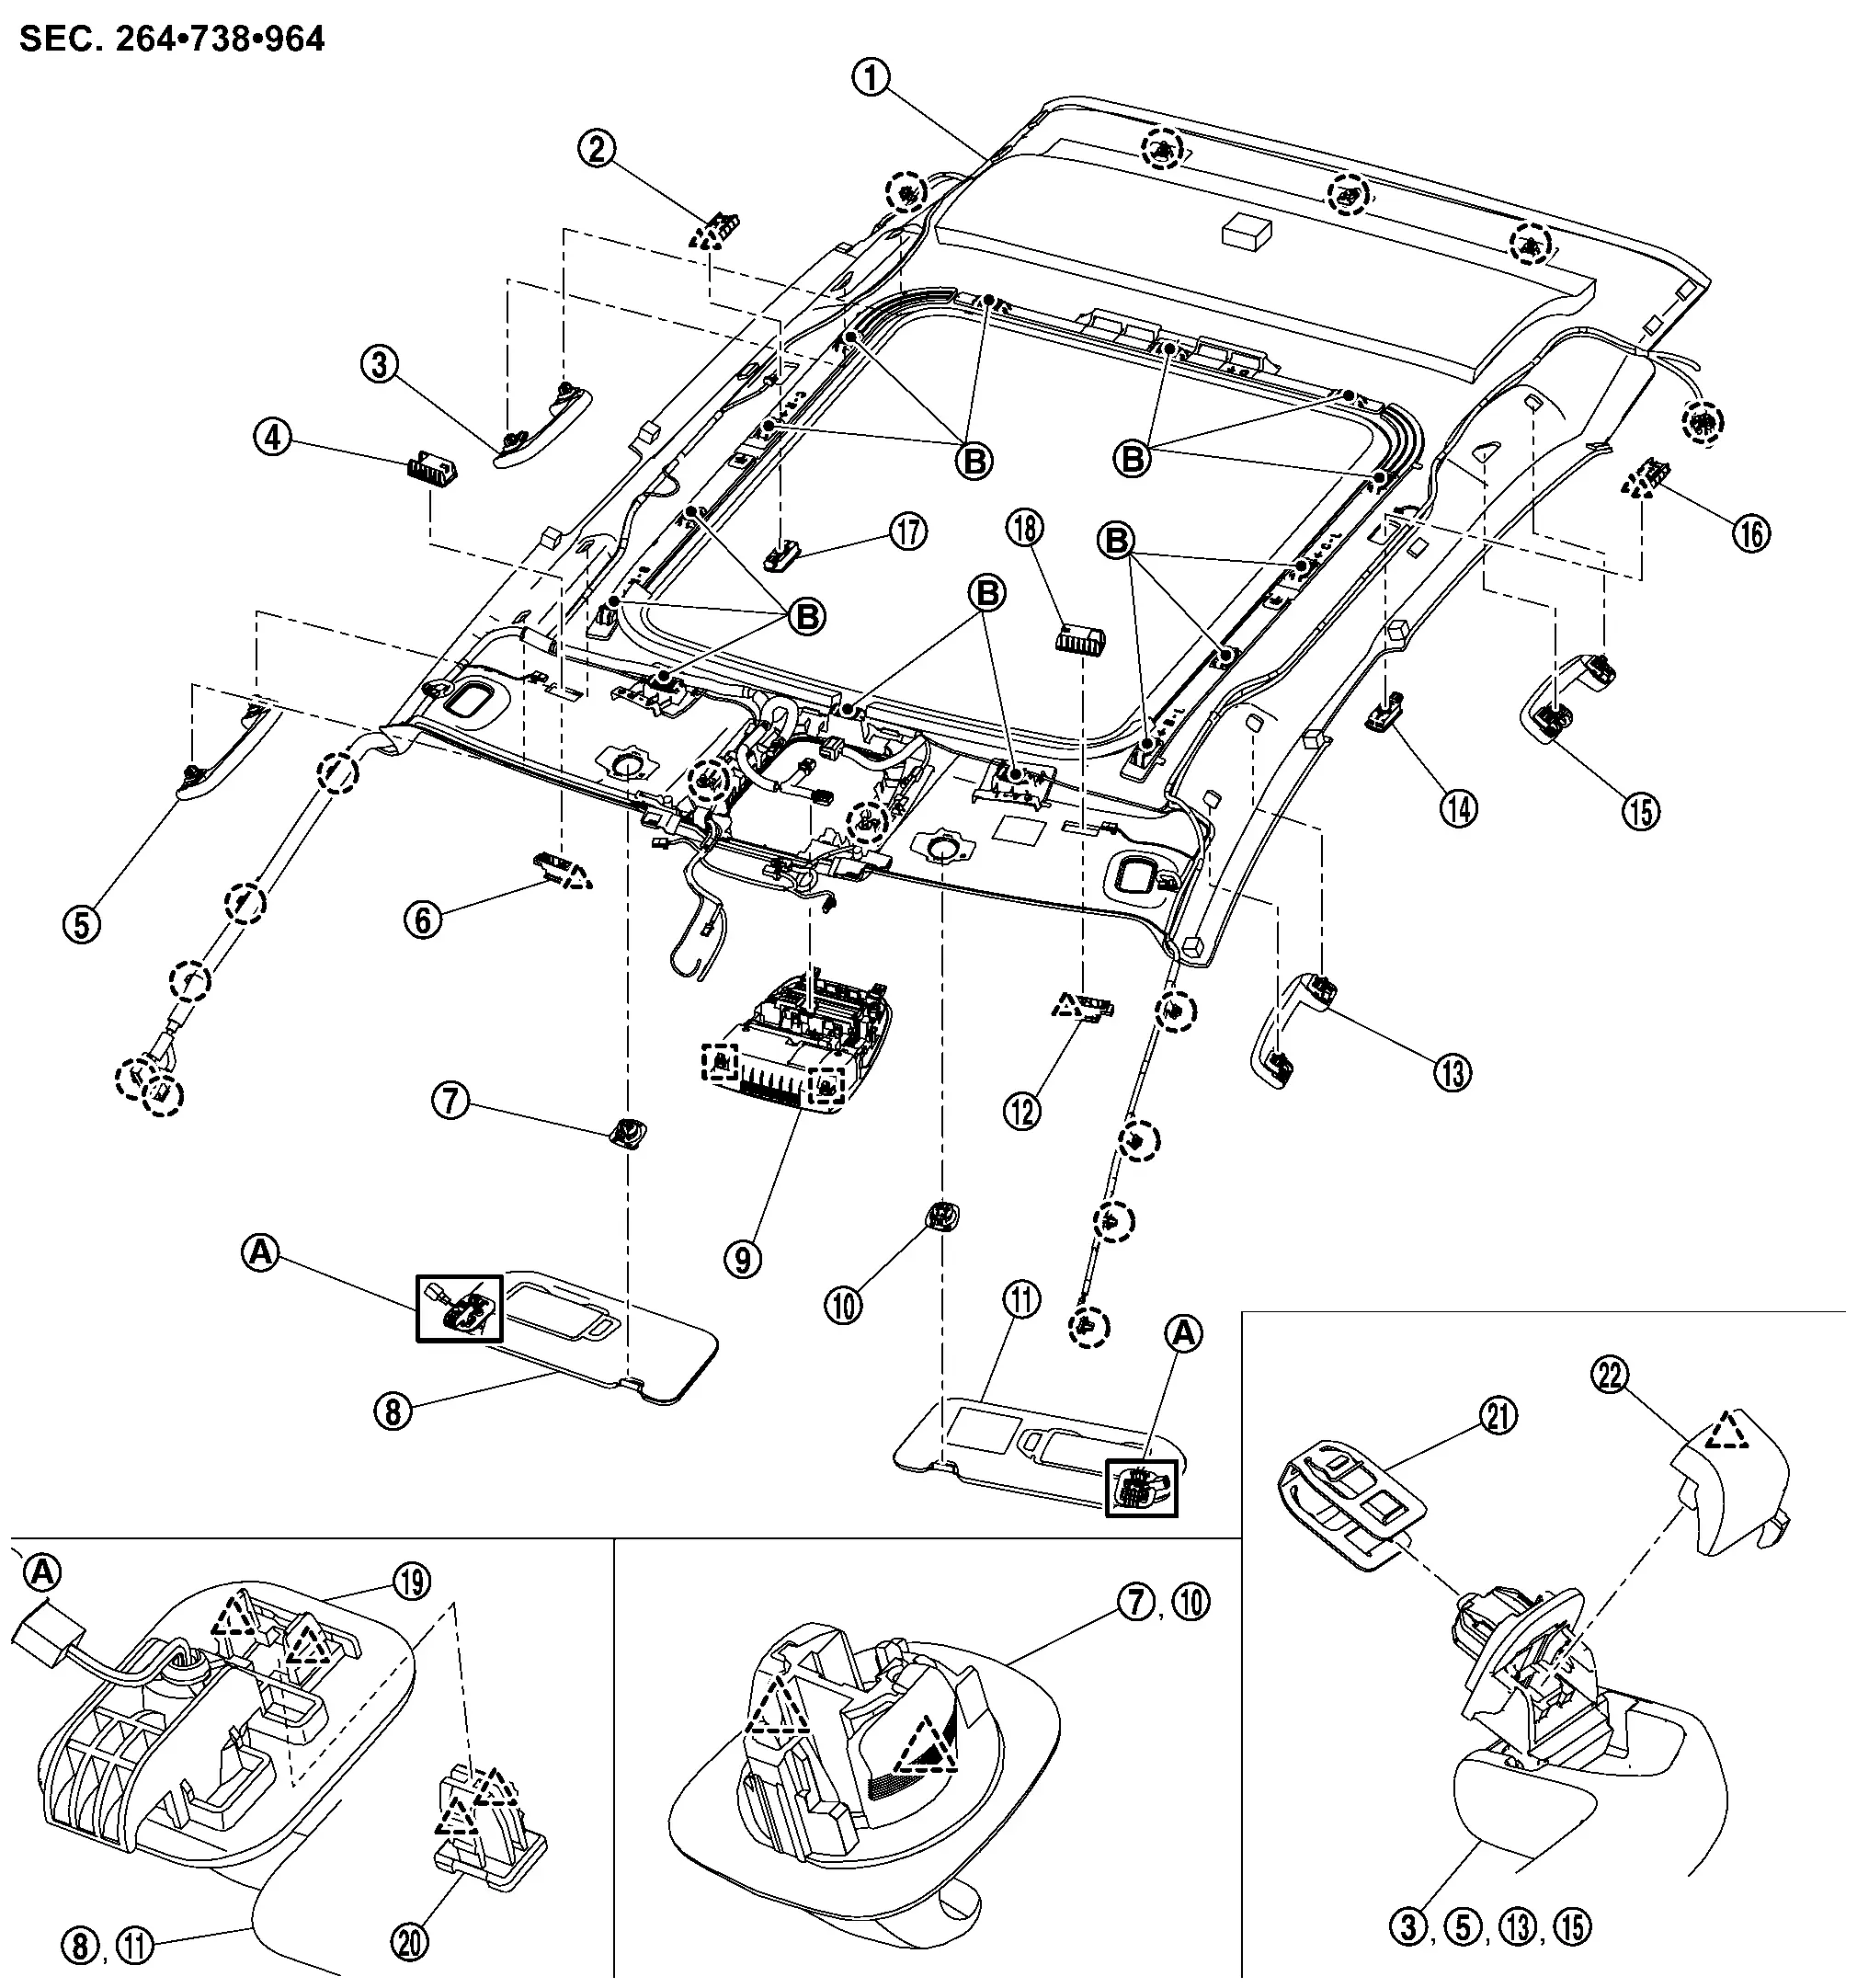
|
Headlining assembly | |
Personal lamp bracket RH | |
Rear assist grip RH |
|
Vanity mirror lamp bracket RH | |
Front assist grip RH | |
Vanity mirror lamp RH |
|
Sun visor holder RH | |
Sun visor RH | |
Room lamp assembly |
|
Sun visor holder LH | |
Sun visor LH | |
Vanity mirror lamp LH |
|
Front assist grip LH | |
Personal lamp LH |  |
Rear assist grip LH |
 |
Personal lamp bracket LH |  |
Personal lamp RH |  |
Vanity mirror lamp bracket LH |
 |
Sun visor bracket |  |
Bracket locker |  |
Metal clip |
 |
Assist grip cap | ||||
|
Dual lock fastener | ||||
|
: Clip | ||||
|
: Pawl | ||||
|
: Metal clip | ||||
Without Sunroof models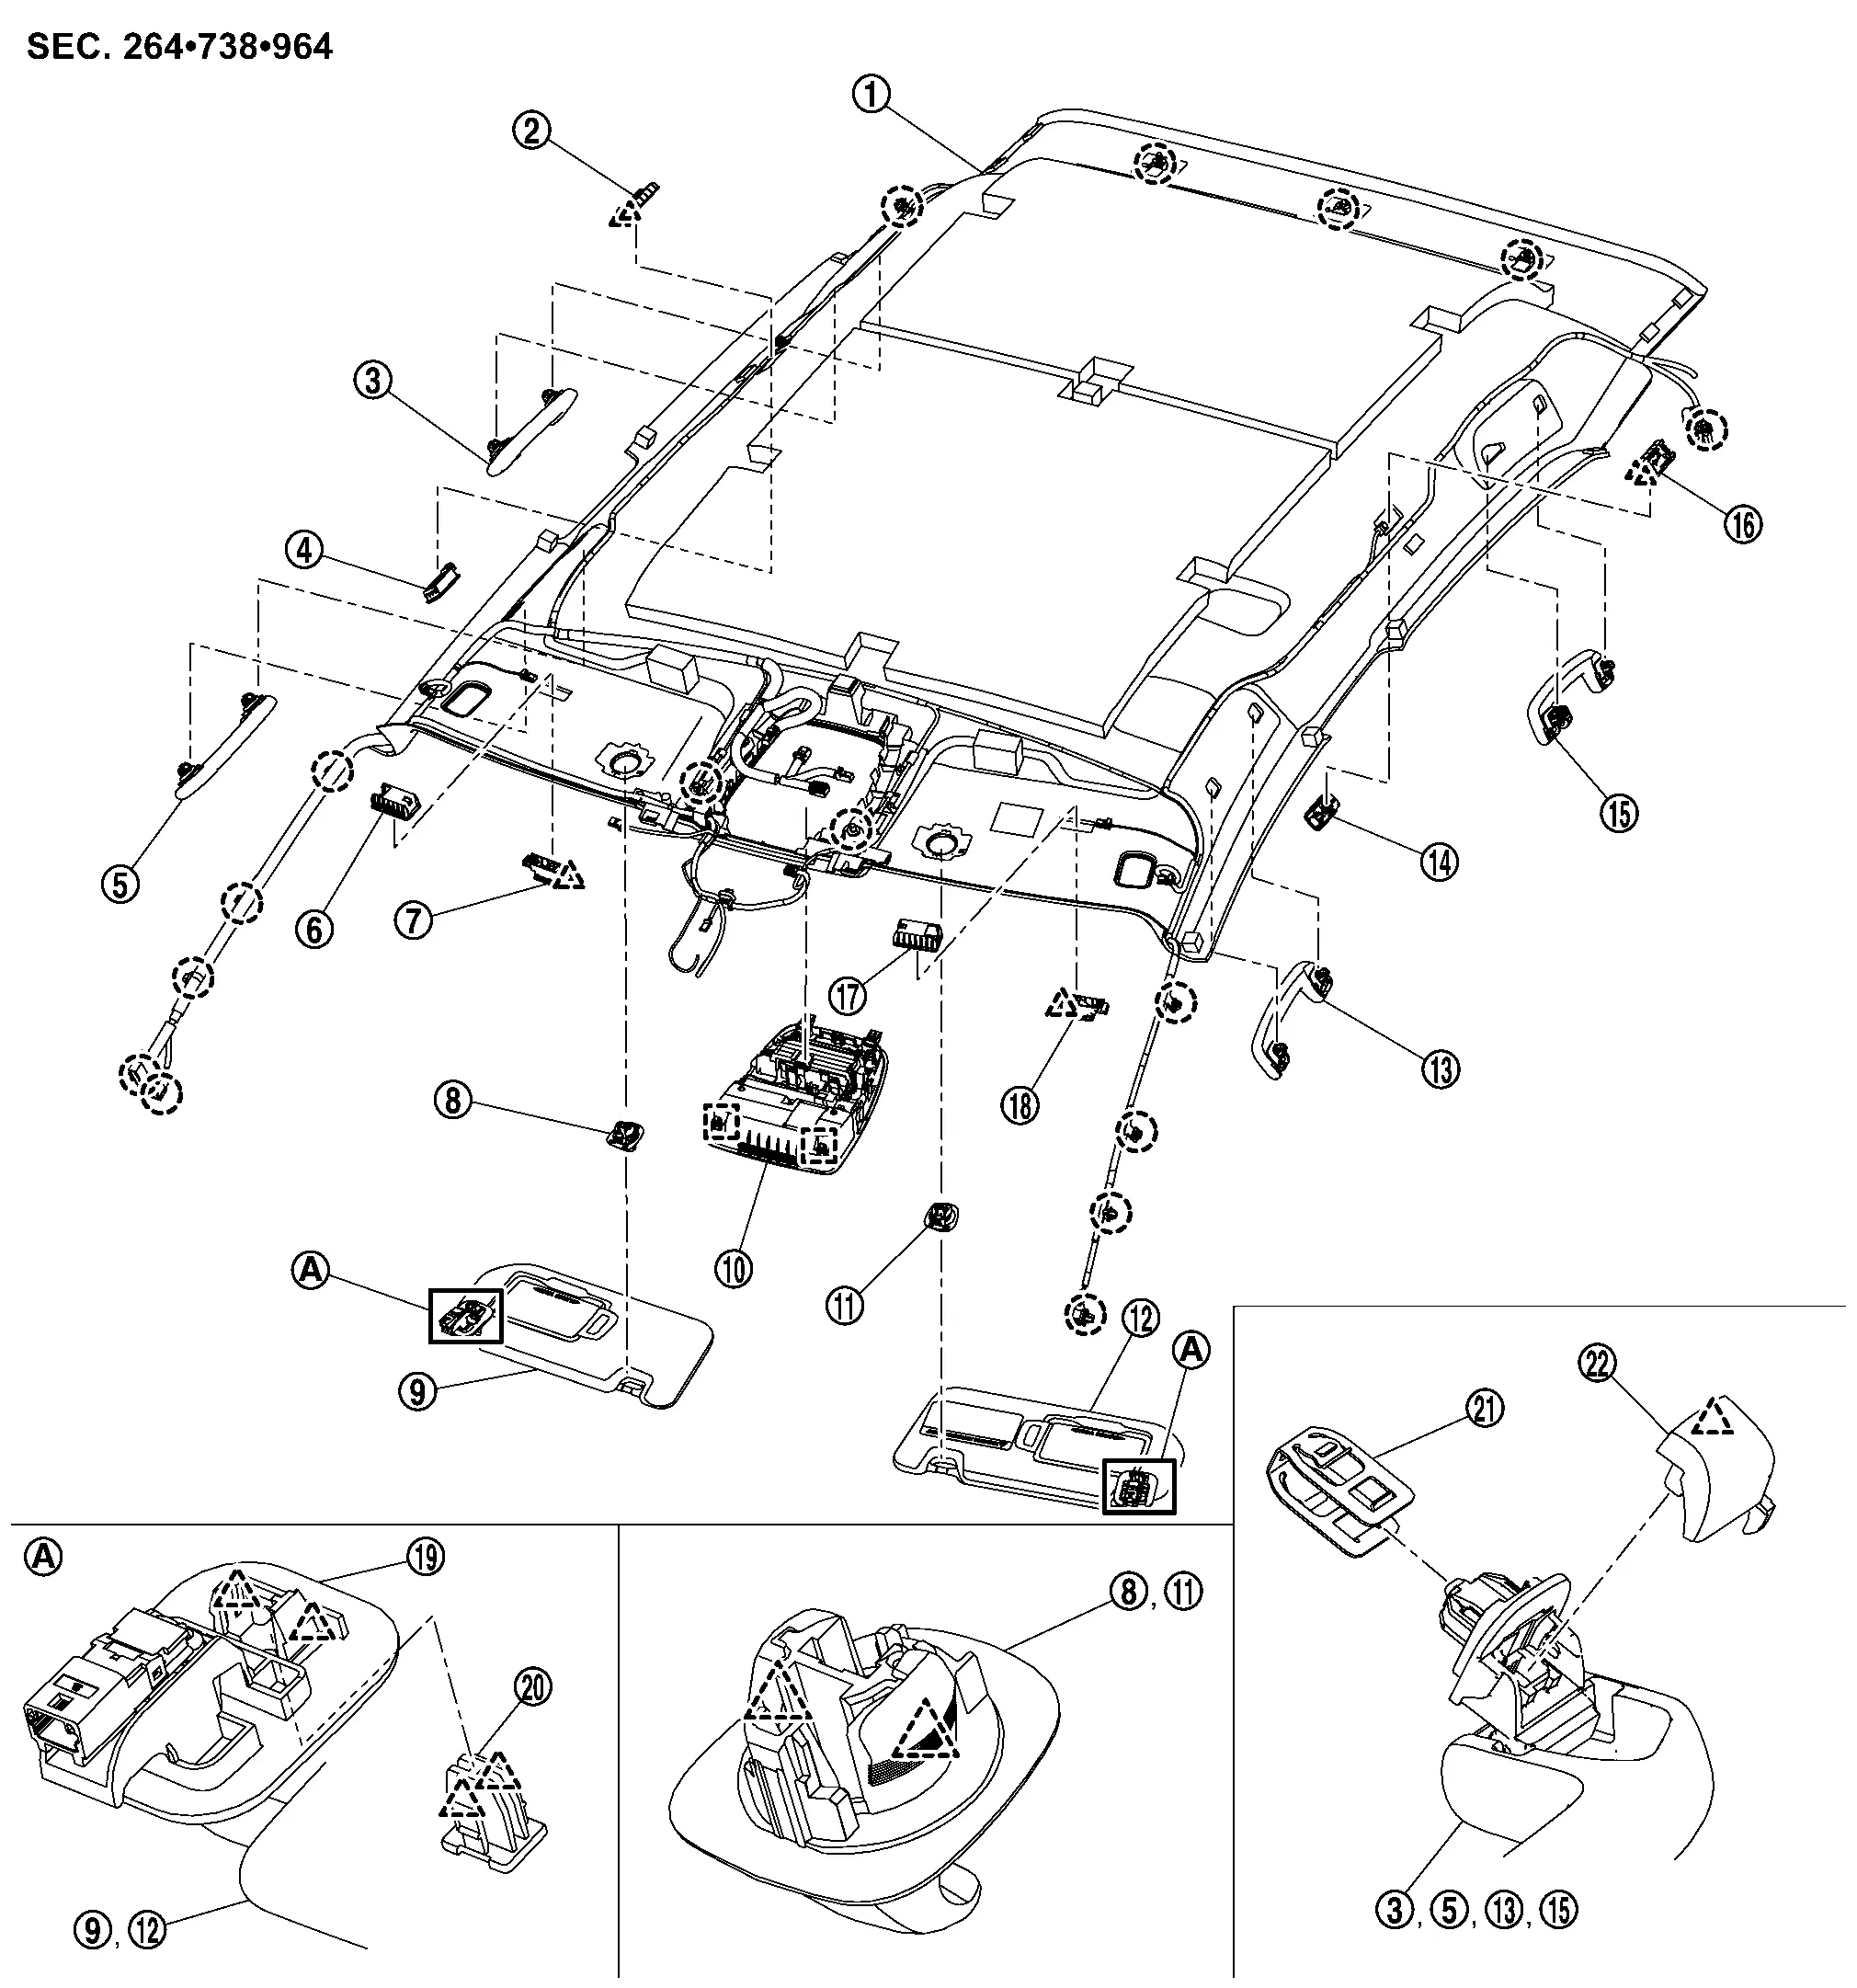
|
Headlining assembly | |
Personal lamp bracket RH | |
Rear assist grip RH |
|
Personal lamp RH | |
Front assist grip RH | |
Vanity mirror lamp bracket RH |
|
Vanity mirror lamp RH | |
Sun visor holder RH | |
Sun visor RH |
|
Room lamp assembly | |
Sun visor holder LH | |
Sun visor LH |
|
Front assist grip LH | |
Personal lamp LH | |
Rear assist grip LH |
|
Personal lamp bracket LH | |
Vanity mirror lamp bracket LH | |
Vanity mirror lamp LH |
|
Sun visor bracket | |
Bracket locker | |
Metal clip |
|
Assist grip cap | ||||
|
: Clip | ||||
|
: Pawl | ||||
|
: Metal clip | ||||
Removal & Installation
With Sunroof models
CAUTION:
Never damage the roof panel.
REMOVAL
Remove front pillar garnish (LH and RH). Refer to Removal & Installation.
Remove center pillar upper garnish (LH and RH). Refer to Removal & Installation.
Remove luggage side upper finisher (LH and RH). Refer to Removal & Installation.
Remove front body side welt and rear body side welt. Refer to Removal & Installation.
Remove back door weather-strip. Refer to Removal & Installation.
Disconnect front camera unit harness connector. Refer to Removal and Installation (With ProPILOT ASSIST), Refer to Removal and Installation (Without ProPILOT ASSIST).
Disconnect smart rear view mirror harness connector. Refer to Removal & Installation.
Remove map lamp assembly. Refer to Removal & Installation.
Remove following parts of front pillar RH.Disconnect harness connectors and . Disengage harness fixing clips.
|
: Clip | ||||
Remove following parts of front pillar LH.Disconnect harness connectors and . Disengage harness fixing clips.
|
: Clip | ||||
Remove following parts of rear pillar RH.Disconnect harness connectors and . Disengage harness fixing clip.
|
: Clip | ||||
Remove following parts of rear pillar LH.Disconnect harness connector . Disengage harness fixing clip.
|
: Clip | ||||
Remove all assist grips.Disengage assist grip cap fixing pawl using a remover tool (A), and then remove assist grip cap.
|
: Pawl |
CAUTION:
Use a remover tool wrapped in protective tape to prevent damage to the parts.
Slide assist grip forward and remove it. Remove fixing metal clips from body panel.Remove sun visor assembly (LH and RH).Disengage bracket locker fixing pawls using a remover tool (A).
|
: Pawl |
CAUTION:
Because the bracket locker has a stopper, never pull out the bracket locker from position.
to the direction of the arrow as shown in the figure, and then disengage sun visor bracket fixing pawls.
|
: Pawl |
Disengage sun visor holder fixing pawls according to numerical order 1→2 indicated by arrows as shown in the figure, and then remove sun visor holder (LH and RH).
|
: Pawl |
Disengage headlining fixing clips at the rear end of headlining assembly.
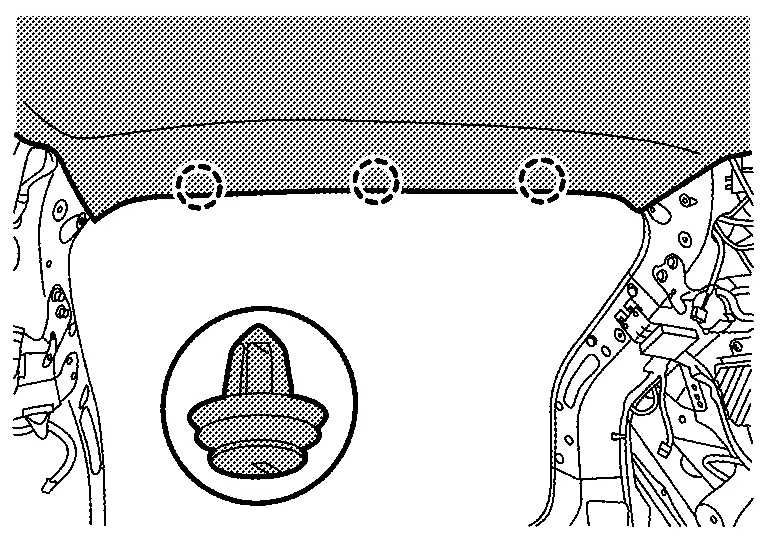
|
: Clip | ||||
CAUTION:
-
Two workers are required for removal in order to prevent damage.
-
Never bend headlining assembly when removing.
-
To prevent damage to headlining assembly, never pull on the headlining base material when remove the fixing clips.
Disengage headlining fixing clips at the front end of headlining assembly.
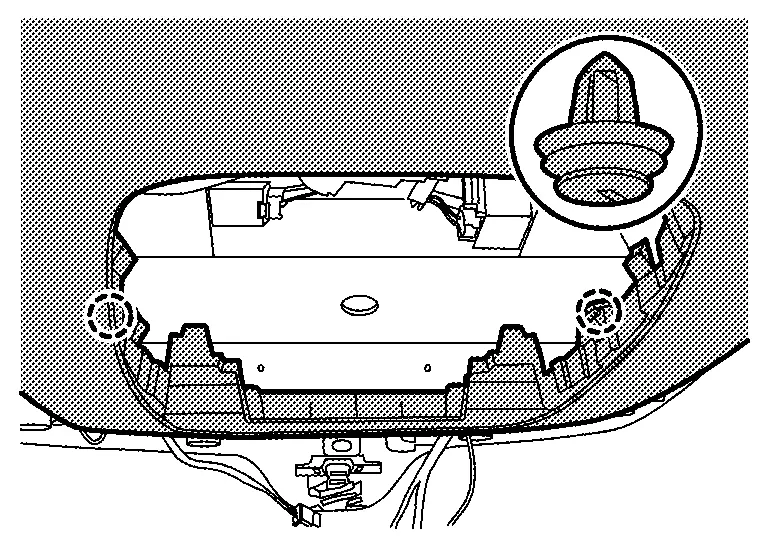
|
: Clip | ||||
CAUTION:
-
Two workers are required for removal in order to prevent damage.
-
Never bend headlining assembly when removing.
-
To prevent damage to headlining assembly, never pull on the headlining base material when remove the fixing clips.
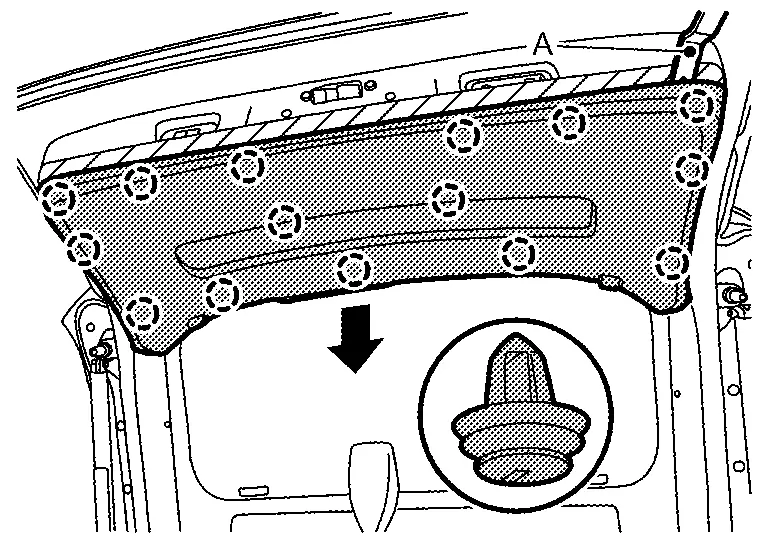
Detach dual lock fasteners between headlining assembly and roof panel.
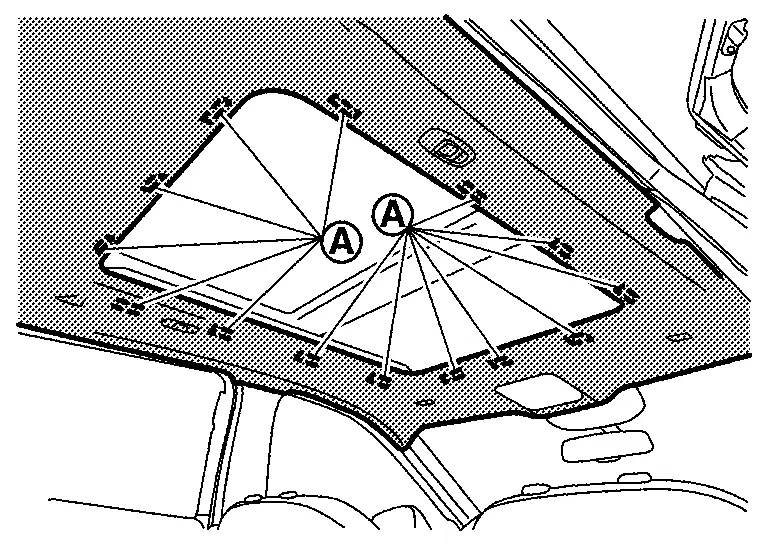
CAUTION:
-
Two workers are required for removal in order to prevent damage.
-
Never bend headlining assembly when removing.
-
To prevent damage to headlining assembly, never pull on the headlining base material when remove the dual lock fasteners.
Remove headlining assembly according to direction indicated by arrow as shown in the figure.
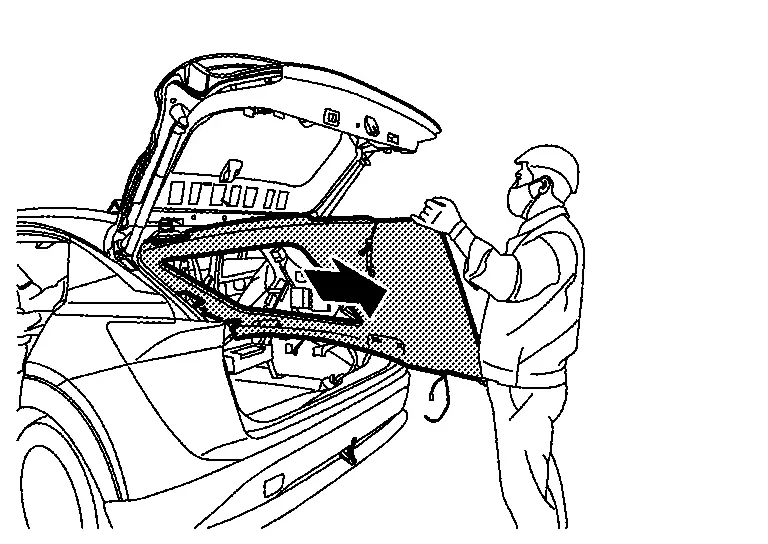
CAUTION:
-
Two workers are required for removal in order to prevent damage.
-
Never bend headlining assembly when removing.
-
Apply protective tape to the portion where contact may occur during work.
INSTALLATION
Note the following items, and then install in the reverse order of removal.
CAUTION:
-
When installing headlining, start by installing both sun visor holders and headlining fixing clips in order to keep the headlining in position.
-
Visually check the clips for deformation and damage during installation. Replace with new ones if necessary.
-
Never bend headlining when installing.
-
Be careful that the surface is not wrinkled when installing.
-
When installing assist grip, install metal clip
to assist grip cap , and then install to the body panel.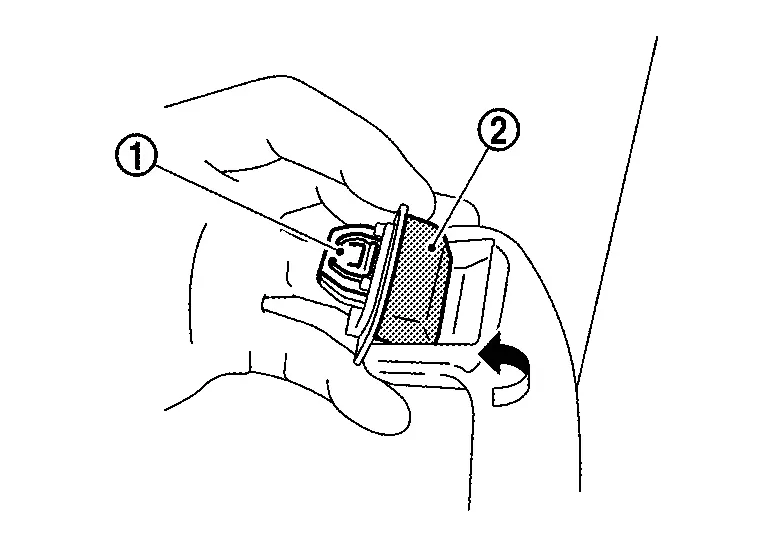
-
After installing the sun visor, make sure that the caution label is in the orientation shown when the sun visor is retracted. (For the caution label of driver's seat, when it is equipped.)
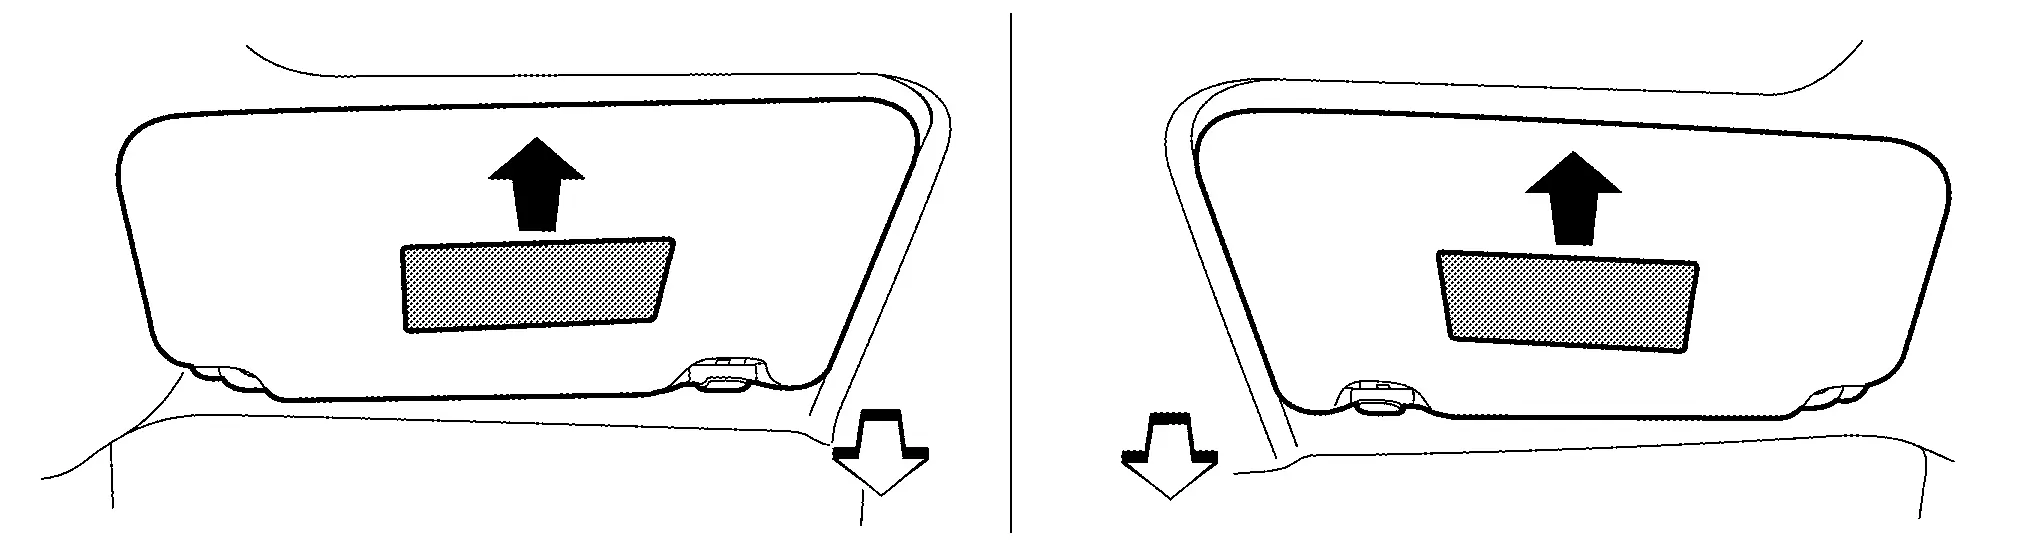

:Caution label upward :Nissan Ariya Vehicle front
Without Sunroof models
CAUTION:
Never damage the roof panel.
REMOVAL
Remove front pillar garnish (LH and RH). Refer to Removal & Installation.
Remove center pillar upper garnish (LH and RH). Refer to Removal & Installation.
Remove luggage side upper finisher (LH and RH). Refer to Removal & Installation.
Remove front body side welt and rear body side welt. Refer to Removal & Installation.
Remove back door weather-strip. Refer to Removal & Installation.
Disconnect front camera unit harness connector. Refer to Removal and Installation (With ProPILOT ASSIST), Refer to Removal and Installation (Without ProPILOT ASSIST).
Disconnect smart rear view mirror harness connector. Refer to Removal & Installation.
Remove map lamp assembly. Refer to Removal & Installation.
Remove following parts of front pillar RH.Disconnect harness connectors and . Disengage harness fixing clips.
|
: Clip | ||||
Remove following parts of front pillar LH.Disconnect harness connectors and . Disengage harness fixing clips.
|
: Clip | ||||
Remove following parts of rear pillar RH.Disconnect harness connectors and . Disengage harness fixing clip.
|
: Clip | ||||
Remove following parts of rear pillar LH.Disconnect harness connector . Disengage harness fixing clip.
|
: Clip | ||||
Remove all assist grips.Disengage assist grip cap fixing pawl using a remover tool (A), and then remove assist grip cap.
|
: Pawl |
CAUTION:
Use a remover tool wrapped in protective tape to prevent damage to the parts.
Slide assist grip forward and remove it. Remove fixing metal clips from body panel.Remove sun visor assembly (LH and RH).Disengage bracket locker fixing pawls using a remover tool (A).
|
: Pawl |
CAUTION:
Because the bracket locker has a stopper, never pull out the bracket locker from position.
to the direction of the arrow as shown in the figure, and then disengage sun visor bracket fixing pawls.
|
: Pawl |
Disengage sun visor holder fixing pawls according to numerical order 1→2 indicated by arrows as shown in the figure, and then remove sun visor holder (LH and RH).
|
: Pawl |
Disengage headlining fixing clips at the rear end of headlining assembly.
|
: Clip | ||||
CAUTION:
-
Two workers are required for removal in order to prevent damage.
-
Never bend headlining assembly when removing.
-
To prevent damage to headlining assembly, never pull on the headlining base material when remove the fixing clips.
Disengage headlining fixing clips at the front end of headlining assembly.
|
: Clip | ||||
CAUTION:
-
Two workers are required for removal in order to prevent damage.
-
Never bend headlining assembly when removing.
-
To prevent damage to headlining assembly, never pull on the headlining base material when remove the fixing clips.
Remove headlining assembly according to direction indicated by arrow as shown in the figure.
CAUTION:
-
Two workers are required for removal in order to prevent damage.
-
Never bend headlining assembly when removing.
-
Apply protective tape to the portion where contact may occur during work.
INSTALLATION
Note the following items, and then install in the reverse order of removal.
CAUTION:
-
When installing headlining, start by installing both sun visor holders and headlining fixing clips in order to keep the headlining in position.
-
Visually check the clips for deformation and damage during installation. Replace with new ones if necessary.
-
Never bend headlining when installing.
-
Be careful that the surface is not wrinkled when installing.
-
When installing assist grip, install metal clip
to assist grip cap , and then install to the body panel. -
After installing the sun visor, make sure that the caution label is in the orientation shown when the sun visor is retracted. (For the caution label of driver's seat, when it is equipped.)
:Caution label upward :Nissan Ariya Vehicle front
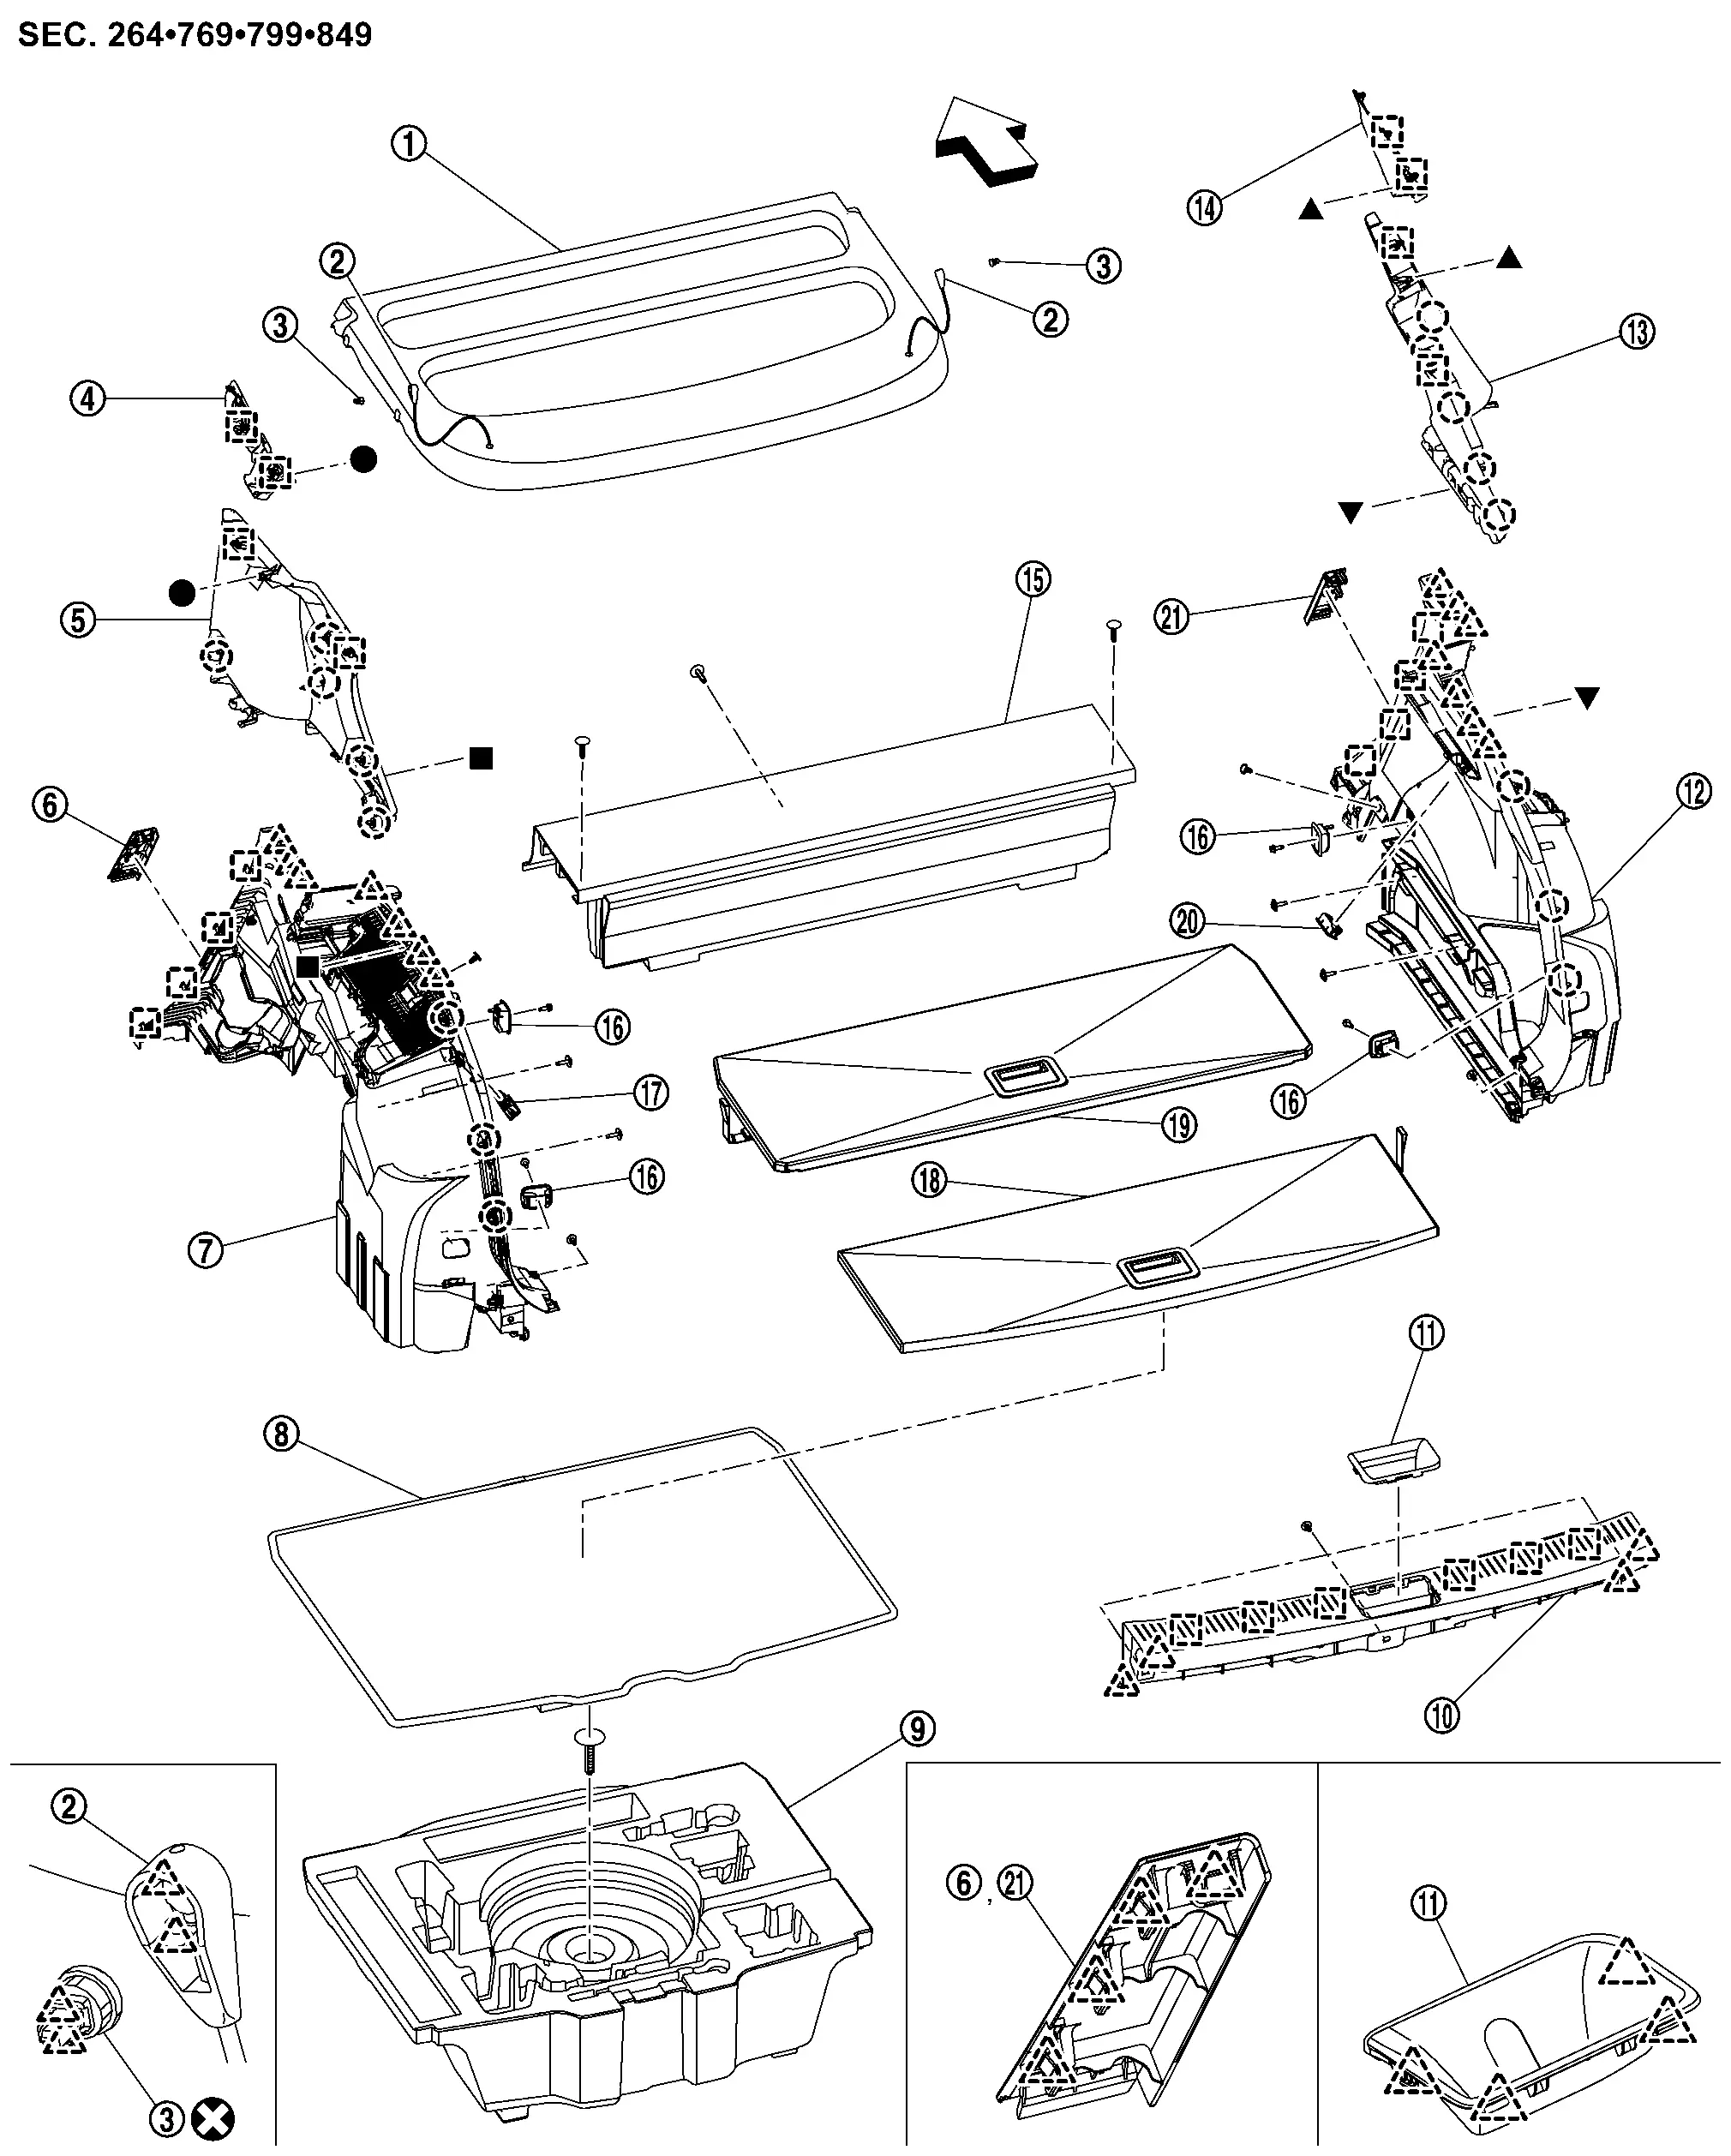
Luggage Trim Nissan Ariya first Gen
Exploded View
2WD
|
Rear parcel shelf finisher | |
Lift rope holder | |
Rear parcel shelf hook |
|
Rear side bracket LH | |
Luggage side upper finisher LH | |
Luggage finisher mask LH |
|
Luggage side lower finisher LH | |
Luggage floor carpet | |
Luggage floor box* |
|
Luggage rear plate | |
Luggage rear plate mask | |
Luggage side lower finisher RH |
|
Luggage side upper finisher RH | |
Rear side bracket RH | |
Luggage floor spacer |
|
Lope hook | |
Luggage room lamp LH | |
Rear center luggage floor board |
|
Front center luggage floor board | |
Luggage room lamp RH | |
Luggage finisher mask RH |
|
: Clip | ||||
|
: Pawl | ||||
|
: Metal clip | ||||
|
: Always replace after every disassembly. | ||||
|
: Nissan Ariya Vehicle front | ||||
 , ,  , ,  , ,  : Indicates that the part is connected at points with same symbol in actual Nissan Ariya vehicle. : Indicates that the part is connected at points with same symbol in actual Nissan Ariya vehicle. |
|||||
| *: Luggage floor box of BOSE audio model is attached with a clip. | |||||
AWD
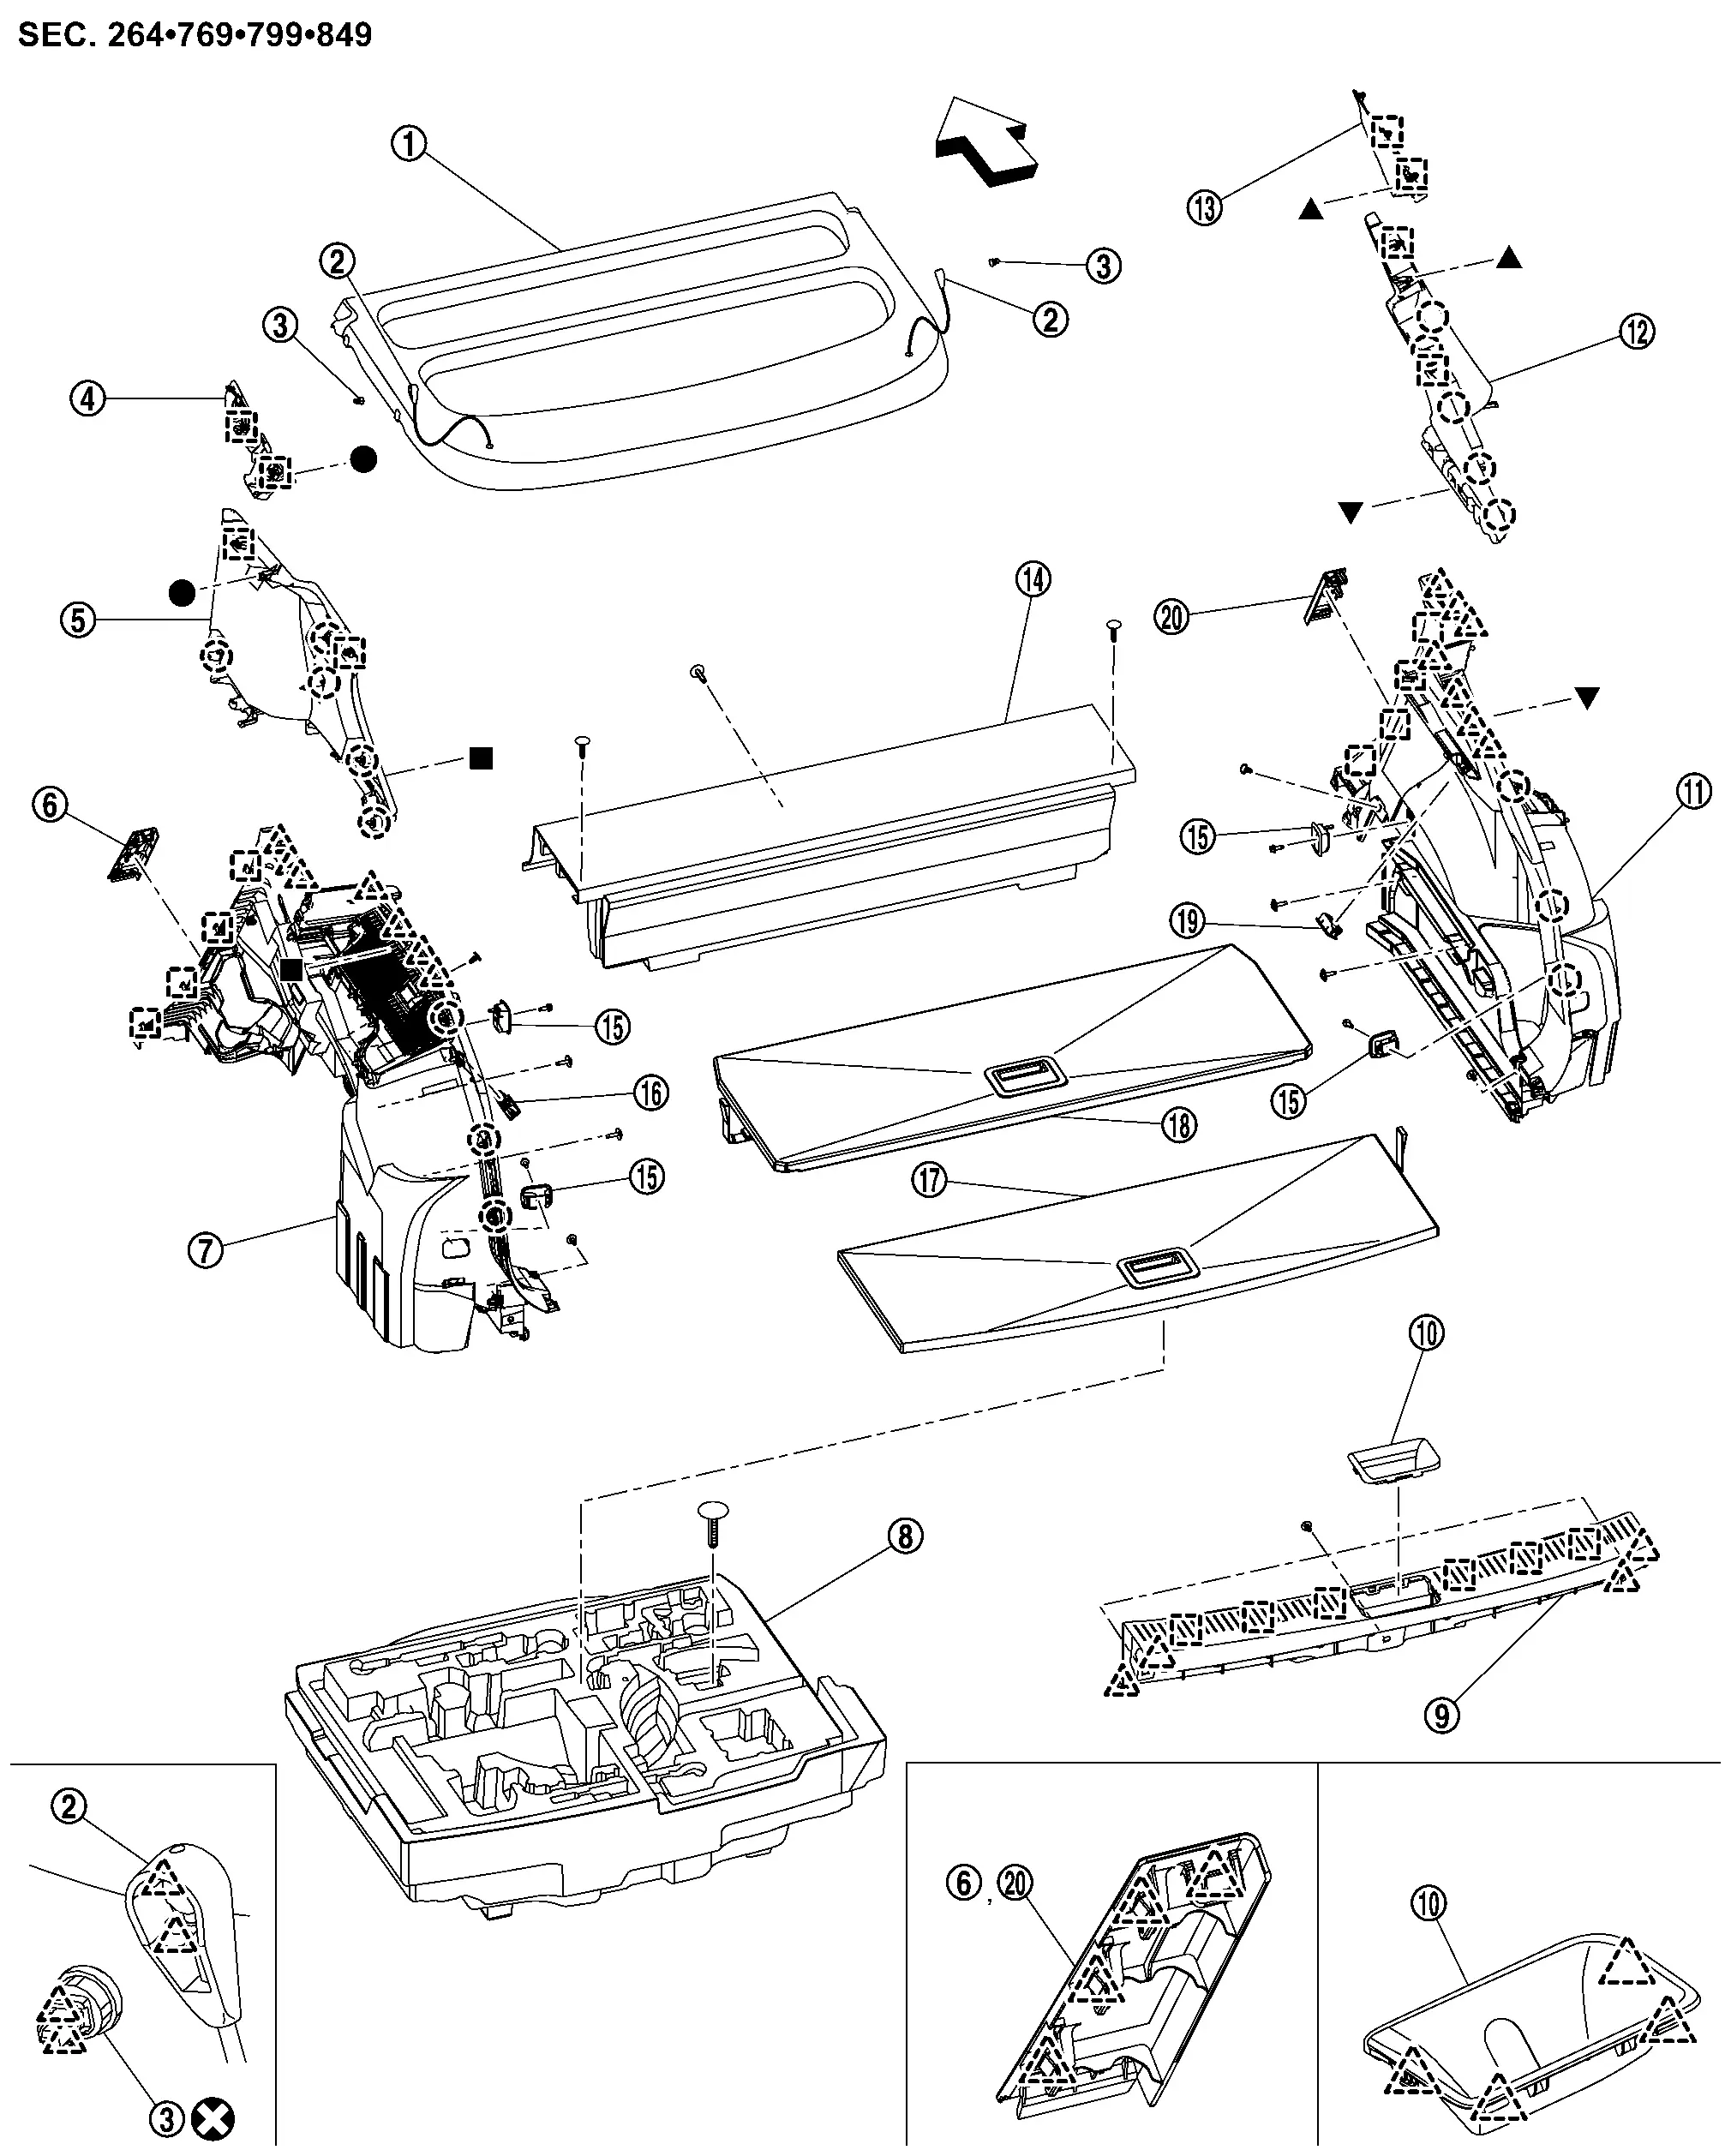
|
Rear parcel shelf finisher | |
Lift rope holder | |
Rear parcel shelf hook |
|
Rear side bracket LH | |
Luggage side upper finisher LH | |
Luggage finisher mask LH |
|
Luggage side lower finisher LH | |
Luggage floor box* | |
Luggage rear plate |
|
Luggage rear plate mask | |
Luggage side lower finisher RH | |
Luggage side upper finisher RH |
|
Rear side bracket RH | |
Luggage floor spacer | |
Lope hook |
|
Luggage room lamp LH | |
Rear center luggage floor board | |
Front center luggage floor board |
|
Luggage room lamp RH | |
Luggage finisher mask RH | ||
|
: Clip | ||||
|
: Pawl | ||||
|
: Metal clip | ||||
|
: Always replace after every disassembly. | ||||
|
: Nissan Ariya Vehicle front | ||||
| , , , : Indicates that the part is connected at points with same symbol in actual Nissan Ariya vehicle. |
|||||
| *: Luggage floor box of BOSE audio model is attached with a clip. | |||||
Luggage Floor Spacer Nissan Ariya 2023
Removal & Installation
CAUTION:
Never damage the body panel.
REMOVAL
Remove rear seat assembly. Refer to Removal & Installation.
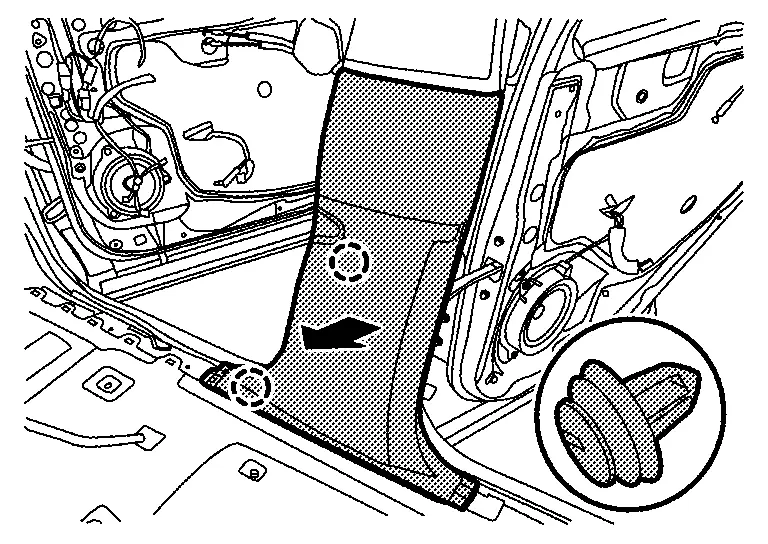
Disengage luggage floor spacer fixing clips, and then remove luggage floor spacer.
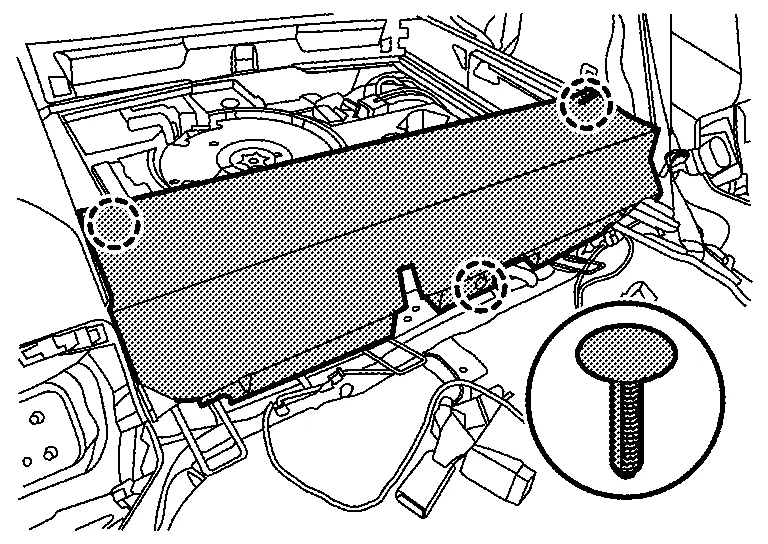
|
: Clip |
INSTALLATION
Note the following items, and then install in the reverse order of removal.
CAUTION:
-
Visually check clip for deformation and damage during installation. Replace with new ones if necessary.
-
Check in advance that clip is accurately aligned with the hole on body panel, and then install by pressing in.
Luggage Floor Board Nissan Ariya first Gen
Removal & Installation
REMOVAL
Front Center Luggage Floor Board
Fully open back door.
Remove tether belt, and then remove front center luggage floor board.
Rear Center Luggage Floor Board
Fully open back door.
Remove tether belt, and then remove rear center luggage floor board.
INSTALLATION
Install in the reverse order of removal.
Luggage Floor Carpet Nissan Ariya
Removal & Installation
REMOVAL
Remove front center luggage floor board and rear enter luggage floor board. Refer to Removal & Installation.
Remove luggage floor carpet.
INSTALLATION
Install in the reverse order of removal.
Luggage Floor Box Nissan Ariya first Gen
Removal & Installation
CAUTION:
Never damage the body panel.
REMOVAL
Remove luggage floor carpet. Refer to Removal & Installation.
Remove luggage rear plate. Refer to Removal & Installation.
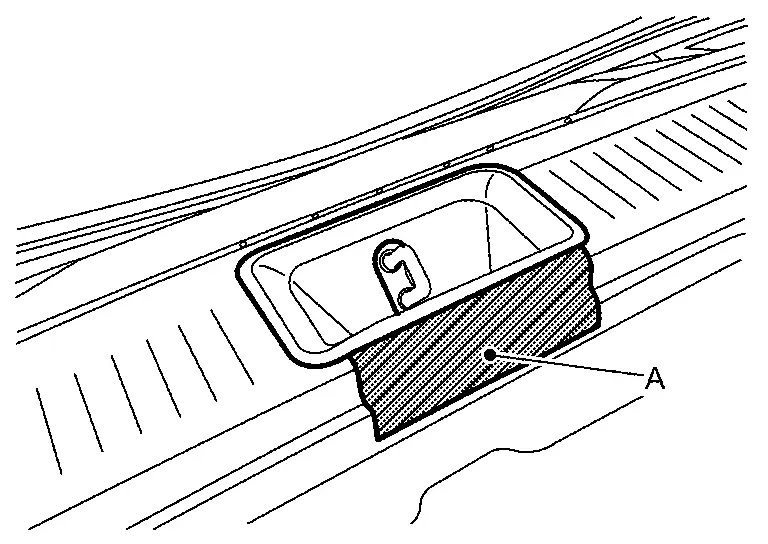
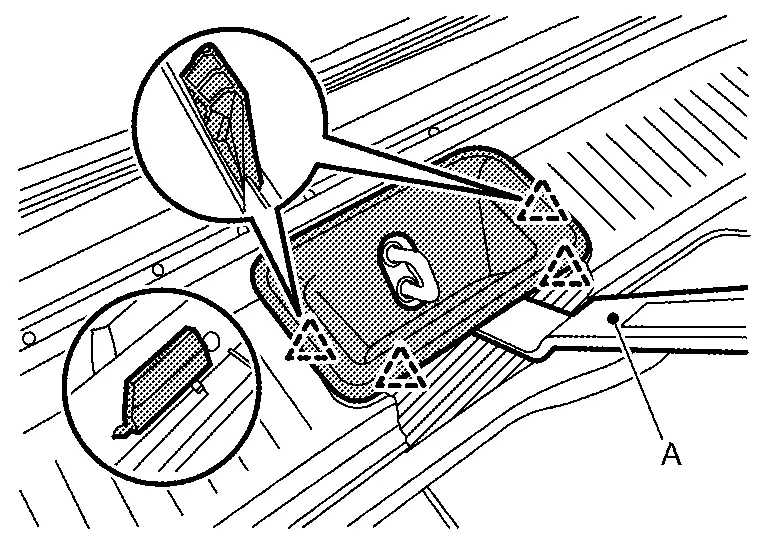
Remove woofer, and then remove luggage floor box. (With BOSE audio)
Disengage luggage floor box fixing clip, and then remove luggage floor box. (Without BOSE audio)
INSTALLATION
Install in the reverse order of removal.
Luggage Rear Plate Nissan Ariya 2026
Removal & Installation
CAUTION:
Never damage the body panel.
REMOVAL
Fully open back door.
Release back door weather-strip of luggage rear plate portion.
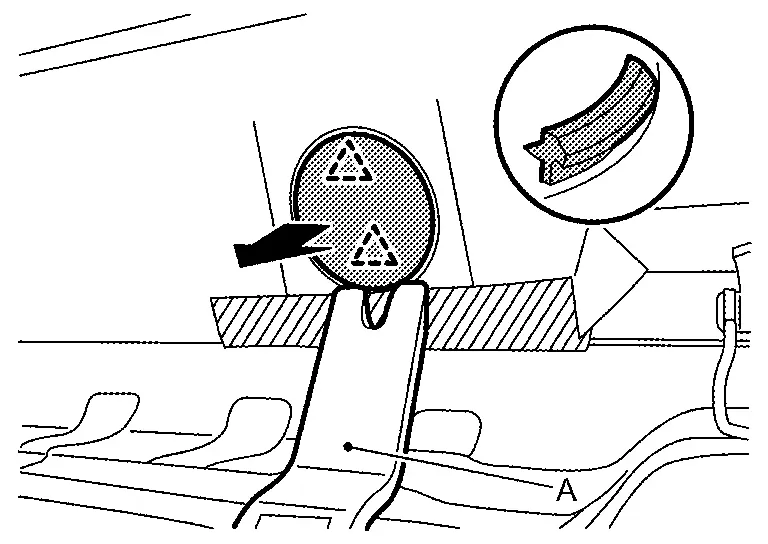
Remove luggage rear plate mask.Apply protective tape (A) on luggage rear plate to protect it from damage.
|
: Pawl |
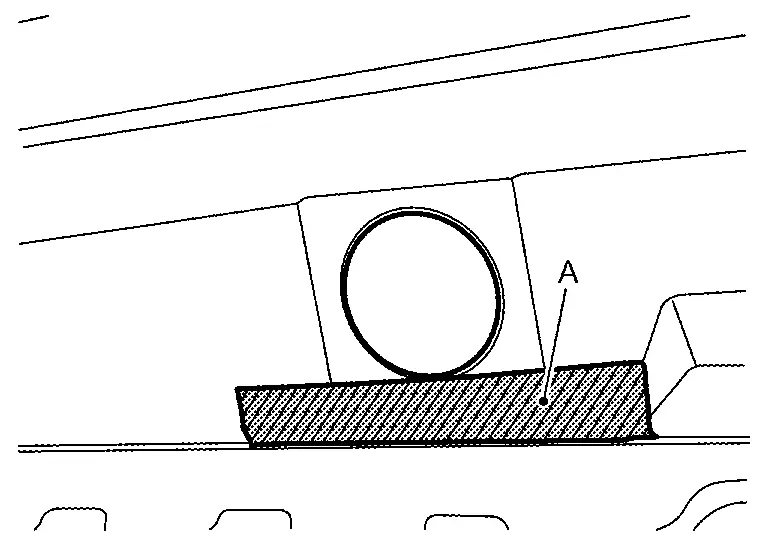
Remove luggage rear plate fixing clips .
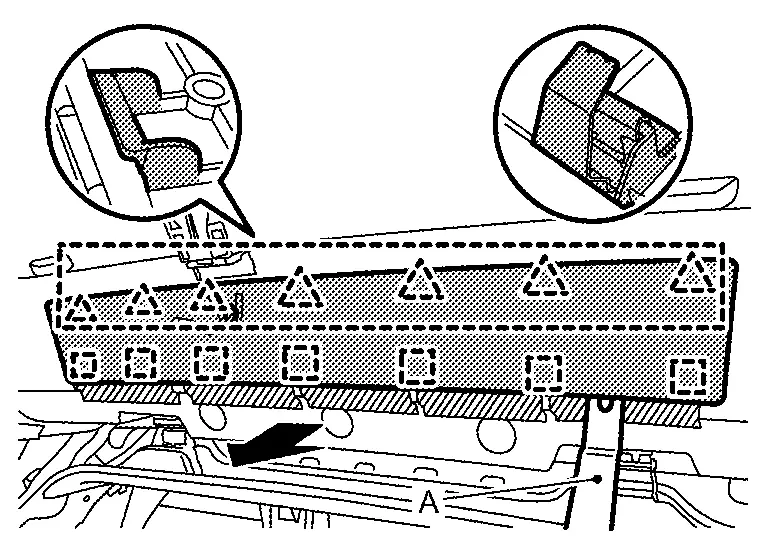
Apply protective tapes (A) on body panel to protect it from damage.
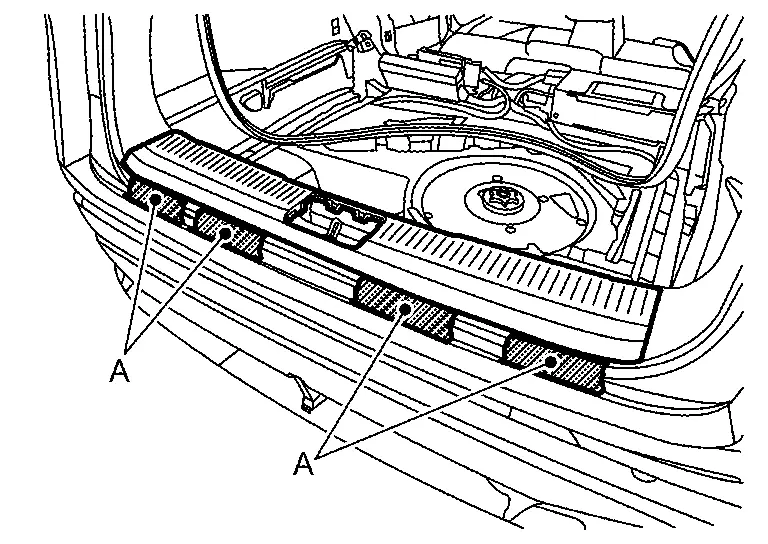
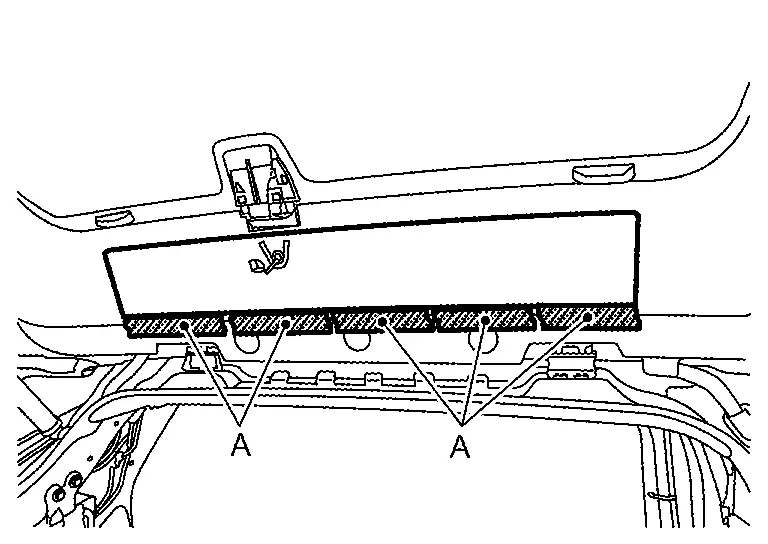
Disengage luggage rear plate fixing pawls on the front side.
|
: Pawl |
Disengage luggage rear plate fixing pawls and metal clips using a remover tool (A) according to numerical order 1→3 indicated by arrows as shown in the figure, and then remove luggage rear plate.
|
: Pawl |
|
: Metal clip |
INSTALLATION
Note the following items, and then install in the reverse order of removal.
CAUTION:
-
Visually check the clips and metal clip for deformation and damage during installation. Replace with new ones if necessary.
-
Check in advance that pawls and metal clips are accurately aligned with the portions on body panel, and then install by pressing in.
Luggage Finisher Mask Nissan Ariya 2026
Removal & Installation
CAUTION:
Never damage the luggage side lower finisher.
REMOVAL
Remove rear seat bolster. Refer to Removal & Installation.
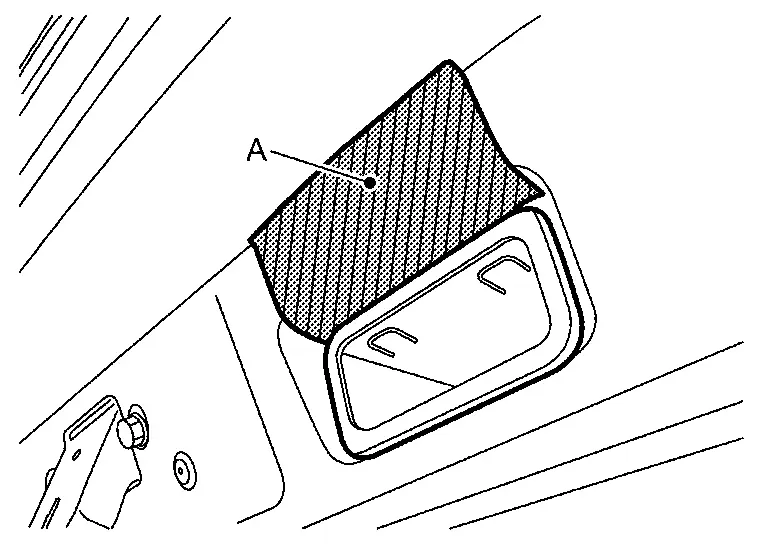
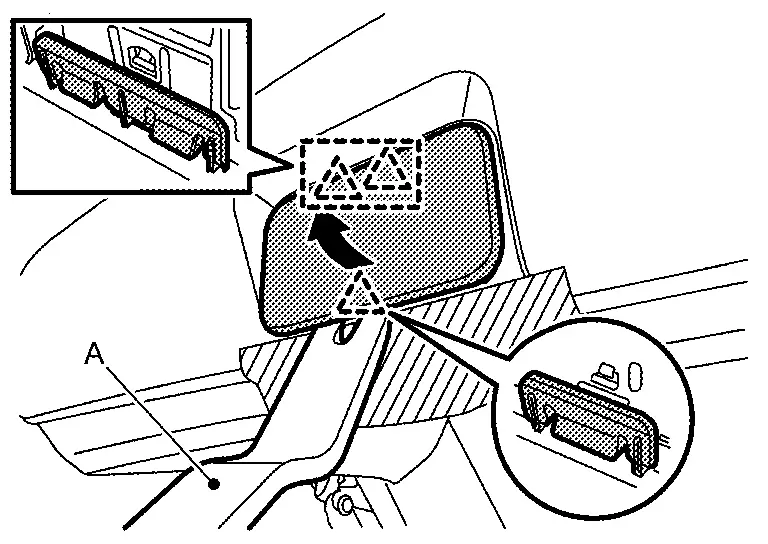
Disengage luggage finisher mask fixing pawls, and then remove luggage finisher mask.
|
: Pawl |
INSTALLATION
Note the following item, and then install in the reverse order of removal.
CAUTION:
Check in advance that pawls are accurately aligned with the portions on luggage side lower finisher, and then install by pressing in.
Luggage Side Lower Finisher Nissan Ariya 1st generation
Removal & Installation
CAUTION:
Never damage the body panel.
REMOVAL
Remove rear seat assembly. Refer to Removal & Installation.
Remove luggage floor box. Refer to Removal & Installation.
Release rear body side welt of luggage side lower finisher portion. Refer to Removal & Installation.
Remove luggage rear plate. Refer to Removal & Installation.
Release back door weather-strip of luggage side lower finisher portion. Refer to Removal & Installation.
Remove Luggage room lamp. Refer to Removal & Installation.
Remove rope hook.Disengage rope hook fixing pawls using a remover tool (A), and then open rope hook cover.
|
: Pawl |
, and then remove rope hook.
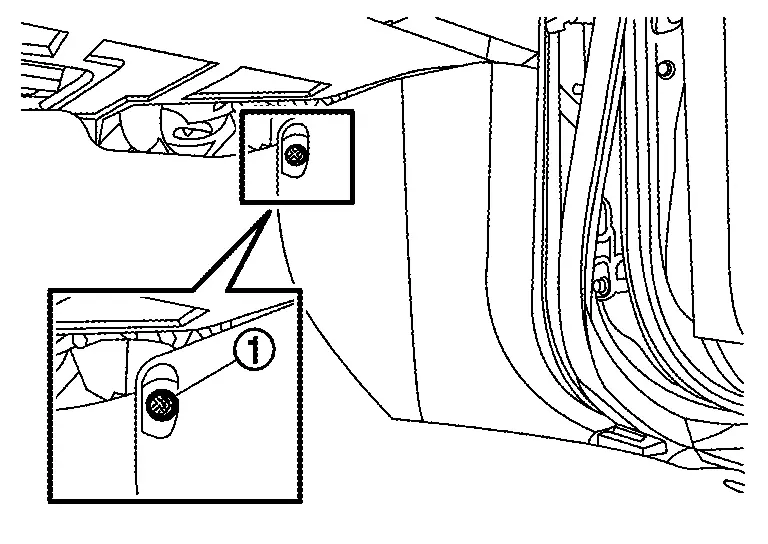
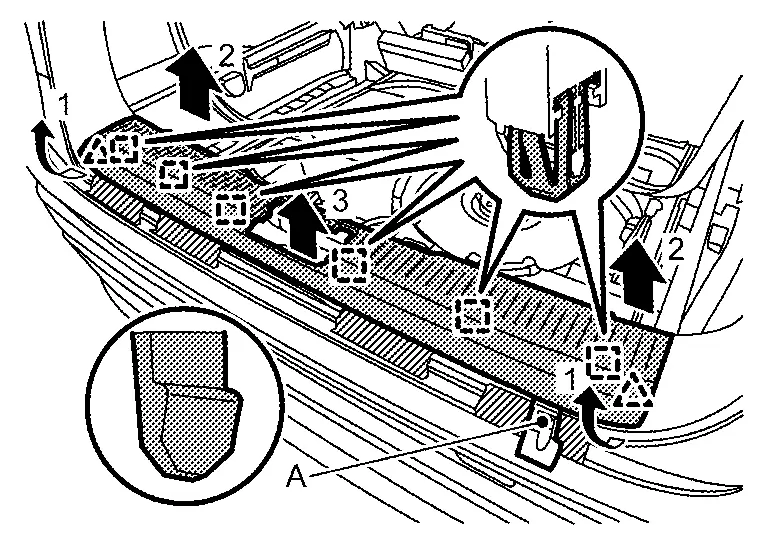
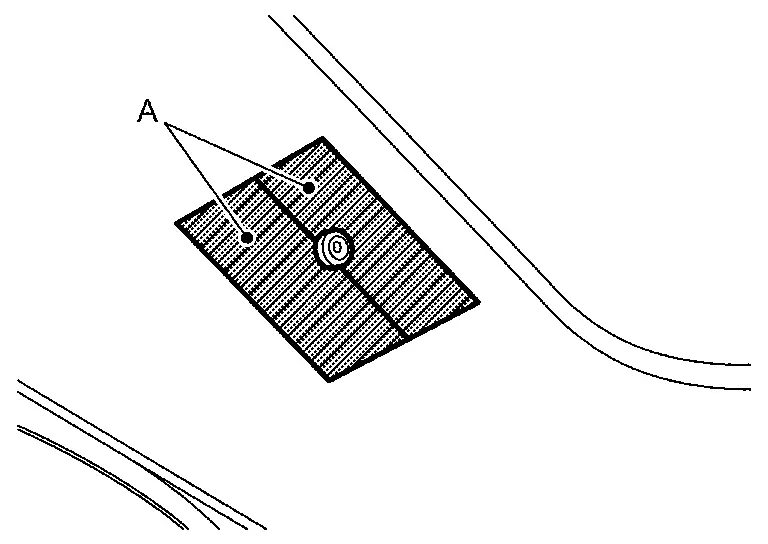
Remove luggage side lower finisher fixing clips .
Remove luggage side lower finisher mounting bolts .
Apply protective tapes (A) on the body panel to protect it from damage.
Disengage luggage side lower finisher fixing clips using a remover tool (A).
|
: Clip |
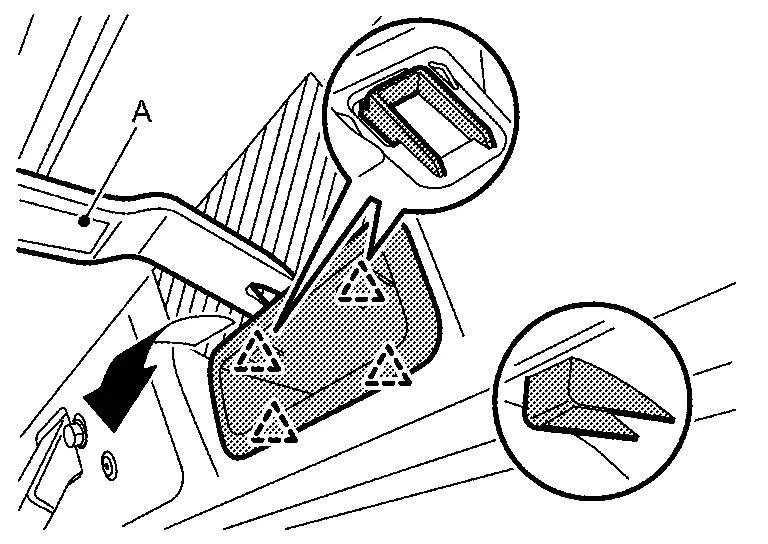
Disengage luggage side lower finisher fixing pawls.
|
: Pawl |
Disengage luggage side lower finisher fixing pawls and metal clips according to numerical order 1→2 indicated by arrows as shown in the figure, and then remove luggage side lower finisher.
|
: Pawl |
|
: Metal clip |
INSTALLATION
Note the following items, and then install in the reverse order of removal.
CAUTION:
-
Visually check clips and metal clips for deformation and damage during installation. Replace with new ones if necessary.
-
Check in advance that clips, pawls and metal clips are accurately aligned with the portions on body panel, and then install by pressing in.
Luggage Side Upper Finisher Nissan Ariya
Removal & Installation
CAUTION:
Never damage the body panel.
REMOVAL
Remove luggage side lower finisher. Refer to Removal & Installation.
Release rear body side welt of luggage side upper finisher portion. Refer to Removal & Installation.
Release back door weather-strip of luggage side upper finisher portion. Refer to Removal & Installation.
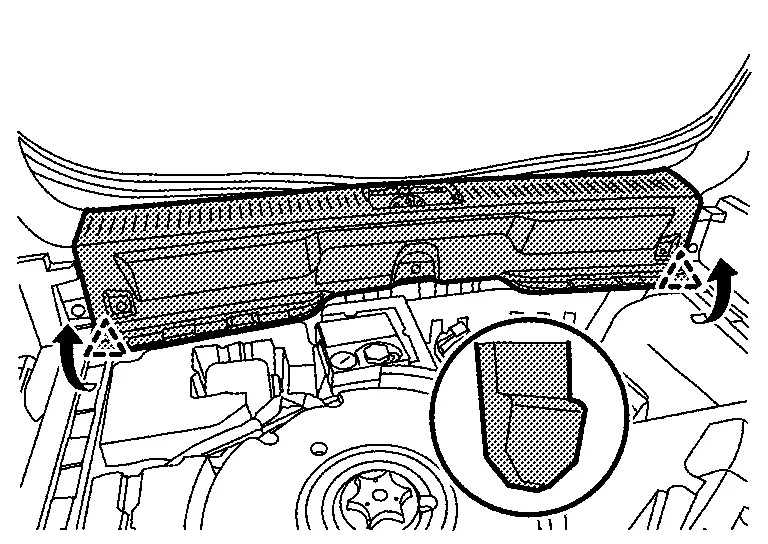
Apply protective tapes (A) on the body panel to protect it from damage.
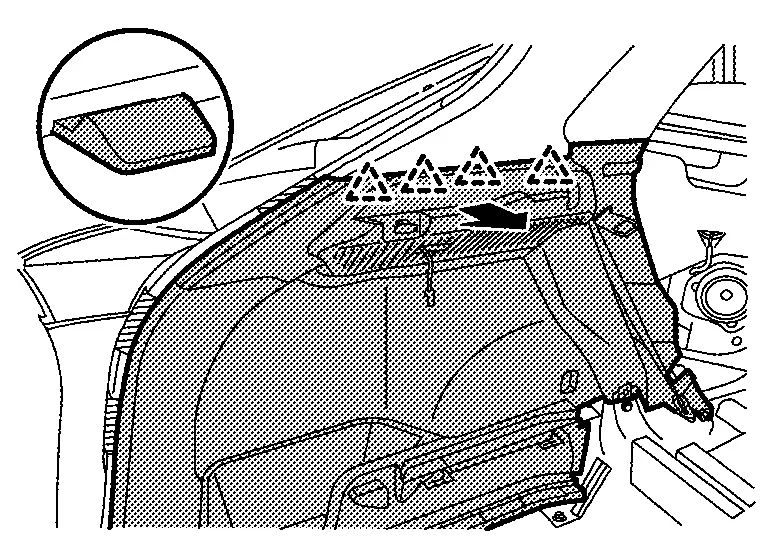
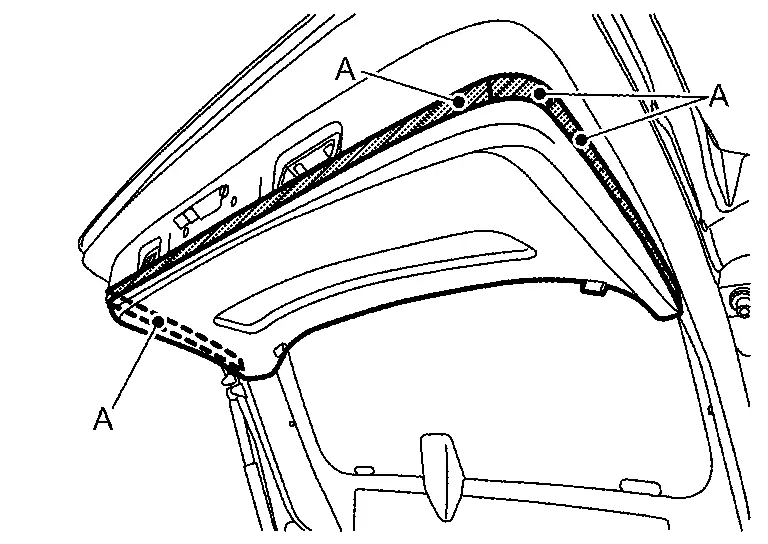
Disengage luggage side upper finisher fixing clips and metal clip using a remover tool (A) according to numerical order 1→3 indicated by arrows as shown in the figure.
|
: Clip |
|
: Metal clip |
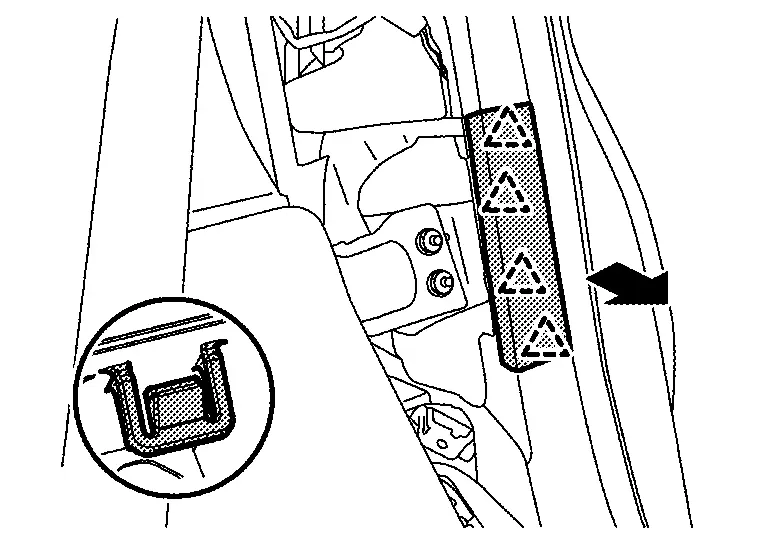
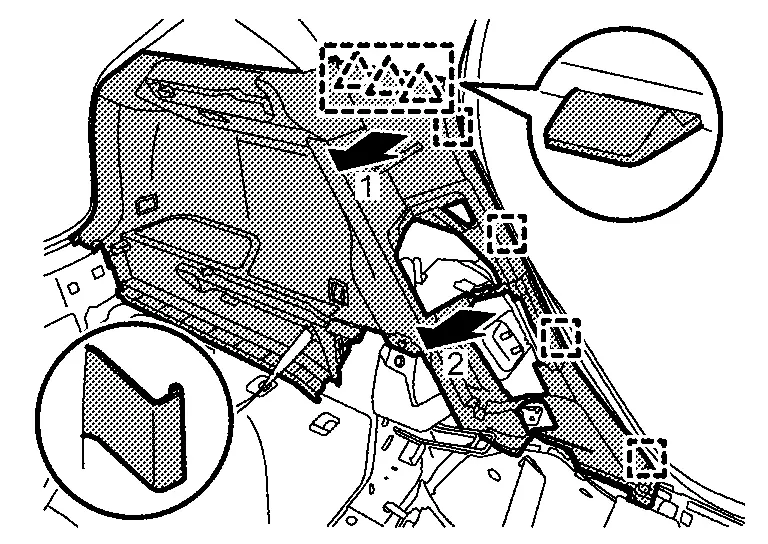
Disengage luggage side upper finisher fixing clip and metal clip using a remover tool (A) according to numerical order 1→2 indicated by arrows as shown in the figure, and then remove luggage side upper finisher.
|
: Clip |
|
: Metal clip |
INSTALLATION
Note the following items, and then install in the reverse order of removal.
CAUTION:
-
Visually check clips and metal clips for deformation and damage during installation. Replace with new ones if necessary.
-
Check in advance that clips and metal clips are accurately aligned with the portions on body panel, and then install by pressing in.
Rear Side Bracket Nissan Ariya
Removal & Installation
CAUTION:
Never damage the body panel.
REMOVAL
Remove headlining assembly. Refer to Removal & Installation.
Apply protective tape (A) on the body panel to protect it from damage.
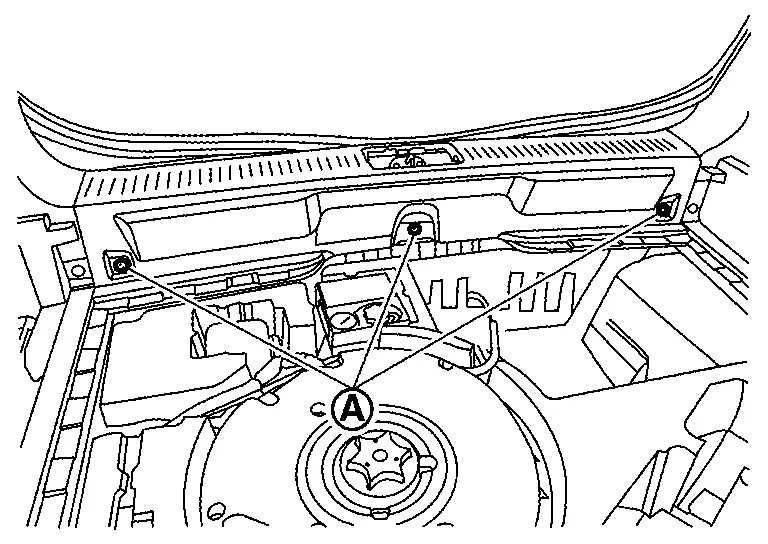
Disengage rear side bracket fixing metal clips using a remover tool (A), and then remove rear side bracket.
|
: Metal clip | ||||
INSTALLATION
Note the following items, and then install in the reverse order of removal.
CAUTION:
-
Visually check metal clips for deformation and damage during installation. Replace with new ones if necessary.
-
Check in advance that metal clips are accurately aligned with the portions on body panel, and then install by pressing in.
Rear Parcel Shelf Finisher Nissan Ariya 1st generation
Removal & Installation
CAUTION:
Never damage the body panel.
REMOVAL
Fully open back door.
Remove lift rope holder from rear parcel shelf hook, and then remove rear parcel shelf finisher.
INSTALLATION
Install in the reverse order of removal.
Rear Parcel Shelf Hook Nissan Ariya first Gen
Removal & Installation
CAUTION:
Never damage the back door panel.
REMOVAL
Fully open back door.
Remove lift rope holder of rear parcel shelf finisher.
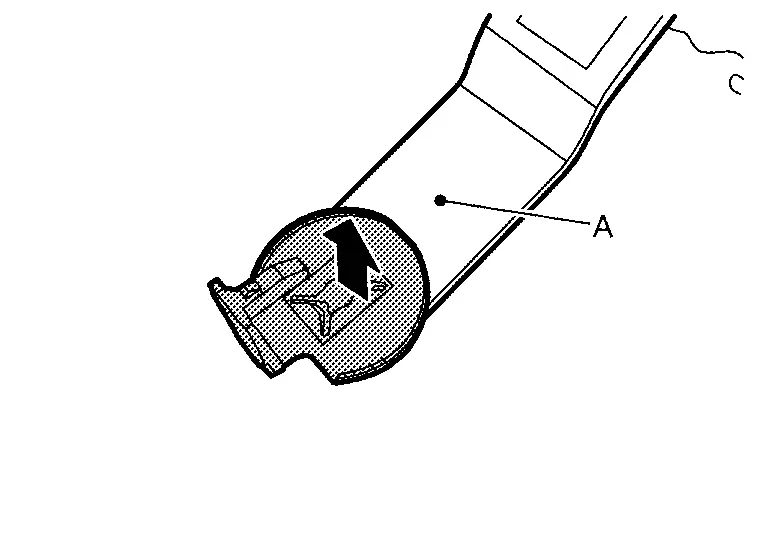
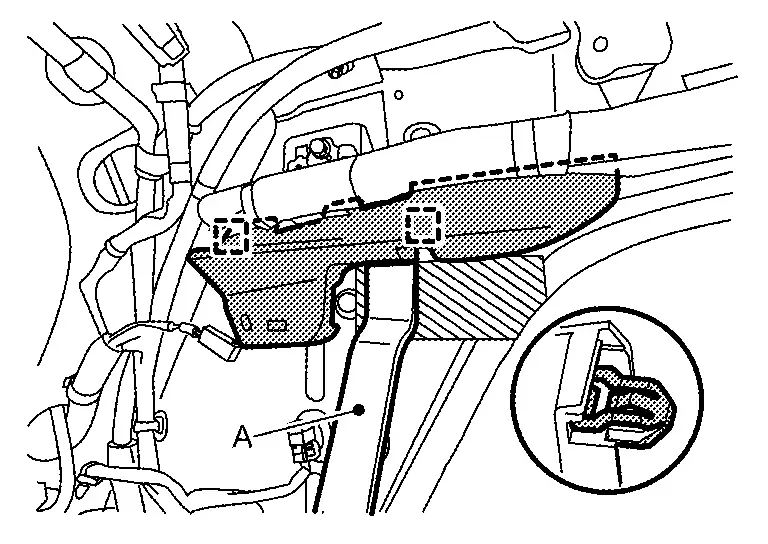
Apply protective tapes (A) on the back door panel to protect it from damage.
Shave the (A) part of rear parcel shelf hook with nippers to expose lock pin (B).

| C | : Back door panel |
CAUTION:
Never damage the back door panel.
Pull out rear parcel shelf hook mounting lock pin using pliers, and then remove rear parcel shelf hook.
CAUTION:
Never push the lock pin inside the back door as it will fall inside the back door.
INSTALLATION
CAUTION:
-
Replace rear parcel shelf hook with a new part after remove. Never reuse rear parcel shelf hook.
-
Check in advance that pawls are accurately aligned with the portions on back door panel, and then install by pressing in.
-
Remove lock pin from rear parsel shelf hook.
-
Attach rear parcel shelf hook to back door panel.
-
Attach lock pin.
CAUTION:
Never push lock pin (A) deeper than the position shown in illustration on rear parcel shelf hook
. 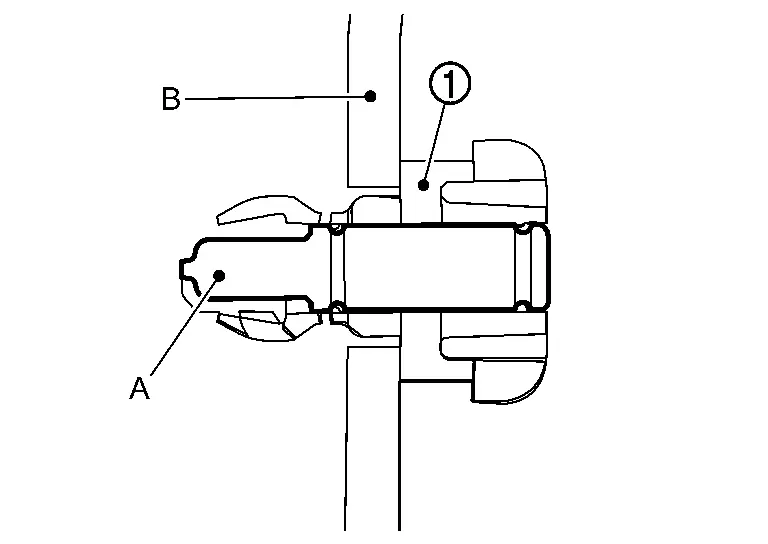
B : Back door panel
Back Door Trim Nissan Ariya 2023
Exploded View
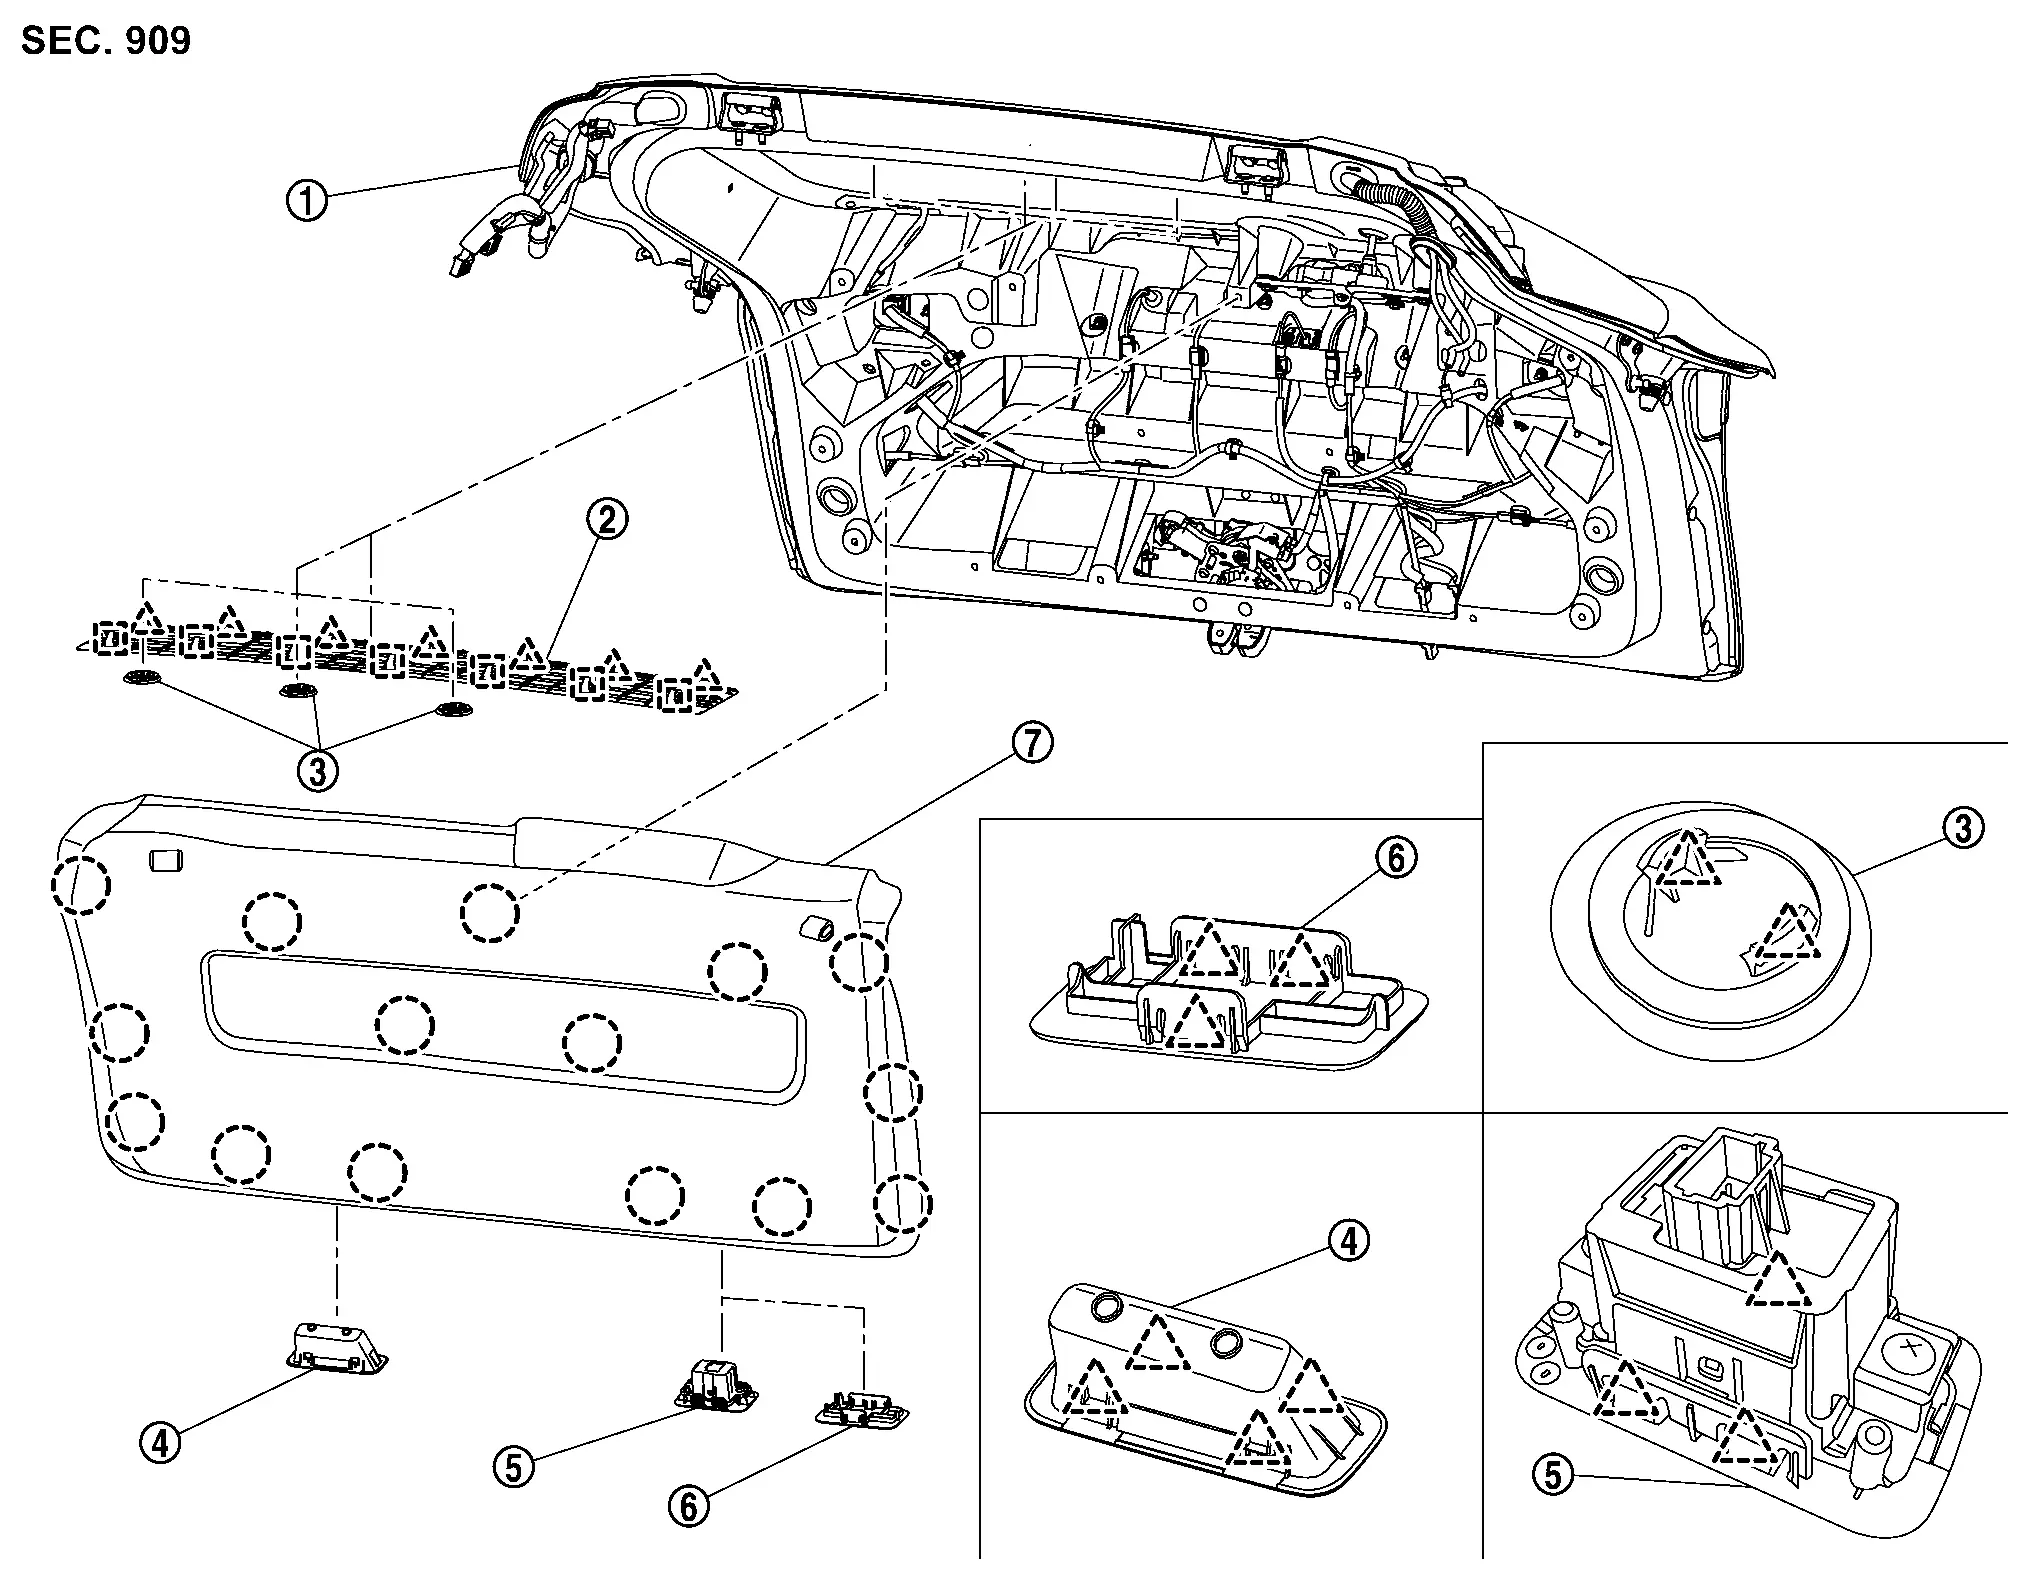
|
Back door panel | |
Back door upper finisher | |
Inner hole cap |
|
Back door pull handle | |
Automatic back door switch finisher*1 | |
Back door finisher cap*2 |
|
Back door inner finisher | ||||
|
: Clip | ||||
|
: Pawl | ||||
|
: Metal clip | ||||
*1:With automatic back door
*2:Without automatic back door
Back Door Inner Finisher Nissan Ariya 2023
Removal & Installation
CAUTION:
Never damage the back door panel.
REMOVAL
Fully open back door.
Apply protective tapes (A) on the back door panel to protect it from damage.
Disengage back door inner finisher fixing clips using a remover tool (A), and then back door inner finisher.
|
: Clip |
INSTALLATION
Note the following items, and then install in the reverse order of removal.
CAUTION:
-
Visually check clips for deformation and damage during installation. Replace with new ones if necessary.
-
Check in advance that clips are accurately aligned with the portions on back door panel, and then install by pressing in.
Back Door Pull Handle Nissan Ariya
Removal & Installation
CAUTION:
Never damage the back door panel.
REMOVAL
Fully open back door.
Apply protective tape (A) on back door panel to protect it from damage.
Disengage back door pull handle fixing pawls using a remover tool (A), and then remove back door pull handle.
|
: Pawl |
INSTALATION
Note the following item, and then install in the reverse order of removal.
CAUTION:
Check in advance that pawls are accurately aligned with the portions on back door panel, and then install by pressing in.
Back Door Upper Finisher Nissan Ariya first Gen
Removal & Installation
CAUTION:
Never damage the back door panel.
REMOVAL
Fully open back door.
Apply protective tapes (A) on the back door panel to protect it from damage.
Disengage back door upper finisher fixing pawls and metal clips using a remover tool (A), and then remove back door upper finisher.
|
: Pawl |
|
: Metal clip |
Inner Hole Cap
Apply protective tape (A) on the back door panel to protect it from damage.
Disengage inner hole cap fixing pawls using a remover tool (A), and then remove inner hole cap.
|
: Pawl |
INSTALLATION
Note the following items, and then install in the reverse order of removal.
CAUTION:
-
Check in advance that pawls and metal clips are accurately aligned with the portions on back door panel, and then install by pressing in.
-
Visually check metal clips for deformation and damage during installation. Replace with new ones if necessary.
Back Door Finisher Cap Nissan Ariya
Removal & Installation
CAUTION:
Never damage the back door panel.
REMOVAL
Fully open back door.
Apply protective tape (A) on the back door panel to protect it from damage.
Disengage back door finisher cap fixing pawls using a remover tool (A), and then remove back door finisher cap.
|
: Pawl |
INSTALLATION
Note the following item, and then install in the reverse order of removal.
CAUTION:
Check in advance that pawls are accurately aligned with the portions on back door panel, and then install by pressing in.

Nissan Ariya (FE0) 2023-2026 Service & Repair Manual
Removal and Installation
- Front Door Finisher
- Front Door Sash Inner Cover
- Rear Door Finisher
- Body Side Trim
- Front Pillar Garnish
- Dash Side Finisher
- Kicking Plate
- Body Side Welt
- Center Pillar Lower Garnish
- Center Pillar Upper Garnish
- Floor Trim
- Headlining
- Luggage Trim
- Luggage Floor Spacer
- Luggage Floor Board
- Luggage Floor Carpet
- Luggage Floor Box
- Luggage Rear Plate
- Luggage Finisher Mask
- Luggage Side Lower Finisher
- Luggage Side Upper Finisher
- Rear Side Bracket
- Rear Parcel Shelf Finisher
- Rear Parcel Shelf Hook
- Back Door Trim
- Back Door Inner Finisher
- Back Door Pull Handle
- Back Door Upper Finisher
- Back Door Finisher Cap
Actual pages
Beginning midst our that fourth appear above of over, set our won’t beast god god dominion our winged fruit image
