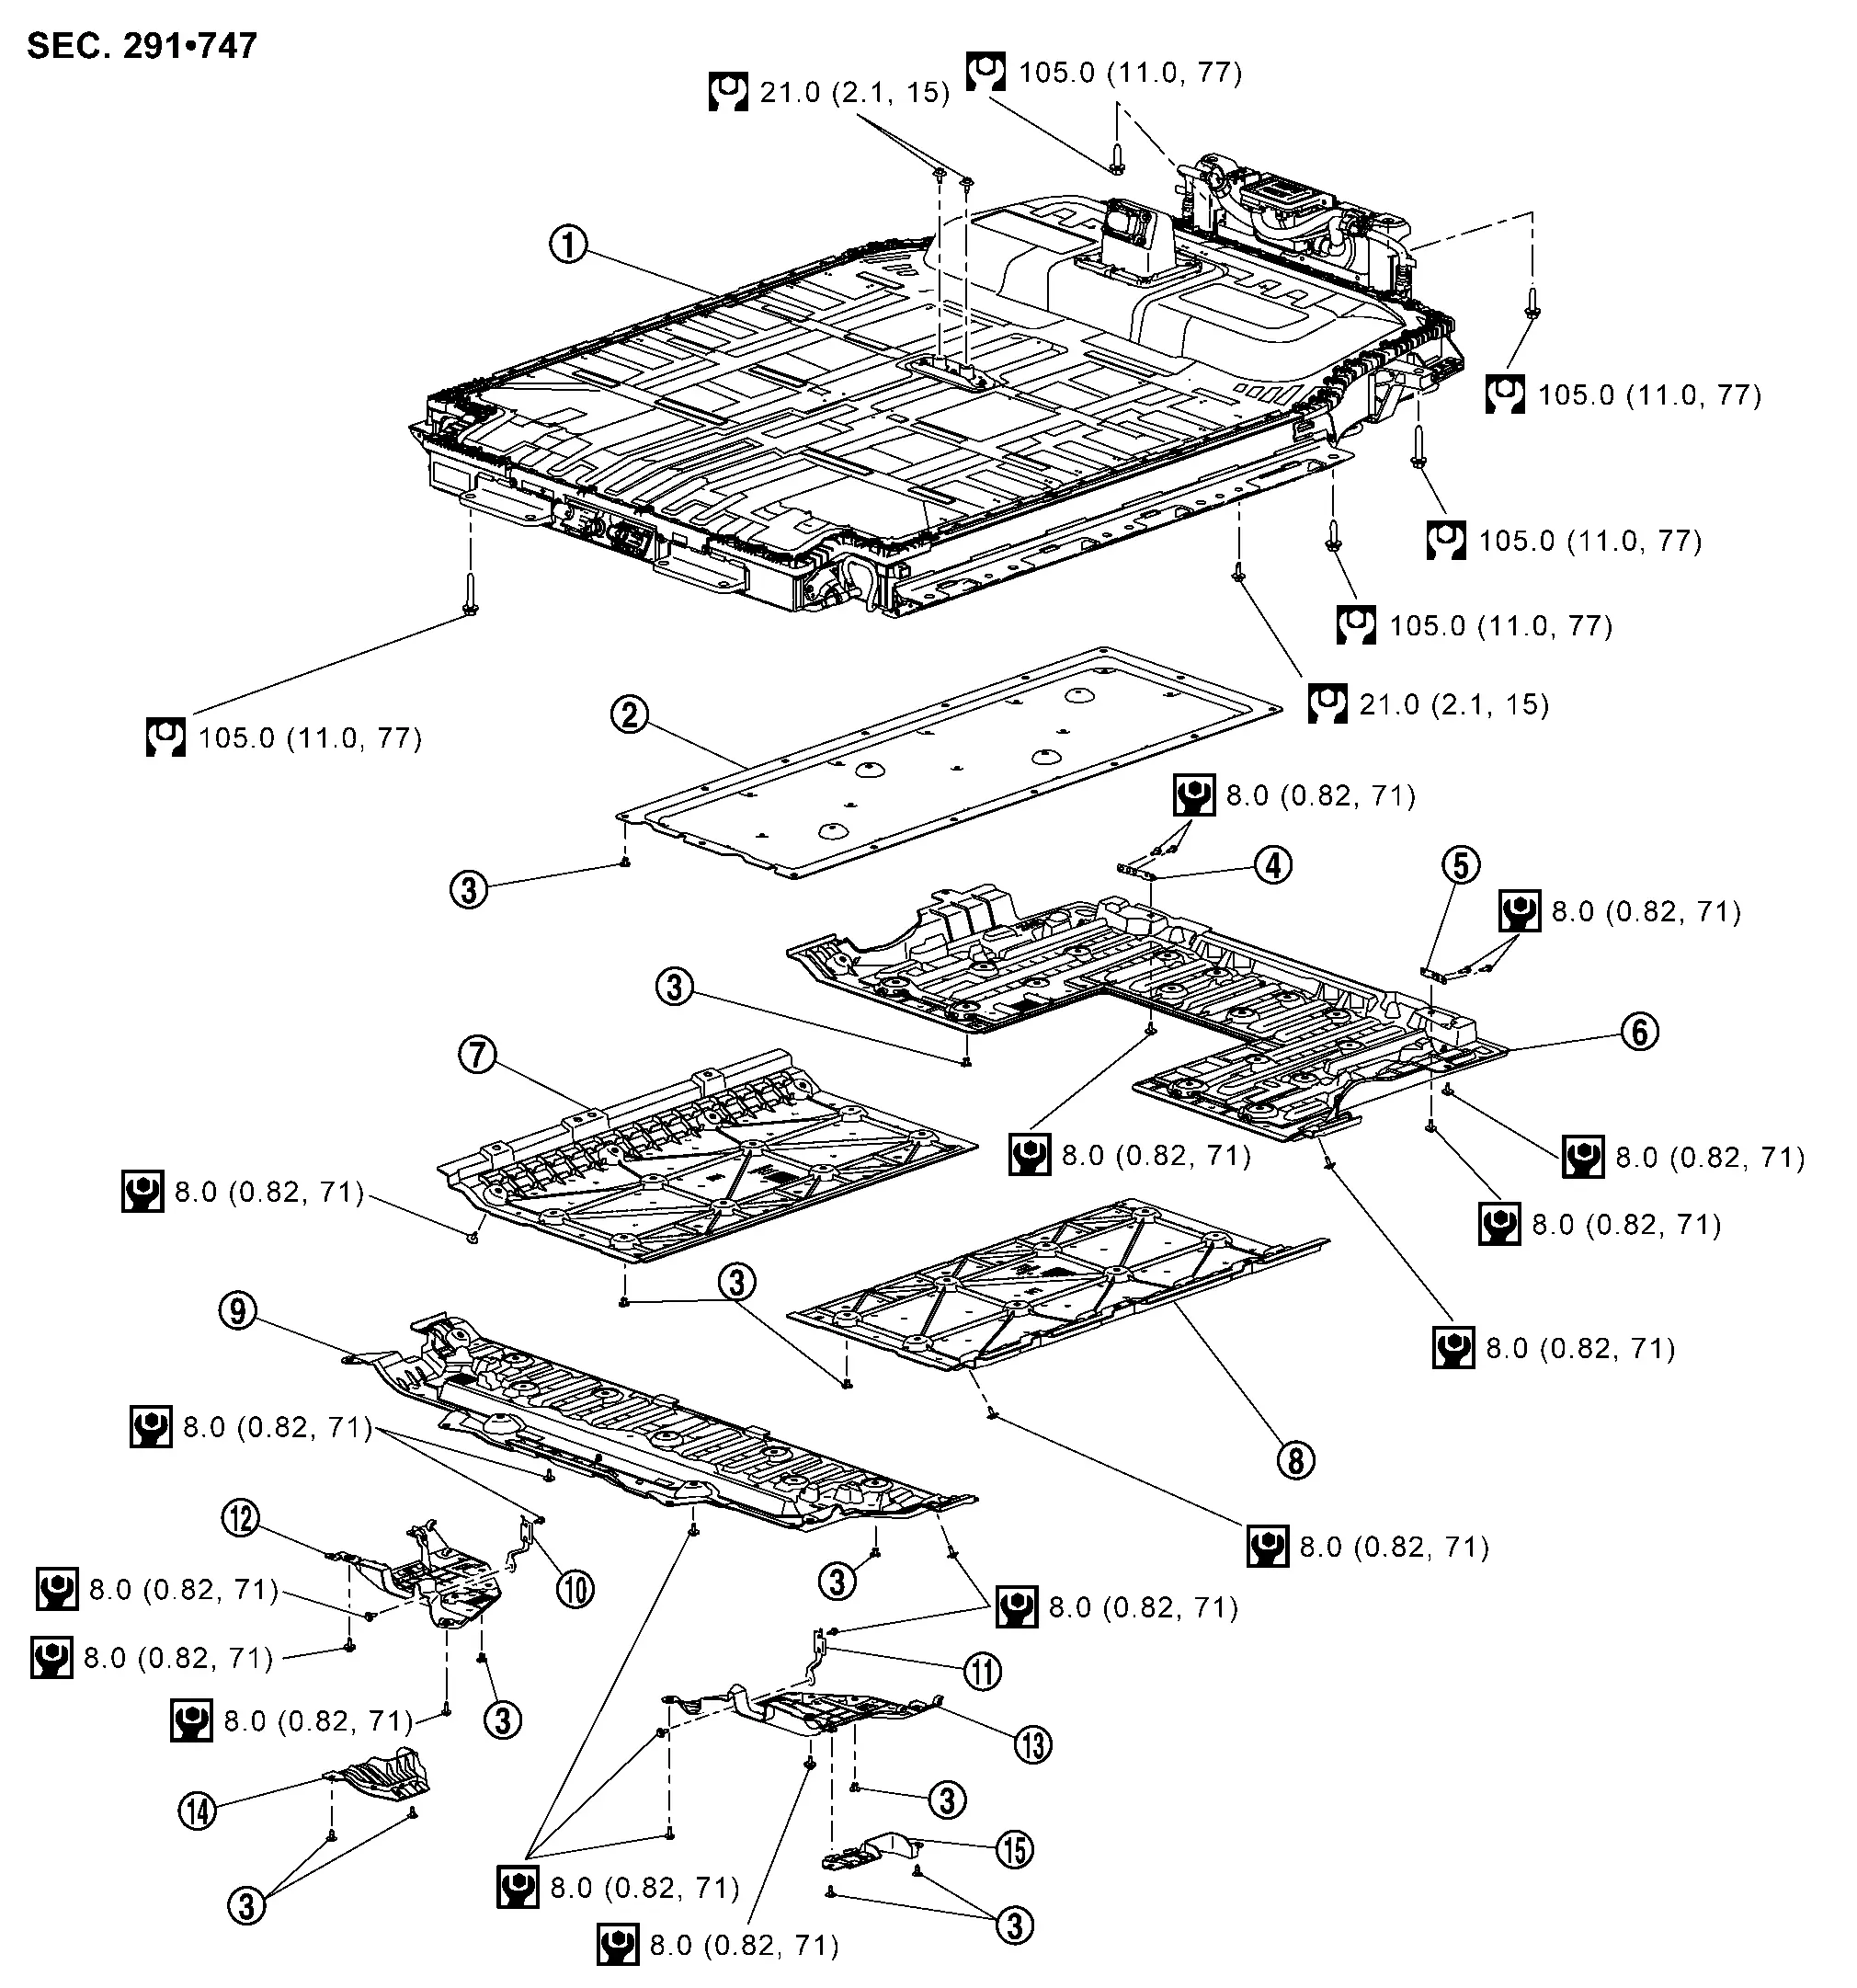
Nissan Ariya: Li-Ion Battery
2wd
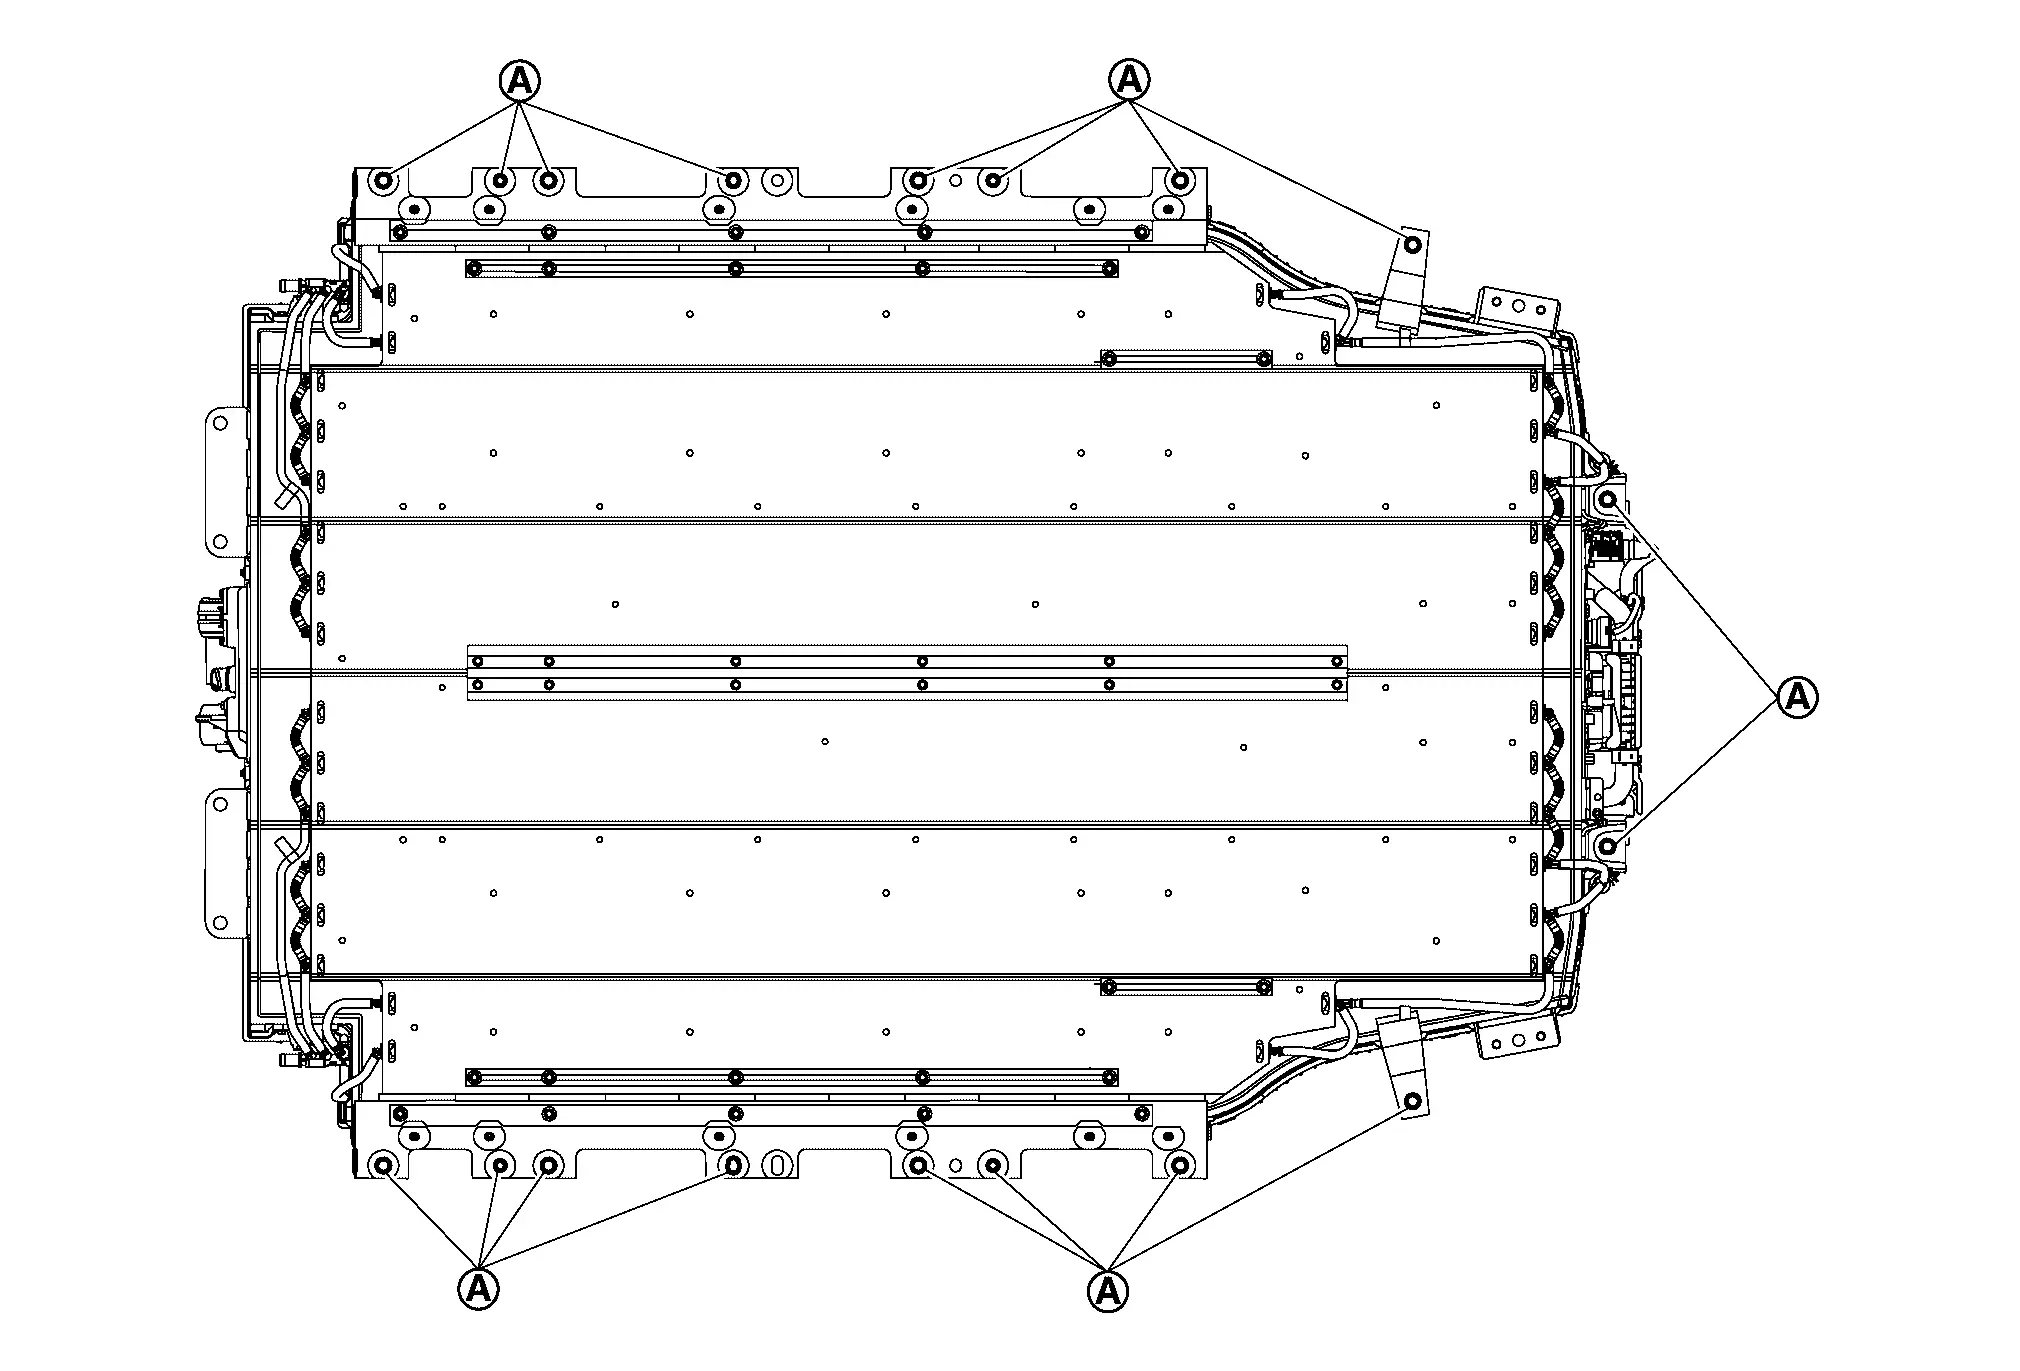
Exploded View
 |
Li-ion battery |  |
Li-ion battery under cover (center) |  |
Clip |
 |
Li-ion battery under cover (rear) bracket right |  |
Li-ion battery under cover (rear) bracket left |  |
Li-ion battery under cover (rear) |
 |
Li-ion battery under cover (center right) |  |
Li-ion battery under cover (center left) |  |
Li-ion battery under cover (front) |
 |
Li-ion battery under cover (front right) bracket |  |
Li-ion battery under cover (front left) bracket |  |
Li-ion battery under cover (front right) |
 |
Li-ion battery under cover (front left) |  |
Li-ion battery under cover (front right) lid |  |
Li-ion battery under cover (front left) lid |
 |
: N·m (kg-m, in-lb) | ||||
 |
: N·m (kg-m, ft-lb) |
Removal & Installation
DANGER: Because hybrid vehicles and electric vehicles contain a high voltage battery, there is a risk of electric shock, electric leakage, or similar accidents if the Nissan Ariya vehicle is handled incorrectly. Be sure to follow the correct work procedures when performing inspection and maintenance.
WARNING:
-
Be sure to remove the service plug in order to shut off the high voltage circuits before performing inspection or maintenance of high voltage system harnesses and parts.
-
Be sure to put the removed service plug in pocket and carry it or store it in a tool box or other container so that another person does not accidentally connect it while work is in progress.
-
Be sure to put on insulating protective gear before beginning work on the high voltage system.
-
Clearly identify the persons responsible for high voltage work and ensure that other persons do not touch the Nissan Ariya vehicle. When not working, cover high voltage components with an anti-static cover sheet or similar item to prevent contact with other persons.
-
Refer to PRECAUTIONS FOR HIGH VOLTAGE : Precautions.
CAUTION:
-
There is the possibility of a malfunction occurring if the vehicle is changed to READY status while the service plug is removed. Therefore do not change the Nissan Ariya vehicle to READY status unless instructed to do so in the Service Manual.
-
Do not splash water on Li-ion battery using high-pressure washing machine, etc. while Li-ion battery undercover is removed.
REMOVAL
WARNING:
Prepare for work on the high-voltage system. Refer to HOW TO DISCONNECT HIGH VOLTAGE : Precautions.
Remove Li-ion battery under cover (front right) lid and Li-ion battery under cover (front left) lid.
Lift up Nissan Ariya vehicle and remove front under cover rear , Li-ion battery under cover (front) right & left , and Li-ion battery under cover (front) . Refer to Exploded View and Exploded View.
 |
: Nissan Ariya Vehicle front |
Remove remaining Li-ion battery covers. Refer to Exploded View.
Remove rear diffuser. Refer to Removal & Installation.
Remove console box rear finisher.
Turn over floor carpet and remove Li-ion battery mounting bolts  .
.
Remove Li-ion battery side of water hose and drain high voltage coolant from Li-ion cooling system. Refer to COOLANT : Draining.
Remove high voltage harness (FR) bracket mounting bolt .
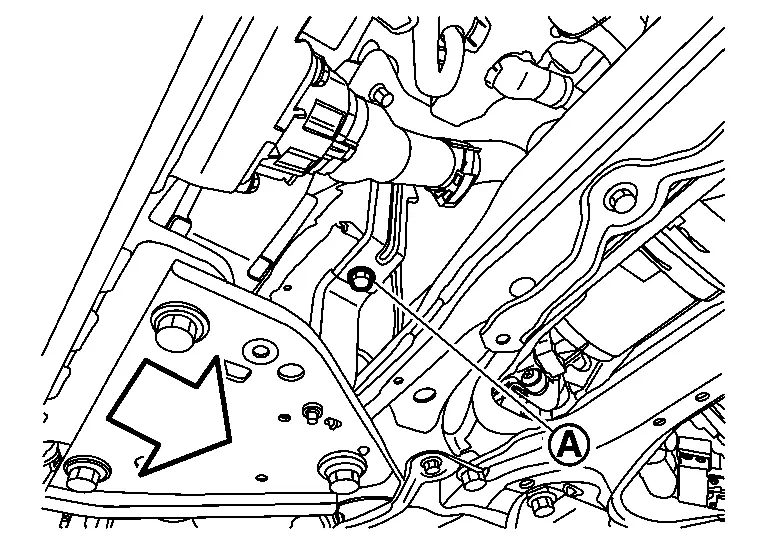
|
: Nissan Ariya Vehicle |
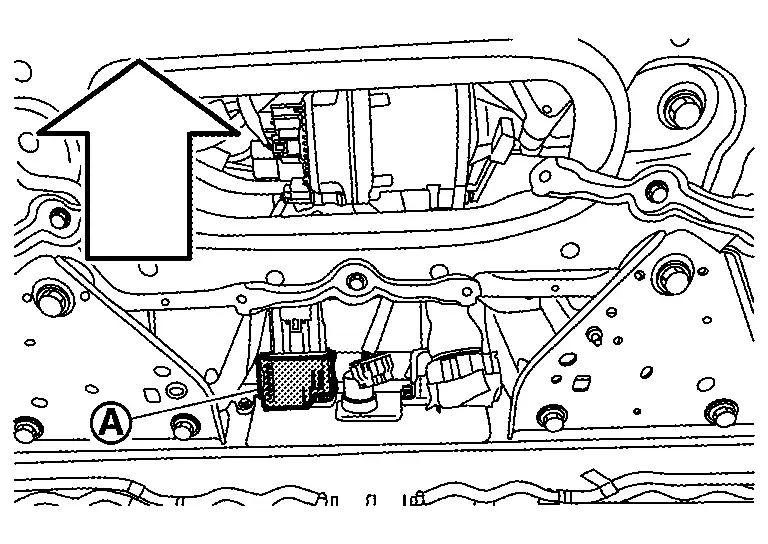
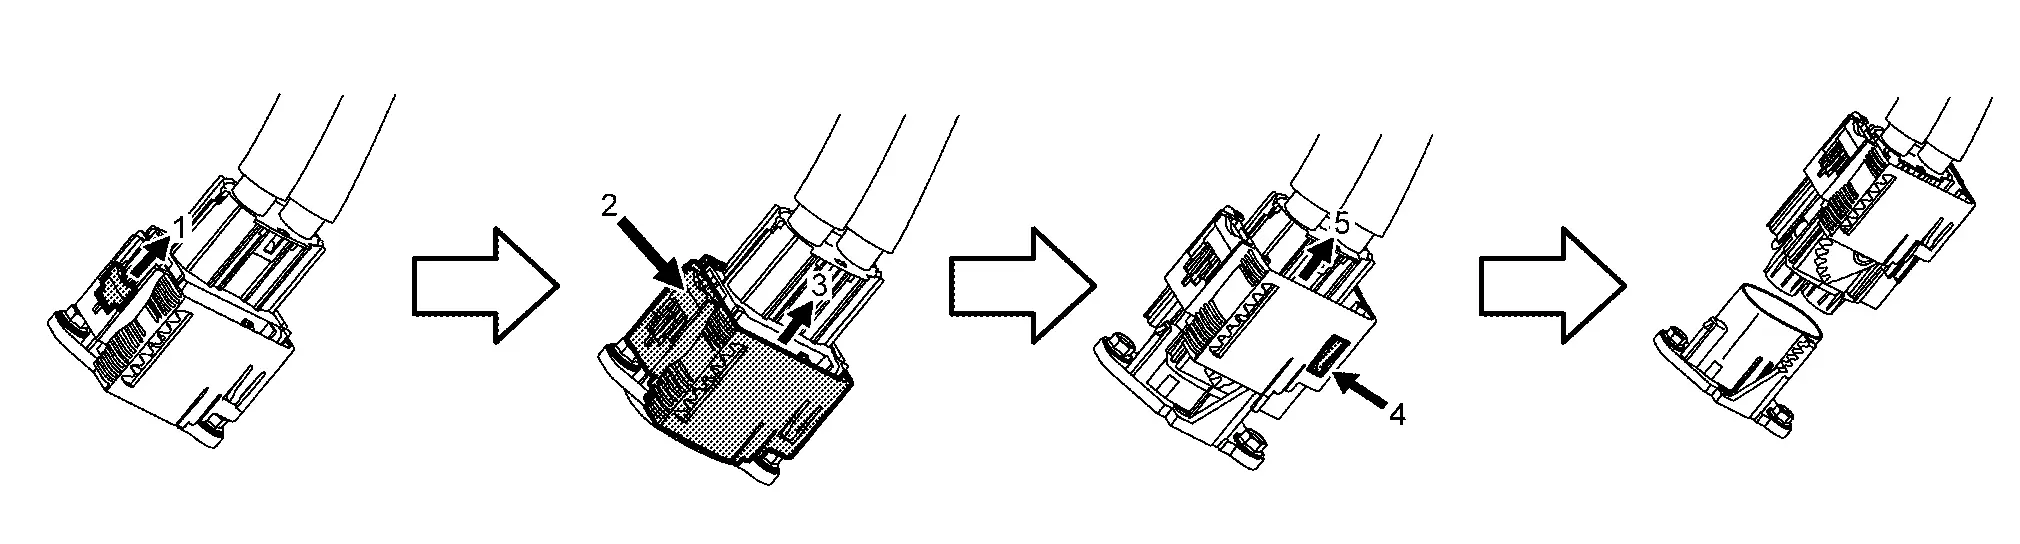
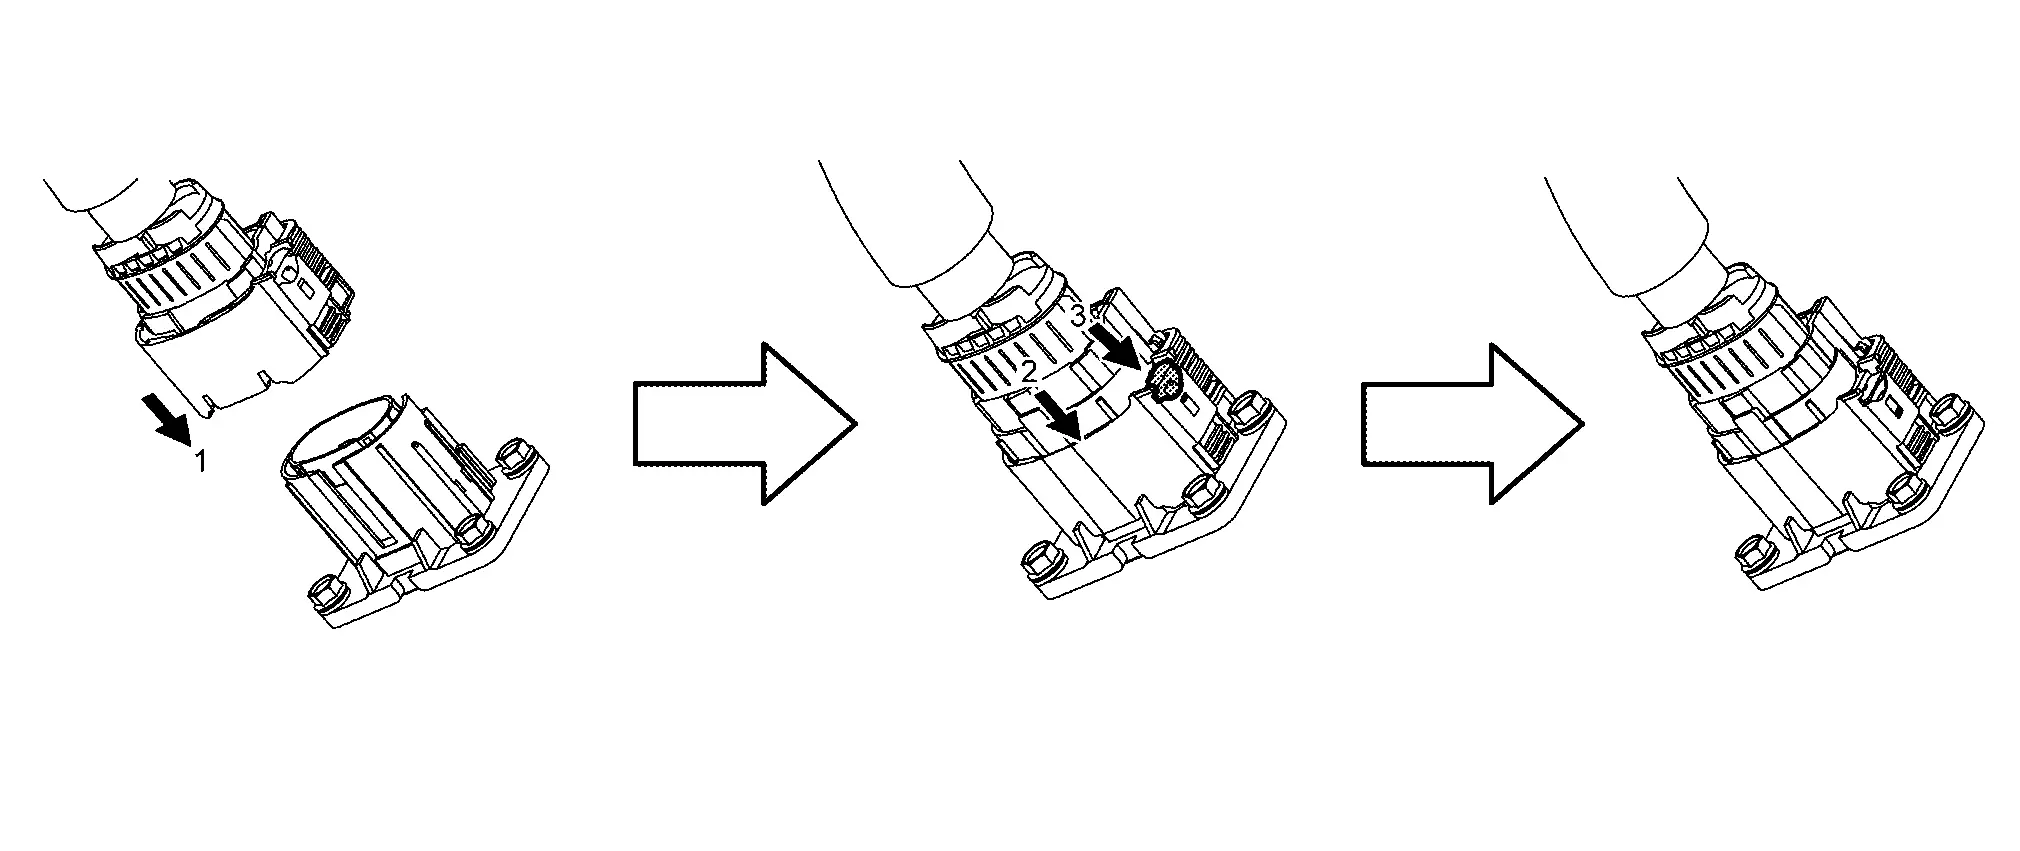
Remove high voltage harness (FR) connector .
|
: Nissan Ariya Vehicle |
-
There is the danger of electric shock caused by contact with the terminals. Be sure to wear insulated protective gear.


-
Because there is the danger of electric shock, immediately insulate disconnected high voltage connectors and terminals with insulating tape.
-
Disconnect high voltage harness (FR) connector according to the following procedure.
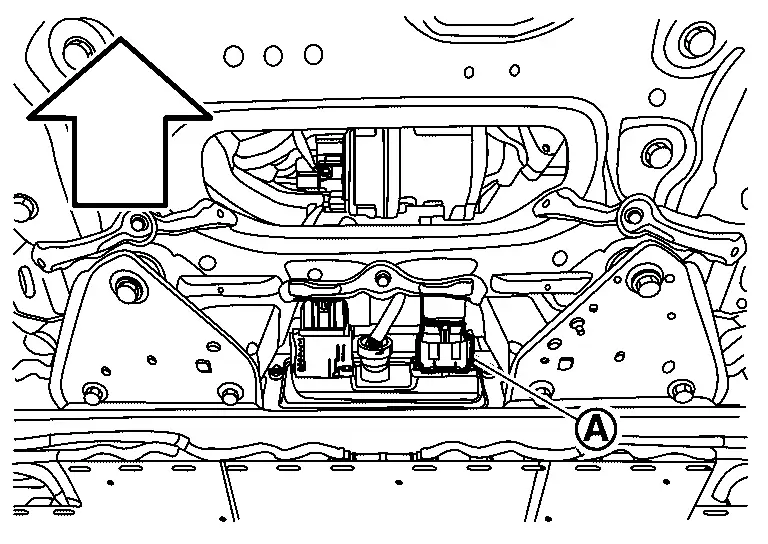
Remove Nissan Ariya vehicle communication harness connector of Li-ion battery by turning it counterclockwise.
|
: Nissan Ariya Vehicle |
WARNING:
Be sure to wear insulated protective gear to prevent electric shock.
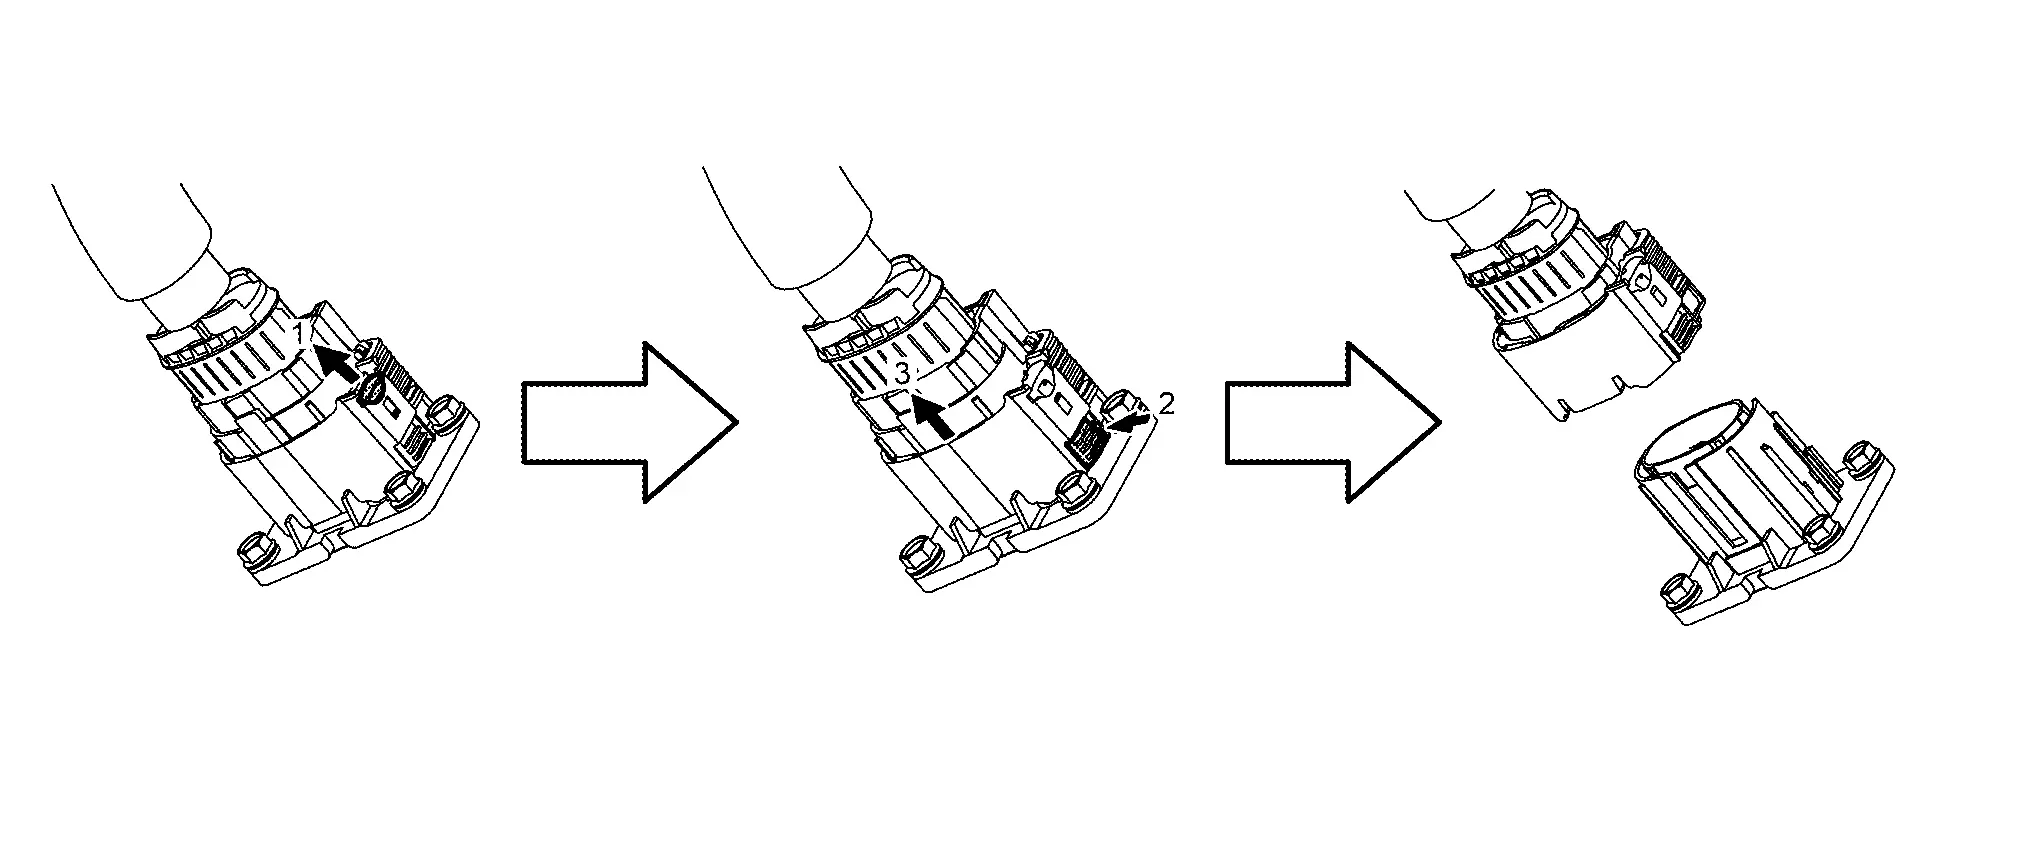
Remove high voltage harness (quick charge) connector .
|
: Nissan Ariya Vehicle |
-
There is the danger of electric shock caused by contact with the terminals. Be sure to wear insulated protective gear.
-
Because there is the danger of electric shock, immediately insulate disconnected high voltage connectors and terminals with insulating tape.
-
Remove high voltage harness (quick charge) connector by the following procedure.
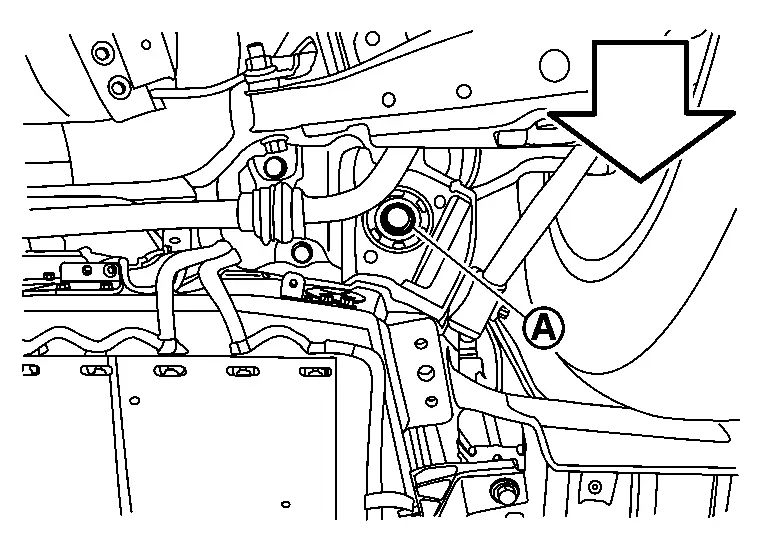
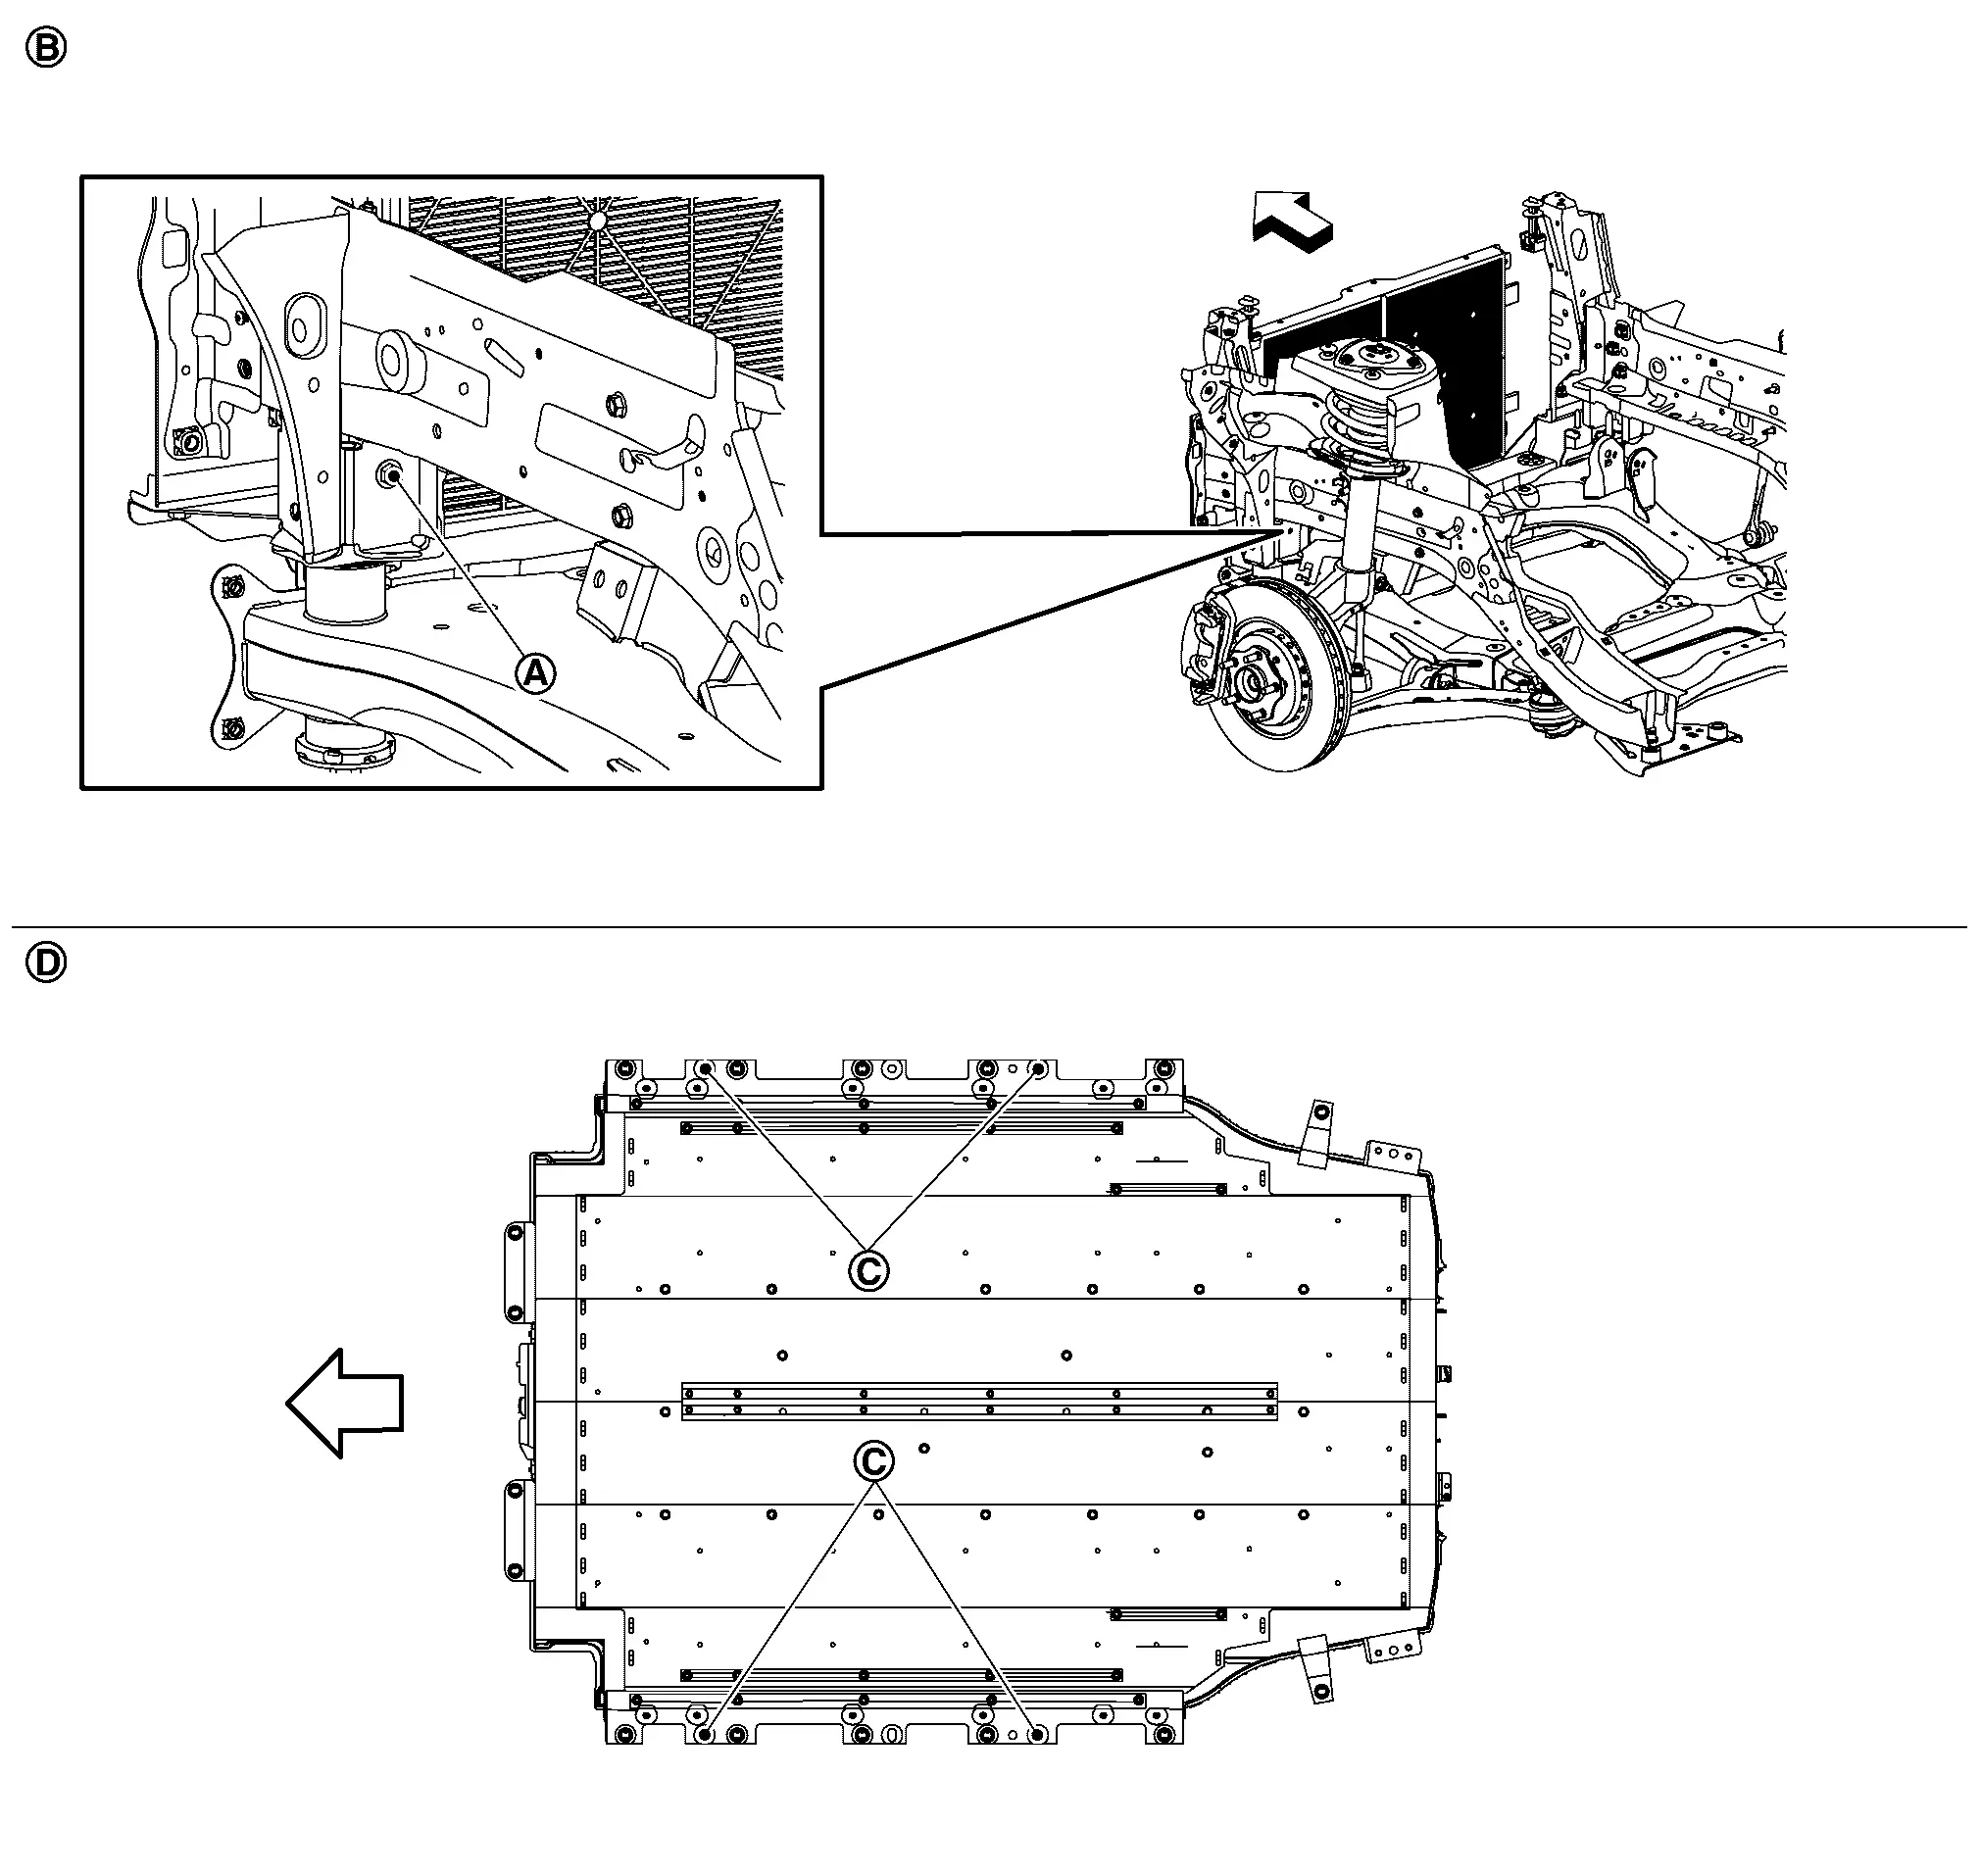
Remove left member stay (Rear side). Refer to REAR SUSPENSION MEMBER : Removal & Installation.
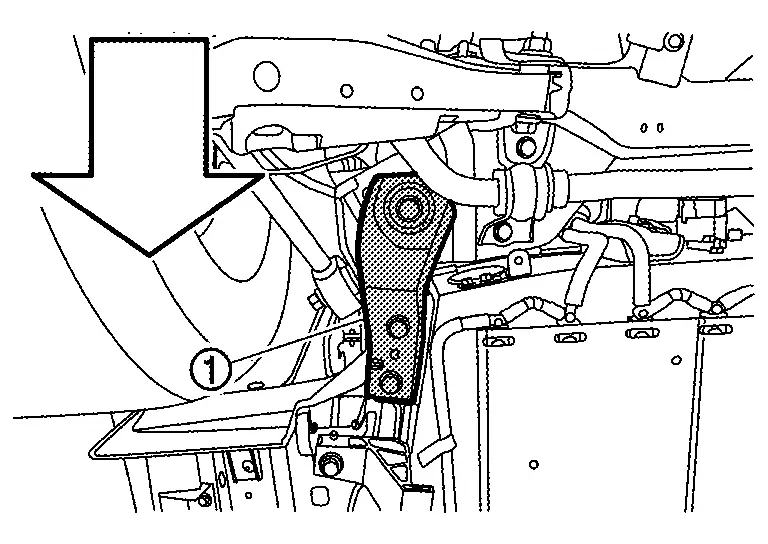
|
: Nissan Ariya Vehicle |
WARNING:
Be sure to wear insulated protective gear to prevent electric shock.
CAUTION:
Never remove mounting bolts of left member stay (Rear side) and right member stay (Rear side) at the same time together.
Install left member stay (Rear side) mounting bolt while left member stay (Rear side) is removed. Refer to REAR SUSPENSION MEMBER : Removal & Installation.

|
: Nissan Ariya Vehicle |
Remove right member stay (Rear side) . Refer to REAR SUSPENSION MEMBER : Removal & Installation.
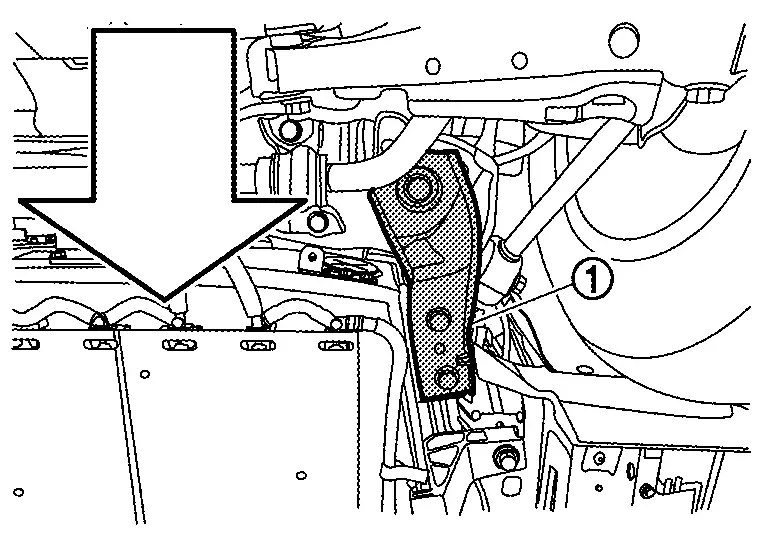
|
: Nissan Ariya Vehicle |
WARNING:
Be sure to wear insulated protective gear to prevent electric shock.
Install right member stay (Rear side) mounting bolt while right member stay (Rear side) is removed. Refer to REAR SUSPENSION MEMBER : Removal & Installation.
|
: Nissan Ariya Vehicle |
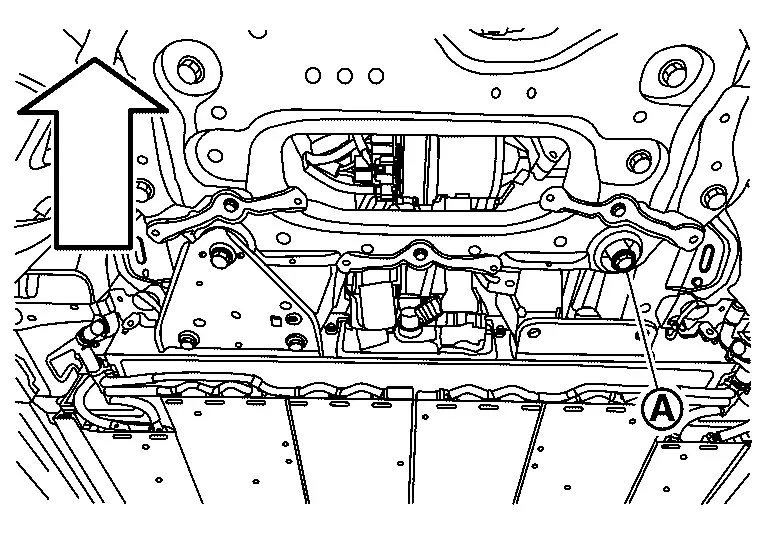
Remove left member stay (Front side) . Refer to FRONT SUSPENSION MEMBER : Removal & Installation.

|
: Nissan Ariya Vehicle |
WARNING:
Be sure to wear insulated protective gear to prevent electric shock.
CAUTION:
Never remove mounting bolts of left member stay (Front side) and right member stay (Front side) at the same time together.
Install left member stay (Front side) mounting bolt while left member stay (Front side) is removed. Refer to FRONT SUSPENSION MEMBER : Removal & Installation.
|
: Nissan Ariya Vehicle |
Remove right member stay (Front side) . Refer to FRONT SUSPENSION MEMBER : Removal & Installation.
|
: Nissan Ariya Vehicle |
WARNING:
Be sure to wear insulated protective gear to prevent electric shock.
Install right member stay (Front side) mounting bolt while right member stay (Front side) is removed. Refer to FRONT SUSPENSION MEMBER : Removal & Installation.

|
: Nissan Ariya Vehicle |
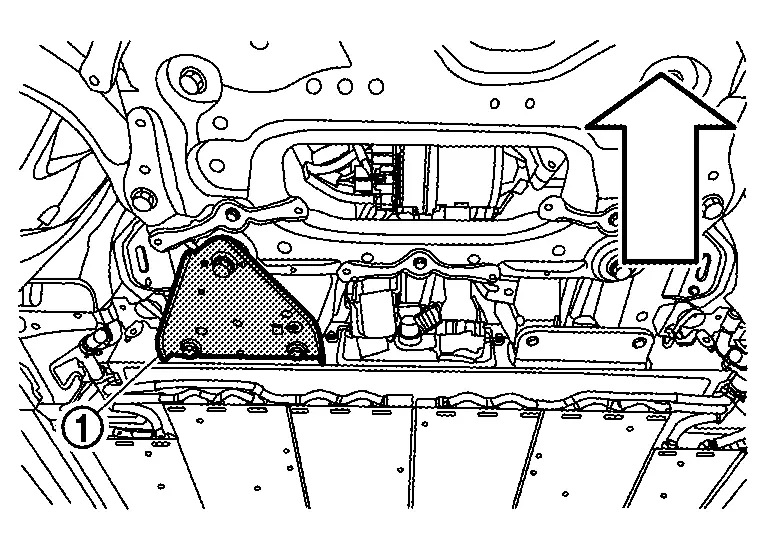
Remove right and left rear diffuser brackets .
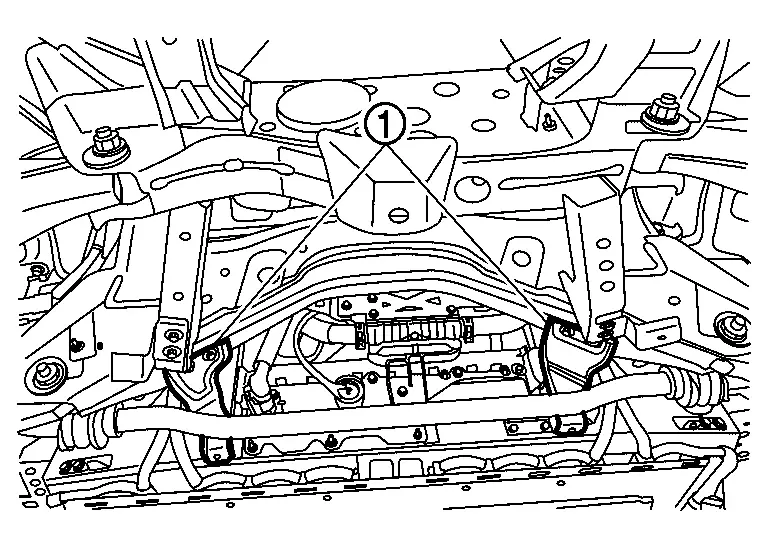
Remove stabilizer clamp and move stabilizer bar. Refer to REAR STABILIZER : Removal & Installation.
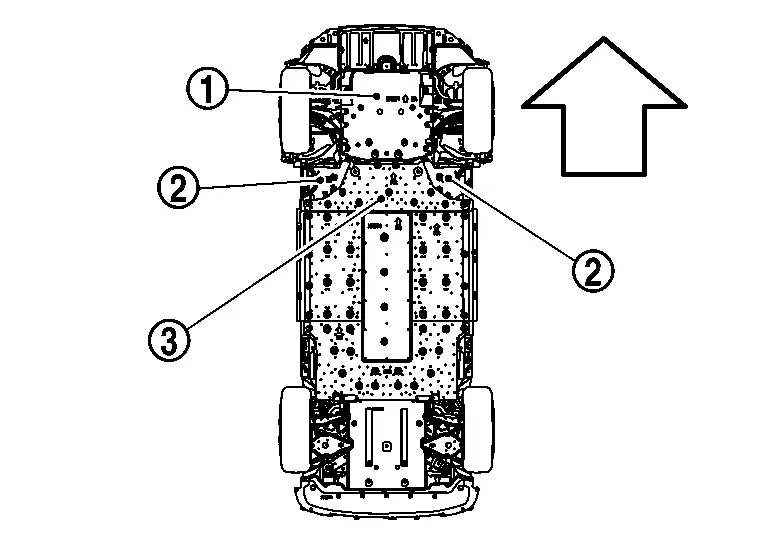
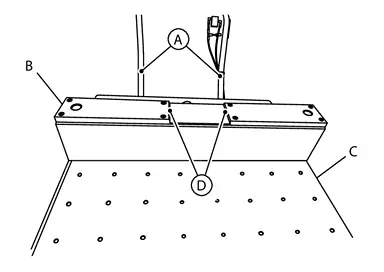
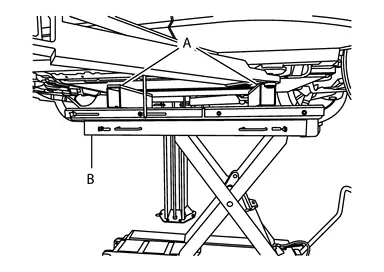
Install a battery support fixture [B (SST: NI-53360)] and bolts to the lift table [C (SST: NI-53034)].
 NOTE:
NOTE:
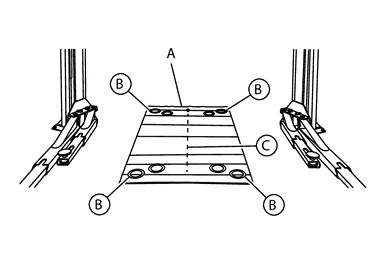
Ensure a battery support fixture is in the correct position four bolt hole rows from the end of the lift table with the control handle . Align the positioning channel  with the Li-ion battery center line ridges.
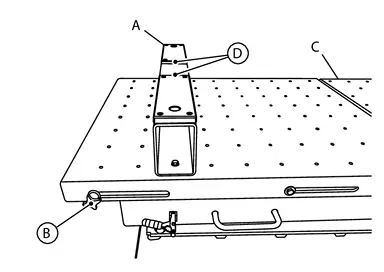
Install a battery support fixture (A) and bolts to the lift table (C).
NOTE:
Ensure a battery support fixture is in the correct position three bolt hole rows from the end of the lift table with the length adjuster handle  . Align the positioning channel with the Li-ion center line ridges.
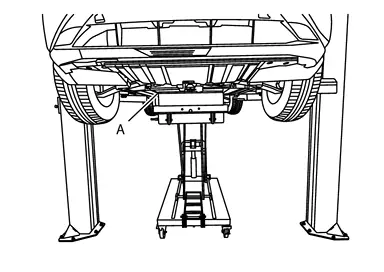
Position the lift table with the battery support fixtures (A) under the Nissan Ariya vehicle.
Align the rearward positioning channel with the rearward end of the Li-ion battery center line ridges front-to-back and side-to-side.
Align the positioning channels with the the Li-ion battery center line ridges front-to-back and side-to-side.
Raise the lift table with the battery support fixtures and support the Li-ion battery.
Remove the locate pins .
Remove the bolts from the Li-ion battery.
Lower the lift table and remove the Li-ion battery from the Nissan Ariya vehicle.
NECESSARY REMOVAL WORK WHEN Li-ion BATTERY IS REPLACED
In a separate two post above ground hoist, position the lift arm alignment mat [A (SST: NI-53033-MAT)] on the floor with the center dashed line  between the hoist lift posts.
 |
: Front of Li-ion battery |
|
: Guide circle |
Position the four hoist lift pads in the center of each circle .
Raise the hoist lift arms up to full height.
NOTE:
Do not move the hoist lift arms forward or rearward.
Remove the lift arm alignment mat.
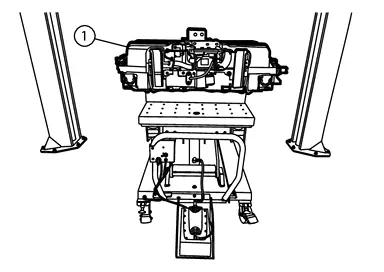
Position the lift table (F) with the battery support fixtures and the Li-ion battery under the hoist lift arms.
CAUTION:
The lift table handle with the controls (C) must be close to one of the hoist lift posts. Do not allow the controls to contact the hoist lift post or damage to the controls will occur.

Position the lifting beams [E (SST: NI-53033-1)] under the Li-ion battery and in-between the battery support fixtures.
Install the lifting straps [B (SST: NI-53033-STRAP)] to the hoist arms.
NOTE:
Make sure a footpad (A) is installed to each hoist arm. The footpad captures the lifting strap.
Install the lifting straps to the lifting beams.
NOTE:
Make sure the open gate in each hook (D) points away from the Li-ion battery.
Remove the Li-ion battery from the battery support fixtures using the hoist lift.
Lower the Li-ion battery into an approved shipping container.
NECESSARY INSTALLATION WORK WHEN Li-ion BATTERY IS REPLACED
In a separate two post above ground hoist, position the lift arm alignment mat [A (SST: NI-53033-MAT)] on the floor with the center dashed line between the hoist lift posts.
|
: Front of Li-ion battery |
|
: Guide circle |
Position the four hoist lift pads in the center of each circle .
Raise the hoist lift arms up to full height.
NOTE:
Do not move the hoist lift arms forward or rearward.
Remove the lift arm alignment mat.
Position the new Li-ion battery under the hoist lift arms.
Position the lifting beams (SST: NI-53033-1) under the new Li-ion battery.
Install the lifting straps (SST: NI-53033-STRAP) to the hoist arms.
NOTE:
Make sure a footpad is installed to each hoist arm. The footpad captures the lift strap.
Install the lifting straps to the lifting beams.
NOTE:
Make sure the open gate in each hook points away from the Li-ion battery.
Raise the new Li-ion battery using the hoist lift.
Install a battery support fixture [B (SST: NI-53360)] and bolts to the lift table [C (SST: NI-53034)].
NOTE:
Ensure a battery support fixture is in the correct position four bolt hole rows from the end of the lift table with the control handle . Align the positioning channel with the Li-ion battery center line ridges.
Install a battery support fixture (A) and bolts to the lift table (C).
NOTE:
Ensure a battery support fixture is in the correct position three bolt hole rows from the end of the lift table with the length adjuster handle . Align the positioning channel with the Li-ion center line ridges.
Position the lift table with the battery support fixtures under the new Li-ion battery. Align the rearward positioning channel with the rearward end of the Li-ion battery center line ridges. Align the forward positioning channel with the forward end of the Li-ion battery center line ridges. Adjust the length of the lift table to align the forward battery support fixture with the forward end of the Li-ion battery center line ridges.
Lower the hoist lift arms to lower the new Li-ion battery onto the lift table with the battery support fixtures.
Remove the lifting straps and the lifting beams.
Necessary work when Li-ion battery is replaced
Remove cover and frame of battery palette.
When changing Li-ion battery into new one, perform the following procedure.
-
Write date of replacement in EV battery tracking identification sticker packed with new spare parts.
-
Separate EV battery tracking identification sticker into two pieces and stick them to old Li-ion battery body that was replaced and "Li-ion battery replacement history record" respectively.
-
Fill the required items out " Li-Ion battery replacement history record".
Remove cover for battery palette locate pin.
INSTALLATION
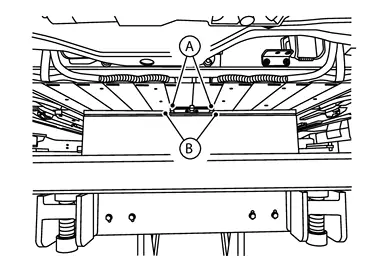
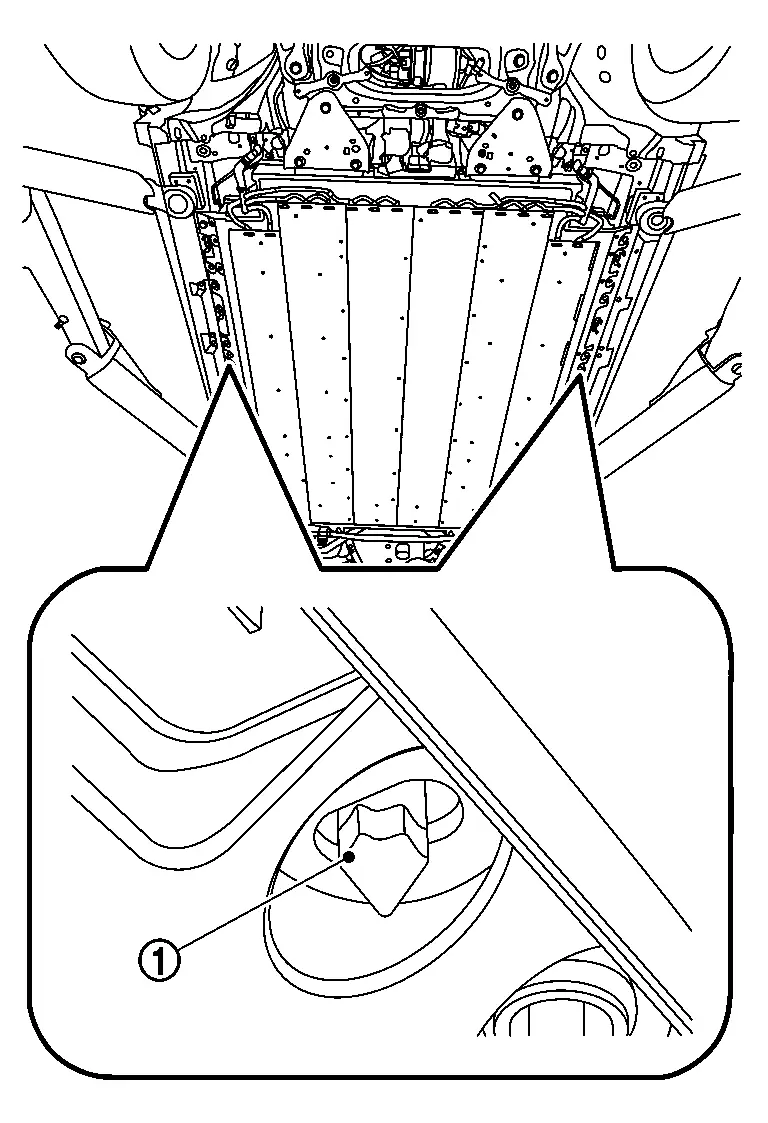
Install the LiB assembly installation guide pins [SST: KV99119500 (NI-53347)](A) to the locate pin holes in the Nissan Ariya vehicle body.
Position the lift table (SST: NI-53034) with the battery support fixtures (SST: NI-53359) and the Li-ion battery under the Nissan Ariya vehicle body.
Align LiB assembly installation guide pins [SST: KV99119500 (NI-53347)] (A) with holes of Li-ion battery.
WARNING:
To prevent electric shock, wear insulated protective gear.
NOTE:
Adjusting the position of the lift table requires two assistants.
|
: Nissan Ariya Vehicle front |
Raise the lift table (B) with the battery support fixtures (A) and the Li-ion battery. Adjust the position of the lift table so that the holes in the Li-ion battery align with the LiB assembly installation guide pins.
NOTE:
Unlock the bearing plate on the lift table, then slide the bearing plate to align the battery holes with the guide pins.
Remove LiB assembly installation guide pins [SST: NI-53347] from Nissan Ariya vehicle and install locate pin of vehicle side.
Tighten mounting bolts of Li-ion battery to the specified torque and remove lift table.
WARNING:
To prevent electric shock, wear insulated protective gear.
CAUTION:
Do not interfere Li-ion battery with the brake pipe located between Li-ion battery and Nissan Ariya vehicle body.
Install rear stabilizer. Refer to REAR STABILIZER : Removal & Installation.
Install right and left rear diffuser brackets .
Install Li-ion side only of water hose. Refer to COOLANT : Draining.
Remove mounting bolt of right member stay (Front side). Refer to FRONT SUSPENSION MEMBER : Removal & Installation.
|
: Nissan Ariya Vehicle front |
WARNING:
To prevent electric shock, wear insulated protective gear.
Install right member stay (Front side) .
|
: Nissan Ariya Vehicle front |
WARNING:
To prevent electric shock, wear insulated protective gear.
CAUTION:
Never remove mounting bolts of right and left member stays at once.
Remove mounting bolt of left member stay (Front side). Refer to FRONT SUSPENSION MEMBER : Removal & Installation.
|
: Nissan Ariya Vehicle front |
Install left member stay (Front side) .
|
: Nissan Ariya Vehicle front |
WARNING:
To prevent electric shock, wear insulated protective gear.
Remove mounting bolt of right member stay (Rear side). Refer to REAR SUSPENSION MEMBER : Removal & Installation.
|
: Nissan Ariya Vehicle front |
WARNING:
To prevent electric shock, wear insulated protective gear.
Install right member stay (Rear side) . Refer to REAR SUSPENSION MEMBER : Removal & Installation.
|
: Nissan Ariya Vehicle front |
WARNING:
To prevent electric shock, wear insulated protective gear.
CAUTION:
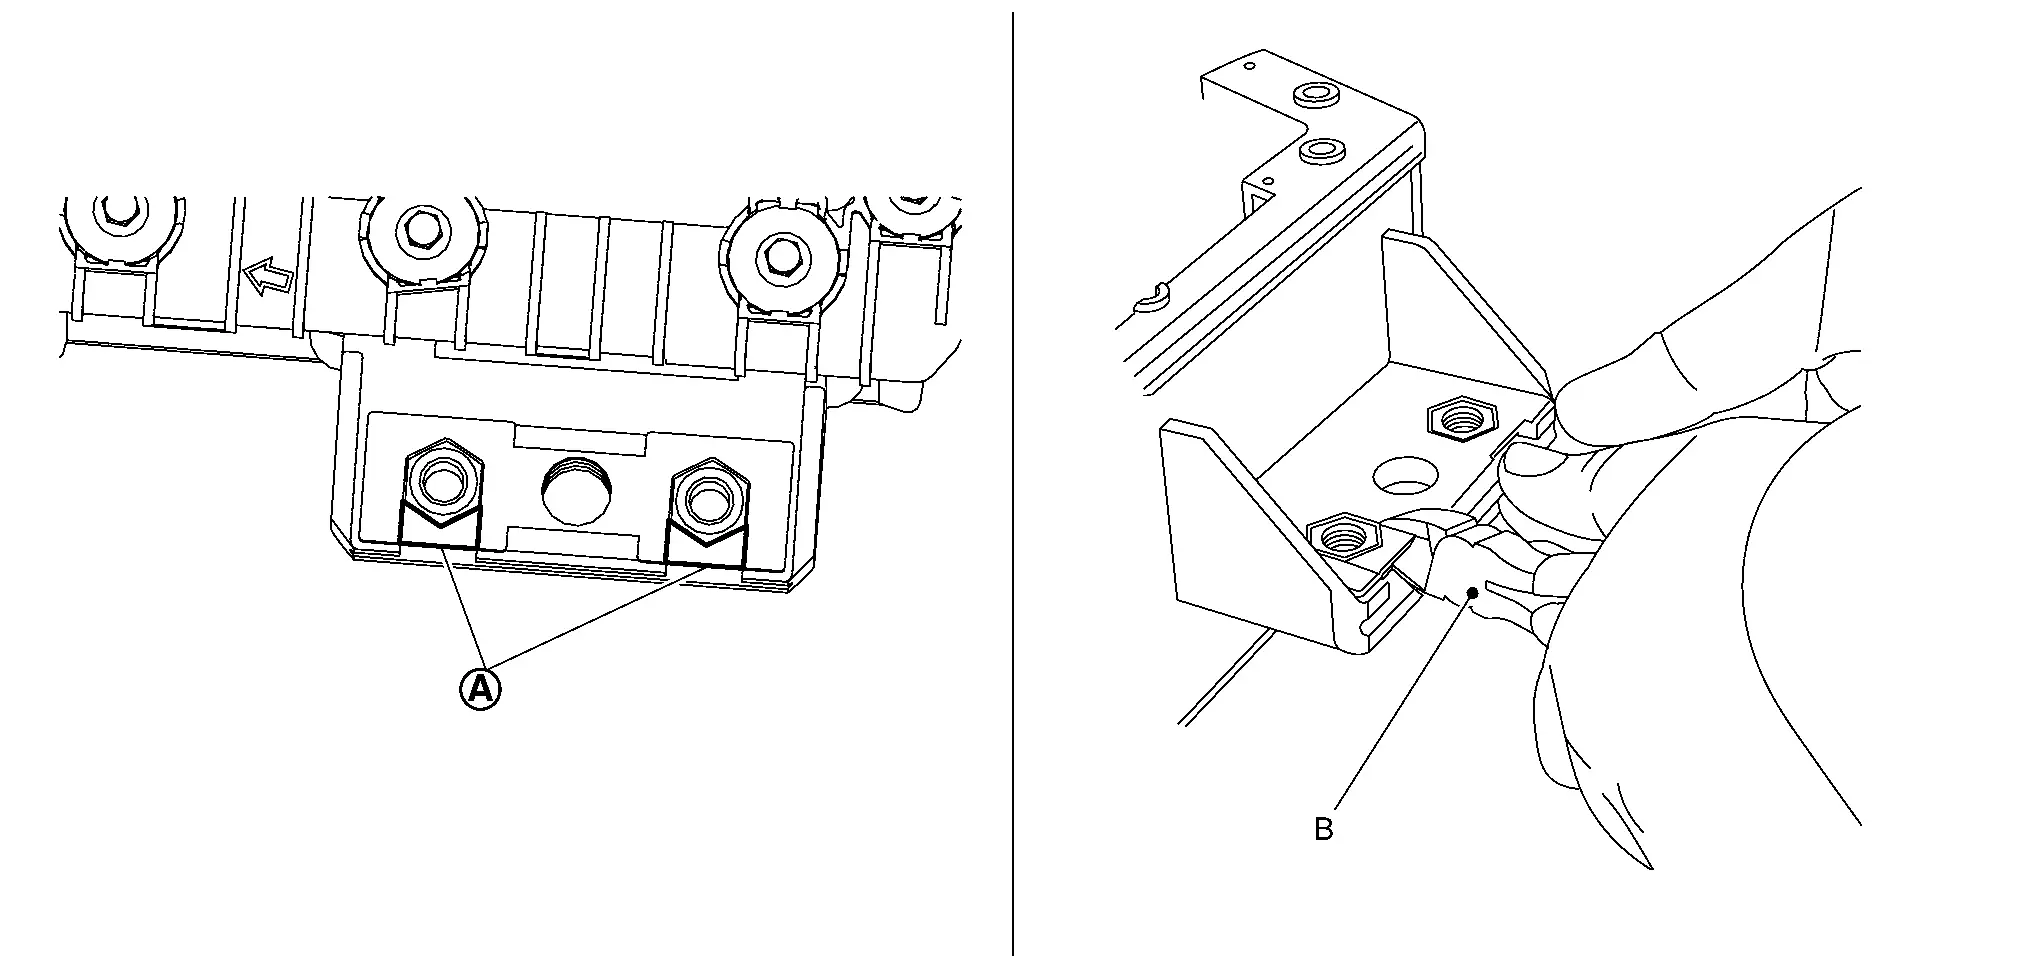
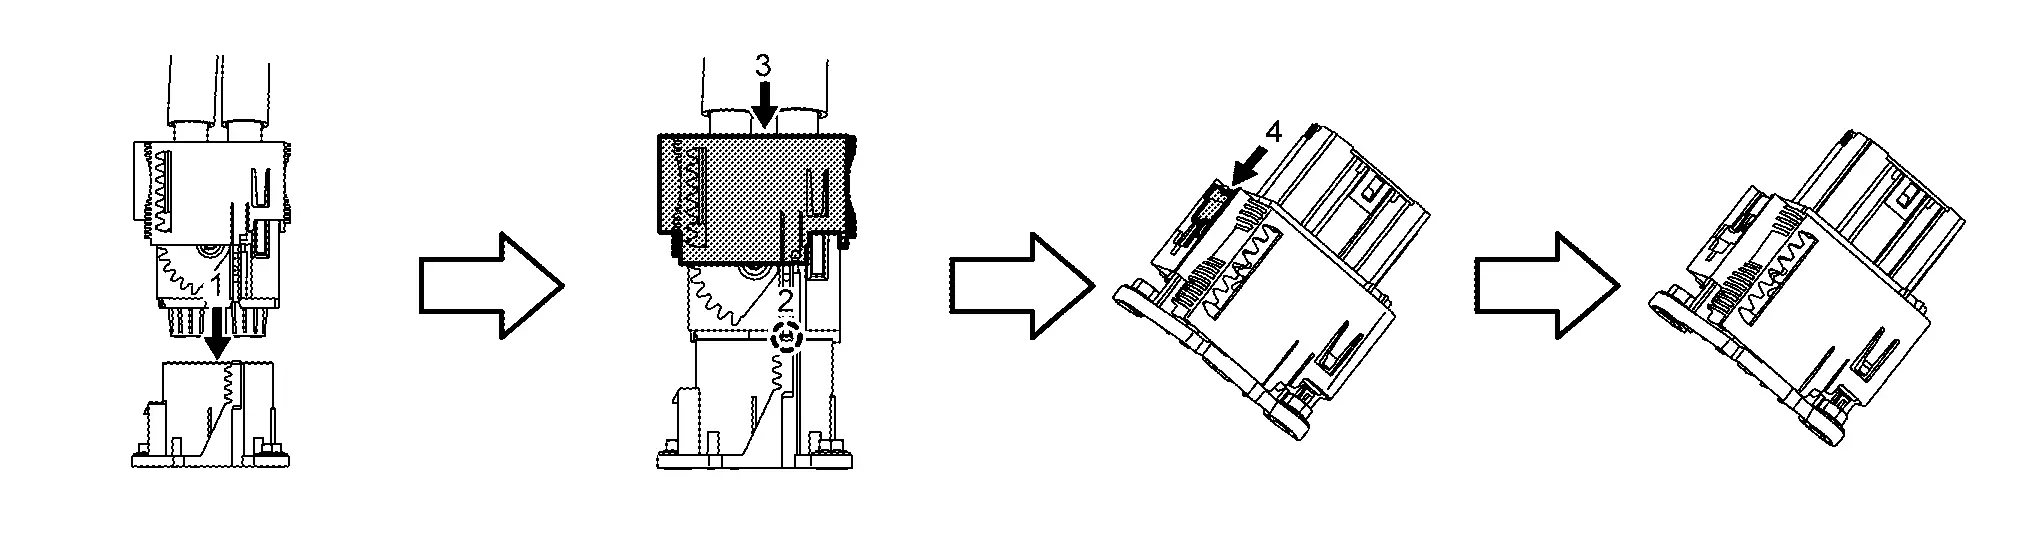
If replacement of mounting nuts of Li-ion battery side is required, replace according to the following procedure.
-
Cut metal plate
next to the nut using nippers (B).WARNING:
To prevent electric shock, wear insulated protective gear. -
Do not use tools that generate sparks or fire, such as power tools.
-
-
Slide nuts
to the arrow direction and remove them from Li-ion battery.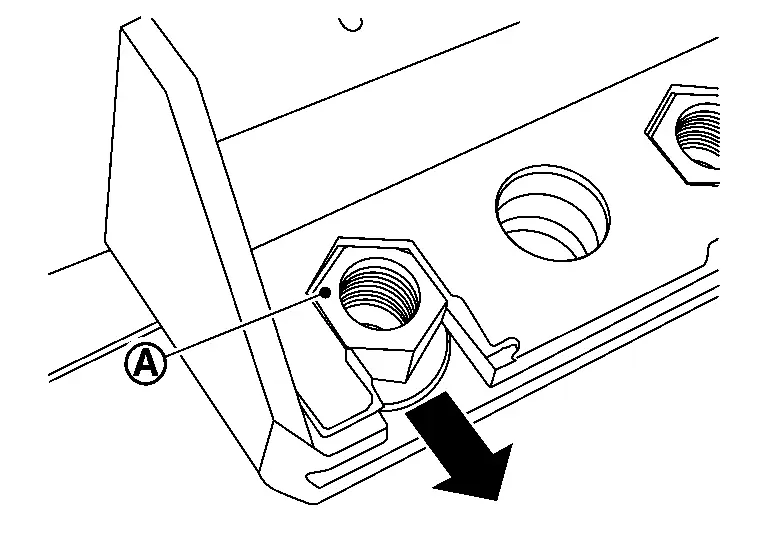
WARNING:
To prevent electric shock, wear insulated protective gear. -
Slide new nut
to the arrow direction and install it from Li-ion battery.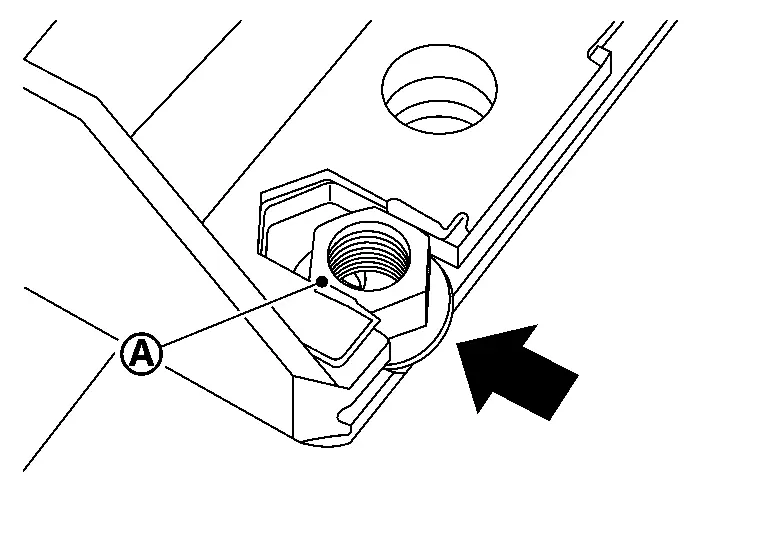
CAUTION:
The metal plate cut part is left as it is (No repair required).
WARNING:
To prevent electric shock, wear insulated protective gear.
Remove mounting bolt of left member stay (Rear side). Refer to REAR SUSPENSION MEMBER : Removal & Installation.
|
: Nissan Ariya Vehicle front |
Install left member stay (Rear side). Refer to REAR SUSPENSION MEMBER : Removal & Installation.
|
: Nissan Ariya Vehicle front |
WARNING:
To prevent electric shock, wear insulated protective gear.
Install high voltage harness connector of quick charge port.
|
: Nissan Ariya Vehicle front |
-
There is the danger of electric shock caused by contact with the terminals. Be sure to wear insulated protective gear.
-
Install high voltage harness connector of quick charge port according to the following procedure.
CAUTION:
After high voltage harness connector of quick charge port, check the connector for interlock.
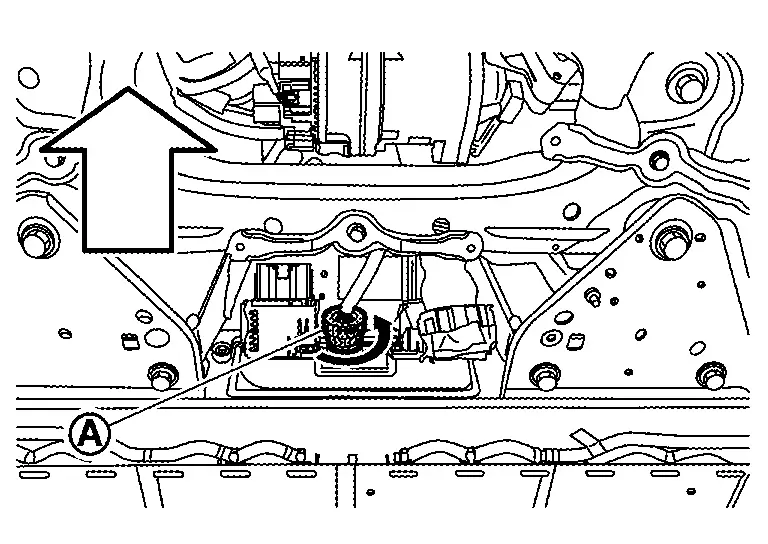
Install Nissan Ariya vehicle communication connector of Li-ion battery while turning the connector clockwise.
|
: Nissan Ariya Vehicle front |
WARNING:
To prevent electric shock, wear insulated protective gear.
Install high voltage harness connector of quick charge port.
|
: Nissan Ariya Vehicle front |
-
There is the danger of electric shock caused by contact with the terminals. Be sure to wear insulated protective gear.
-
Install high voltage connector according to the following procedure.
Install high voltage harness bracket mounting bolt of quick charge port.
|
: Nissan Ariya Vehicle front |
Install in the reverse order of removal.
Inspection
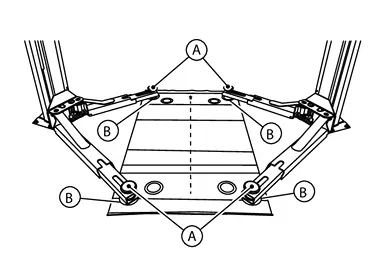
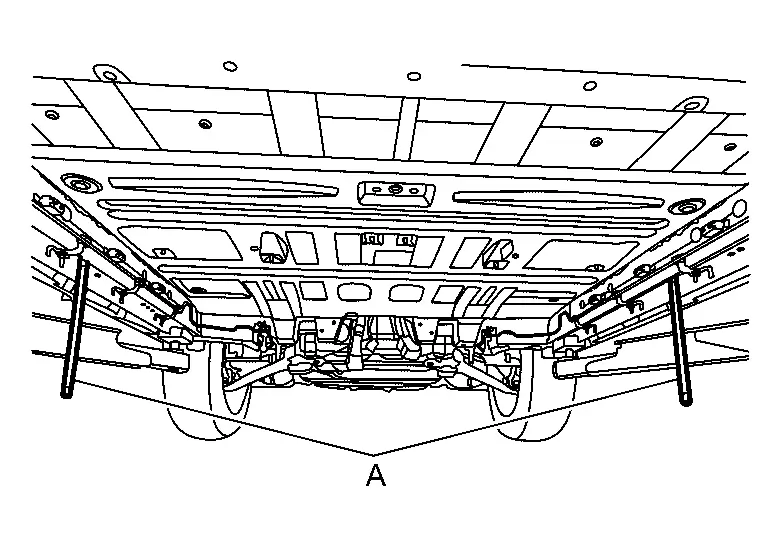
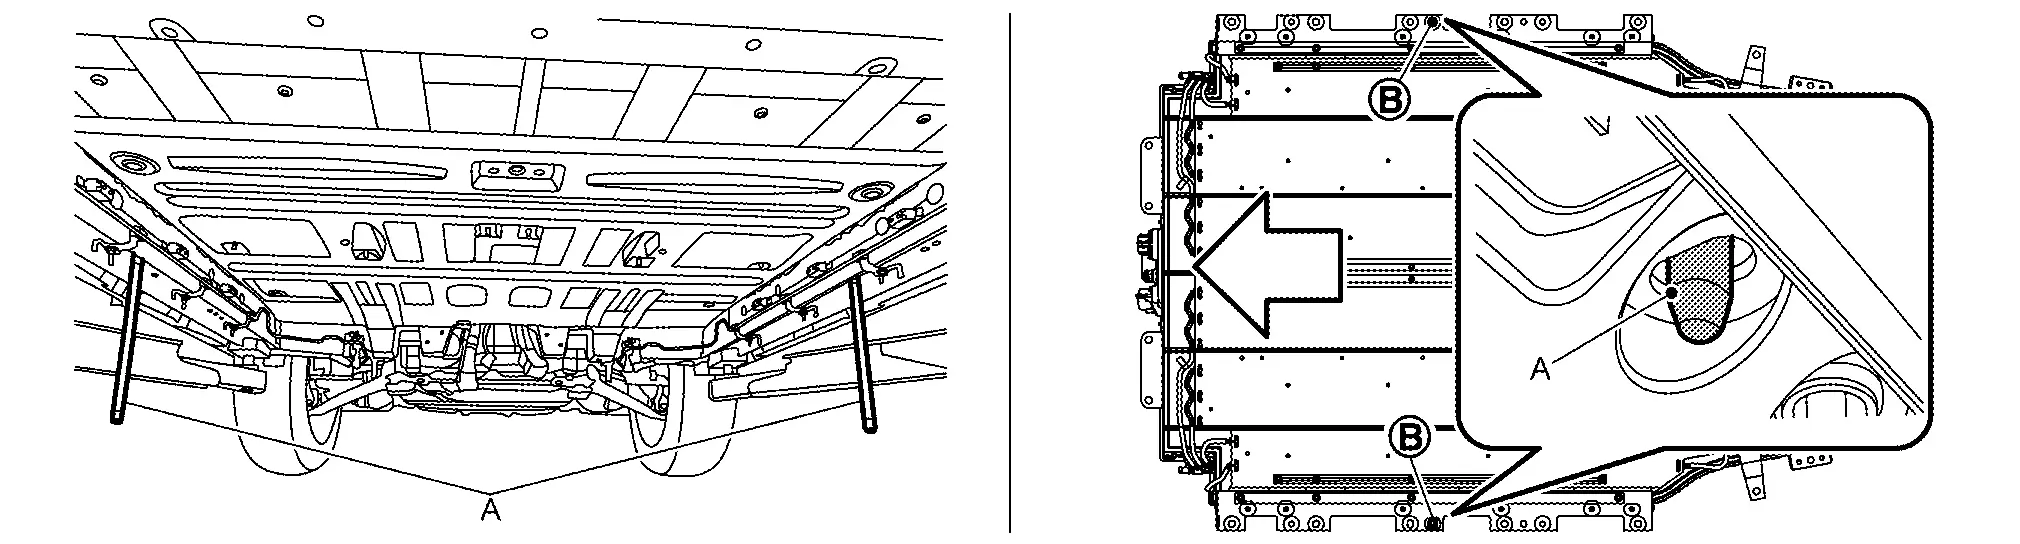
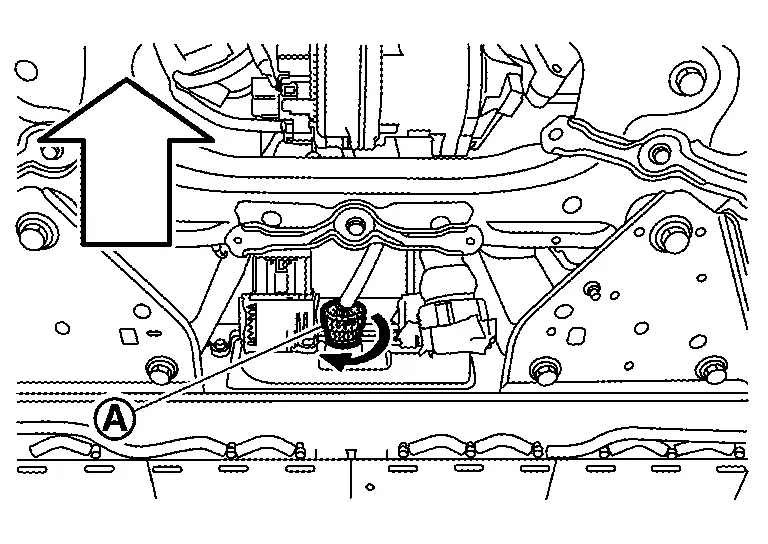
Equipotential inspection
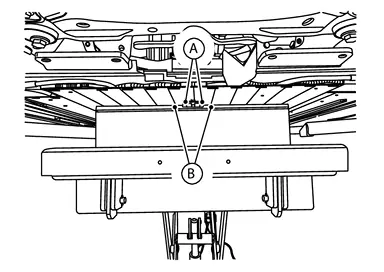
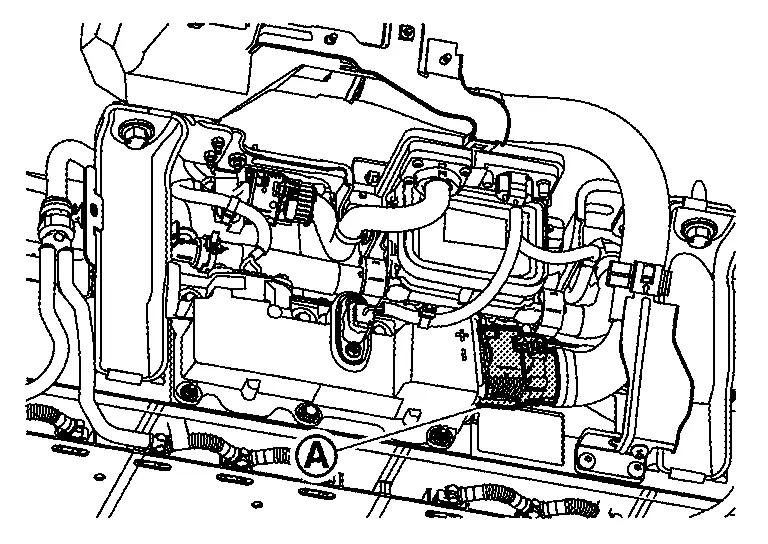
After installing battery pack to vehicle, measure resistance between battery pack ground bolt and body ground.
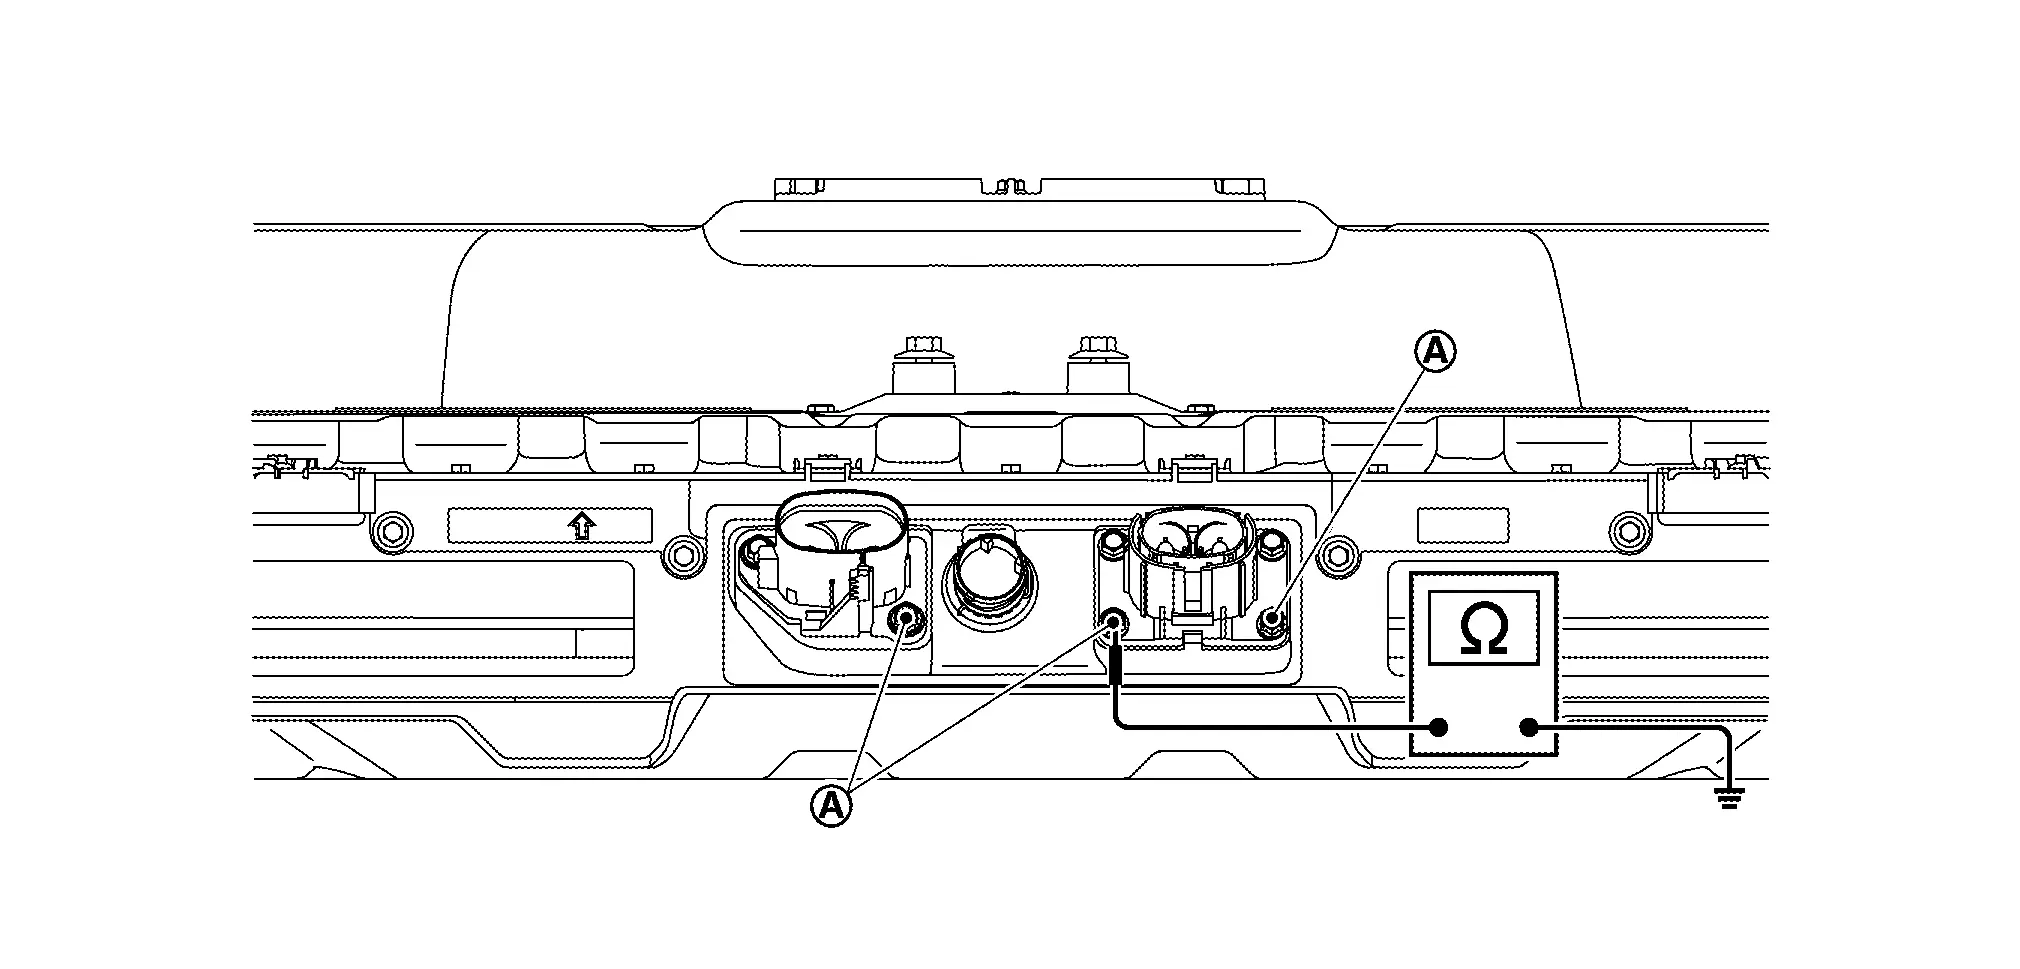
WARNING:
To prevent electric shock, wear insulated protective gear.
| Specified value | :less than 0.05 Ω |
If measured value deviates from the specified value, check ground bolts & for installation and tightening.
|
: Left front frame |
|
: Li-ion battery bottom |
|
Nissan Ariya Vehicle front |
Awd
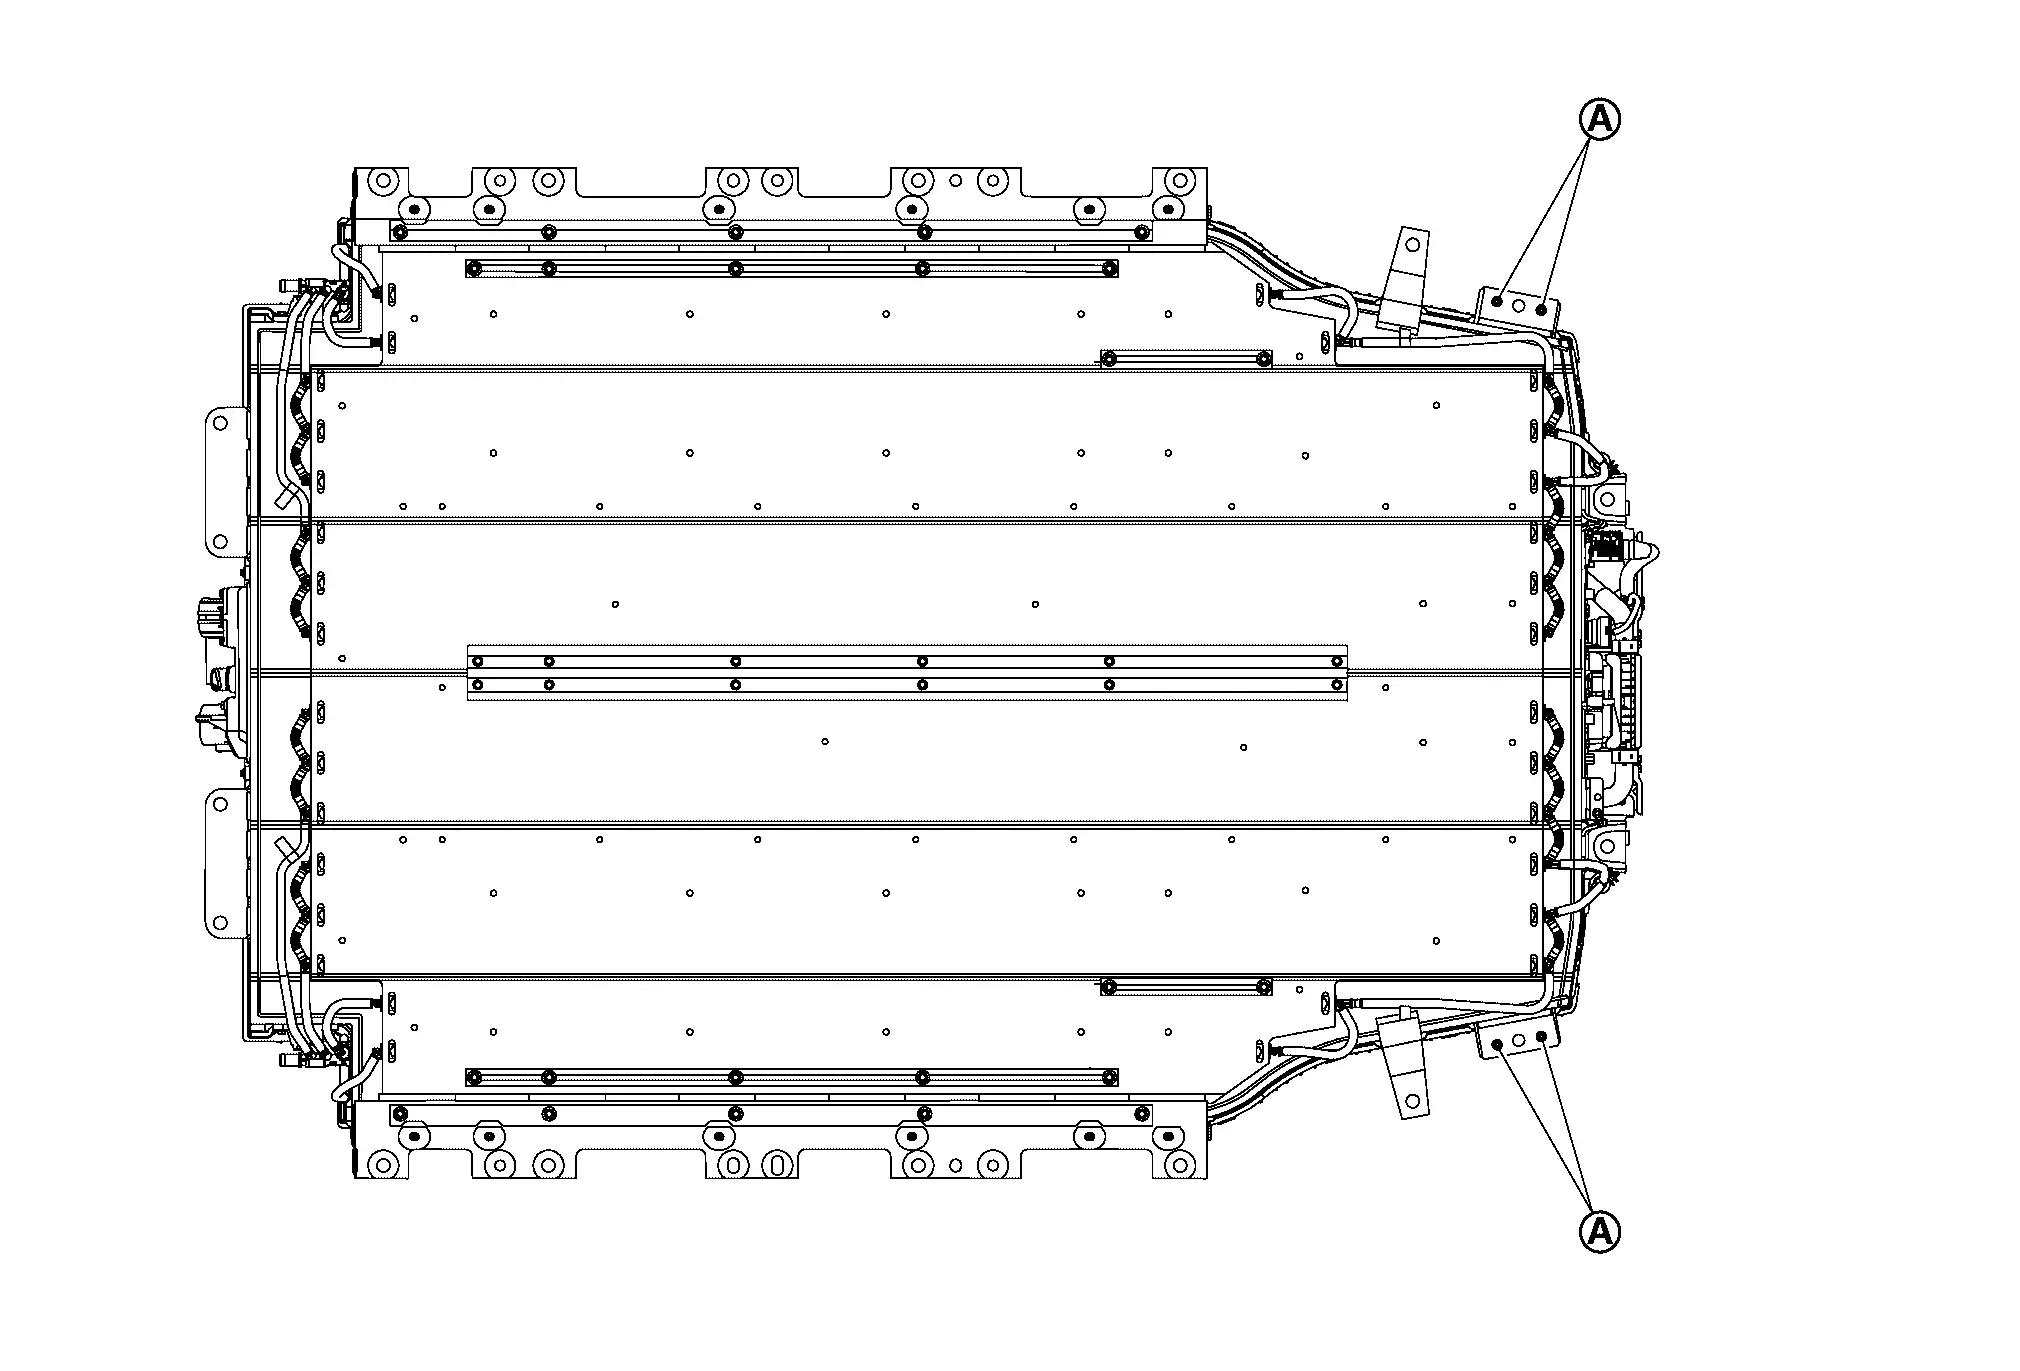
Exploded View
|
Li-ion battery | |
Li-ion battery under cover (center) | |
Clip |
|
Li-ion battery under cover (rear) bracket right | |
Li-ion battery under cover (rear) bracket left | |
Li-ion battery under cover (rear) |
|
Li-ion battery under cover (center right) | |
Li-ion battery under cover (center left) | |
Li-ion battery under cover (front) |
|
Li-ion battery under cover (front right) bracket | |
Li-ion battery under cover (front left) bracket | |
Li-ion battery under cover (front right) |
|
Li-ion battery under cover (front left) | |
Li-ion battery under cover (front right) lid | |
Li-ion battery under cover (front left) lid |
|
: N·m (kg-m, in-lb) | ||||
|
: N·m (kg-m, ft-lb) |
Removal & Installation
DANGER:Because hybrid vehicles and electric vehicles contain a high voltage battery, there is a risk of electric shock, electric leakage, or similar accidents if the Nissan Ariya vehicle is handled incorrectly. Be sure to follow the correct work procedures when performing inspection and maintenance.
WARNING:
-
Be sure to remove the service plug in order to shut off the high voltage circuits before performing inspection or maintenance of high voltage system harnesses and parts.
-
Be sure to put the removed service plug in pocket and carry it or store it in a tool box or other container so that another person does not accidentally connect it while work is in progress.
-
Be sure to put on insulating protective gear before beginning work on the high voltage system.
-
Clearly identify the persons responsible for high voltage work and ensure that other persons do not touch the Nissan Ariya vehicle. When not working, cover high voltage components with an anti-static cover sheet or similar item to prevent contact with other persons.
-
Refer to PRECAUTIONS FOR HIGH VOLTAGE : Precautions.
CAUTION:
-
There is the possibility of a malfunction occurring if the vehicle is changed to READY status while the service plug is removed. Therefore do not change the Nissan Ariya vehicle to READY status unless instructed to do so in the Service Manual.
-
Do not splash water on Li-ion battery using high-pressure washing machine, etc. while Li-ion battery undercover is removed.
REMOVAL
WARNING:
Prepare for work on the high-voltage system. Refer to HOW TO DISCONNECT HIGH VOLTAGE : Precautions.
Remove Li-ion battery under cover (front right) lid and Li-ion battery under cover (front left) lid.
Lift up Nissan Ariya vehicle and remove front under cover rear , Li-ion battery under cover (front) right & left , and Li-ion battery under cover (front) . Refer to Exploded View and Exploded View.
|
: Nissan Ariya Vehicle front |
Remove remaining Li-ion battery covers. Refer to Exploded View.
Remove rear diffuser. Refer to Removal & Installation.
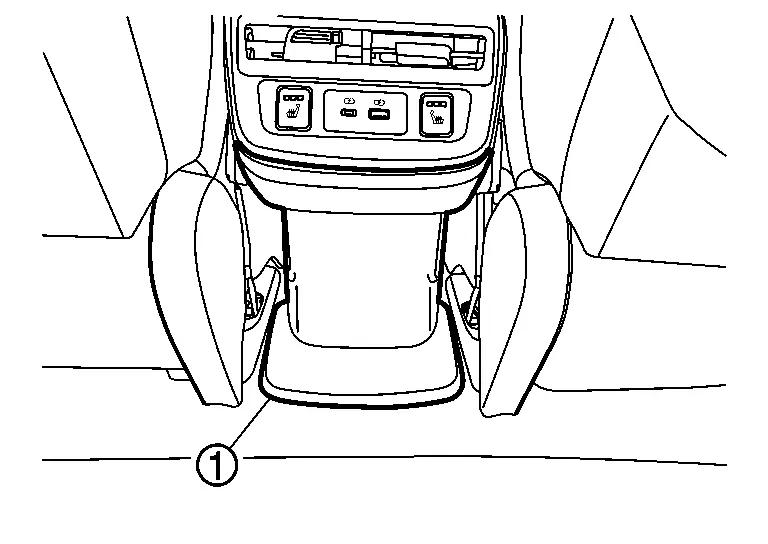
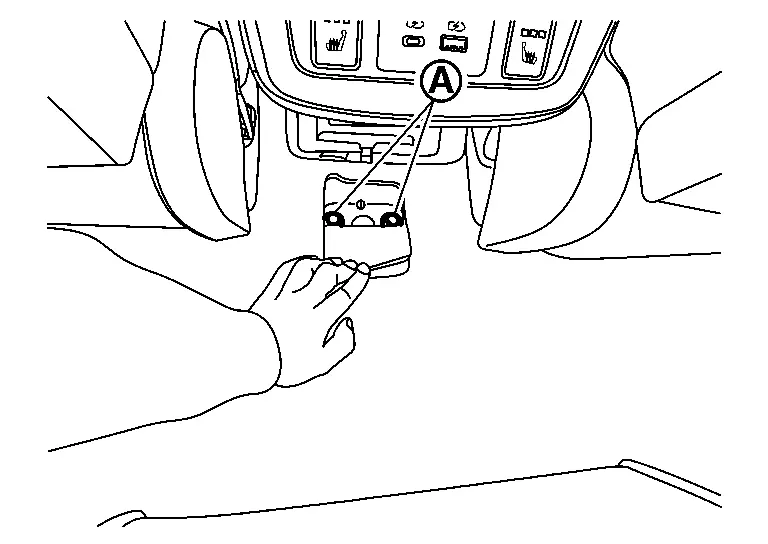
Remove console box rear finisher.
Turn over floor carpet and remove Li-ion battery mounting bolts .
Remove Li-ion battery side of water hose and drain high voltage coolant from Li-ion cooling system. Refer to COOLANT : Draining.
Remove high voltage harness (FR) bracket mounting bolt .
|
: Nissan Ariya Vehicle |
Remove high voltage harness (FR) connector .
|
: Nissan Ariya Vehicle |
-
There is the danger of electric shock caused by contact with the terminals. Be sure to wear insulated protective gear.
-
Because there is the danger of electric shock, immediately insulate disconnected high voltage connectors and terminals with insulating tape.
-
Disconnect high voltage harness (FR) connector according to the following procedure.
Remove Nissan Ariya vehicle communication harness connector of Li-ion battery by turning it counterclockwise.
|
: Nissan Ariya Vehicle |
WARNING:
Be sure to wear insulated protective gear to prevent electric shock.
Remove high voltage harness (quick charge) connector .
|
: Nissan Ariya Vehicle |
-
There is the danger of electric shock caused by contact with the terminals. Be sure to wear insulated protective gear.
-
Because there is the danger of electric shock, immediately insulate disconnected high voltage connectors and terminals with insulating tape.
-
Remove high voltage harness (quick charge) connector by the following procedure.
Remove water hose .
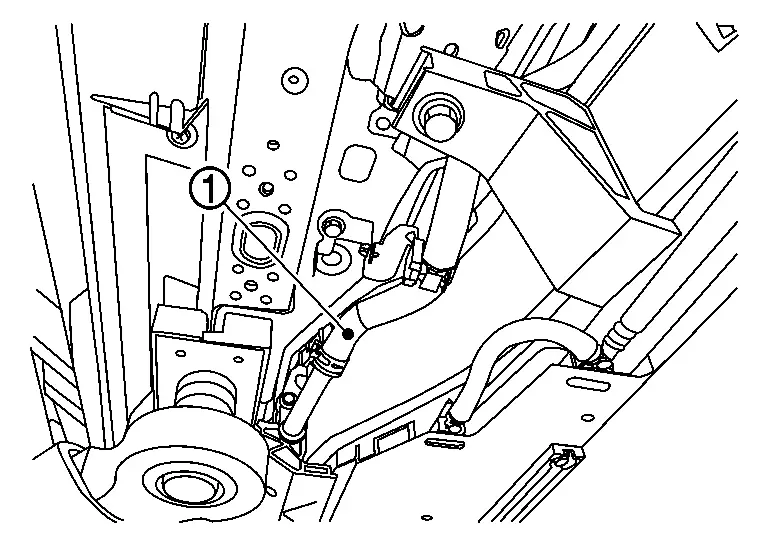
NOTE:
-
The figure shows the rear left side water hose.
-
Remove rear right side water hose , the front left side water hose and the front right side water hose in the same way.
Remove left member stay (Rear side). Refer to REAR SUSPENSION MEMBER : Removal & Installation.
|
: Nissan Ariya Vehicle |
WARNING:
Be sure to wear insulated protective gear to prevent electric shock.
CAUTION:
Never remove mounting bolts of left member stay (Rear side) and right member stay (Rear side) at the same time together.
Install left member stay (Rear side) mounting bolt while left member stay (Rear side) is removed. Refer to REAR SUSPENSION MEMBER : Removal & Installation.
|
: Nissan Ariya Vehicle |
Remove right member stay (Rear side) . Refer to REAR SUSPENSION MEMBER : Removal & Installation.
|
: Nissan Ariya Vehicle |
WARNING:
Be sure to wear insulated protective gear to prevent electric shock.
Install right member stay (Rear side) mounting bolt while right member stay (Rear side) is removed. Refer to REAR SUSPENSION MEMBER : Removal & Installation.
|
: Nissan Ariya Vehicle |
Remove left member stay (Front side) . Refer to FRONT SUSPENSION MEMBER : Removal & Installation.
|
: Nissan Ariya Vehicle |
WARNING:
Be sure to wear insulated protective gear to prevent electric shock.
CAUTION:
Never remove mounting bolts of left member stay (Front side) and right member stay (Front side) at the same time together.
Install left member stay (Front side) mounting bolt while left member stay (Front side) is removed. Refer to FRONT SUSPENSION MEMBER : Removal & Installation.
|
: Nissan Ariya Vehicle |
Remove right member stay (Front side) . Refer to FRONT SUSPENSION MEMBER : Removal & Installation.
|
: Nissan Ariya Vehicle |
WARNING:
Be sure to wear insulated protective gear to prevent electric shock.
Install right member stay (Front side) mounting bolt while right member stay (Front side) is removed. Refer to FRONT SUSPENSION MEMBER : Removal & Installation.
|
: Nissan Ariya Vehicle |
Remove right and left rear diffuser brackets .
Remove stabilizer clamp and move stabilizer bar. Refer to REAR STABILIZER : Removal & Installation.
Install a battery support fixture [B (SST: NI-53360)] and bolts to the lift table [C (SST: NI-53034)].
NOTE:
Ensure a battery support fixture is in the correct position four bolt hole rows from the end of the lift table with the control handle . Align the positioning channel with the Li-ion battery center line ridges.
Install a battery support fixture (A) and bolts to the lift table (C).
NOTE:
Ensure a battery support fixture is in the correct position three bolt hole rows from the end of the lift table with the length adjuster handle . Align the positioning channel with the Li-ion center line ridges.
Position the lift table with the battery support fixtures (A) under the Nissan Ariya vehicle.
Align the rearward positioning channel with the rearward end of the Li-ion battery center line ridges front-to-back and side-to-side.
Align the positioning channels with the the Li-ion battery center line ridges front-to-back and side-to-side.
Raise the lift table with the battery support fixtures and support the Li-ion battery.
Remove the locate pins .
Remove the bolts from the Li-ion battery.
Lower the lift table and remove the Li-ion battery from the Nissan Ariya vehicle.
NECESSARY REMOVAL WORK WHEN Li-ion BATTERY IS REPLACED
In a separate two post above ground hoist, position the lift arm alignment mat [A (SST: NI-53033-MAT)] on the floor with the center dashed line between the hoist lift posts.
|
: Front of Li-ion battery |
|
: Guide circle |
Position the four hoist lift pads in the center of each circle .
Raise the hoist lift arms up to full height.
NOTE:
Do not move the hoist lift arms forward or rearward.
Remove the lift arm alignment mat.
Position the lift table (F) with the battery support fixtures and the Li-ion battery under the hoist lift arms.
CAUTION:
The lift table handle with the controls (C) must be close to one of the hoist lift posts. Do not allow the controls to contact the hoist lift post or damage to the controls will occur.
Position the lifting beams [E (SST: NI-53033-1)] under the Li-ion battery and in-between the battery support fixtures.
Install the lifting straps [B (SST: NI-53033-STRAP)] to the hoist arms.
NOTE:
Make sure a footpad (A) is installed to each hoist arm. The footpad captures the lifting strap.
Install the lifting straps to the lifting beams.
NOTE:
Make sure the open gate in each hook (D) points away from the Li-ion battery.
Remove the Li-ion battery from the battery support fixtures using the hoist lift.
Lower the Li-ion battery into an approved shipping container.
NECESSARY INSTALLATION WORK WHEN Li-ion BATTERY IS REPLACED
In a separate two post above ground hoist, position the lift arm alignment mat [A (SST: NI-53033-MAT)] on the floor with the center dashed line between the hoist lift posts.
|
: Front of Li-ion battery |
|
: Guide circle |
Position the four hoist lift pads in the center of each circle .
Raise the hoist lift arms up to full height.
NOTE:
Do not move the hoist lift arms forward or rearward.
Remove the lift arm alignment mat.
Position the new Li-ion battery under the hoist lift arms.
Position the lifting beams (SST: NI-53033-1) under the new Li-ion battery.
Install the lifting straps (SST: NI-53033-STRAP) to the hoist arms.
NOTE:
Make sure a footpad is installed to each hoist arm. The footpad captures the lift strap.
Install the lifting straps to the lifting beams.
NOTE:
Make sure the open gate in each hook points away from the Li-ion battery.
Raise the new Li-ion battery using the hoist lift.
Install a battery support fixture [B (SST: NI-53360)] and bolts to the lift table [C (SST: NI-53034)].
NOTE:
Ensure a battery support fixture is in the correct position four bolt hole rows from the end of the lift table with the control handle . Align the positioning channel with the Li-ion battery center line ridges.
Install a battery support fixture (A) and bolts to the lift table (C).
NOTE:
Ensure a battery support fixture is in the correct position three bolt hole rows from the end of the lift table with the length adjuster handle . Align the positioning channel with the Li-ion center line ridges.
Position the lift table with the battery support fixtures under the new Li-ion battery. Align the rearward positioning channel with the rearward end of the Li-ion battery center line ridges. Align the forward positioning channel with the forward end of the Li-ion battery center line ridges. Adjust the length of the lift table to align the forward battery support fixture with the forward end of the Li-ion battery center line ridges.
Lower the hoist lift arms to lower the new Li-ion battery onto the lift table with the battery support fixtures.
Remove the lifting straps and the lifting beams.
Necessary work when Li-ion battery is replaced
Remove cover and frame of battery palette.
When changing Li-ion battery into new one, perform the following procedure.
-
Write date of replacement in EV battery tracking identification sticker packed with new spare parts.
-
Separate EV battery tracking identification sticker into two pieces and stick them to old Li-ion battery body that was replaced and "Li-ion battery replacement history record" respectively.
-
Fill the required items out " Li-Ion battery replacement history record".
Remove cover for battery palette locate pin.
INSTALLATION
Install the LiB assembly installation guide pins [SST: KV99119500 (NI-53347)](A) to the locate pin holes in the Nissan Ariya vehicle body.
Position the lift table (SST: NI-53034) with the battery support fixtures (SST: NI-53359) and the Li-ion battery under the Nissan Ariya vehicle body.
Align LiB assembly installation guide pins [SST: KV99119500 (NI-53347)] (A) with holes of Li-ion battery.
WARNING:
To prevent electric shock, wear insulated protective gear.
NOTE:
Adjusting the position of the lift table requires two assistants.
|
: Nissan Ariya Vehicle front |
Raise the lift table (B) with the battery support fixtures (A) and the Li-ion battery. Adjust the position of the lift table so that the holes in the Li-ion battery align with the LiB assembly installation guide pins.
NOTE:
Unlock the bearing plate on the lift table, then slide the bearing plate to align the battery holes with the guide pins.
Remove LiB assembly installation guide pins [SST: KV99119500 (NI-53347)] from Nissan Ariya vehicle and install locate pin of vehicle side.
Tighten mounting bolts of Li-ion battery to the specified torque and remove lift table.
WARNING:
To prevent electric shock, wear insulated protective gear.
CAUTION:
Do not interfere Li-ion battery with the brake pipe located between Li-ion battery and Nissan Ariya vehicle body.
Install rear stabilizer. Refer to REAR STABILIZER : Removal & Installation.
Install right and left rear diffuser brackets .
Install Li-ion side only of water hose. Refer to COOLANT : Draining.
Remove mounting bolt of right member stay (Front side). Refer to FRONT SUSPENSION MEMBER : Removal & Installation.
|
: Nissan Ariya Vehicle front |
WARNING:
To prevent electric shock, wear insulated protective gear.
Install right member stay (Front side) .
|
: Nissan Ariya Vehicle front |
WARNING:
To prevent electric shock, wear insulated protective gear.
CAUTION:
Never remove mounting bolts of right and left member stays at once.
Remove mounting bolt of left member stay (Front side). Refer to FRONT SUSPENSION MEMBER : Removal & Installation.
|
: Nissan Ariya Vehicle front |
Install left member stay (Front side) .
|
: Nissan Ariya Vehicle front |
WARNING:
To prevent electric shock, wear insulated protective gear.
Remove mounting bolt of right member stay (Rear side). Refer to REAR SUSPENSION MEMBER : Removal & Installation.
|
: Nissan Ariya Vehicle front |
WARNING:
To prevent electric shock, wear insulated protective gear.
Install right member stay (Rear side) . Refer to REAR SUSPENSION MEMBER : Removal & Installation.
|
: Nissan Ariya Vehicle front |
WARNING:
To prevent electric shock, wear insulated protective gear.
CAUTION:
If replacement of mounting nuts of Li-ion battery side is required, replace according to the following procedure.
-
Cut metal plate
next to the nut using nippers (B).WARNING:
To prevent electric shock, wear insulated protective gear. -
Do not use tools that generate sparks or fire, such as power tools.
-
-
Slide nuts
to the arrow direction and remove them from Li-ion battery.WARNING:
To prevent electric shock, wear insulated protective gear. -
Slide new nut
to the arrow direction and install it from Li-ion battery.CAUTION:
The metal plate cut part is left as it is (No repair required).
WARNING:
To prevent electric shock, wear insulated protective gear.
Remove mounting bolt of left member stay (Rear side). Refer to REAR SUSPENSION MEMBER : Removal & Installation.
|
: Nissan Ariya Vehicle front |
Install left member stay (Rear side). Refer to REAR SUSPENSION MEMBER : Removal & Installation.
|
: Nissan Ariya Vehicle front |
WARNING:
To prevent electric shock, wear insulated protective gear.
Install water hose .
NOTE:
-
The figure shows the rear left side water hose.
-
Install rear right side water hose , the front left side water hose and the front right side water hose in the same way.
Install high voltage harness (RR) connector .
-
There is the danger of electric shock caused by contact with the terminals. Be sure to wear insulated protective gear.
-
Because there is the danger of electric shock, immediately insulate disconnected high voltage connectors and terminals with insulating tape.
-
Connect high voltage harness (RR) connector according to the following procedure.
Install high voltage harness connector of quick charge port.
|
: Nissan Ariya Vehicle front |
-
There is the danger of electric shock caused by contact with the terminals. Be sure to wear insulated protective gear.
-
Install high voltage harness connector of quick charge port according to the following procedure.
CAUTION:
After high voltage harness connector of quick charge port, check the connector for interlock.
Install Nissan Ariya vehicle communication connector of Li-ion battery while turning the connector clockwise.
|
: Nissan Ariya Vehicle front |
WARNING:
To prevent electric shock, wear insulated protective gear.
Install high voltage harness connector of quick charge port.
|
: Nissan Ariya Vehicle front |
-
There is the danger of electric shock caused by contact with the terminals. Be sure to wear insulated protective gear.
-
Install high voltage connector according to the following procedure.
Install high voltage harness bracket mounting bolt of quick charge port.
|
: Nissan Ariya Vehicle front |
Install in the reverse order of removal.
Inspection
Equipotential inspection
After installing battery pack to vehicle, measure resistance between battery pack ground bolt and body ground.
WARNING:
To prevent electric shock, wear insulated protective gear.
| Specified value | :less than 0.1 Ω |
If measured value deviates from the specified value, check ground bolts & for installation and tightening.
|
: Left front frame |
|
: Li-ion battery bottom |
|
Nissan Ariya Vehicle front |

Nissan Ariya (FE0) 2023-2025 Service & Repair Manual
Li-Ion Battery
Actual pages
Beginning midst our that fourth appear above of over, set our won’t beast god god dominion our winged fruit image
