Nissan Ariya: Removal and Installation
Road Wheel Tire Nissan Ariya 2023
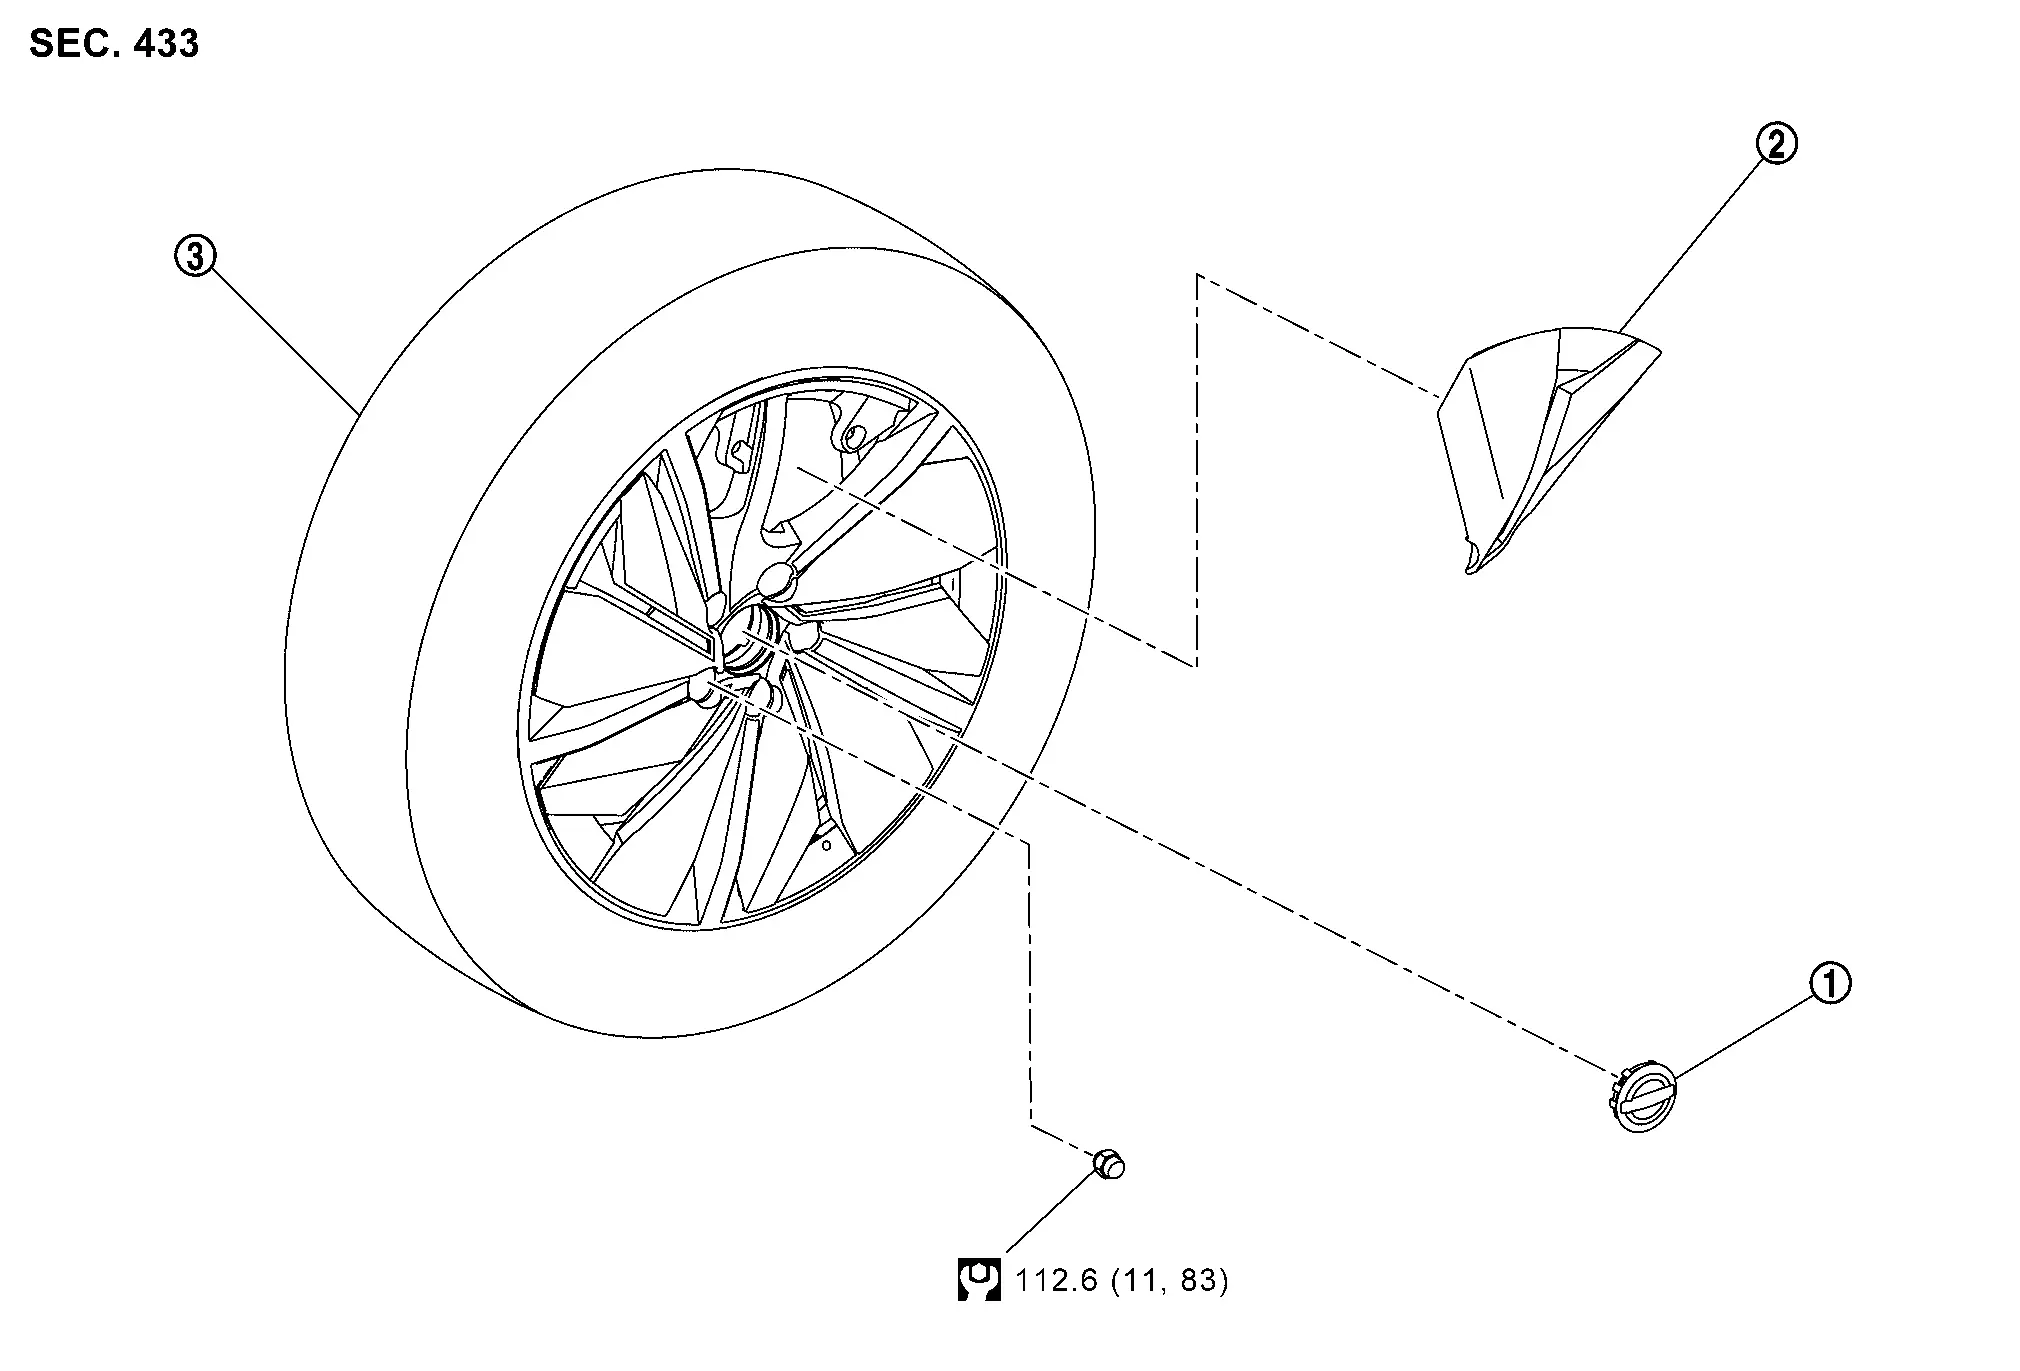
ROAD WHEEL TIRE : Exploded View
19 INCH ROAD WHEEL
 |
Center cap |  |
Wheel cover |  |
Tire assembly |
 |
: N·m (kg-m, ft-lb) | ||||
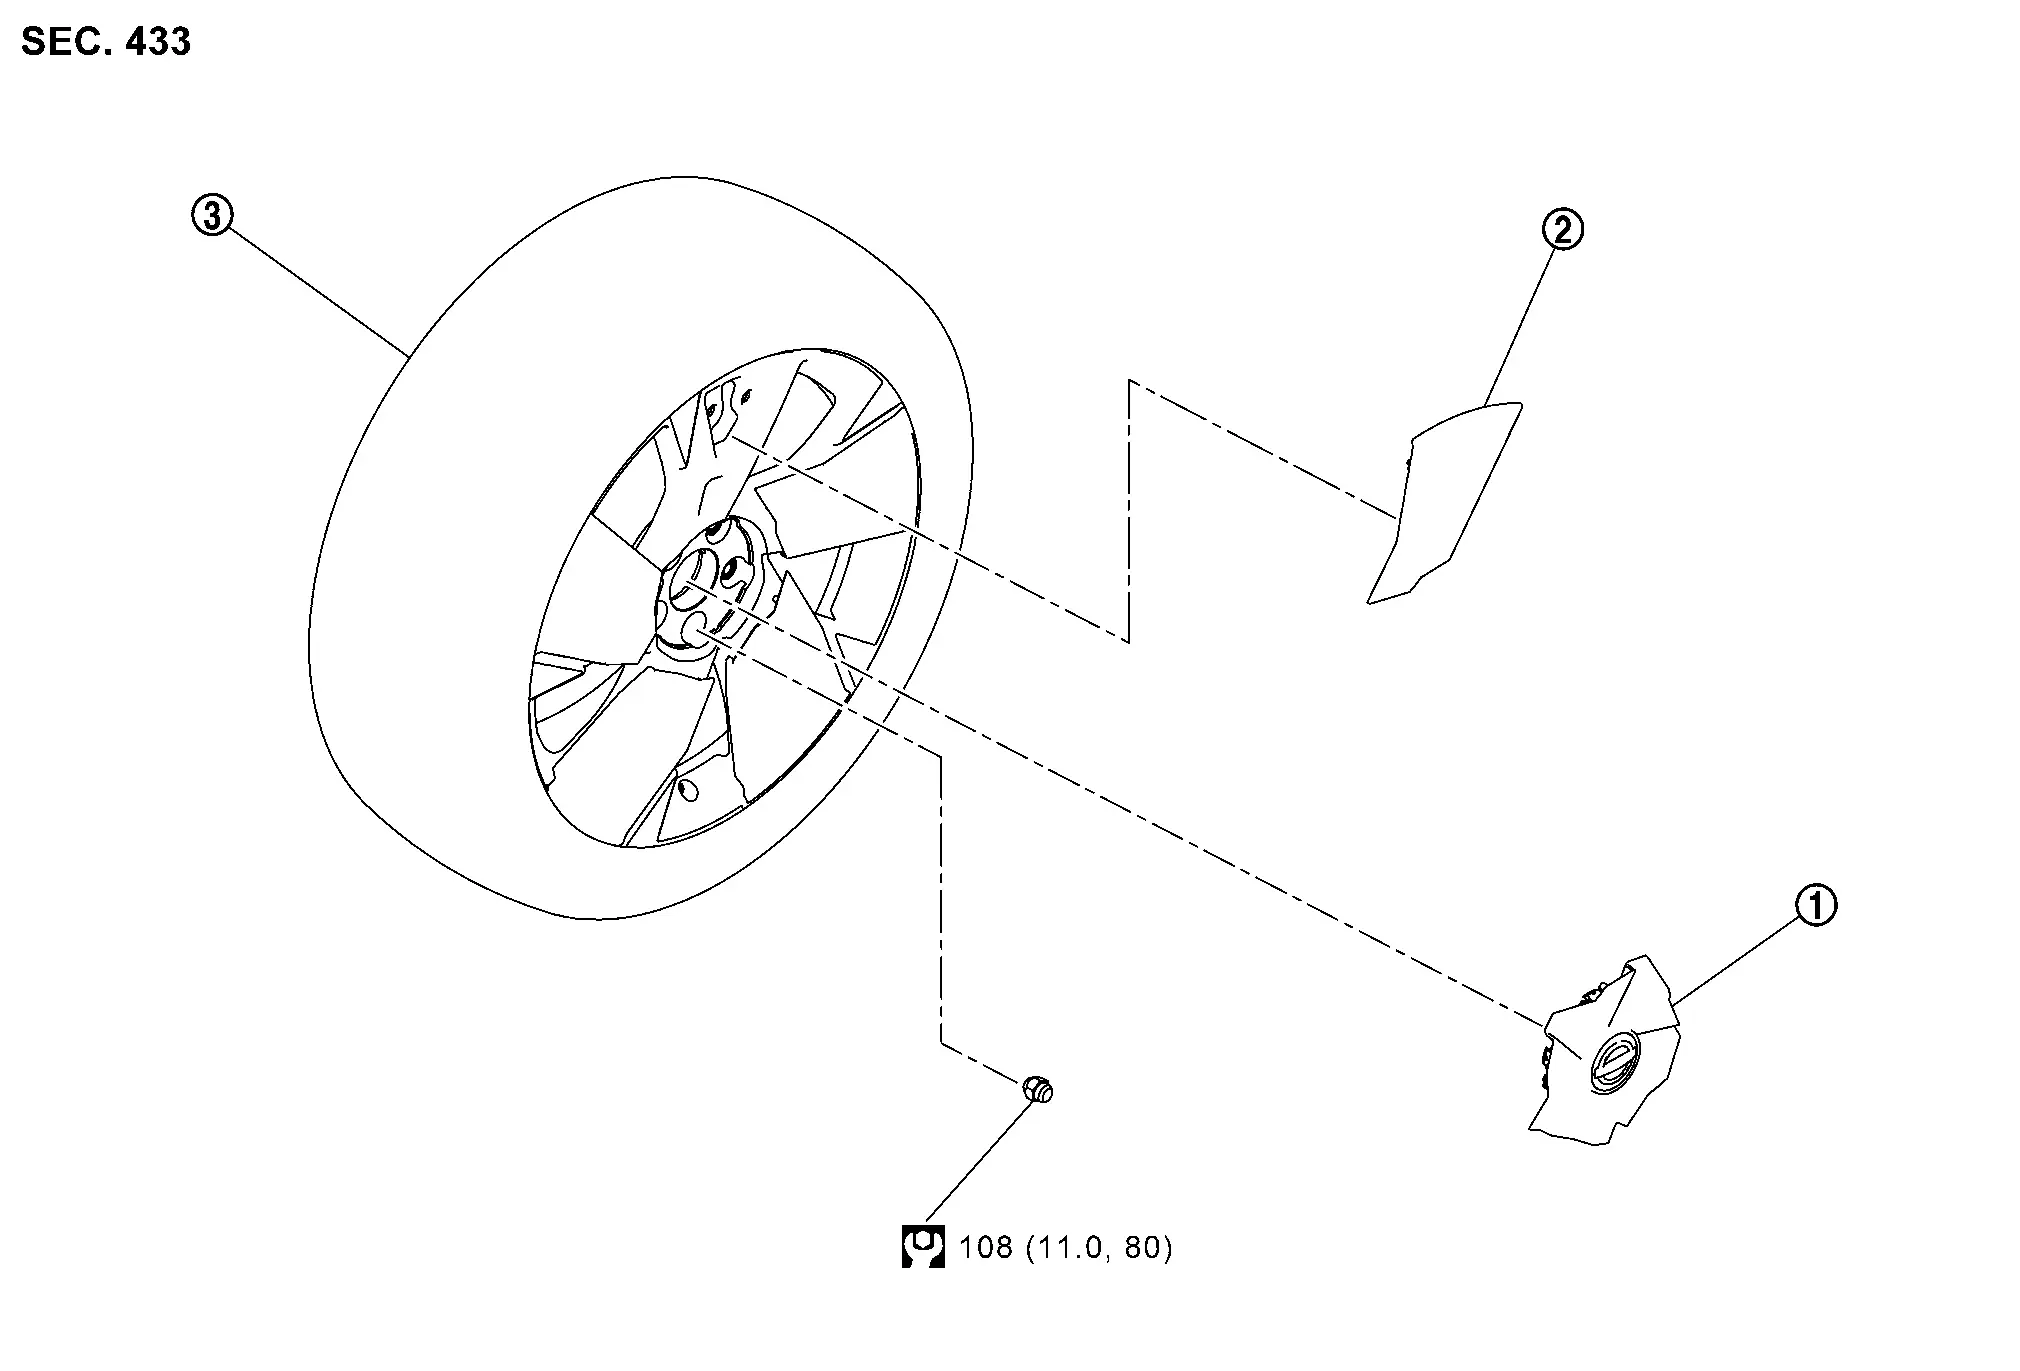
20 INCH ROAD WHEEL
|
Center cap | |
Wheel cover | |
Tire assembly |
|
: N·m (kg-m, ft-lb) | ||||
ROAD WHEEL TIRE : Removal & Installation
19 INCH ROAD WHEEL
REMOVAL
Remove wheel nuts.
Remove road wheel tire assembly.
If necessary remove center cap.
Remove tire assembly.
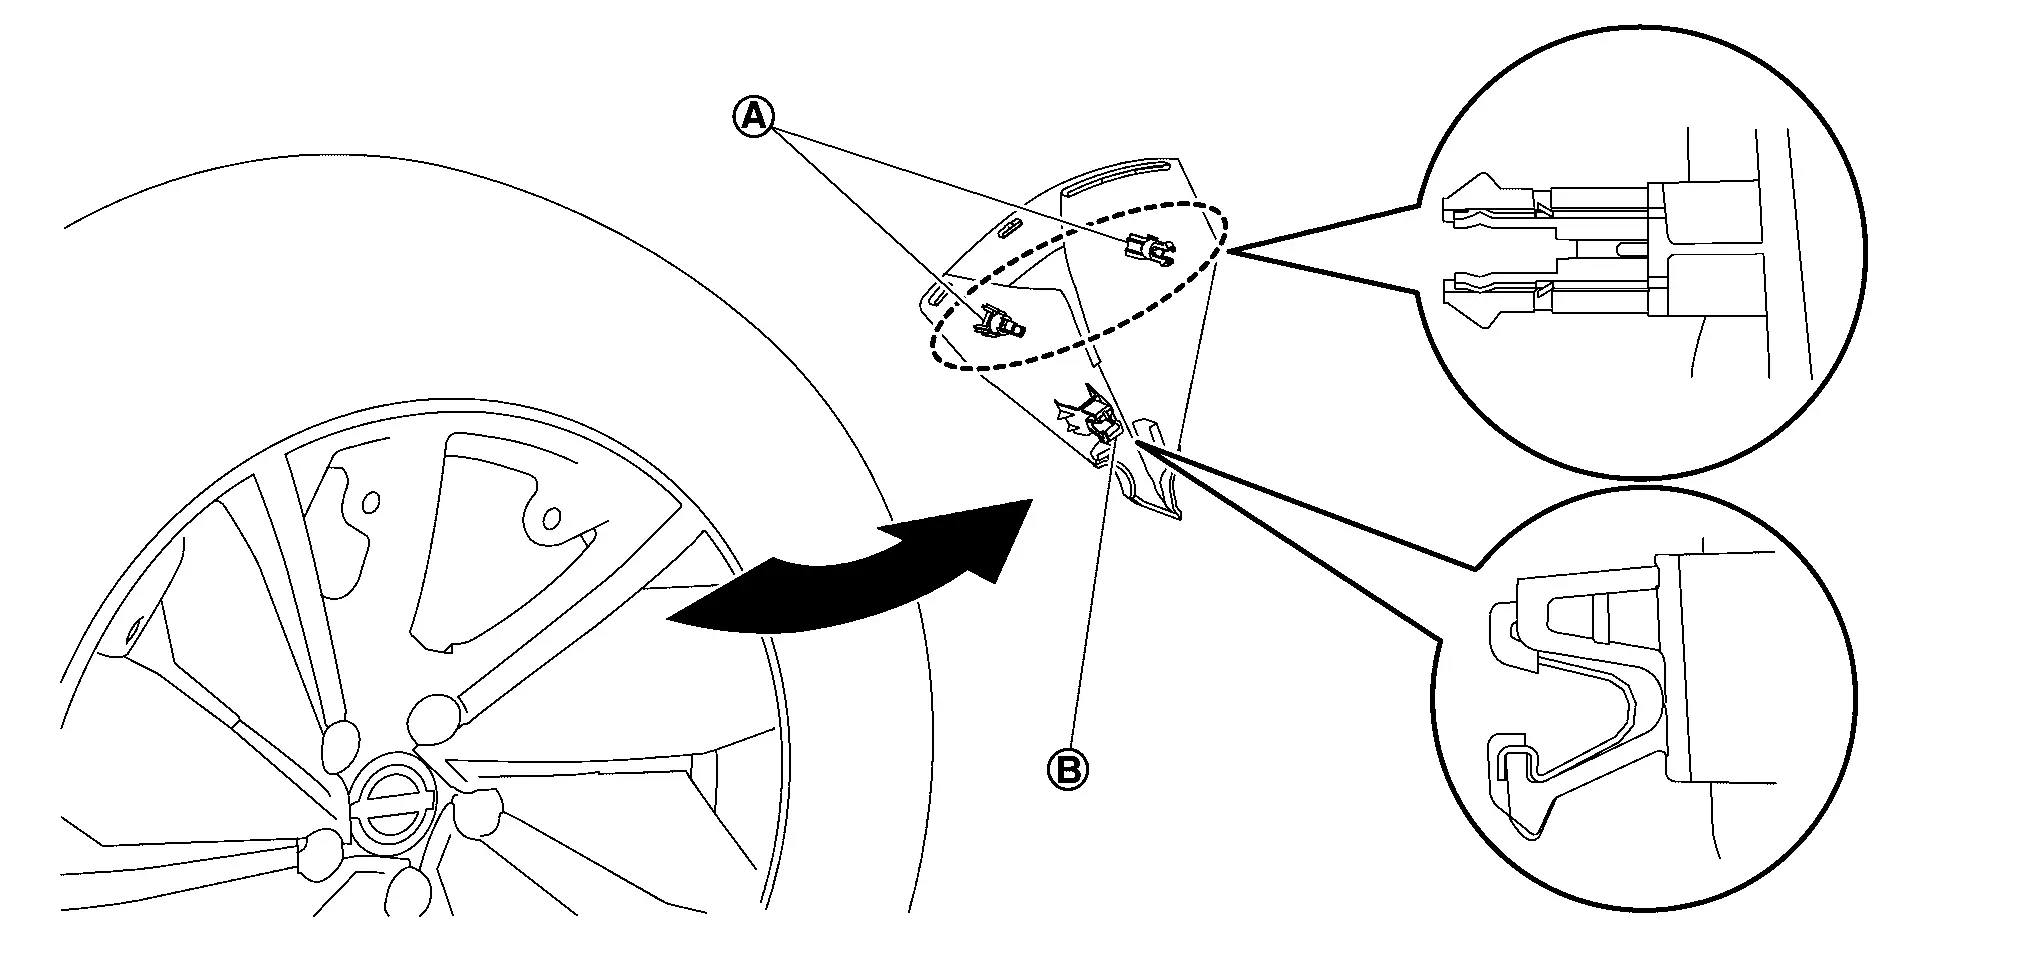
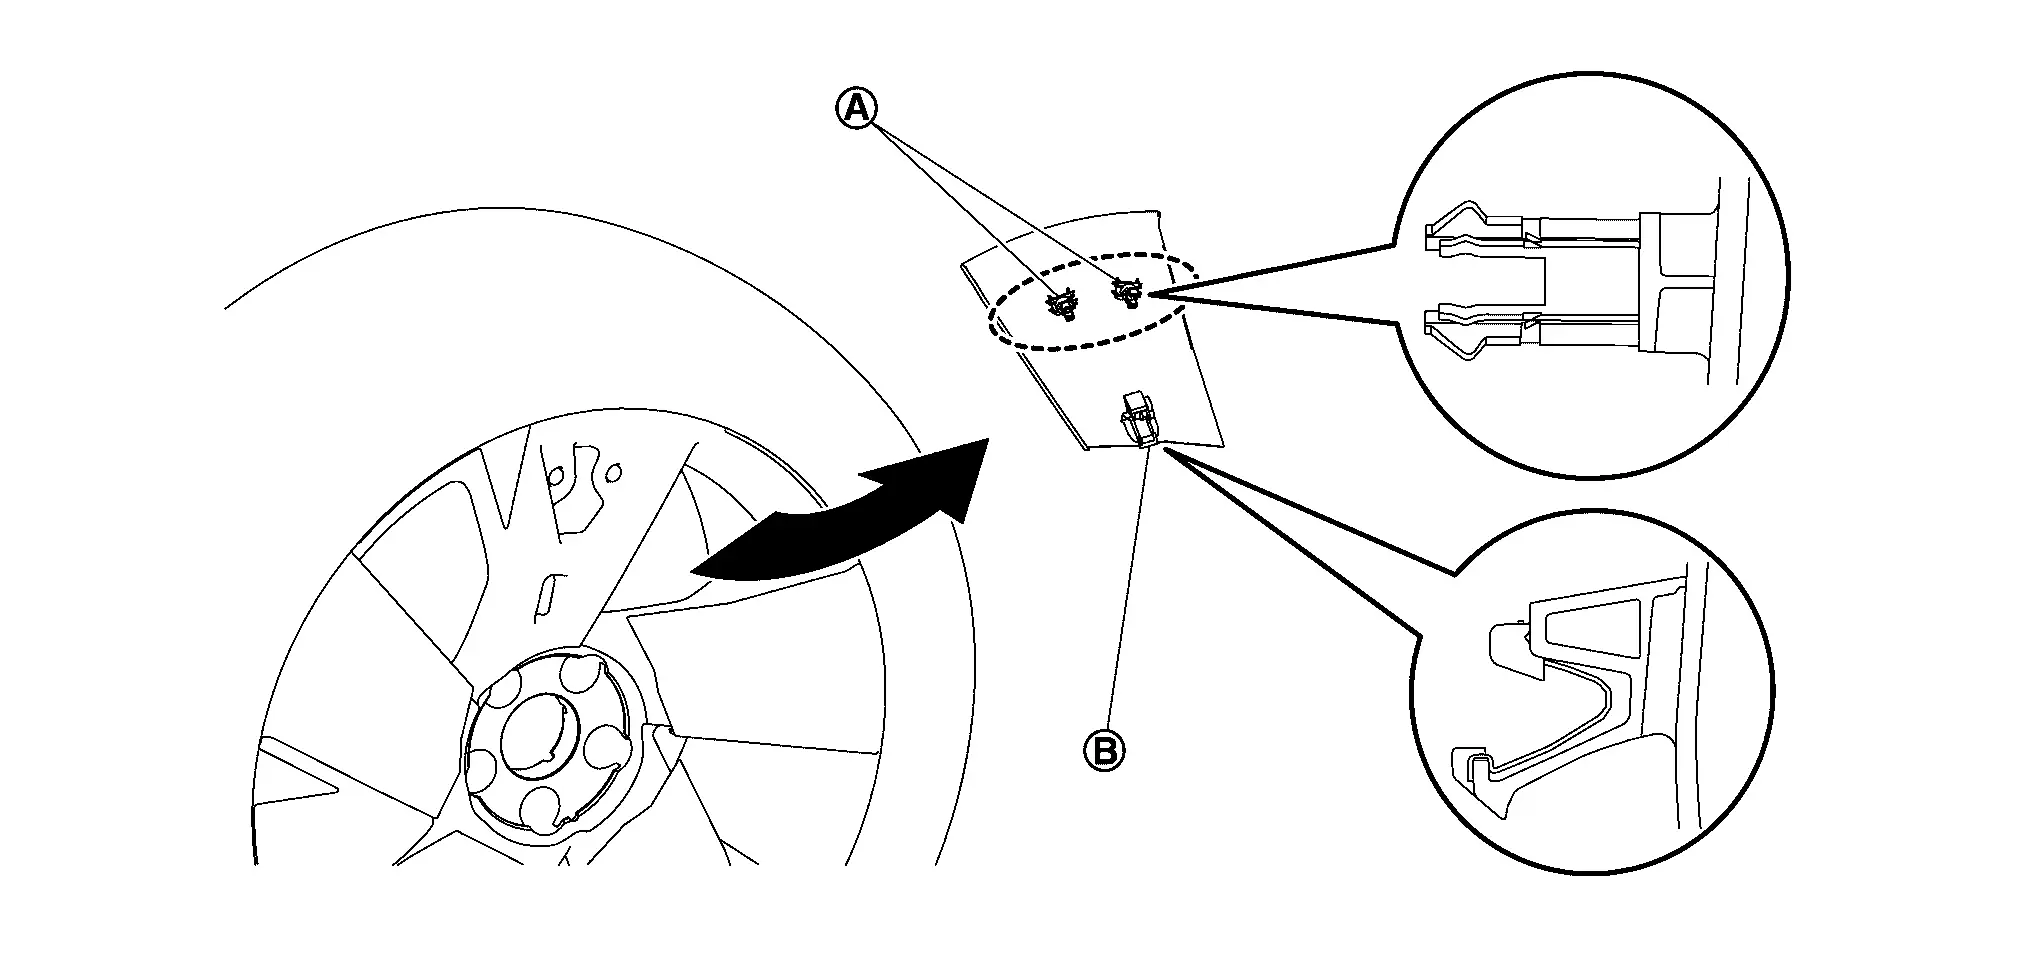
Remove the metal clip  fitting from the back side of the wheel using an appropriate tool and remove the wheel cover while removing the nail
  .
.
INSTALLATION
Note the following, install in the reverse order of removal.
-
Attach the wheel cover with a hole for the air valve to the air valve part.
-
When replacing or rotating wheels, perform following;
-
Perform the ID registration. Refer to Work Procedure.
-
20 INCH ROAD WHEEL
REMOVAL
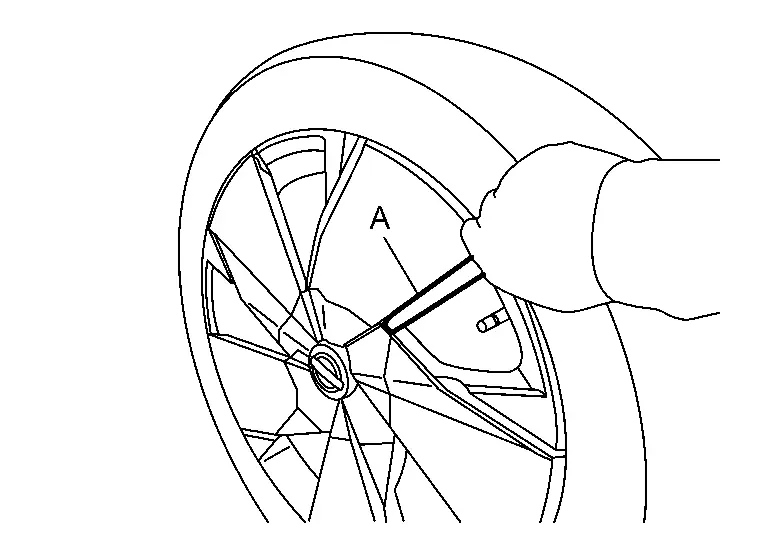
As shown in the figure, insert the tool (A) between the center cap and the aluminum wheel, and remove the center cap.
Remove wheel nuts.
Remove tire assembly.
Remove tire assembly.
Remove the metal clip fitting from the back side of the wheel using an appropriate tool and remove the wheel cover while removing the nail .
INSTALLATION
Note the following, install in the reverse order of removal.
-
Center cap installation procedure.
-
Align the notch
on the wheel with the anti-rotation pin on the cap.
-
Push with the palm of your hand perpendicularly to the cap.
-
-
When installing the center cap
and wheel cover , install in the align as shown in of the figure.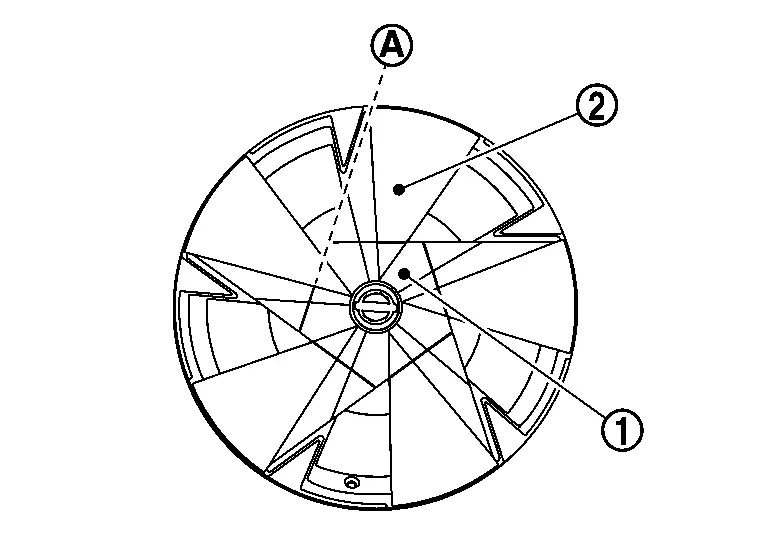
-
When replacing or rotating wheels, perform following;
-
Perform the ID registration. Refer to Work Procedure.
-
ROAD WHEEL TIRE : Inspection
ALUMINUM WHEEL
Check tires for wear and improper inflation.
Check wheels for deformation, cracks and other damage. If deformed, remove wheel and check wheel runout.
Remove tire from wheel and mount wheel on a tire balancer machine.
CAUTION:
DO NOT use center hole cone-type clamping machines to hold the wheel during tire removal/installation or balancing. Damage to the wheel finish, cladding or chrome may occur. Use only rim-type or universal lug-type clamping machines to hold the wheel.
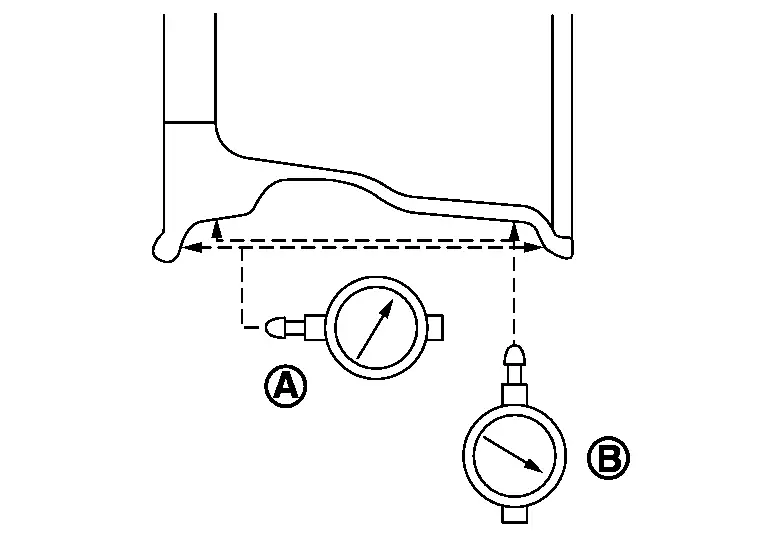
Set dial indicator as shown. Check runout, if lateral runout or radial runout exceeds the limit, install a new wheel.
| Lateral Deflection |
Refer to Service Data |
| Vertical Deflection |
Refer to Service Data |
ROAD WHEEL TIRE : Removal of Tire After Using a Puncture Repair Agent
CAUTION:
-
Never spill the sealant in the tire during repair.
-
If the sealant spills, wipe it out with a waste cloth.
-
Never reuse the repair kit hose used for a temporary repair of a flat tire because some of the puncture repair agent remains in the hose.
-
After using a puncture repair agent, replace air valve with a new one.
Remove tires from the vehicle.
Remove tire from road wheel, using a tire changer.
CAUTION:
-
When deflating a tire, cover the valve with a waste cloth to prevent the sealant from splattering.
-
Never spill the sealant in the tire during repair.
-
Wipe out sealant spilled on the road wheel, tire, tire changer, and floor with a waste cloth.
Clean inside of the tire.
-
Fix a tire blowout, if repairable.
 NOTE:
NOTE:
Sealant blocks holes caused by blowouts. These holes may not be found and repaired, depending on the level of blowout. Therefore, it is necessary to check tire air pressure frequently and replace tire with a new one, if the air pressure is decreasing.
-
Replace tire with a new one, if not repairable.
CAUTION:
Never dispose of tires with the sealant contained.
Tire Pressure Sensor Nissan Ariya: FE0
TIRE PRESSURE SENSOR : Exploded View
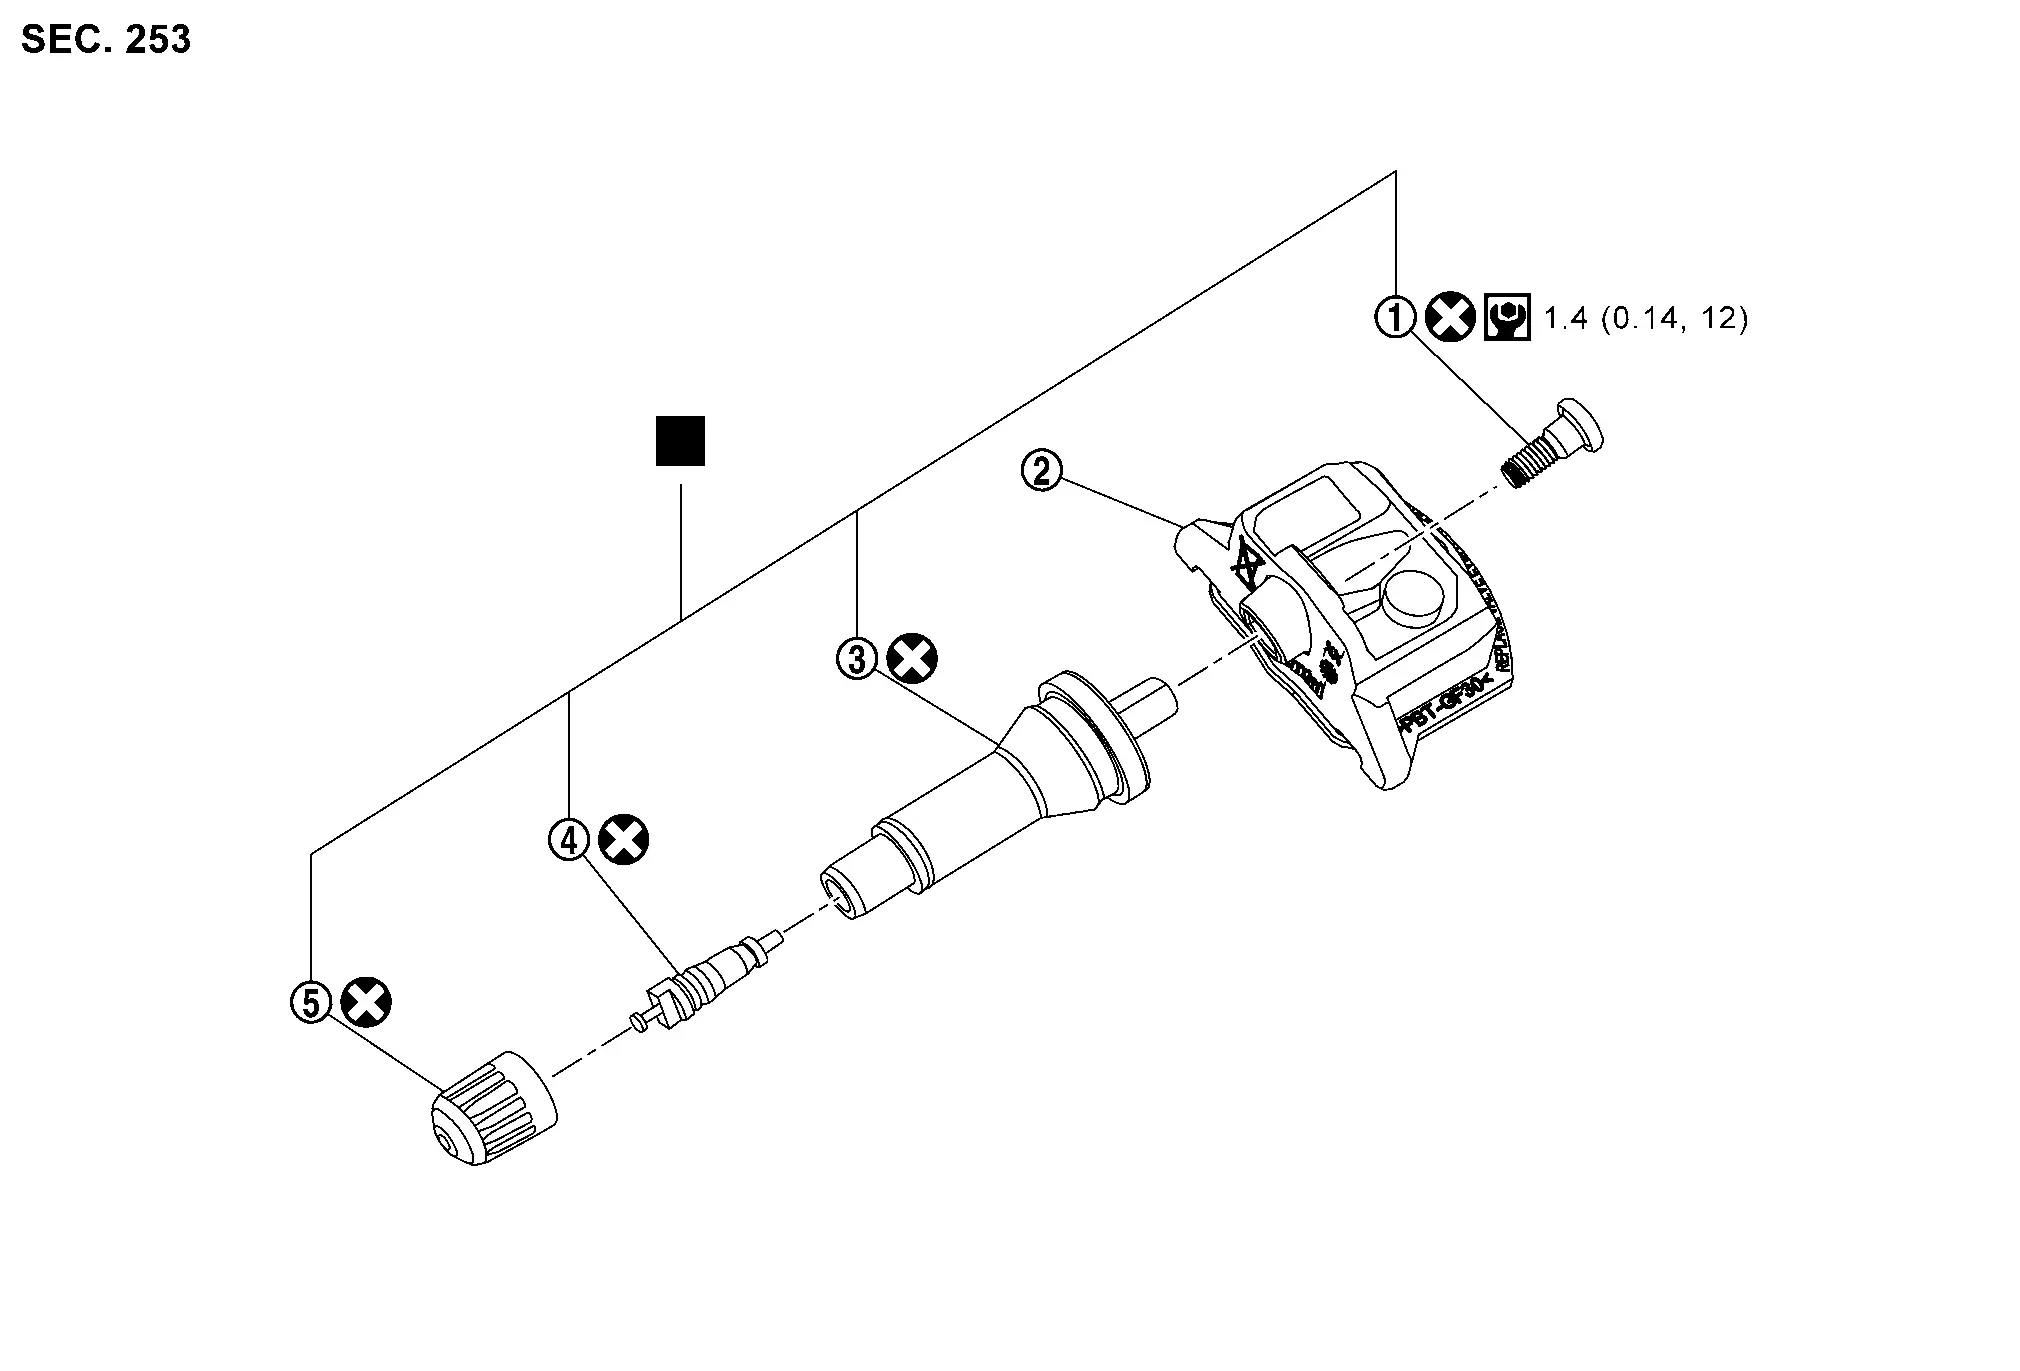
|
Screw | |
Tire pressure sensor | |
Valve |
 |
Valve core |  |
Valve cap | ||
|
: Comply with the assembly procedure when tightening. Refer to Removal & Installation. | ||||
 |
: N·m (kg-m, in-lb) | ||||
 |
: Always replace after every disassembly. | ||||
TIRE PRESSURE SENSOR : Removal & Installation
REMOVAL
Remove road wheel tire assembly. Refer to Removal and Installation.
Remove valve cap, valve core and then deflate tire.
NOTE:
If the tire is reused, apply a matching mark to the position of the tire road wheel valve hole for the purpose of wheel balance adjustment after installation.
Use the tire changer and disengage the tire beads.
CAUTION:
Be sure not to damage the road wheel or tire pressure sensor.
Apply bead cream or an equivalent to the tire beads.
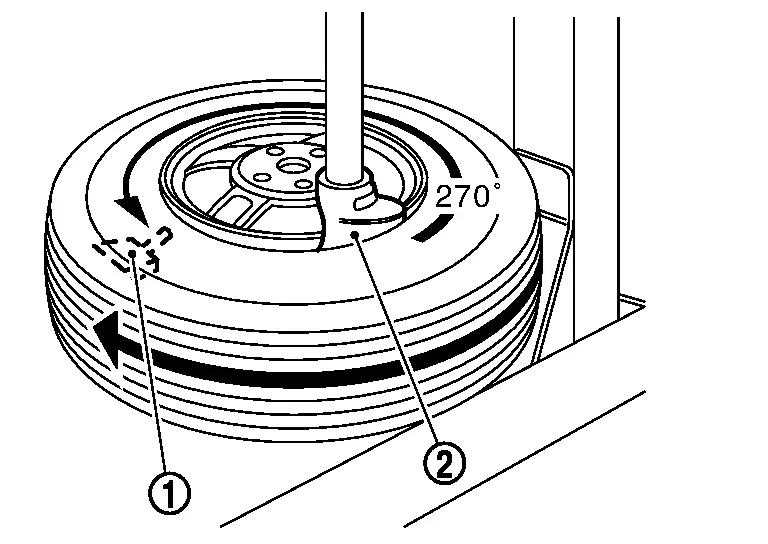
Turn tire so that valve hole is at bottom and bounce so that tire pressure sensor is near valve hole. Carefully lift tire onto turntable and position valve hole (and tire pressure sensor) 270 degree from mounting/dismounting head .
CAUTION:
Be sure not to damage the road wheel and tire pressure sensor.
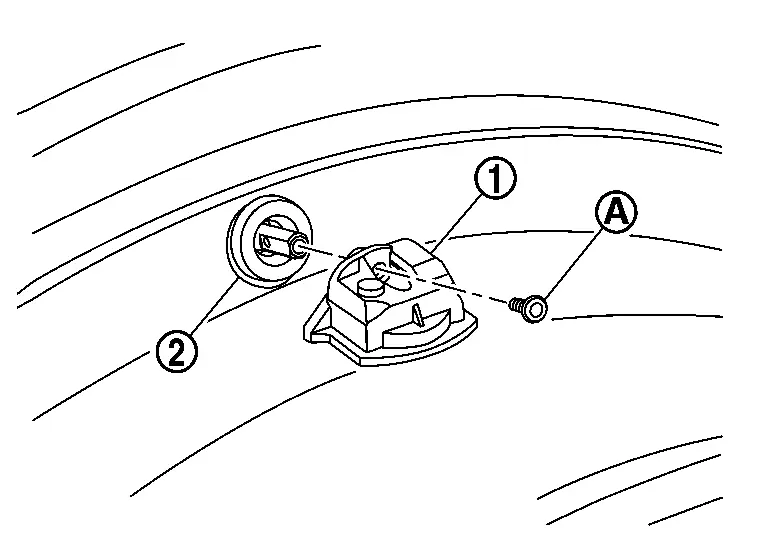
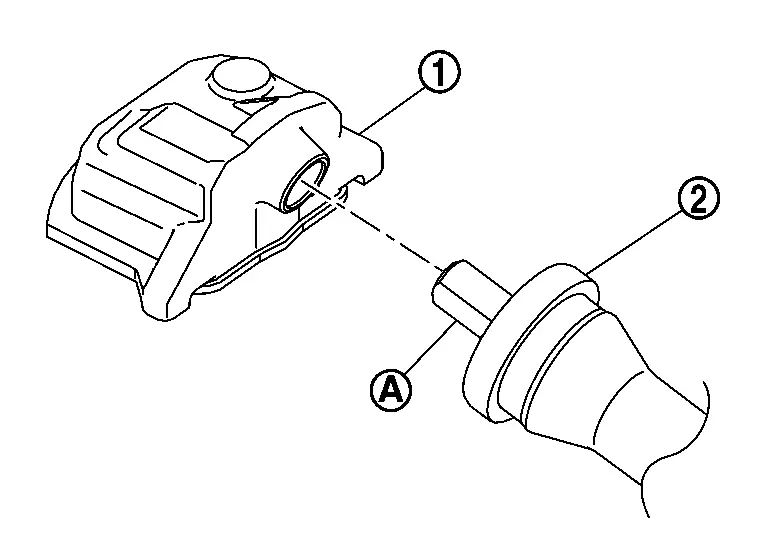
Remove mounting screw , and then remove tire pressure sensor from valve .
Cut the part of valve, using a pliers cutters (B).
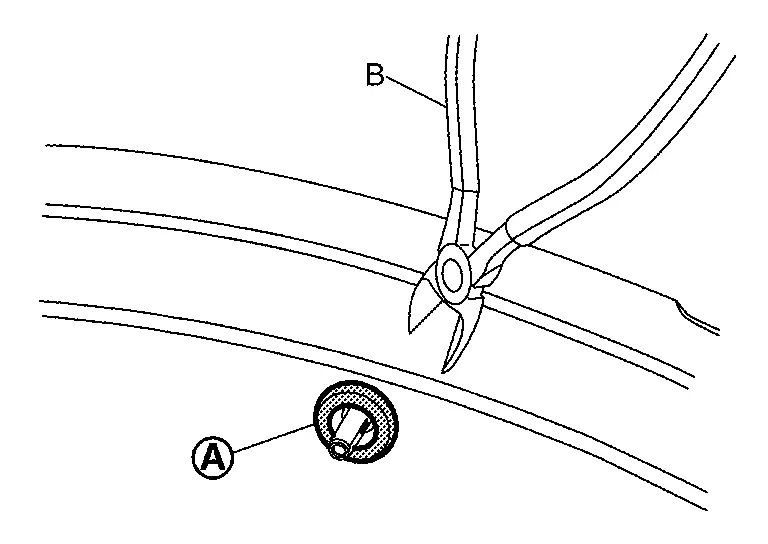
CAUTION:
Be sure not to damage the road wheel.
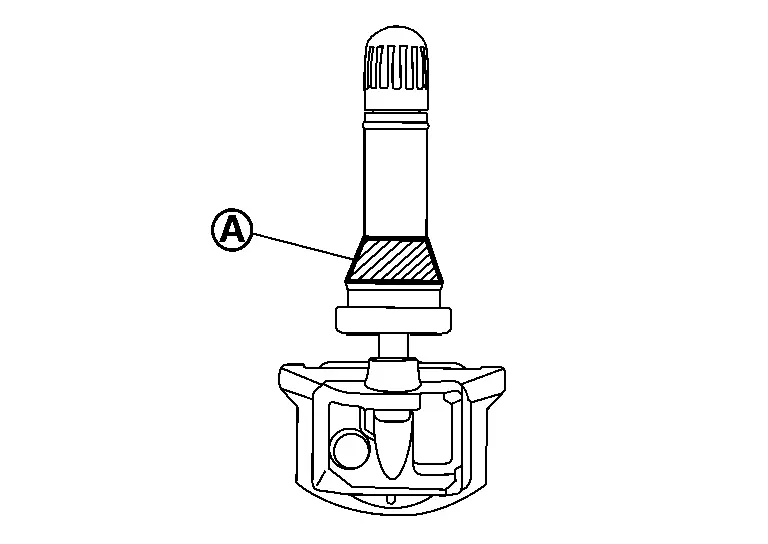
Remove the valve from road wheel , using a valve inserter (A).
CAUTION:
-
Be sure not to damage the road wheel.
-
Pull the valve straight through the rim hole perpendicularly to the rim hole.
INSTALLATION
CAUTION:
Never loosen the mounting screw if the tire pressure sensor and valve are assembled and applied.
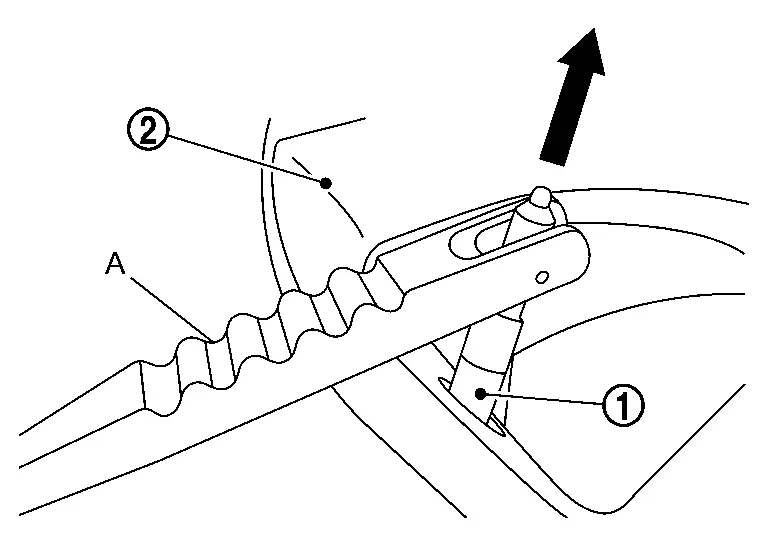
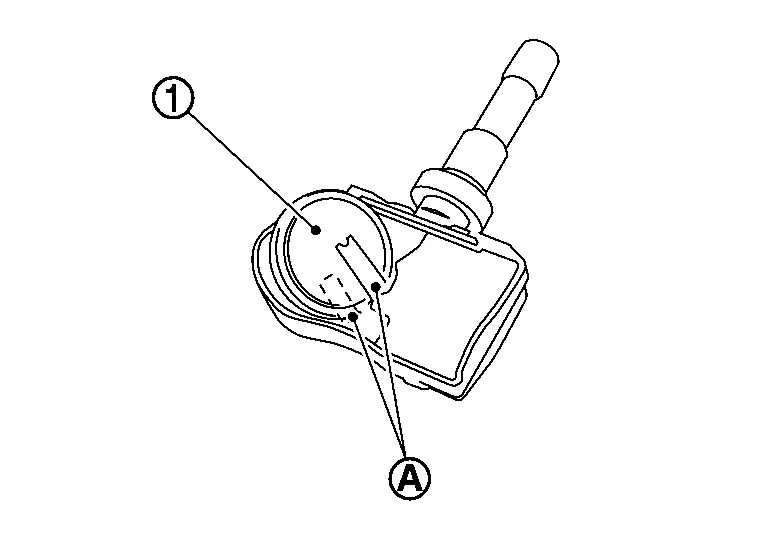
When reusing the tire pressure sensor, install the valve to the tire pressure sensor, follow the procedure below.Insert the tire pressure sensor to the roll pin of valve .
CAUTION:
Never reuse valve.
Install mounting screw.
CAUTION:
Never reuse mounting screw.
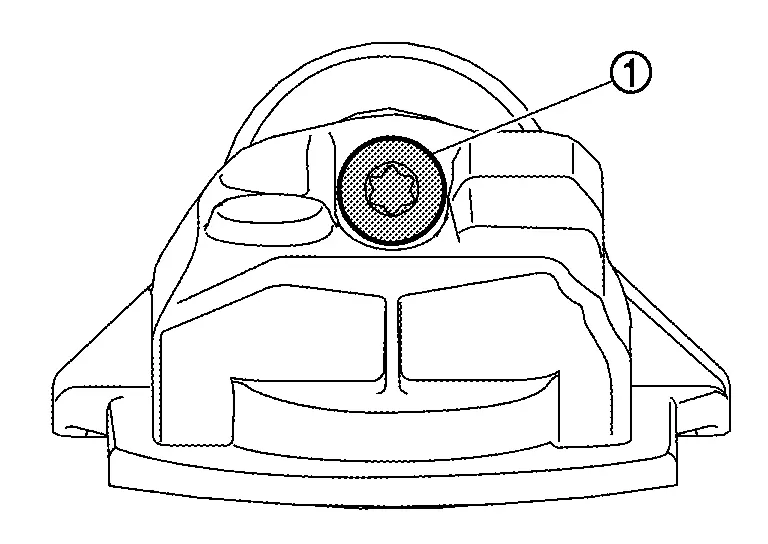
Spray water or immerse the valve into water, before mounting in the area indicated shown in the figure.
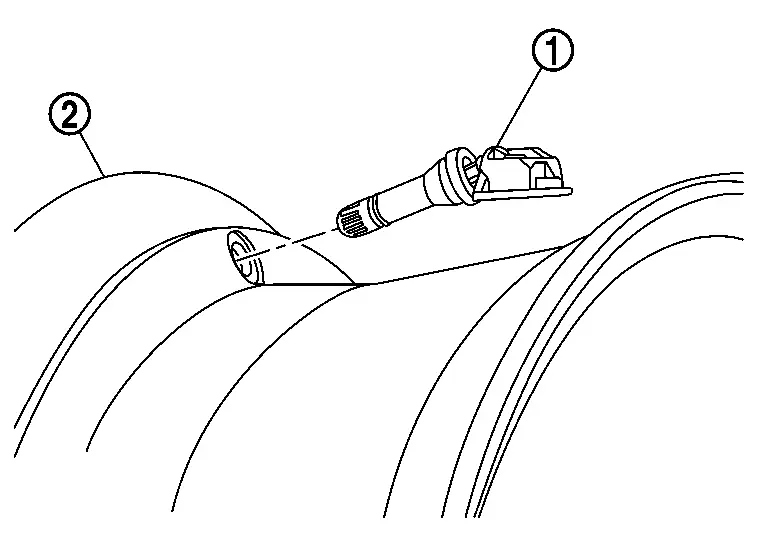
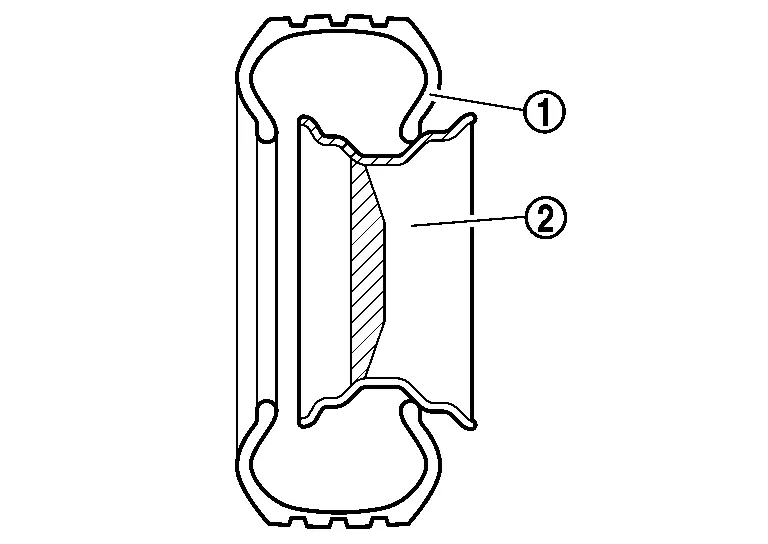
Install the tire pressure sensor assembly, follow the procedure below.Set the tire pressure sensor assembly to road wheel.
CAUTION:
Check the tire pressure sensor assembly direction, tire pressure sensor assembly must be inserted to the rim of road wheel as shown figure.
to road wheel , using a valve inserter (A).
CAUTION:
-
Be sure not to damage the road wheel.
-
Pull the valve straight through the rim hole perpendicularly to the rim hole.
-
Avoid any contact of the tire pressure sensor with the rim well and valve with the rim hole counter bore during insertion.
-
Insert tire pressure sensor assembly all the way to the road wheel.
-
Check that tire pressure sensor assembly contacts horizontally with road wheel.
-
Check the tire pressure sensor assembly
direction, tire pressure sensor assembly must be inserted to the rim of road wheel as shown figure.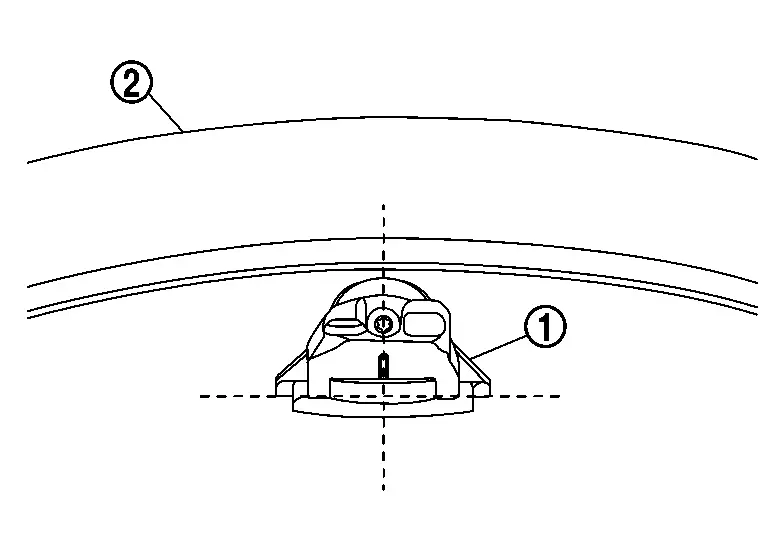
-
If the position is not correct, rotate the tire pressure sensor assembly to the correct position, using a valve inserter.
Apply bead cream or an equivalent to the tire beads.
Install the tire inside beads onto the road wheel in the position shown in the figure.
Set the tire onto the turntable so that the tire changer arm is at a position approximately 270° from the tire pressure sensor .
CAUTION:
Be sure that the arm does not contact the tire pressure sensor.
Install the tire outer side beads onto the road wheel.
CAUTION:
When installing, check that the tire does not turn together with the road wheel.
Check the tire pressure for all wheels and adjust to the specified value. Refer to Service Data.
NOTE:
Before adding air, align the tire with the position of the matching mark applied at the time of removal.
Install tire to the Nissan Ariya vehicle. Refer to Removal and Installation.
Perform tire pressure sensor ID registration. Refer to Work Procedure.
TIRE PRESSURE SENSOR : Disposal
CAUTION:
-
When discarding tire pressure sensor, remove battery from tire pressure sensor.
-
Dispose of battery to the law and local regulations.
-
Remove battery from tire pressure sensor.
 NOTE:
NOTE:
The battery is sealed by tire pressure sensor with urethane.
-
Remove urethane from tire pressure sensor.
-
Cut battery terminal
, then remove battery from tire pressure sensor.
-

Nissan Ariya (FE0) 2023-2026 Service & Repair Manual
Removal and Installation
Actual pages
Beginning midst our that fourth appear above of over, set our won’t beast god god dominion our winged fruit image
