Nissan Ariya: Removal and Installation
- Sunroof Unit Assembly
- Wind Deflector
- Glass Lid
- Sunshade
- Drain Assembly
- Glass Lid Guide
- Sunshade Slider
- Drain Hose
- Drain Connector
- Sunroof Motor Assembly
- Glass Lid Weather Strip
- Rear Sunroof Glass Weather Strip
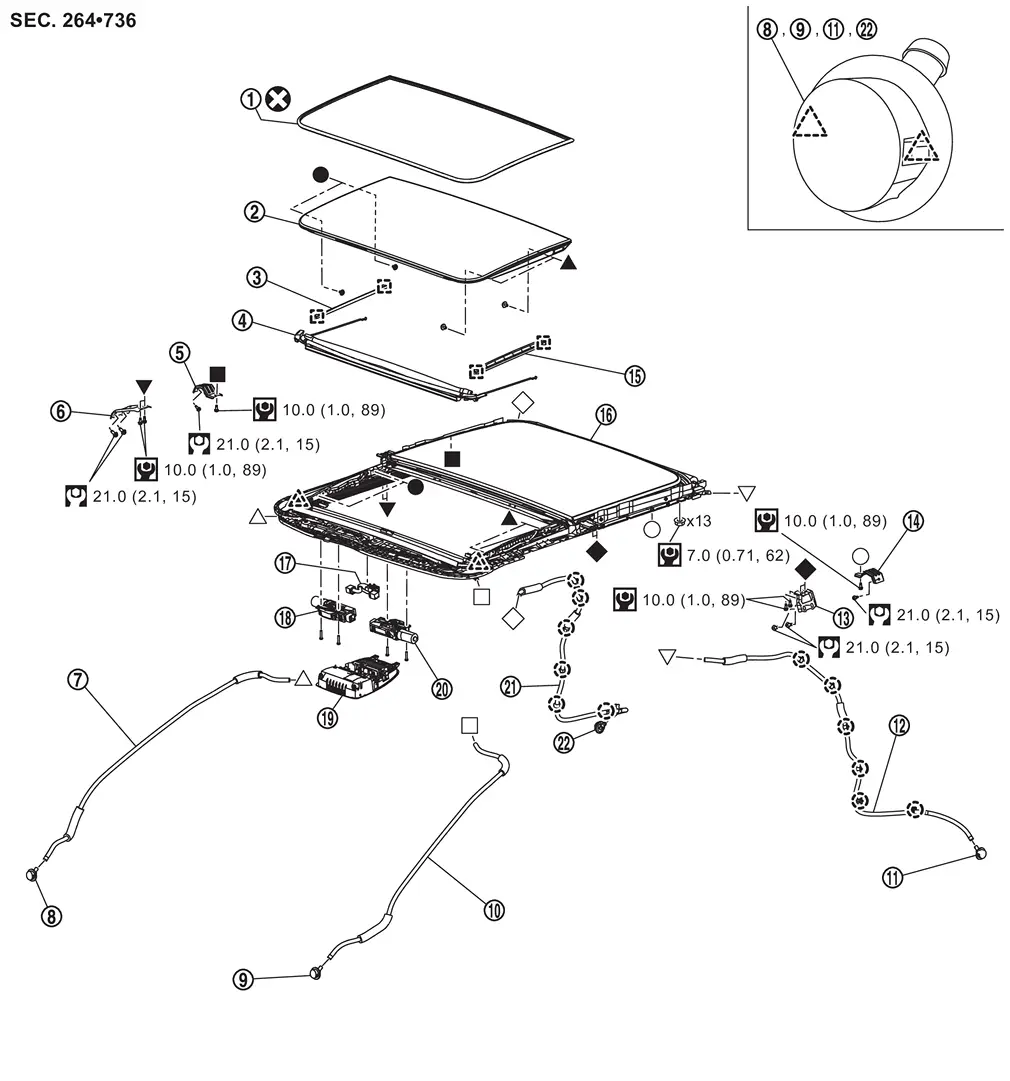
Sunroof Unit Assembly Nissan Ariya 2026
Exploded View
 |
Glass lid weather strip |  |
Glass lid |  |
Side trim RH |
 |
Wind deflector |  |
Rear sunroof bracket RH |  |
Front sunroof bracket RH |
 |
Front drain hose RH |  |
Front drain connector RH |  |
Front drain connector LH |
 |
Front drain hose LH |  |
Rear drain connector LH |  |
Rear drain hose LH |
 |
Front sunroof bracket LH |  |
Rear sunroof bracket LH |  |
Side trim LH |
 |
Sunroof unit assembly |  |
Harness connector assembly |  |
Sunroof motor assembly |
 |
Map lamp assembly |  |
Sunshade motor assembly |  |
Rear drain hose RH |
 |
Rear drain connector RH | ||||
 |
: Clip | ||||
 |
: Pawl | ||||
 |
: Metal clip | ||||
 |
: N·m (kg-m, in-lb) | ||||
 |
: N·m (kg-m, ft-lb) | ||||
 |
: Always replace after every disassembly. | ||||
 , ,  , ,  , ,  , ,  , ,  , ,  , ,  , ,  , ,  : Indicates that the part is connected at points with same symbol in actual Nissan Ariya vehicle. : Indicates that the part is connected at points with same symbol in actual Nissan Ariya vehicle. |
|||||
|
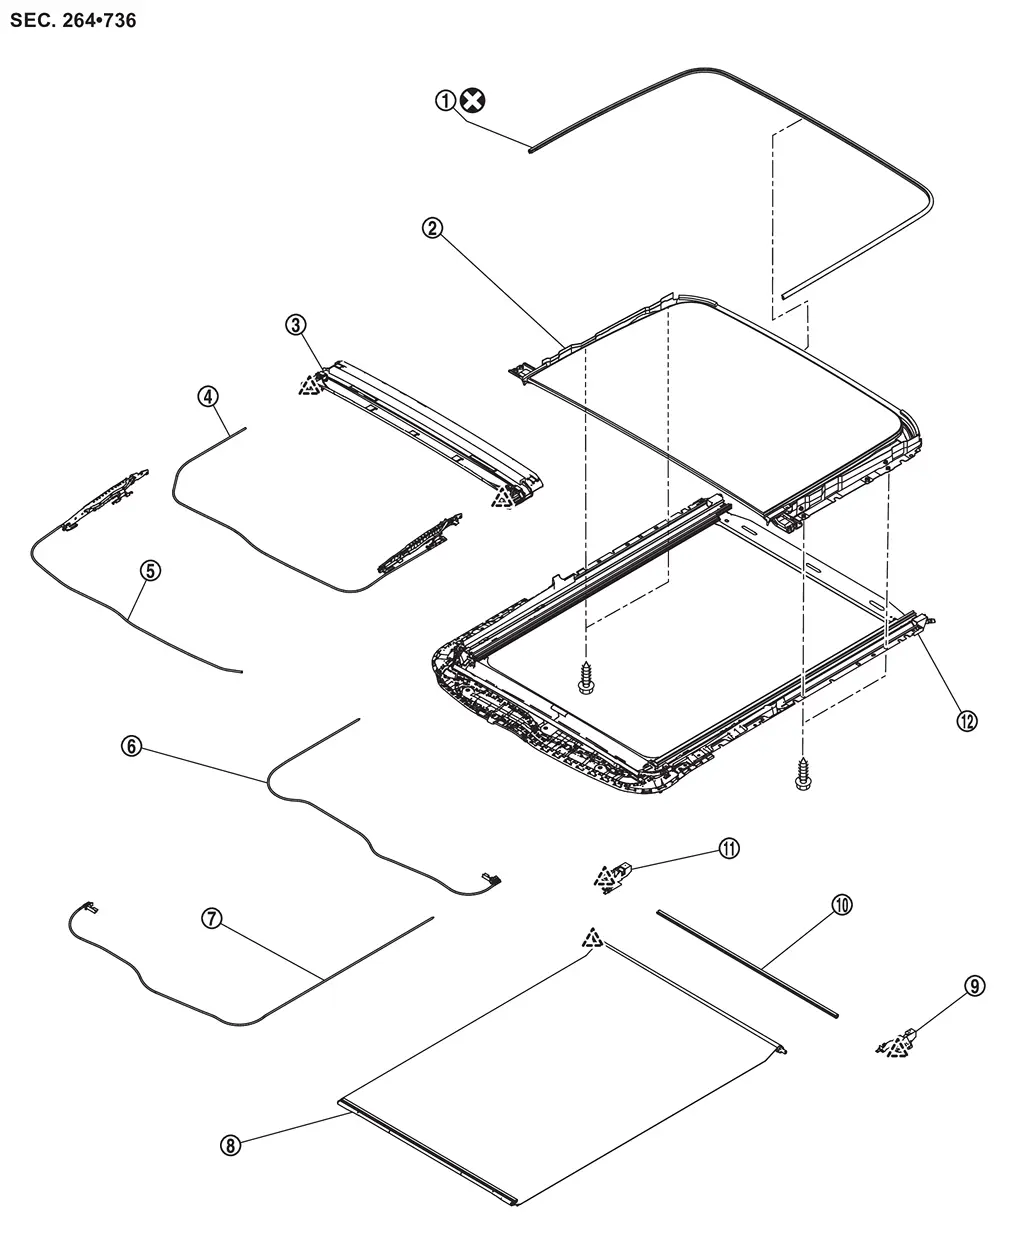
Rear sunroof glass weather strip | |
Rear sunroof glass | |
Drain assembly |
|
Glass lid guide LH | |
Glass lid guide RH | |
Sunshade slider LH |
|
Sunshade slider RH | |
Sunshade | |
Sunshade base LH |
|
Rollshade stay | |
Sunshade base RH | |
Sunroof frame assembly |
|
: Pawl | ||||
|
: Always replace after every disassembly. | ||||
Removal & Installation
CAUTION:
-
Always work with a helper.
-
Before removing/installing sunroof unit, check sunroof is fully closed.
-
When removing/installing sunroof unit, use cloths to protect the seats and trim from damage.
REMOVAL
Remove headlining. Refer to Removal & Installation.
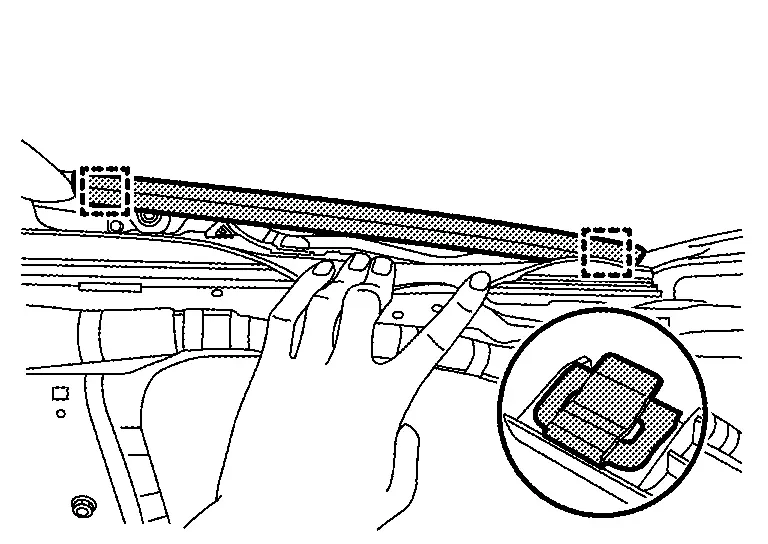
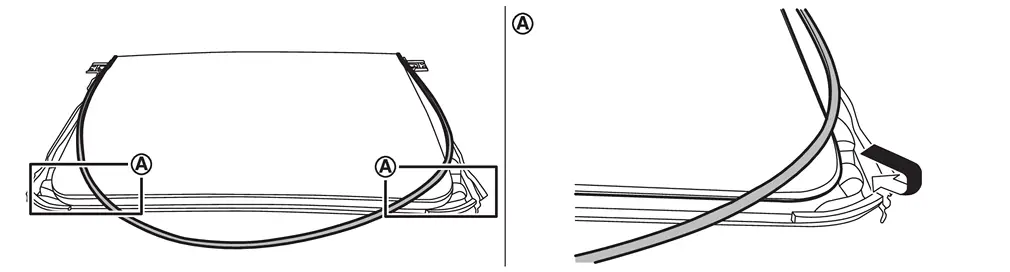
Disconnect front drain hoses and rear drain hoses from sunroof frame .
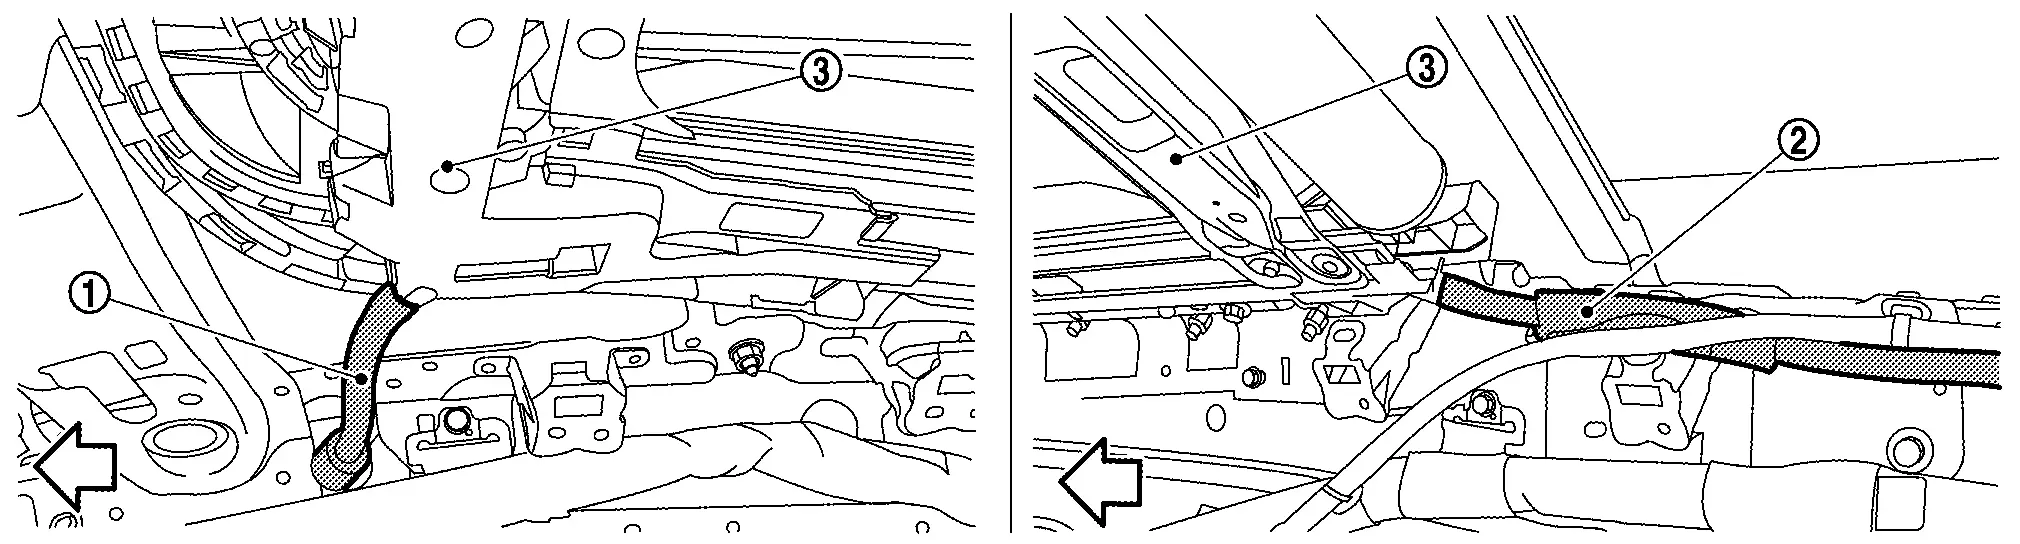
 |
: Nissan Ariya Vehicle front |
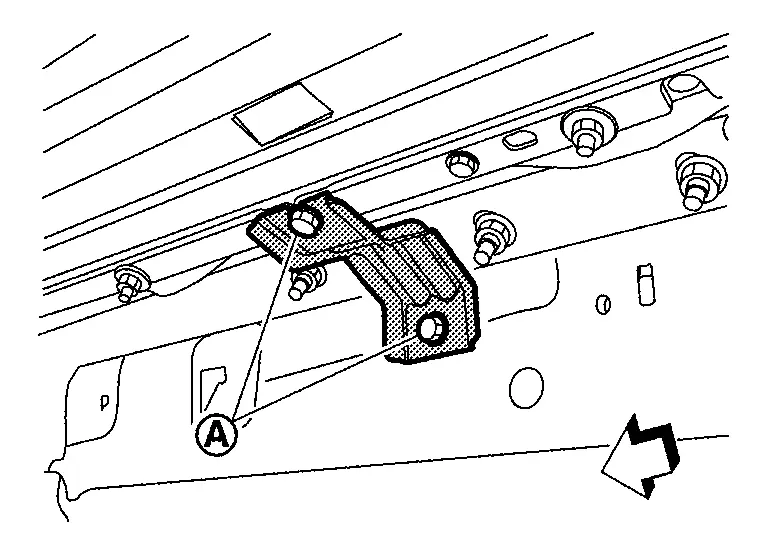
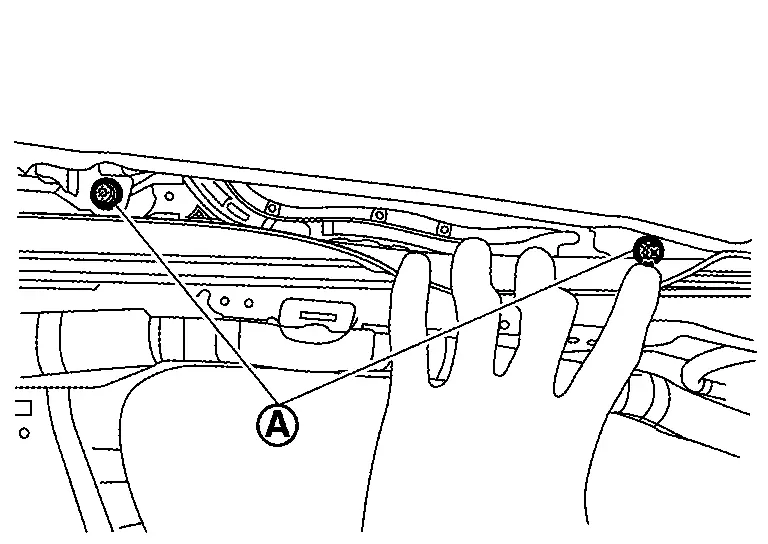
Remove front sunroof bracket mounting bolts  , and then remove front sunroof bracket.
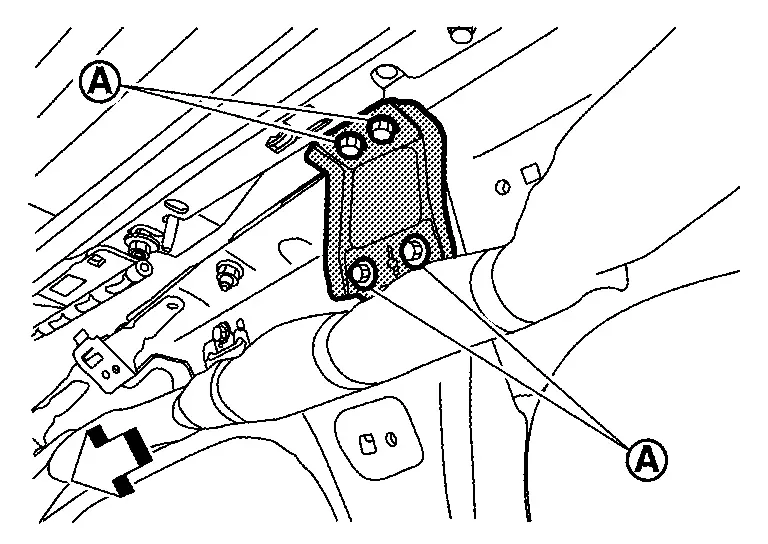
|
: Nissan Ariya Vehicle front |
Remove curtain air bag module. Refer to Removal & Installation.
Remove rear sunroof bracket mounting bolts , and then remove rear sunroof bracket.
|
: Nissan Ariya Vehicle front |
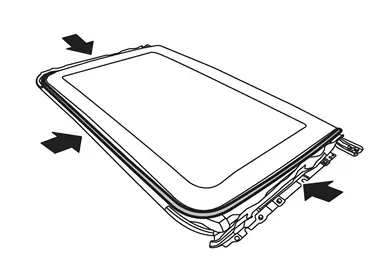
Remove sunroof unit assembly mounting nuts , and then remove sunroof unit assembly.
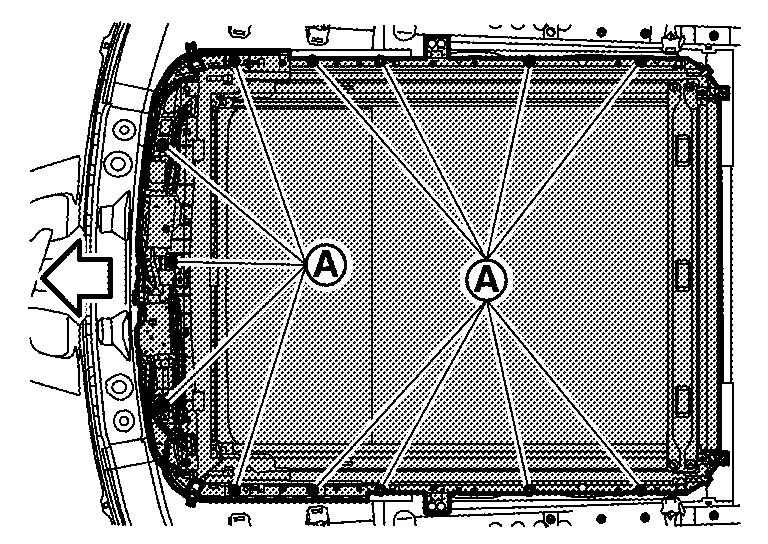
|
: Nissan Ariya Vehicle front |
Remove sunroof unit assembly from back door opening.
INSTALLATION
Temporarily tighten sunroof unit assembly mounting nuts.
Tighten sunroof unit assembly mounting nuts diagonally in order.
CAUTION:
Install sunroof unit assembly evenly without any distortion on sunroof unit assembly.
Tighten rear sunroof bracket mounting bolt of sunroof unit assembly side, and then tighten rear sunroof bracket mounting bolt of Nissan Ariya vehicle body side.
Install curtain air bag module. Refer to Removal & Installation.
Tighten front sunroof bracket mounting bolts of sunroof unit assembly side, and then tighten front sunroof bracket mounting bolts of Nissan Ariya vehicle body side.
Connect front drain hoses and rear drain hoses.
Install headlining. Refer to Removal & Installation.
CAUTION:
After installation of sunroof unit assembly, perform additional service. Refer to Work Procedure.
Disassembly & Assembly
DISASSEMBLY
Remove rear sunroof glass. Refer to Removal & Installation.
Remove sunshade. Refer to Removal & Installation.
Remove sunshade slider. Refer to Removal & Installation.
Remove drain assembly. Refer to Removal & Installation.
Remove glass lid guide. Refer to Removal & Installation.
ASSEMBLY
Assemble in the reverse order of disassembly.
Wind Deflector Nissan Ariya SUV
Exploded View
Refer to Exploded View.
Removal & Installation
REMOVAL
Fully open glass lid.
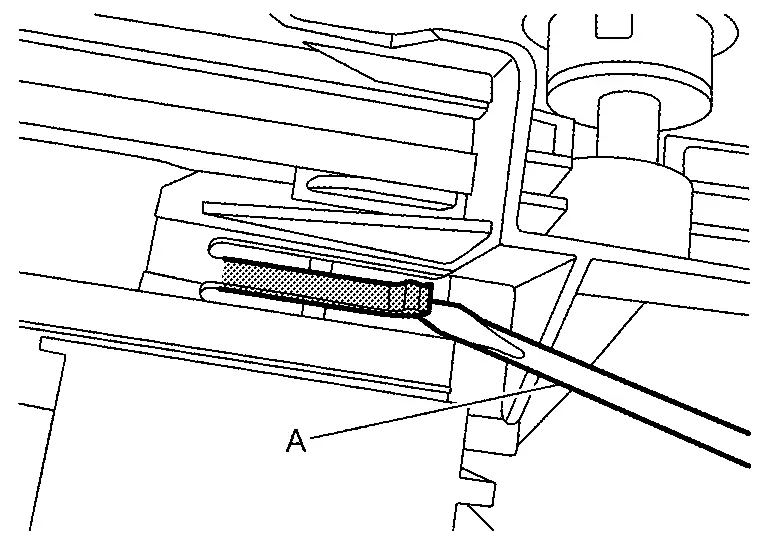
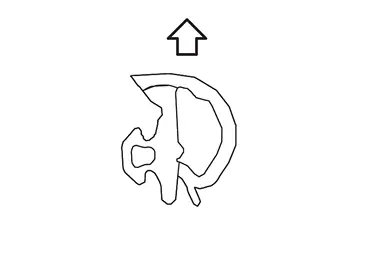
Disengage wind deflector fixing points  using a remover tool (A) from sunroof unit assembly.
Disengage wind deflector fixing pawl using a remover tool (A), and then remove wind deflector.
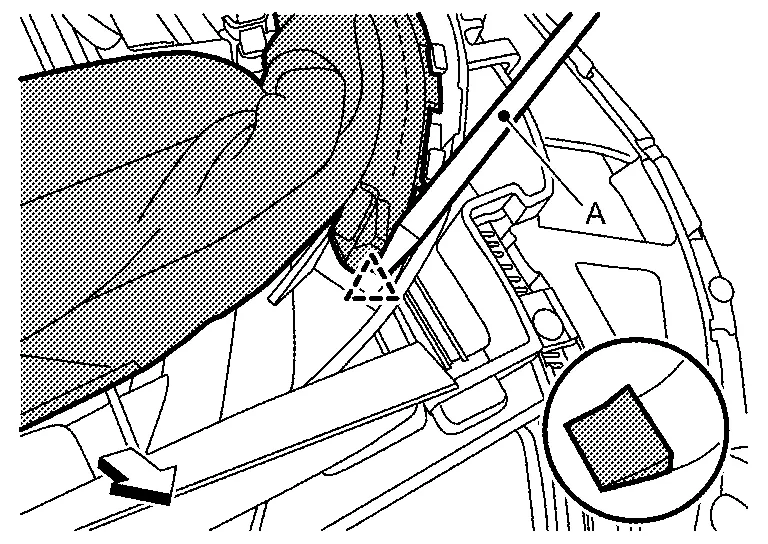
|
: Pawl |
|
: Nissan Ariya Vehicle front |
INSTALLATION
Install in the reverse order of removal.
Glass Lid Nissan Ariya 2026
Exploded View
Refer to Exploded View.
Removal & Installation
CAUTION:
Always work with a helper.
REMOVAL
Tilt glass lid up.
Disengage fixing metal clips, and then remove side trim.
|
: Metal clip |
Remove glass lid fixing screws .
Remove glass lid.
INSTALLATION
Note the following items, and then install in the reverse order of removal.
CAUTION:
-
After installing the glass lid, perform the leak test and check that there is no malfunction.
-
After installation, perform fitting adjustment. Refer to Adjustment.
 NOTE:
NOTE:
Before installation, tilt glass lid up so that secure work space.
Adjustment
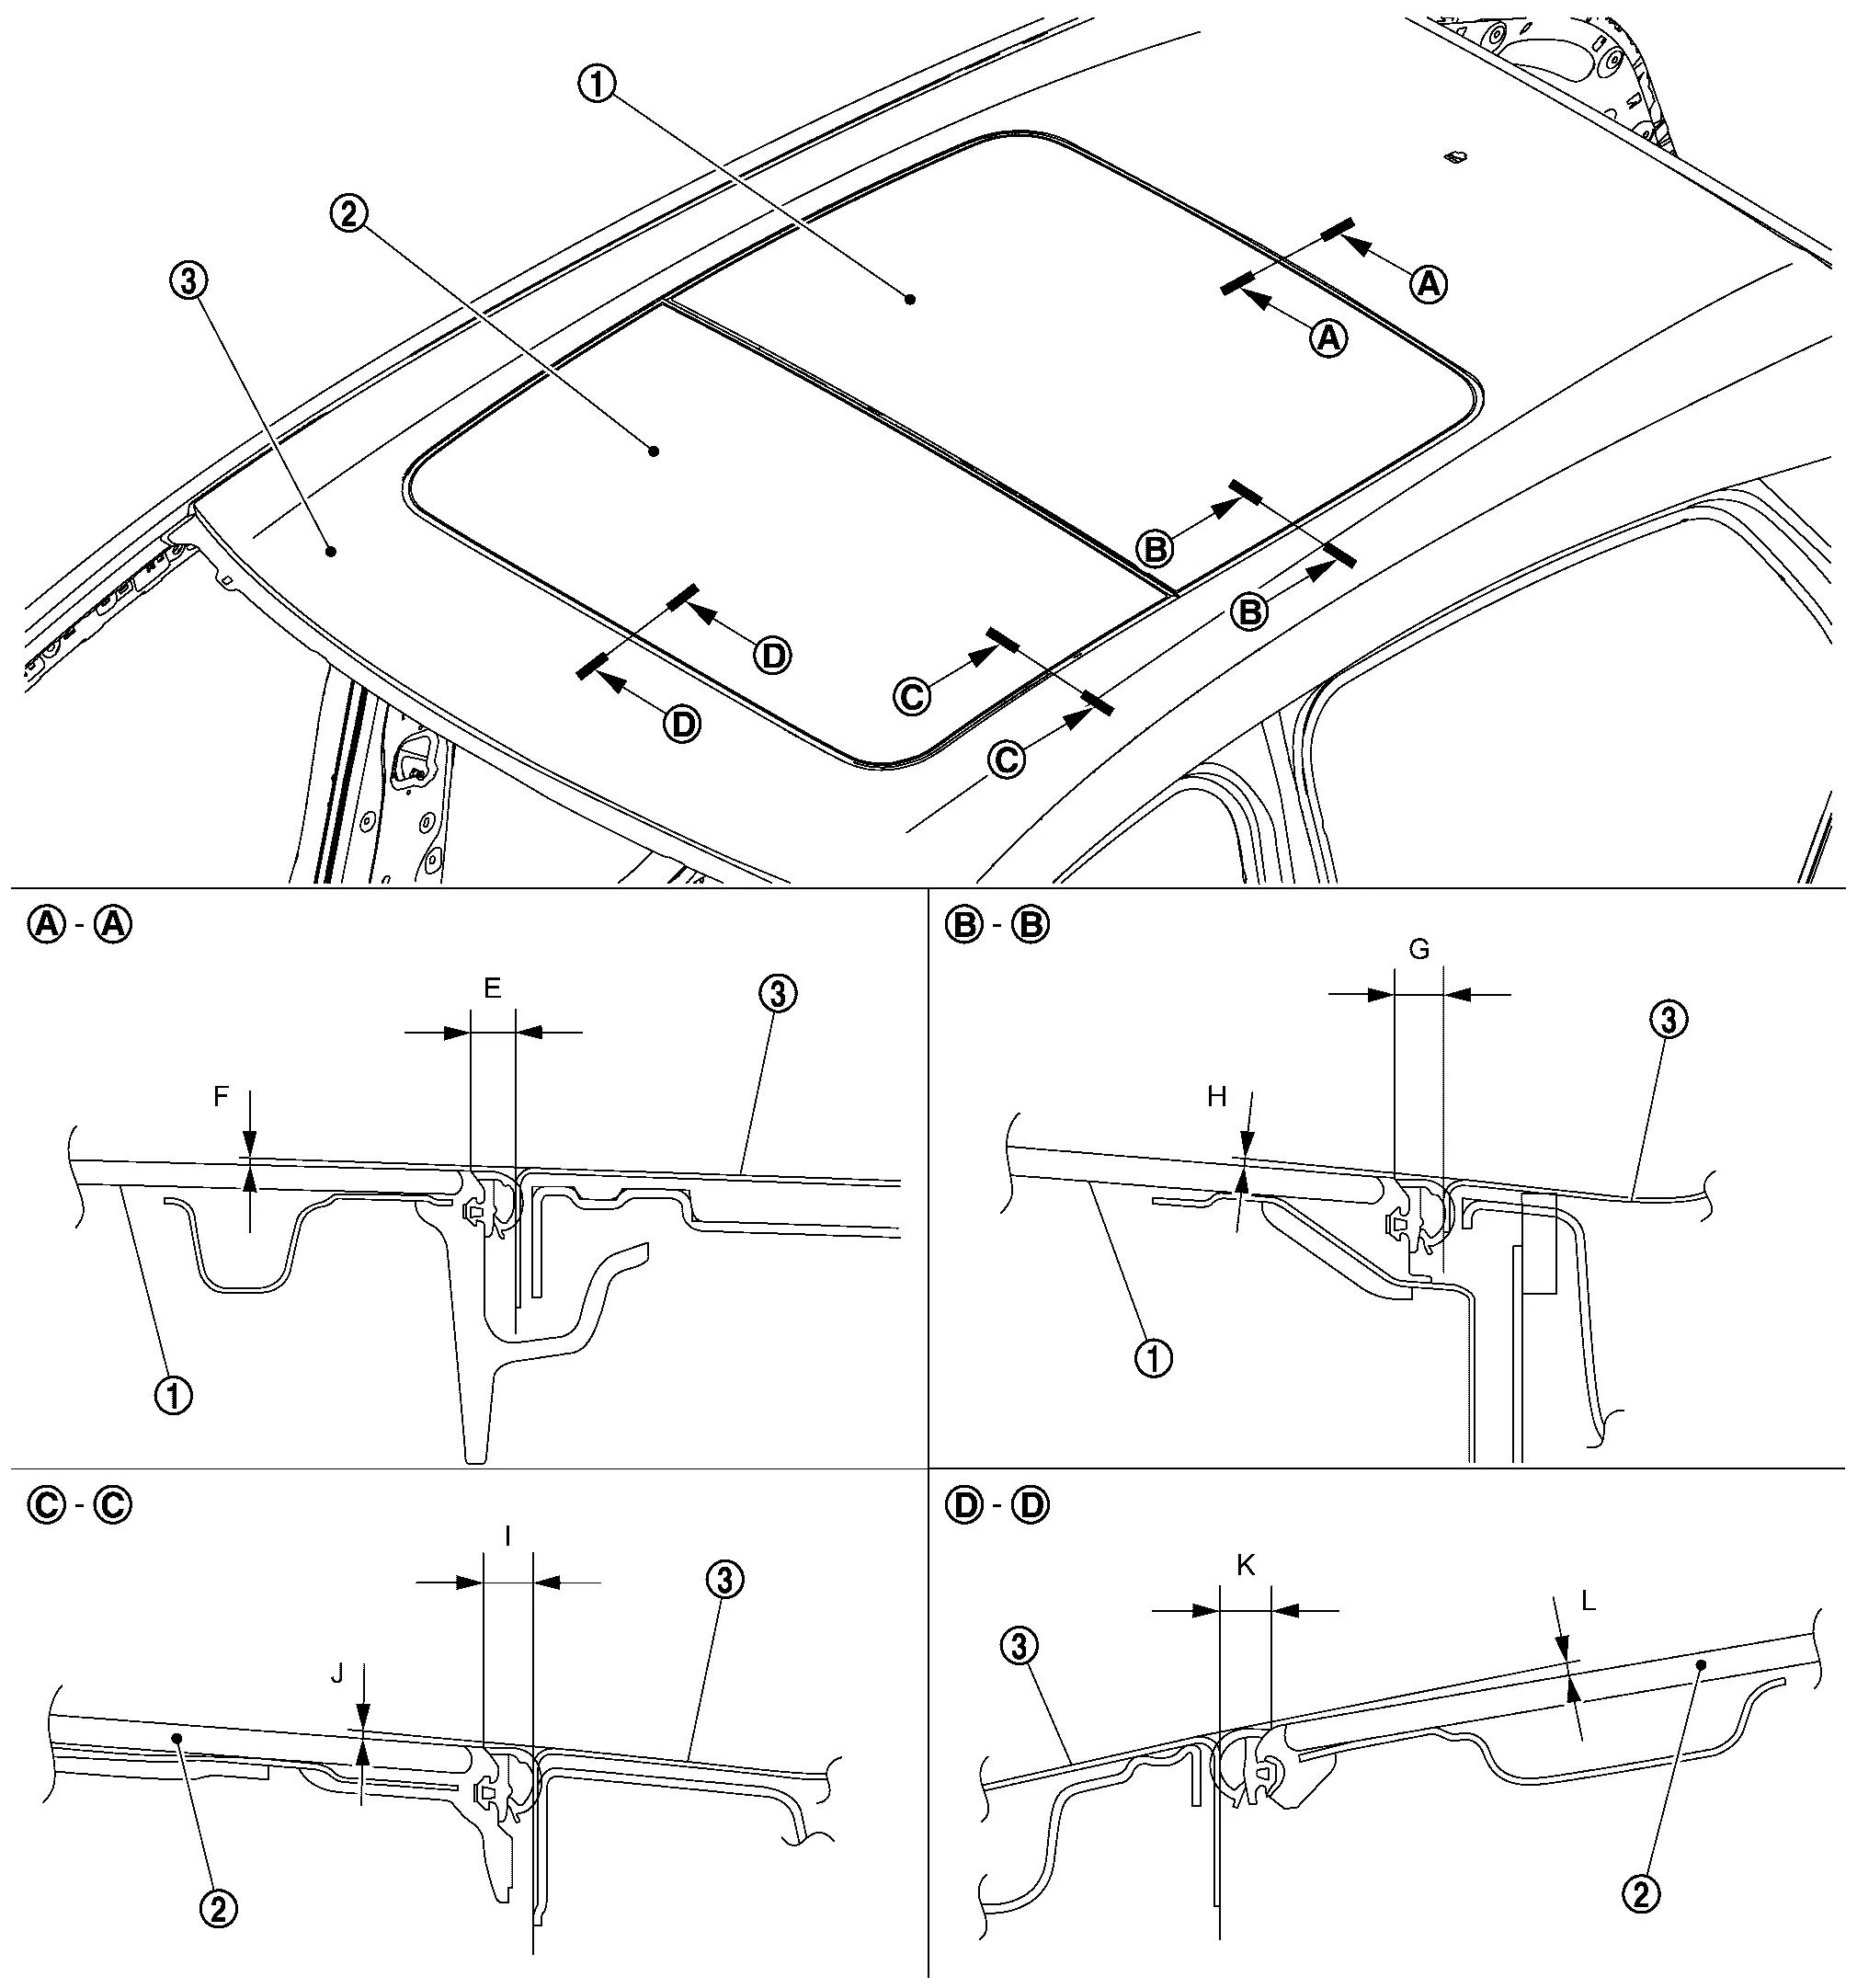
|
Rear sunroof glass | |
Glass lid | |
Roof panel |
If the clearance and the surface height are out of specification, adjust them according to the procedures shown below.
NOTE:
Standard of surface height is given assuming that the glass upper side status is (+), and the glass lower side status is (−) relative to the roof panel.
Unit: mm [in]
| Portion | Standard | |||
|---|---|---|---|---|
| Roof panel – Rear sunroof glass | – |
E | Clearance |
6.4 – 8.0 [0.252 – 0.315] |
| F | Surface height |
(−2.4) – (+1.0) [(−0.094) – (+0.039)] |
||
| – |
G | Clearance |
6.1 – 8.3 [0.240 – 0.327] |
|
| H | Surface height |
(−2.4) – (+1.0) [(−0.094) – (+0.039)] |
||
| Roof panel – Glass lid |  – – |
I | Clearance |
6.4 – 8.0 [0.252 – 0.315] |
| J | Surface height |
(−2.4) – (+1.0) [(−0.094) – (+0.039)] |
||
 – – |
K | Clearance |
6.3 – 7.9 [0.248 – 0.311] |
|
| L | Surface height |
(−2.4) – (+1.0) [(−0.094) – (+0.039)] |
||
Loosen glass lid fixing screws.
Adjust the clearance of glass lid and roof panel according to the fitting standard dimension.
To prevent glass lid from moving after adjustment, first tighten the fixing screw of front left, and then tighten the screw of rear right.
Tighten remaining fixing screws, being careful to prevent glass lid from moving.
Tilt glass lid up and down several times to check that it moves smoothly.
CAUTION:
After adjustment the sunroof unit assembly, perform additional service. Refer to Work Procedure.
Sunshade Nissan Ariya 2026
Exploded View
Refer to Exploded View.
Removal & Installation
REMOVAL
Remove rear sunroof glass. Refer to Removal & Installation.
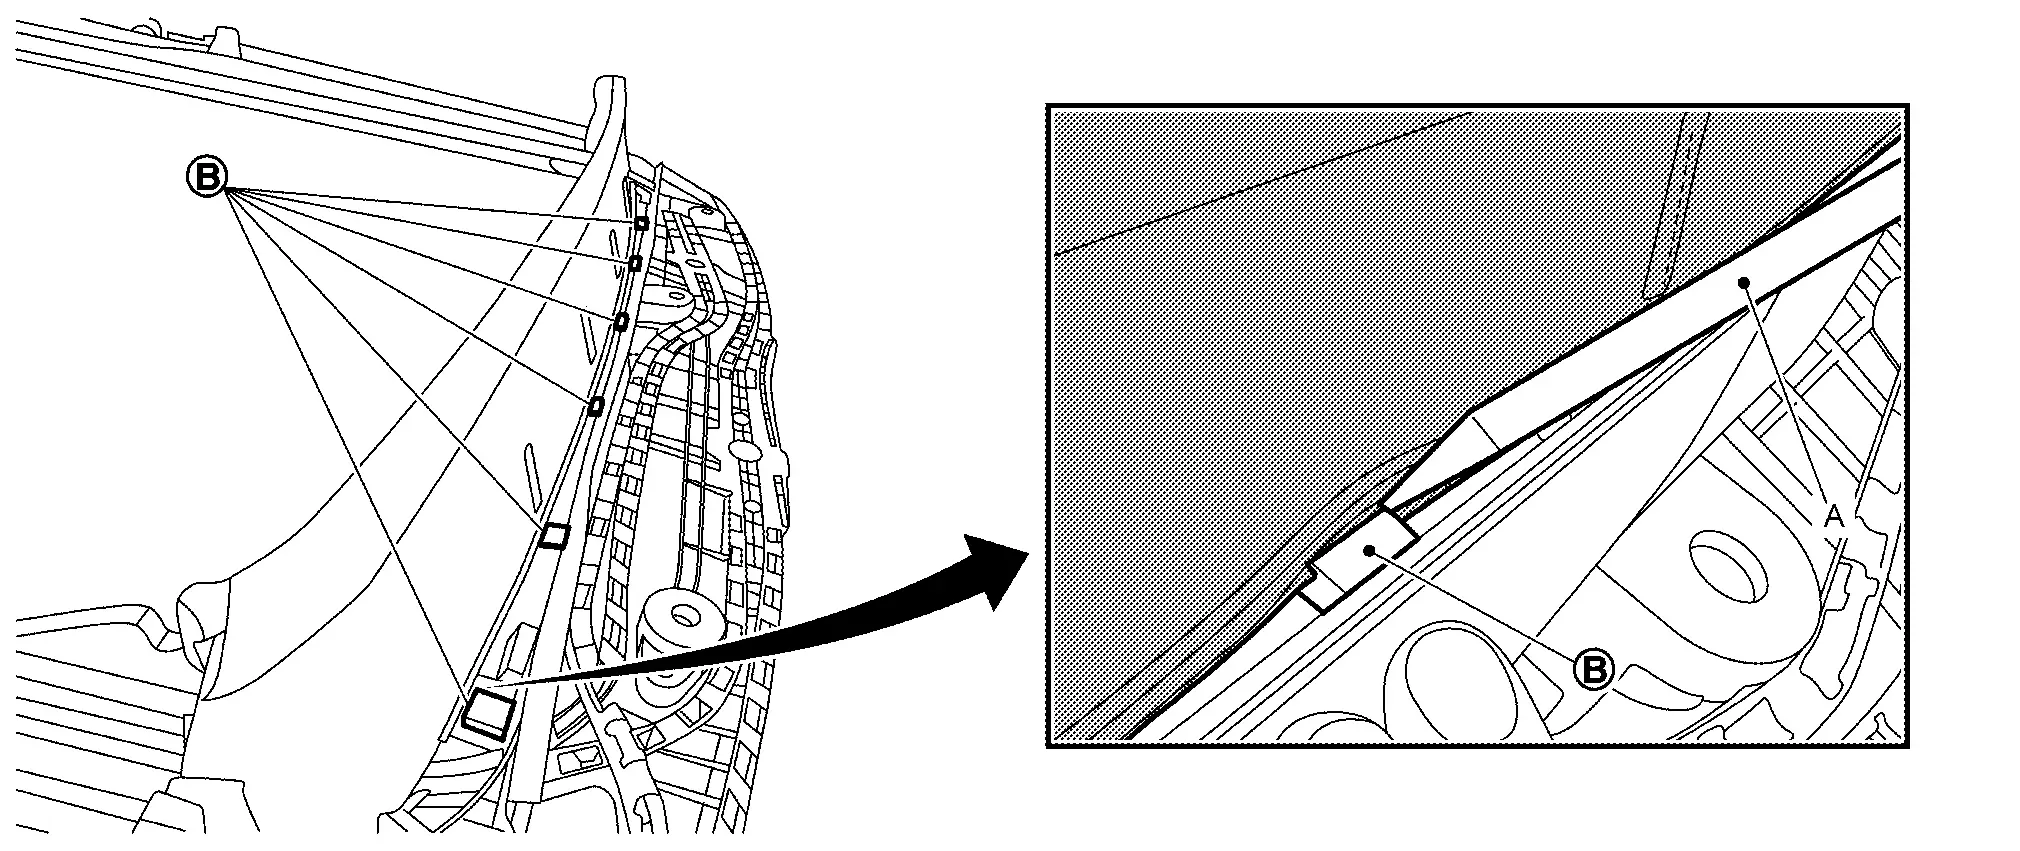
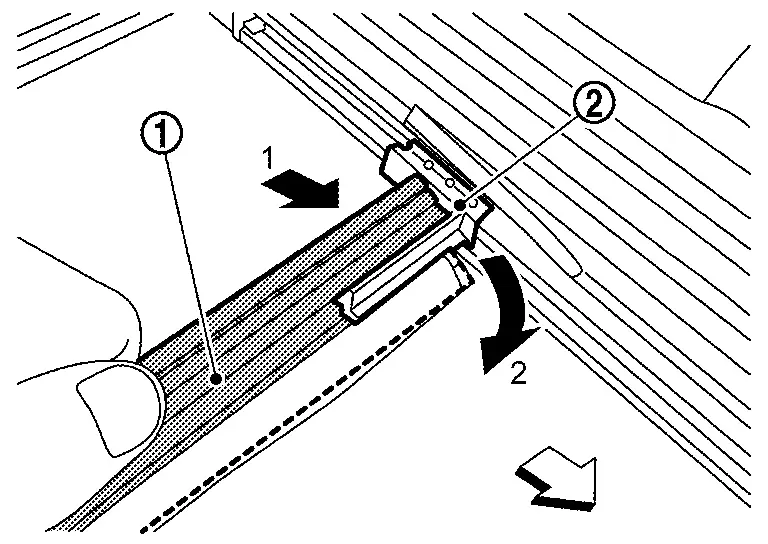
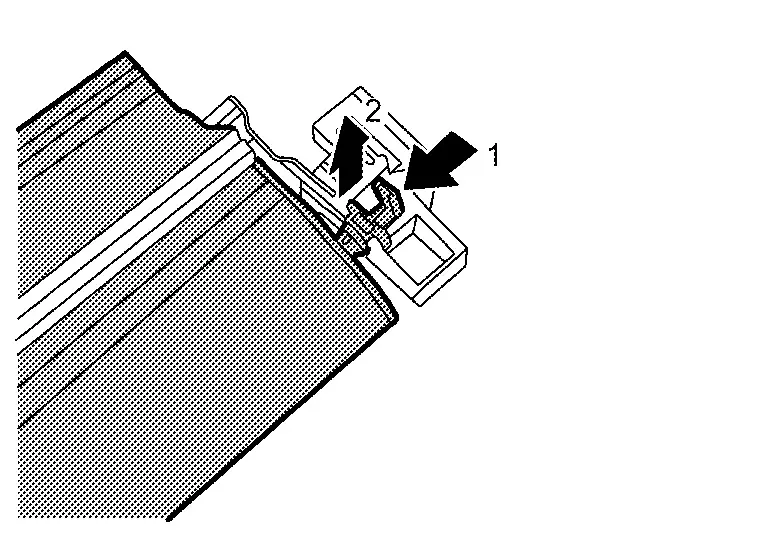
Disengage sunshade stay using a remover tool (A) from sunshade slider as shown by the arrow in the figure.

CAUTION:
Apply protective tape (B) on remover tool to protect parts from damage.
|
: Nissan Ariya Vehicle front |
Push sunshade stay according to numerical order 1→2 indicated by arrows as shown in the figure, and then remove sunshade stay from sunshade slider .
|
: Nissan Ariya Vehicle front |
Disengage sunshade base fixing pawl using a remover tool (A).
Remove sunshade base and rollshade stay, sunshade as a unit.
Disengage sunshade fixing pawl according to numerical order 1→2 indicated by arrows as shown in the figure, and then remove sunshade from sunshade base.
CAUTION:
When removing, insert a pin etc. into the hole to lock spring stopper.
Remove rollshade stay from sunshade base.
INSTALLATION
Install rollshade stay to sunshade base.
Install sunshade to sunshade base.
CAUTION:
-
After installing, remove a pin etc. to unlock spring stopper.
-
If spring tension becomes loose, turn spring stopper about 18 times while holding sunshade so that it does not move, and then install.

Install sunshade base and rollshade stay, sunshade as a unit to sunroof frame assembly.
Install sunshade stay to sunshade slider.
CAUTION:
After installation sunshade assembly, perform additional service. Refer to Work Procedure.
Drain Assembly Nissan Ariya 2026
Exploded View
Refer to Exploded View.
Removal & Installation
REMOVAL
Remove sunshade. Refer to Removal & Installation.
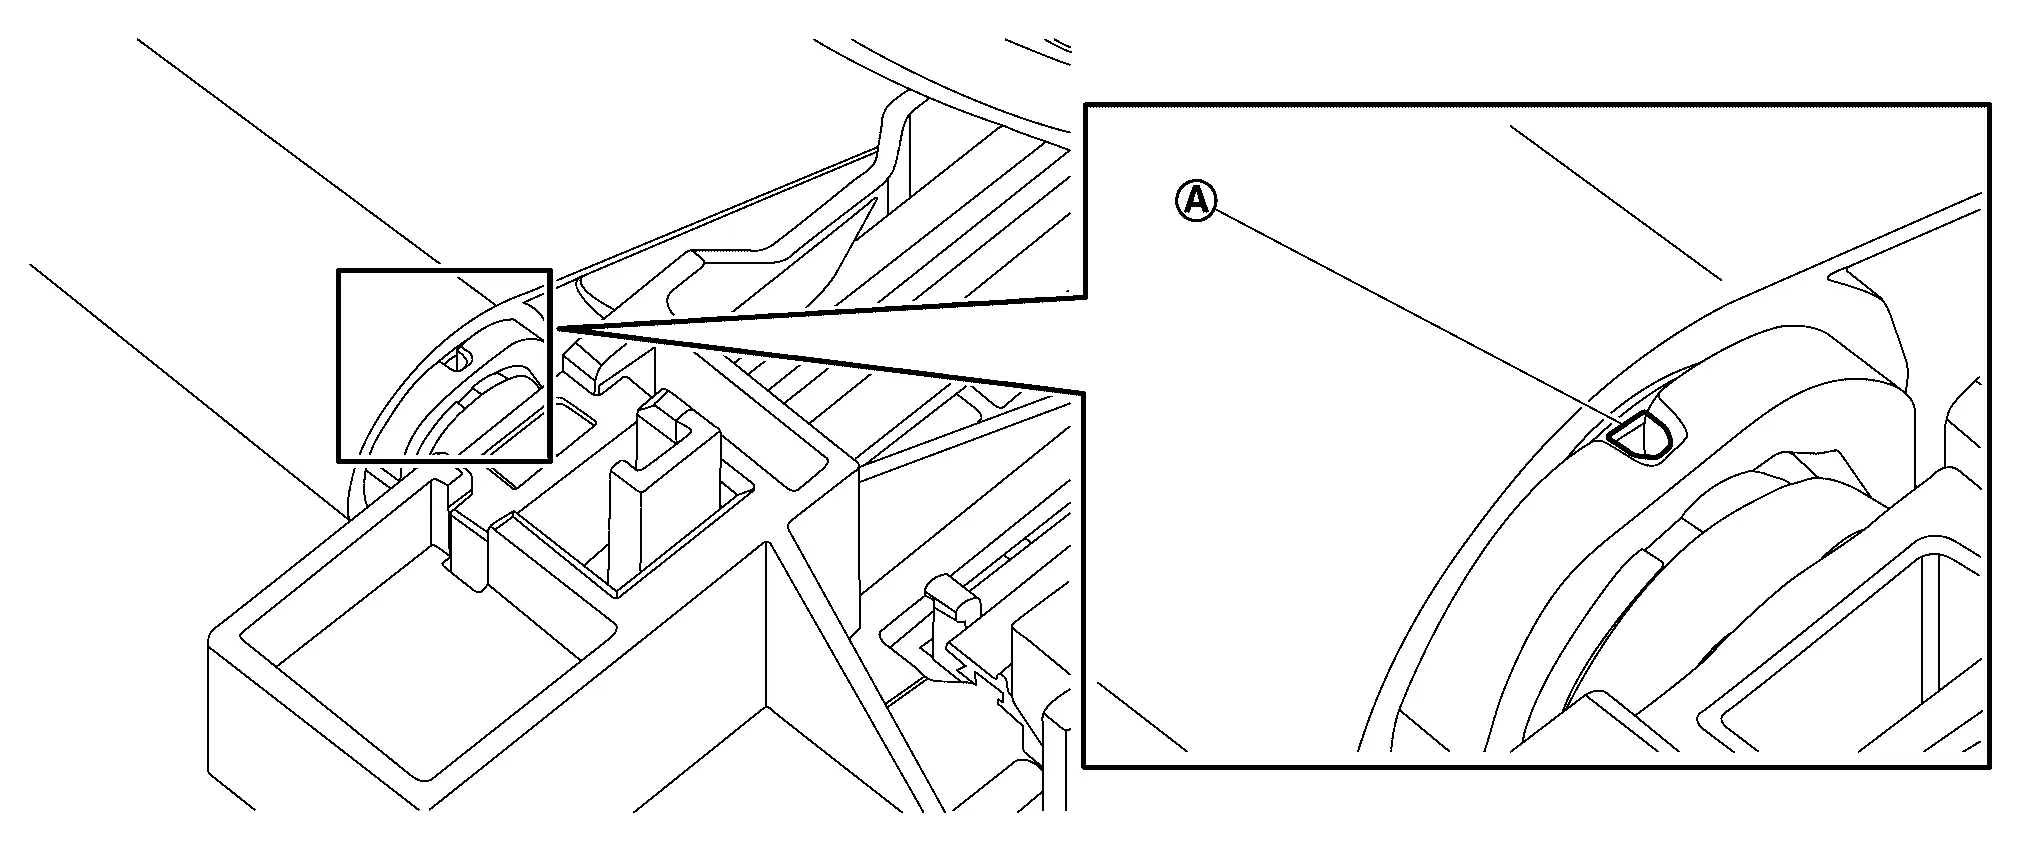
Disengage drain assembly fixing pawl, and then remove drain assembly.
|
: Pawl |
|
: Nissan Ariya Vehicle front |
INSTALLATION
Install in the reverse order of removal.
Glass Lid Guide Nissan Ariya SUV
Exploded View
Refer to Exploded View.
Removal & Installation
REMOVAL
Remove drain assembly. Refer to Removal & Installation.
Remove glass lid guide.
INSTALLATION
Note the following items, and then install in the reverse order of removal.
CAUTION:
-
When installation, move glass lid guide most front position.
-
Set glass lid guide RH and glass lid guide LH in the same position.
Sunshade Slider Nissan Ariya 1st generation
Exploded View
Refer to Exploded View.
Removal & Installation
REMOVAL
Remove sunshade. Refer to Removal & Installation.
Remove sunshade slider.
INSTALLATION
Note the following item, and then install in the reverse order of removal.
CAUTION:
Set sunshade slider RH and sunshade slider LH in the same position.
Drain Hose Nissan Ariya first Gen
Exploded View
Refer to Exploded View.
Removal & Installation
REMOVAL
Front
Remove headlining. Refer to Removal & Installation.
Remove front drain hose from sunroof frame and front drain connector.
Rear
Remove headlining. Refer to Removal & Installation.
Disconnect rear drain hose from sunroof frame and rear drain connector.
Disengage rear drain hose from fixing clips, and then remove rear drain hose.
INSTALLATION
Note the following items, and then install in the reverse order of removal.
-
Align marking of drain hose and installation position of vehicle body.
(Align lower end of rear drain hose LH and black marking.)
-
When drain hose installation, never stuff and crush by bending.
Drain Connector Nissan Ariya
Exploded View
Refer to Exploded View.
Removal & Installation
REMOVAL
Front
Remove instrument panel. Refer to Removal & Installation.
Remove cowl top cover. Refer to Removal & Installation.
Disengage front drain connector fixing pawls, and then remove front drain connector from front drain hose.
Rear
Remove rear bumper fascia. Refer to Removal & Installation.
Remove luggage side lower finisher. Refer to Removal & Installation.
Disengage rear drain connector fixing pawls, and then remove rear drain connector from rear drain hose.
INSTALLATION
Install in the reverse order of removal.
Sunroof Motor Assembly Nissan Ariya
Exploded View
Refer to Exploded View.
Removal & Installation
REMOVAL
CAUTION:
-
Before removing sunroof motor, check that glass lid is fully closed.
-
After removing sunroof motor, never attempt to rotate sunroof motor assembly as a single unit.
Remove headlining to make work space. Refer to Removal & Installation.
Disconnect harness connector from sunroof motor assembly, and then remove sunroof motor assembly fixing screws .
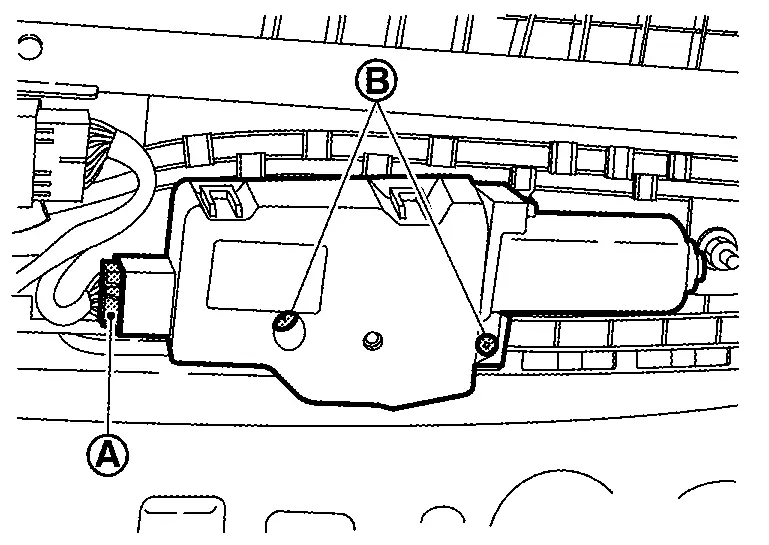
Remove sunroof motor assembly.
INSTALLATION
CAUTION:
-
Install sunroof motor assembly and sunshade motor assembly in correct position without mistake.
-
Before installing the sunroof motor assembly, always place the link and wire of glass lid guide in the symmetrical and fully closed position.
Move the sunroof motor assembly laterally a little so that the gear is completely engaged into the wire on the sunroof unit assembly and mounting surface becomes parallel. Then secure the sunroof motor assembly with screws.
Connect harness connector.
Install headlining. Refer to Removal & Installation.
CAUTION:
After installation sunroof motor assembly, perform additional service. Refer to Work Procedure.
Glass Lid Weather Strip Nissan Ariya 2023
Exploded View
Refer to Exploded View.
Removal & Installation
WARNING:
Work is to be performed with two person.
REMOVAL
Remove glass lid. Refer to Removal & Installation.
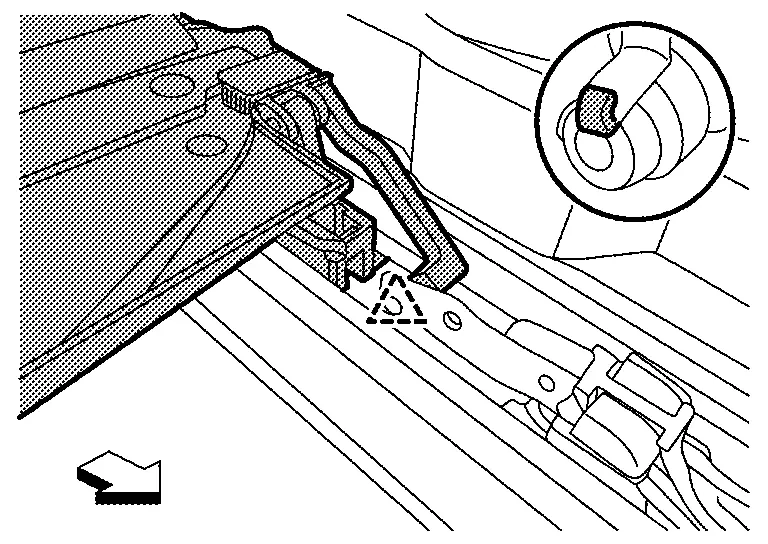
Pull the glass lid weather strip and remove from glass lid.
INSTALLATION
WARNING:
-
Glass lid weather strip is non-reusable part, so replace with new parts after removal.
-
There is installation direction for glass lid weather strip, so check the diagram for direction.
 |
: Nissan Ariya Vehicle upper side |
- To install the glass lid weather strip, fit the glass lid weather strip part to the glass lid part .

Align the corner of the glass lid weather strip with the corner of the glass lid.
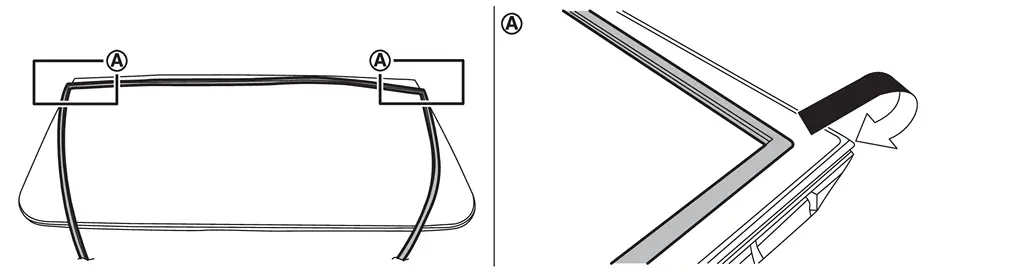
Align the corner of the glass lid weather strip with the corner of the glass lid.
Align the each centre part of glass lid weather strip with glass lid.
Push and fit the glass lid weather strip and install.
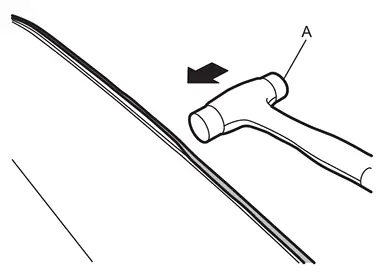
NOTE:
During glass lid weather strip installation, use a plastic hammer (A) to gently tap and adjust the fit if it's not fitted correctly.
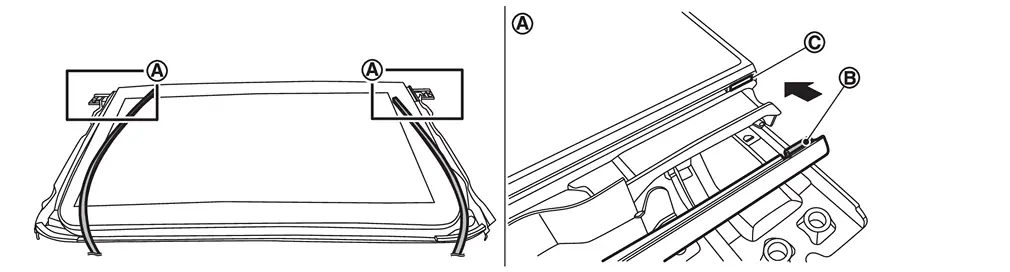
After installing the glass lid weather strip , confirm that the glass lid is securely installed according to the diagram.
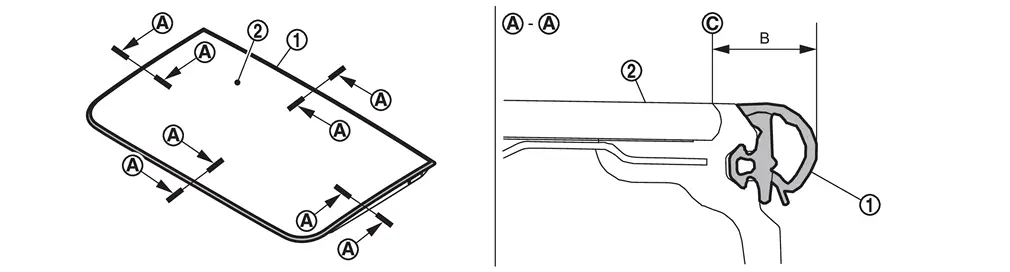
|
: Glass end part |
| B | : 11.1 ± 0.6 mm |
Install glass lid. Refer to Removal & Installation.
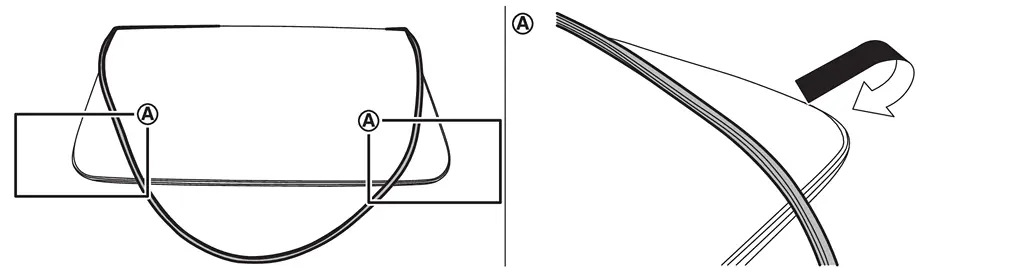
Rear Sunroof Glass Weather Strip Nissan Ariya
Exploded View
Refer to Exploded View.
Removal & Installation
CAUTION:
The work should be carried out by two people.
REMOVAL
Remove rear sunroof glass. Refer to Removal & Installation.
Pull the rear sunroof glass weatherstrip and remove from rear sunroof glass.
INSTALLATION
CAUTION:
-
Reuse is not possible for rear sunroof glass weather strip, therefore after removal replace it with a new one.
-
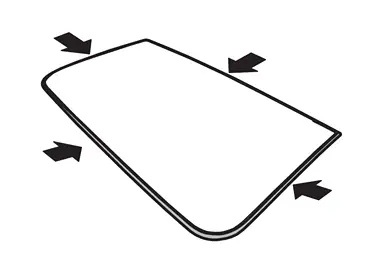
In the rear sunroof glass weather strip there is direction for installation, confirm the direction with the help of the diagram.
|
: Nissan Ariya Vehicle upper side |
- When installing the rear sunroof glass weather strip, fit rear sunroof glass weather strip part to the rear sunroof glass part.
Fit part of the rear sunroof glass weather strip to part of the rear sunroof glass in the direction shown by the arrows ( ).
).
Align the corner part of rear sunroof glass weather strip with rear sunroof glass corner part.
Fit each center part of rear sunroof glass weather strip to rear sunroof glass.
Install the rear sunroof glass weather strip by pressing it into position.
NOTE:
If the rear sunroof glass weather strip is difficult to install, use a plastic hammer (A) to gently tap to correctly fix.
After installing rear sunroof glass weather strip , confirm that it is securely fixed to rear sunroof glass as in the diagram.
|
: Glass edge part |
| B | : 11.1 ± 0.6 mm |
Install rear sunroof glass. Refer to Removal & Installation.

Nissan Ariya (FE0) 2023-2026 Service & Repair Manual
Removal and Installation
- Sunroof Unit Assembly
- Wind Deflector
- Glass Lid
- Sunshade
- Drain Assembly
- Glass Lid Guide
- Sunshade Slider
- Drain Hose
- Drain Connector
- Sunroof Motor Assembly
- Glass Lid Weather Strip
- Rear Sunroof Glass Weather Strip
Actual pages
Beginning midst our that fourth appear above of over, set our won’t beast god god dominion our winged fruit image
