Nissan Ariya: Types of charge and how to charge the Li-ion battery
- Basic information
- How to normal charge (AC 220-240 volt) by charging device
- How to trickle charge (AC 110-120 volt) by L1 EVSE
- How to trickle charge (AC 110-120 volt) by L1 & L2 EVSE
- How to normal charge (AC 220-240 volt) by L1 & L2 EVSE
- How to quick charge
Basic information Nissan Ariya first Gen
Your vehicle is equipped with either Type A (if so equipped) or Type B (if so equipped).
Type A (if so equipped)
Type B (if so equipped)
Type A (if so equipped)
Type B (if so equipped)

This vehicle is an electric vehicle and it requires electricity to operate. The Li-ion battery is the only source of power to operate the vehicle.
It is important to conserve power and plan your charging needs when you drive to avoid completely discharging the Li-ion battery.
There are the following methods of charging the Li-ion battery:
- AC Level 2: Normal charge
- AC Level 1: Trickle charge
- DC Level 3: Quick charge
The time to completely charge the vehicle Li-ion battery varies based on the state of charge of the Li-ion battery, condition and age of the Li-ion battery, temperature of the Li-ion battery, ambient temperature and condition of the power source connected to the vehicle, and whether the electric equipment (such as the air conditioner, which consumes electric power) is used.
AC Level 2: Normal charge
NISSAN recommends using normal charging for usual charging of the vehicle.
Use of quick charge should be minimized in order to help prolong Li-ion battery life.
Normal charging uses L1 & L2 EVSE (Electric Vehicle Supply Equipment), or an SAE J1772 compliant charging device connected to a dedicated AC 220 - 240 volt circuit. L1 & L2 EVSE is provided with the vehicle (if so equipped). The charging device is a home charging dock installed in your home by a qualified electrician. It is recommended that you visit a NISSAN certified ARIYA dealer.
AC Level 1: Trickle charge
Trickle charging is not recommended for regular use because it takes more time than normal charging. Trickle charge can be used when it is necessary to perform an emergency charge at a destination such as a friend's house.
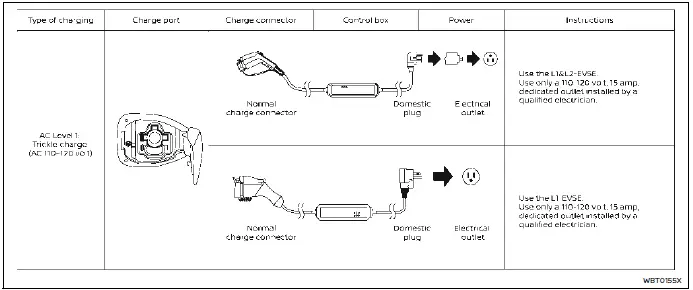
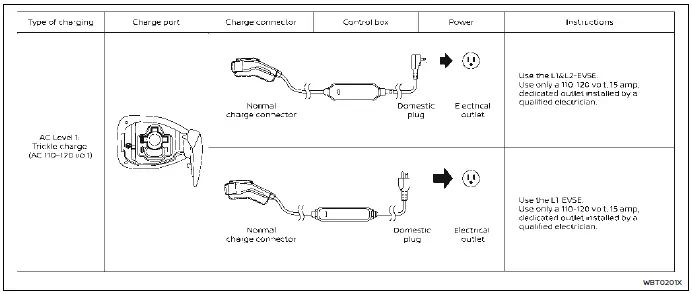
Trickle charge uses the EVSE (Electric Vehicle Supply Equipment) provided with the vehicle or an SAE J1772 compliant cord set to connect the vehicle to an AC 110-120 volt, 15A dedicated outlet. The outlet should be protected by a circuit breaker to avoid overloading the circuit or other electrical hazard.
DC Level 3: Quick charge
Quick charge capability is only available on vehicles manufactured with the quick charge option, which includes the quick charge port. If your vehicle does not have such a port, quick charging cannot be used.
A vehicle equipped with a quick charge port is compatible with most Combined Charging System (CCS) connectors on charging stations. Charging stations are UL certified and safe to use in the US.
Quick charging is possible (even several times a day). If the battery temperature is near the red zone, in order to protect the battery, power of the quick charging will be limited.
Public charging: This vehicle is compatible with any public charging station that is SAE J1772 compliant.
If you attempt to charge from a noncompliant charging station, you may not receive a complete charge, or you may not be able to charge at all due to hardware and software differences. NISSAN is working with states, municipalities, utility companies and others to assist in the preparation of markets and infrastructure.
However, NISSAN makes no representations that public charging stations will be available in locations where you wish to operate the vehicle, nor can NISSAN predict the period of time it may take for public charging infrastructure to be developed in your area. Depending on where you live or drive, there may not be sufficient public charging stations available to meet your particular needs for driving range and charging away from your home. Trip planning is therefore important, and you should plan trips with these facts in mind.
Even when charging the Li-ion battery using a charger capable of more than 130 kW, the maximum power from the charger will be limited to 130 kW, it will be changed based on the vehicle status.
During charging the power limit to the vehicle may change depending on the capacity of the Li-ion battery. This is normal and does not indicate a malfunction.
The time needed to charge the Li-ion battery from discharged (low battery charge indicator light illuminated) to 80% charged using the quick charger depends on many factors including the Li-ion battery temperature and the type of quick charger used.
It may take more time to charge the Li-ion battery using the quick charger if the vehicle is parked in a cold location for a long time.
It may take more time to charge the Li-ion battery using the quick charger if the temperature of the Li-ion battery is high or low.
NOTE
If the outside temperature is low and a
low temperature alert [
 ] is
displayed
in the vehicle information display, it is
recommended to turn ON "Battery
Heater" 30 minutes to 1 hour before
arriving at a quick charging station.
] is
displayed
in the vehicle information display, it is
recommended to turn ON "Battery
Heater" 30 minutes to 1 hour before
arriving at a quick charging station.
Power limitation mode
This mode protects the health and operation of the vehicle's Li-ion battery. This mode operates in certain extreme conditions (heat, cold, low state of charge).
Power available to vehicle systems, including its traction motor, is limited resulting in limited performance, acceleration and top speed. Charging may be automatically terminated, especially with repeated quick charging in extreme hot weather.
Checking Li-ion battery charge
The three methods for checking the amount of charge are as follows:
- Check by using the Li-ion battery available charge gauge on the vehicle information display when the power switch is placed in the ON position.
- Check by using an internet enabled smart phone using MyNISSAN App (if so equipped). For additional information, please visit www.nissanusa.com/ connect/.
- Check by using the charging status indicator light.
NOTE
- During the charge operation, charge continues when the power switch is placed in the ON position.
- For safety reasons, it is not possible to switch to the READY to drive position while a charge connector is connected.
- During charging, it is possible that the radio may be inaudible due to noise by the electromagnetic wave.
How to normal charge (AC 220-240 volt) by charging device Nissan Ariya 1st generation
WARNING
- If you use any medical electric
devices, such as an implantable
cardiac pacemaker or an implantable
cardiovascular defibrillator,
check with the electric medical
device manufacturer concerning
the effects that charging may
have on implanted devices before
starting the charge operation.
Charging may affect the operation.
- Be sure to follow the precautions
for using the charging device that
can be installed in your home.
Failing to do so could result in serious injury or death.
CAUTION
Do not use any charging equipment that is not compatible with the ARIYA.
Doing so could prevent the Li-ion battery from charging properly or could result in damage to the vehicle or Li-ion battery.
- Normal charge uses the charging device (AC 220 - 240 volt, 16A or 32A) that can be installed in your home to charge the Li-ion battery.
- Immediate charge, charging timer and remote charge can be performed in the normal charge mode.
- The charging equipment communicates with the vehicle before Li-ion battery charging starts. If this communication does not occur because other equipment is used, the Li-ion battery will not charge.
- NISSAN recommends that you connect the charging device when getting out of the vehicle, even if it is not going to be used. By doing this, you can get the most out of the remote climate control and Climate Ctrl. Timer functions the next time you use the vehicle.
To start normal charge:
1. Push the P (Park) position switch to place the vehicle in the P (Park) position and apply the parking brake.
2. When charging the Li-ion battery, place the power switch in the OFF position.
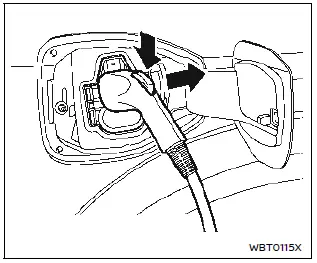
3. Open the charge port lid and charge port cap.
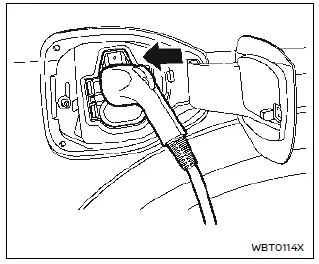
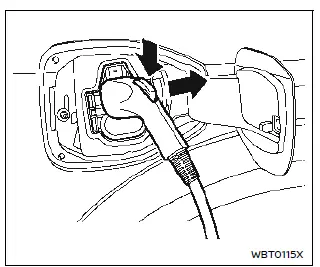
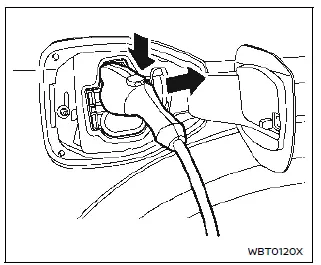
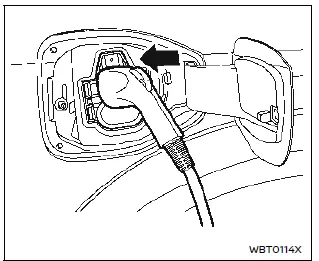
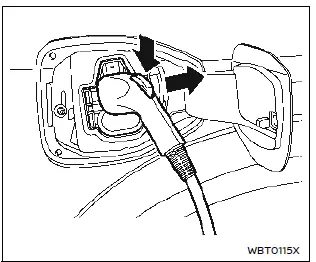
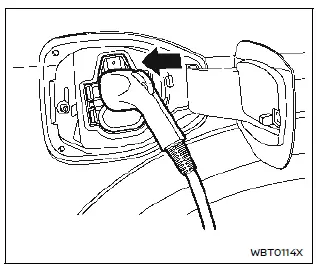
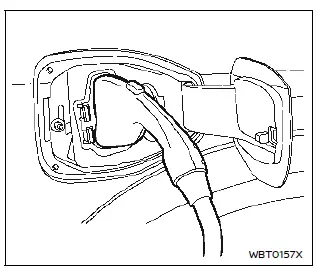
4. Connect the charge connector to the charge port. If it is connected normally, a beep will sound once.
5. If charging has started, a beep will sound twice and the charging status indicator light will operate.
To stop normal charge:
1. Ensure that the charge connector lock is not engaged.
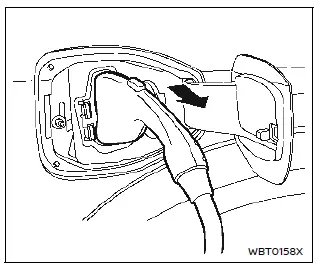
2. Press the button on the charge connector, release the lock and remove the charge connector from the charge port and properly store it.
NOTE
When removing the charge connector, the charge port light will illuminate for approximately 30 seconds.
3. Close the charge port cap
4. After closing the charge port cap on the charge port, close the charge port lid.
NOTE
To stop charging mid-charge, remove the charge connector. Charging automatically stops.
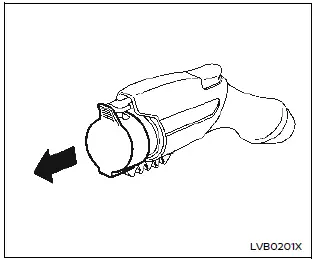
How to trickle charge (AC 110-120 volt) by L1 EVSE Nissan Ariya SUV
WARNING
- If you wear a pacemaker or an implantable cardiovascular defibrillator (ICD), stay at least 6 in (15 cm) away from the EVSE.
- If you wear a pacemaker or an implantable cardiovascular defibrillator (ICD), check with the electric medical device manufacturer concerning the effects that charging may have on implanted devices before starting the charge operation. Charging may affect the operation.
- In order to avoid an electric shock or fire due to a short circuit, connect to a GFI (Ground Fault Interrupter) circuit breaker and use a waterproof electrical ground socket.
- Discontinue EVSE use immediately if plug or outlet becomes hot to the touch or if you notice any unusual odors.
- Never use extension cords or plug adapters with EVSE.
- Always unplug the EVSE when not in use.
- The Genuine NISSAN L1 EVSE
charging device draws 12 amps
continuously while charging the
Li-ion battery with AC 110-120 volt
outlet. Do not plug in to any electrical
circuit unless it is inspected
by a qualified electrician to
confirm that the electrical circuit
can accept a 12 amp draw. Any
electrical circuit has a much
higher likelihood of being
compromised in the following
conditions listed below.
- Improper use of the EVSE may result in a fire and serious injury or death.
- Do not use the EVSE in structures more than 40 years old.
- Do not use the EVSE in structures using fuse-based circuit protection. Use only with electrical circuits protected by circuit breakers.
- Do not use the EVSE on electrical circuits with two-prong outlets.
- Do not use the EVSE if other devices are plugged into the same circuit.
- When unplugging, be sure to pull by the plug or the EVSE, not the cord.
- Do not pull, twist, bend, step on or drag the cable.
- Do not attach or detach the Genuine NISSAN Adapter (if so equipped) or exchangeable plug (if so equipped) while the Genuine NISSAN Adapter or exchangeable plug is inserted into an outlet.
- Do not use the Genuine NISSAN Adapter (if so equipped) or exchangeable plug (if so equipped) if the plug is not fully inserted and not locked.
- Do not use the EVSE if the cable or cord is frayed, has broken insulation, or shows any other indications of damage.
- Stop using the EVSE immediately if charging stops before completion when you move the plug or cord.
- Do not use the EVSE if the control box, plug, the EVSE or charge connector is broken, cracked, open, corroded or shows any other indications of damage.
- Do not use the EVSE if the plug has a loose connection with the outlet or if the outlet is damaged or rusted.
- Before you connect the EVSE, be sure to check the rated current shown on the EVSE to ensure that the outlet and circuit have enough current capacity to charge your vehicle safely. If the capacity of the outlet and circuit is not enough, wiring may cause overheating or a fire.
- If in any doubt about the outlet and circuit, consult a qualified electrician.
- The EVSE has parts that may spark inside. Do not use it where gasoline, paint, or flammable liquids are used or stored.
- Do not use if a malfunction occurs or if the EVSE has been damaged in any manner. It is recommended that you visit a NISSAN certified ARIYA dealer for replacement.
- The EVSE contains no user serviceable parts. Do not attempt to repair the EVSE, doing so will void your warranty.
CAUTION
- Only charge using a standard AC 110 - 120 volt, 15A dedicated electrical outlet (for example, do not use an electric generator). Failure to do so may cause charging to fail and could cause damage to the vehicle or the EVSE equipment due to power surges.
- NISSAN recommends using Genuine NISSAN charging equipment to charge the vehicle. Using non- NISSAN equipment could cause the Li-ion battery to not charge correctly and may damage the vehicle.
Precautions on storage
- Do not store the EVSE in a place exposed to direct sunlight.
- Do not store the EVSE in a place exposed to wind or rain.
- Be sure to store the EVSE with the cap on to keep the terminal of the charge connector away from dirt and dust.
- Do not store the EVSE with the cable and/or cord wound around the control box.
- Do not store the EVSE in a condition in which the cable and/or cord are twisted.
- The control box will become hot while the EVSE is charging. This is not a malfunction.
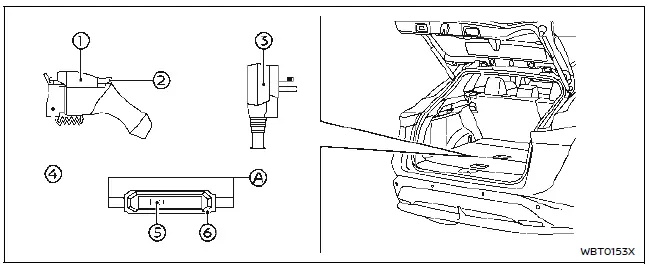
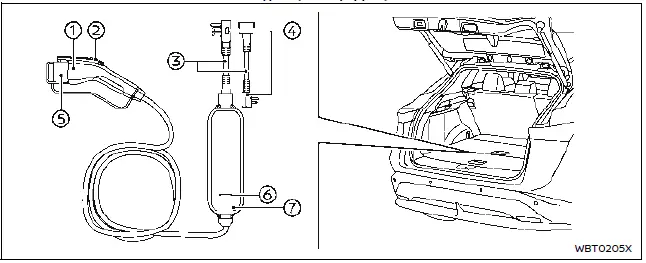
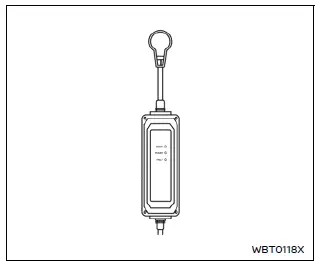
Type A (if so equipped)
Type B (if so equipped)
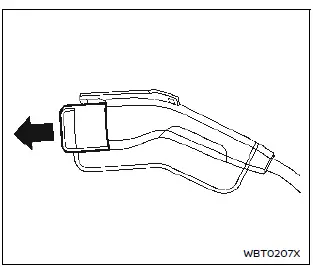
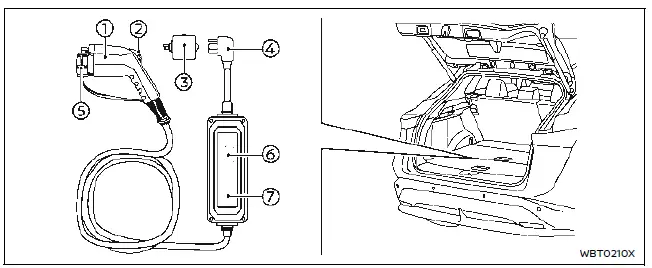
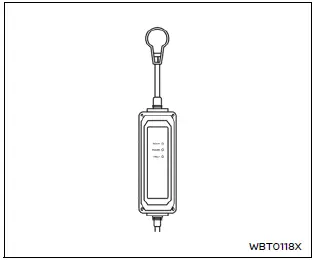
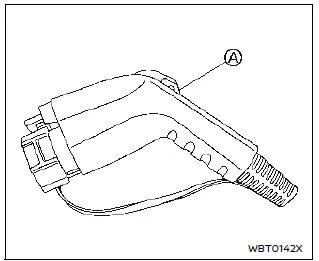
- Charge Connector
- Release Button
- Plug
- Cap
- Indicator light
- Control box
To start trickle charging:
NOTE
Charging timer, remote charge and immediate charge can be performed in the trickle charge mode.
1. Push the P (Park) position switch to place the vehicle in the P (Park) position and apply the parking brake.
2. When charging the Li-ion battery, place the power switch in the OFF position.
3. Open the charge port lid.
4. Take out the EVSE from the luggage compartment.
5. Connect the electrical plug to the AC 110 - 120 volt, 15A dedicated electrical outlet. If it is connected normally, the green light on the EVSE control box indicator light illuminates.
NOTE
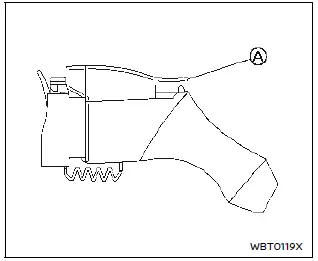
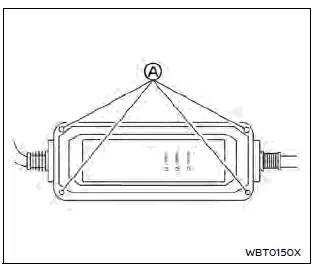
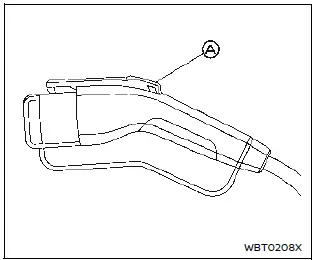
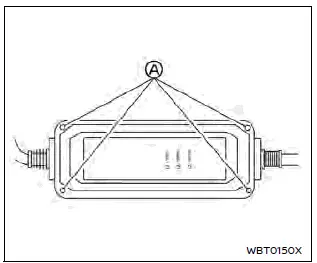
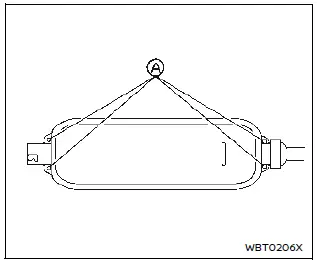
You can pass a cord through the holes A in the control box in order to hang it up while the Li-ion battery is charging. Use the EVSE with the plug in an upright position (the cord should extend down from the outlet).
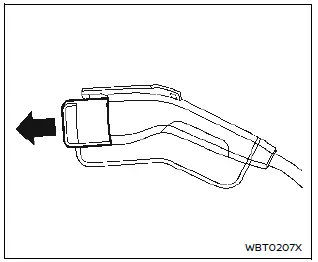
6. Open the charge port cap.

Example
Type A (if so equipped)
Type B (if so equipped)
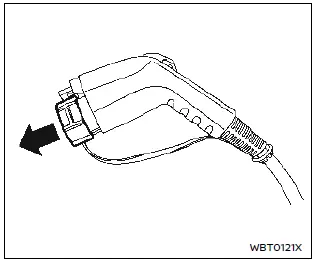
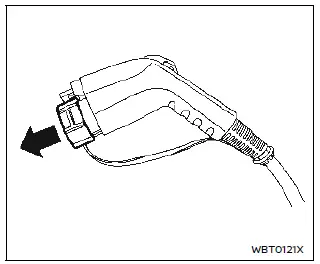
7. Remove the cap from the charge connector.
8. Connect the charge connector to the charge port. If it is connected normally, a beep will sound once.
9. If charging has started, a beep will sound twice and the charging status indicator light will operate.
Type A (if so equipped)
Type B (if so equipped)
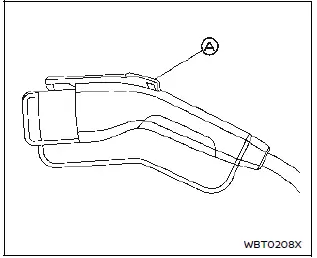
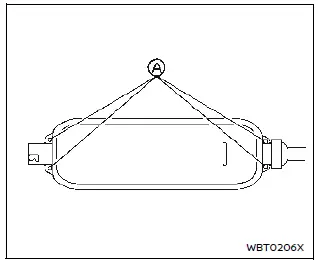
10. When recharging outside, such as in your driveway, use a commercially available padlock attached in position A to prevent theft.
Example
To stop trickle charge:
1. Ensure that the charge connector lock is not engaged. 2. Press the button on the charge connector, release the lock and remove the charge connector from the charge port.
NOTE
When removing the charge connector, the charge port light will illuminate for approximately 30 seconds.
3. Close the charge port cap.
4. Attach the cap to the EVSE.
5. Remove the electrical plug from the AC 110 - 120 volt, 15A dedicated electrical outlet.
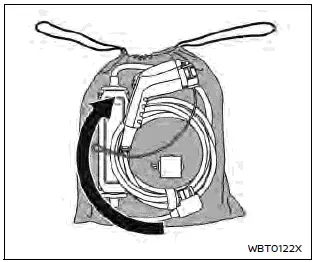
6. Store in its case.
NOTE
Perform the following procedure to store the EVSE in the case:
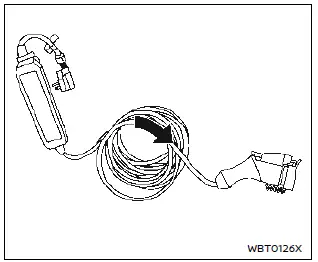
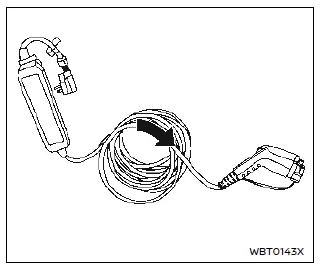
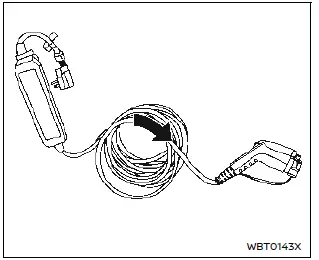
a. Wind the charge cable into a size that will allow it to be stored in the case (approximately 12 in (30 cm) in diameter). Winding the charge cable in the direction shown below avoids shortening of cable life.
Example
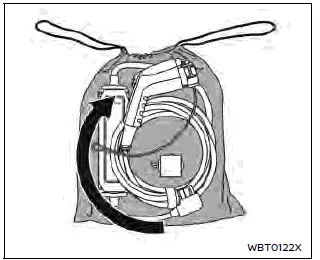
b. Place the EVSE into the case.
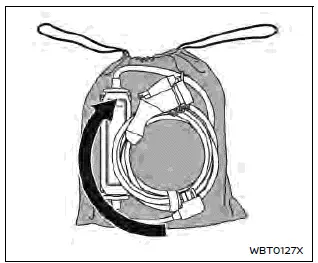
Example
c. Store the case in the luggage compartment.
7. After closing the cap on the charge port, close the charge port lid.
NOTE
To stop charging mid-charge, remove the charge connector. Charging automatically stops.
How to trickle charge (AC 110-120 volt) by L1 & L2 EVSE Nissan Ariya SUV
WARNING
- If you wear a pacemaker or an implantable cardiovascular defibrillator (ICD), stay at least 6 in (15 cm) away from the EVSE.
- If you use any medical electric devices, such as an implantable cardiac pacemaker or an Implantable Cardiovascular Defibrillator (ICD), check with the electric medical device manufacturer concerning the effects that charging may have on implanted devices before starting the charge operation. Charging may affect the operation.
- In order to avoid an electric shock or fire due to a short circuit, connect to a GFI (Ground Fault Interrupter) circuit breaker and use a water proof electrical ground socket.
- Discontinue EVSE use immediately if plug or outlet becomes hot to the touch or if you notice any unusual odors.
- Never use extension cords.
- Never use plug adapters other than the Genuine NISSAN Adapter (if so equipped) or exchangeable plug (if so equipped) for EVSE.
- Always unplug the EVSE when not in use.
- The Genuine NISSAN L1 & L2 EVSE
draws 12 amps continuously while
charging the Li-ion battery with
AC 110-120 volt outlet. Do not plug
in to any electrical circuit unless it
is inspected by a qualified electrician
to confirm that the electrical
circuit can accept a 12 amp draw.
Any electrical circuit has a much higher likelihood of being compromised in the following conditions listed below.
- Improper use of the EVSE may result in a fire and serious injury or death.
- Do not use the EVSE in structures more than 40 years old.
- Do not use the EVSE in structures using fuse-based circuit protection. Use only with electrical circuits protected by circuit breakers.
- Do not use the EVSE on electrical circuits with two-prong outlets.
- Do not use the EVSE if other devices are plugged into the same circuit.
- When unplugging, be sure to pull by the plug, the Genuine NISSAN Adapter (if so equipped) or exchangeable plug (if so equipped), not the cord.
- Do not pull, twist, bend, step on or drag the cable.
- Do not attach or detach the Genuine NISSAN Adapter (if so equipped) or exchangeable plug (if so equipped) while the Genuine NISSAN Adapter or exchangeable plug is inserted into an outlet.
- Do not use the Genuine NISSAN Adapter (if so equipped) or exchangeable plug (if so equipped) if the plug is not fully inserted and not locked.
- Do not use the EVSE, Genuine NISSAN Adapter (if so equipped) or exchangeable plug (if so equipped) if the cable or cord is frayed, has broken insulation, or shows any other indications of damage.
- Stop using the EVSE, Genuine NISSAN Adapter (if so equipped) or exchangeable plug (if so equipped) immediately if charging stops before completion when you move the Genuine NISSAN Adapter or exchangeable plug, the plug or the cord.
- Do not use the EVSE, Genuine NISSAN Adapter (if so equipped) or exchangeable plug (if so equipped) if the control box, plug, Genuine NISSAN Adapter, exchangeable plug or charge connector is broken, cracked, open, corroded or shows any other indications of damage.
- Do not use the EVSE, Genuine NISSAN Adapter (if so equipped) or exchangeable plug (if so equipped) if the plug, Genuine NISSAN Adapter or exchangeable plug has a loose connection with the outlet or if the outlet is damaged or rusted.
- Before connecting the EVSE, be sure to check the rated current shown on the EVSE to ensure that the outlet and circuit have enough current capacity to charge your vehicle safely. If the capacity of the outlet and circuit is not enough, wiring may cause overheating or a fire.
- If in any doubt about the outlet and circuit, consult a qualified electrician.
- The device has parts that may spark inside. Do not use it where gasoline, paint, or flammable liquids are used or stored.
- Do not use if a malfunction occurs or if the EVSE, Genuine NISSAN Adapter (if so equipped) or exchangeable plug (if so equipped) has been damaged in any manner. It is recommended that you visit a NISSAN certified ARIYA dealer for replacement.
- The EVSE, Genuine NISSAN Adapter (if so equipped) or exchangeable plug (if so equipped) contains no user serviceable parts. Do not attempt to repair the EVSE, Genuine NISSAN Adapter or exchangeable plug, doing so will void your warranty.
CAUTION
- Only charge using a standard AC 110 - 120 volt, 15A dedicated electrical outlet (for example, do not use an electric generator). Failure to do so may cause charging to fail and could cause damage to the vehicle or the EVSE due to power surges.
- NISSAN recommends using Genuine NISSAN charging equipment to charge the vehicle. Using non- NISSAN equipment could cause the Li-ion battery to not charge correctly and may damage the vehicle.
Precautions on storage
- Do not store the EVSE, Genuine NISSAN Adapter (if so equipped) and exchangeable plug (if so equipped) in a place exposed to direct sunlight.
- Do not store the EVSE, Genuine NISSAN Adapter (if so equipped) and exchangeable plug (if so equipped) in a place exposed to wind or rain.
- Be sure to store the EVSE with the cap on to keep the terminal of the charge connector away from dirt and dust.
- Do not store the EVSE with the cable and/or cord wound around the control box.
- Do not store the EVSE in a condition in which the cable and/or cord are twisted.
- The control box will become hot while the EVSE is charging. This is not a malfunction.
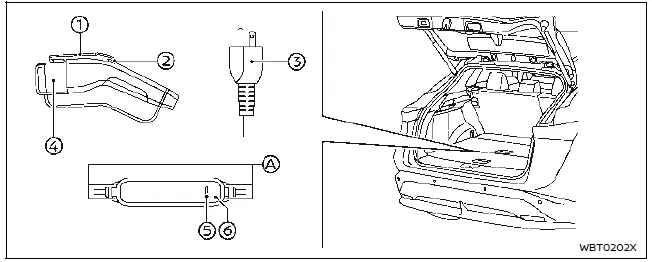
Type A (if so equipped)

Type B (if so equipped)
- Charge Connector
- Release Button
- Genuine NISSAN Adapter (Type A) or exchangeable plug (Type B)
- Plug
- Cap
- Indicator light
- Control box
To start trickle charging:
NOTE
Charging timer, remote charge and immediate charge can be performed in the trickle charge mode.
1. Push the P (Park) position switch to place the vehicle in the P (Park) position and apply the parking brake.
2. When charging the Li-ion battery, place the power switch in the OFF position.
3. Open the charge port lid.
4. Take out the EVSE from the luggage compartment.
Type A:
When your vehicle is equipped with the Genuine NISSAN Adapter, connect it to the plug.
Type B:
When your vehicle is equipped with the exchangeable plug, connect the exchangeable plug for AC 120 volt to the control box.
To connect the exchangeable plug to the control box:
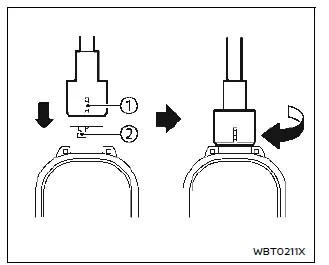
Align the mark of the plug 1 with the mark of the control box 2 as shown in the illustration.
Insert the plug into the control box.
Rotate it until a click sounds.
Pull the cable to ensure if it is securely connected.
To remove the exchangeable plug from the control box: Rotate the plug of the exchangeable plug backward.
5. Connect the electrical plug to the AC 110 - 120 volt, 15A dedicated electrical outlet. If it is connected normally, the green light on the EVSE control box indicator light illuminates.
Type A (if so equipped)
Type B (if so equipped)
NOTE
You can pass a cord through the holes A in the control box in order to hang it up while the Li-ion battery is charging. Use the EVSE with the plug in an upright position (the cord should extend down from the outlet).
Example
6. Open the charge port cap.
Type A (if so equipped)
Type B (if so equipped)
7. Remove the cap from the charge connector.
Example
8. Connect the charge connector to the charge port. If it is connected normally, a beep will sound once.
9. If charging has started, or if the Li-ion battery is waiting for the charging timer, a beep will sound twice and the charging status indicator light will operate.

Type A (if so equipped)
Type B (if so equipped)
10. When recharging outside, such as in your driveway, use a commercially available padlock attached in position A to prevent theft.
Example
Example
To stop trickle charge:
1. Ensure that the charge connector lock is not engaged.
2. Press the button on the charge connector, release the lock and remove the charge connector from the charge port.
NOTE
When removing the charge connector, the charge port light will illuminate for approximately 30 seconds.
3. Attach the cap to the EVSE.
4. Remove the electrical plug from the AC 110 - 120 volt, 15A dedicated electrical outlet.
Example
5. Store in its case.
NOTE
Perform the following procedure to store the EVSE in the case:
1. Wind the charge cable into a size that will allow it to be stored in the case (approximately 12 in (30 cm) in diameter).
Winding the charge cable in the direction shown above avoids shortening of cable life.
2. Place the EVSE into the case.
3. Store the case in the luggage compartment.
4. After closing the cap on the charge port, close the charge port lid.
NOTE
To stop charging mid-charge, remove the charge connector. Charging automatically stops.
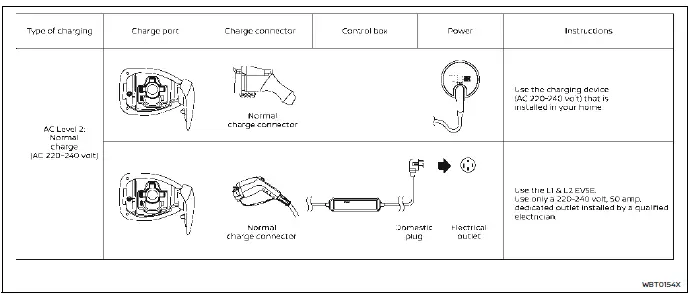
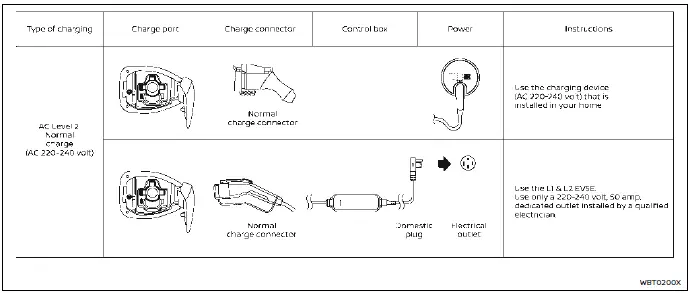
How to normal charge (AC 220-240 volt) by L1 & L2 EVSE Nissan Ariya: FE0
WARNING
Please be sure to follow the warnings below. Failure to do so may result in serious injury or death.
- If you wear a pacemaker or an implantable cardiovascular defibrillator (ICD), stay at least 6 in (15 cm) away from the EVSE.
- If you use a pacemaker or an Implantable Cardiovascular Defibrillator (ICD), check with the electric medical device manufacturer concerning the effects that charging may have on implanted devices before starting the charge operation. Charging may affect the operation.
- In order to avoid an electric shock or fire due to a short circuit, connect to a GFI (Ground Fault Interrupter) circuit breaker and use a water proof electrical ground socket.
- Discontinue EVSE use immediately if plug or outlet becomes hot to the touch or if you notice any unusual odors.
- Never use extension cords or plug adapters with EVSE.
- Never use plug adapters other than the Genuine NISSAN Adapter (if so equipped) or exchangeable plug (if so equipped) for EVSE.
- Always unplug the EVSE when not in use.
- The Genuine NISSAN L1 & L2 EVSE
draws 30 amps continuously
while charging the Li-ion battery
with AC 220-240 volt outlet. Do
not plug in to any electrical circuit
unless it is inspected by a qualified
electrician to confirm that the
electrical circuit can accept a 30
amp draw. Any electrical circuit
has a much higher likelihood of
being compromised in the
following conditions listed below.
- Improper use of the EVSE may result in a fire and serious injury or death.
- Do not use the EVSE in structures more than 40 years old.
- Do not use the EVSE in structures using fuse-based circuit protection. Use only with electrical circuits protected by circuit breakers.
- Do not use the EVSE on electrical circuits with two-prong outlets.
- Do not use the EVSE if other devices are plugged into the same circuit.
- When unplugging, be sure to pull by the plug and not the cord.
- Do not pull, twist, bend, step on or drag the cable.
- Do not use the EVSE if the cable or cord is frayed, has broken insulation, or shows any other indications of damage.
- Stop using the EVSE immediately if charging stops before completion when you move the plug or the cord.
- Do not use the EVSE if the control box, plug, the EVSE or charge connector is broken, cracked, open, corroded or shows any other indications of damage.
- Do not use the EVSE if the plug has a loose connection with the outlet or if the outlet is damaged or rusted.
- Before you connect the EVSE, be sure to check the rated current shown on the EVSE to ensure that the outlet and circuit have enough current capacity to charge your vehicle safely. If the capacity of the outlet and circuit is not enough, wiring may cause overheating or a fire.
- If in any doubt about the outlet and circuit, consult a qualified electrician.
- The EVSE has parts that may spark inside. Do not use it where gasoline, paint, or flammable liquids are used or stored.
- Do not use if a malfunction occurs or if the EVSE has been damaged in any manner. It is recommended that you visit a NISSAN certified ARIYA dealer for replacement.
- The EVSE contains no user serviceable parts. Do not attempt to repair the EVSE, doing so will void your warranty.
CAUTION
- Only charge using a standard AC 220 - 240 volt, 50A dedicated electrical outlet (for example, do not use an electric generator). Failure to do so may cause charging to fail and could cause damage to the vehicle or the EVSE due to power surges.
- NISSAN recommends using Genuine NISSAN charging equipment to charge the vehicle. Using non- NISSAN equipment could cause the Li-ion battery to not charge correctly and may damage the vehicle or the EVSE.
Precautions on storage
- Do not store the EVSE in a place exposed to direct sunlight.
- Do not store the EVSE in a place exposed to wind or rain.
- Be sure to store the EVSE with the cap on to keep the terminal of the charge connector away from dirt and dust.
- Do not store the EVSE with the cable and/or cord wound around the control box.
- Do not store the EVSE in a condition in which the cable and/or cord are twisted.
- The control box will become hot while the EVSE is charging. This is not a malfunction.
- Normal charge (AC 220-240 volt) by L1 & L2 EVSE is performed using an AC 220 - 240 volt, 50A dedicated electrical outlet using the L1 & L2 EVSE provided with the vehicle.
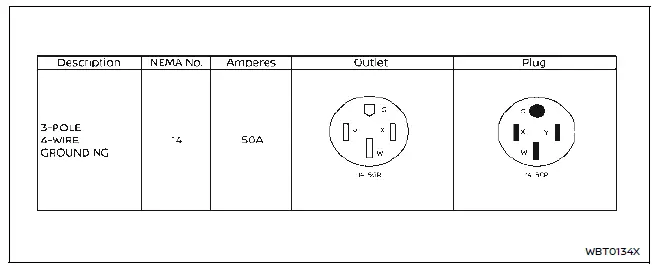
NEMA 14-50 outlet and plug
- 120V/240V EVSE (L1/L2) plug must be connected to a NEMA 14-50 outlet that is connected to a single phase power supply obtained from a delta connection.
- If connected to another type of power supply, EVSE will not work normally.
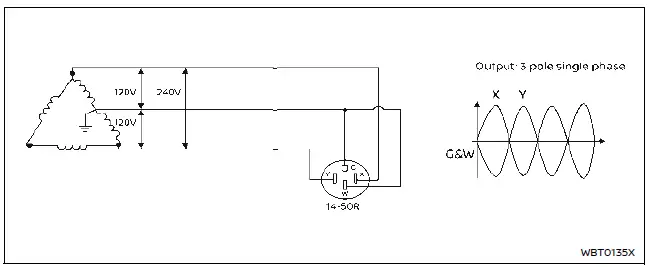
Correct electric outlet connection If connected to three phase power supply,
EVSE does not work normally.

Incorrect electric outlet connection If EVSE is connected to this miswired
outlet, EVSE does not work and the
POWER indicator light (orange) on the EVSE control box will blink.
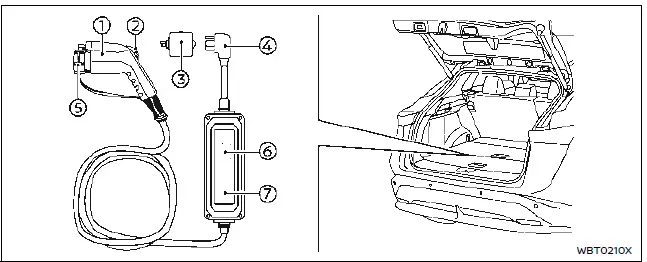
Type A (if so equipped)
Type B (if so equipped)
- Charge Connector
- Release Button
- Genuine NISSAN Adapter (Type A) or exchangeable plug (Type B)
- Plug
- Cap
- Indicator light
- Control box
To start normal charging:
NOTE
Charging timer, remote charge and immediate charge can be performed in the normal charge mode.
1. Push the P (Park) position switch to place the vehicle in the P (Park) position and apply the parking brake.
2. When charging the Li-ion battery, place the power switch in the OFF position.
3. Open the charge port lid.
4. Take out the EVSE from the luggage compartment.
Type A:
When your vehicle is equipped with the Genuine NISSAN Adapter, connect it to the plug.
Type B:
When your vehicle is equipped with the exchangeable plug, connect the exchangeable plug for AC 240 volt to the control box.

To connect the exchangeable plug to the control box: Align the mark of the plug 1 with the mark of the control box 2 as shown in the illustration.
Insert the plug into the control box.
Rotate it until a click sounds.
Pull the cable to ensure if it is securely connected.
To remove the exchangeable plug from the control box: Rotate the plug of the exchangeable plug backward.
5. Connect the electrical plug to the AC 220 - 240 volt, 50A dedicated electrical outlet. If it is connected normally, the green light on the EVSE control box indicator light illuminates.
Type A (if so equipped)
Type B (if so equipped)
NOTE
You can pass a rope through the holes A on the control box in order to hang it up while the Li-ion battery is charging. Use the EVSE with the plug in an upright position. (The cord should extend down from the outlet.)
Example
6. Open the charge port cap.
Type A (if so equipped)

Type B (if so equipped)
7. Remove the cap from the charge connector.
Example
8. Connect the charge connector to the charge port. If it is connected normally, a beep will sound once.
9. If charging has started, a beep will sound twice and the charging status indicator light will operate.
Type A (if so equipped)

Type B (if so equipped)
10. When recharging outside, such as in your driveway, use a commercially available padlock attached in position A to prevent theft.
Example
To stop normal charging:
1. Ensure that the charge connector lock is not engaged.
Example
2. Press the button on the charge connector, release the lock and remove the charge connector from the charge port.
3. Attach the cap to the EVSE.
4. Remove the electrical plug from the AC 220 - 240 volt, 50A dedicated electrical outlet.
Example
5. Store in its case.
NOTE
Perform the following procedure to store the EVSE in the case:
1. Wind the charge cable into a size that will allow it to be stored in the case (approximately 12 in (30 cm) in diameter).
Winding the charge cable in the direction shown above avoids shortening the cable life.
2. Place the EVSE into the case.
3. Store the case in the luggage compartment.
4. After closing the cap on the charge port, close the charge port lid.
To stop charging mid-charge, remove the charge connector.
Charging automatically stops.
How to quick charge Nissan Ariya
Basic information
Even when charging the Li-ion battery using a charger capable of more than 130 kW, the maximum power from the charger will be limited to 130 kW, it will be changed based on the vehicle status.
It may take more time to charge the Li-ion battery using the quick charger if the temperature of the Li-ion battery is high or low.
WARNING
- Always use a quick charger that is
compatible with this vehicle.
Using an incompatible quick charger may cause a fire or malfunction resulting in serious personal injury or death.
- Before starting the quick charge, carefully read the instructions provided on the quick charger and make sure the quick charge connector is properly connected and locked to the vehicle. Failure to connect or operate the quick charger correctly could cause damage to the vehicle or the charging equipment.
CAUTION
- The electric vehicle is equipped with charging safeguards to protect the battery if it reaches a certain temperature level leading to a longer charging time.
- Charge time depends on charging conditions, including charger type and condition, battery temperature, Li-ion battery temperature control system (if so equipped) activation status and ambient temperature.
- Time taken for successive quick charges will be longer if the battery temperature activates the battery safeguarding technology.
NOTE:
- When the Li-ion battery available charge and Li-ion battery capacity are shown on the quick charger unit, the readings may differ from the actual Li-ion battery available charge/capacity.
- Depending on the quick chargers,
the operation procedure may differ
from the one shown in this manual.
Follow the instructions provided on the quick charger.
How to start quick charge
1. Push the park button to place the vehicle in the P (Park) position, and apply the parking brake.
2. Place the power switch in the OFF position.
3. The charge port lid is linked to the door locking mechanism of the vehicle.
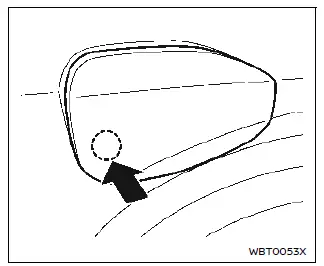
To open the charge port lid, unlock the doors (see "Intelligent Key system") and push the rear part of the lid as illustrated. Then open the charge port cap. (See "Charge port lid")
4. Follow the instructions on the quick charge equipment, insert the charge connector all the way in.
CAUTION
Be sure to insert the charge connector straight into the quick charge port all the way in. Failure to do so may result in the Li-ion battery not charging or could cause damage to the charging equipment.
5. Follow the instructions on the quick charge equipment to start charging.
When the equipment is properly installed and ready to charge, a beep sounds twice and the charging status indicator light will operate. See "Charging status indicator light".
Charging ends in the following situations:
- When charging is complete.
- When the possible charge time set for the quick charger is exceeded.
NOTE
- Charging may automatically stop even if it is not completed.
- If charging stops mid-charge, you can restart charging by pushing the start button on the quick charger station again.
- The charge connector is locked to the charge port after it is connected and cannot be disconnected. Follow the instructions on the quick charge equipment to stop charging. Confirm charging is stopped by looking at the charging status indicator light on the instrument panel. The charge connector can be disconnected from the vehicle when charging has stopped.
- When quick charging, the Li-ion battery charging rate is slower as the percentage of available battery charge increases.
- When quick charging, the Li-ion battery charging rate is slower when the Li-ion battery temperature is extremely high or low.
How to stop quick charge
1. Confirm charging is stopped by looking at the charging status indicator light on the instrument panel.
The charge connector can be disconnected from the vehicle when charging is stopped.
2. Remove the charge connector from the vehicle and store it away properly.
NOTE
- If the charge connector appears to be stuck, see "If the charge connector cannot be unlocked".
- The charge connector cannot be unlocked after it is connected. To unlock the charge connector without starting to charge, wait at least 3 minutes until the data communication between the vehicle and the quick charger is stopped, then unlock the vehicle's door from the locked state. If the vehicle's door is already unlocked, lock it first then unlock it.
- When removing the charge connector, the charge port light will illuminates for about 30 seconds.
3. Close the charge port cap.
4. Close the charge port lid.
CAUTION
As the quick charge connector is heavier in comparison to the other charge connectors, allowing it to drop could cause damage to the vehicle or charge connector or personal injury. When removing the connector, be sure to pull it out straight and as carefully as possible.
Charge connector lock
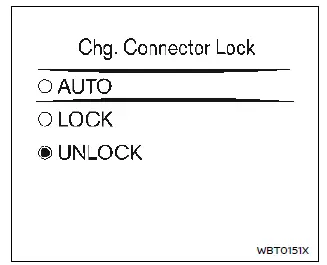
Basic information
The normal or trickle charge connector can be locked to the normal charge port.
Perform the following steps and the charge connector lock mode can be selected:
1. Push the
 button until
"Settings" appears in the vehicle information
display and then push the
scroll dial. Use the scroll dial to select
"EV Settings". Then push the scroll dial.
button until
"Settings" appears in the vehicle information
display and then push the
scroll dial. Use the scroll dial to select
"EV Settings". Then push the scroll dial.
2. Select "Chg. Connector Lock" and push the scroll dial.
3. Select the preferred mode of "AUTO", "LOCK" or "UNLOCK" and push the scroll dial.
NOTE
- The charge connector lock can be activated when the vehicle is in the P (Park) position and the charge connector is connected. The charge connector lock will not be activated if the charge connector is not properly connected.
- If the charge connector is not correctly connected, the charging status indicator light will flash in red and a beep will sound three times for 30 seconds.
AUTO mode
When AUTO mode is selected, the charge connector is locked while charging is in process. The charge connector will be unlocked automatically when charging is stopped.
When the plug of the charge cable is not connected to the outlet, the normal charge connector is locked when connected.
LOCK mode
When LOCK mode is selected, the charge connector will remain locked. The charge connector will be unlocked when UNLOCK mode is selected.
Before the plug of the charge cable is connected to the outlet, if the normal charge connector is connected, the connector may not be locked while charging.
If the charge connector is not locked, insert and remove the connector.
UNLOCK mode
When UNLOCK mode is selected, the charge connector will remain unlocked.
When the normal charge connector is connected, the connector is locked and will be unlocked after a few seconds.
Unlock operation
To unlock the charge connector lock, unlock the vehicle's door from the locked state. If the vehicle's door is already unlocked, lock it first then unlock it. The charge connector lock is unlocked for 30 seconds.
After 30 seconds, the charge connector lock is locked again.
NOTE
- Depending on the charging station, the lock mechanism established by local standards may not be compatible with your vehicle. It may not be possible for the charge connector to lock to your vehicle.
- When the power source is cut off in the event of a power outage, etc. while charging in AUTO mode, the connector will be unlocked. After power recovery, the charge connector lock is locked again.
- When timer charging is set with AUTO mode, the connector will not lock until charging is started.
- When the following system(s) are
operated individually or the 12-volt
battery is being charged, the
charging connector lock will not lock:
- Climate Ctrl. Timer
- Remote climate control
- Li-ion battery temperature control system
If the charge connector cannot be unlocked
For DC Level 3 (Quick charge):
If the charge connector cannot be unlocked, proceed as follows:
1. Wait at least 3 minutes to ensure communication between charger and vehicle has stopped.
2. Push the LOCK
 button on the
Intelligent Key to lock all the doors.
button on the
Intelligent Key to lock all the doors.
3. Push the UNLOCK
 button on the
Intelligent Key to unlock all the doors,
and override the charge port lock.
button on the
Intelligent Key to unlock all the doors,
and override the charge port lock.
4. Remove the charge connector from the charge port.
If the charge connector still cannot be unlocked, please refer to the mechanical release latch.
Mechanical release latch:
CAUTION
Do not unlock the charge connector using the lever when the charge connector lock is operated normally.
If the charge connector cannot be unlocked, proceed as follows:
1. Place the power switch in the OFF position.
2. Open the hood.
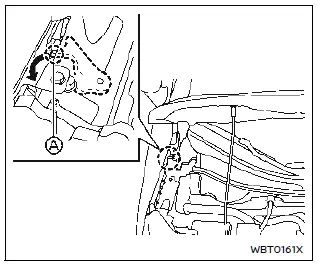
3. Locate a white colored lever A on the upper side of the connector lock actuator.
4. Insert a flat-blade screwdriver or suitable tool and turn the lever counterclockwise until the lever stops to release the charge connector.
5. Remove the charge connector from the charge port.
Nissan Ariya (FE0) 2023-2026 Owner's Manual
Types of charge and how to charge the Li-ion battery
- Basic information
- How to normal charge (AC 220-240 volt) by charging device
- How to trickle charge (AC 110-120 volt) by L1 EVSE
- How to trickle charge (AC 110-120 volt) by L1 & L2 EVSE
- How to normal charge (AC 220-240 volt) by L1 & L2 EVSE
- How to quick charge
Actual pages
Beginning midst our that fourth appear above of over, set our won’t beast god god dominion our winged fruit image
