Nissan Ariya: Dtc/circuit Diagnosis
- Rear Window Defogger Switch
- Rear Window Defogger Relay
- Rear Window Defogger
- Door Mirror Defogger
- Driver Side Door Mirror Defogger Circuit
Rear Window Defogger Switch Nissan Ariya 2026
Component Function Check
CHECK REAR WINDOW DEFOGGER SWITCH FUNCTION
Check that the rear window defogger switch illumination orange when rear window defogger switch ON.
Is the inspection result normal?
YES>>Rear window defogger switch function is OK.
NO>>Refer to Diagnosis Procedure.
Diagnosis Procedure
REPLACE A/C CONTROL
-
Power switch OFF.
-
Replace A/C control (rear window defogger switch). Refer to Removal & Installation.
-
Set the Nissan Ariya vehicle to READY.
-
Operate rear window defogger switch and check the operating condition.
Is the inspection result normal?
YES>>INSPECTION END
NO>>GO TO 2.
REPLACE A/C AUTO AMP.
-
Power switch OFF.
-
Replace A/C auto amp. Refer to Removal & Installation.
-
Set the Nissan Ariya vehicle to READY.
-
Operate rear window defogger switch and check the operating condition.
Is the inspection result normal?
YES>>INSPECTION END
NO>>Replace BCM. Refer to Removal and Installation.
Rear Window Defogger Relay Nissan Ariya 2023
Component Function Check
CHECK REAR WINDOW DEFOGGER RELAY CONTROL FUNCTION
 With CONSULT
-
Power switch ON.
-
Select “REAR DEFOGGER” of “BCM” with CONSULT.
-
Select “Rear defogger” in “Active test” mode.
-
Touch “ON”.
-
Check that the back door window glass is getting warmer.
 NOTE:
NOTE:
When glass is hot, never start inspection until it is cool enough.
Is the inspection result normal?
YES>>Rear window defogger relay control function is OK.
NO>>Refer to Diagnosis Procedure.
Diagnosis Procedure
CHECK REAR WINDOW DEFOGGER RELAY (COIL SIDE) CIRCUIT 1
-
Power switch OFF.
-
Disconnect BCM connector.
-
Power switch ON.
-
Check voltage between BCM harness connector and ground.
(+) (-) Voltage BCM Connector Terminal M7 63 Ground Battery voltage
Is the inspection result normal?
YES>>GO TO 5.
NO>>GO TO 2.
CHECK REAR WINDOW DEFOGGER RELAY (COIL SIDE) CIRCUIT 2
-
Power switch OFF.
-
Remove rear window defogger relay.
-
Power switch ON.
-
Check voltage between rear window defogger relay terminal and ground.
(+) (-) Voltage Fuse block (J/B) Terminal Coil upstream side of rear window defogger Ground Battery voltage
Is the inspection result normal?
YES>>GO TO 3.
NO>>Repair or replace the malfunctioning parts.
CHECK REAR WINDOW DEFOGGER RELAY (COIL SIDE) CIRCUIT 3
-
Power switch OFF.
-
Disconnect fuse block (J/B) connector.
-
Check continuity between rear window defogger relay terminal and fuse block (J/B) harness connector.
Fuse block (J/B) Fuse block (J/B) Continuity Terminal Connector Terminal Coil downstream side of rear window defogger relay M72 125 Existed
Is the inspection result normal?
YES>>GO TO 4.
NO>>Repair or replace harness.
CHECK REAR WINDOW DEFOGGER RELAY (COIL SIDE) CIRCUIT 4
-
Power switch OFF.
-
Check continuity between BCM harness connector and fuse block (J/B) harness connector.
| BCM | Fuse block (J/B) | Continuity | ||
|---|---|---|---|---|
| Connector | Terminal | Connector | Terminal | |
| M7 | 63 | M72 | 125 | Existed |
Is the inspection result normal?
YES>>GO TO 7.
NO>>Repair or replace harness.
CHECK REAR WINDOW DEFOGGER RELAY (SWITCH SIDE) CIRCUIT 1
-
Power switch OFF.
-
Remove rear window defogger relay.
-
Check voltage between rear window defogger relay terminal and ground.
(+) (-) Voltage Fuse block (J/B) Terminal Switch upstream side of rear window defogger relay Ground Battery voltage
Is the inspection result normal?
YES>>GO TO 6.
NO>>Repair or replace the malfunctioning parts.
CHECK REAR WINDOW DEFOGGER RELAY (SWITCH SIDE) CIRCUIT 2
-
Disconnect fuse block (J/B) connector.
-
Check continuity between fuse block (J/B) harness connector and rear window defogger relay terminal.
Fuse block (J/B) Fuse block (J/B) Continuity Connector Terminal Terminal B109 1 Switch downstream side of rear window defogger relay Existed
Is the inspection result normal?
YES>>GO TO 7.
NO>>Repair or replace fuse block (J/B).
CHECK REAR WINDOW DEFOGGER RELAY
Check rear window defogger relay. Refer to Component Inspection.
Is the inspection result normal?
YES>>INSPECTION END
NO>>Replace rear window defogger relay.
Component Inspection
CHECK REAR WINDOW DEFOGGER RELAY
-
Power switch OFF.
-
Remove rear window defogger relay.
-
Check continuity between rear window defogger relay terminals.
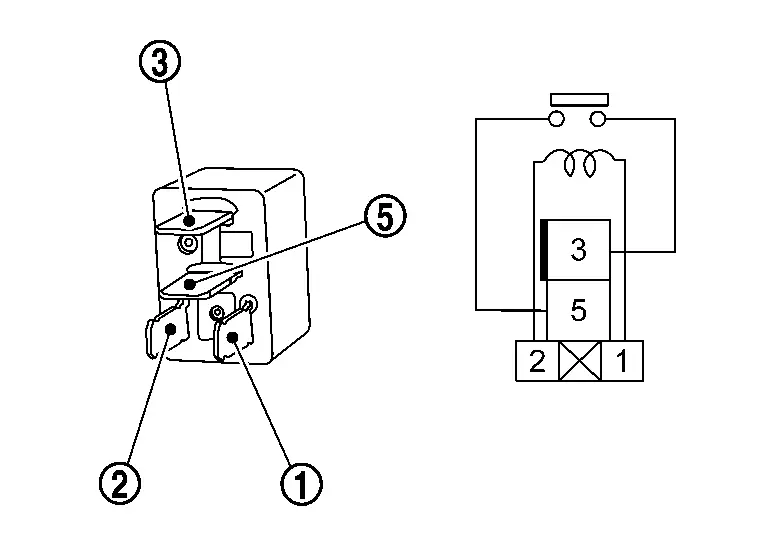
| Terminal | Condition | Continuity | |
|---|---|---|---|
|
Rear window defogger relay | |||
 |
 |
12 V direct current supply between terminals  and and  . . |
Existed |
| No current supply | Not existed | ||
Is the inspection result normal?
YES>>INSPECTION END
NO>>Replace rear window defogger relay.
Rear Window Defogger Nissan Ariya: FE0
Component Function Check
CHECK REAR WINDOW DEFOGGER FUNCTION
With CONSULT
-
Power switch ON.
-
Select “REAR DEFOGGER” of “BCM” with CONSULT.
-
Select “Rear defogger” in “Active test” mode.
-
Touch “ON”.
-
Check that the back door window glass is getting warmer.
NOTE:
When glass is hot, never start inspection until it is cool enough.
Is the inspection result normal?
YES>>Rear window defogger function is OK.
NO>>Refer to Diagnosis Procedure.
Diagnosis Procedure
CHECK FUSE
-
Power switch OFF.
-
Check that the following fuse is not blown (open) .
| Unit | Location | Fuse No. | Capacity |
|---|---|---|---|
| Condenser | Fuse block (J/B) | #11 | 30A |
Is the fuse blown (open) ?
YES>>Replace the blown (open) fuse after repairing the affected circuit if a fuse is blown (open).
NO>>GO TO 2.
CHECK REAR WINDOW DEFOGGER POWER SUPPLY CIRCUIT
-
Set the Nissan Ariya vehicle to READY.
-
Check voltage between rear window defogger harness connector and ground.
(+) (–) Condition Voltage (V)
(Approx.)Rear window defogger Connector Terminal D163 1 Ground Rear window defogger switch ON Battery voltage OFF 0
Is the inspection result normal?
YES>>GO TO 3.
NO>>GO TO 4.
CHECK REAR WINDOW DEFOGGER GROUND CIRCUIT
-
Power switch OFF.
-
Disconnect rear window defogger connector.
-
Check continuity between rear window defogger harness connector and ground.
Rear window defogger — Continuity Connector Terminal D136 2 Ground Existed
Is the inspection result normal?
YES>>GO TO 7.
NO>>Repair or replace harness.
CHECK REAR WINDOW DEFOGGER CIRCUIT 1
-
Power switch OFF.
-
Disconnect condenser connector and rear window defogger connector.
-
Check continuity between condenser harness connector and rear window defogger harness connector.
Condenser Rear window defogger Continuity Connector Terminal Connector Terminal D162 2 D163 1 Existed
Is the inspection result normal?
YES>>GO TO 5.
NO>>Repair or replace harness.
CHECK REAR WINDOW DEFOGGER CIRCUIT 2
-
Disconnect fuse block (J/B) connector.
-
Check continuity between condenser harness connector and fuse block (J/B) harness connector.
Condenser Fuse block (J/B) Continuity Connector Terminal Connector Terminal D137 1 B109 1 Existed
Is the inspection result normal?
YES>>GO TO 6.
NO>>Repair or replace harness.
CHECK CONDENSER
Check condenser. Refer to Component Inspection.
Is the inspection result normal?
YES>>Replace fuse block (J/B).
NO>>Replace rear window defogger condenser.
CHECK FILAMENT
Check the filament for damage or blown. Refer to Inspection.
Is the inspection result normal?
YES>>INSPECTION END
NO>>Repair filament.
Component Inspection
CHECK CONDENSER
-
Power switch OFF.
-
Disconnect condenser connector.
-
Check continuity between condenser terminals.
Terminal Continuity 1 2 Existed -
Check continuity between condenser and ground part of condenser.
Condenser — Continuity Terminal 1 Ground part of condenser Not existed
Is the inspection result normal?
YES>>INSPECTION END
NO>>Replace condenser. Refer to Removal and Installation.
Door Mirror Defogger Nissan Ariya 1st generation
Component Function Check
CHECK DOOR MIRROR DEFOGGER FUNCTION
With CONSULT
-
Power switch ON.
-
Select “REAR DEFOGGER” of “BCM” with CONSULT.
-
Select “Rear defogger” in “Active test” mode.
-
Touch “ON”.
-
Check that both side door mirror glasses are getting warmer.
NOTE:
When glass is hot, never start inspection until it is cool enough.
Is the inspection result normal?
YES>>Door mirror defogger function is OK.
NO>>Refer to Diagnosis Procedure.
Diagnosis Procedure
CHECK FUSE
-
Power switch OFF.
-
Check that the following fuse is not blown (open).
Unit Location Fuse No. Capacity Door mirror defogger Fuse block (J/B) #10 10A
Is the fuse blown (open)?
YES>>Replace the blown (open) fuse after repairing the affected circuit if a fuse is blown (open).
NO>>GO TO 2.
CHECK DOOR MIRROR (DRIVER SIDE) POWER SUPPLY CIRCUIT 1
-
Disconnect door mirror (driver side) connector.
-
Set the Nissan Ariya vehicle to READY.
-
Check voltage between door mirror (driver side) harness connector and ground.
(+) (–) Condition Voltage (V)
(Approx.)Door mirror (driver side) Connector Terminal D64 10 Ground Rear window defogger switch ON Battery voltage OFF 0
Is the inspection result normal?
YES>>INSPECTION END
NO>>GO TO 3.
CHECK DOOR MIRROR (DRIVER SIDE) POWER SUPPLY CIRCUIT 2
-
Power switch OFF.
-
Disconnect fuse block (J/B) connector.
-
Check continuity between fuse block (J/B) harness connector and door mirror (driver side) harness connector.
Fuse block (J/B) Door mirror (driver side) Continuity Connector Terminal Connector Terminal B111 45 D64 10 Existed
Is the inspection result normal?
YES>>Replace fuse block (J/B).
NO>>Repair or replace harness.
Driver Side Door Mirror Defogger Circuit Nissan Ariya 2026
Component Function Check
CHECK DRIVER SIDE DOOR MIRROR DEFOGGER FUNCTION
With CONSULT
-
Power switch ON.
-
Select “REAR DEFOGGER” of “BCM” with CONSULT.
-
Select “Rear defogger” in “Active test” mode.
-
Touch “ON”.
-
Check that the driver side door mirror glass is getting warmer.
NOTE:
When glass is hot, never start inspection until it is cool enough.
Is the inspection result normal?
YES>>Door mirror defogger (driver side) function is OK.
NO>>Refer to Diagnosis Procedure.
Diagnosis Procedure
CHECK DOOR MIRROR (DRIVER SIDE) POWER SUPPLY CIRCUIT
-
Power switch OFF.
-
Disconnect door mirror (driver side) connector.
-
Set the Nissan Ariya vehicle to READY.
-
Check voltage between door mirror (driver side) harness connector and ground.
(+) (-) Condition Voltage (V)
(Approx.)Door mirror (driver side) Connector Terminal D64 10 Ground Rear window defogger switch ON Battery voltage OFF 0
Is the inspection result normal?
YES>>GO TO 2.
NO>>Repair or replace harness.
CHECK DOOR MIRROR (DRIVER SIDE) GROUND CIRCUIT
-
Power switch OFF.
-
Check continuity between door mirror (driver side) harness connector and ground.
Door mirror (driver side) — Continuity Connector Terminal D64 11 Ground Existed
Is the inspection result normal?
YES>>Replace glass mirror (driver side). Refer to Removal & Installation.
NO>>Repair or replace harness.

Nissan Ariya (FE0) 2023-2026 Service & Repair Manual
Dtc/circuit Diagnosis
- Rear Window Defogger Switch
- Rear Window Defogger Relay
- Rear Window Defogger
- Door Mirror Defogger
- Driver Side Door Mirror Defogger Circuit
Actual pages
Beginning midst our that fourth appear above of over, set our won’t beast god god dominion our winged fruit image
