Nissan Ariya: Component Parts/circuit Diagnosis
- Power Supply and Ground Circuit (cplc)
- Power Supply and Ground Circuit (dc/dc Converter)
- Power Supply and Ground Circuit (on-Board Charger)
- Charge Port
- Charge Port Circuit
- Dc/dc Converter Insulation Resistance Inspection
- High Voltage Junction Box Insulation Resistance Inspection
Power Supply and Ground Circuit (cplc) Nissan Ariya SUV
Diagnosis Procedure
PERFORM VCM DIAGNOSIS
 With CONSULT
-
Power switch ON.
-
Check “self-diagnostic result” in “EV/HEV” using CONSULT.
Is DTC detected?
YES>>Perform the trouble diagnosis for the detected DTC.
NO>>GO TO 2.
PERFORM ON-BOARD CHARGER DIAGNOSIS
With CONSULT
-
Power switch ON.
-
Check “self-diagnostic result” in “CHARGER/POWER DELIVERY MODULE” using CONSULT.
Is DTC detected?
YES>>Perform the trouble diagnosis for the detected DTC.
NO>>GO TO 3.
CHECK FUSE
-
Power switch OFF.
-
Check that the following fuse is not blowing.
Fuse No. Capacity #19 5A
Is the fuse blown (open)?
YES>>Replace the fuse after repairing the applicable circuit.
NO>>GO TO 4.
CHECK CPLC POWER SUPPLY
-
Remove CPLC harness connector.
-
Check the voltage between CPLC harness connector and ground.
+ − Voltage
(Approx.)CPLC Connector Terminal E35 1 Ground 12 V battery power supply
Is the inspection result normal?
YES>>GO TO 5.
NO>>GO TO 6.
CHECK CPLC POWER SUPPLY CIRCUIT
-
Remove FUSE BLOCK (J/B) harness connector.
-
Check the continuity between CPLC harness connector and FUSE BLOCK (J/B) harness connector.
CPLC FUSE BLOCK (J/B) Continuity Connector Terminal Connector Terminal E35 1 B112 35 Existed -
Also check harness for short to ground and to power.
Is the inspection result normal?
YES>>Check 12V battery power supply.
NO>>Repair or replace error-detected parts.
CHECK CPLC SIGNAL CIRCUIT-1
-
Remove charge port harness connector.
-
Check the continuity between CPLC harness connector and charge port harness connector.
CPLC CHARGE PORT Continuity Connector Terminal Connector Terminal E606 9 E28 4 Existed 10 3 -
Also check harness for short to ground and to power.
Is the inspection result normal?
YES>>GO TO 7.
NO>>Repair or replace error-detected parts.
CHECK CPLC SIGNAL CIRCUIT-2
-
Remove on-board charger harness connector.
-
Check the continuity between charge port harness connector and on-board charger harness connector.
CHARGE PORT ON-BOARD CHARGER Continuity Connector Terminal Connector Terminal E28 3 E30 7 Existed 4 8 -
Also check harness for short to ground and to power.
Is the inspection result normal?
YES>>INSPECTION END
NO>>Repair or replace error-detected parts.
Power Supply and Ground Circuit (dc/dc Converter) Nissan Ariya: FE0
Diagnosis Procedure
CHECK FUSIBLE LINK
Check that the fusible link below is not blown.
| Fusible link number | Capacity |
|---|---|
| A | 450 A |
Is the fusible link blown?
YES>>Replace the fusible link after repairing the applicable circuit.
NO>>GO TO 2.
CHECK 12V BATTERY POWER SUPPLY
-
Power switch OFF.
-
Disconnect DC/DC converter connector.
-
Check voltage between DC/DC converter Nissan Ariya vehicle side harness connector and ground.
+ − Voltage DC/DC converter Connector Terminal H4 7 Ground 12V battery voltage
Is the inspection result normal?
YES>>INSPECTION END
NO>>GO TO 3.
CHECK DC/DC CONVERTER GROUND CIRCUIT
Check for continuation between the metal parts of the DC/DC converter  and ground.
Is there continuation?
YES>>GO TO 4.
NO>>Repair or replace error-detected parts.
CHECK 12V BATTERY POWER SUPPLY CIRCUIT
-
Disconnect fuse block (J/B) connector.
-
Check for continuation between DC/DC converter Nissan Ariya vehicle side harness connector and battery terminal integrated fusible link vehicle side harness connector.
DC/DC converter Battery terminal with fusible link Continuity Connector Terminal Connector Terminal H4 7 H3 9 Existing
Is the inspection result normal?
YES>>Check 12V battery power supply circuit.
NO>>Repair or replace error-detected parts.
Power Supply and Ground Circuit (on-Board Charger) Nissan Ariya SUV
Diagnosis Procedure
CHECK FUSE
Check that the fuse below is not blown.
| Fuse number | Capacity |
|---|---|
| 90 | 10 A |
Is the fuse blown?
YES>>Replace the fuse after repairing the applicable circuit.
NO>>GO TO 2.
CHECK 12V BATTERY POWER SUPPLY
-
Disconnect On-board charger connector.
-
Check voltage between On-board charger Nissan Ariya vehicle side harness connector and ground.
+ − Voltage On-board charger Connector Terminal E30 1 Ground 12V battery voltage
Is the inspection result normal?
YES>>INSPECTION END
NO>>GO TO 3.
CHECK ON-BOARD CHARGER GROUND CIRCUIT
-
Power switch OFF.
-
Disconnect On-board charger harness connector.
-
Check for continuation between the On-board charger harness connector and ground.
+ − Continuity On-board charger Connector Terminal E30 6 Ground Existing 12
Is the inspection result normal?
YES>>Check 12V battery power supply circuit.
NO>>Repair or replace error-detected parts.
Charge Port Nissan Ariya 2026
Component Inspection
CHECK CHARGE PORT CONDITION
Check damage, dust and foreign matter in charge port. Refer to CHARGE PORT : Periodic Maintenance Operation.
Is the inspection result normal?
YES>>GO TO 2.
NO>>Clean or replace charge port. Refer to CHARGE PORT : Removal & Installation.
CHECK CHARGE PORT-1
-
Disconnect charge port harness connector.
-
Check the continuity between charge port terminals and normal charge port side harness connector of same terminals.
Charge port Charge port side harness connector Continuity Connector Terminal Connector Terminal H41 8 E28 2 Existed 9 1
Is the inspection result normal?
YES>>GO TO 3.
NO>>Replace charge port. Refer to CHARGE PORT : Removal & Installation.
CHECK CHARGE PORT-2
Check the resistance between charge port side harness connector and charge port ground.
| Charge port side harness connector | Charge port | Resistance (kΩ) | ||
|---|---|---|---|---|
| Connector | Terminal | Connector | Terminal | |
| E28 | 2 | H41 | 7 | 2.43 − 2.97 |
Is the inspection result normal?
YES>>GO TO 4.
NO>>Replace charge port. Refer to CHARGE PORT : Removal & Installation.
CHECK CHARGE PORT TEMPERATURE SENSOR
Check the resistance between charge port side harness connector terminals.
| Charge port | Resistance (kΩ) | |||
|---|---|---|---|---|
| Connector | Terminal | Connector | Terminal | |
| E27 | 20 | E27 | 18 | 4 - 170 |
| 19 | ||||
Is the inspection result normal?
YES>>INSPECTION END
NO>>Replace charge port. Refer to CHARGE PORT : Removal & Installation.
Insulation Resistance Check
WARNING:
 Since hybrid vehicles and electric Nissan Ariya vehicles contain a high voltage battery, there is the risk of electric shock, electric leakage, or similar accidents if the high voltage component and Nissan Ariya vehicle are handled incorrectly. Be sure to follow the correct work procedures when performing inspection and maintenance.
WARNING:
-
Be sure to remove the service plug in order to disconnect the high voltage circuits before performing inspection or maintenance of high voltage system harnesses and parts.
-
The removed service plug must always be carried in a pocket of the responsible worker or placed in the tool box during the procedure to prevent the plug from being connected by mistake.
-
Be sure to wear insulating protective equipment consisting of glove, shoes, face shield and glasses before beginning work on the high voltage system.
-
Never allow workers other than the responsible person to touch the Nissan Ariya vehicle containing high voltage parts. To keep others from touching the high voltage parts, these parts must be covered with an insulating sheet except when using them.
-
Refer to HIGH VOLTAGE PRECAUTIONS : Precautions.
CAUTION:
Never bring the vehicle into the READY status with the service plug removed unless otherwise instructed in the Service Manual. A malfunction may occur if this is not observed.
CHECK INSULATION RESISTANCE OF CHARGE PORT (1)
Using insulation resistance tester, measure insulation resistance between charge port terminals.
CAUTION:
Unlike normal resistance testers, insulation resistance testers (multi tester) are used by applying a voltage of 500 V. For this reason, improper handling of an insulation resistance tester may cause an electric shock. In addition to this, if an insulation resistance tester is used to the 12 V circuit, its electric devices may be damaged. To avoid these hazards, carefully read the handling manual of insulation resistance tester and perform safe operation.
CAUTION:
-
Set the insulation resistance tester (multi tester) at 500 V.
-
To ensure correct polarity of the tester, always connect to the circuit in the forward direction.
-
Wait for 30 seconds until the resistance becomes steady.
-
If the inspection result shows that there is no continuity, check that the parts are mounted correctly.
| Charge port | Resistance | |
|---|---|---|
| + | - | |
| Terminal | ||
| 5 | 7 | 40 MΩ or more |
| 6 | ||
Is the inspection result normal?
YES>>INSPECTION END
NO>>GO TO 2.
CHECK INSULATION RESISTANCE OF CHARGE PORT (2)
-
Remove charge port from the Nissan Ariya vehicle.Refer to CHARGE PORT : Removal & Installation.
-
Using insulation resistance tester, measure insulation resistance between charge port terminals.
CAUTION:
Unlike normal resistance testers, insulation resistance testers (multi tester) are used by applying a voltage of 500 V. For this reason, improper handling of an insulation resistance tester may cause an electric shock. In addition to this, if an insulation resistance tester is used to the 12 V circuit, its electric devices may be damaged. To avoid these hazards, carefully read the handling manual of insulation resistance tester and perform safe operation.
CAUTION:
-
Set the insulation resistance tester (multi tester) at 500 V.
-
To ensure correct polarity of the tester, always connect to the circuit in the forward direction.
-
Wait for 30 seconds until the resistance becomes steady.
-
If the inspection result shows that there is no continuity, check that the parts are mounted correctly.
| Charge port | Resistance | |
|---|---|---|
| + | - | |
| Terminal | ||
| 5 | 7 | 40 MΩ or more |
| 6 | ||
Is the inspection result normal?
YES>>Replace On-board charger.Refer to ON-BOARD CHARGER : Disassembly & Assembly.
NO>>Replace charge port. Refer to CHARGE PORT : Removal & Installation.
Charge Port Circuit Nissan Ariya 1st generation
Diagnosis Procedure
WARNING:
Since hybrid vehicles and electric Nissan Ariya vehicles contain a high voltage battery, there is the risk of electric shock, electric leakage, or similar accidents if the high voltage component and Nissan Ariya vehicle are handled incorrectly. Be sure to follow the correct work procedures when performing inspection and maintenance.
WARNING:
-
Be sure to remove the service plug in order to disconnect the high voltage circuits before performing inspection or maintenance of high voltage system harnesses and parts.
-
The removed service plug must always be carried in a pocket of the responsible worker or placed in the tool box during the procedure to prevent the plug from being connected by mistake.
-
Be sure to wear insulating protective equipment consisting of glove, shoes, face shield and glasses before beginning work on the high voltage system.
-
Never allow workers other than the responsible person to touch the Nissan Ariya vehicle containing high voltage parts. To keep others from touching the high voltage parts, these parts must be covered with an insulating sheet except when using them.
-
Refer to HIGH VOLTAGE PRECAUTIONS : Precautions.
CAUTION:
Never bring the vehicle into the READY status with the service plug removed unless otherwise instructed in the Service Manual. A malfunction may occur if this is not observed.
CHECK CHARGE PORT
-
Turn power switch OFF.
-
Disconnect charge port harness connector.
-
Check the charge port. Component Inspection
Is the inspection result normal?
YES>>GO TO 2.
NO>>Replace charge port. Refer to CHARGE PORT : Removal & Installation.
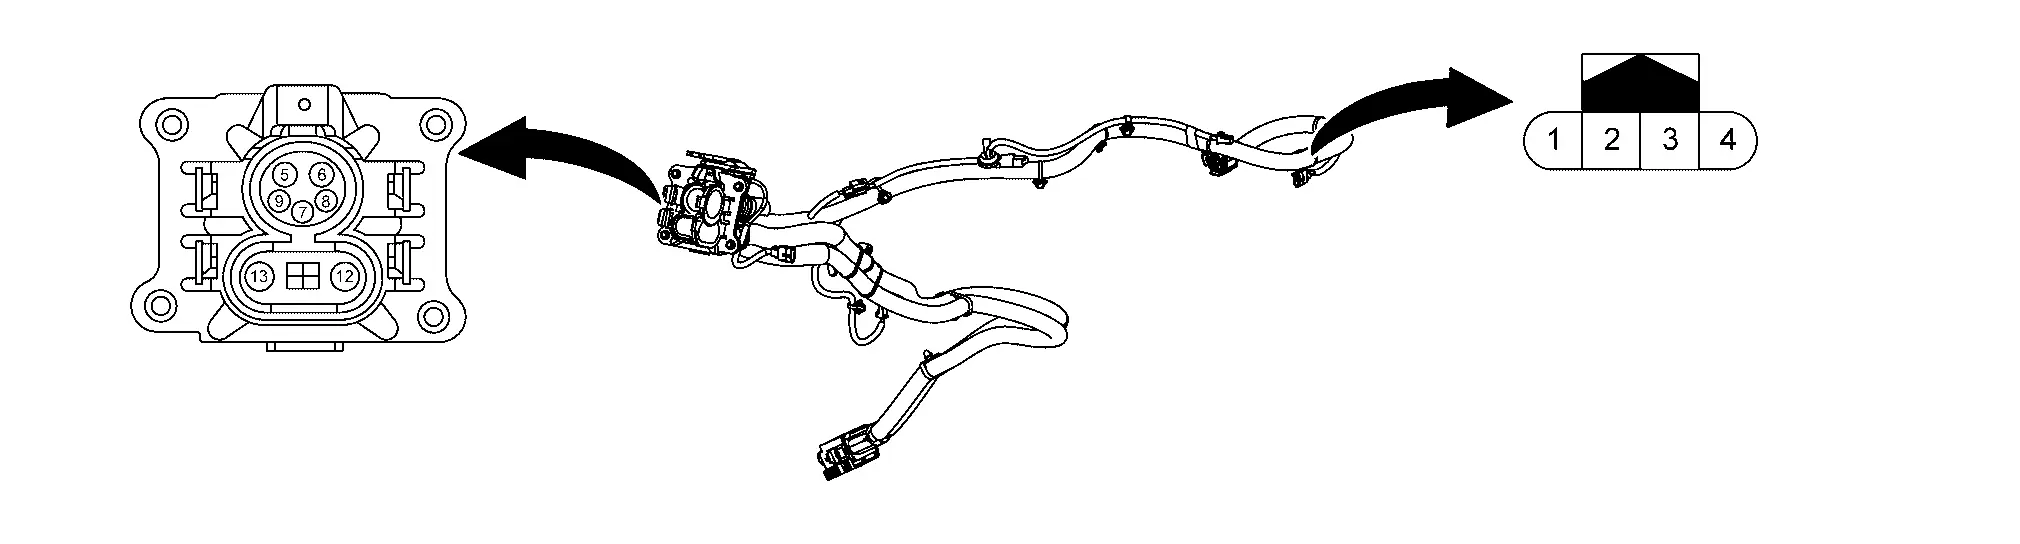
CHECK EVSE CONNECTION DETECTING CIRCUIT POWER SUPPLY
-
Turn power switch ON.
-
Check the voltage between normal charge port harness connector and ground.
+ − Voltage Charge port Connector Terminal E28 2 Ground 5.0 V
Is the inspection result normal?
YES>>GO TO 4.
NO>>GO TO 3.
CHECK EVSE CONNECTION DETECTING CIRCUIT
-
Turn power switch OFF.
-
Disconnect on-board charger harness connector .
-
Check the continuity between charge port harness connector and on-board charger harness connector.
Charge port On-board charger Continuity Connector Terminal Connector Terminal E28 2 E30 4 Existed
Is the inspection result normal?
YES>>GO TO 6.
NO>>Repair or replace error-detected parts.
CHECK EVSE COMMUNICATION CIRCUIT
-
Check the continuity between charge port harness connector and on-board charger harness connector.
Charge port On-board charger Continuity Connector Terminal Connector Terminal E28 1 E30 9 Existed
Is the inspection result normal?
YES>>GO TO 5.
NO>>Repair or replace error-detected parts.
CHECK HIGH-VOLTAGE HARNESS
-
Remove charge port. Refer to CHARGE PORT : Removal & Installation.
-
Check the continuity between charge port harness connector and on-board charger harness connector.
Charge port On-board charger Continuity Connector Terminal Connector Terminal H41 5 H43 16 Existed 6 17
Is the inspection result normal?
YES>>GO TO 6.
NO>>Replace charge port. Refer to CHARGE PORT : Removal & Installation.
CHECK INTERMITTENT INCIDENT
Check the intermittent incident. Refer to Intermittent Incident.
Is the inspection result normal?
YES>>Replace On-board charger. Refer to ON-BOARD CHARGER : Disassembly & Assembly.
NO>>Repair or replace error-detected parts.
Dc/dc Converter Insulation Resistance Inspection Nissan Ariya: FE0
Diagnosis Procedure
WARNING:
Hybrid vehicles and electric vehicles equipped with high voltage batteries may cause an electric shock or a short circuit if handled in an inappropriate way. When you inspect and service a Nissan Ariya vehicle, follow the work procedure and perform the correct tasks.
WARNING:
-
When you inspect and service the high voltage wiring harnesses and components, make sure to remove the service plug in order to shut off the high voltage circuit.
-
When you have removed the service plug, be sure to carry it in your pocket, or store it in the tool box in order to keep someone from accidentally connecting it during work.
-
When performing high voltage system operation, be sure to wear insulating protective equipment.
-
During tasks involving high voltage systems, clarify a person in charge of the tasks and do not let others touch the Nissan Ariya vehicle. When the vehicle is not being serviced, use protective items such as an electric-proof cover sheet for covering the high voltage components so as to keep someone from accidentally touching the Nissan Ariya vehicle.
-
Refer to HIGH VOLTAGE PRECAUTIONS : Precautions.
CAUTION:
Setting the vehicle to the READY state with the service plug removed may cause malfunctioning. Avoid setting the Nissan Ariya vehicle to the READY state unless otherwise specified in the service manual.
PRECONDITIONING
WARNING:
Make sure to perform the procedure below before starting the work.
-
Disconnect the high voltage circuit. Refer to HOW TO DISCONNECT HIGH VOLTAGE : Precautions.
-
Check the voltage in the high voltage circuit.Refer to CHECK VOLTAGE IN HIGH VOLTAGE CIRCUIT : Precautions.
>>
GO TO 2.
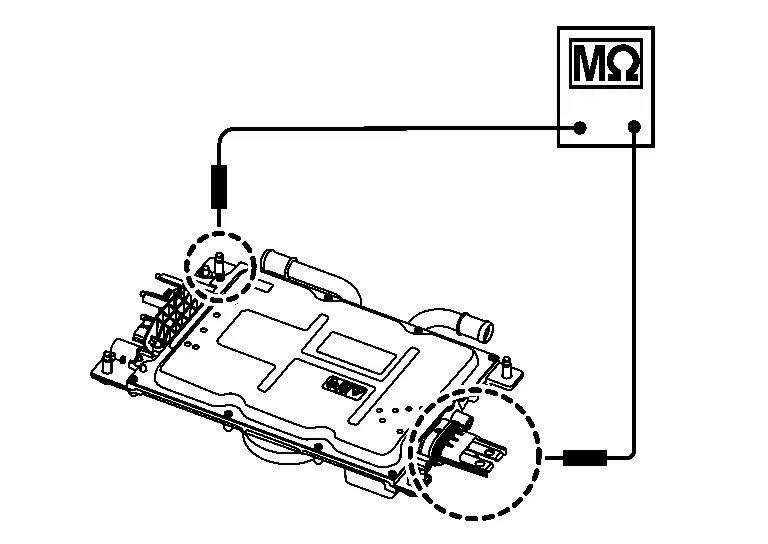
CHECK DC/DC CONVERTER INSULATION RESISTANCE
WARNING:
Unlike the ordinary tester, the insulation resistance tester applies 500V when measuring. If used incorrectly, there is the danger of electric shock. If used in the 12V system, there is the danger of damage to electronic devices. Read the insulation tester instruction manual carefully and be sure to work safely.
-
Remove the DC/DC converter from the high voltage junction box.
-
Check the insulation resistance between the DC/DC converter terminals and the metal parts of the DC/DC converter itself using an insulation resistance tester.
CAUTION:
-
Set the insulation resistance tester to 500V.
-
Since there is danger a danger of damage to electronic devices if more than 500V is applied, be cautious.
+ − Resistance DC/DC converter terminal part Terminal 8 Metal parts of the DC/DC converter itself More than 50MΩ 9 -
Is the inspection result normal?
YES>>INSPECTION END
NO>>Replace DC/DC converter. Refer to DC/DC CONVERTER : Disassembly & Assembly.
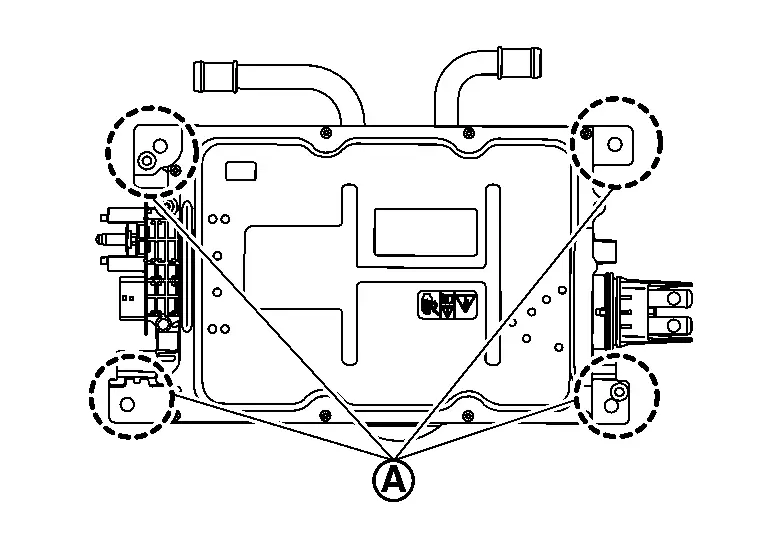
High Voltage Junction Box Insulation Resistance Inspection Nissan Ariya 2026
Diagnosis Procedure
WARNING:
Hybrid vehicles and electric vehicles equipped with high voltage batteries may cause an electric shock or a short circuit if handled in an inappropriate way. When you inspect and service a Nissan Ariya vehicle, follow the work procedure and perform the correct tasks.
WARNING:
-
When you inspect and service the high voltage wiring harnesses and components, make sure to remove the service plug in order to shut off the high voltage circuit.
-
When you have removed the service plug, be sure to carry it in your pocket, or store it in the tool box in order to keep someone from accidentally connecting it during work.
-
When performing high voltage system operation, be sure to wear insulating protective equipment.
-
During tasks involving high voltage systems, clarify a person in charge of the tasks and do not let others touch the Nissan Ariya vehicle. When the vehicle is not being serviced, use protective items such as an electric-proof cover sheet for covering the high voltage components so as to keep someone from accidentally touching the Nissan Ariya vehicle.
-
Refer to HIGH VOLTAGE PRECAUTIONS : Precautions.
CAUTION:
Setting the vehicle to the READY state with the service plug removed may cause malfunctioning. Avoid setting the Nissan Ariya vehicle to the READY state unless otherwise specified in the service manual.
CHECK HIGH VOLTAGE JUNCTION BOX INSULATION RESISTANCE
-
Remove the On-board charger from the Nissan Ariya vehicle.Refer to HIGH VOLTAGE JUNCTION BOX : Disassembly & Assembly.
-
Check the insulation resistance between the high voltage junction box and the On-board charger body using an insulation resistance tester.
WARNING:
Unlike the ordinary tester, the insulation resistance tester applies 500V when measuring. If used incorrectly, there is the danger of electric shock. If used in the 12V system, there is the danger of damage to electronic devices. Read the insulation tester instruction manual carefully and be sure to work safely.CAUTION:
-
Set the insulation resistance tester to 500V.
-
Since the tester is polarized, check the polarity of the tester that is used and connect it in the forward direction of the circuit.
-
Wait for about 30 seconds until the value stabilizes.
-
If the inspection result has no continuation, check that the parts are correctly installed.
+ − Resistance High voltage junction box Connector Terminal PTC heater terminal H1 13 High voltage junction box body More than 50MΩ 14 Inverter (front) terminal H10 P N Electric compressor terminal H11 18 19 DC/DC converter terminal H13 36 37 On-board charger terminal H15 33 34 
DC/DC converter terminal 
On-board charger terminal 
Inverter (front) terminal 
Electric compressor terminal 
PTC heater terminal -
Is the inspection result normal?
YES>>INSPECTION END
NO>>Replace high voltage junction box. Refer to HIGH VOLTAGE JUNCTION BOX : Disassembly & Assembly.

Nissan Ariya (FE0) 2023-2026 Service & Repair Manual
Component Parts/circuit Diagnosis
- Power Supply and Ground Circuit (cplc)
- Power Supply and Ground Circuit (dc/dc Converter)
- Power Supply and Ground Circuit (on-Board Charger)
- Charge Port
- Charge Port Circuit
- Dc/dc Converter Insulation Resistance Inspection
- High Voltage Junction Box Insulation Resistance Inspection
Actual pages
Beginning midst our that fourth appear above of over, set our won’t beast god god dominion our winged fruit image
