Nissan Ariya: Removal and Installation
- Cplc
- High Voltage Power Delivery Assembly
- Charge Port
- Charge Connector Lock Actuator
- Immediate Charging Switch
- Charging Status Indicator
Cplc Nissan Ariya 2026
CPLC : Exploded View
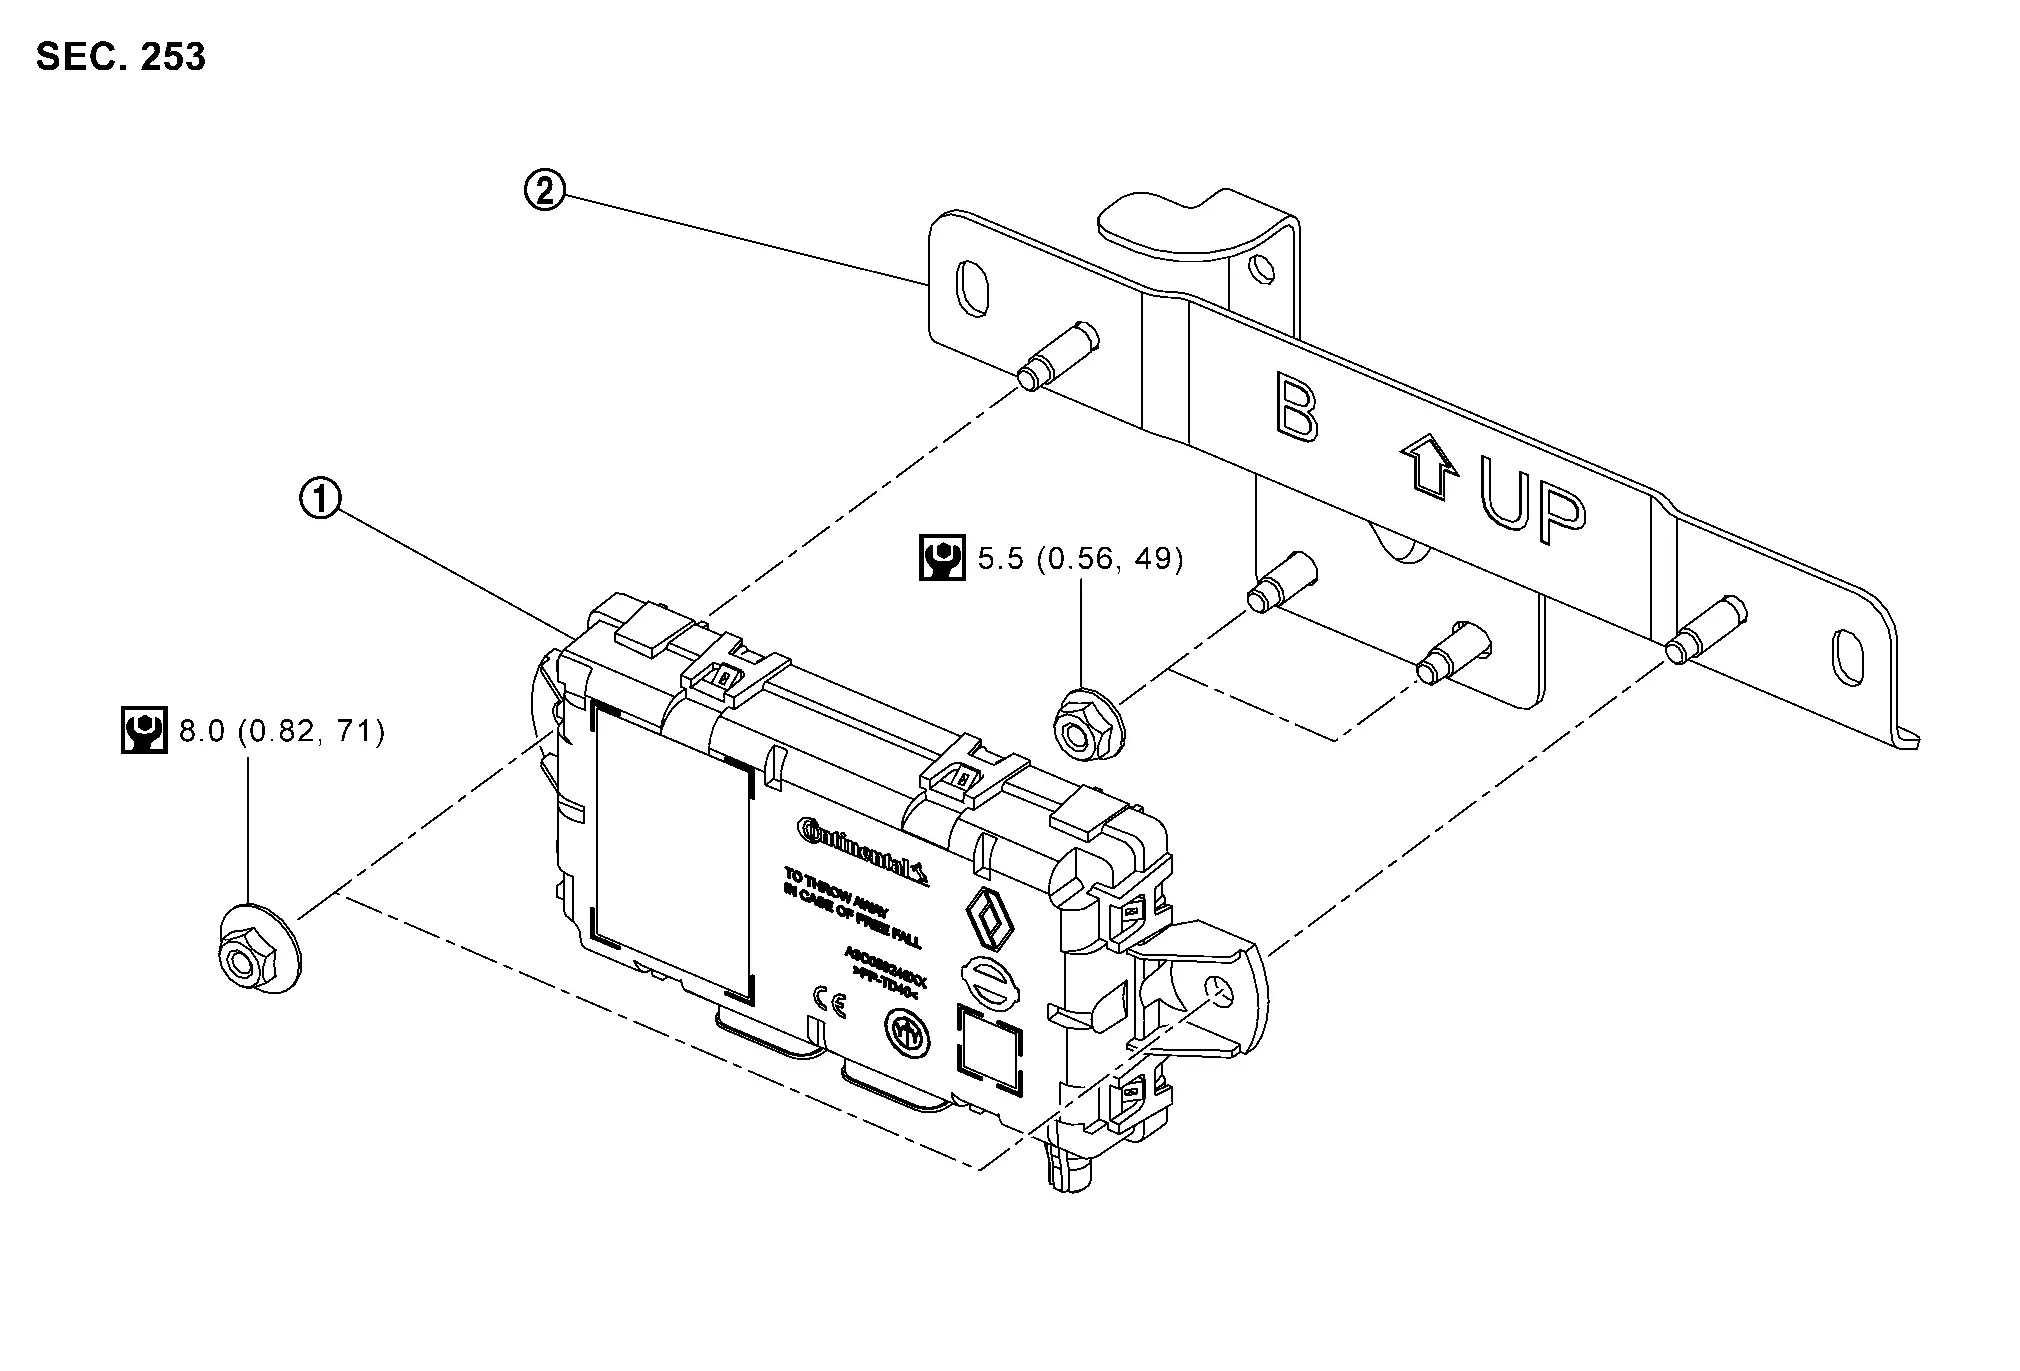
 |
CPLC |  |
CPLC bracket | ||
 |
:N·m(kg-m, in-lb) |
CPLC : Removal & Installation
CAUTION:
-
Discard any CPLC that has been dropped from a height and use a new one.
-
When the CPLC was replaced, make sure to perform the tasks listed in "ADDITIONAL SERVICE WHEN REPLACING CPLC". Refer to Work Procedure.
Remove instrument lower cover center .
Remove RH front kicking plate.Refer to Removal & Installation.
Remove RH dash side finisher. Refer to Removal & Installation.
Turn up the front right side of the floor carpet.
Remove front floor spacer RH. Refer to Exploded View.
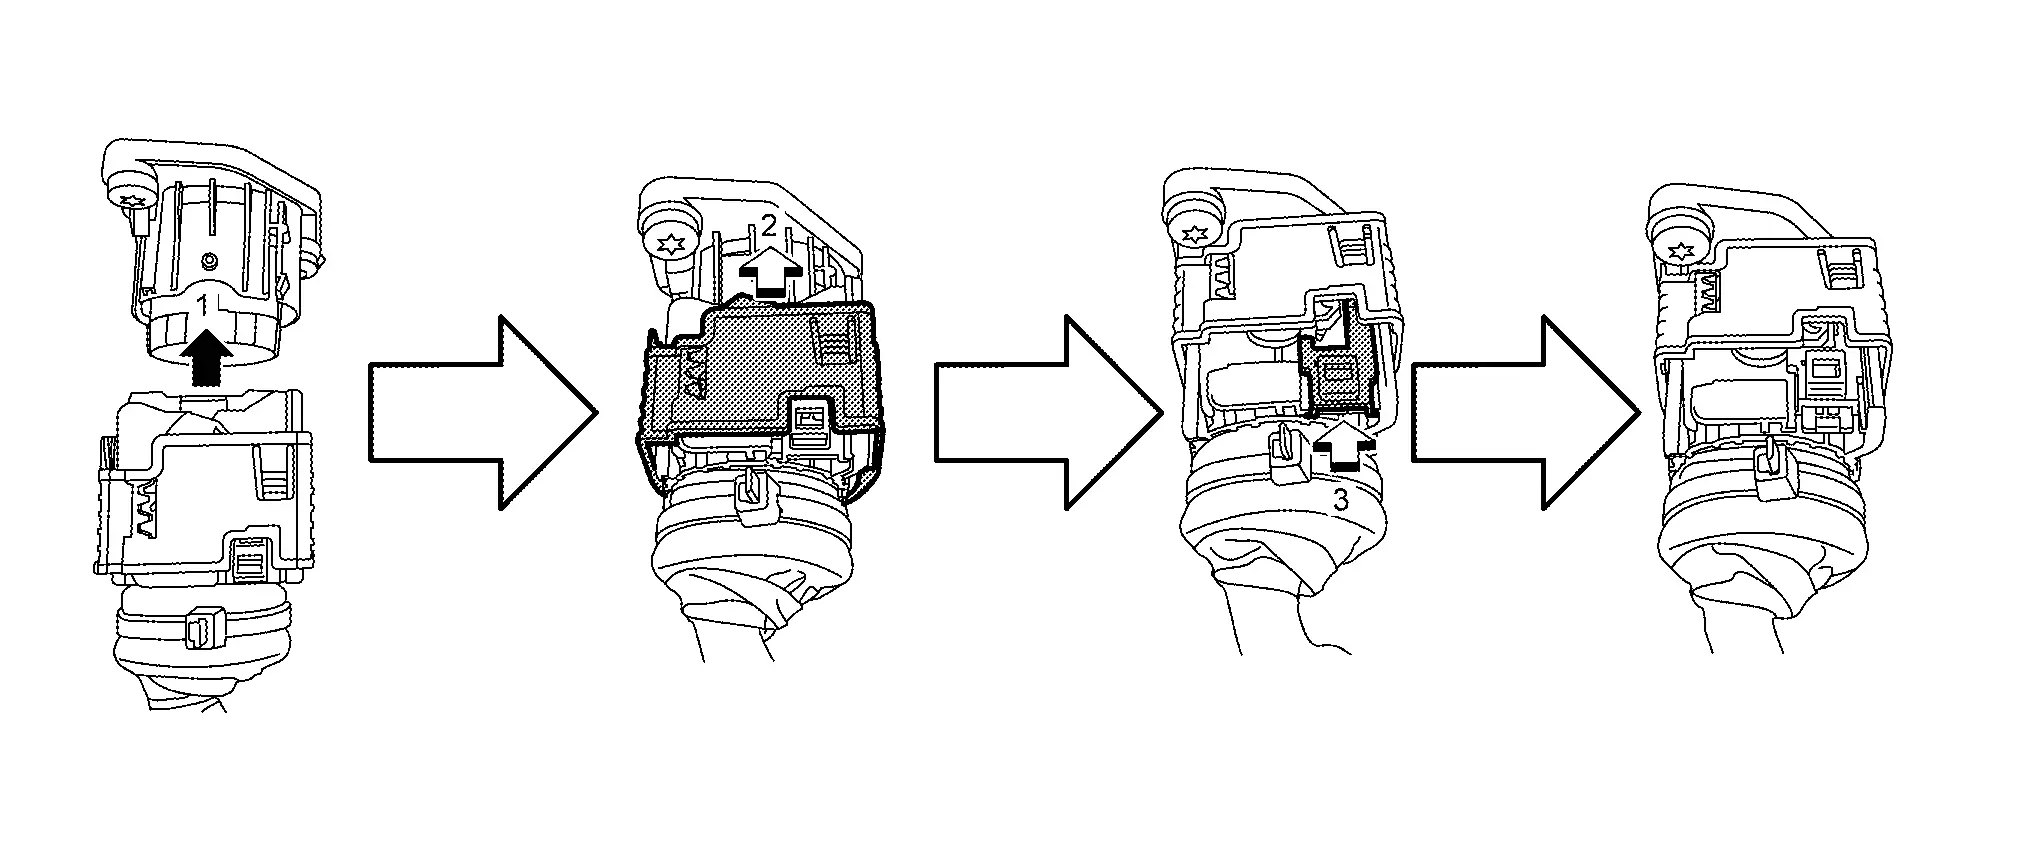
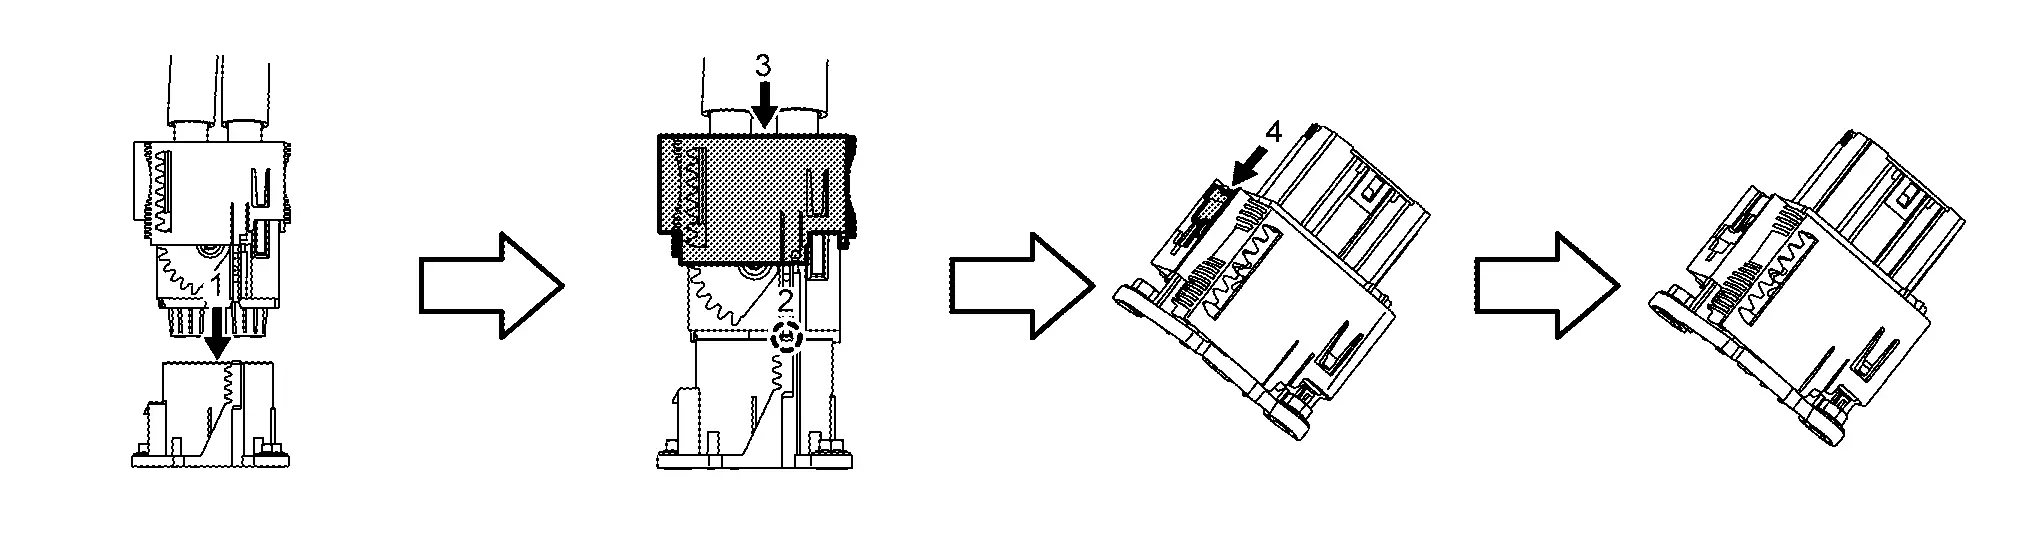
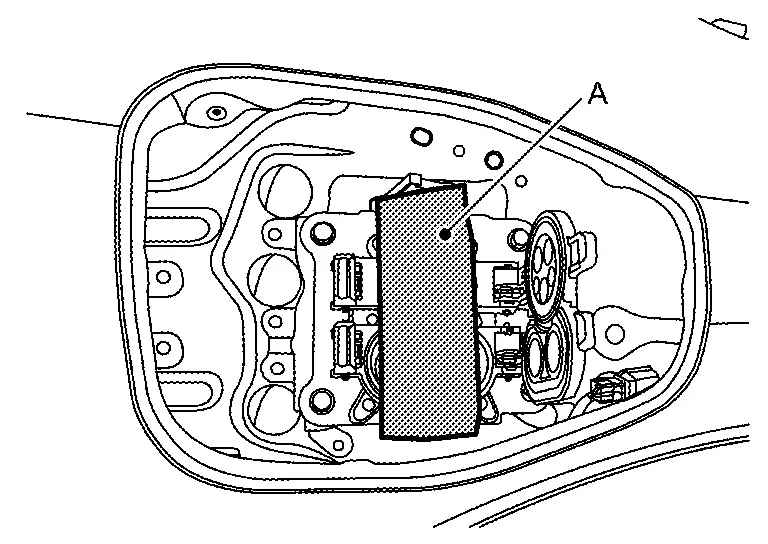
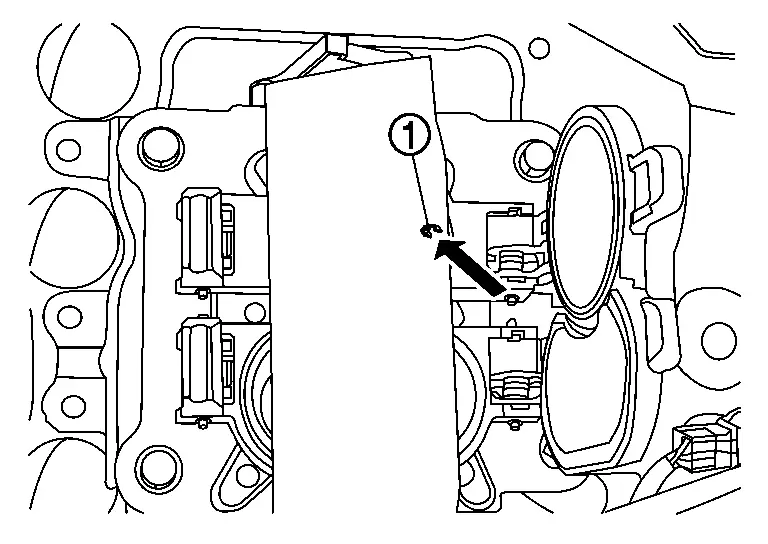
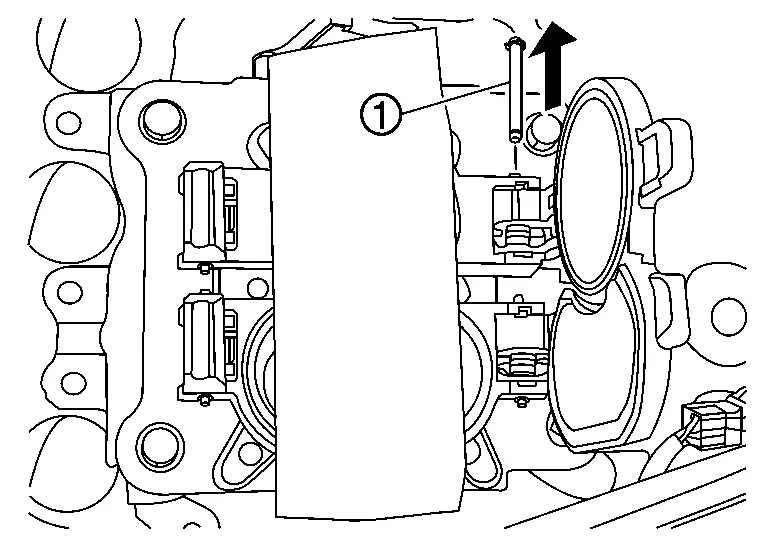
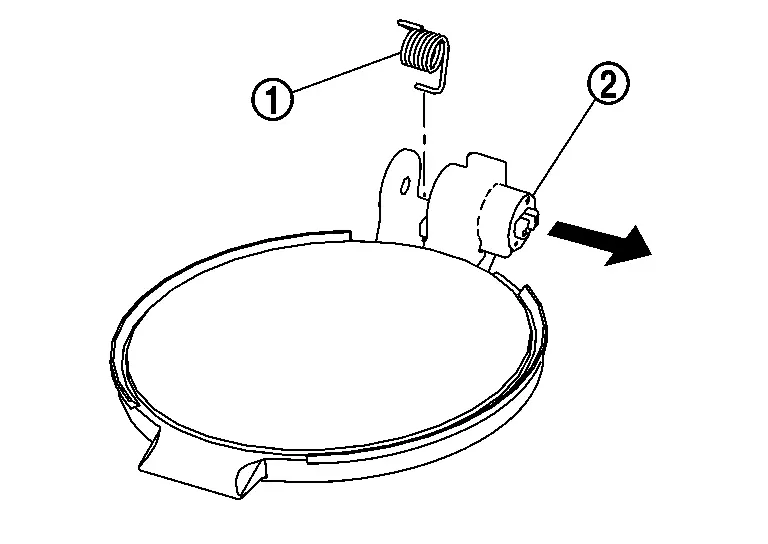
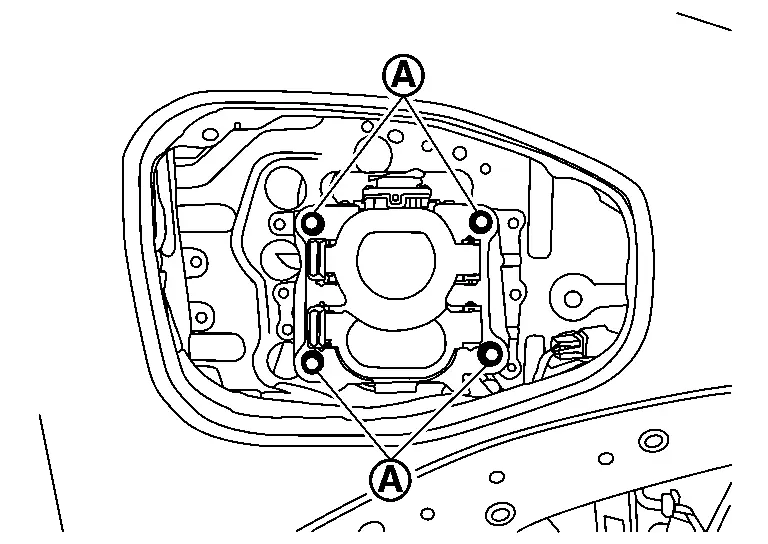
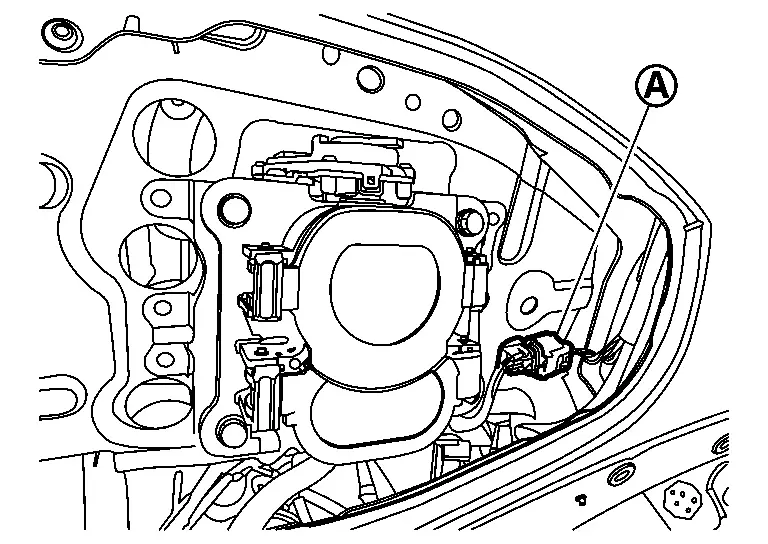
Remove the CPLC installing nut  and remove the CPLC harness connector
  .
.
Remove the CPLC bracket installing nut. (If necessary)
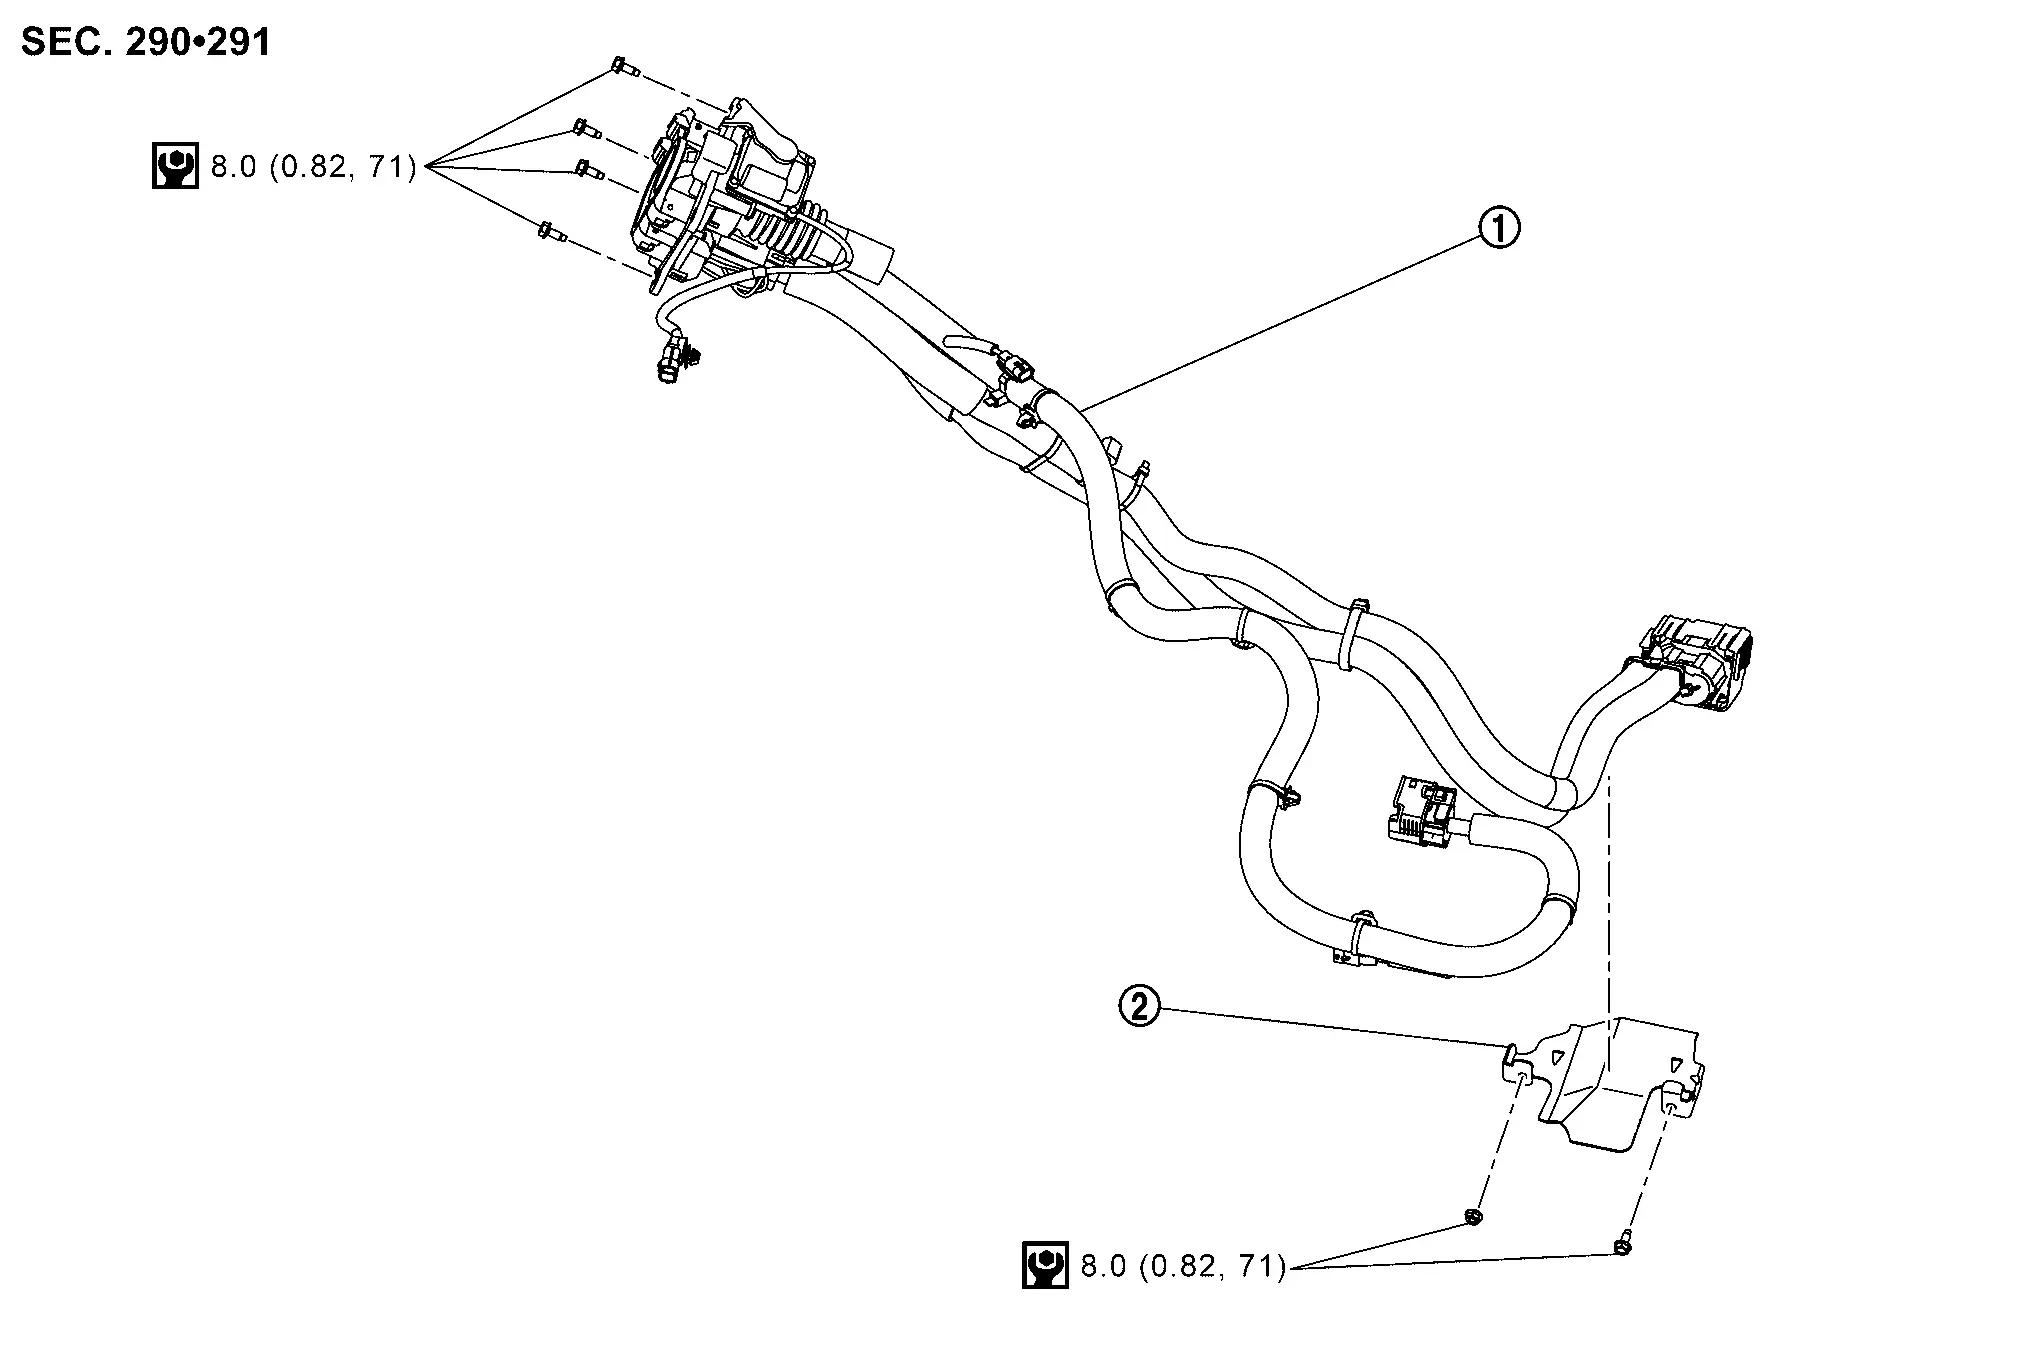
High Voltage Power Delivery Assembly Nissan Ariya: FE0
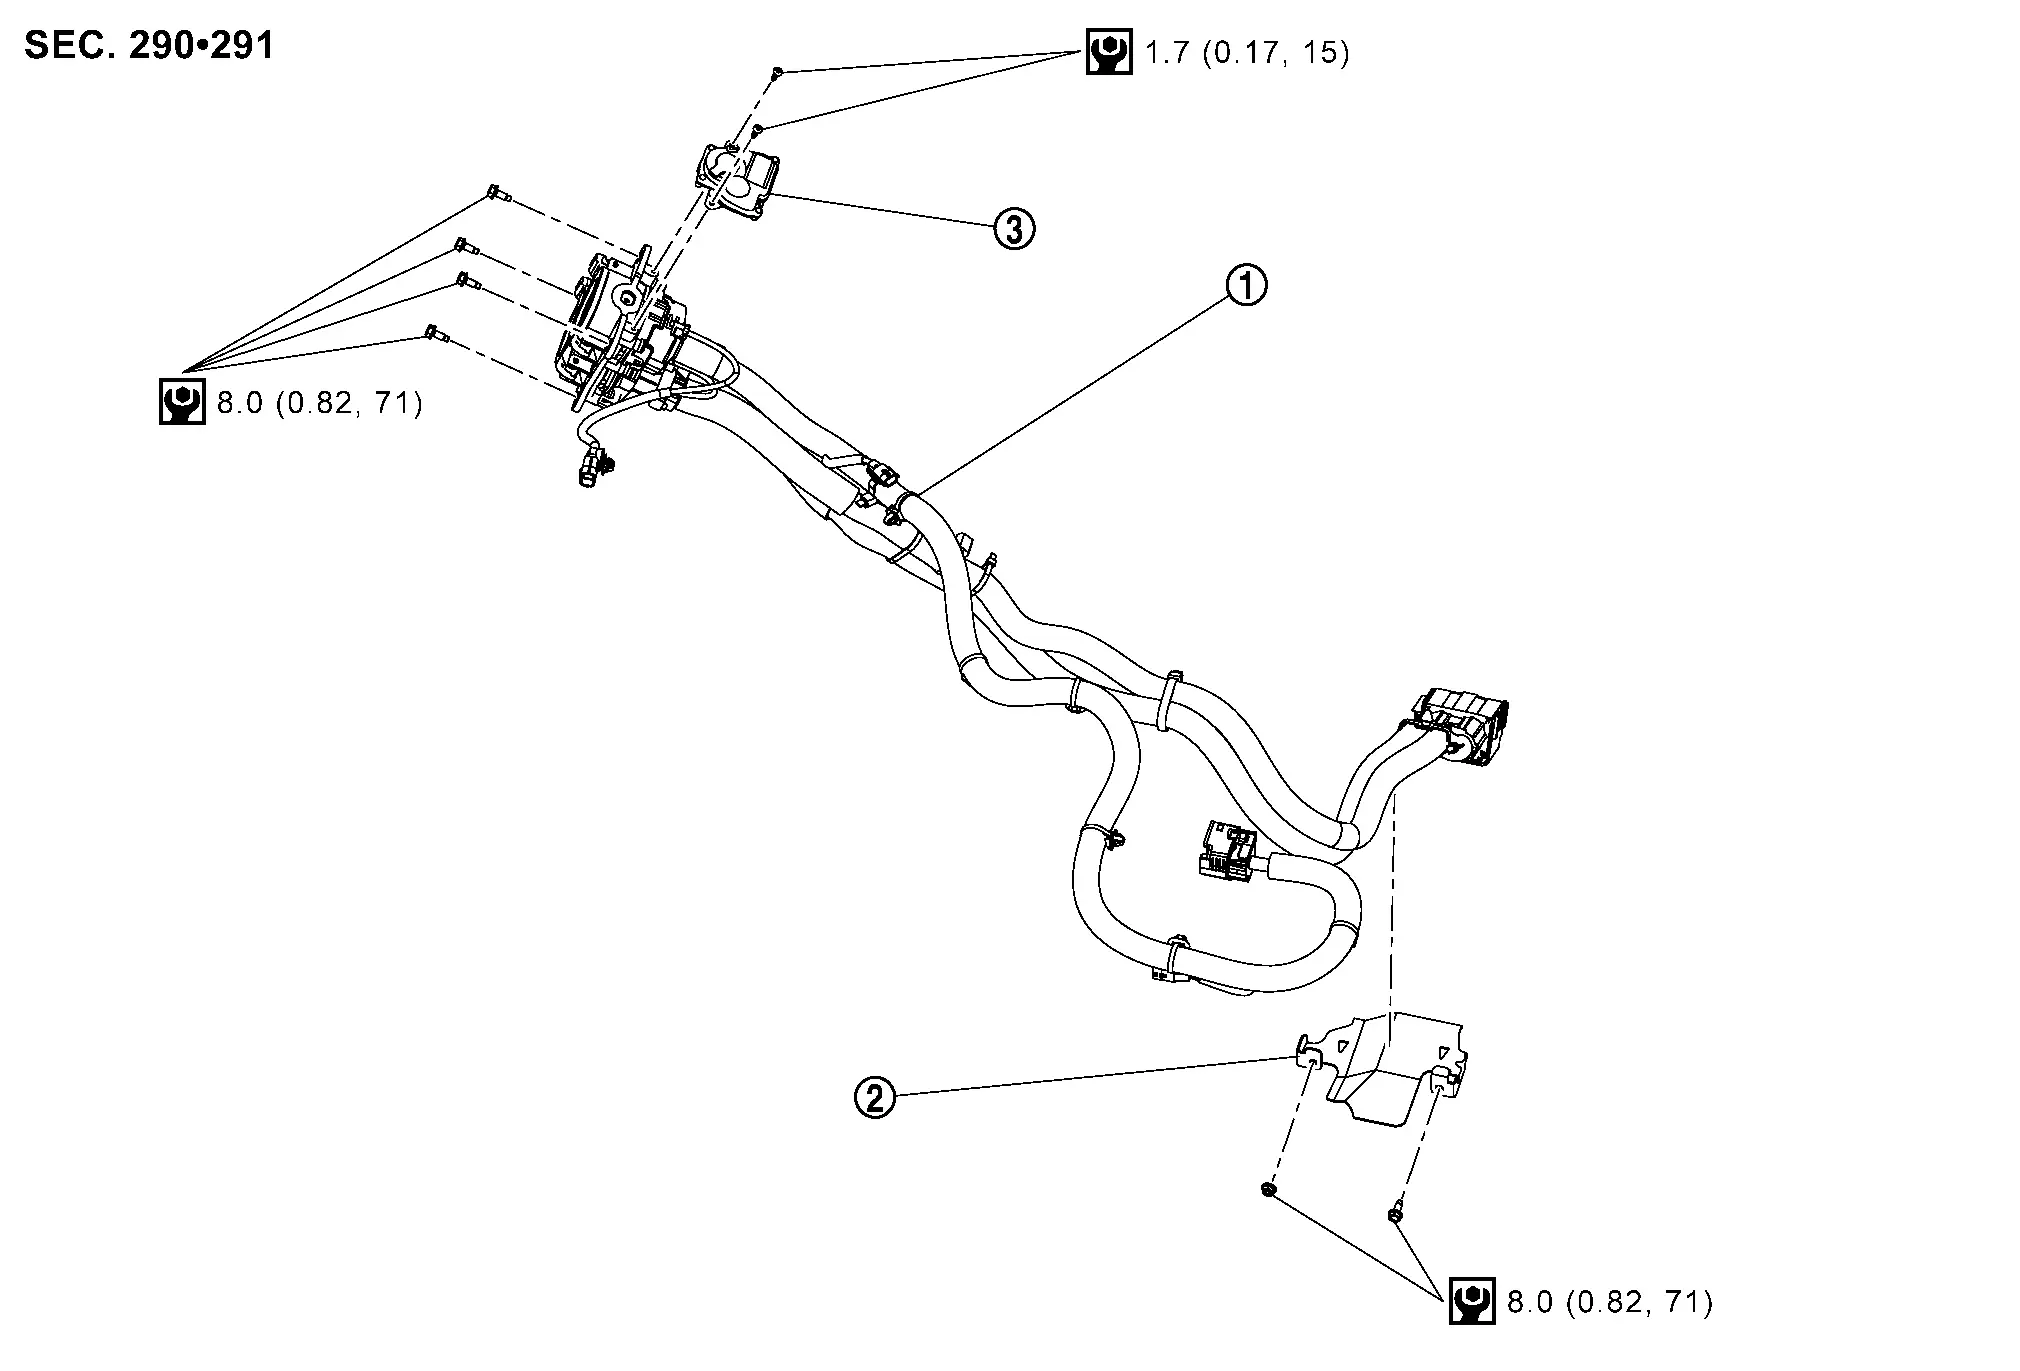
HIGH VOLTAGE POWER DELIVERY ASSEMBLY : Exploded View
EXPLODED VIEW
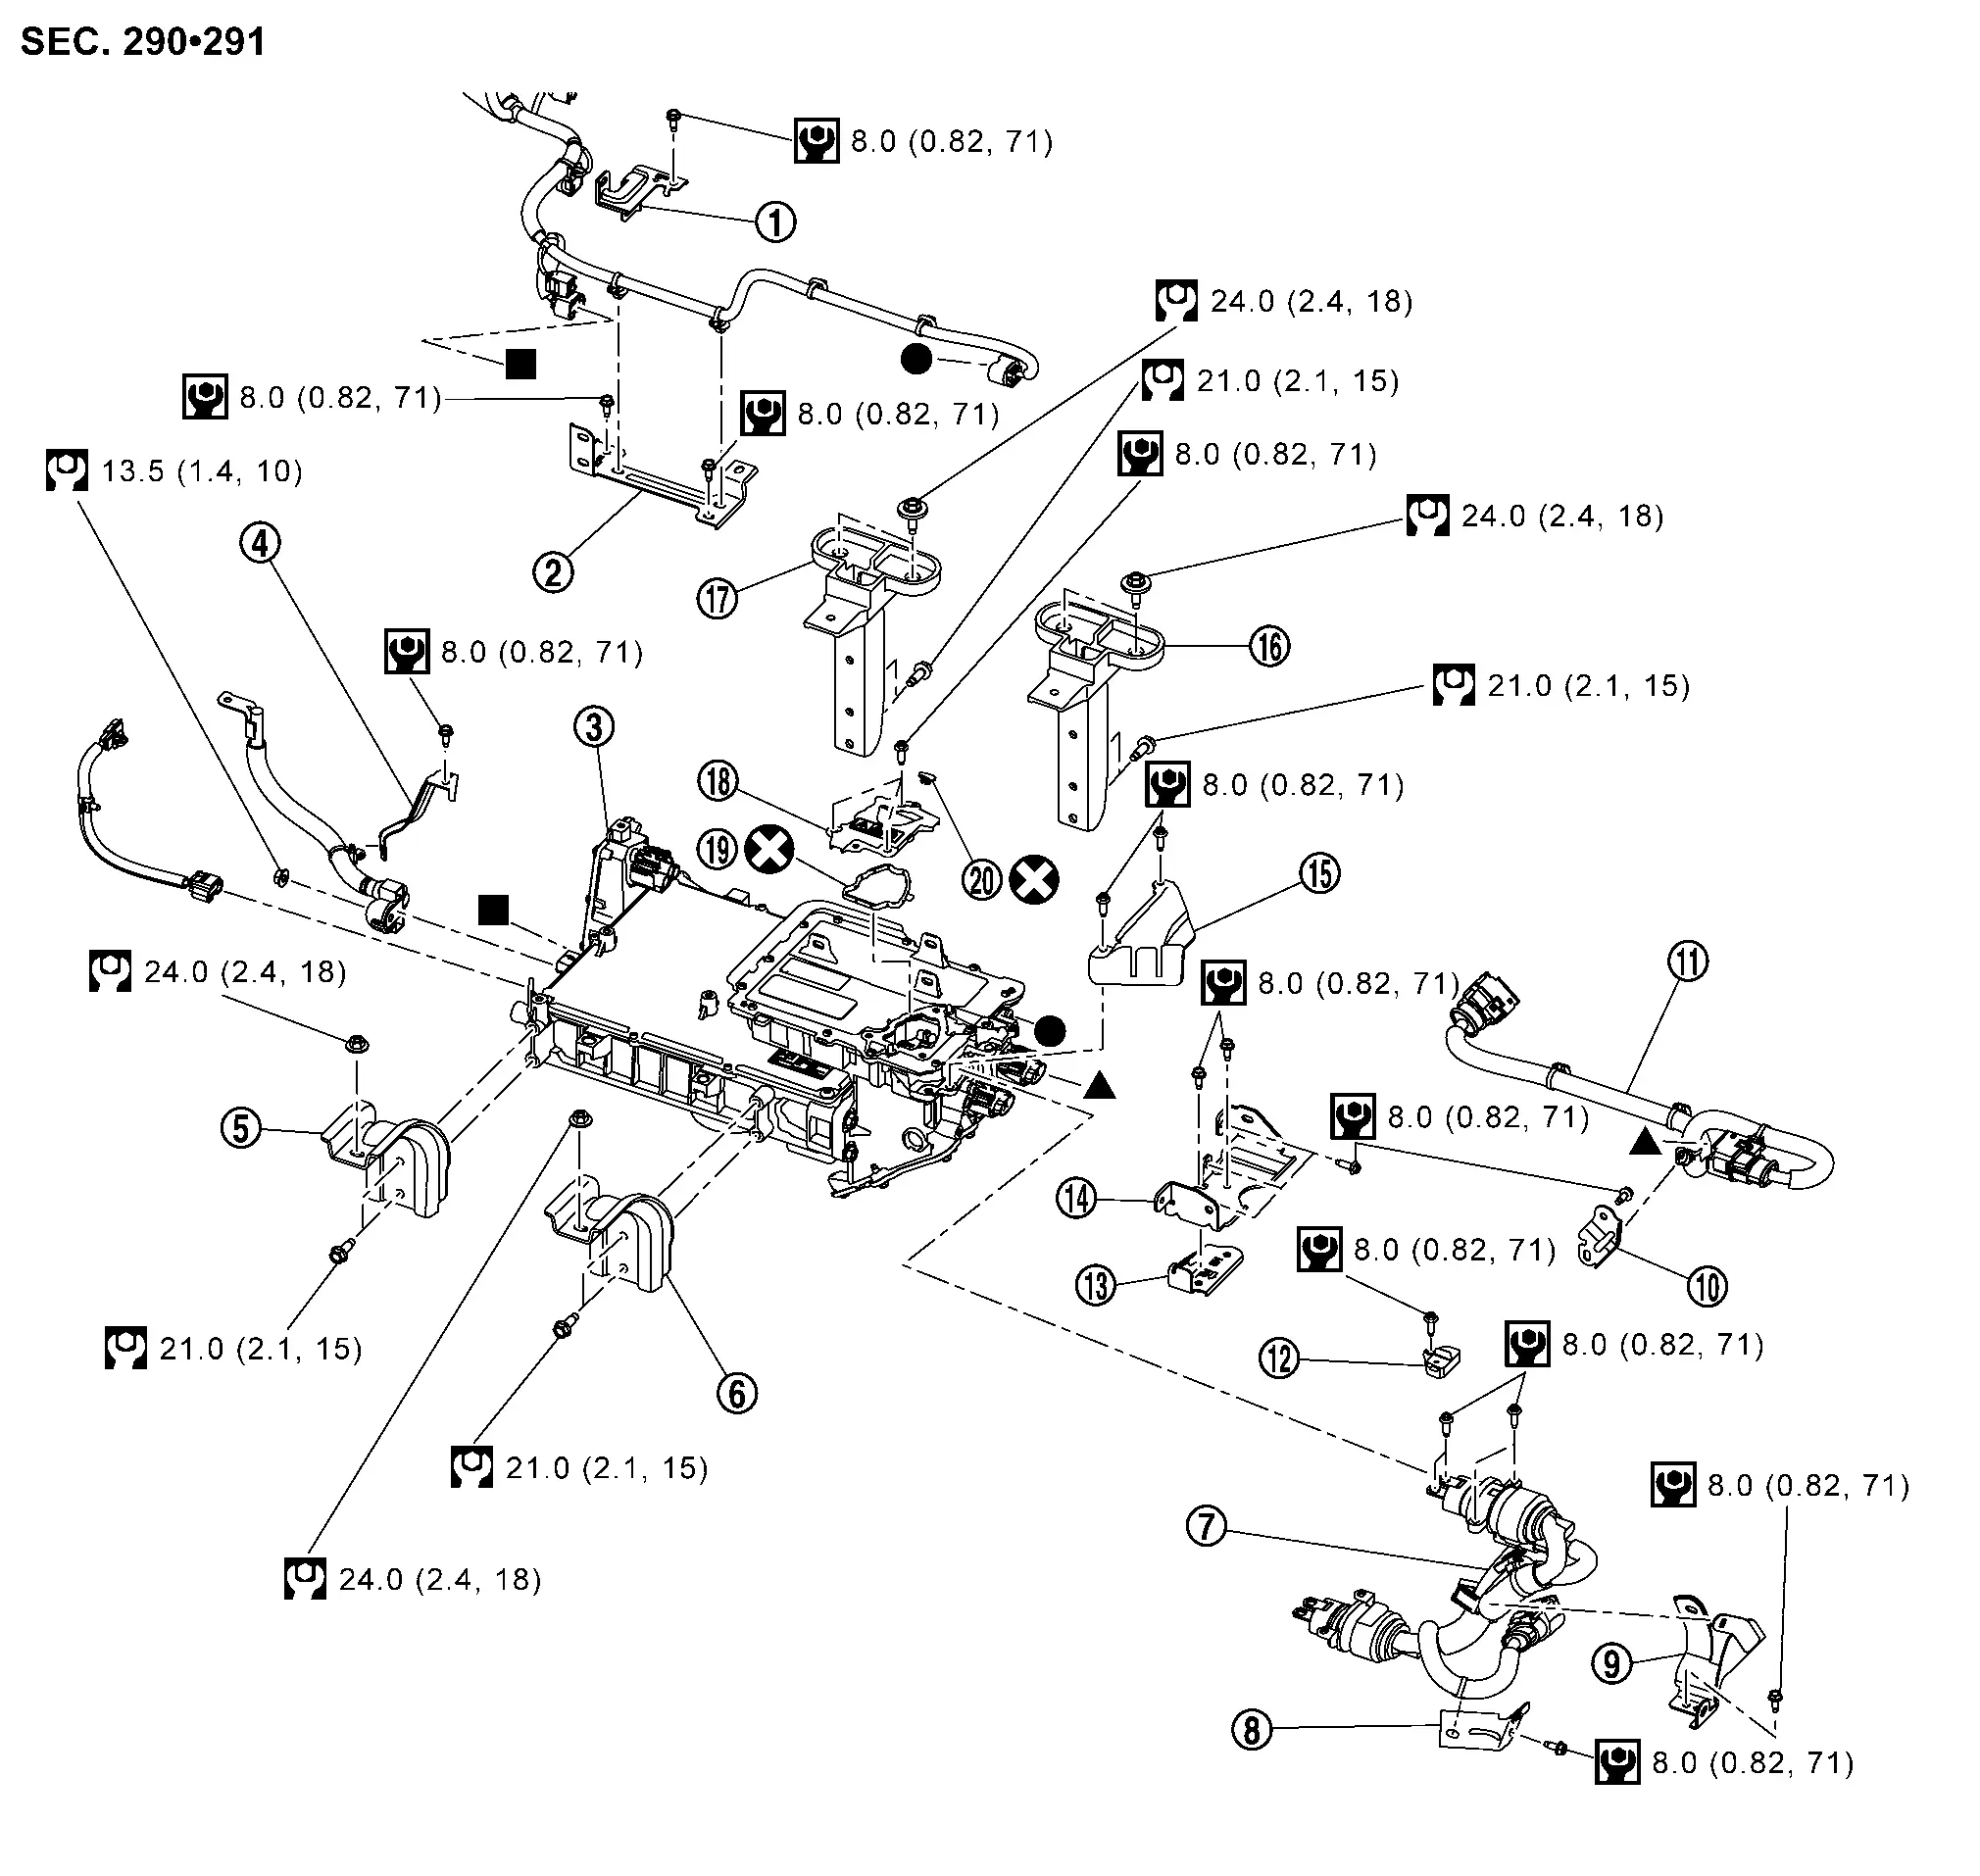
|
Harness bracket 1 | |
Harness bracket 2 |  |
High voltage power delivery ASSY |
 |
Harness bracket 3 |  |
High voltage power delivery ASSY bracket (front RH) |  |
High voltage power delivery ASSY bracket (front LH) |
 |
High voltage harness (high voltage Junction box - traction motor inverter) |  |
Harness bracket 4 |  |
Harness bracket 5 |
 |
Harness bracket 6 |  |
High voltage harness (high voltage Junction box - air conditioner unit) |  |
Terminal cover |
 |
High voltage harness protector lower bracket |  |
High voltage harness protector lower |  |
High voltage harness protector upper |
 |
High voltage power delivery ASSY bracket (rear LH) |  |
High voltage power delivery ASSY bracket (rear RH) |  |
Busbercover |
 |
Gasket |  |
Breather plug | ||
 |
: N·m (kg-m, ft-lb) | ||||
|
: N·m (kg-m, in-lb) | ||||
 |
: Always replace after every disassembly. | ||||
 , , , , : Indicates that parts with the same mark are connected : Indicates that parts with the same mark are connected |
|||||
HIGH VOLTAGE POWER DELIVERY ASSEMBLY : Removal & Installation
DANGER:Since hybrid vehicles and electric vehicles contain a high voltage battery, there is the risk of electric shock, electric leakage, or similar accidents if the high voltage component and Nissan Ariya vehicle are handled incorrectly. Be sure to follow the correct work procedures when performing inspection and maintenance.
WARNING:
-
Be sure to remove the service plug in order to disconnect the high voltage circuits before performing inspection or maintenance of high voltage system harnesses and parts.
-
The removed service plug must always be carried in a pocket of the responsible worker or placed in the tool box during the procedure to prevent the plug from being connected by mistake.
-
Be sure to wear insulating protective equipment consisting of glove, shoes, face shield and glasses before beginning work on the high voltage system.
-
Never allow workers other than the responsible person to touch the Nissan Ariya vehicle containing high voltage parts. To keep others from touching the high voltage parts, these parts must be covered with an insulating sheet except when using them.
-
Refer to HIGH VOLTAGE PRECAUTIONS : Precautions.
CAUTION:
Never bring the vehicle into the READY status with the service plug removed unless otherwise instructed in the Service Manual. A malfunction may occur if this is not observed.
REMOVAL
WARNING:
Disconnect high voltage. Refer to HOW TO DISCONNECT HIGH VOLTAGE : Precautions .
-
Check voltage in high voltage circuit. (Check that condenser are discharged.)
DANGER: Touching high voltage components without using the appropriate protective equipment will cause electrocution.


-
Drain coolant. Refer to COOLANT : Draining.
-
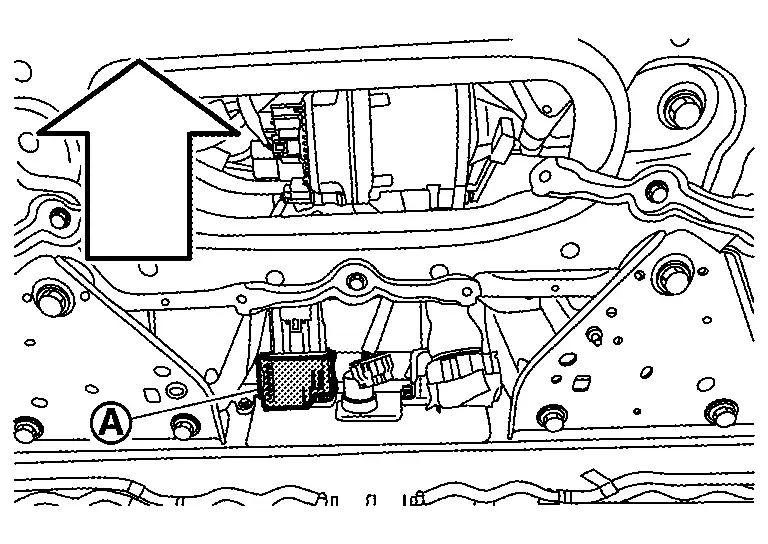
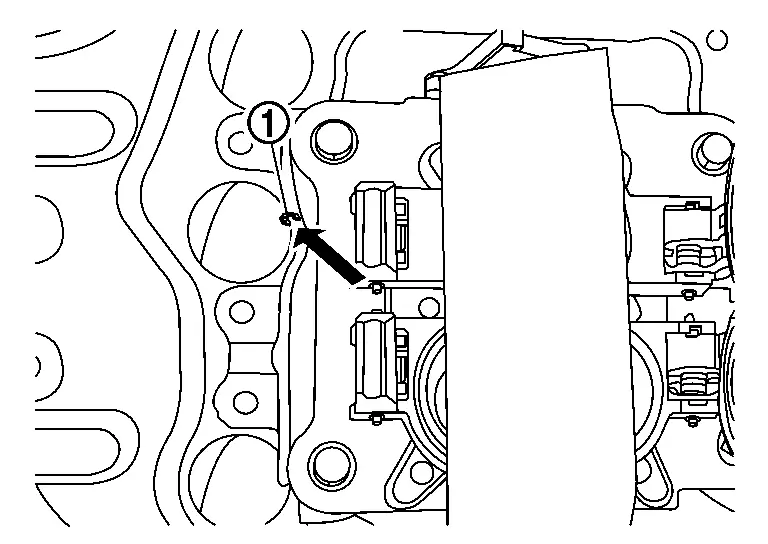
Remove the ground bolt
in the motor room.
DANGER:
: Nissan Ariya Vehicle front Touching high voltage components without using the appropriate protective equipment will cause electrocution. -
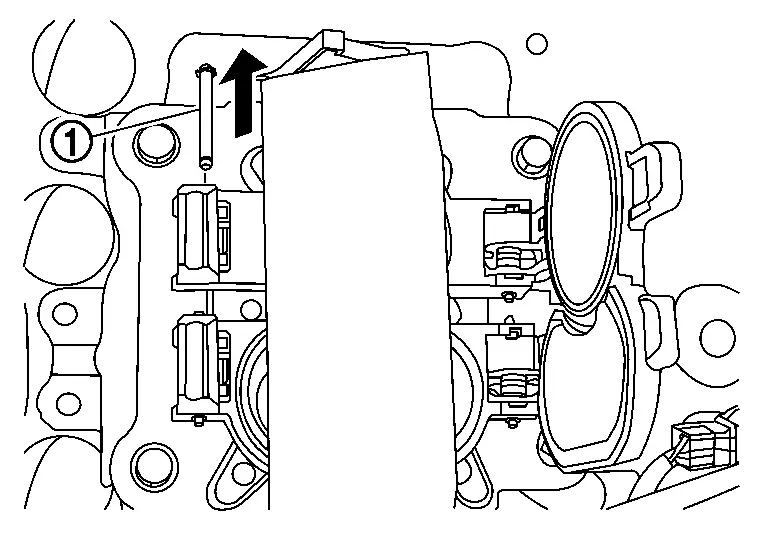
Remove the bus bar cover
on the high voltage junction box.
DANGER: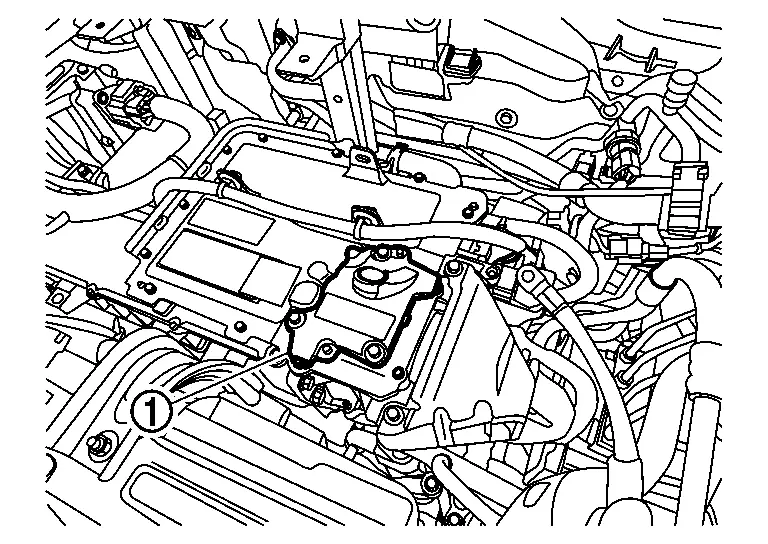 Touching high voltage components without using the appropriate protective equipment will cause electrocution.
 -
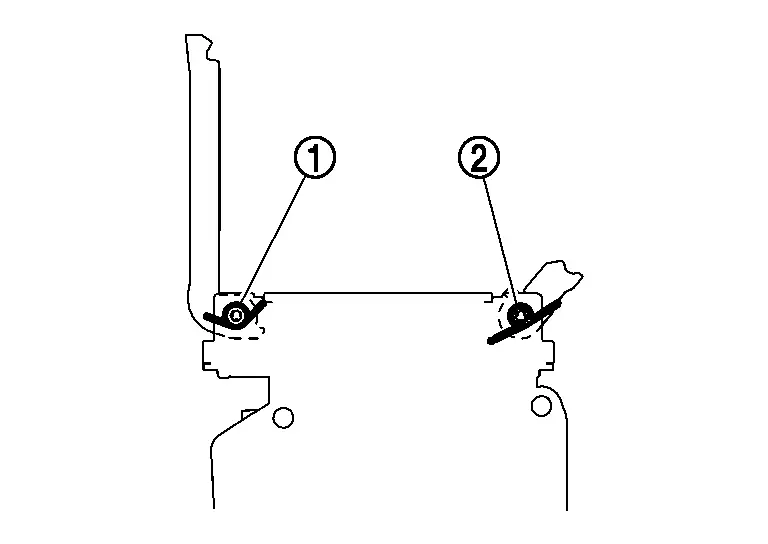
Remove the bus bar cover fixing bolt
to remove the terminal cover of the bus bar.
DANGER: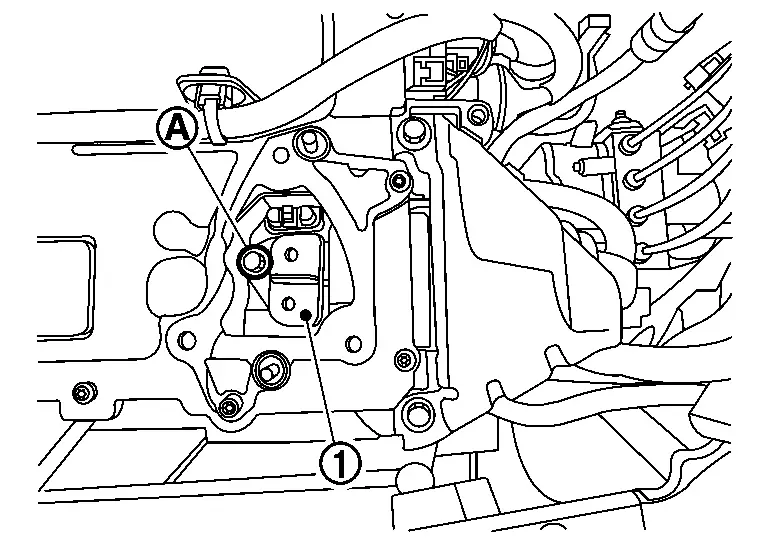 Touching high voltage components without using the appropriate protective equipment will cause electrocution.
 -
Remove the bus bar fastening bolt
.
DANGER: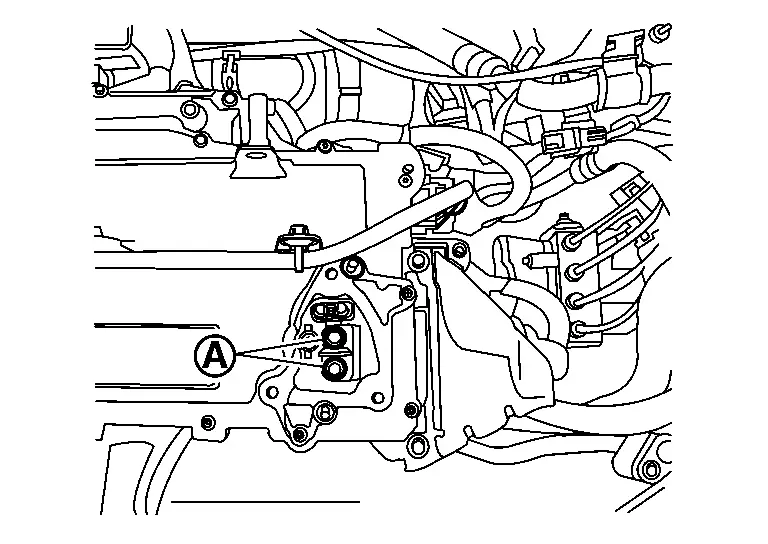 Touching high voltage components without using the appropriate protective equipment will cause electrocution.
 -
Remove the high voltage harness protector upper fixing bolt
to remove the high voltage harness protector upper.
DANGER: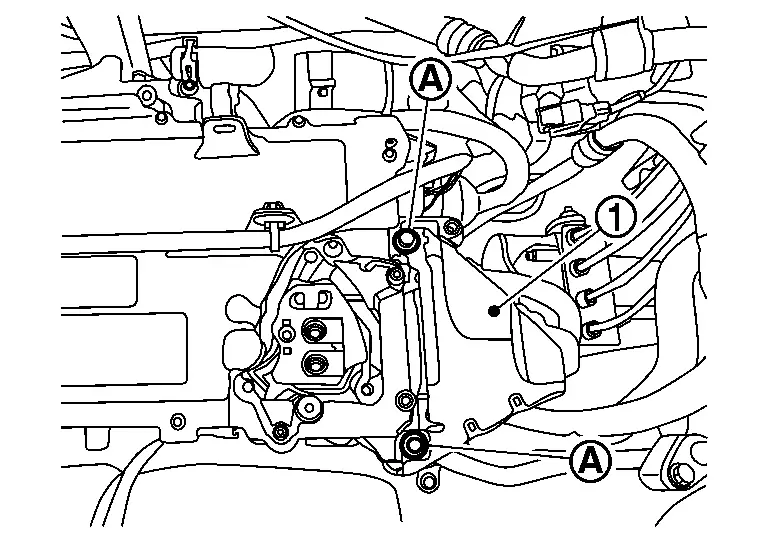 Touching high voltage components without using the appropriate protective equipment will cause electrocution.
 - Remove the high voltage harness fixing bolt to remove the high voltage harness from the high voltage junction box.
DANGER: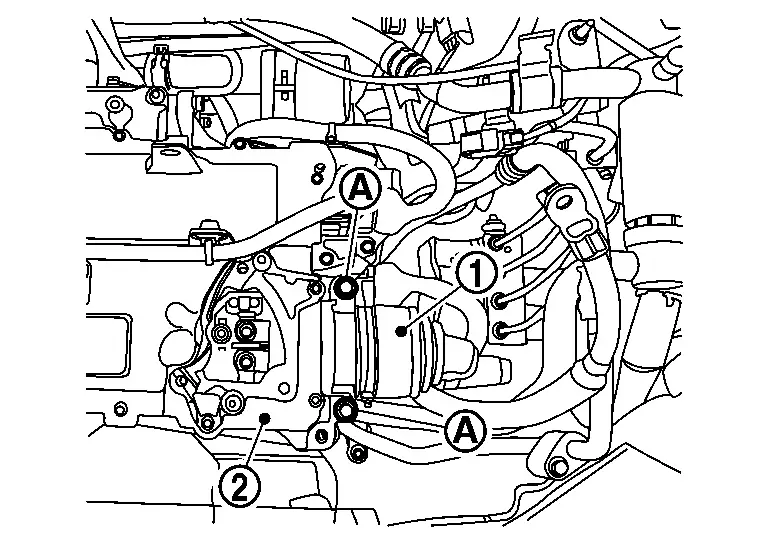 Touching high voltage components without using the appropriate protective equipment will cause electrocution.
 -
Apply protective tape on the high voltage junction box opening area and high voltage harness.
DANGER:Touching high voltage components without using the appropriate protective equipment will cause electrocution. -
Remove the harness bracket 6 fixing bolt
.
DANGER: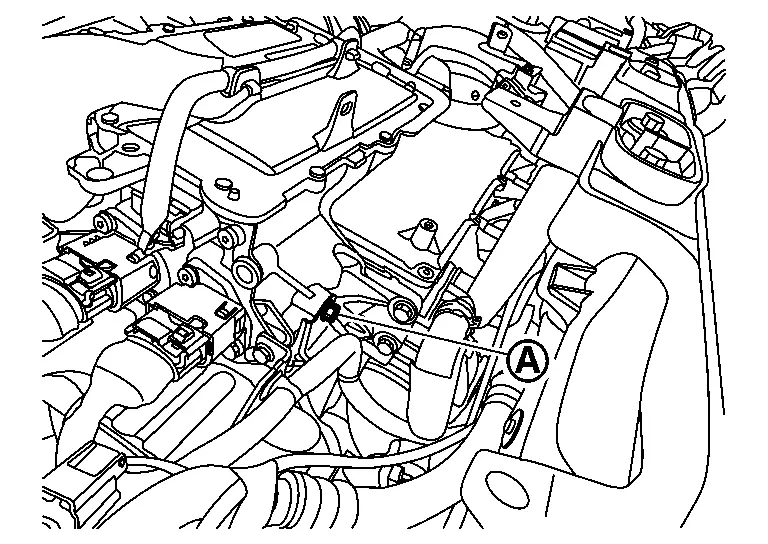 Touching high voltage components without using the appropriate protective equipment will cause electrocution.
 -
Remove the high voltage harness connector
, high voltage harness connector and the high voltage harness clip .
.
DANGER: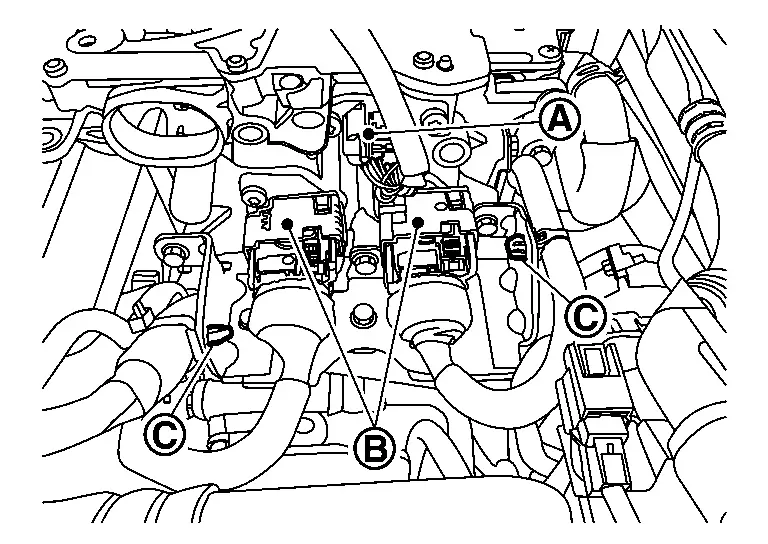 Touching high voltage components without using the appropriate protective equipment will cause electrocution.
-
High voltage harness connector is disconnected as per the following steps.
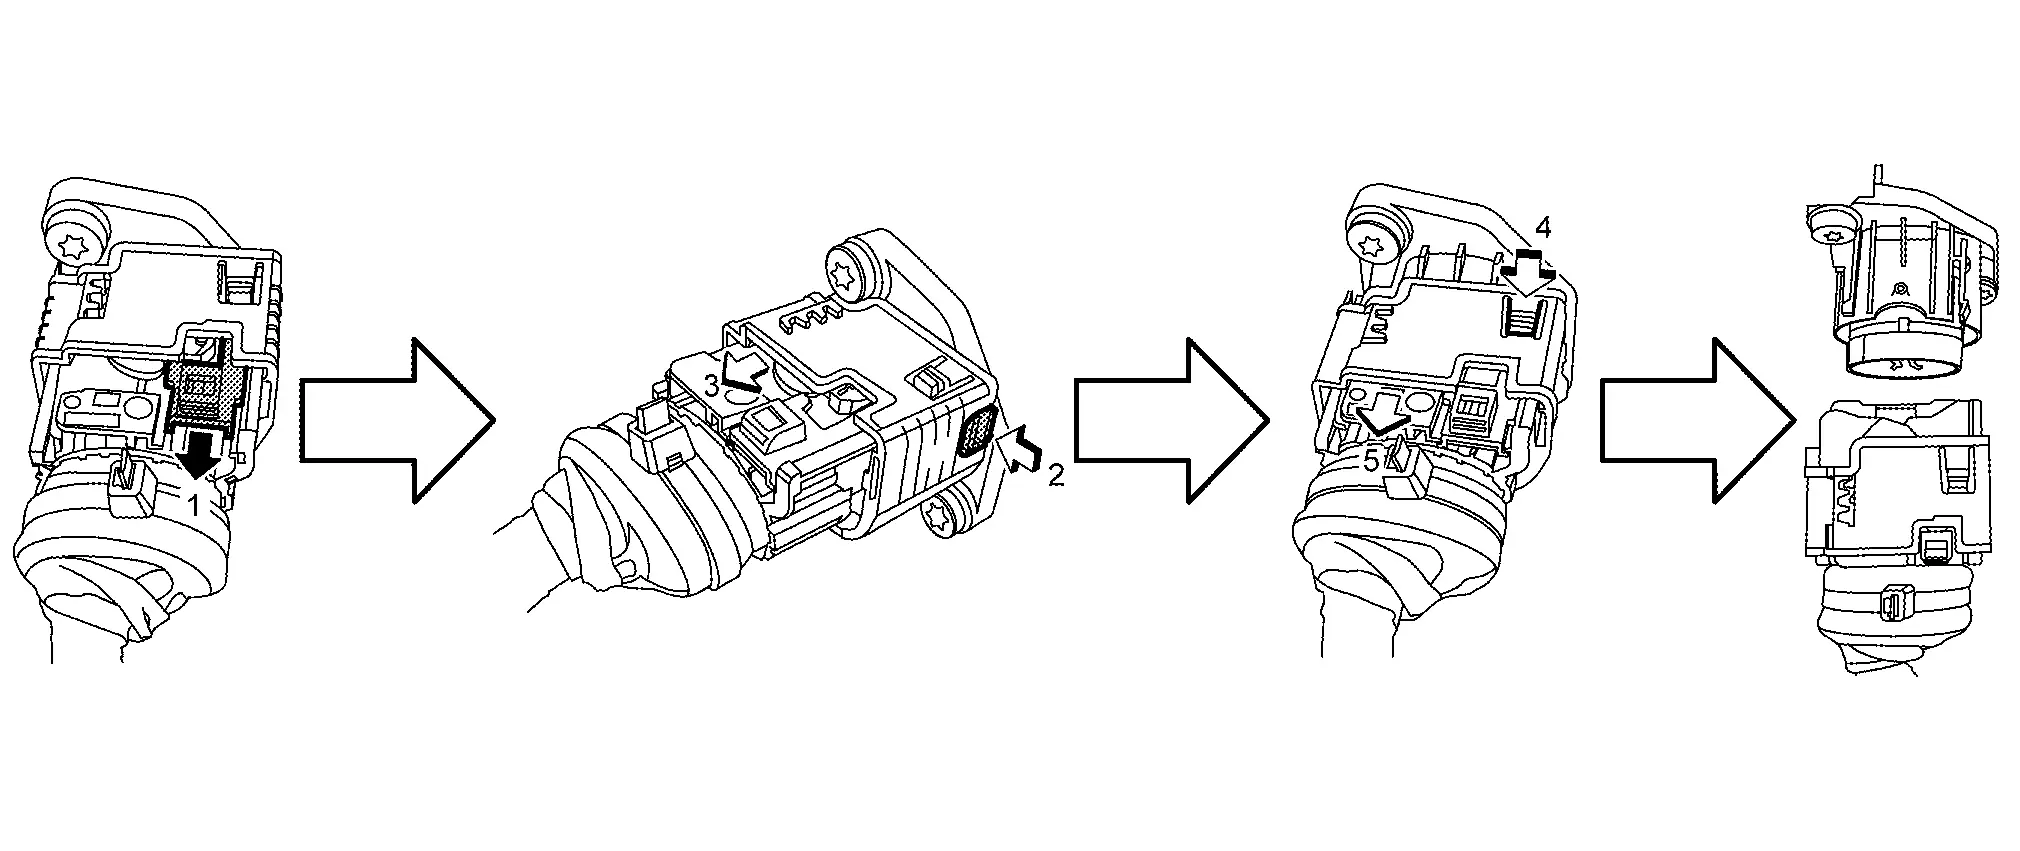
-
-
Apply protective tape on the high voltage harness and the connector part.
DANGER:Touching high voltage components without using the appropriate protective equipment will cause electrocution. -
Remove the harness protector lower fixing bolt
to remove the high voltage harness protector lower.
DANGER: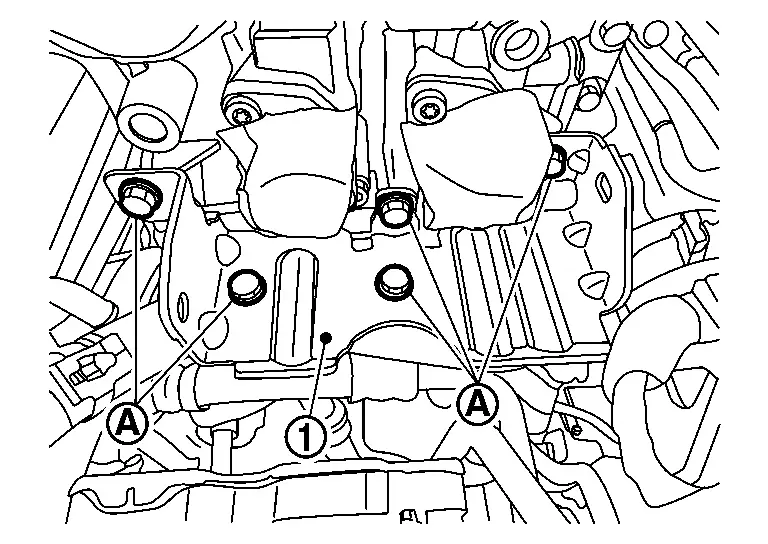 Touching high voltage components without using the appropriate protective equipment will cause electrocution.
 -
Remove the harness clip
.
DANGER: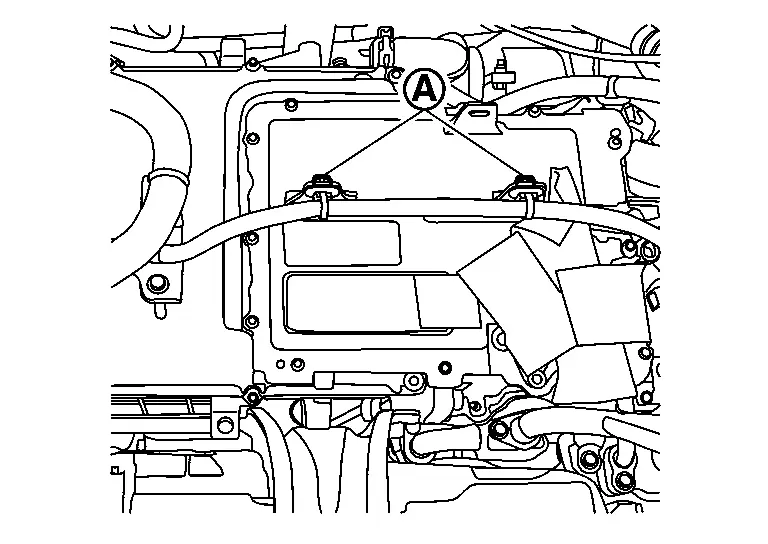 Touching high voltage components without using the appropriate protective equipment will cause electrocution.
 -
Remove the high voltage harness bracket bolt
.
DANGER: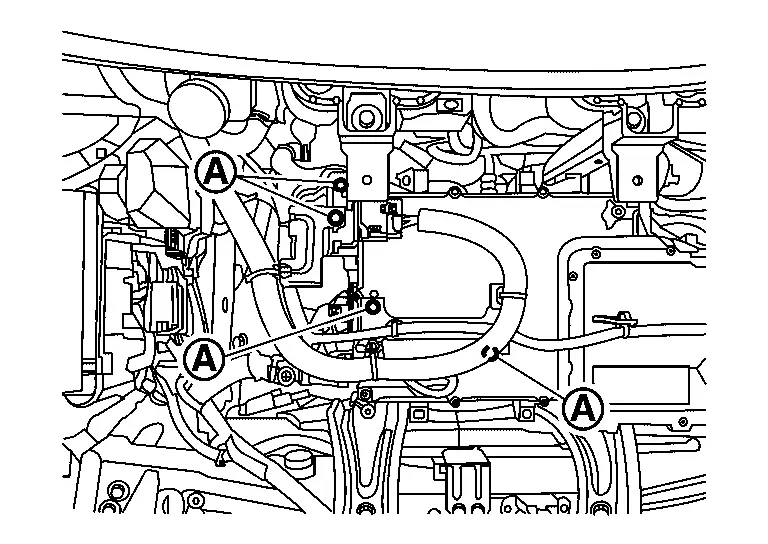 Touching high voltage components without using the appropriate protective equipment will cause electrocution.
 -
Disconnect the high voltage harness connecter
.
DANGER: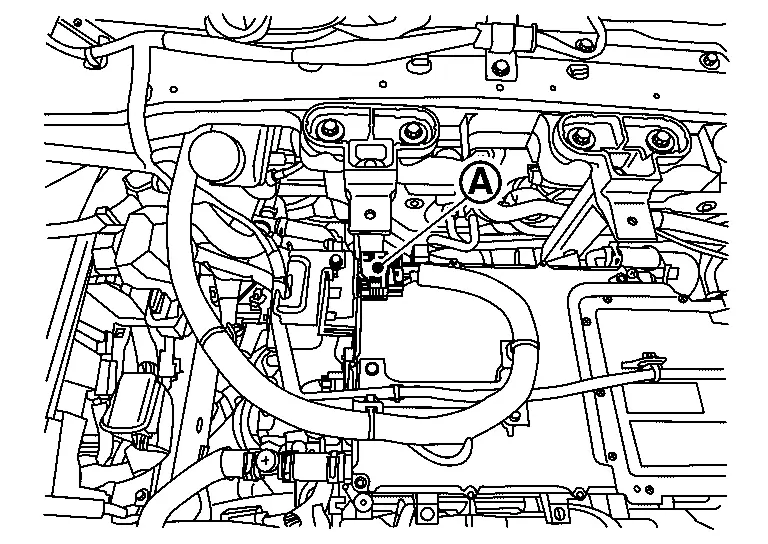 Touching high voltage components without using the appropriate protective equipment will cause electrocution.
-
High voltage harness connector is disconnected as per the following steps.
-
-
Apply protective tape on the high voltage harness and connector part of the on-board charger.
DANGER:Touching high voltage components without using the appropriate protective equipment will cause electrocution. -
Disconnect the harness connector
.
DANGER: Touching high voltage components without using the appropriate protective equipment will cause electrocution.
 -
Disconnect the harness connector
.
DANGER: Touching high voltage components without using the appropriate protective equipment will cause electrocution.
 -
Apply protective tape on the high voltage harness and the connector part.
DANGER:Touching high voltage components without using the appropriate protective equipment will cause electrocution. -
Fasten the high voltage harness by lope in the area where is not disturb repairing operation.
DANGER:Touching high voltage components without using the appropriate protective equipment will cause electrocution. -
Disconnect the harness connector
and the harness connector.
DANGER: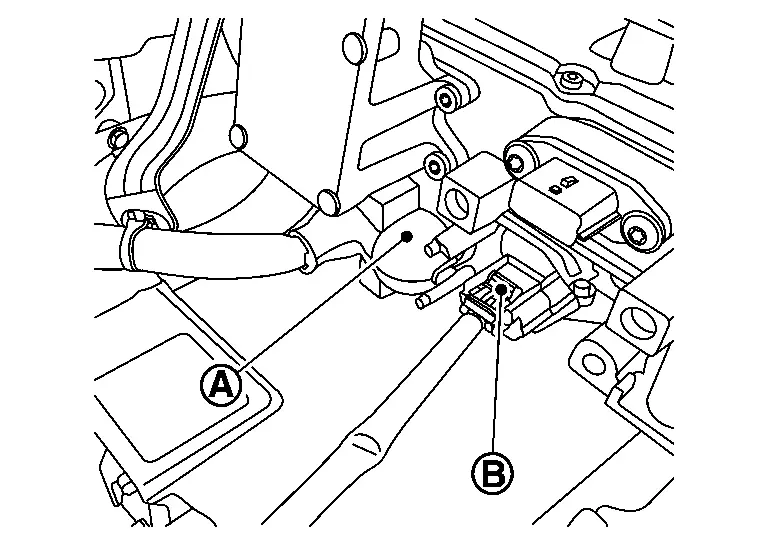 Touching high voltage components without using the appropriate protective equipment will cause electrocution.
 -
Remove front side of the water hose
from the on-board charger.
DANGER: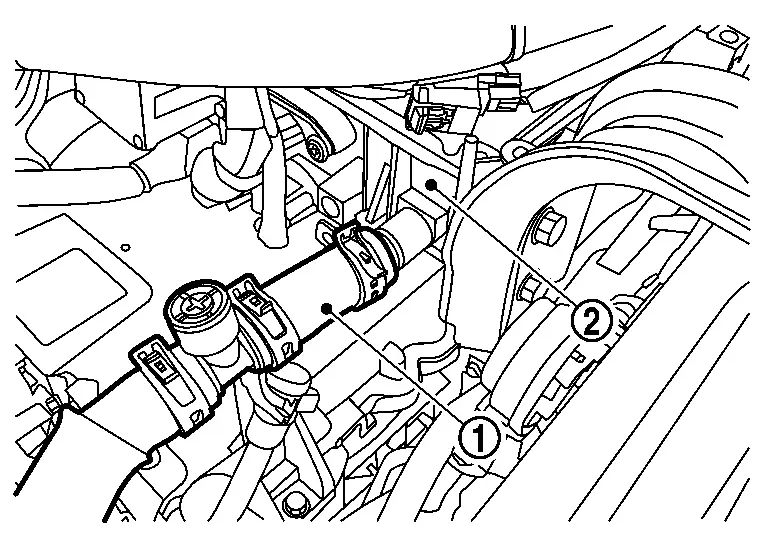 Touching high voltage components without using the appropriate protective equipment will cause electrocution.
 -
Remove rear side of the water hose
from the DC/DC converter.
DANGER: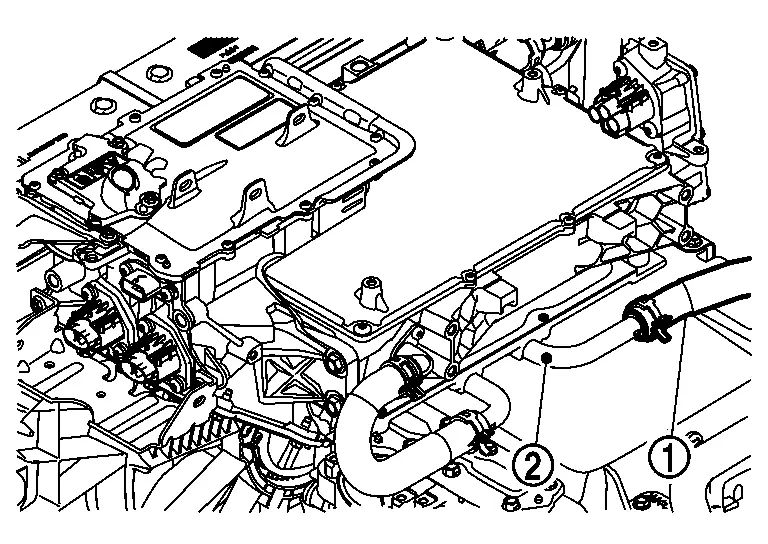 Touching high voltage components without using the appropriate protective equipment will cause electrocution.
CAUTION:
Be careful to avoid damaging the DC/DC converter tube, do not applying force in any direction other than the axial direction of the DC/DC converter tube when removing the hose.
-
Remove high voltage power delivery ASSY fixing bolts and nuts
to remove the high voltage power delivery ASSY from the Nissan Ariya vehicle.
DANGER: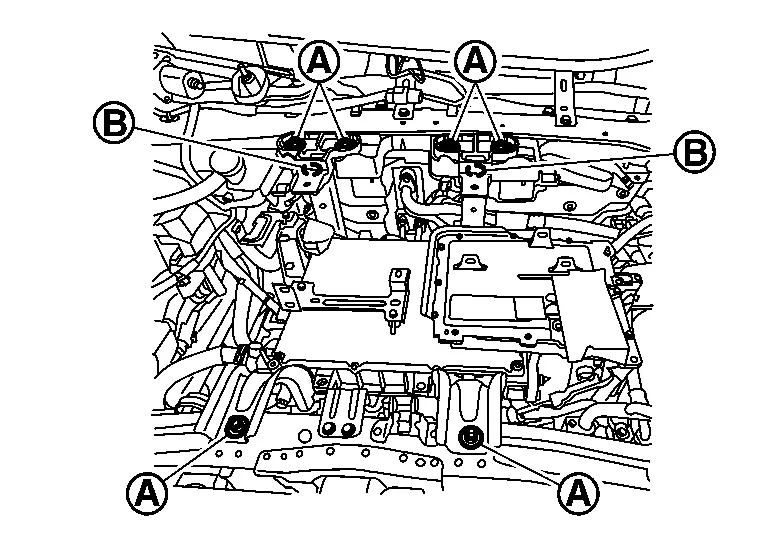 Touching high voltage components without using the appropriate protective equipment will cause electrocution.
CAUTION:
Do not loosen the bolt
, if the bolt is loosen by incorrect operation, replace the bracket ASSY. -
Remove the high voltage power delivery ASSY bracket if needed.
DANGER:Touching high voltage components without using the appropriate protective equipment will cause electrocution.
INSTALLATION
Note the followings, and install in the reverse order of removal.
-
Connect high voltage harness connectors
.
DANGER: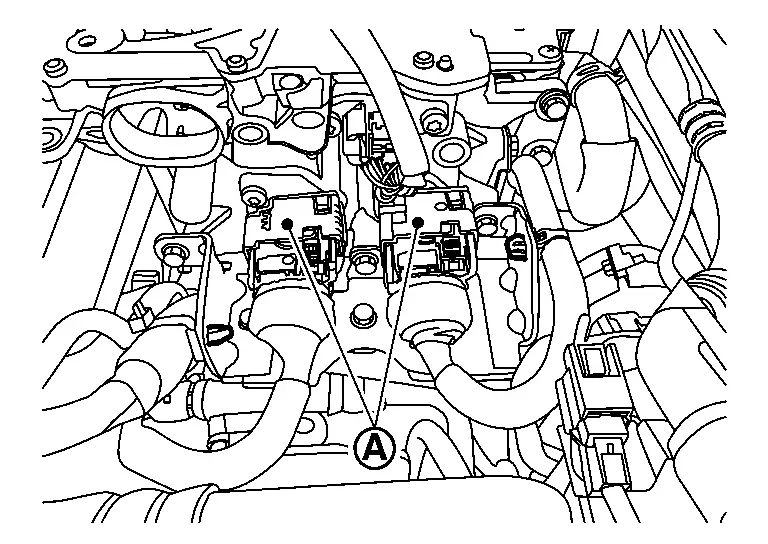 Touching high voltage components without using the appropriate protective equipment will cause electrocution.
-
High voltage harness connector is connected as per the following steps.
-
-
Install the high voltage harness connector
.
DANGER:Touching high voltage components without using the appropriate protective equipment will cause electrocution.-
High voltage harness connector is connected as per the following steps.
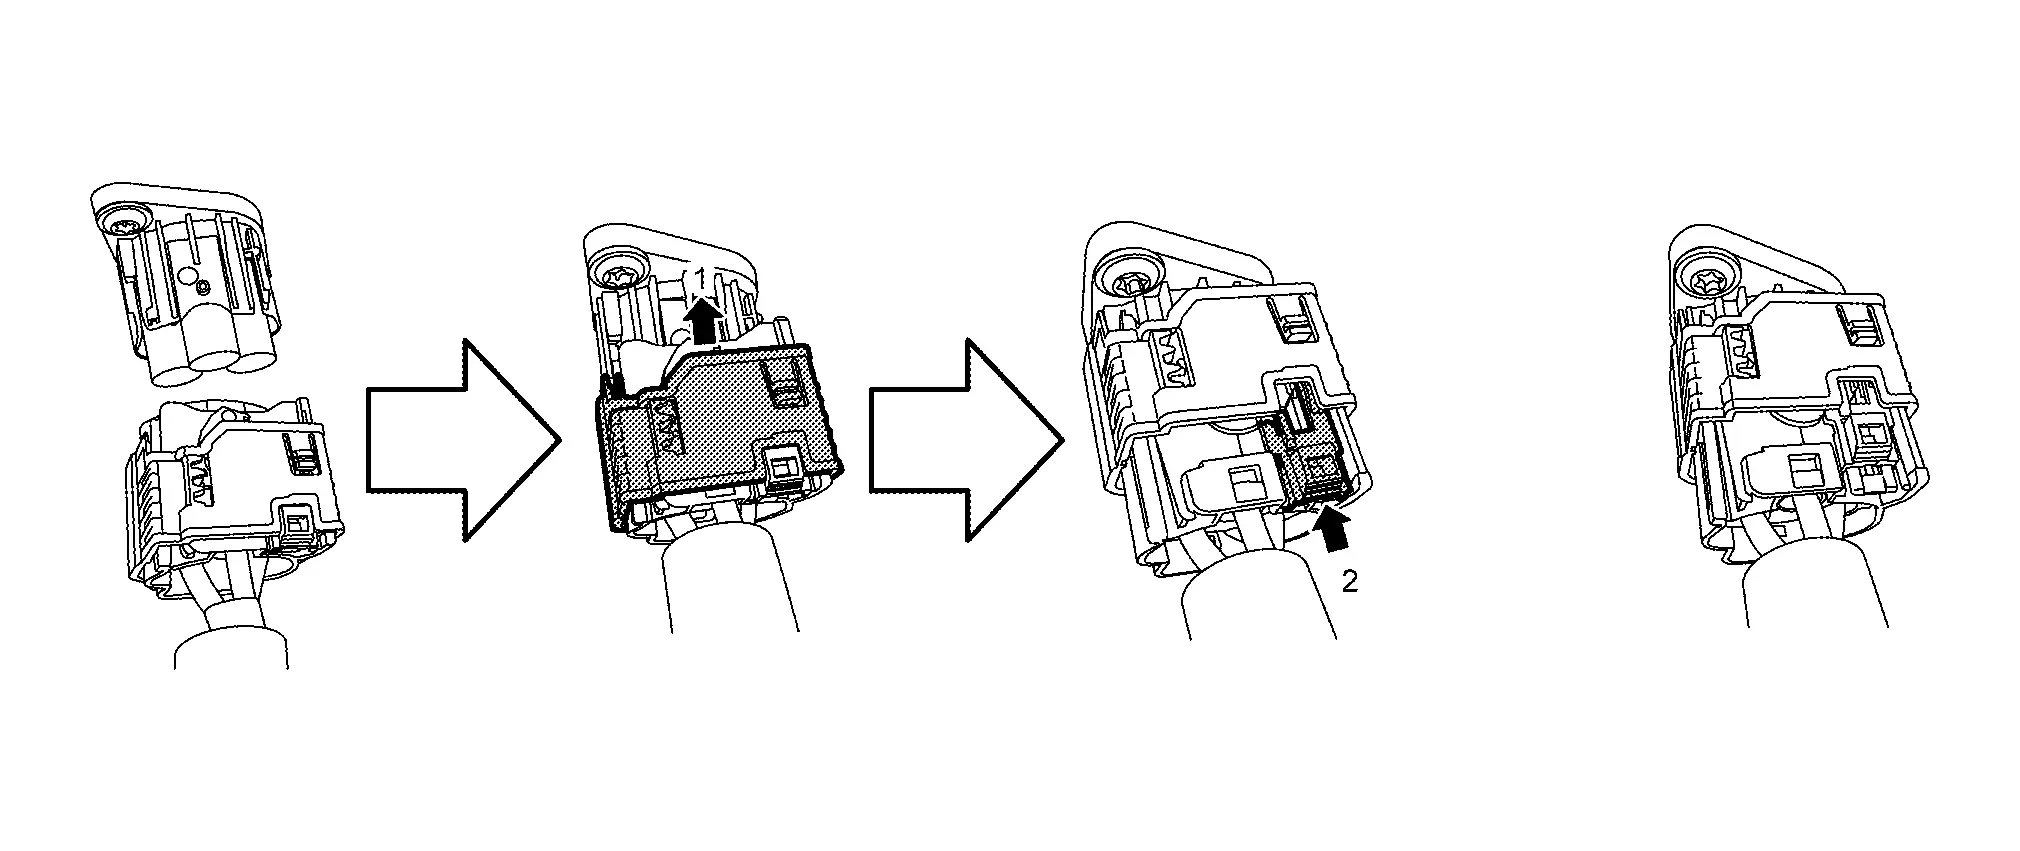
-
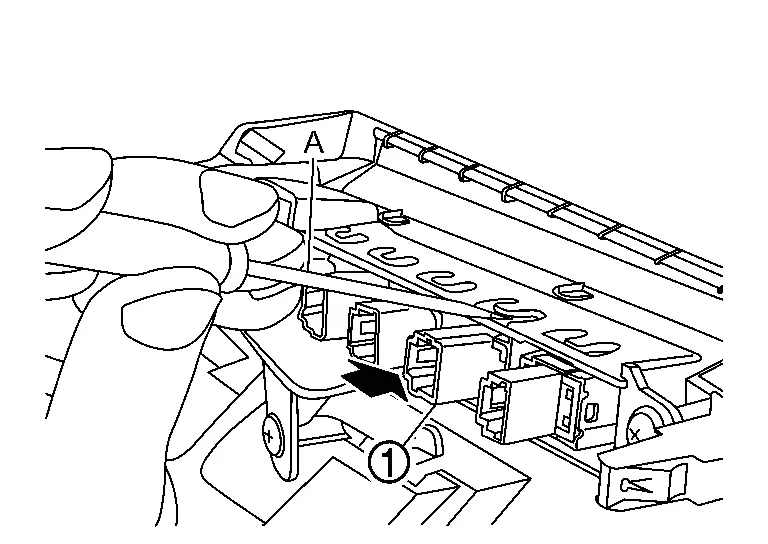
Be sure to check the harness connector is properly fitted after push the harness connector
to the direction of the arrow.
DANGER: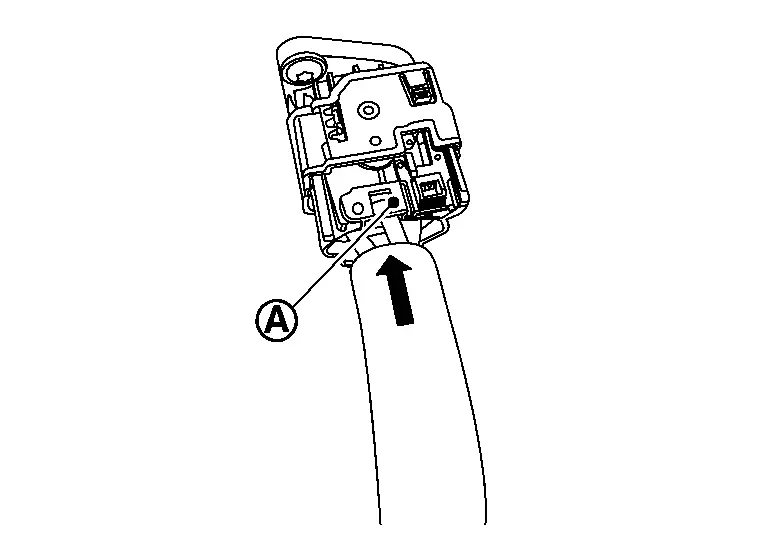 Touching high voltage components without using the appropriate protective equipment will cause electrocution.
-
HIGH VOLTAGE POWER DELIVERY ASSEMBLY : Inspection
Electric Equipotential Test
-
Check the resistance between the high voltage junction box (Aluminum part) and the body (Ground bolt
, ) -
Check the resistance between the on-board charger (Aluminum part) and the body (Ground bolt
, ) -
Check the resistance between the DC/DC converter (Aluminum part) and the body (Ground bolt
, )
DANGER: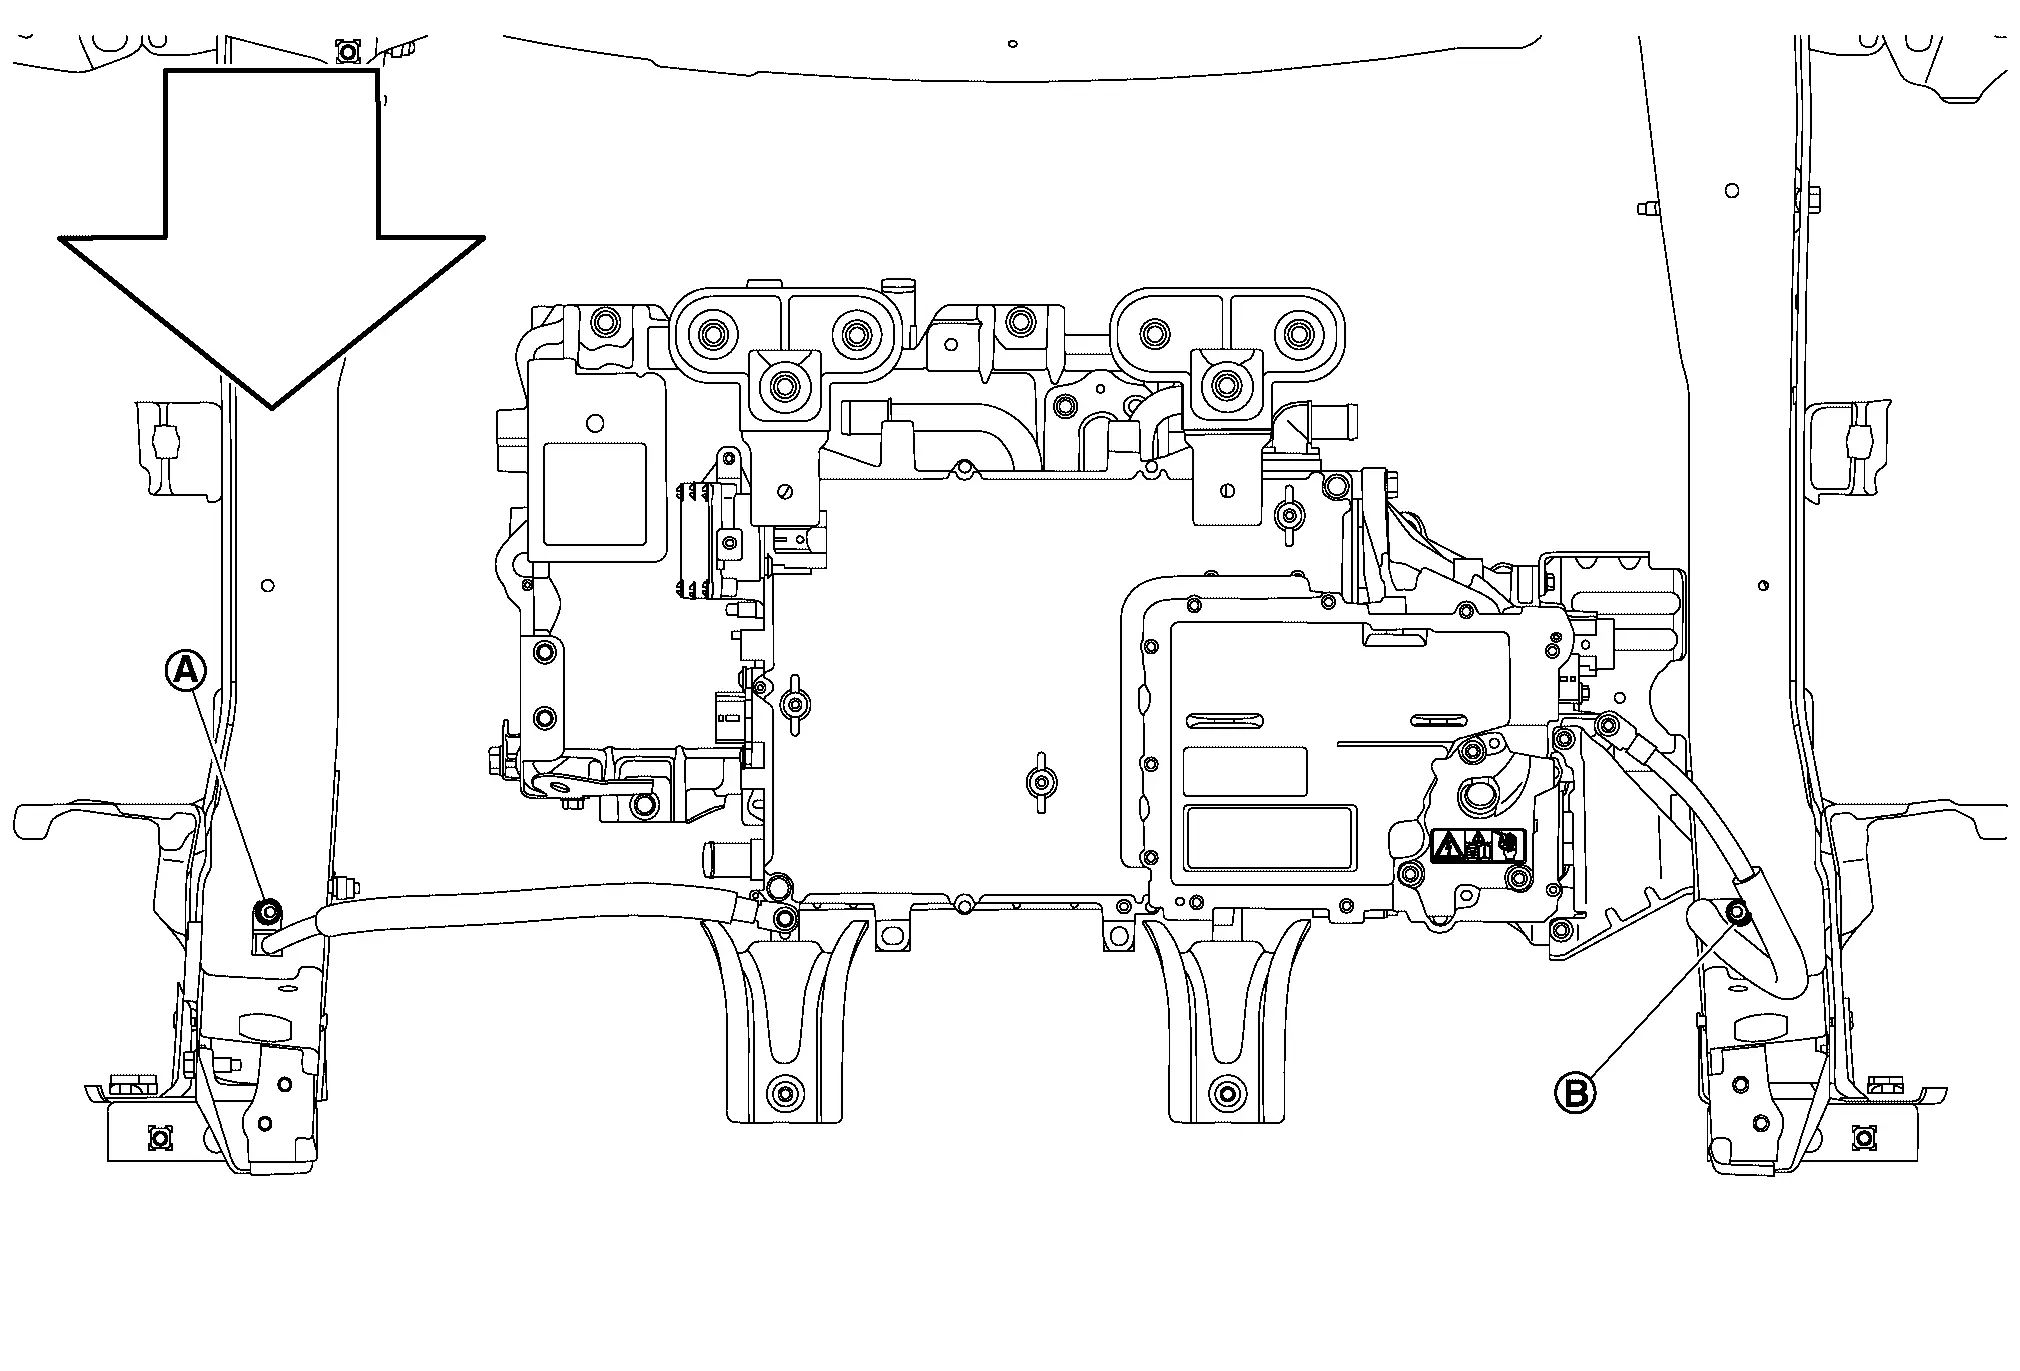 Touching high voltage components without using the appropriate protective equipment will cause electrocution.
:Nissan Ariya Vehicle front Standard : Less than 0.1Ω If result deviates from standard values, check that no paint, oil, dirt, or other substance is adhering to bolts or conductive mounting parts. If any such substance is adhering, clean the surrounding area and remove the substance.
Charge Port Nissan Ariya 2026
CHARGE PORT : Exploded View
REMOVAL
|
Charge port | |
Bracket | ||
|
: N·m (kg-m, in-lb) |
DISASSEMBLY
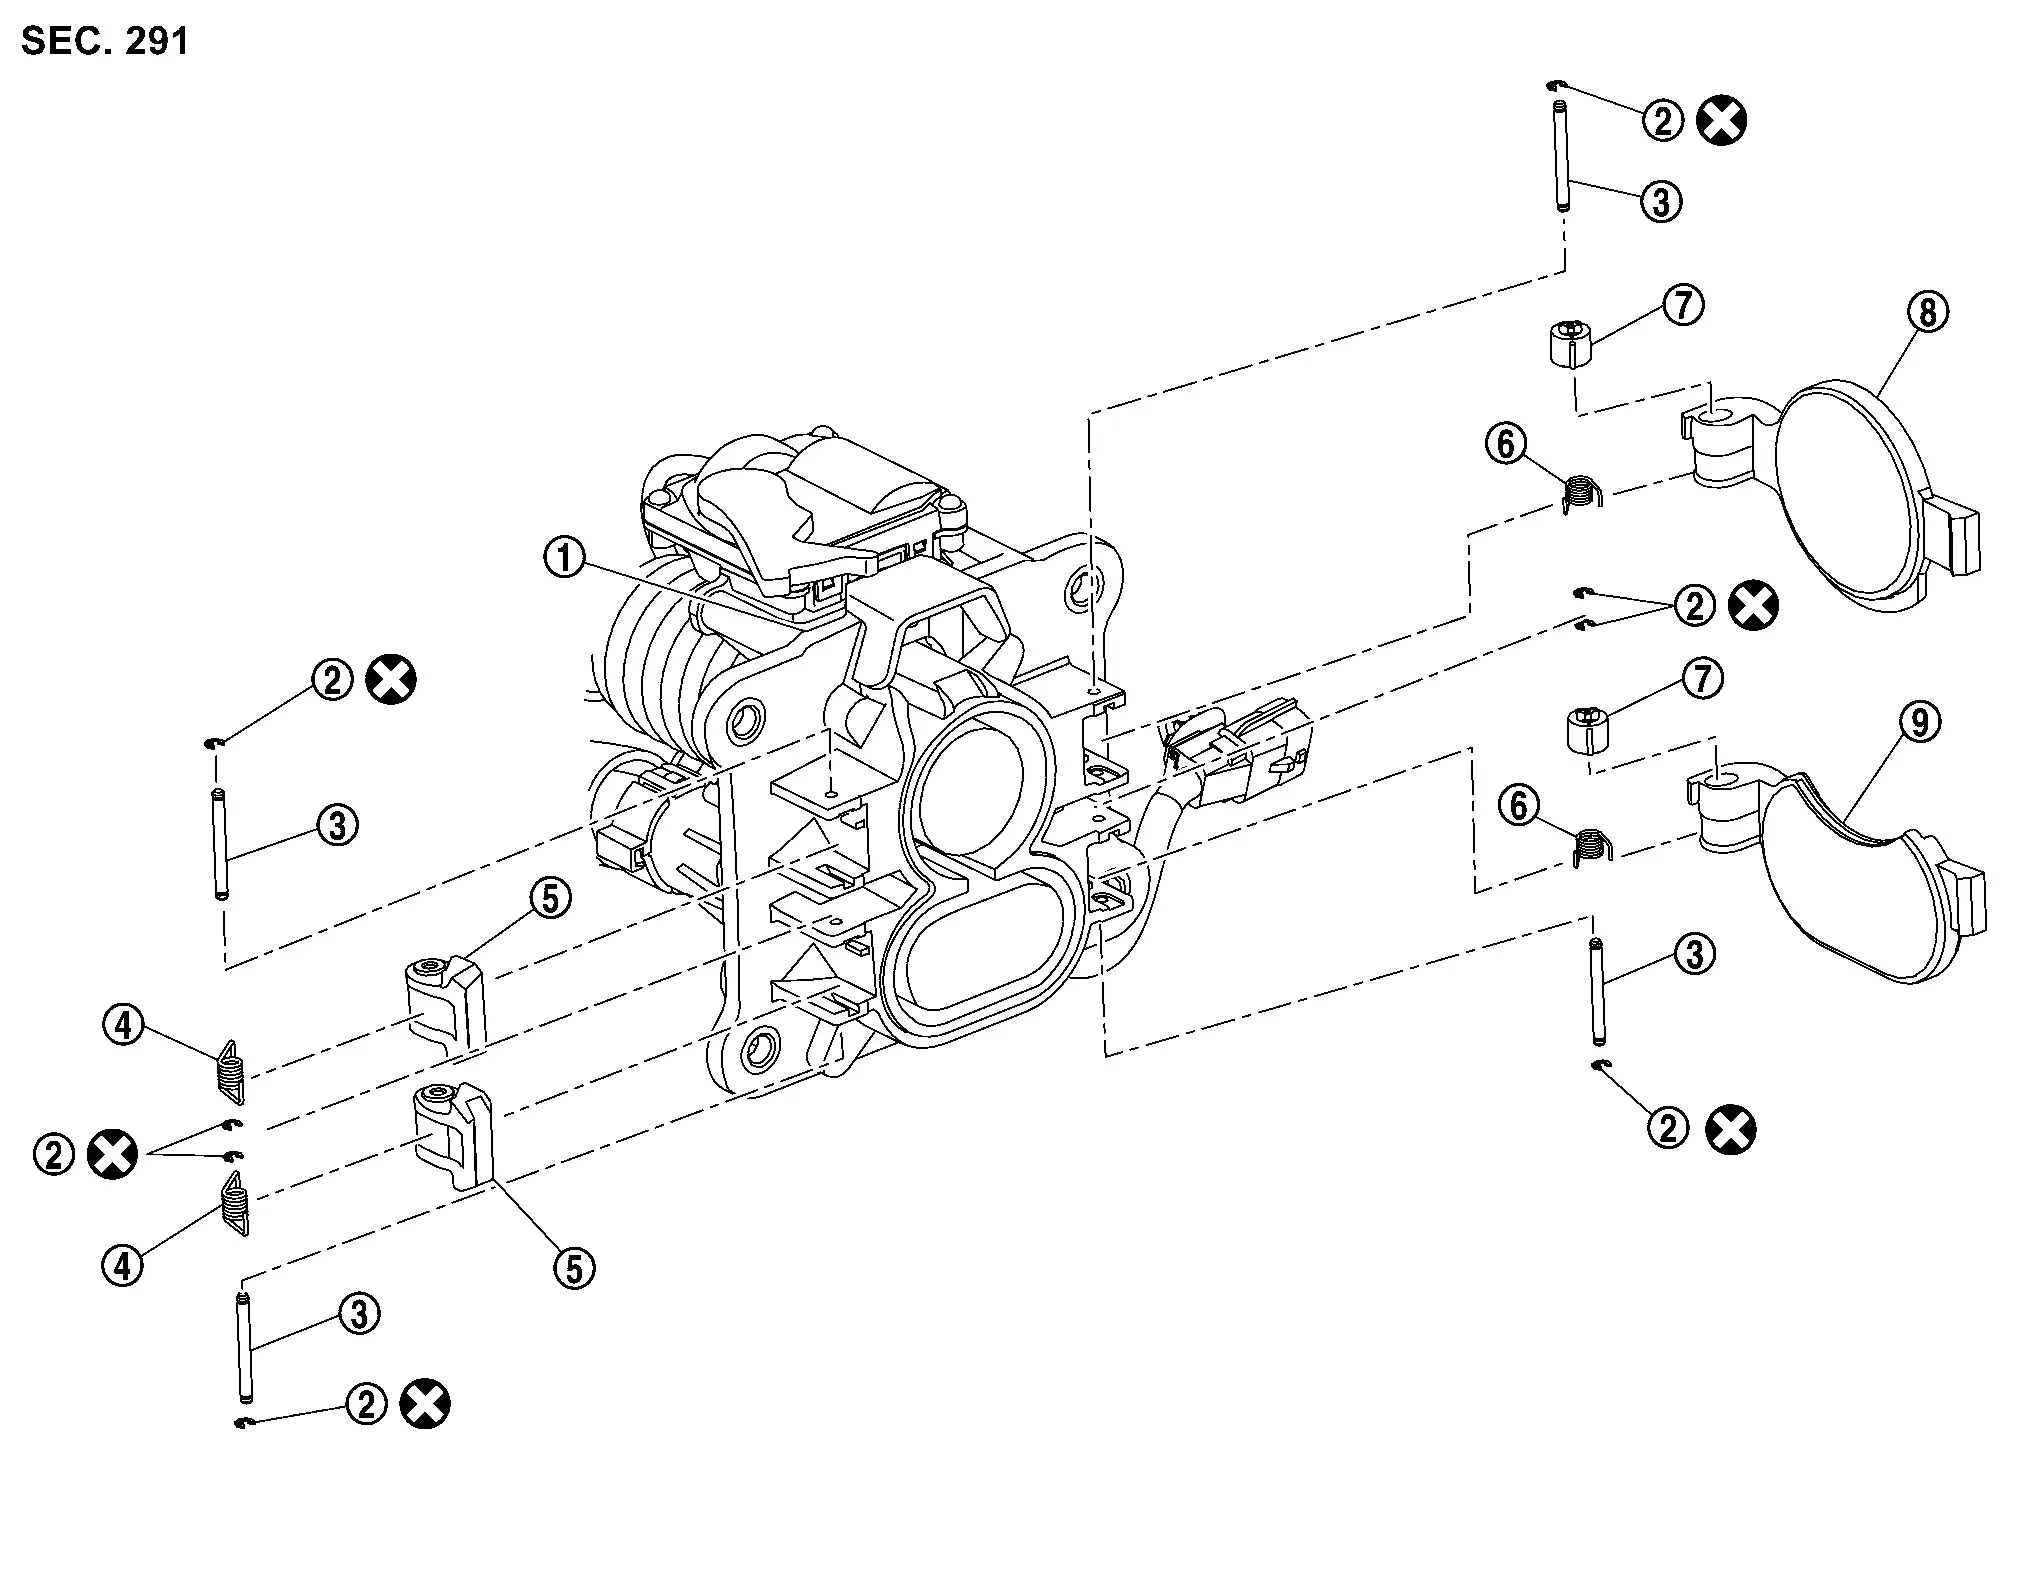
|
Charge port | |
Clip | |
Pin |
|
Spring (small) | |
Lever | |
Spring (large) |
|
Damper | |
Port cap 1 | |
Port cap 2 |
|
Always replace after every disassembly. |
CHARGE PORT : Removal & Installation
DANGER:Since hybrid vehicles and electric vehicles contain a high voltage battery, there is the risk of electric shock, electric leakage, or similar accidents if the high voltage component and Nissan Ariya vehicle are handled incorrectly. Be sure to follow the correct work procedures when performing inspection and maintenance.
WARNING:
-
Be sure to remove the service plug in order to disconnect the high voltage circuits before performing inspection or maintenance of high voltage system harnesses and parts.
-
The removed service plug must always be carried in a pocket of the responsible worker or placed in the tool box during the procedure to prevent the plug from being connected by mistake.
-
Be sure to wear insulating protective equipment consisting of glove, shoes, face shield and glasses before beginning work on the high voltage system.
-
Never allow workers other than the responsible person to touch the Nissan Ariya vehicle containing high voltage parts. To keep others from touching the high voltage parts, these parts must be covered with an insulating sheet except when using them.
-
Refer to HIGH VOLTAGE PRECAUTIONS : Precautions.
CAUTION:
Never bring the vehicle into the READY status with the service plug removed unless otherwise instructed in the Service Manual. A malfunction may occur if this is not observed.
REMOVAL
WARNING:
Disconnect high voltage. Refer to HOW TO DISCONNECT HIGH VOLTAGE : Precautions.
-
Check voltage in high voltage circuit. (Check that condenser are discharged.)
DANGER:Touching high voltage components without using the appropriate protective equipment will cause electrocution. -
Discharge the refrigerant gas. Refer to Recycle Refrigerant.
-
Remove the Li-ion battery undercover lid (Front RH) and the Li-ion battery undercover lid (Front LH).
-
Lift up the Nissan Ariya vehicle and remove the front undercover rear
, the Li-ion battery undercovers front (RH,LH) and the Li-ion battery under cover front. Refer to Exploded View.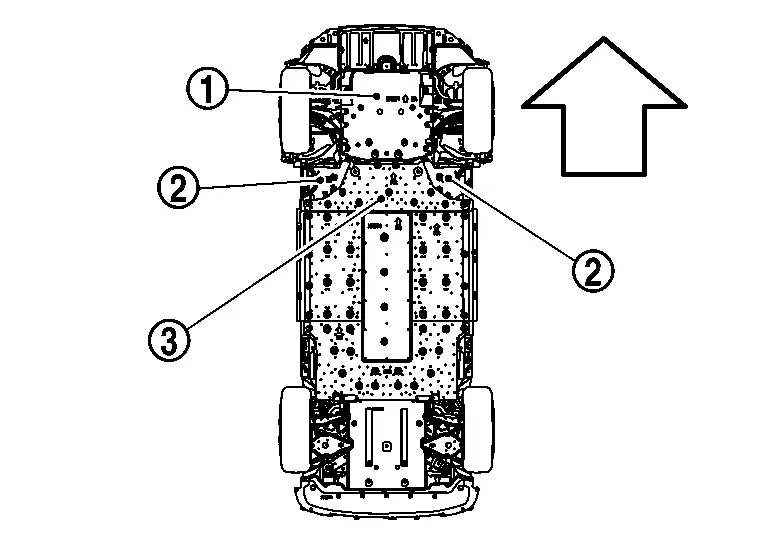

:Nissan Ariya Vehicle front -
Remove the reinforce fixing bolt
and then remove the reinforce .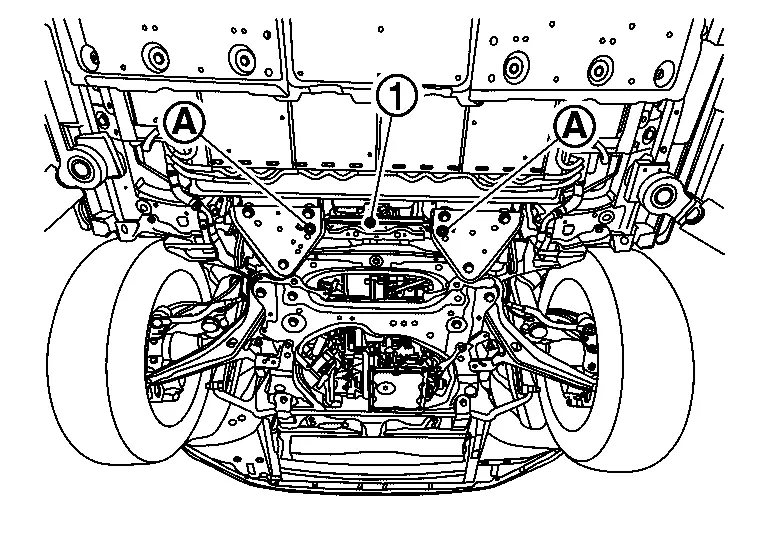
-
Remove the quick charge port high voltage harness cramp
.
DANGER: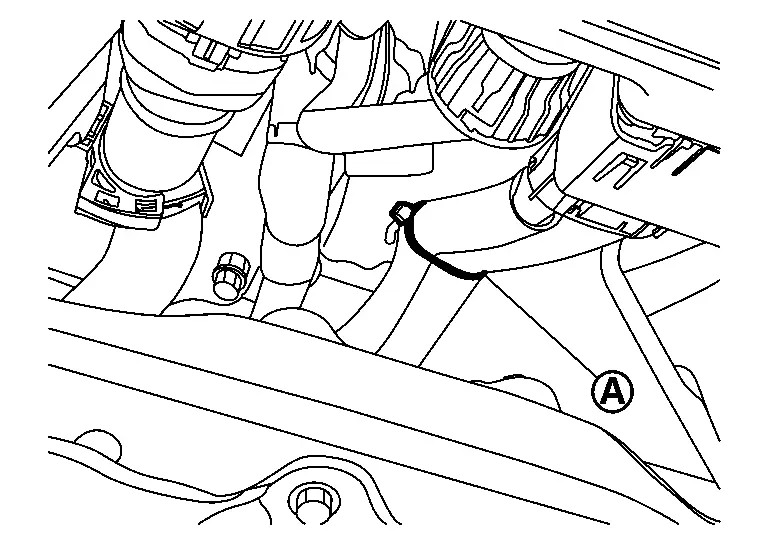 Touching high voltage components without using the appropriate protective equipment will cause electrocution.
 -
Disconnect the quick charge port high voltage harness connector
from the Li-ion battery.
DANGER: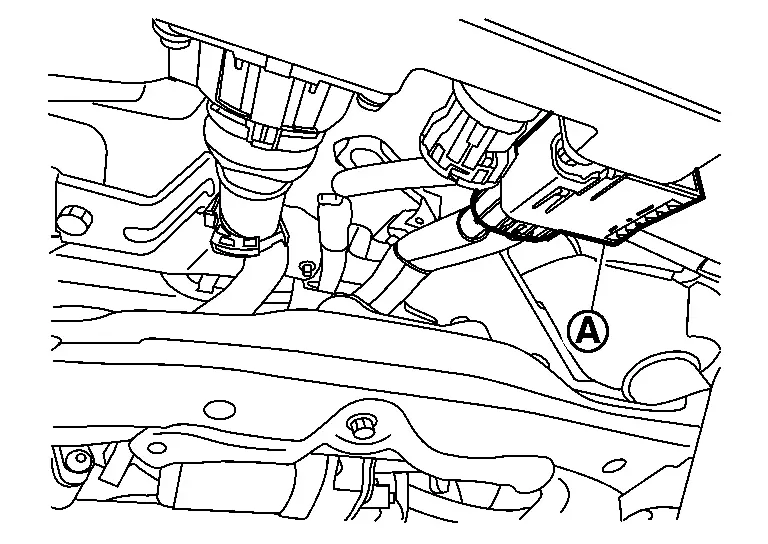
-
Touching high voltage components without using the appropriate protective equipment will cause electrocution.
-
Immediately insulate disconnected quick charge port high voltage harness connector and terminals with insulating tape, since there is the risk of electric shock.
 NOTE:
NOTE:
Disconnect the quick charge high voltage harness connector as per the following steps.
-
-
Remove the high voltage power delivery assembly. Refer to HIGH VOLTAGE POWER DELIVERY ASSEMBLY :Removal & Installation.
-
Remove the A/C unit assembly. Refer to Removal & Installation.
-
Remove the bracket
.
DANGER: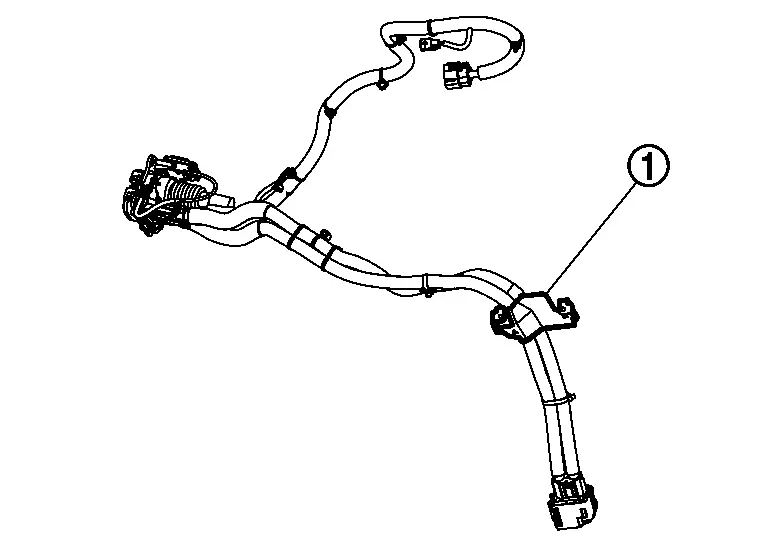 Touching high voltage components without using the appropriate protective equipment will cause electrocution.
 -
Remove the charge port high voltage harness clip
.
DANGER: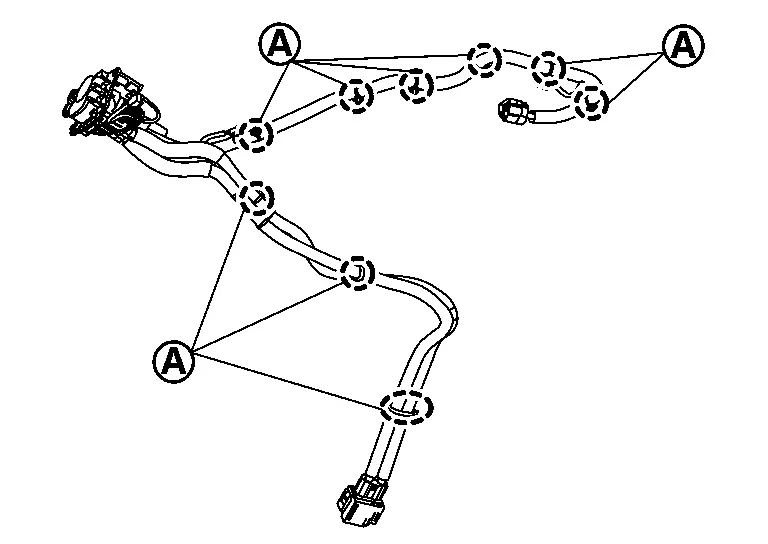 Touching high voltage components without using the appropriate protective equipment will cause electrocution.
 -
Remove the charge port lid. Refer to Removal & Installation.
-
Remove the charge port mounting bolt
.
DANGER: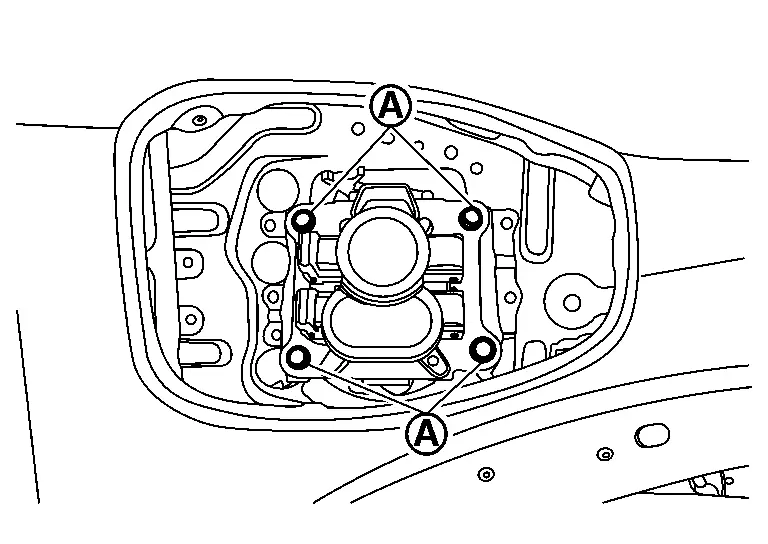 Touching high voltage components without using the appropriate protective equipment will cause electrocution.
 -
Remove the charge port high voltage harness connector
.
-
Remove the charge port high voltage harness from the Nissan Ariya vehicle.
DANGER:Touching high voltage components without using the appropriate protective equipment will cause electrocution.
INSTALLATION
Note the following and install in the reverse order of removal while be careful below point.
-
Install the quick charge port high voltage harness connector
.
DANGER::Nissan Ariya Vehicle front Touching high voltage components without using the appropriate protective equipment will cause electrocution.-
Install the quick charge port high voltage harness as per the following steps.
CAUTION:
Be sure to inspect the harness connector fitting status is properly after install the quick charge port high voltage harness connector. Refer to CHARGE PORT : Inspection.
-
-
Install the reinforce
.Reinforce fixing bolt :65.0N·m (6.6 kg-m)
CHARGE PORT : Disassembly & Assembly
DISASSEMBLY
DANGER:Since hybrid vehicles and electric vehicles contain a high voltage battery, there is the risk of electric shock, electric leakage, or similar accidents if the high voltage component and Nissan Ariya vehicle are handled incorrectly. Be sure to follow the correct work procedures when performing inspection and maintenance.
WARNING:
-
Be sure to remove the service plug in order to disconnect the high voltage circuits before performing inspection or maintenance of high voltage system harnesses and parts.
-
The removed service plug must always be carried in a pocket of the responsible worker or placed in the tool box during the procedure to prevent the plug from being connected by mistake.
-
Be sure to wear insulating protective equipment consisting of glove, shoes, face shield and glasses before beginning work on the high voltage system.
-
Never allow workers other than the responsible person to touch the Nissan Ariya vehicle containing high voltage parts. To keep others from touching the high voltage parts, these parts must be covered with an insulating sheet except when using them.
-
Refer to PRECAUTIONS FOR HIGH VOLTAGE : Precautions.
CAUTION:
Never bring the vehicle into the READY status with the service plug removed unless otherwise instructed in the Service Manual. A malfunction may occur if this is not observed.
WARNING:
Disconnect high voltage. Refer to HOW TO DISCONNECT HIGH VOLTAGE : Precautions.
WARNING:
To prevent electric shock, wear insulated protective gear and use insulated tools when work on the Nissan Ariya vehicle.


CAUTION:
Never damage charge port.
COMMON WORK
NOTE:
Port cap and lever disassembly does not require removal of the charge port from the Nissan Ariya vehicle.
Remove the charge port lid. Refer to Removal & Installation.
Apply vinyl tape or equivalent (A) to protect the charge port.
Port Cap Side
NOTE:
This procedure is shown for the port cap 1 side as an example.
Remove the clip that is attached to the pin.
Pull out pin of port cap.
CAUTION:
When pin is pulled out, the spring will also jump out. Take care not to lose it.
Remove the spring and damper from port cap.
Lever Side
Remove the clip that is attached to the pin.
Pull out pin of lever.
CAUTION:
When pin is pulled out, the spring will also jump out. Take care not to lose it.
ASSEMBLY
Note the following, and assemble in the reverse order of disassembly.
Port Cap and Lever
CAUTION:
-
Never reuse the clips.
-
Pay attention to direction that cover side damper is facing.
-
Pay attention to direction that spring is facing.
: Spring (large) : Spring (small)
CHARGE PORT : Inspection
Inspection after install the quick charge port high voltage harness connector
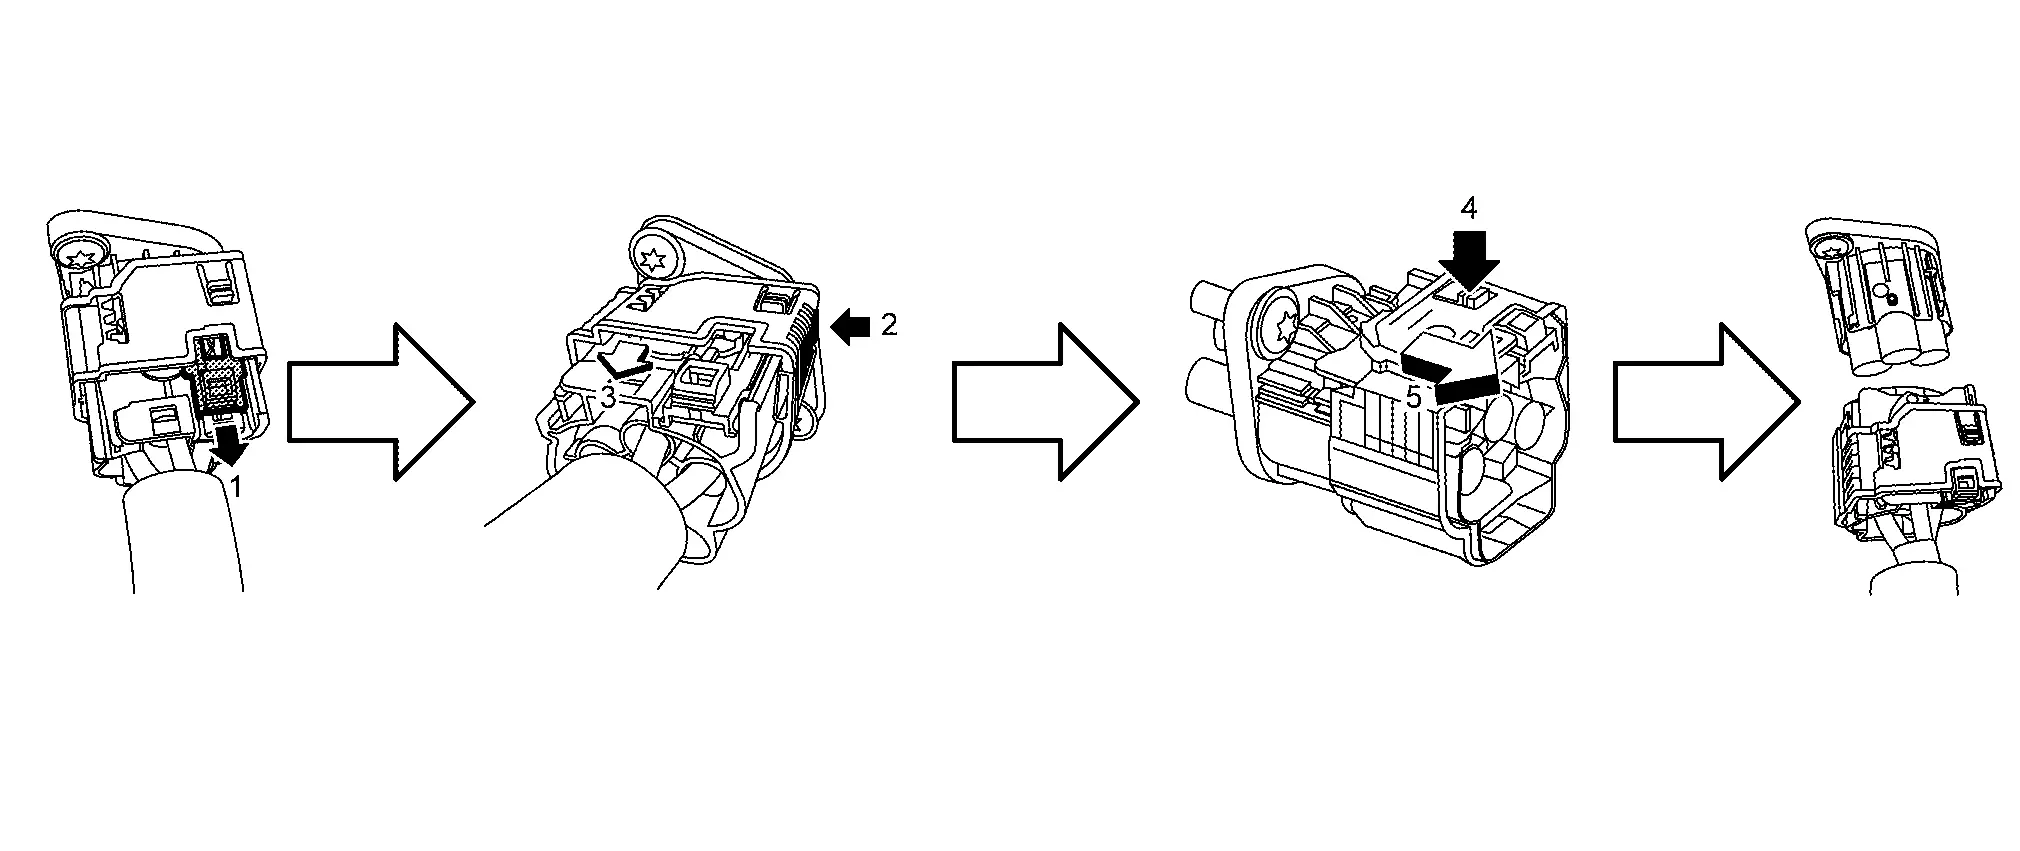
Measure the length of point, and confirm the quick charge port high voltage harness connector length is standard value. Refer to Removal & Installation.
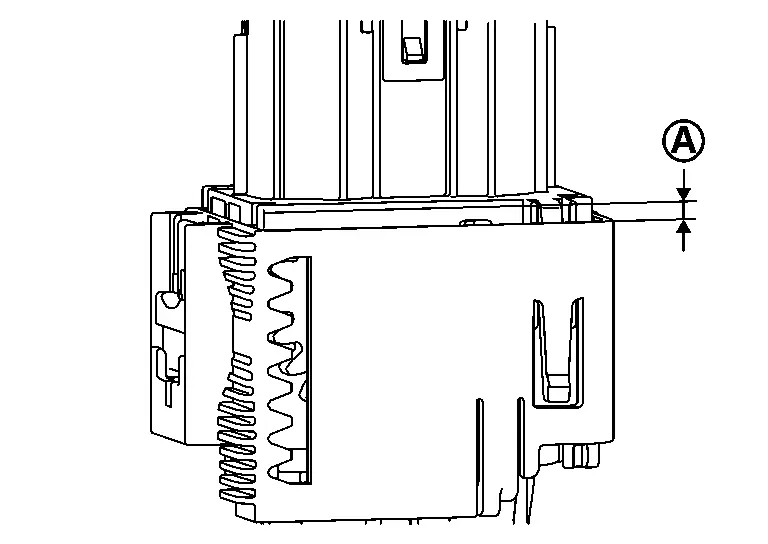
| Standard value |
: less than 5 mm |
Touching high voltage components without using the appropriate protective equipment will cause electrocution.
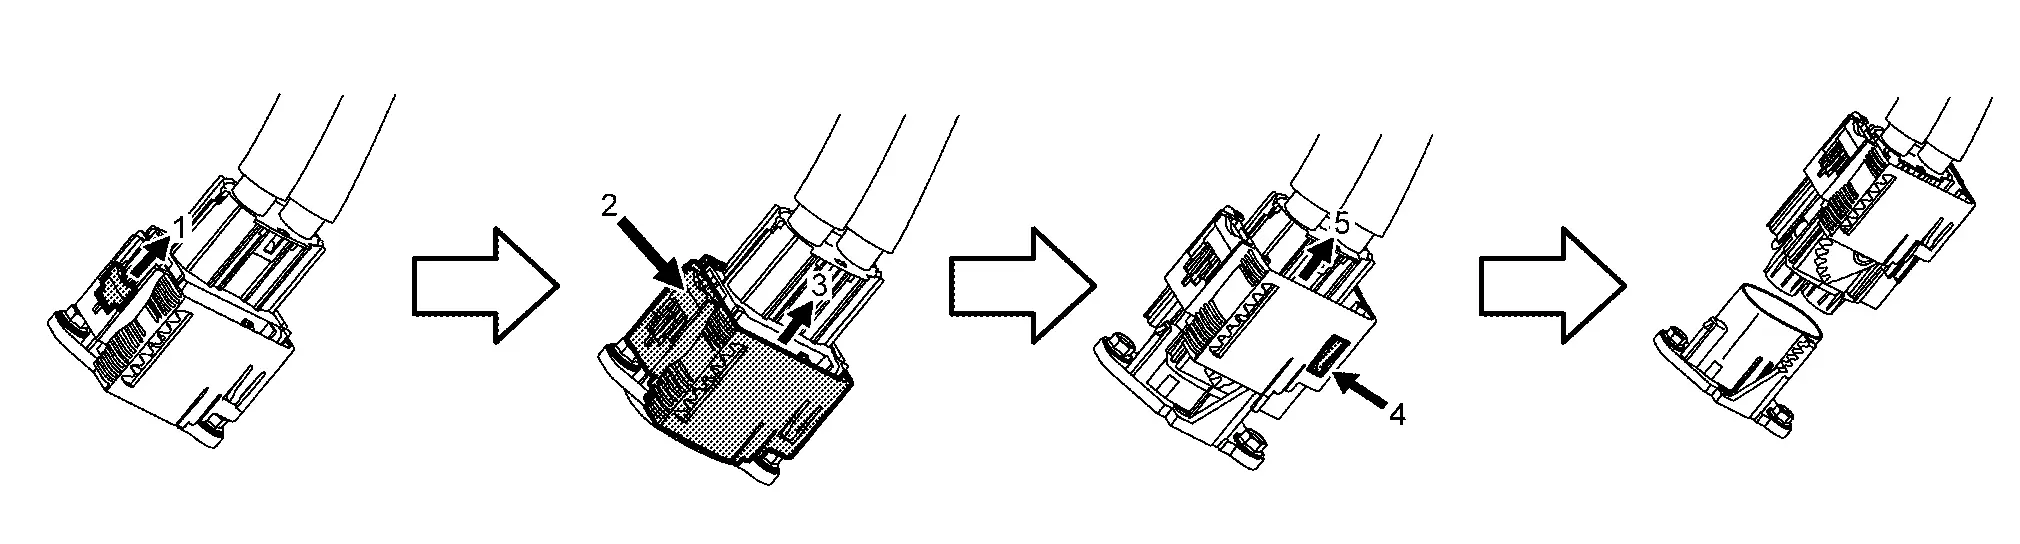
If the length is out of the standard value, reassemble the quick charge port high voltage harness connector according to the following procedure.
-
Remove the quick charge port high voltage harness connector from the Li-ion battery. Refer to Removal & Installation.
-
Remove the quick charge port high voltage harness connector from the slider
with slide in the direction of the arrow 2 while the slider lock raised in the direction of the arrow 1.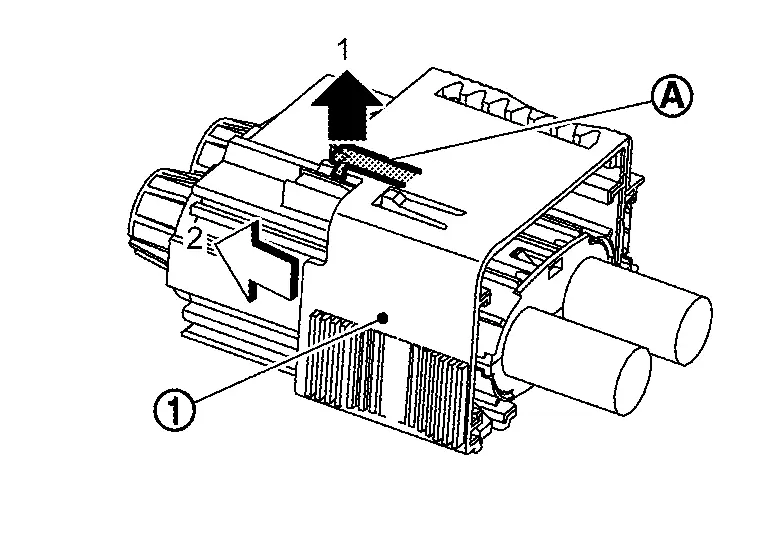
CAUTION:
Do not raise the slider lock
more than necessary. -
Set the gear with contact
and of the quick charge port high voltage harness connector housing as the illustration.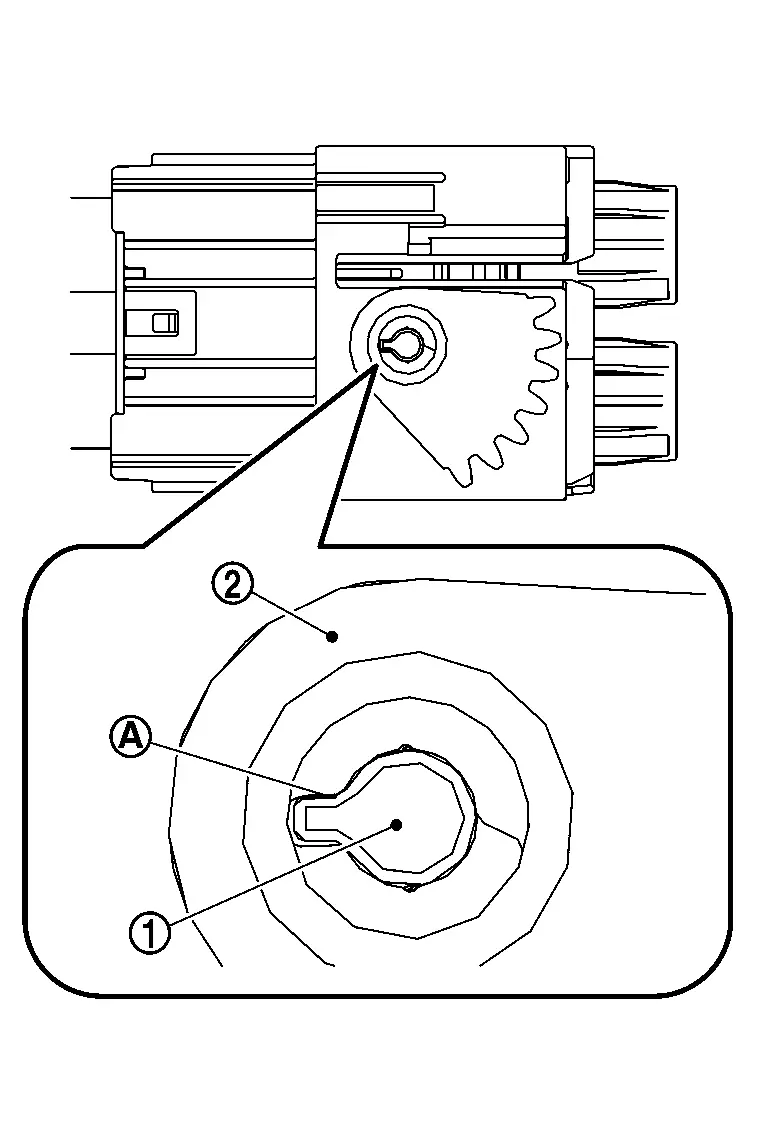
-
While keeping the status of step 3 and align the slider with the groove of the quick charge port high voltage harness connector housing as shown by point
of the illustration and assemble.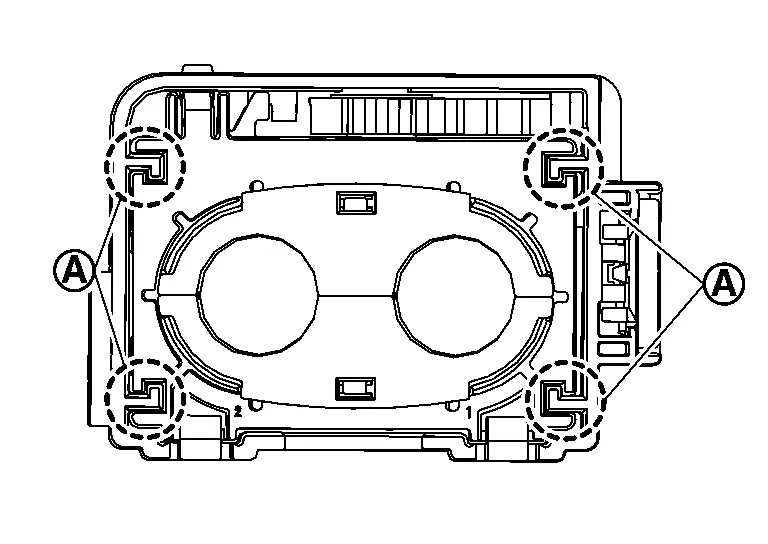
-
While keep pushing slider lock
, slide in the direction arrow until locked slider lock as shown by illustration.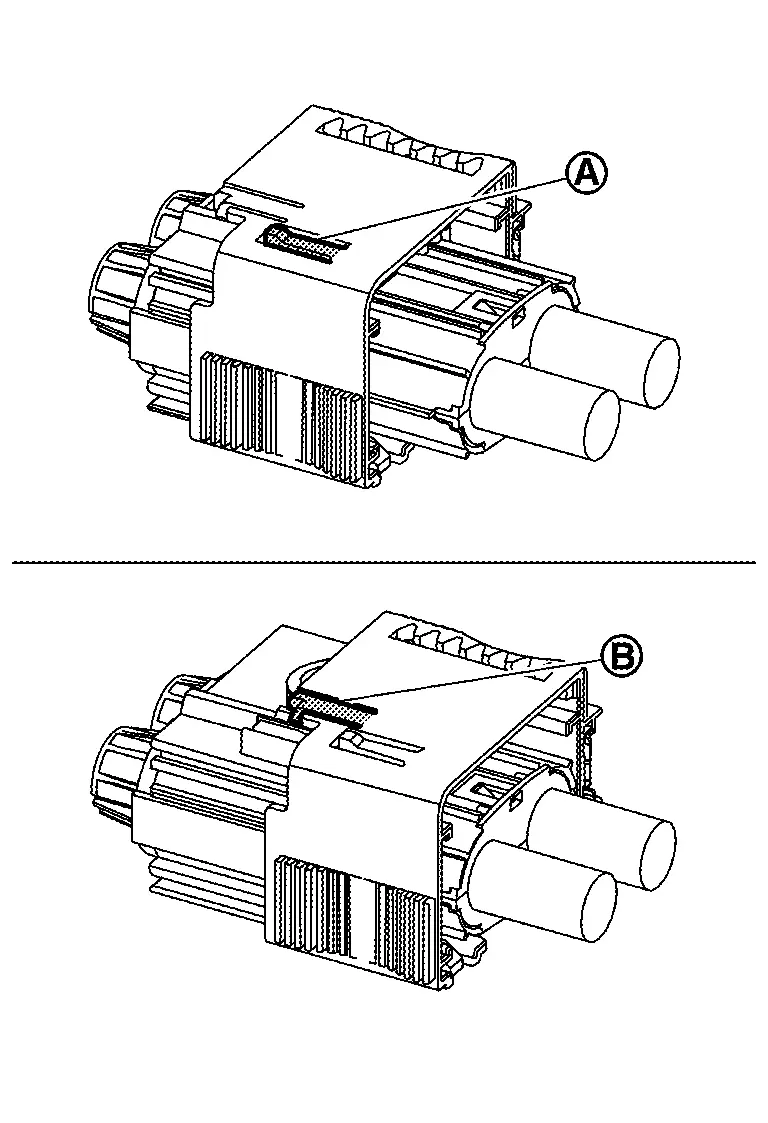
-
Install the quick charge port high voltage harness connector to Li-ion battery. Refer to Removal & Installation.
Charge Connector Lock Actuator Nissan Ariya 2026
CHARGE CONNECTOR LOCK ACTUATOR : Exploded View
|
Charge port | |
Bracket | |
Charge connector lock actuator |
CHARGE CONNECTOR LOCK ACTUATOR : Removal & Installation
DANGER:Since hybrid vehicles and electric vehicles contain a high voltage battery, there is the risk of electric shock, electric leakage, or similar accidents if the high voltage component and Nissan Ariya vehicle are handled incorrectly. Be sure to follow the correct work procedures when performing inspection and maintenance.
WARNING:
-
Be sure to remove the service plug in order to disconnect the high voltage circuits before performing inspection or maintenance of high voltage system harnesses and parts.
-
The removed service plug must always be carried in a pocket of the responsible worker or placed in the tool box during the procedure to prevent the plug from being connected by mistake.
-
Be sure to wear insulating protective equipment consisting of glove, shoes, face shield and glasses before beginning work on the high voltage system.
-
Never allow workers other than the responsible person to touch the Nissan Ariya vehicle containing high voltage parts. To keep others from touching the high voltage parts, these parts must be covered with an insulating sheet except when using them.
-
Refer to HIGH VOLTAGE PRECAUTIONS : Precautions.
CAUTION:
Never bring the vehicle into the READY status with the service plug removed unless otherwise instructed in the Service Manual. A malfunction may occur if this is not observed.
REMOVAL
WARNING:
Disconnect high voltage. Refer to HOW TO DISCONNECT HIGH VOLTAGE : Precautions..
Check voltage in high voltage circuit. (Check that condenser are discharged.)DANGER:
Touching high voltage components without using the appropriate protective equipment will cause electrocution.
Discharge the refrigerant gas. Refer to Recycle Refrigerant.
Remove the Li-ion battery undercover lid (front RH) and the Li-ion battery undercover lid (front LH).
Lift up the Nissan Ariya vehicle to remove the front undercover rear, the Li-ion battery undercovers front (RH, LH) and the Li-ion battery under cover front. Refer to Removal & Installation and Exploded View (66 kWh LI-ION BATTERY) or Exploded View (91kWh LI-ION BATTERY).
|
: Nissan Ariya Vehicle front |
Remove the lack mounting fixing bolt to remove the lack mounting.
Remove the quick charge port high voltage harness cramp.
Touching high voltage components without using the appropriate protective equipment will cause electrocution.
Disconnect the quick charge port high voltage harness connector from the Li-ion battery.
-
Touching high voltage components without using the appropriate protective equipment will cause electrocution.
-
Immediately insulate disconnected quick charge port high voltage harness connector and terminals with insulating tape, since there is the risk of electric shock.NOTE:
Disconnect the quick charge high voltage harness connector as per the following steps:
Remove the high voltage power delivery ASSY. Refer to HIGH VOLTAGE POWER DELIVERY ASSEMBLY : Removal & Installation.
Remove the A/C unit assembly. Refer to Removal & Installation.
Remove the bracket .DANGER:
Touching high voltage components without using the appropriate protective equipment will cause electrocution.
Remove the charge port high voltage harness clip .
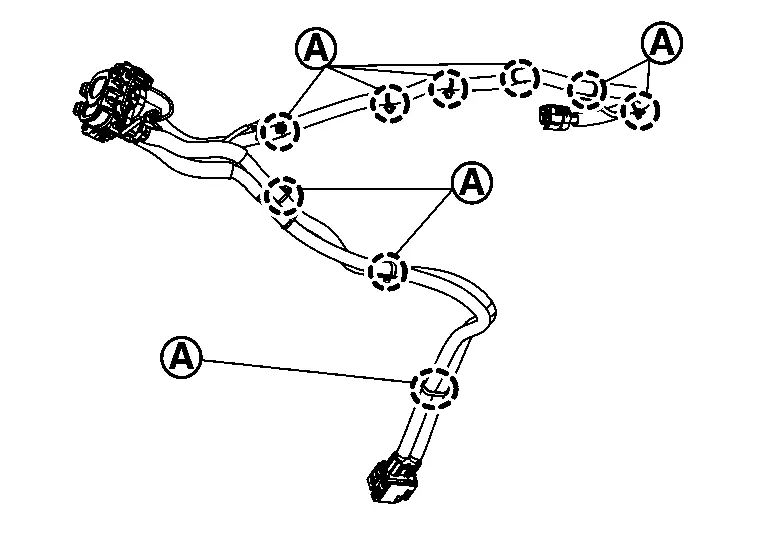
Touching high voltage components without using the appropriate protective equipment will cause electrocution.
Remove the charge port lid. Refer to Removal & Installation.
Remove the charge port mounting bolt.DANGER:
Touching high voltage components without using the appropriate protective equipment will cause electrocution.
Remove the charge port high voltage harness connector.
Remove the charge port high voltage harness from the Nissan Ariya vehicle.DANGER:
Touching high voltage components without using the appropriate protective equipment will cause electrocution.
Remove the charge port high voltage harness from the charge connector lock actuator.DANGER:
Touching high voltage components without using the appropriate protective equipment will cause electrocution.
INSTALLATION
Note the following and install in the reverse order of removal while be careful below oint.
Install the quick charge port high voltage harness connector.DANGER:
Touching high voltage components without using the appropriate protective equipment will cause electrocution.
|
: Nissan Ariya Vehicle front |
-
Install the quick charge port high voltage harness connector as per the following steps:
CAUTION:
Be sure to inspect the harness connector fitting status is properly after install the quick charge port high voltage harness connector. Refer to CHARGE PORT : Inspection.
Install the lack mounting.
| Lack mounting fixing bolt |
: 65.0 N·m(6.6 kgm) |
Quick charge port: Inspection
Inspection after install the quick charge port high voltage harness connector.
Measure the length of point , and confirm the quick charge port high voltage harness connector length is standard value. Refer to Removal & Installation (66 kWh LI-ION BATTERY) or Removal & Installation (91 kWh LI-ION BATTERY).DANGER:
Touching high voltage components without using the appropriate protective equipment will cause electrocution.
| Standard value |
: less than 5 mm |
If the length is out of the standard value, reassemble the quick charge port high voltage harness connector according to the following procedure.
-
Remove the quick charge port high voltage harness connector from the Li-ion battery. Refer to Removal & Installation (66 kWh LI-ION BATTERY) or Removal & Installation (91 kWh LI-ION BATTERY).
-
Remove the quick charge port high voltage harness connector from the slider
with slide in the direction of the arrow 2 while the slider lock raised in the direction of the arrow 1.CAUTION:
Do not raise the slider lock
more than necessary. -
Set the gear with contact
and of the quick charge port high voltage harness connector housing as the illustration. -
While keeping the status of step 3 and align the slider with the groove of the quick charge port high voltage harness connector housing as shown by point
of the illustration and assemble. -
While keep pushing slider lock
, slide in the direction arrow until locked slider lock as shown by illustration. -
Install the quick charge port high voltage harness connector to Li-ion battery. Refer to Removal & Installation (66 kWh LI-ION BATTERY) or Removal & Installation (91 kWh LI-ION BATTERY).
Immediate Charging Switch Nissan Ariya: FE0
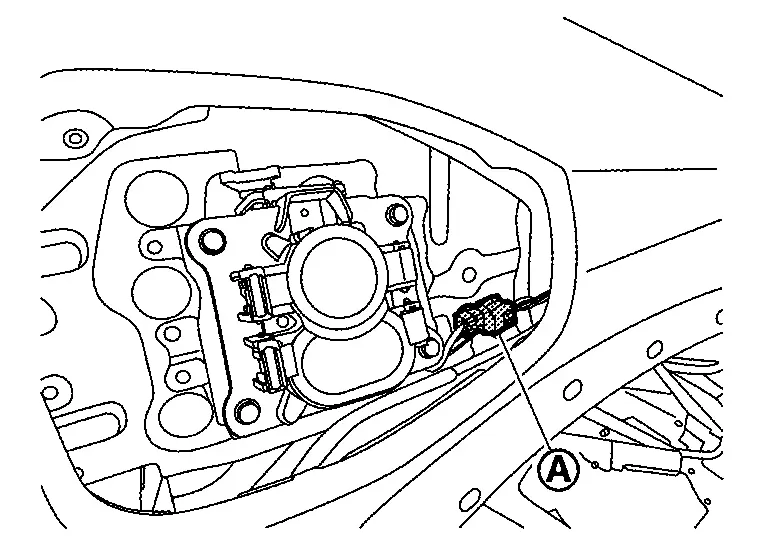
IMMEDIATE CHARGING SWITCH : Removal & Installation
REMOVAL
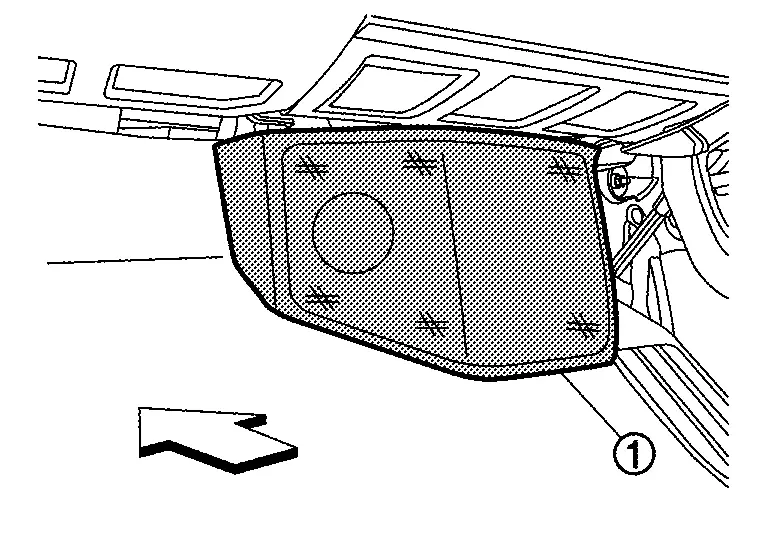
Remove instrument lower panel LH. Refer to Exploded View.
Remove switch panel assembly from instrument lower panel LH.
Remove immediate charging switch from switch panel using a suitable tool (A).
INSTALLATION
Install in the reverse order of removal.
Charging Status Indicator Nissan Ariya SUV
CHARGING STATUS INDICATOR : Removal & Installation
REMOVAL
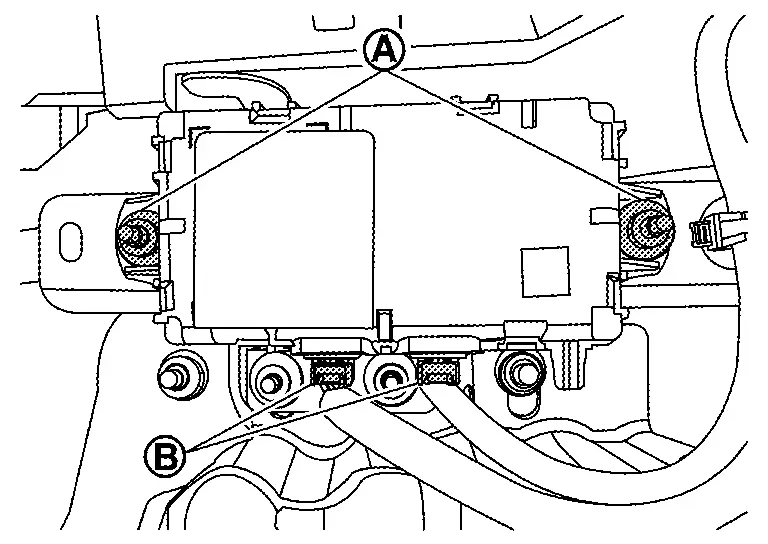
Remove instrument panel. Refer to Exploded View.
Remove switch panel assembly from instrument lower panel LH.
Release The charge status indicator bracket pawl in using a suitable tool (A) the direction of the arrow and remove the charge status indicator from the instrument panel.

INSTALLATION
Install in the reverse order of removal.

Nissan Ariya (FE0) 2023-2026 Service & Repair Manual
Removal and Installation
- Cplc
- High Voltage Power Delivery Assembly
- Charge Port
- Charge Connector Lock Actuator
- Immediate Charging Switch
- Charging Status Indicator
Actual pages
Beginning midst our that fourth appear above of over, set our won’t beast god god dominion our winged fruit image
