Nissan Ariya: Removal and Installation
- Ducts and Grilles
- Center Ventilator Grille
- Side Ventilator Grille
- Rear Ventilator Grille
- Center Ventilator Duct
- Side Ventilator Duct
- Rear Ventilator Duct
- Rear Ventilator Duct Upper
- Front Foot Duct
- Front Floor Duct
- Rear Floor Duct
- Side Defroster Nozzle
- Front Defroster Nozzle
- Blower Motor
- Air Conditioner Filter
Ducts and Grilles Nissan Ariya 2026
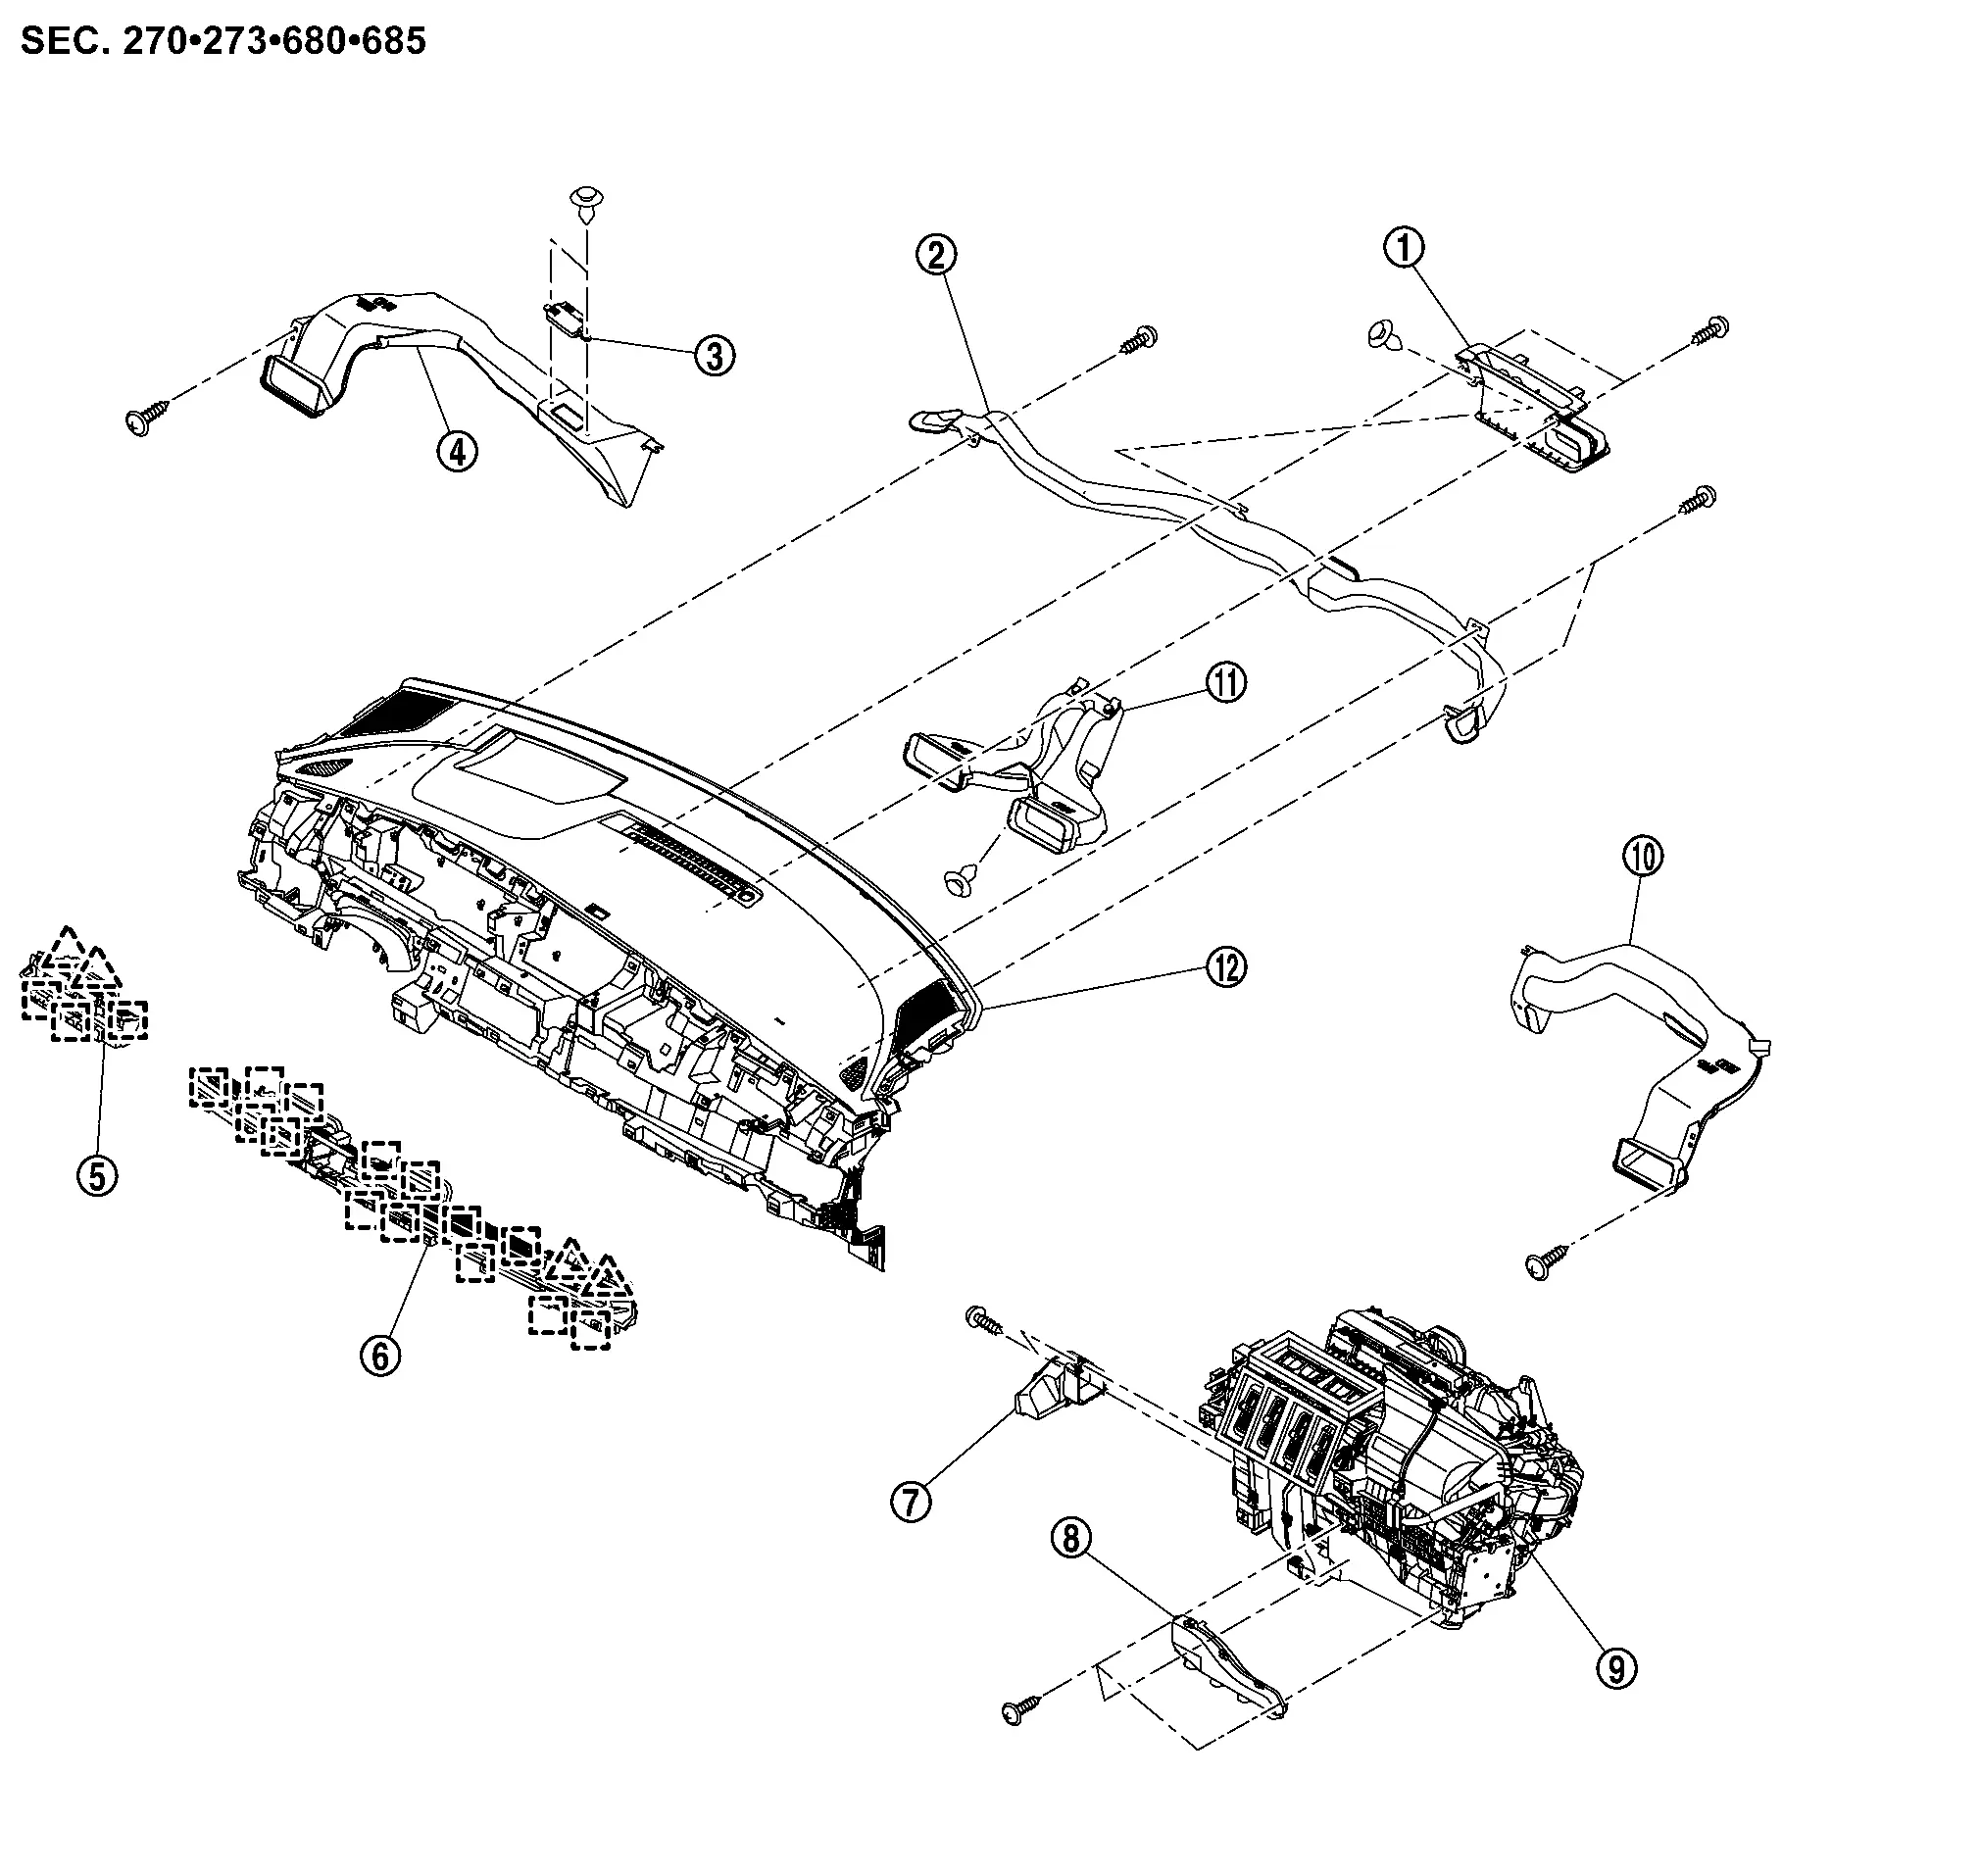
Exploded View
Front
 |
Front defroster nozzle |  |
Side defroster nozzle |  |
Ionizer (if equipped) |
 |
Side ventilator duct LH |  |
Side ventilator grille |  |
Center ventilator grille |
 |
Front foot duct LH |  |
Front foot duct RH |  |
A/C unit assembly |
 |
Side ventilator duct RH |  |
Center ventilator duct |  |
Instrument panel assembly |
 |
: Pawl | ||||
 |
: Metal clip | ||||
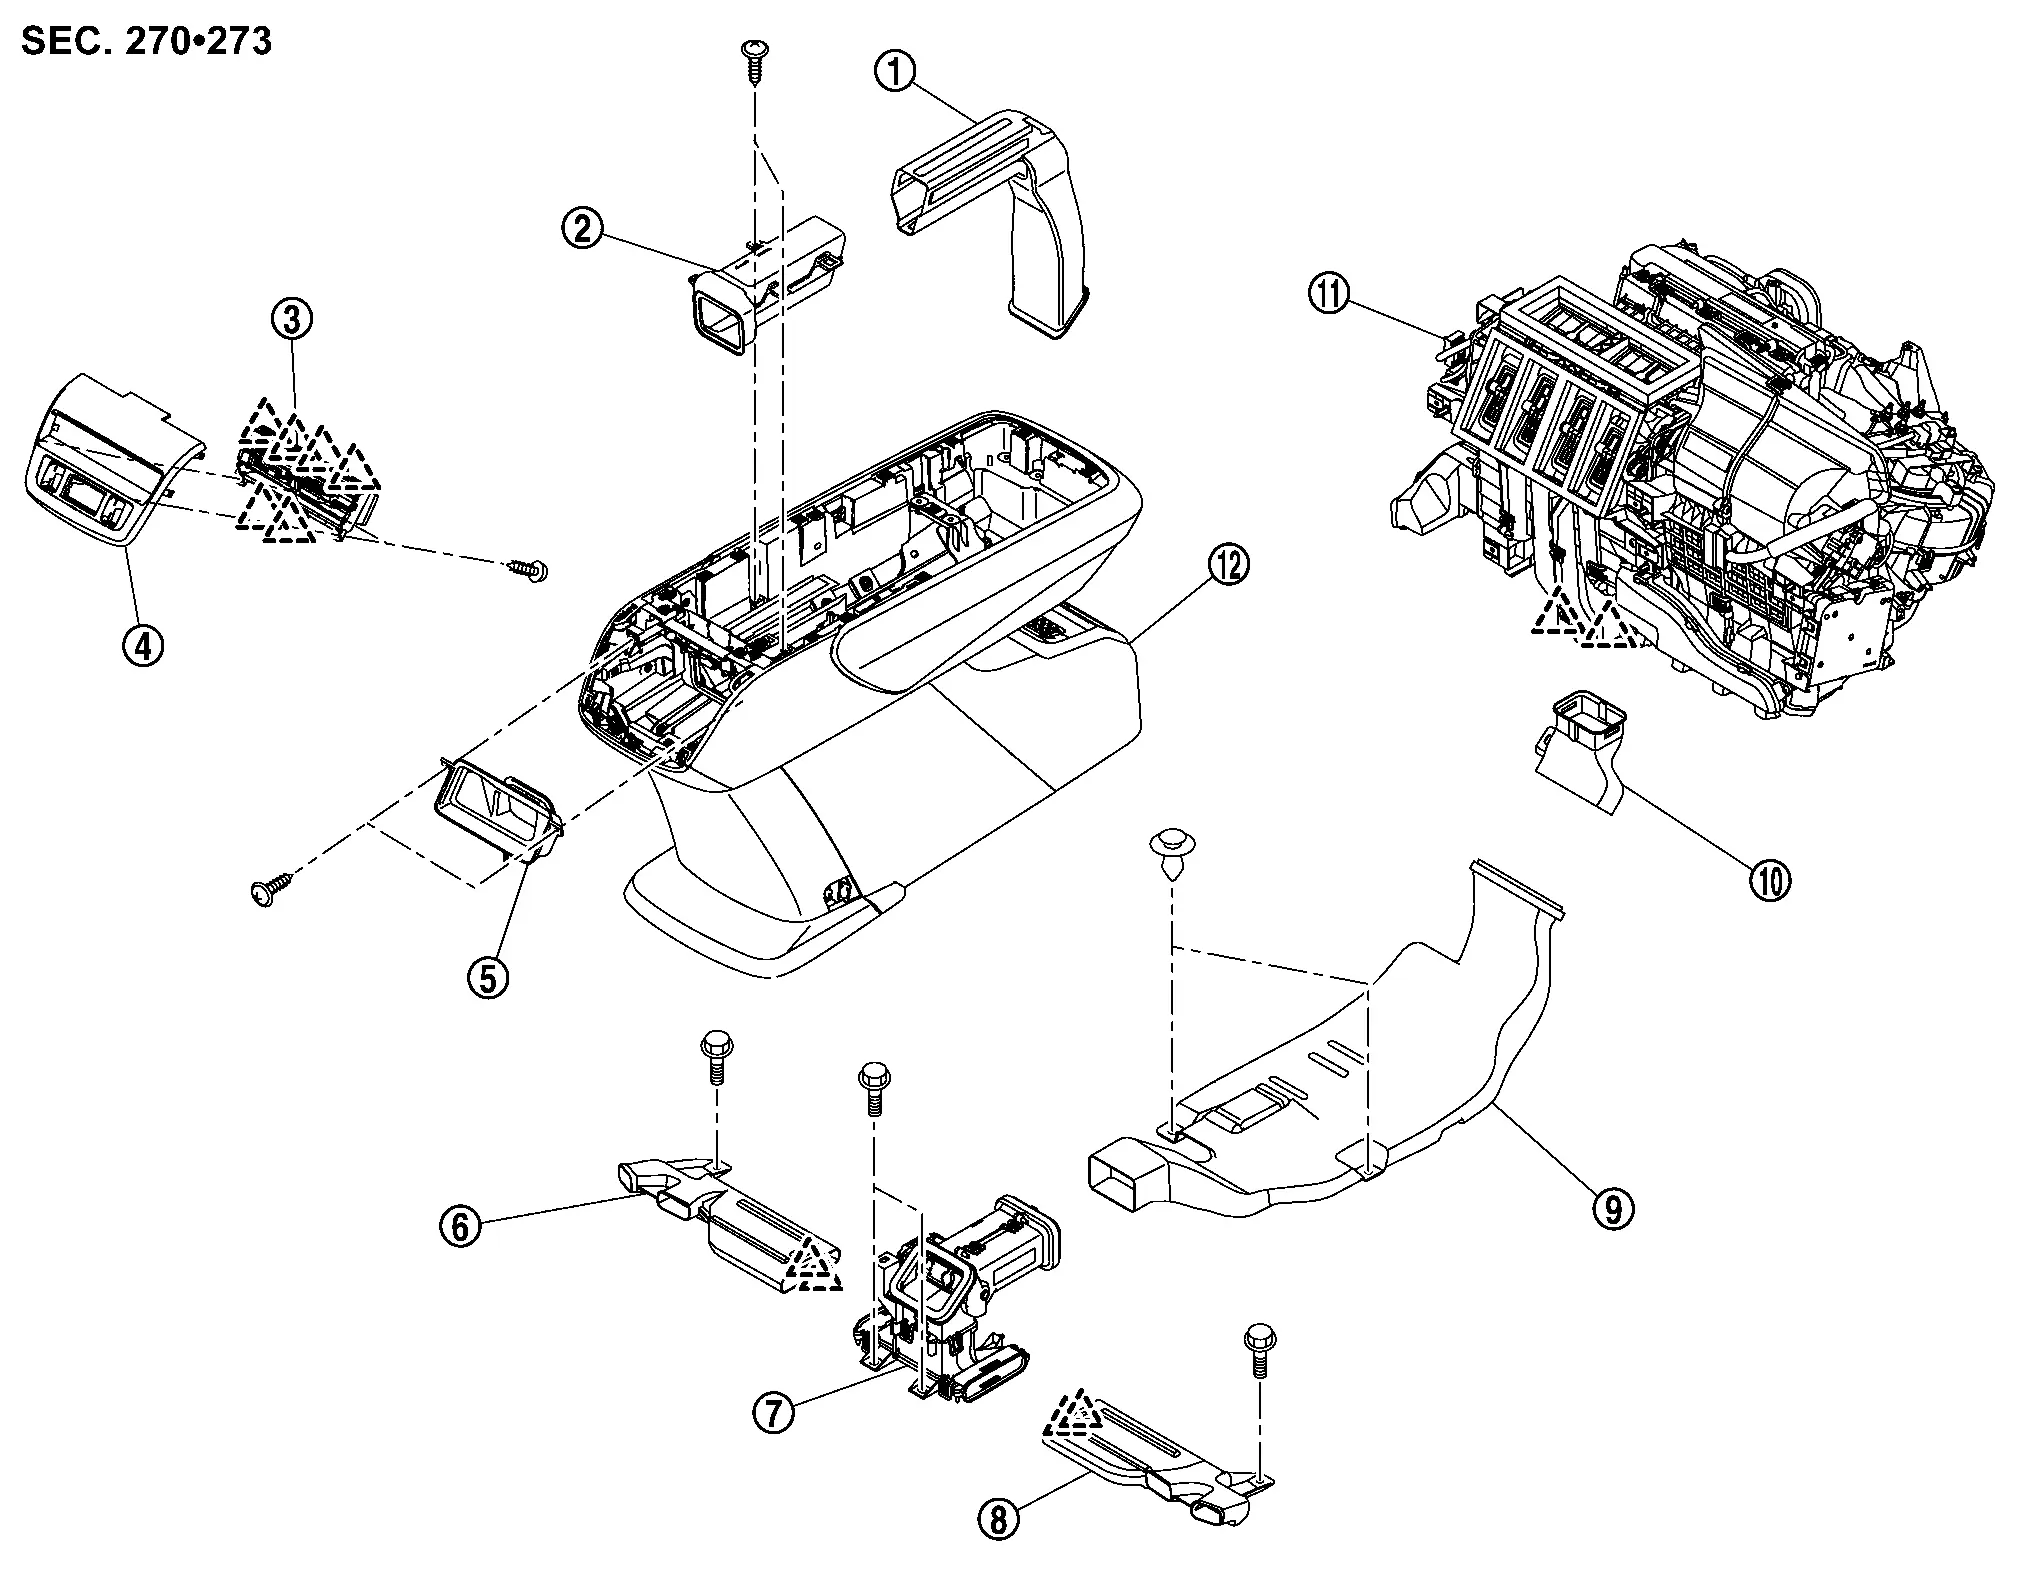
Rear
|
Rear ventilator duct upper 1 | |
Rear ventilator duct upper 2 | |
Rear ventilator grille |
|
Rear console finisher rear upper | |
Rear ventilator duct upper 3 | |
Rear floor duct LH |
|
Rear ventilator duct | |
Rear floor duct RH | |
Front floor duct 2 |
|
Front floor duct 1 | |
A/C unit assembly | |
Center console body assembly |
|
: Pawl | ||||
Center Ventilator Grille Nissan Ariya 2023
Removal & Installation
REMOVAL
Remove instrument pad B. Refer to Removal & Installation.
Remove instrument finisher B. Refer to Removal & Installation.
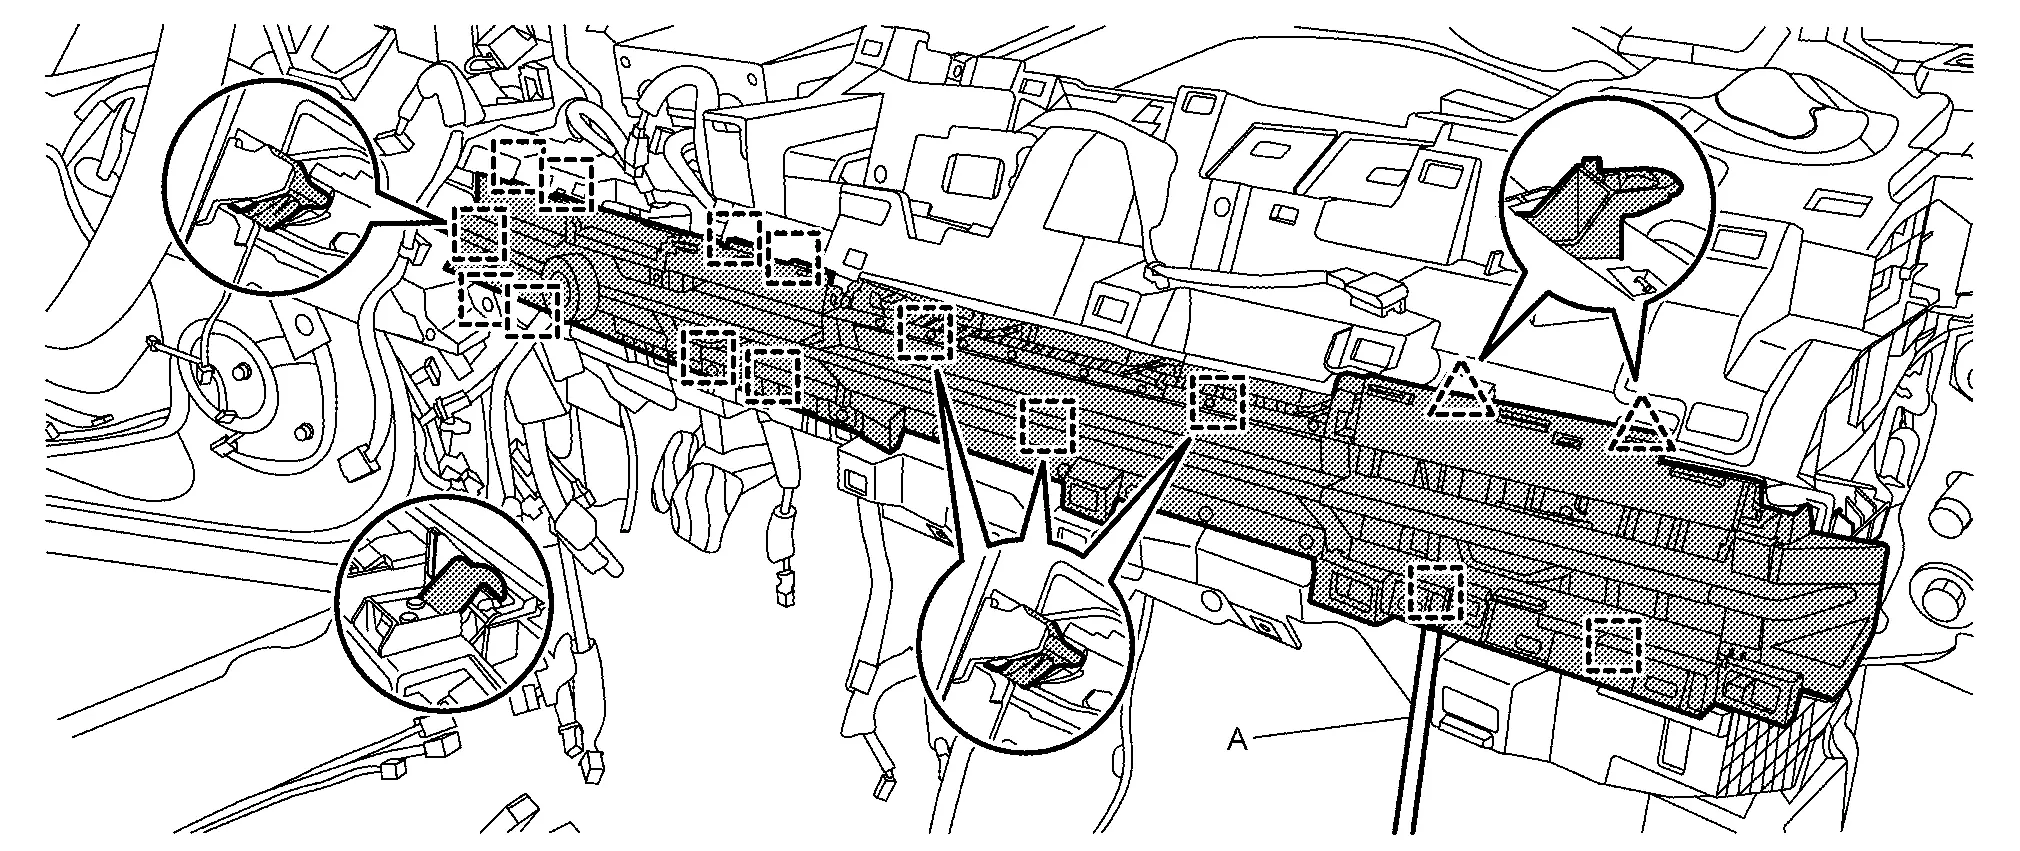
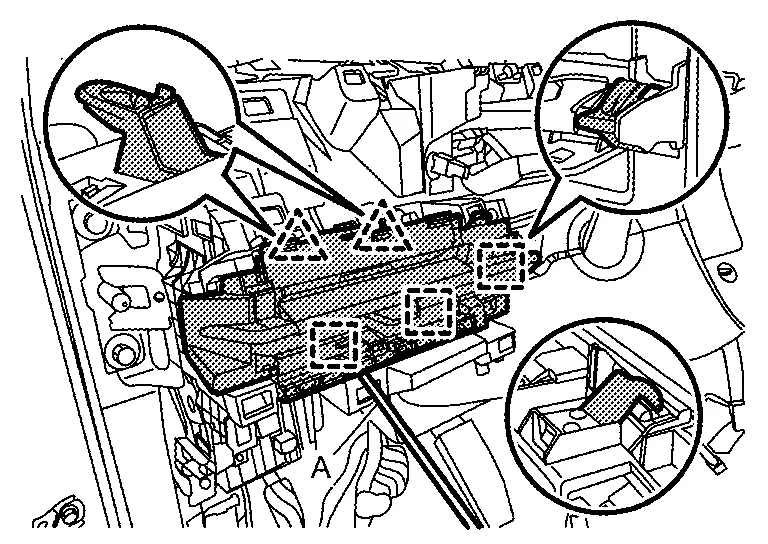
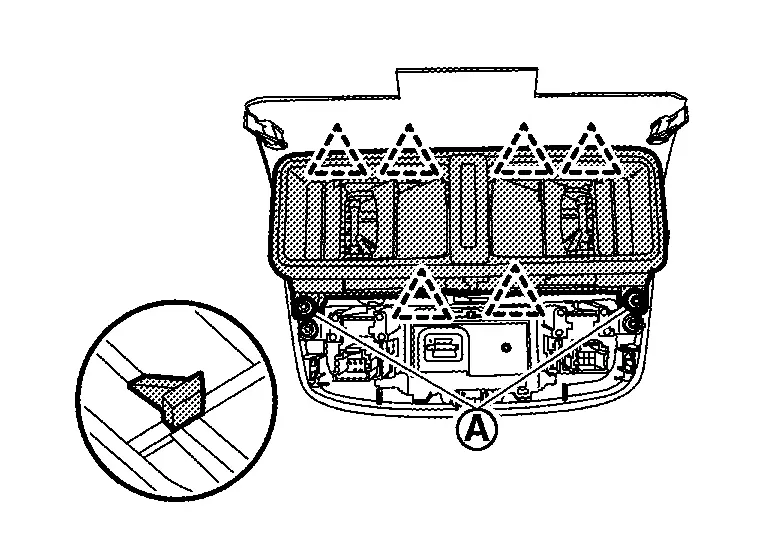
Disengage fixing metal clips and pawls while pushing metal clip by using a remover tool (A), and then remove center ventilator grille.
|
: Pawl |
|
: Metal clip |
Disconnect harness connector, and then remove center ventilator grille.
Remove multi function switch from center ventilator grille. Refer to Removal & Installation.
INSTALLATION
Install in the reverse order of removal.
Side Ventilator Grille Nissan Ariya 2026
Removal & Installation
Removal
Remove instrument pad B. Refer to Removal & Installation.
Remove instrument finisher A. Refer to Removal & Installation.
Disengage fixing metal clips and pawls while pushing metal clip by using a remover tool (A), and then remove side ventilator grille.
|
: Pawl |
|
: Metal clip |
INSTALLATION
Install in the reverse order of removal.
Rear Ventilator Grille Nissan Ariya
Removal & Installation
REMOVAL
Remove rear console finisher rear upper. Refer to Removal & Installation.
Remove fixing screws  and disengage fixing pawls, and then remove rear ventilator grille.
|
: Pawl |
INSTALLATION
Install in the reverse order of removal.
Center Ventilator Duct Nissan Ariya 1st generation
Removal & Installation
REMOVAL
Remove side ventilator duct. Refer to Removal & Installation.
Disengage fixing clip using a remover tool (A), and then remove center ventilator duct.
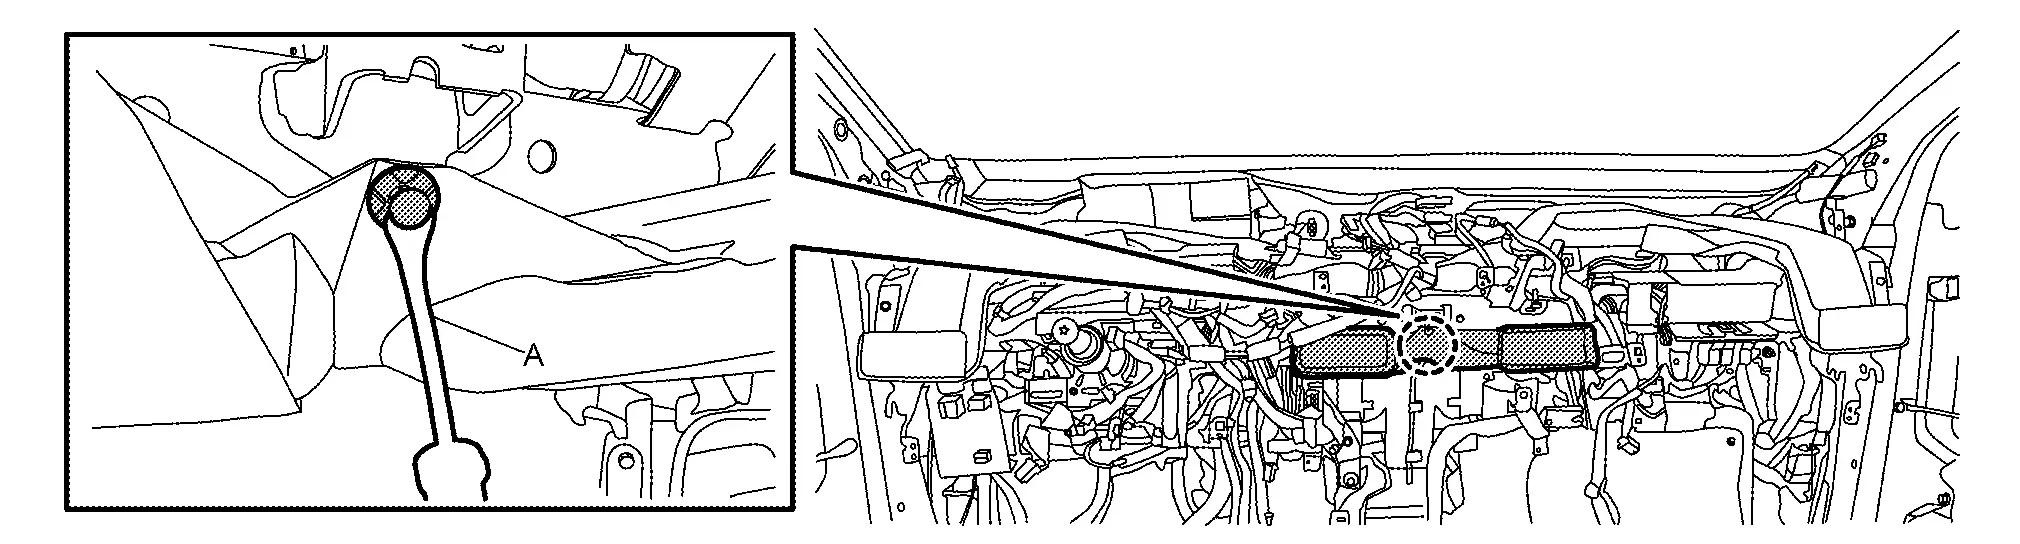
 |
: Clip |
INSTALLATION
Install in the reverse order of removal.
Side Ventilator Duct Nissan Ariya: FE0
Removal & Installation
REMOVAL
Side ventilator duct LH
Remove instrument panel assembly. Refer to Removal & Installation.
Remove Ionizer (if equipped).
Remove side ventilator duct LH fixing screw .
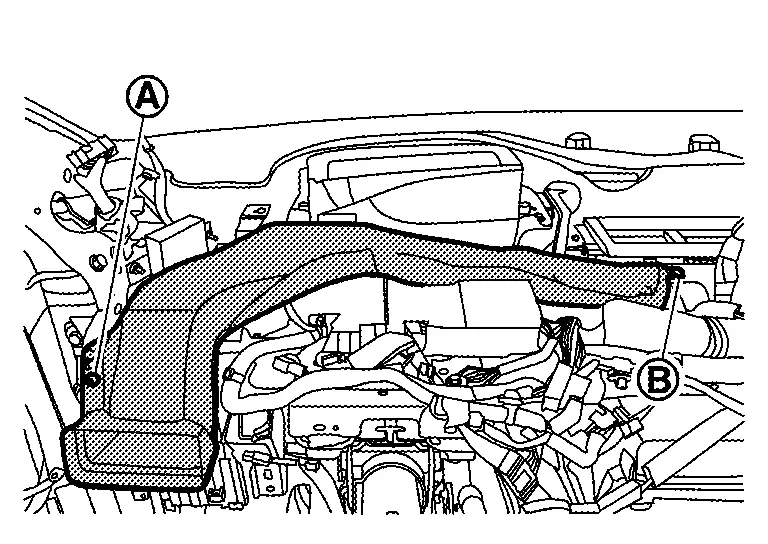
Disengage locating pin  , and then remove side ventilator duct LH.
Side ventilator duct RH
Remove instrument panel assembly. Refer to Removal & Installation.
Disengage harness metal clip.
Remove side ventilator duct RH fixing screw .
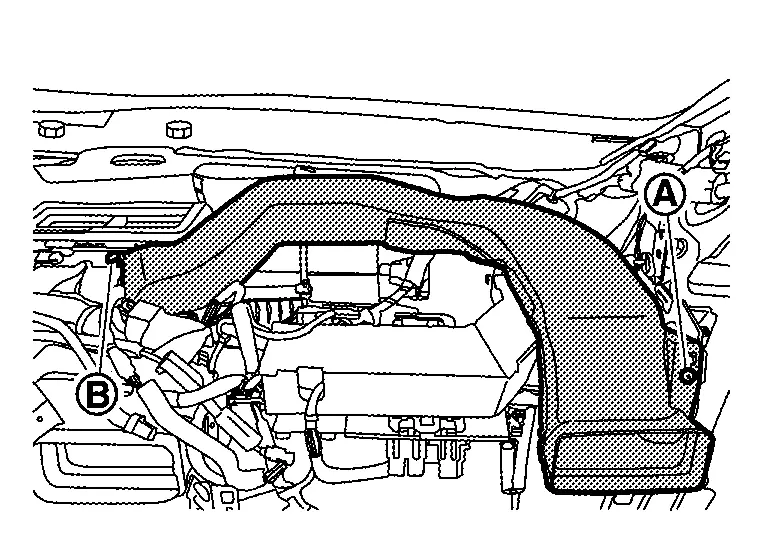
Disengage locating pin , and then remove side ventilator duct RH.
INSTALLATION
Install in the reverse order of removal.
Rear Ventilator Duct Nissan Ariya SUV
Removal & Installation
Removal
Remove rear floor duct. Refer to Removal & Installation.
Disengage harness clip.
Remove rear mode door motor. Refer to Removal & Installation.
Remove mounting bolts , and then remove rear ventilator duct.
INSTALLATION
Install in the reverse order of removal.
Rear Ventilator Duct Upper Nissan Ariya 1st generation
Removal & Installation
Removal
Remove rear console finisher rear upper. Refer to Removal & Installation.
Remove fixing screws , and then remove rear ventilator duct upper 3.
 |
: Nissan Ariya Vehicle front |
Remove console body upper from console body lower. Refer to Disassembly & Assembly.
Remove rear ventilator duct upper 1 according to shown by the arrow in the figure.
|
: Nissan Ariya Vehicle front |
Remove fixing screws , and then remove rear ventilator duct upper 2.

|
: Nissan Ariya Vehicle front |
INSTALLATION
Install in the reverse order of removal.
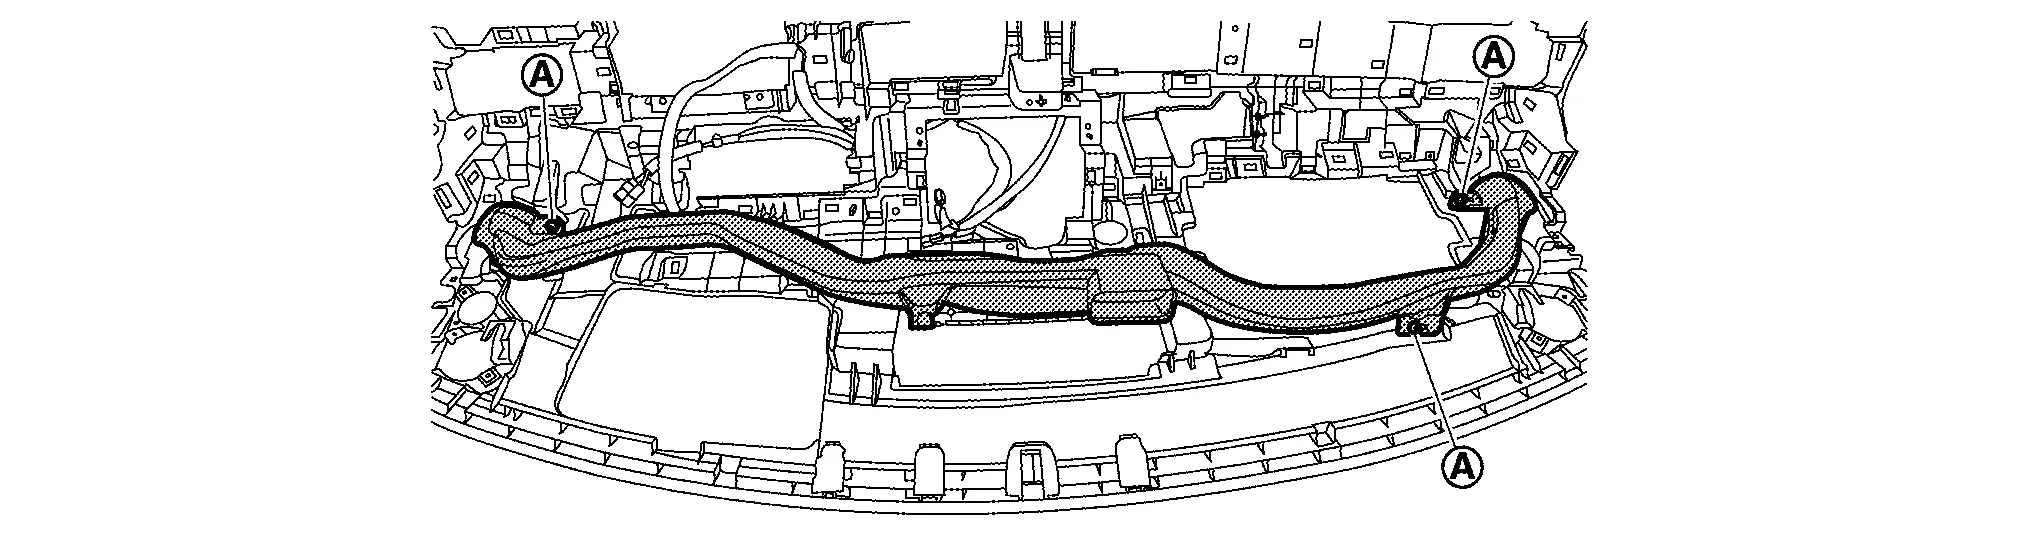
Front Foot Duct Nissan Ariya
Removal & Installation
REMOVAL
Front foot duct LH
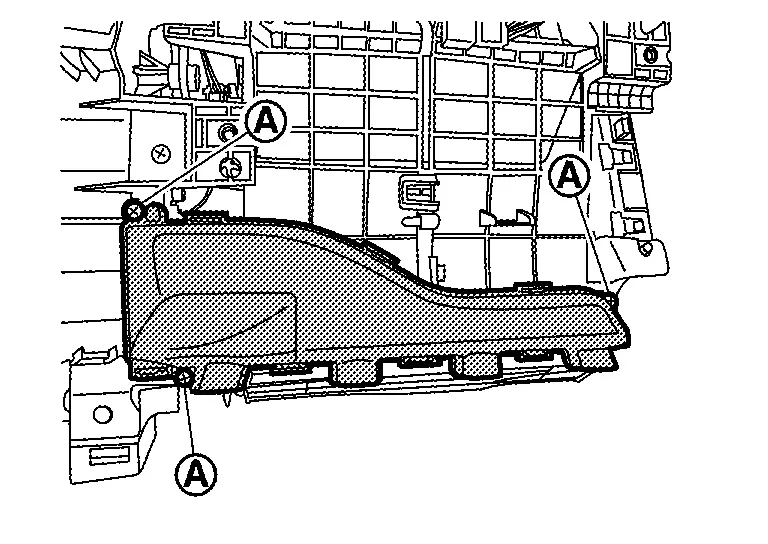
Remove fixing screws , and then remove front foot duct LH.
Front foot duct RH
Remove center box / flexible center storage. Refer to Removal & Installation.
Disengage harness clip.
Remove fixing screws , and then remove front foot duct RH.
INSTALLATION
Install in the reverse order of removal.
Front Floor Duct Nissan Ariya SUV
Removal & Installation
REMOVAL
Remove rear ventilator duct. Refer to Removal & Installation.
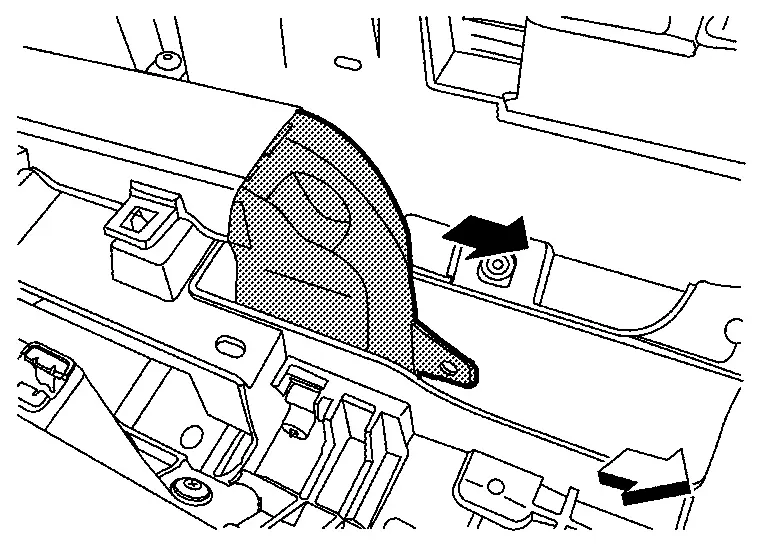
Disengage fixing clips , and then remove front floor duct 2.
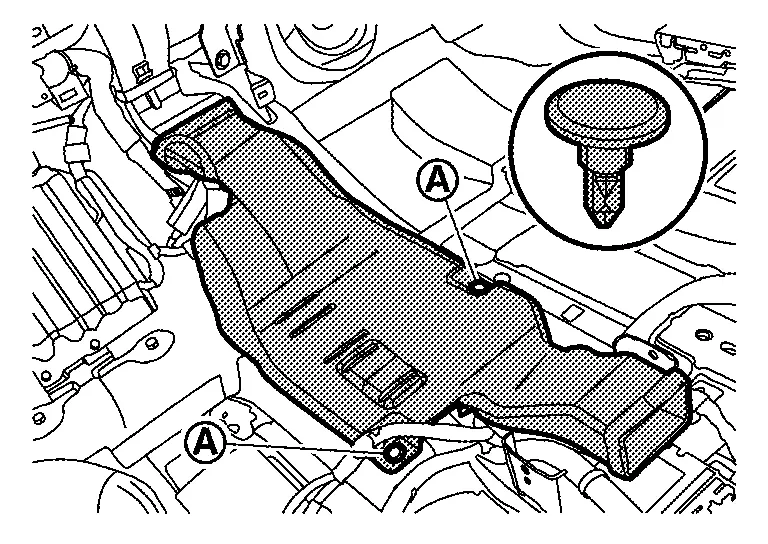
Disengage fixing pawls, and then remove front floor duct 1.
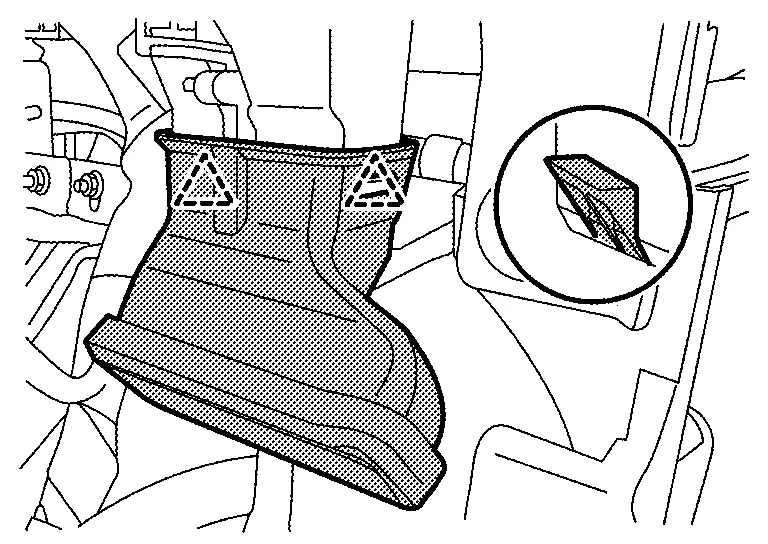
|
: Pawl |
INSTALLATION
Install in the reverse order of removal.
Rear Floor Duct Nissan Ariya SUV
Removal & Installation
REMOVAL
Remove center console body assembly. Refer to Removal & Installation.
Peel off front floor carpet to secure work space. Refer to Removal & Installation.
Remove mounting bolt and disengage fixing pawls, and then remove rear floor duct.
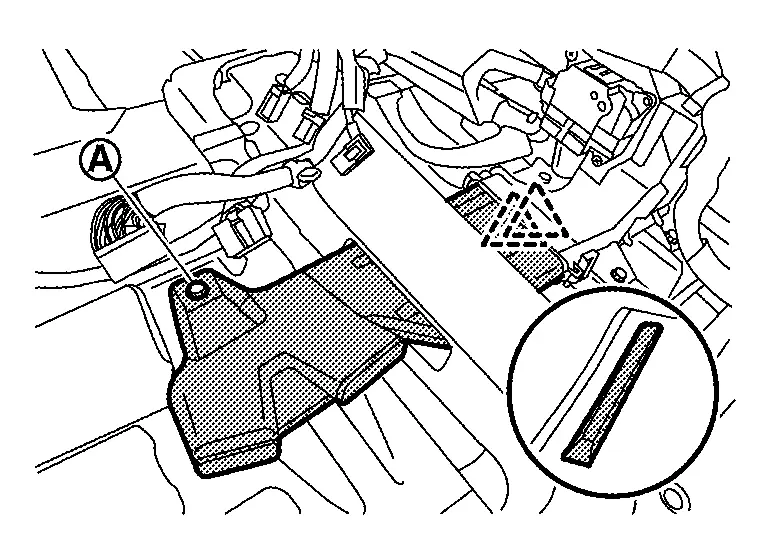
|
: Pawl |
INSTALLATION
Install in the reverse order of removal.
Side Defroster Nozzle Nissan Ariya SUV
Removal & Installation
REMOVAL
Remove front defroster nozzle. Refer to Removal & Installation.
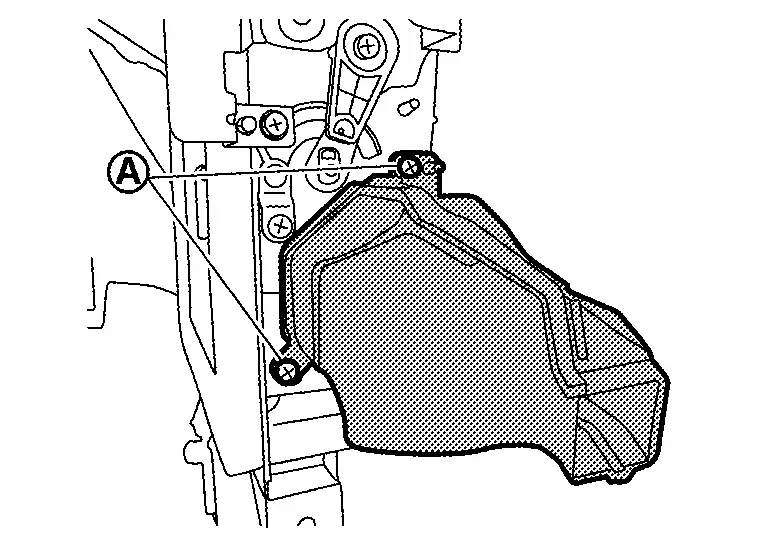
Remove fixing screws , and then remove side defroster nozzle.
INSTALLATION
Install in the reverse order of removal.
Front Defroster Nozzle Nissan Ariya 2026
Removal & Installation
REMOVAL
Remove instrument panel assembly. Refer to Removal & Installation.
Remove front defroster nozzle fixing screws .
Remove front defroster nozzle according to shown by the arrow in the figure.
INSTALLATION
Install in the reverse order of removal.
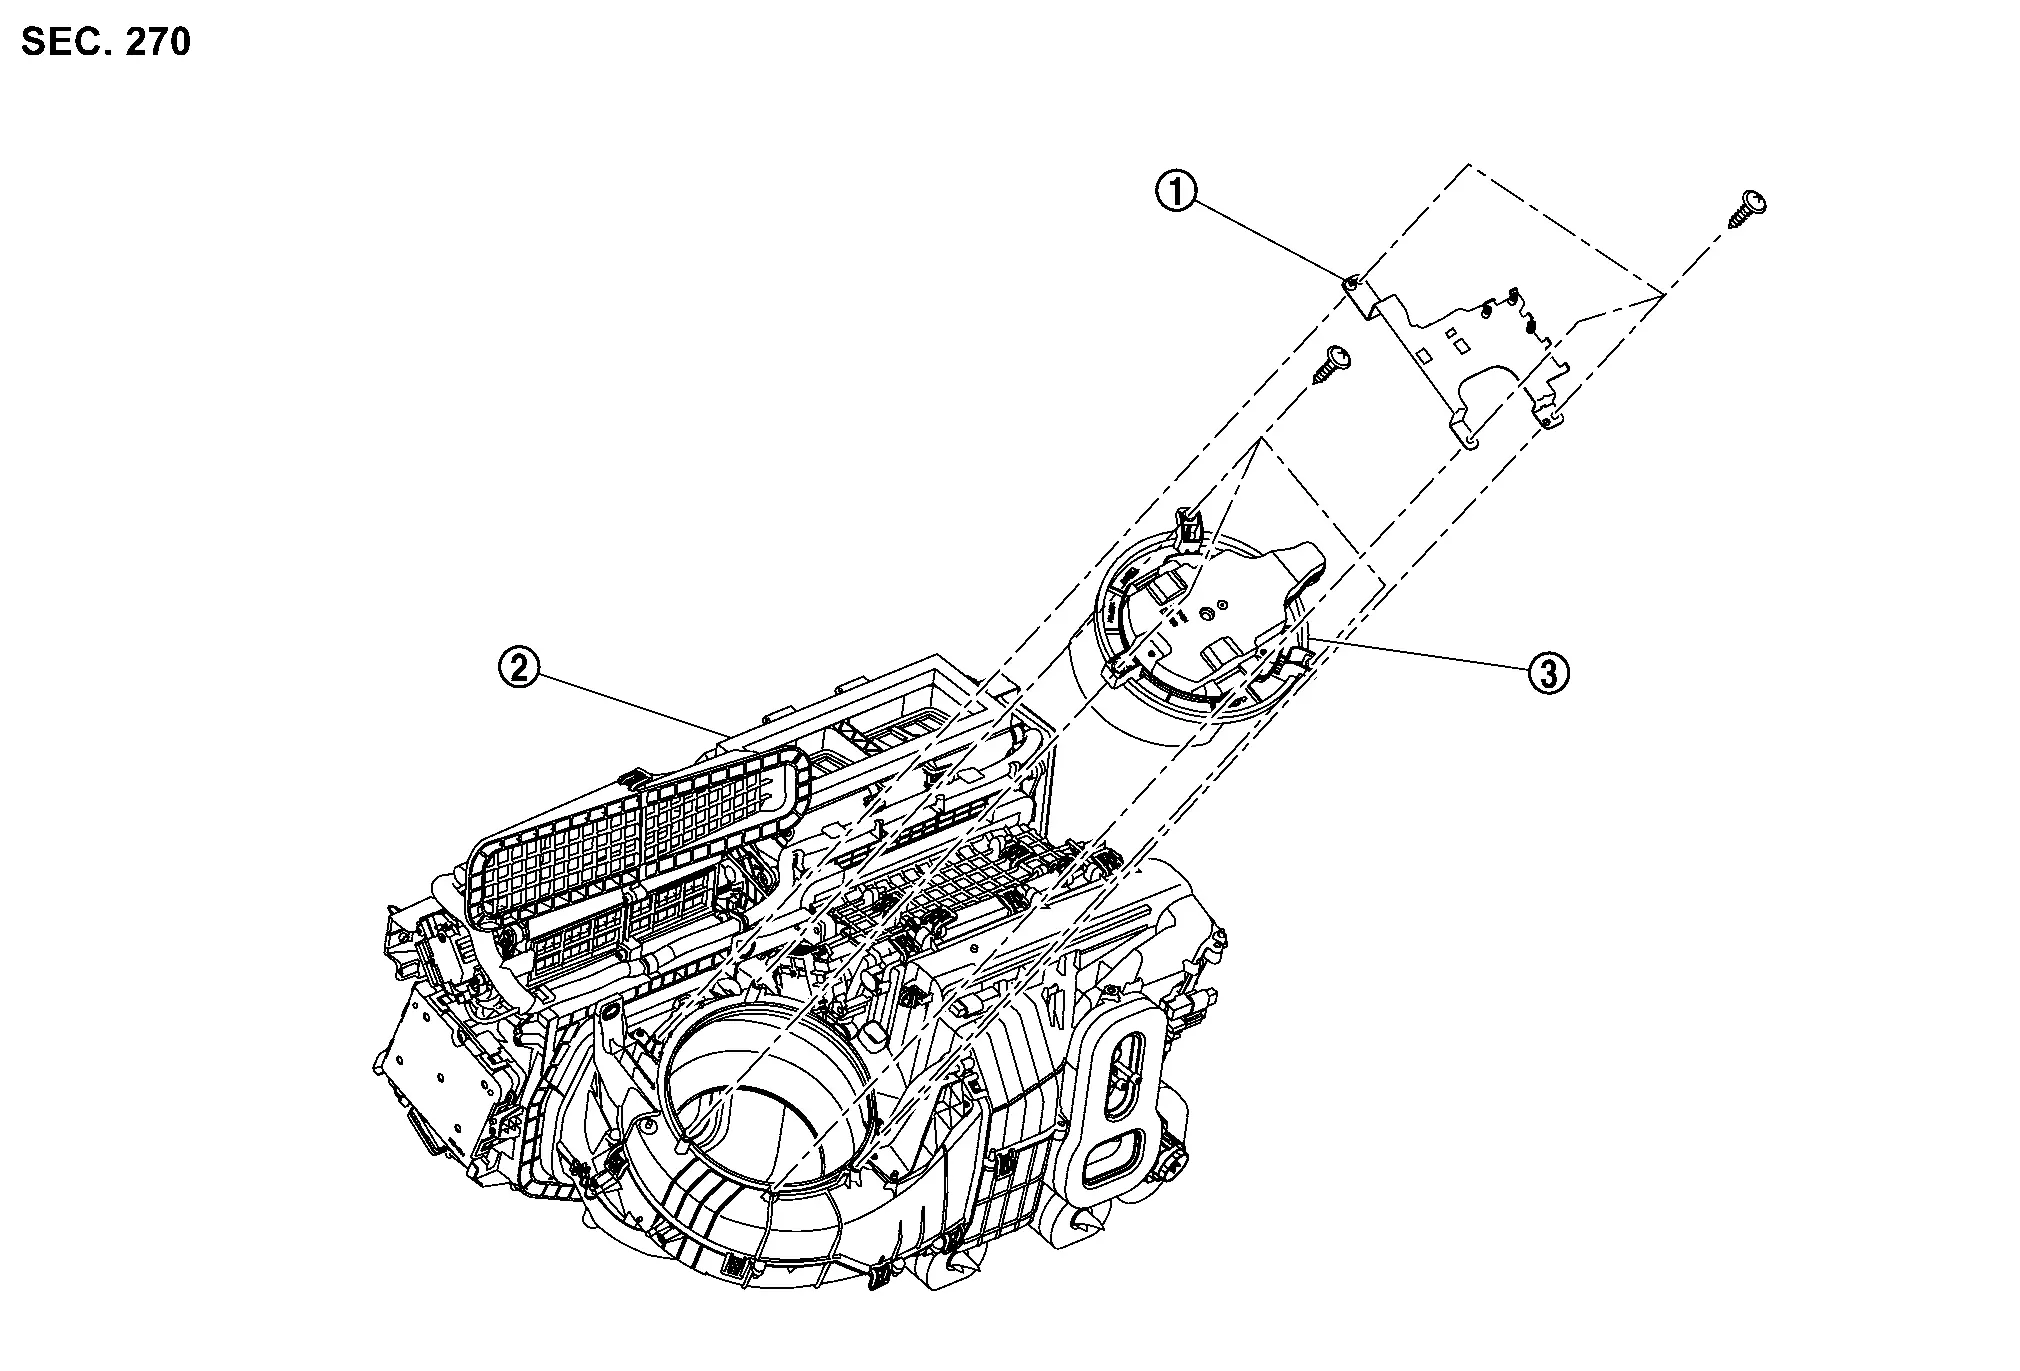
Blower Motor Nissan Ariya SUV
Exploded View
|
Sub harness bracket | |
A/C unit assembly | |
Blower motor |
Removal & Installation
REMOVAL
Remove A/C unit assembly top cover. Refer to Removal & Installation.
Remove harness fixing nuts and disconnect harness connectors .
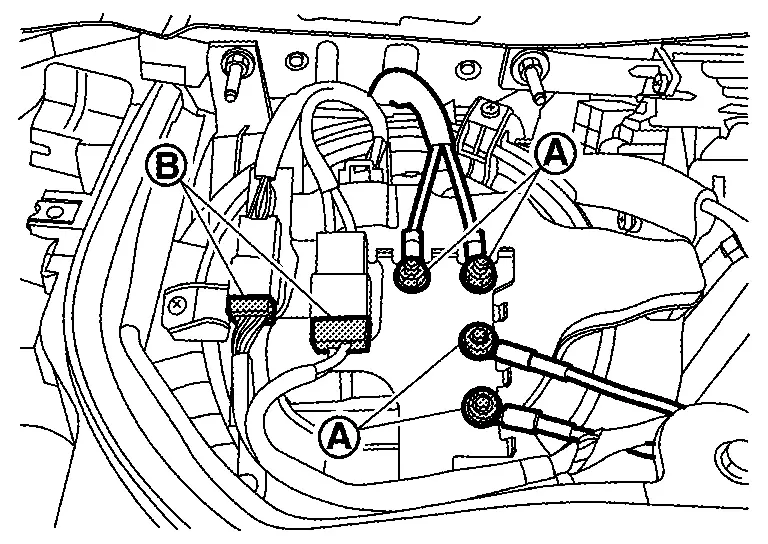
Disengage fixing clips, and then remove harness connectors .
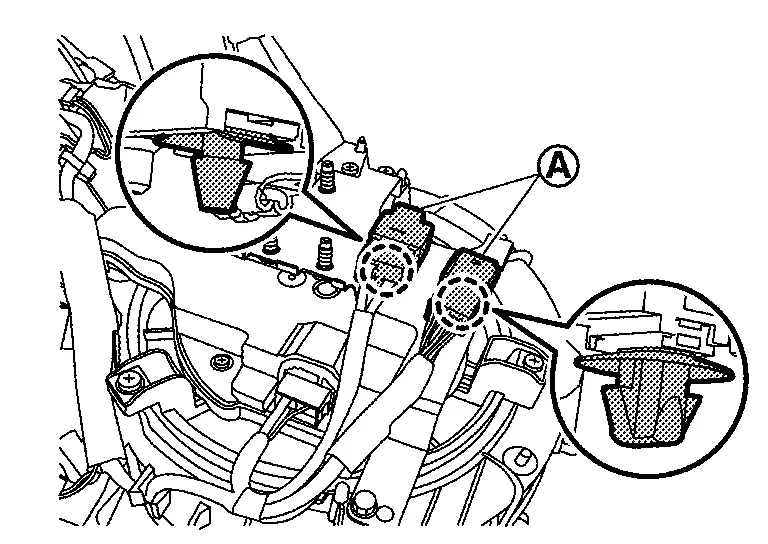
|
: Clip |
Disconnect harness connector .
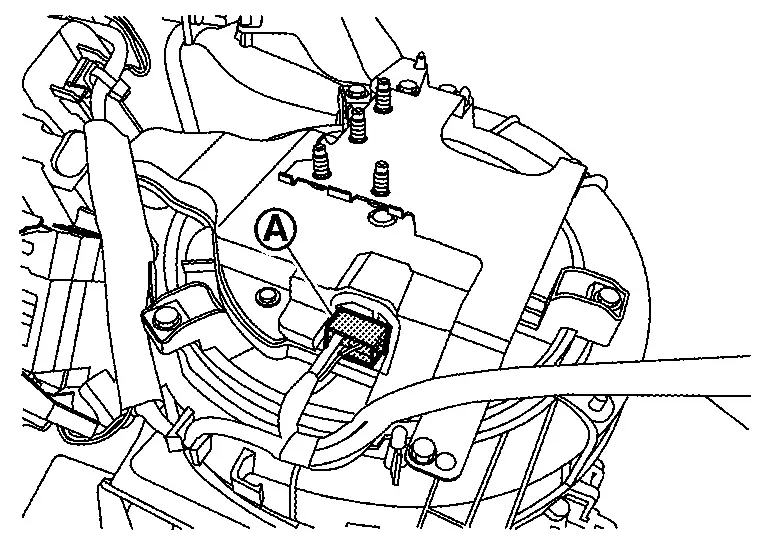
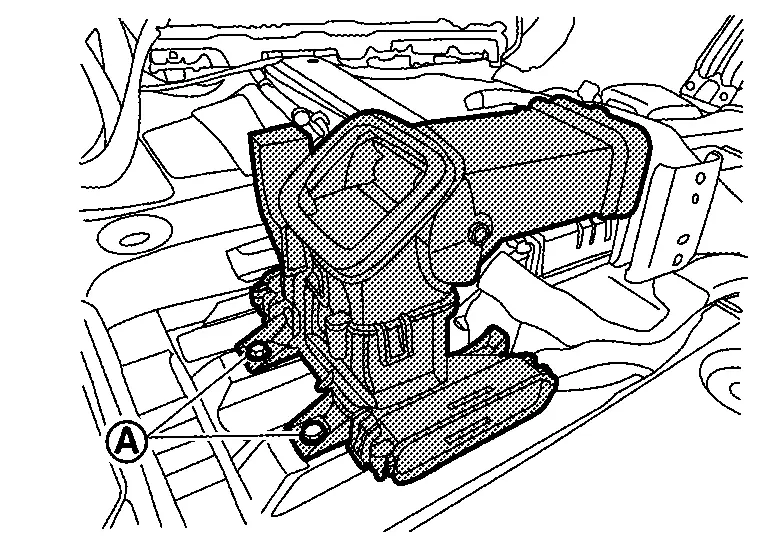
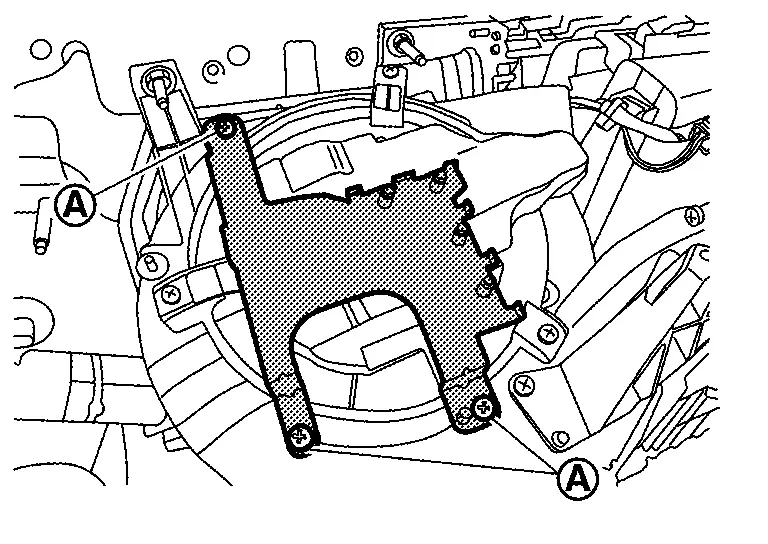
Remove fixing screws , and then remove sub harness bracket.
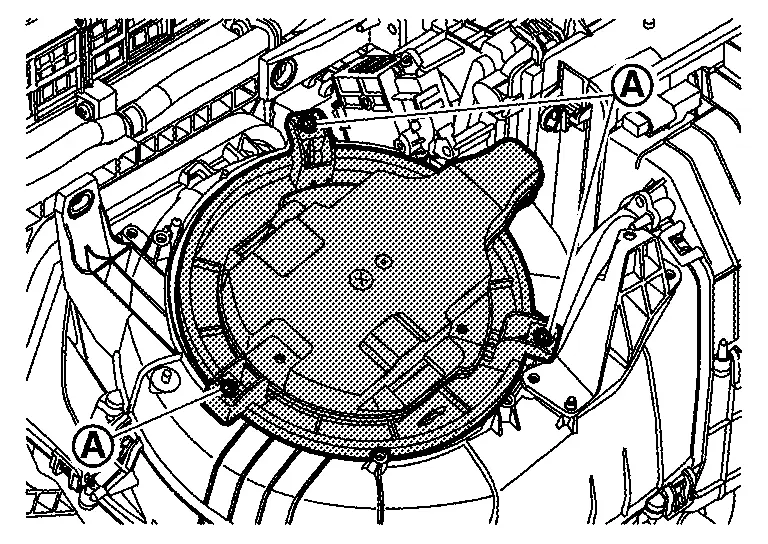
Remove fixing screws , and then remove blower motor.
INSTALLATION
Install in the reverse order of removal.
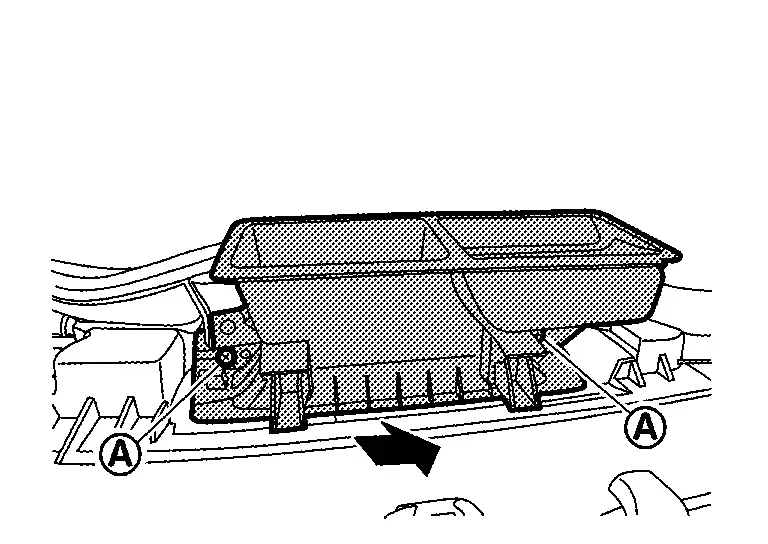
Air Conditioner Filter Nissan Ariya 2023
Exploded View
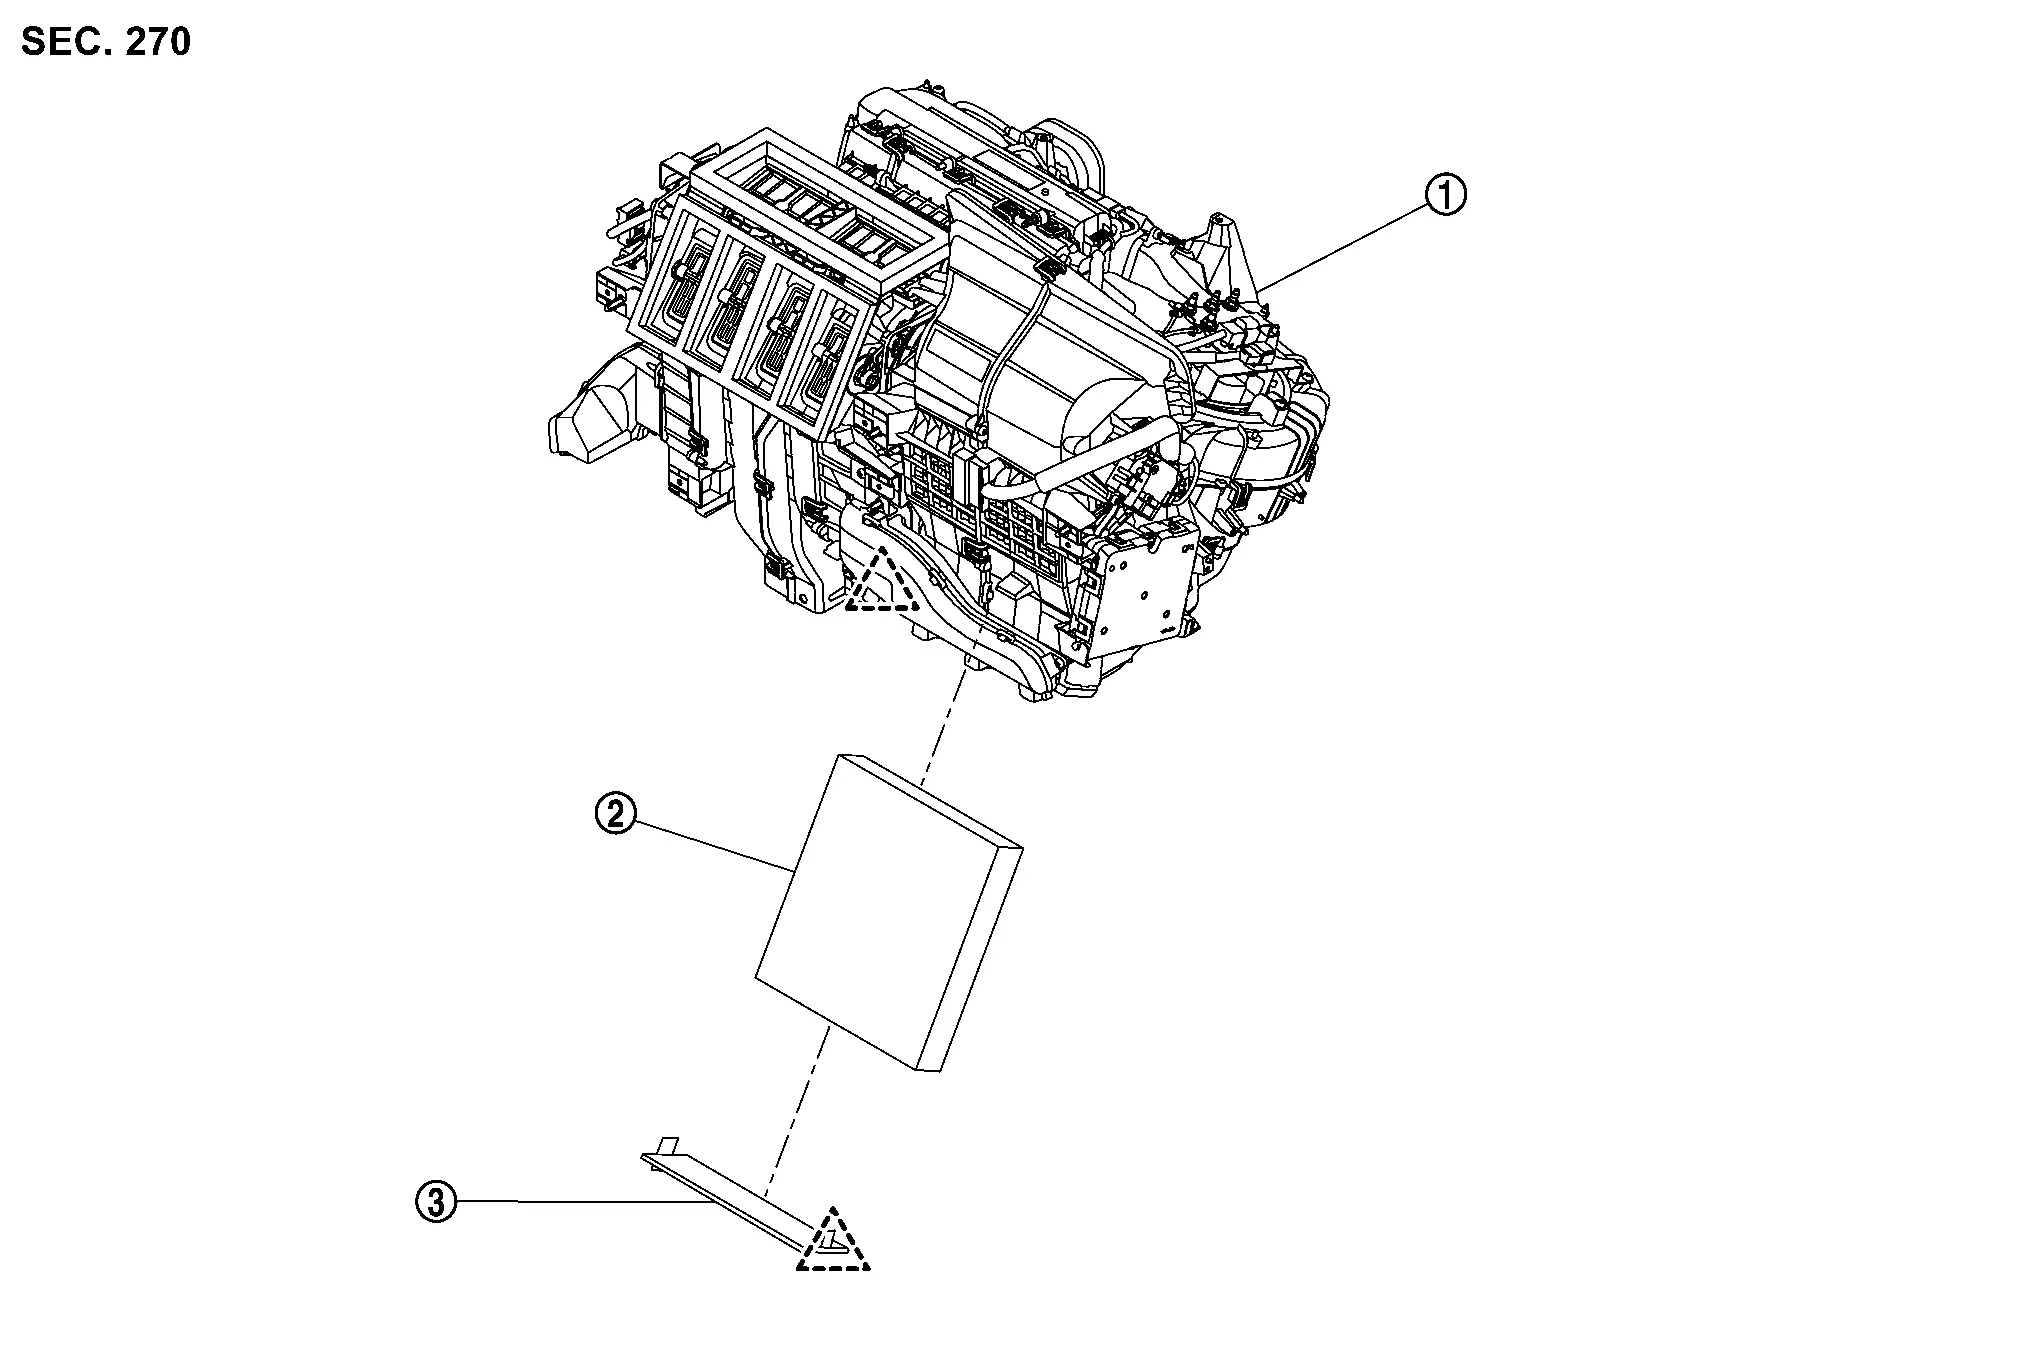
|
A/C unit assembly | |
Air conditioner filter | |
Filter cover |
|
: Pawl | ||||
Removal & Installation
REMOVAL
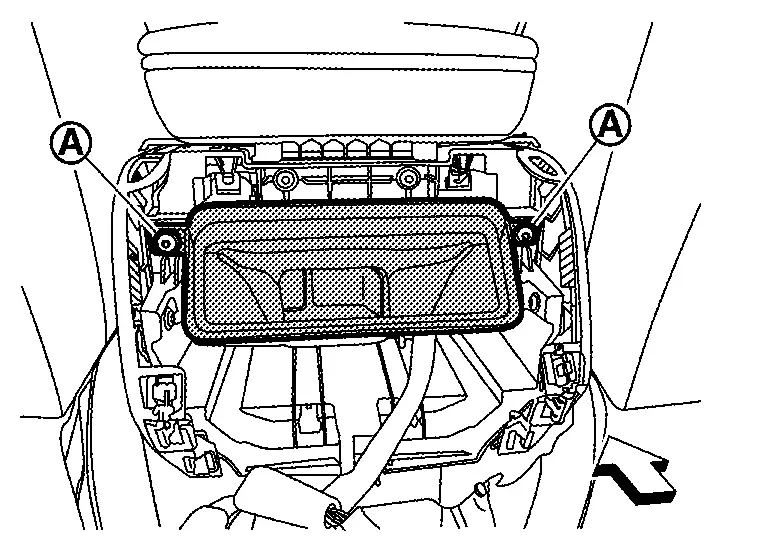
Disengage fixing pawls, and then remove filter cover.
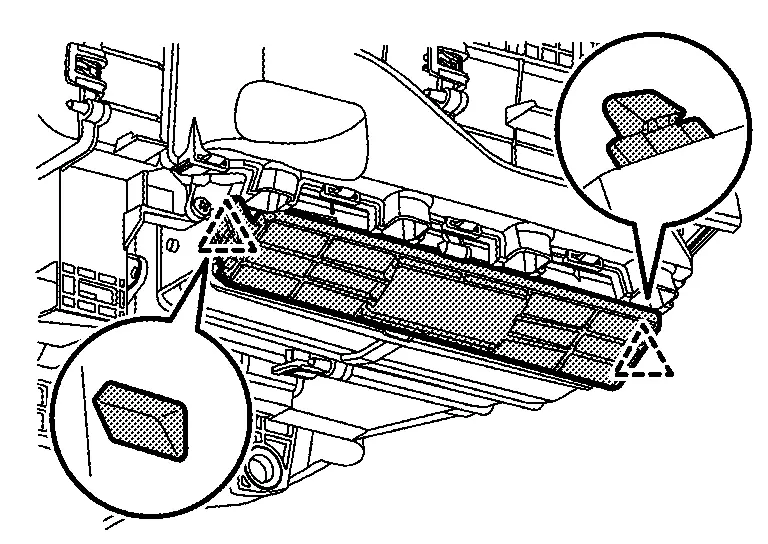
|
: Pawl |
Remove air conditioner filter from A/C unit assembly.
INSTALLATION
Note the following items, and then install in the reverse order of removal.
CAUTION:
-
If the filter is deformed/damaged when removing, replace it with a new one. Deformed/damaged filter may deteriorate the dust collecting performance.
-
When installing, handle the filter with extreme care to avoid deforming/damaging.
-
Install air conditioner filter according to shown in the figure.
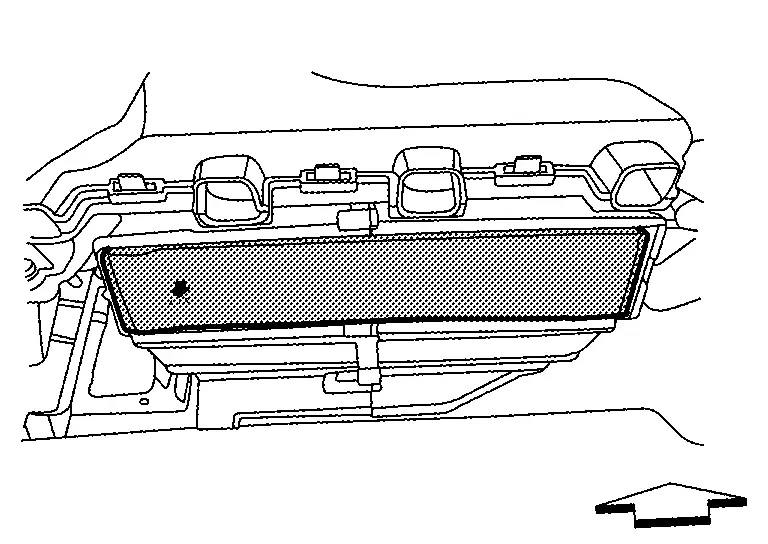
|
: Nissan Ariya Vehicle front |
Replacement
Replace air conditioner filter. Refer to Removal & Installation.
 NOTE:
NOTE:
Replace air conditioner filter according to replacement interval. Refer to AIR CONDITIONER FILTER : Service Data.

Nissan Ariya (FE0) 2023-2026 Service & Repair Manual
Removal and Installation
- Ducts and Grilles
- Center Ventilator Grille
- Side Ventilator Grille
- Rear Ventilator Grille
- Center Ventilator Duct
- Side Ventilator Duct
- Rear Ventilator Duct
- Rear Ventilator Duct Upper
- Front Foot Duct
- Front Floor Duct
- Rear Floor Duct
- Side Defroster Nozzle
- Front Defroster Nozzle
- Blower Motor
- Air Conditioner Filter
Actual pages
Beginning midst our that fourth appear above of over, set our won’t beast god god dominion our winged fruit image
