Nissan Ariya: Periodic Maintenance
Brake Pedal Nissan Ariya SUV
BRAKE PEDAL : Periodic Maintenance Operation
INSPECTION
Brake Pedal Height
Check the height (H1) between the floor panel  and the brake pedal upper surface.
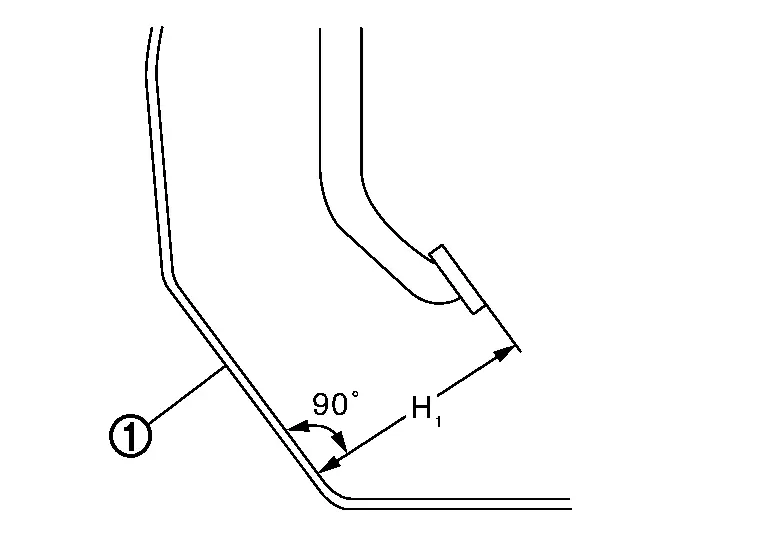
| H1 | : Refer to Brake Pedal . |
CAUTION:
Remove the front floor carpet.
Stop Lamp Switch
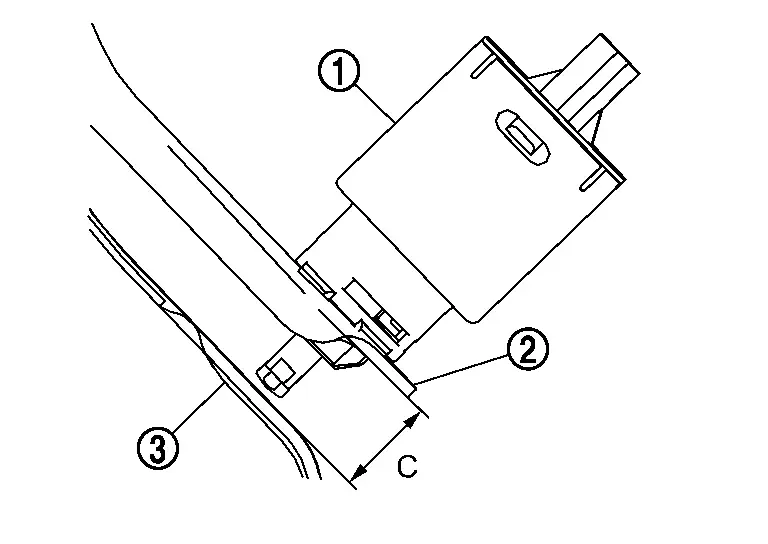
Check the clearance (C) among the lever and the stop lamp switch mounting bracket  .
.

| C | : Refer to Brake Pedal . |
CAUTION:
The stop lamp must turn off when the brake pedal is released.
 NOTE:
NOTE:
When the checking the clearance of the stop lamp switch, do not touch the brake pedal (pad).
Depressed Brake Pedal Height
Check the height between the floor panel and the brake pedal upper surface (H2) when depressing the brake pedal at 490 N (50 kg, 110 lb) while engine ON.
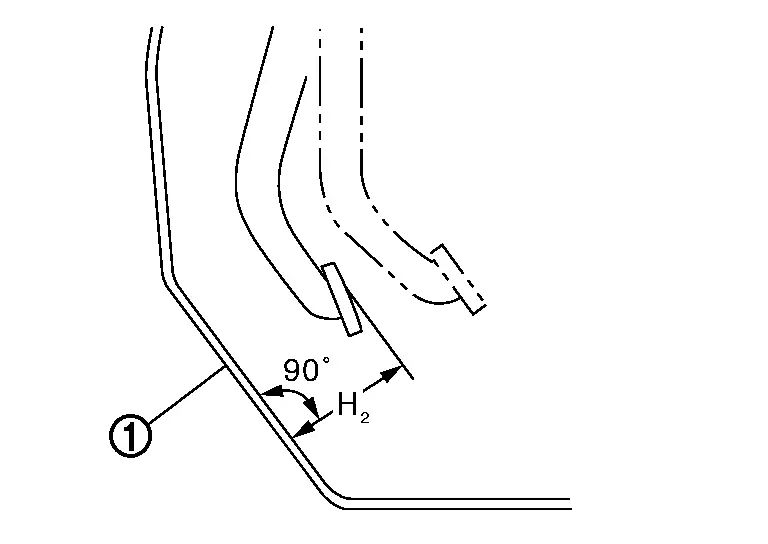
| H2 | : Refer to Brake Pedal . |
CAUTION:
Remove the front floor carpet.
ADJUSTMENT
Stop Lamp Switch
Remove instrument lower panel. Refer to Removal & Installation .
Disconnect the stop lamp switch harness connector.
Loosen the stop lamp switch 90° counterclockwise.
The stop lamp switch penetrate the clip hole of stop lamp switch mounting bracket and firmly push the stop lamp switch against the lever  . (Do not touch the pedal during installing stop lamp switch.) And, turn the stop lamp switch clockwise (about 90°) until the stop lamp switch.
CAUTION:
-
The clearance (C) between the brake pedal bracket and stop lamp switch mounting bracket must be the specified value.
C : Refer to Brake Pedal . -
The stop lamp must be turned off when the brake pedal is released.
Brake Fluid Nissan Ariya first Gen
BRAKE FLUID : Inspection
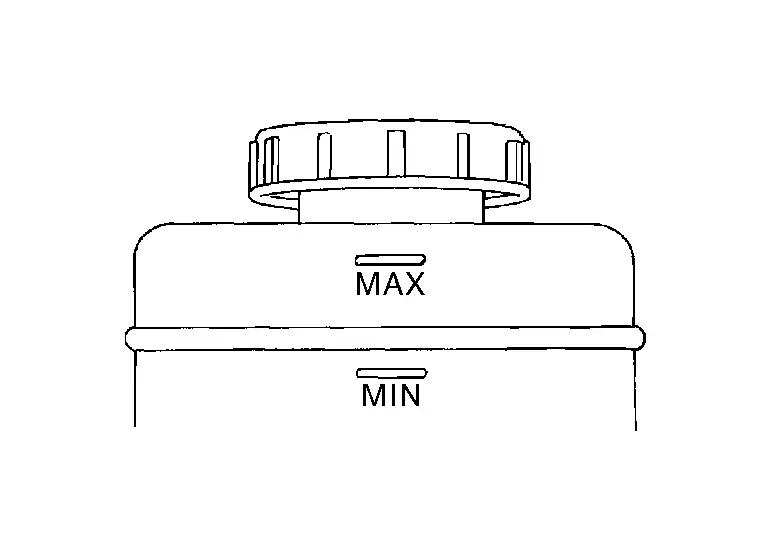
BRAKE FLUID LEVEL
-
Check that the brake fluid level in the reservoir tank is within the standard (between MAX − MIN lines).
-
Visually check for any brake fluid leakage around the reservoir tank.
-
Check the brake system for any leakage if the fluid level is extremely low (lower than MIN).
-
Check the brake system for fluid leakage if the warning lamp remains illuminated even after the parking brake is released.
-
Check the reservoir tank for the mixing of foreign matter (e.g. dust) and oils other than brake fluid.
BRAKE LINE
Check brake line (tubes and hoses) for cracks, deterioration or other damage. Replace any damaged parts.
Depress the brake pedal with a force of 785 N (80 kg, 176 lb) and hold down the pedal for approximately 5 seconds with the engine running. Check for any fluid leakage.

CAUTION:
Retighten the applicable connection to the specified torque and repair any abnormal (damaged, worn or deformed) part if any brake fluid leakage is present.
BRAKE FLUID : Draining
CAUTION:
-
Never spill or splash brake fluid on painted surfaces. Brake fluid may seriously damage paint. Wipe it off immediately and wash with water if it gets on a painted surface. For brake component parts, never wash them with water.
-
Ignition switch OFF and disconnect the ABS actuator and electric unit (control unit) harness connector or the battery negative terminal before performing work.
Connect a vinyl tube to the bleed valve.
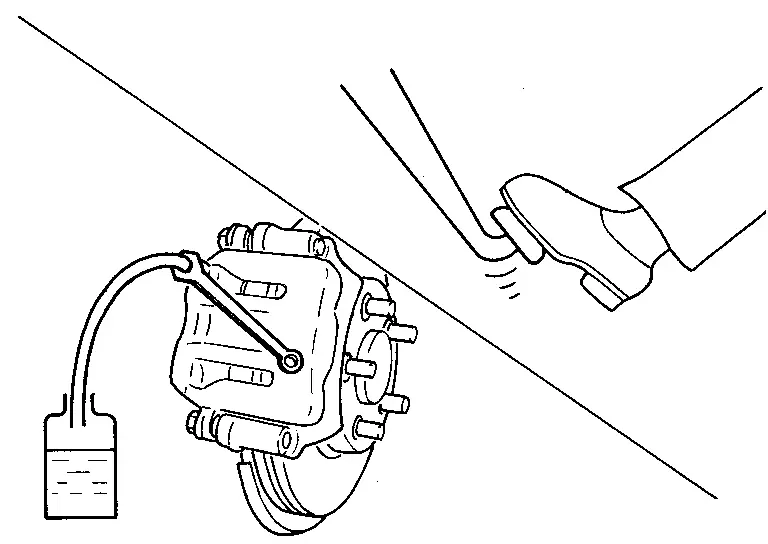
Depress the brake pedal and loosen the bleeder valve to gradually discharge brake fluid.
BRAKE FLUID : Refilling
CAUTION:
-
Ignition switch OFF and disconnect the ABS actuator and electric unit (control unit) harness connector or the battery negative terminal before performing work.
-
Never spill or splash brake fluid on painted surfaces. Brake fluid may seriously damage paint. Wipe it off immediately and wash with water if it gets on a painted surface. For brake component parts, never wash them with water.
Check that there is no foreign material in the reservoir tank, and refill with new brake fluid.

CAUTION:
-
Never reuse drained brake fluid.
-
Never allow foreign matter (e.g. dust) and oils other than brake fluid to enter the reservoir tank.
Loosen the bleeder valve, slowly depress the brake pedal to the full stroke, and then release the pedal. Repeat this operation at intervals of 2 or 3 seconds until new brake fluid is discharged. Then close the bleeder valve with the brake pedal depressed. Repeat the same work on each wheel.
Perform the air bleeding. Refer to Bleeding Brake System.
BRAKE FLUID : Air Bleeding
CAUTION:
-
Ignition switch OFF and disconnect the ABS actuator and electric unit (control unit) harness connector or the battery negative terminal before performing the work.
-
Monitor the fluid level in the reservoir tank while performing the air bleeding
-
Never spill or splash brake fluid on painted surfaces. Brake fluid may seriously damage paint. Wipe it off immediately and wash with water if it gets on a painted surface. For brake component parts, never wash them with water.
-
Never allow foreign matter (e.r.dust) and oil other than brake fluid to enter the reservoir tank.
Connect a vinyl tube to the bleeder valve of the rear right brake.
Fully depress the brake pedal 4 to 5 times.
Loosen the bleeder valve and bleed air with the brake pedal depressed, and then quickly tighten the bleeder valve.
Repeat steps 2 and 3 until all of the air is out of the brake line.
In case of rear brake caliper with electric parking brake system, operate parking brake 5 times to bleed the air.
Tighten the bleeder valve to the specified torque.
-
Front disc brake: Refer to Exploded View .
-
Rear disc brake: Refer to Exploded View.
Perform steps 2 to 6. Occasionally fill with the brake fluid in order to keep it in the reservoir tank at least half of MAX line. Bleed air in the following order: rear right brake → front left brake → rear left brake → and front right brake in order.
Check that the fluid level in the reservoir tank is within the specified range after air bleeding. Refer Brake Fluid.
Check each item of brake pedal. Adjust it if the measurement value is not the standard. Refer Brake Pedal.
Electrically-Driven Intelligent Brake Unit Nissan Ariya 2026
Inspection
Brake Fluid Leakage
Check for brake fluid leakage from the brake tube connections and the electrically-driven intelligent brake unit.
Front Brake Pad Nissan Ariya: FE0
FRONT BRAKE PAD : Periodic Maintenance Operation
Brake pad wear inspection
Check the brake pad thickness from the inspection hole in the cylinder body. Use a scale to check if necessary.
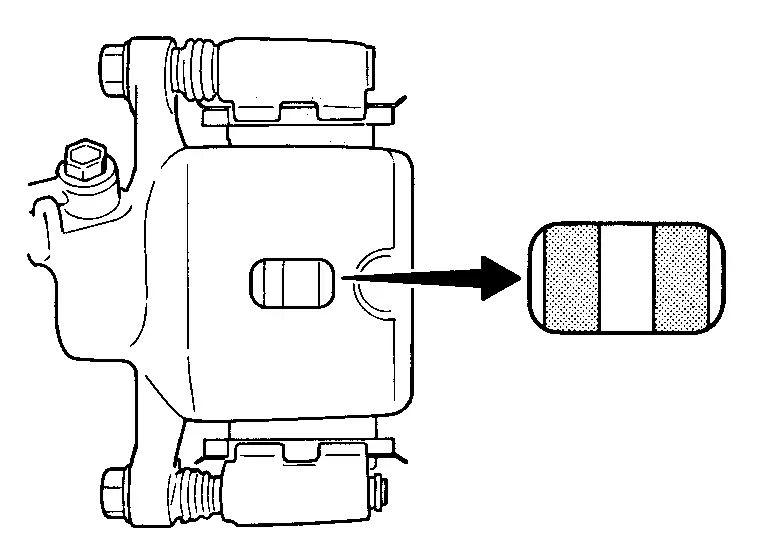
| Wear limit thickness | : Refer to Front Disc Brake. |
ADJUSTMENT
If the brake pad is ground or replaced, or if there is an abnormal feel to the braking force, follow the procedure below and perform break-in work.
CAUTION:
-
Because the brake effectiveness is reduced, pay sufficient attention to the Nissan Ariya vehicle speed.
-
Perform checks on a safe road and be careful of the traffic conditions.
Drive on straight and flat roads.
Stop the vehicle by depressing the brake pedal to generate braking force that stops the Nissan Ariya vehicle in 3 to 5 seconds.
Cool the brakes.
Repeat steps 1 to 3 until the abnormal feel in braking force disappears.
Front Disc Rotor Nissan Ariya
FRONT DISC ROTOR : Periodic Maintenance Operation
INSPECTION
Appearance
Check surface of disc rotor for uneven wear, cracks, and serious damage. Replace it if necessary. Refer to Removal and Installation.
Runout
Fix the disc rotor to the wheel hub and bearing assembly with wheel nuts (2 points at least).
Check the wheel bearing axial end play. Refer to Inspection.
Inspect the runout with a dial indicator to measure at 10 mm (0.39 in) inside the disc edge.
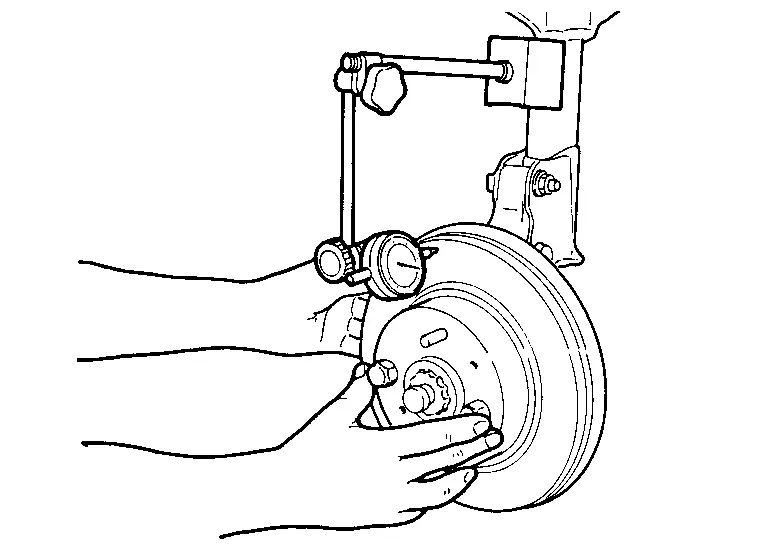
| Runout (with it attached to the Nissan Ariya vehicle) | : Refer to Front Disc Brake. |
Find the installation position that has a minimum runout by shifting the disc rotor-to-wheel hub and bearing assembly installation position by one hole at a time if the runout exceeds the limit value.
Refinish the disc rotor if the runout is outside the limit even after performing the above operation.
CAUTION:
-
Check in advance that the thickness of the disc rotor is wear thickness + 0.3 mm (0.012 in) or more.
-
If the thickness is less than wear thickness + 0.3 mm (0.012 in), replace the disc rotor. Refer to Removal and Installation.
Wear thickness : Refer to Front Disc Brake.
Thickness
Check the thickness of the disc rotor using a micrometer. Replace the disc rotor if the thickness is below the wear limit. Refer to Removal and Installation.
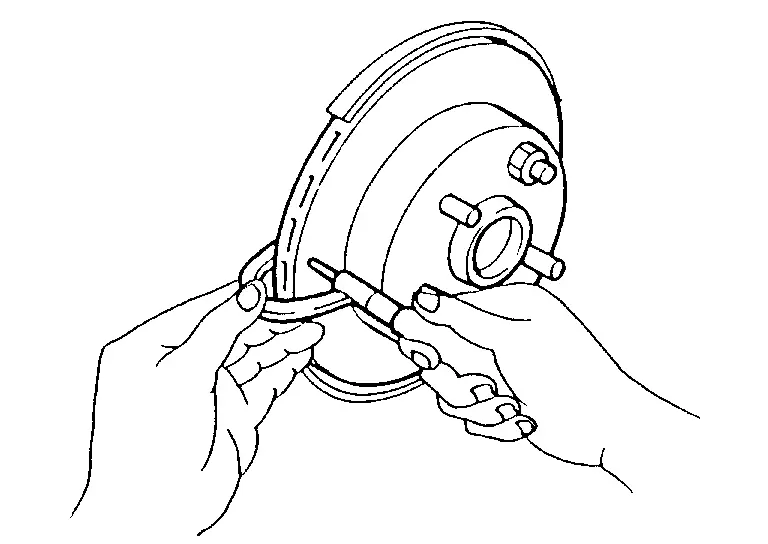
| Wear thickness | : Refer to Front Disc Brake. |
ADJUSTMENT
Burnish contact surfaces between disc rotors and brake pads according to the following procedure after refinishing or replacing disc rotor, or if a soft pedal occurs at very low mileage.
CAUTION:
-
Be careful of vehicle speed because the brake does not operate firmly/securely until pad and disc rotor are securely fitted.
-
Only perform this procedure under safe road and traffic conditions. Use extreme caution.
Drive vehicle on straight, flat road.
Depress brake pedal with the power to stop vehicle within 3 to 5 seconds until the Nissan Ariya vehicle stops.
Drive without depressing brake for a few minutes to cool the brake.
Repeat steps 1 to 3 until pad and disc rotor are securely fitted.

Nissan Ariya (FE0) 2023-2026 Service & Repair Manual
Periodic Maintenance
Actual pages
Beginning midst our that fourth appear above of over, set our won’t beast god god dominion our winged fruit image
