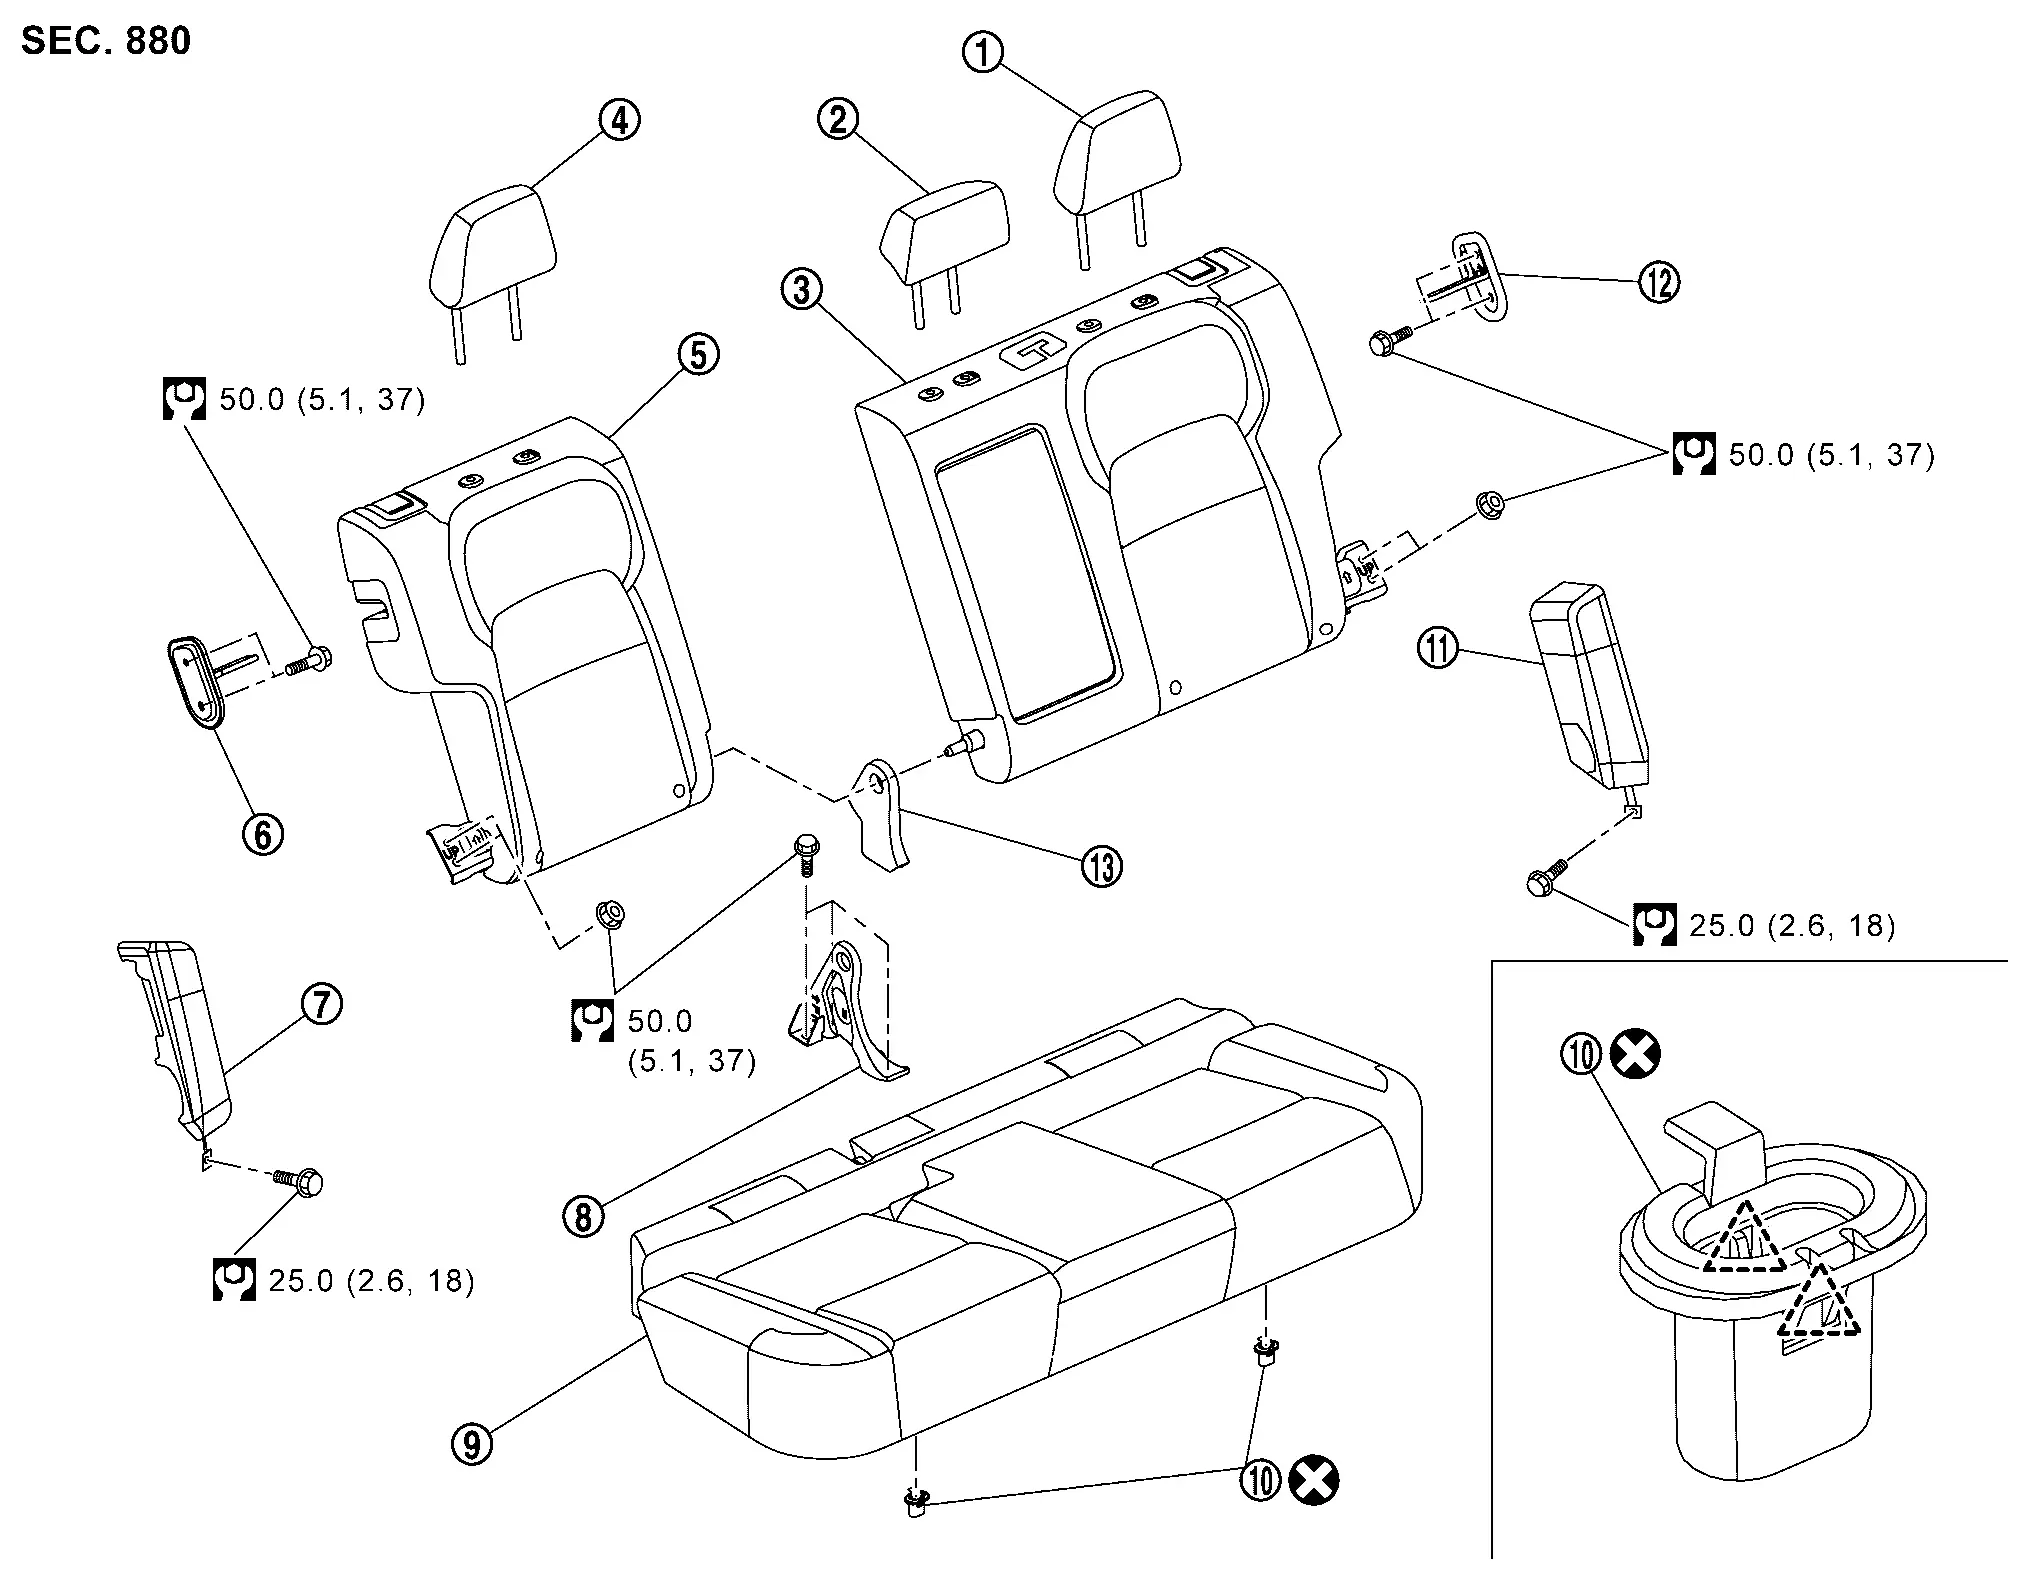
Nissan Ariya: Removal and Installation
- Front Seat
- Front Seatback
- Front Seat Cushion
- Front Seat Cushion Finisher
- Rear Seat
- Rear Seatback
- Rear Seat Cushion
- Power Seat Switch
- Lumbar Support Switch
- Seat Blower Motor
- Rear Heated Seat Switch
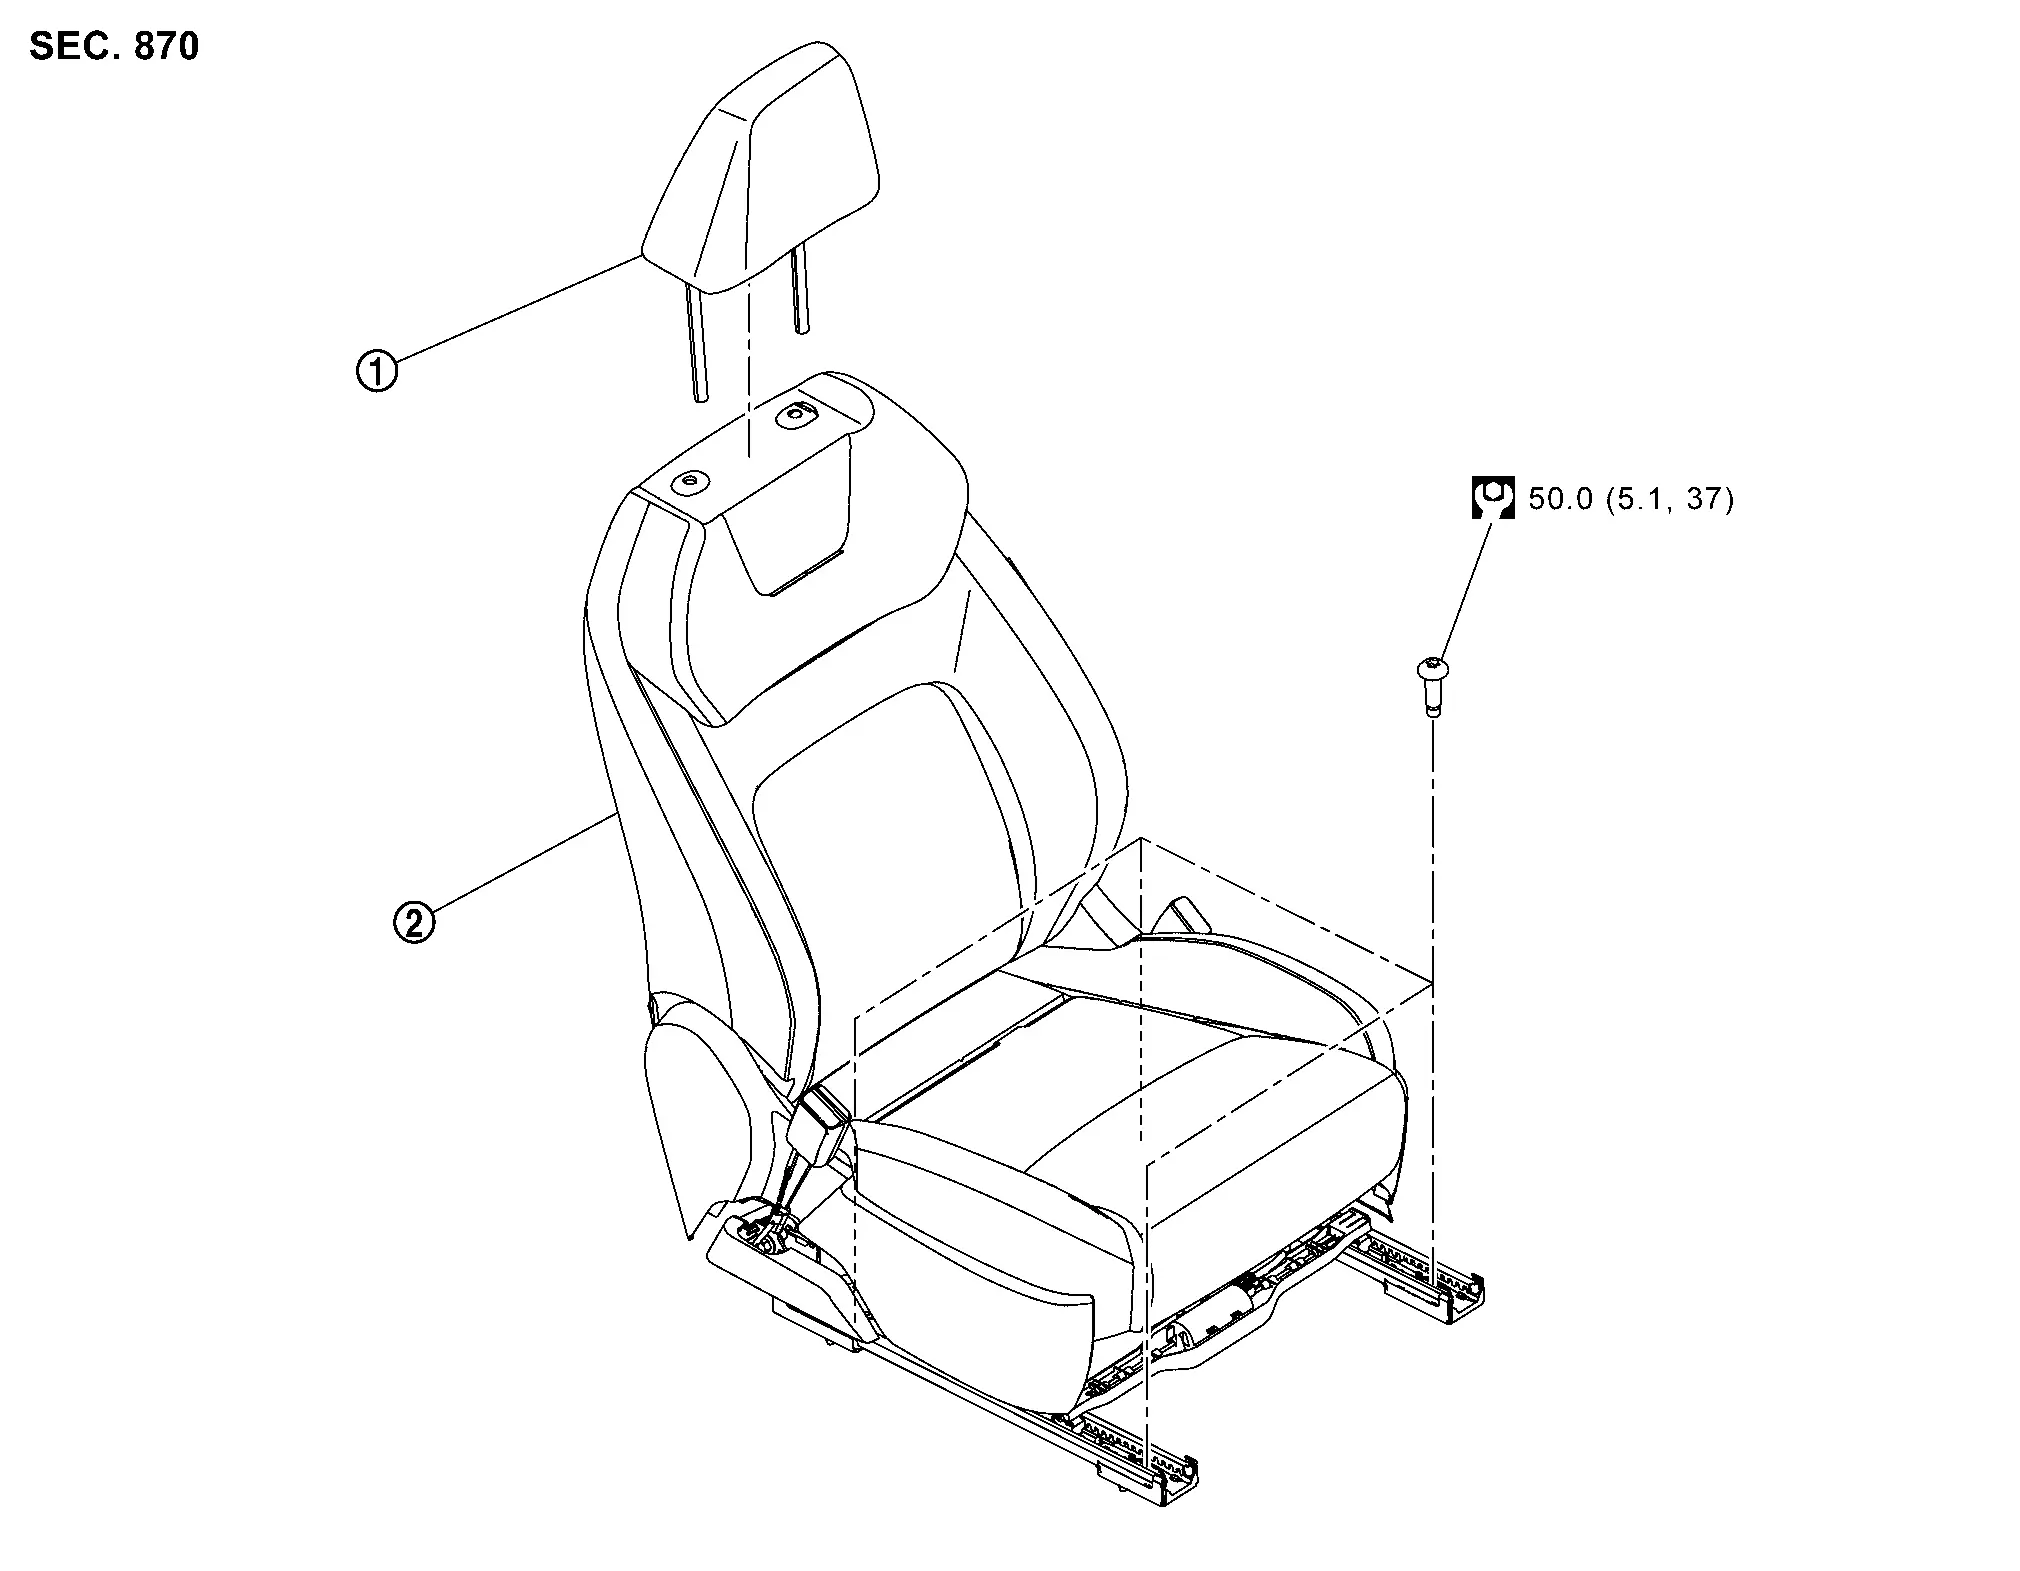
Front Seat Nissan Ariya first Gen
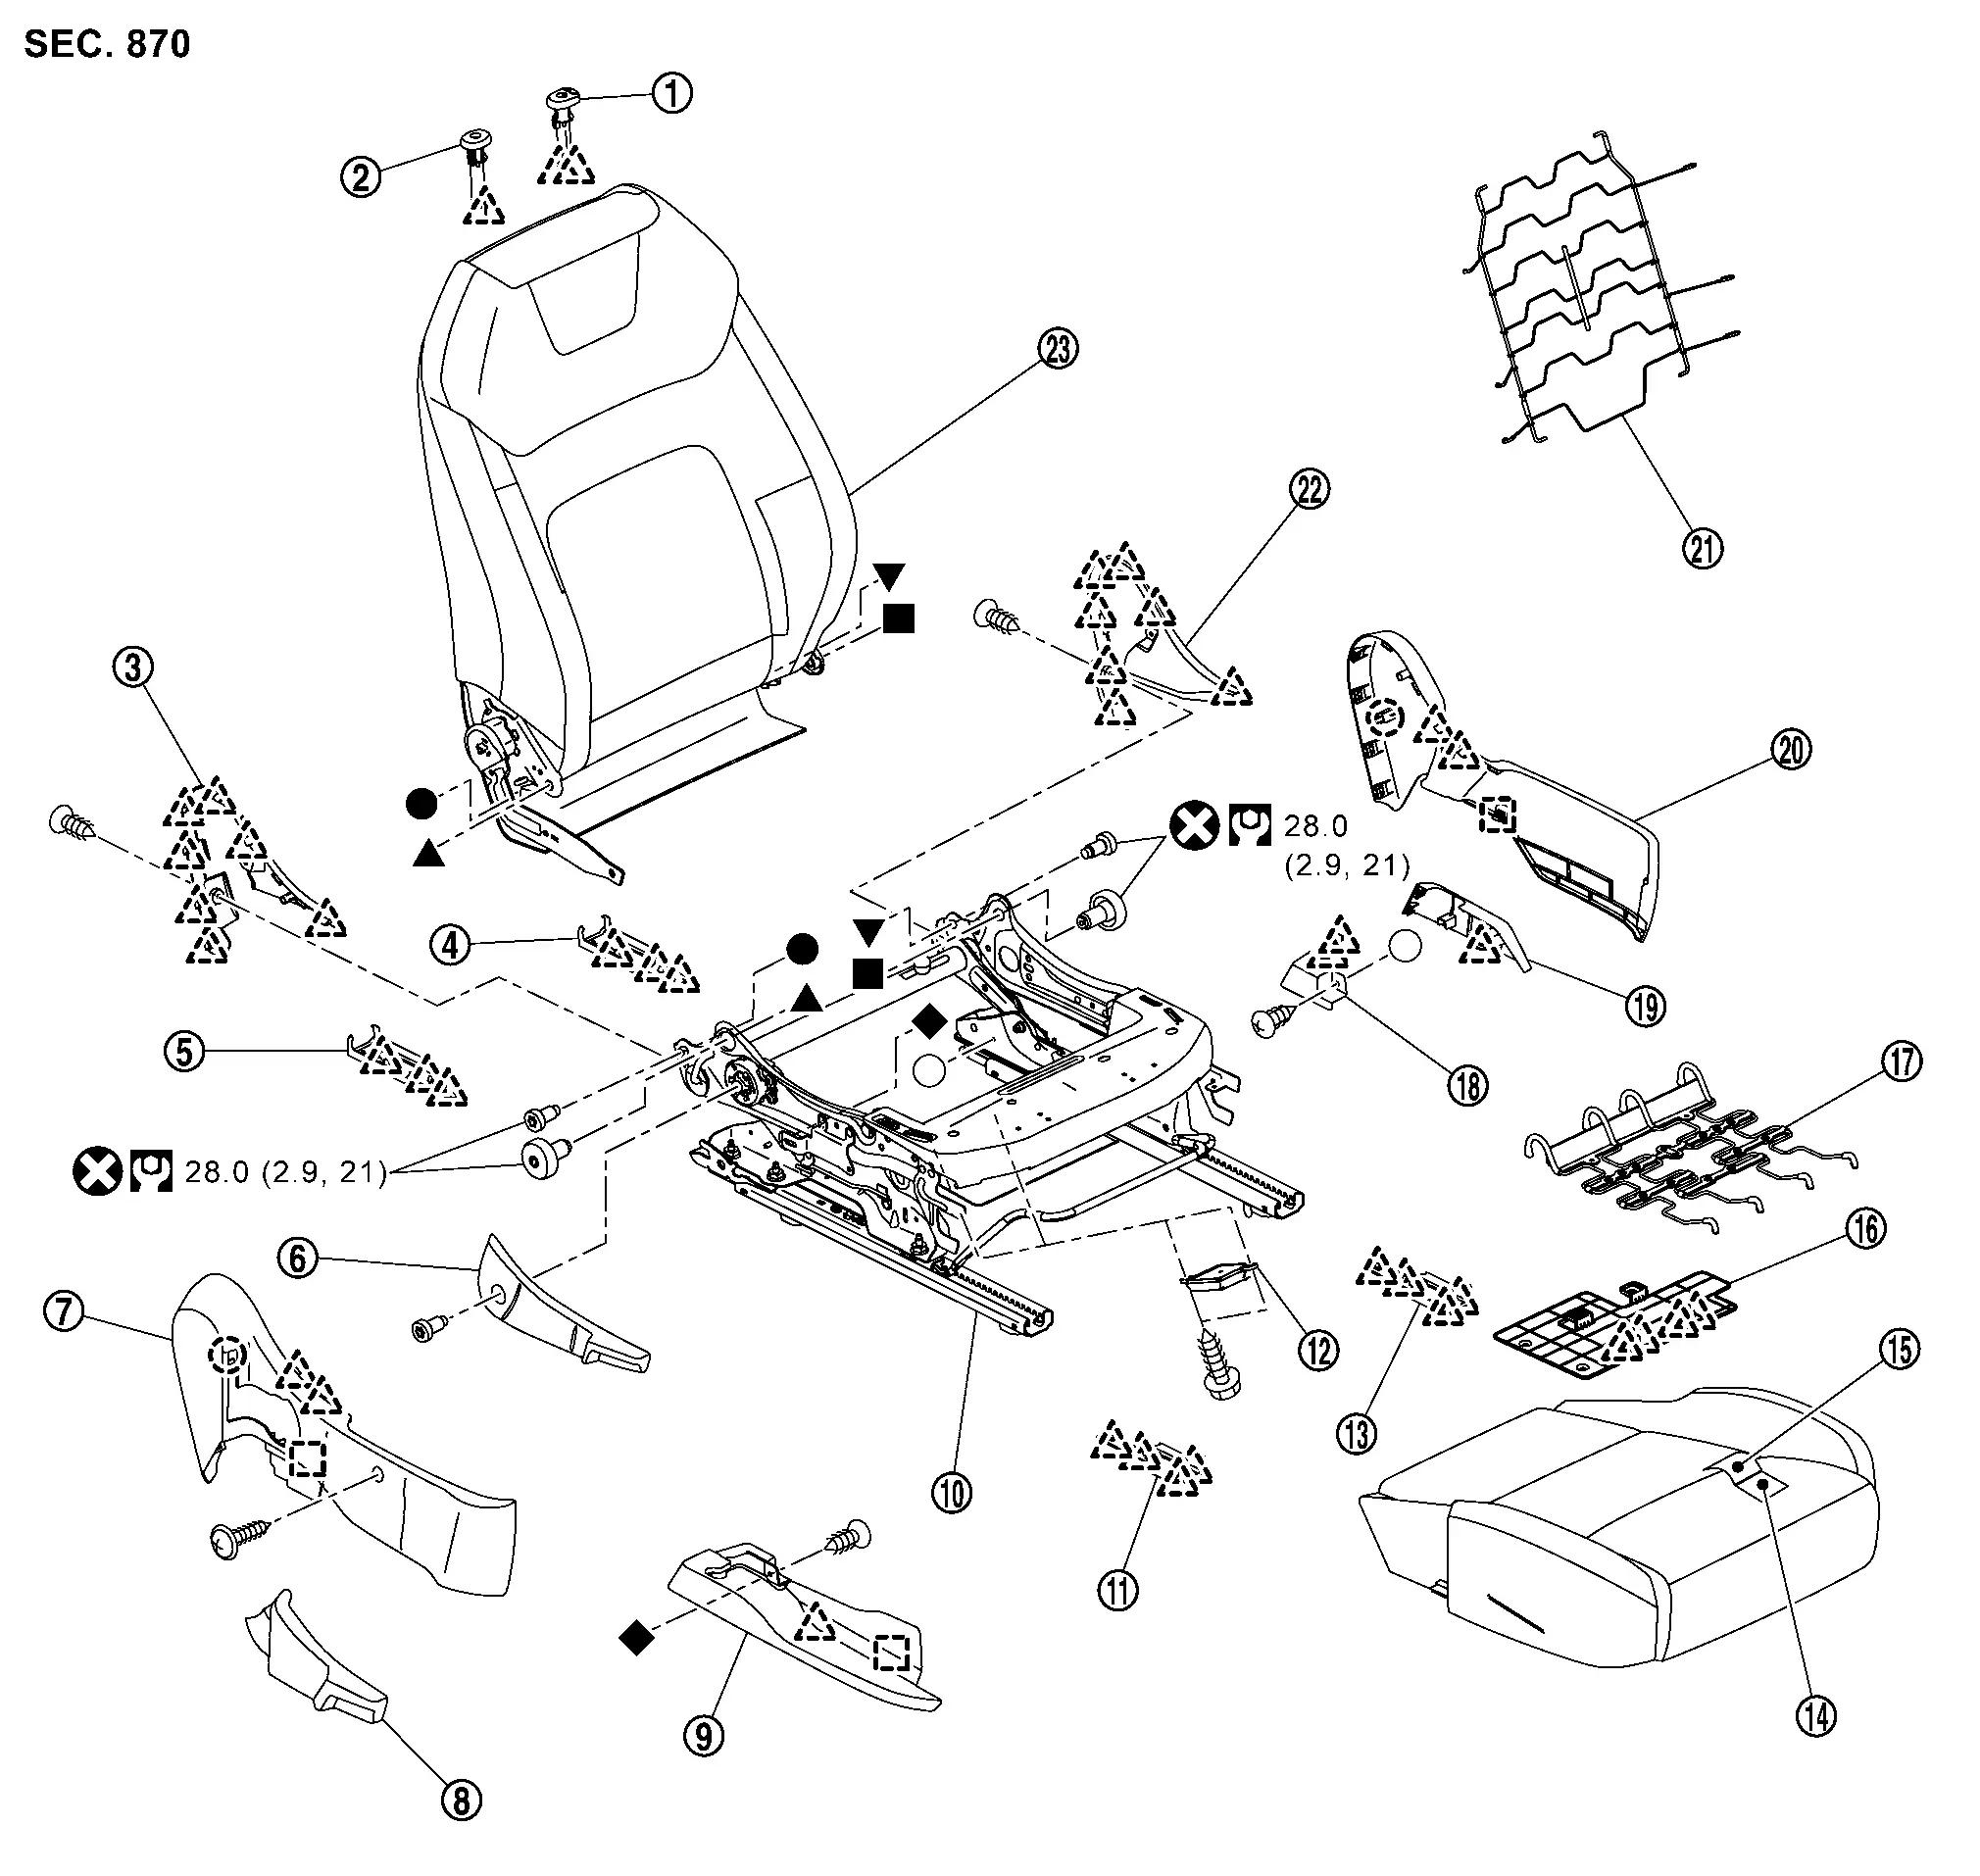
Exploded View
REMOVAL
 |
Headrest |  |
Front seat assembly | ||
 |
: N·m (kg-m, ft-lb) | ||||
DISASSEMBLY
Power seat
|
Headrest holder (lock) | |
Headrest holder (free) |  |
Seatback assembly |
 |
Lumber support unit |  |
Inside seat cushion finisher inner |  |
Inside seat cushion finisher outer |
 |
Inside seat cushion finisher lower outer |  |
Inside seat cushion finisher lower inner |  |
Seat cushion suspension |
 |
Seat cushion harness bracket |  |
Seat cushion blower motor * |
 |
Seat cushion pad |
 |
Seat cushion trim |  |
Seat cushion lower end cap front inner |  |
Seat cushion lower end cap front outer |
 |
Driver seat control unit |  |
Seat cushion frame |  |
Outside seat cushion finisher lower |
 |
Power seat switch |  |
Lumber support switch |  |
Slide switch knob |
 |
Reclining switch knob |  |
Outside seat cushion finisher outer |  |
Seat cushion lower end cap rear outer |
 |
Seat cushion lower end cap rear inner |  |
Outside seat cushion finisher inner |  |
Seatback blower motor * |
 |
: Clip | ||||
 |
: Pawl | ||||
 |
: Metal clip | ||||
 |
: Always replace after every disassembly. | ||||
|
: N·m (kg-m, ft-lb) | ||||
 , ,  , ,  , ,  , ,  , ,  : Indicates that the part is connected at points with same symbol in actual Nissan Ariya vehicle. : Indicates that the part is connected at points with same symbol in actual Nissan Ariya vehicle. |
|||||
*: With heater and ventilation seat system
|
Headrest holder (lock) | |
Headrest holder (free) | |
Seatback blower motor *1 |
|
Outside seat cushion finisher inner | |
Seat cushion lower end cap rear inner | |
Seat cushion lower end cap rear outer |
|
Power seat switch | |
Outside seat cushion finisher outer | |
Reclining switch knob |
|
Slide switch knob | |
Outside seat cushion finisher lower | |
Seat cushion frame |
|
Passenger seat control unit *2 |
|
Seat cushion lower end cap front outer | |
Occupant detection system control unit |
|
Seat cushion lower end cap front inner | |
Seat cushion blower motor *1 |
|
Seat cushion pad |
|
Seat cushion trim | |
Seat cushion harness bracket | |
Seat cushion suspension |
|
Inside seat cushion finisher lower inner | |
Inside seat cushion finisher lower outer | |
Inside seat cushion finisher outer |
|
Seatback suspension | |
Inside seat cushion finisher inner | |
Seatback assembly |
|
: Clip | ||||
|
: Pawl | ||||
|
: Metal clip | ||||
|
: Always replace after every disassembly. | ||||
|
: N·m (kg-m, ft-lb) | ||||
| , , , , , : Indicates that the part is connected at points with same symbol in actual Nissan Ariya vehicle. |
|||||
*1: With heater and ventilation seat system
*2: With memory function
Manual Seat
|
Headrest holder (lock) | |
Headrest holder (free) | |
Seatback assembly |
|
Seatback suspension | |
Inside seat cushion finisher inner | |
Inside seat cushion finisher outer |
|
Inside seat cushion finisher lower outer | |
Inside seat cushion finisher lower inner | |
Seat cushion suspension |
|
Seat cushion harness bracket | |
Seat cushion pad | |
Seat cushion trim |
|
Seat cushion lower end cap front inner | |
Seat cushion lower end cap front outer | |
Seat cushion frame |
|
Outside seat cushion finisher lower | |
Lifter knob | |
Outside seat cushion finisher outer |
|
Reclining knob | |
Seat cushion lower end cap rear outer | |
Seat cushion lower end cap rear inner |
|
Outside seat cushion finisher inner | ||||
|
: Clip | ||||
|
: Pawl | ||||
|
: Metal clip | ||||
|
: Always replace after every disassembly. | ||||
|
: N·m (kg-m, ft-lb) | ||||
| , , , , , : Indicates that the part is connected at points with same symbol in actual Nissan Ariya vehicle. |
|||||
|
Headrest holder (lock) | |
Headrest holder (free) | |
Outside seat cushion finisher inner |
|
Seat cushion lower end cap rear inner | |
Seat cushion lower end cap rear outer | |
Reclining knob |
|
Outside seat cushion finisher outer | |
Lifter knob | |
Outside seat cushion finisher lower |
|
Seat cushion frame | |
Seat cushion lower end cap front outer | |
Occupant detection system control unit |
|
Seat cushion lower end cap front inner | |
Seat cushion pad | |
Seat cushion trim |
|
Seat cushion harness bracket | |
Seat cushion suspension | |
Inside seat cushion finisher lower inner |
|
Inside seat cushion finisher lower outer | |
Inside seat cushion finisher outer | |
Seatback suspension |
|
Inside seat cushion finisher inner | |
Seatback assembly | ||
|
: Clip | ||||
|
: Pawl | ||||
|
: Metal clip | ||||
|
: Always replace after every disassembly. | ||||
|
: N·m (kg-m, ft-lb) | ||||
| , , , , , : Indicates that the part is connected at points with same symbol in actual Nissan Ariya vehicle. |
|||||
Removal & Installation
CAUTION:
-
When removing and installing the passenger seat, perform the Zero-point reset operations. Refer to Work Procedure.
-
When removing and installing, use shop cloths to protect parts from damage.
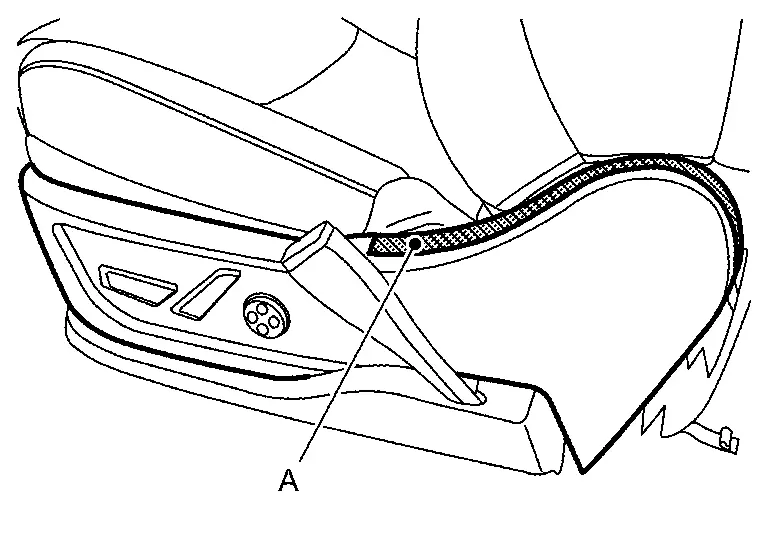
REMOVAL
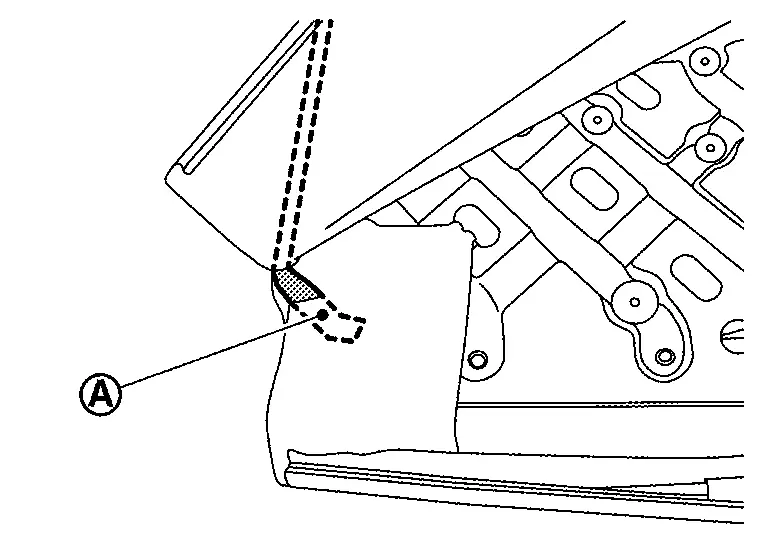
CAUTION:
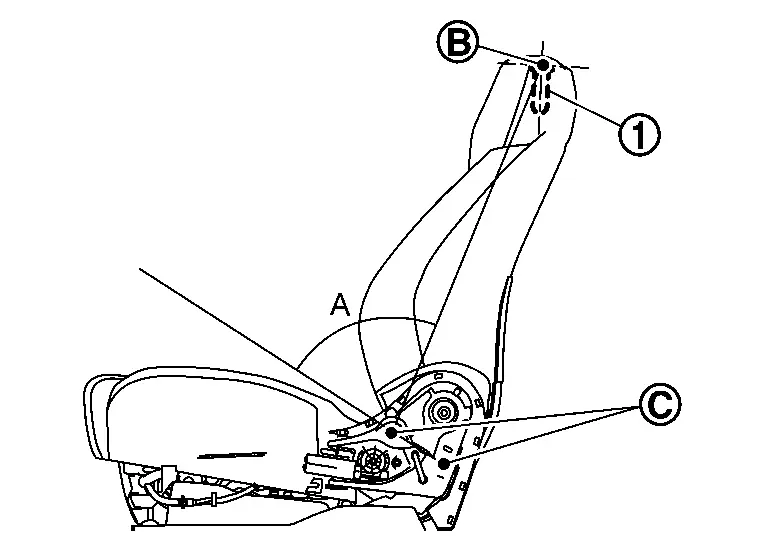
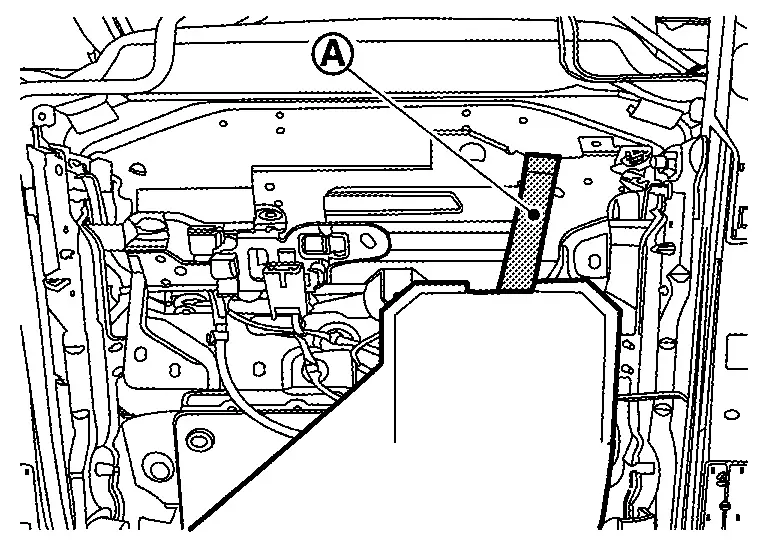
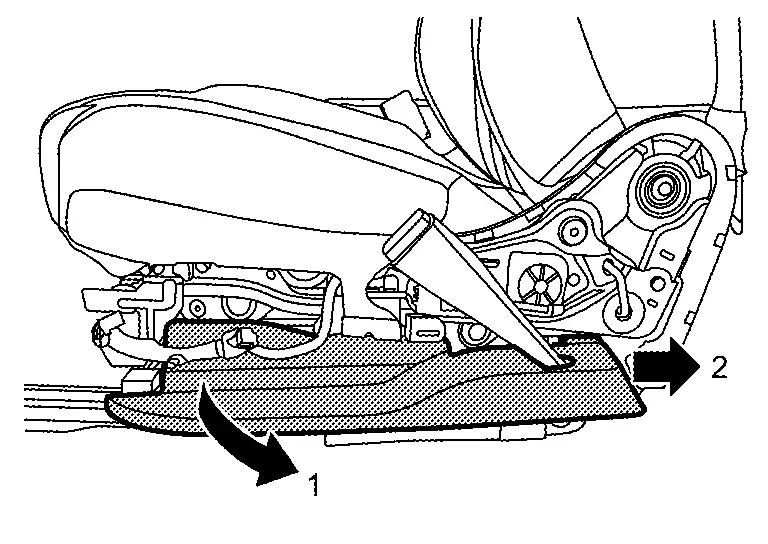
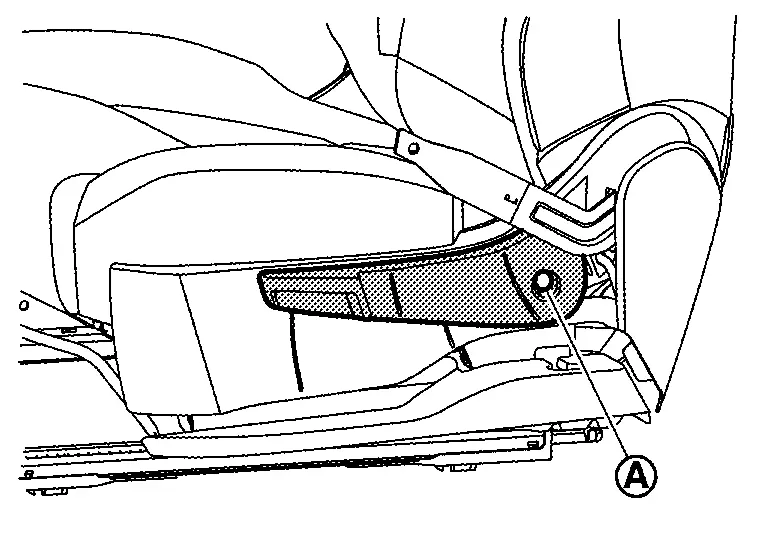
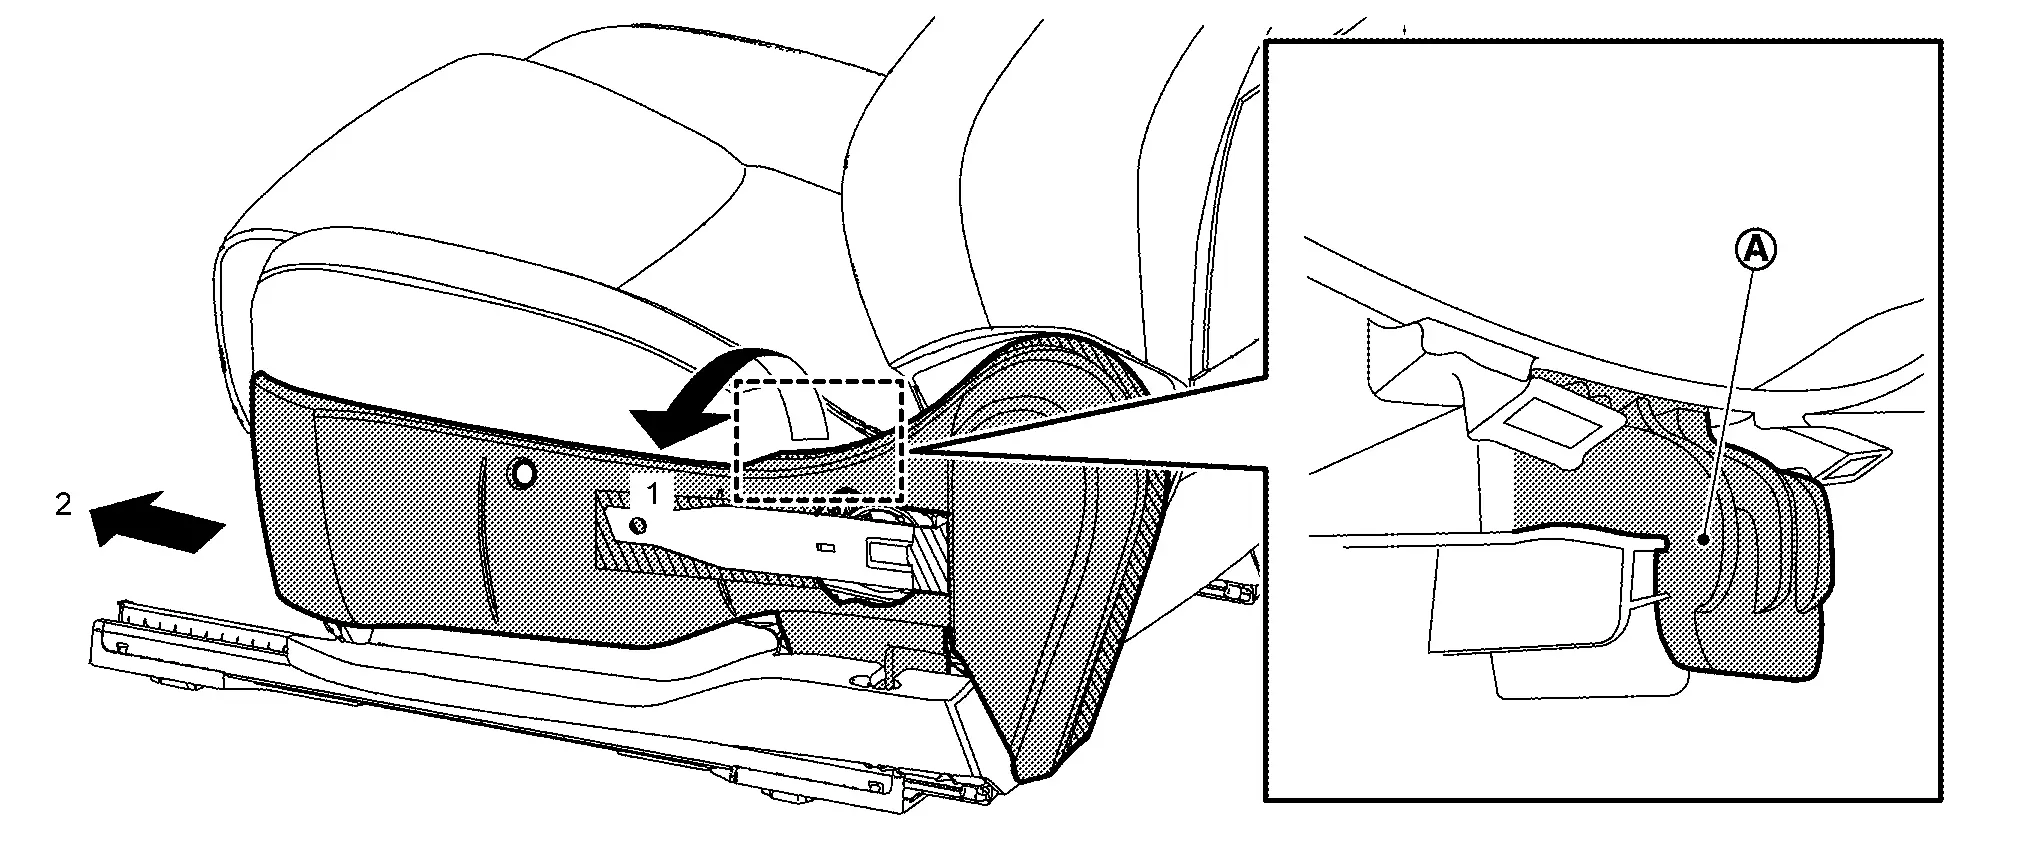
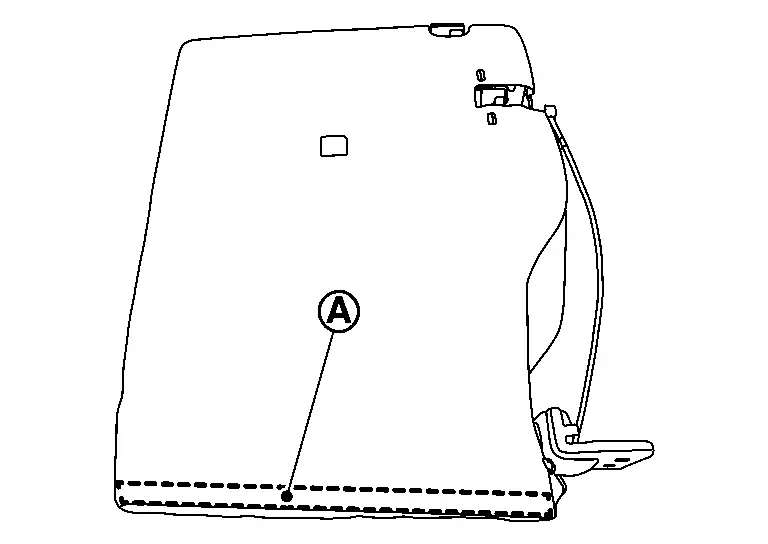
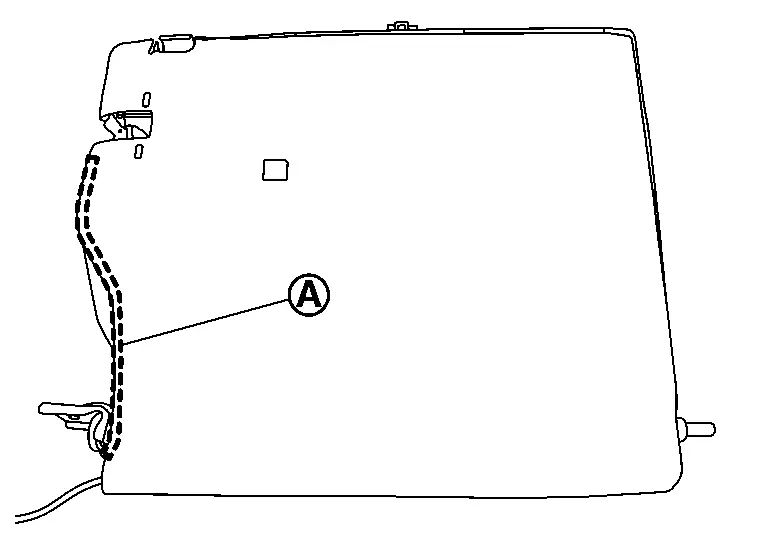
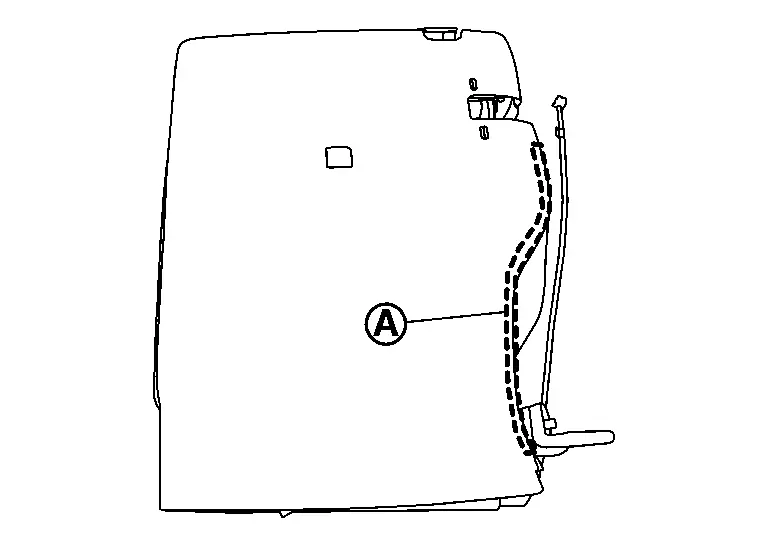
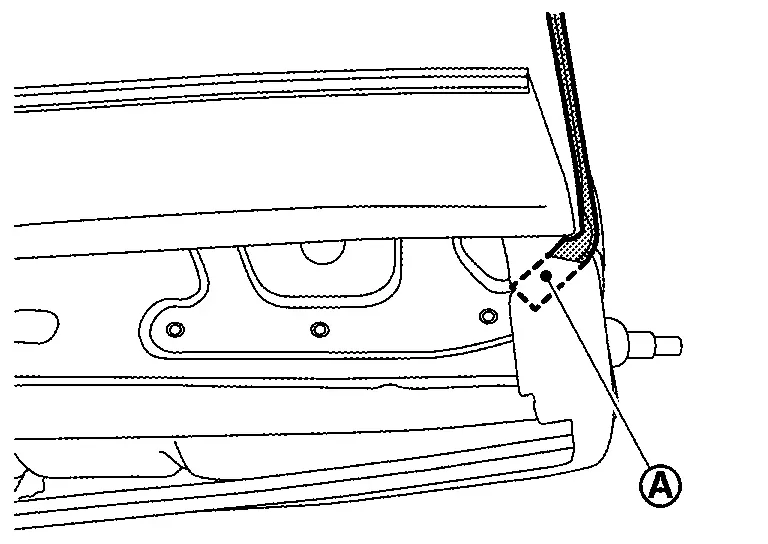
If seatback assembly is removed, remove outside seat cushion finisher outer before removing front seat (Refer to Disassembly & Assembly.). And then, tilt seatback assembly angle (A) backward to 80° or more.
|
Headrest holder |
 |
Center of installing hole for headrest |
 |
Mounting bolt of seatback assembly |
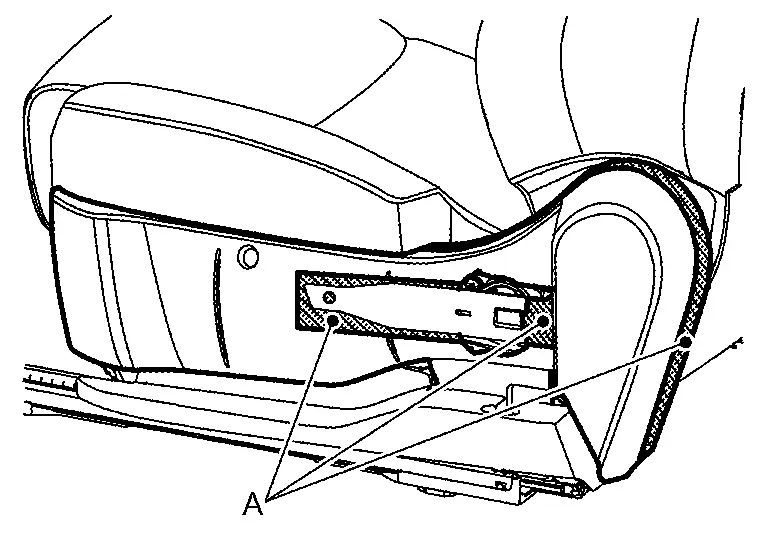
Remove headrest.
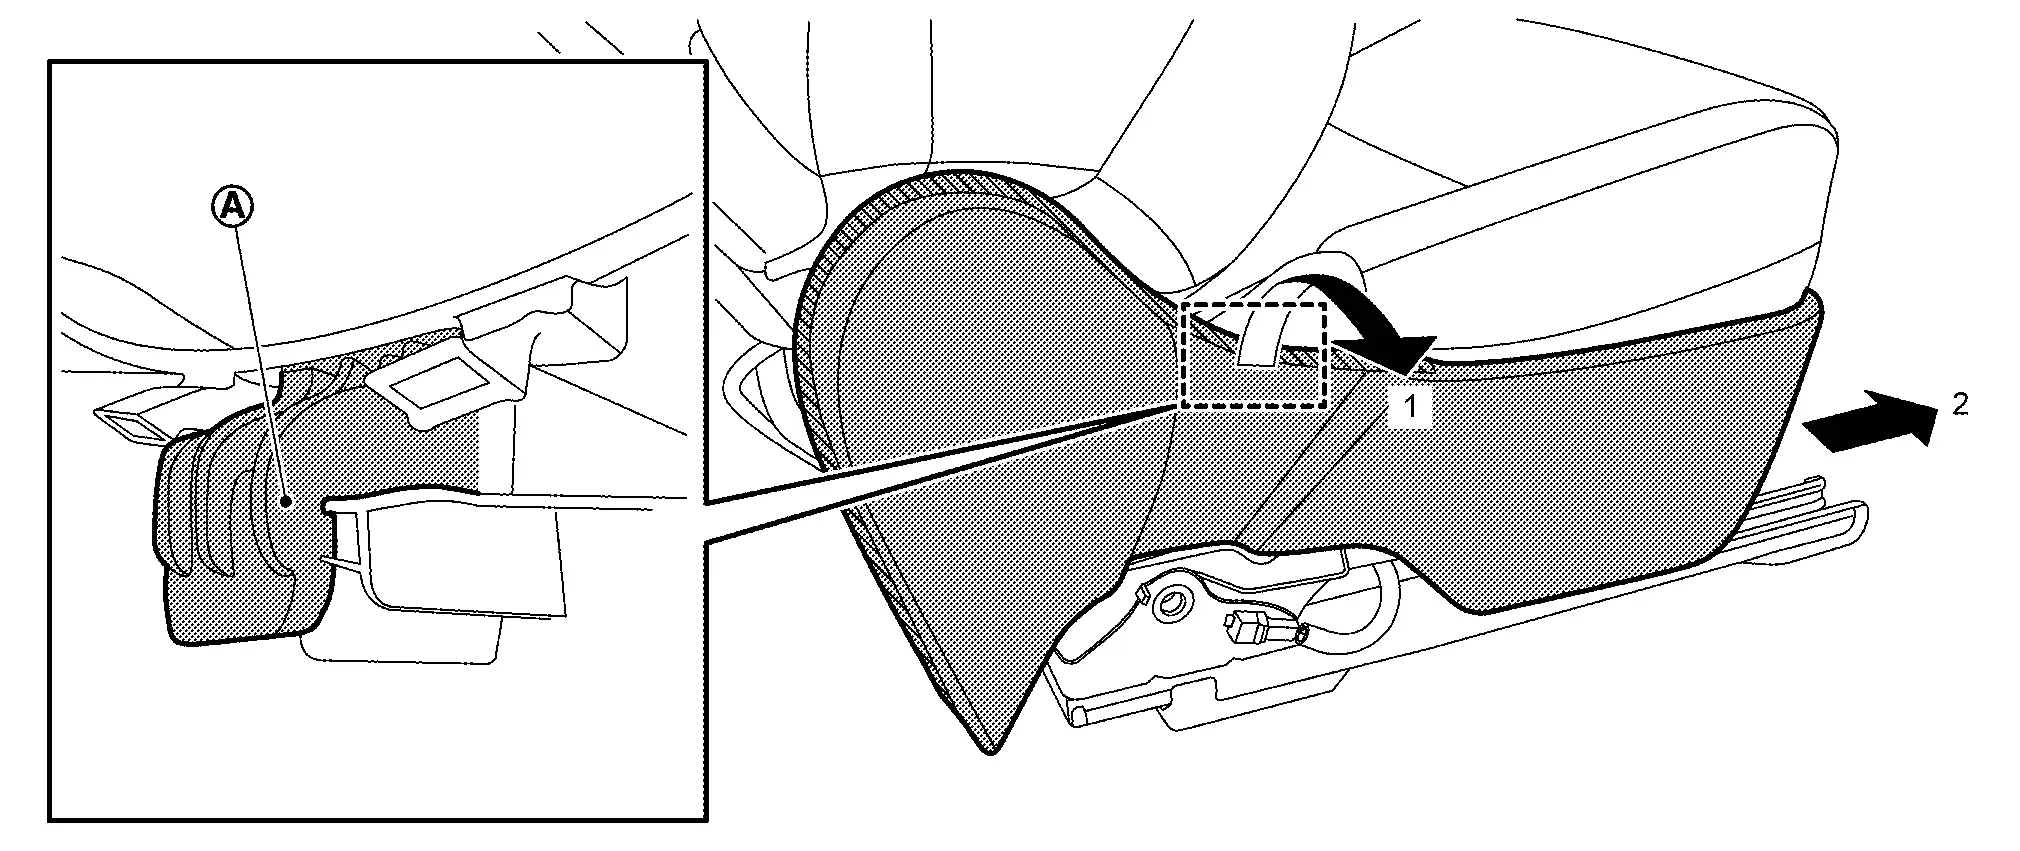
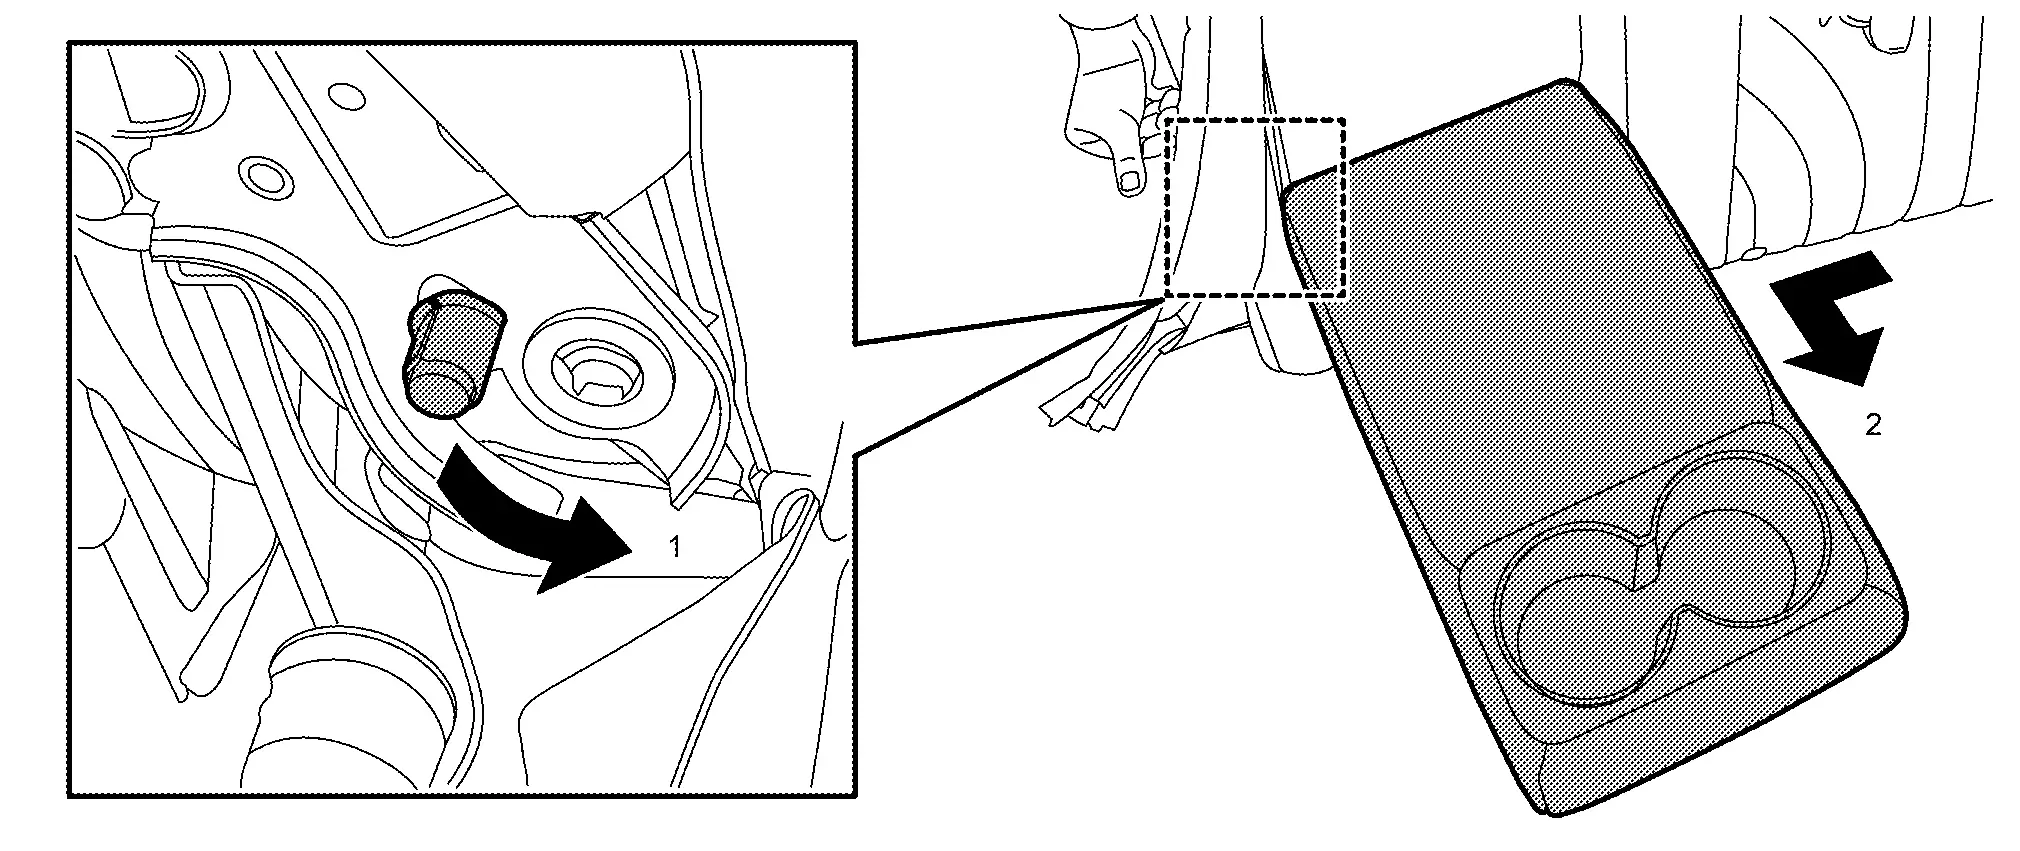
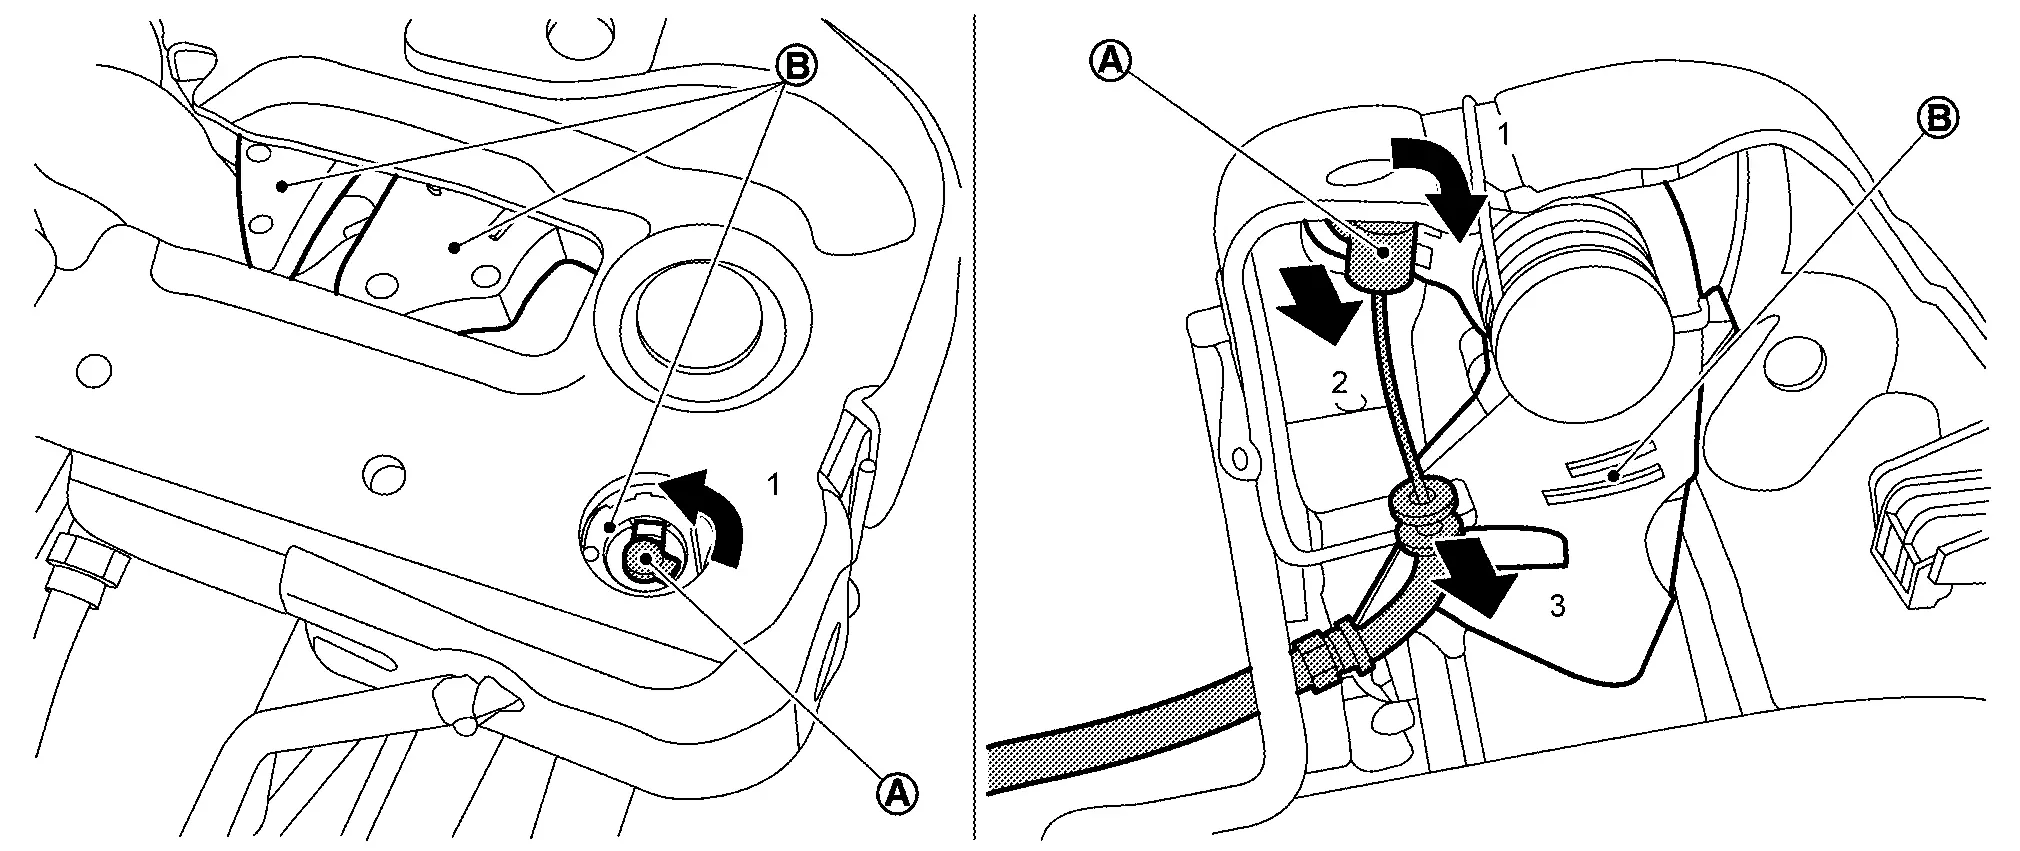
Remove lap pre-tensioner anchor from lap pre-tensioner. Refer to Removal & Installation.
Fully lift up front seat.
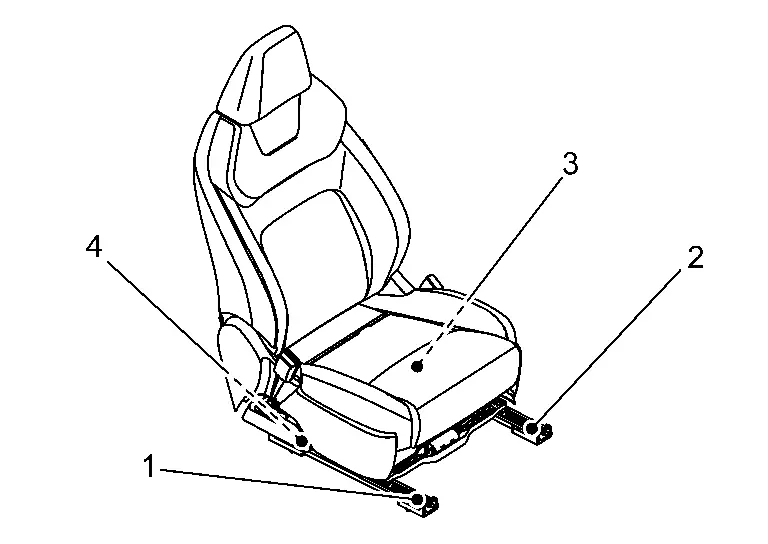
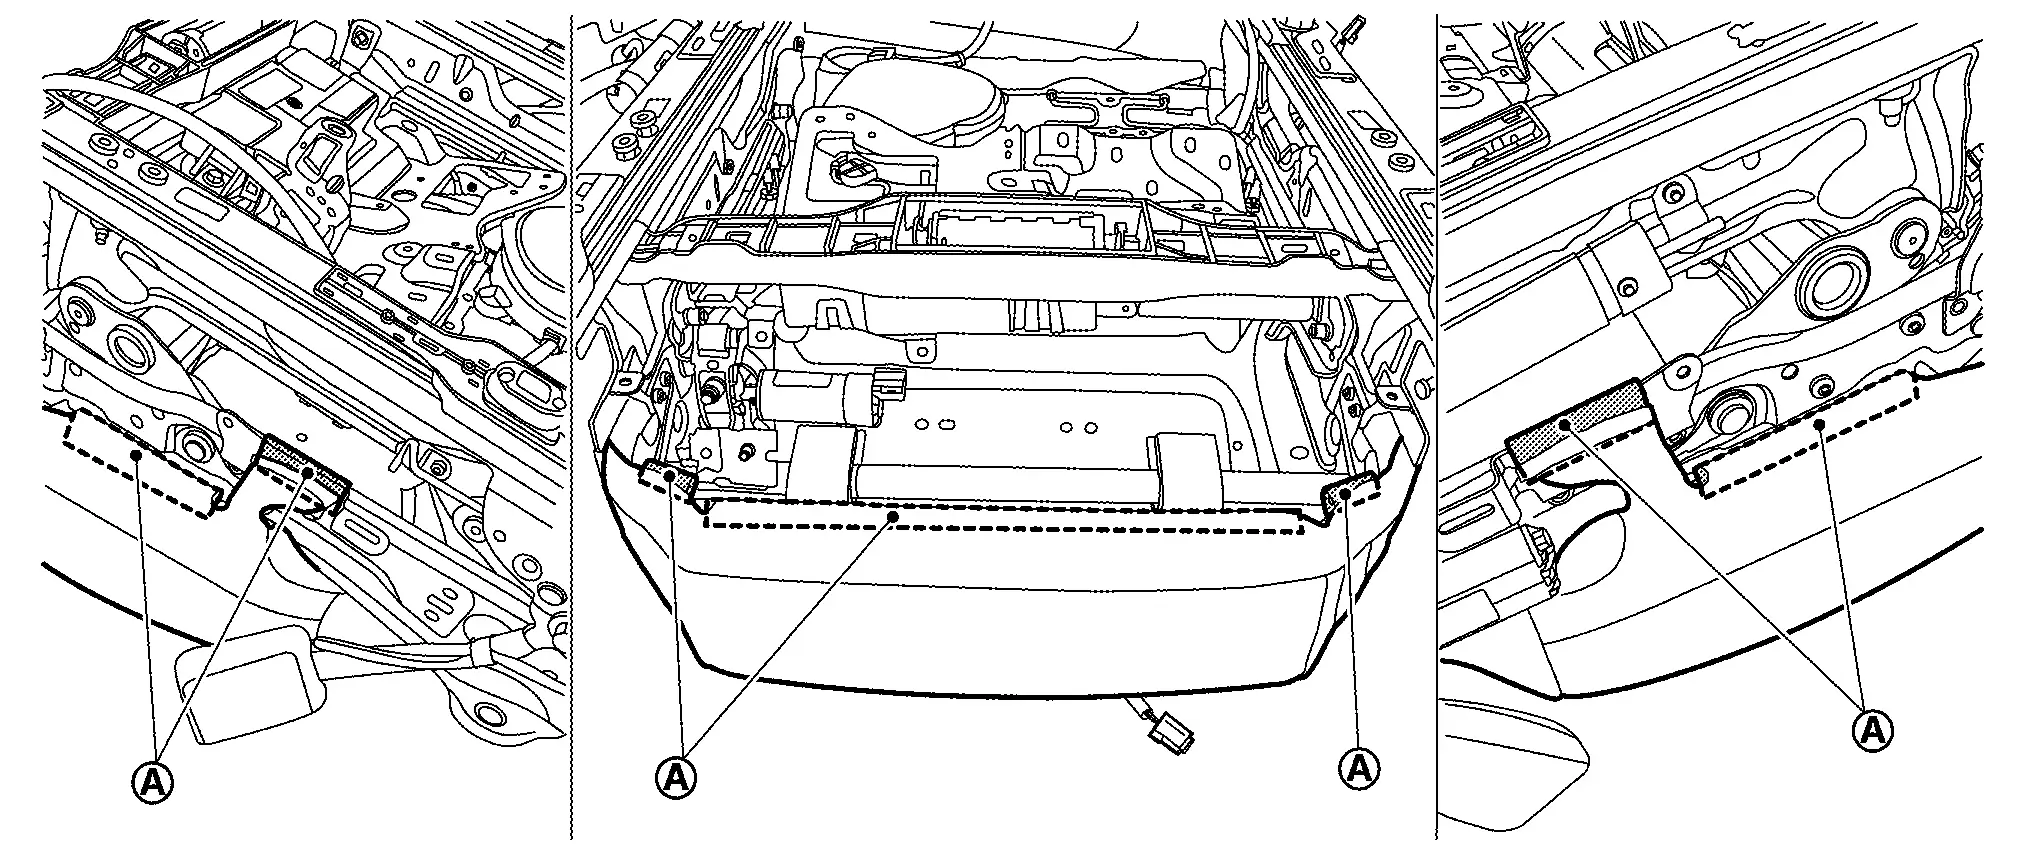
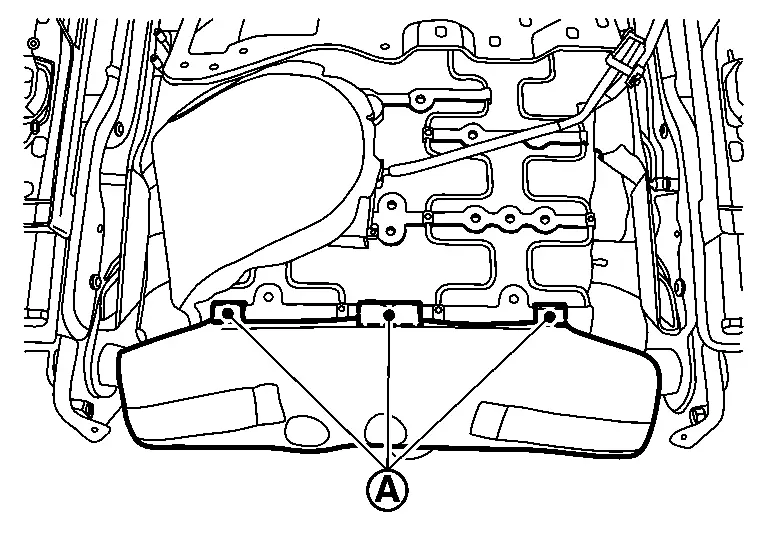
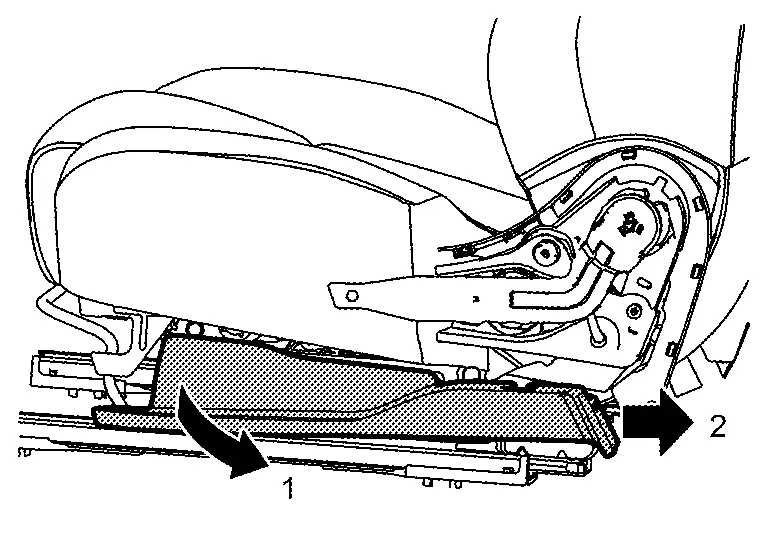
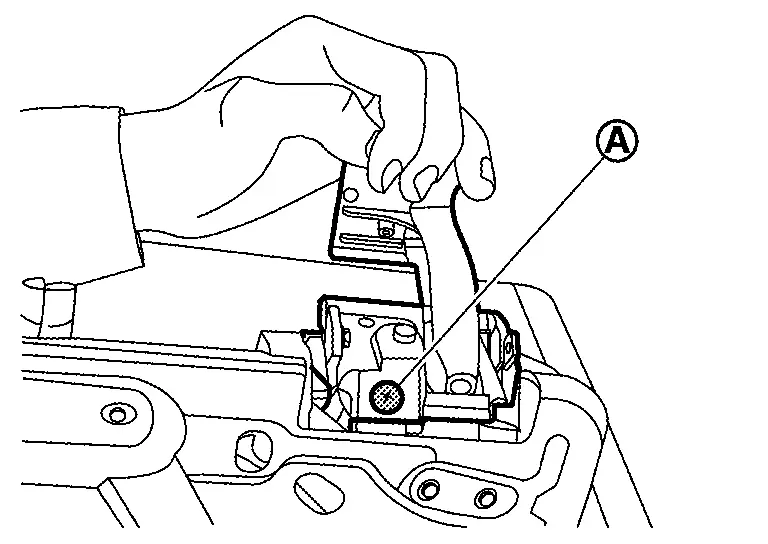
Remove front seat mounting bolts.Slide front seat to front most position. Remove front seat mounting bolts of rear side. Slide front seat to rear most position. Remove front seat mounting bolts of front side.
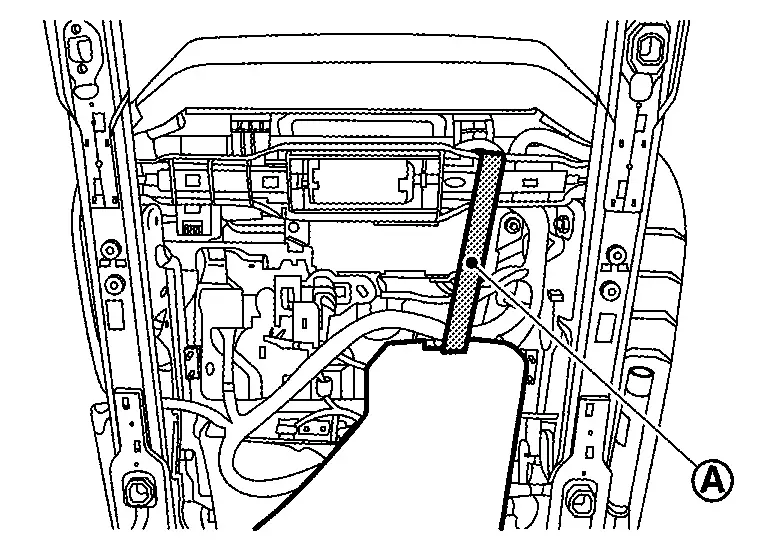
Disengage harness fixing clips of seat cushion lower, and then disconnect harness connectors.
WARNING:
-
When removing the battery negative terminal, refer to Precautions for Removing Battery Terminal.
-
When working, be careful to prevent accidental explosion the each air bag module, refer to Precaution for Supplemental Restraint System (SRS) "AIR BAG" and "SEAT BELT PRE-TENSIONER".
-
Never insert the screw driver etc. to the each air bag module harness connector. (To prevent accidental explosion the inflator by static electricity)
CAUTION:
Before performing disengage/disconnect operation, check the engage, connect position of harness/harness connector locations.
Remove front seat from Nissan Ariya vehicle.
INSTALLATION
Note the following items, and then install in the reverse order of removal.
CAUTION:
-
Before installing the seat to vehicle, check the slide rail locking position which inner and outer side. They should be locking same position.
-
Before tightening seat mounting bolt, check that carpet is not caught in sliding leg bolt hole.
-
When installing, tighten mounting bolts according to the numerical order 1→4 as shown in the figure (Figure indicate the Driver seat, Passenger seat is symmetrical).
-
Tighten seat mounting bolts by specified torque value, specified torque value is refer to Exploded View.
-
After installing, perform self-diagnosis using CONSULT. If the system is normal and "PAST" of "Self Diagnostic Result" is indicated, always perform "ERASE" of "Self Diagnostic Result" using CONSULT. Then, if not erase the result, refer to CONSULT Function.
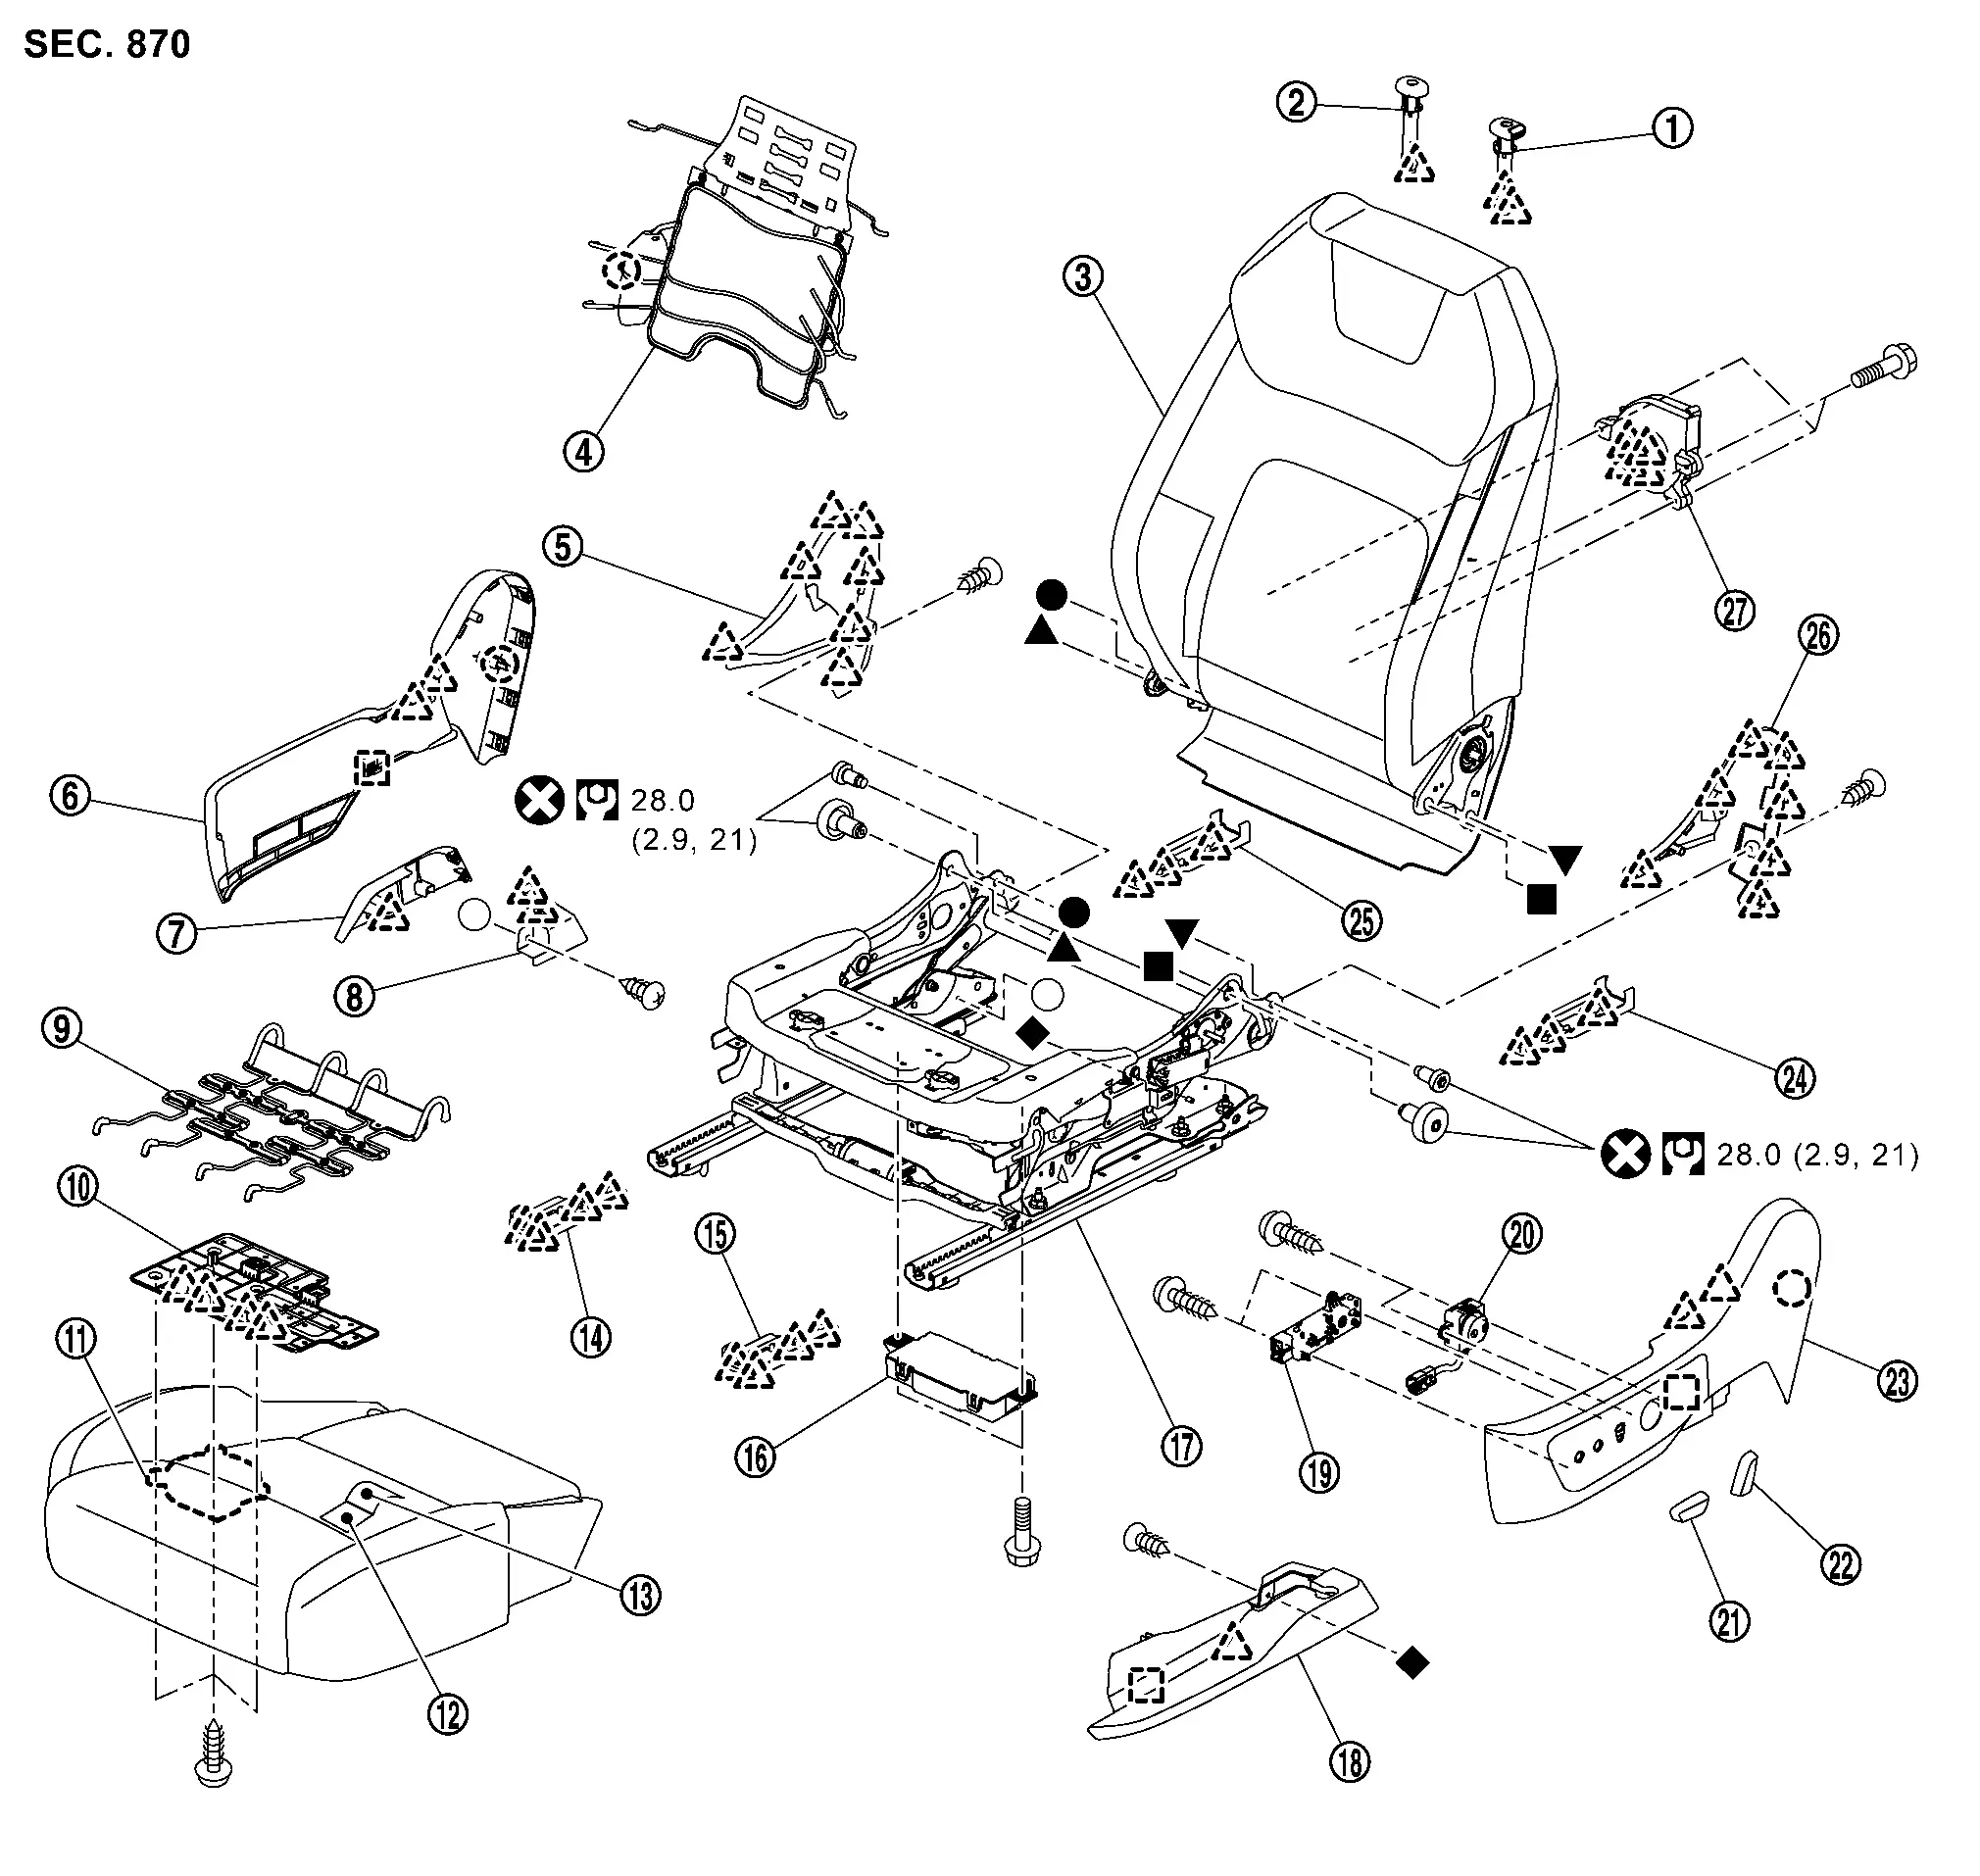
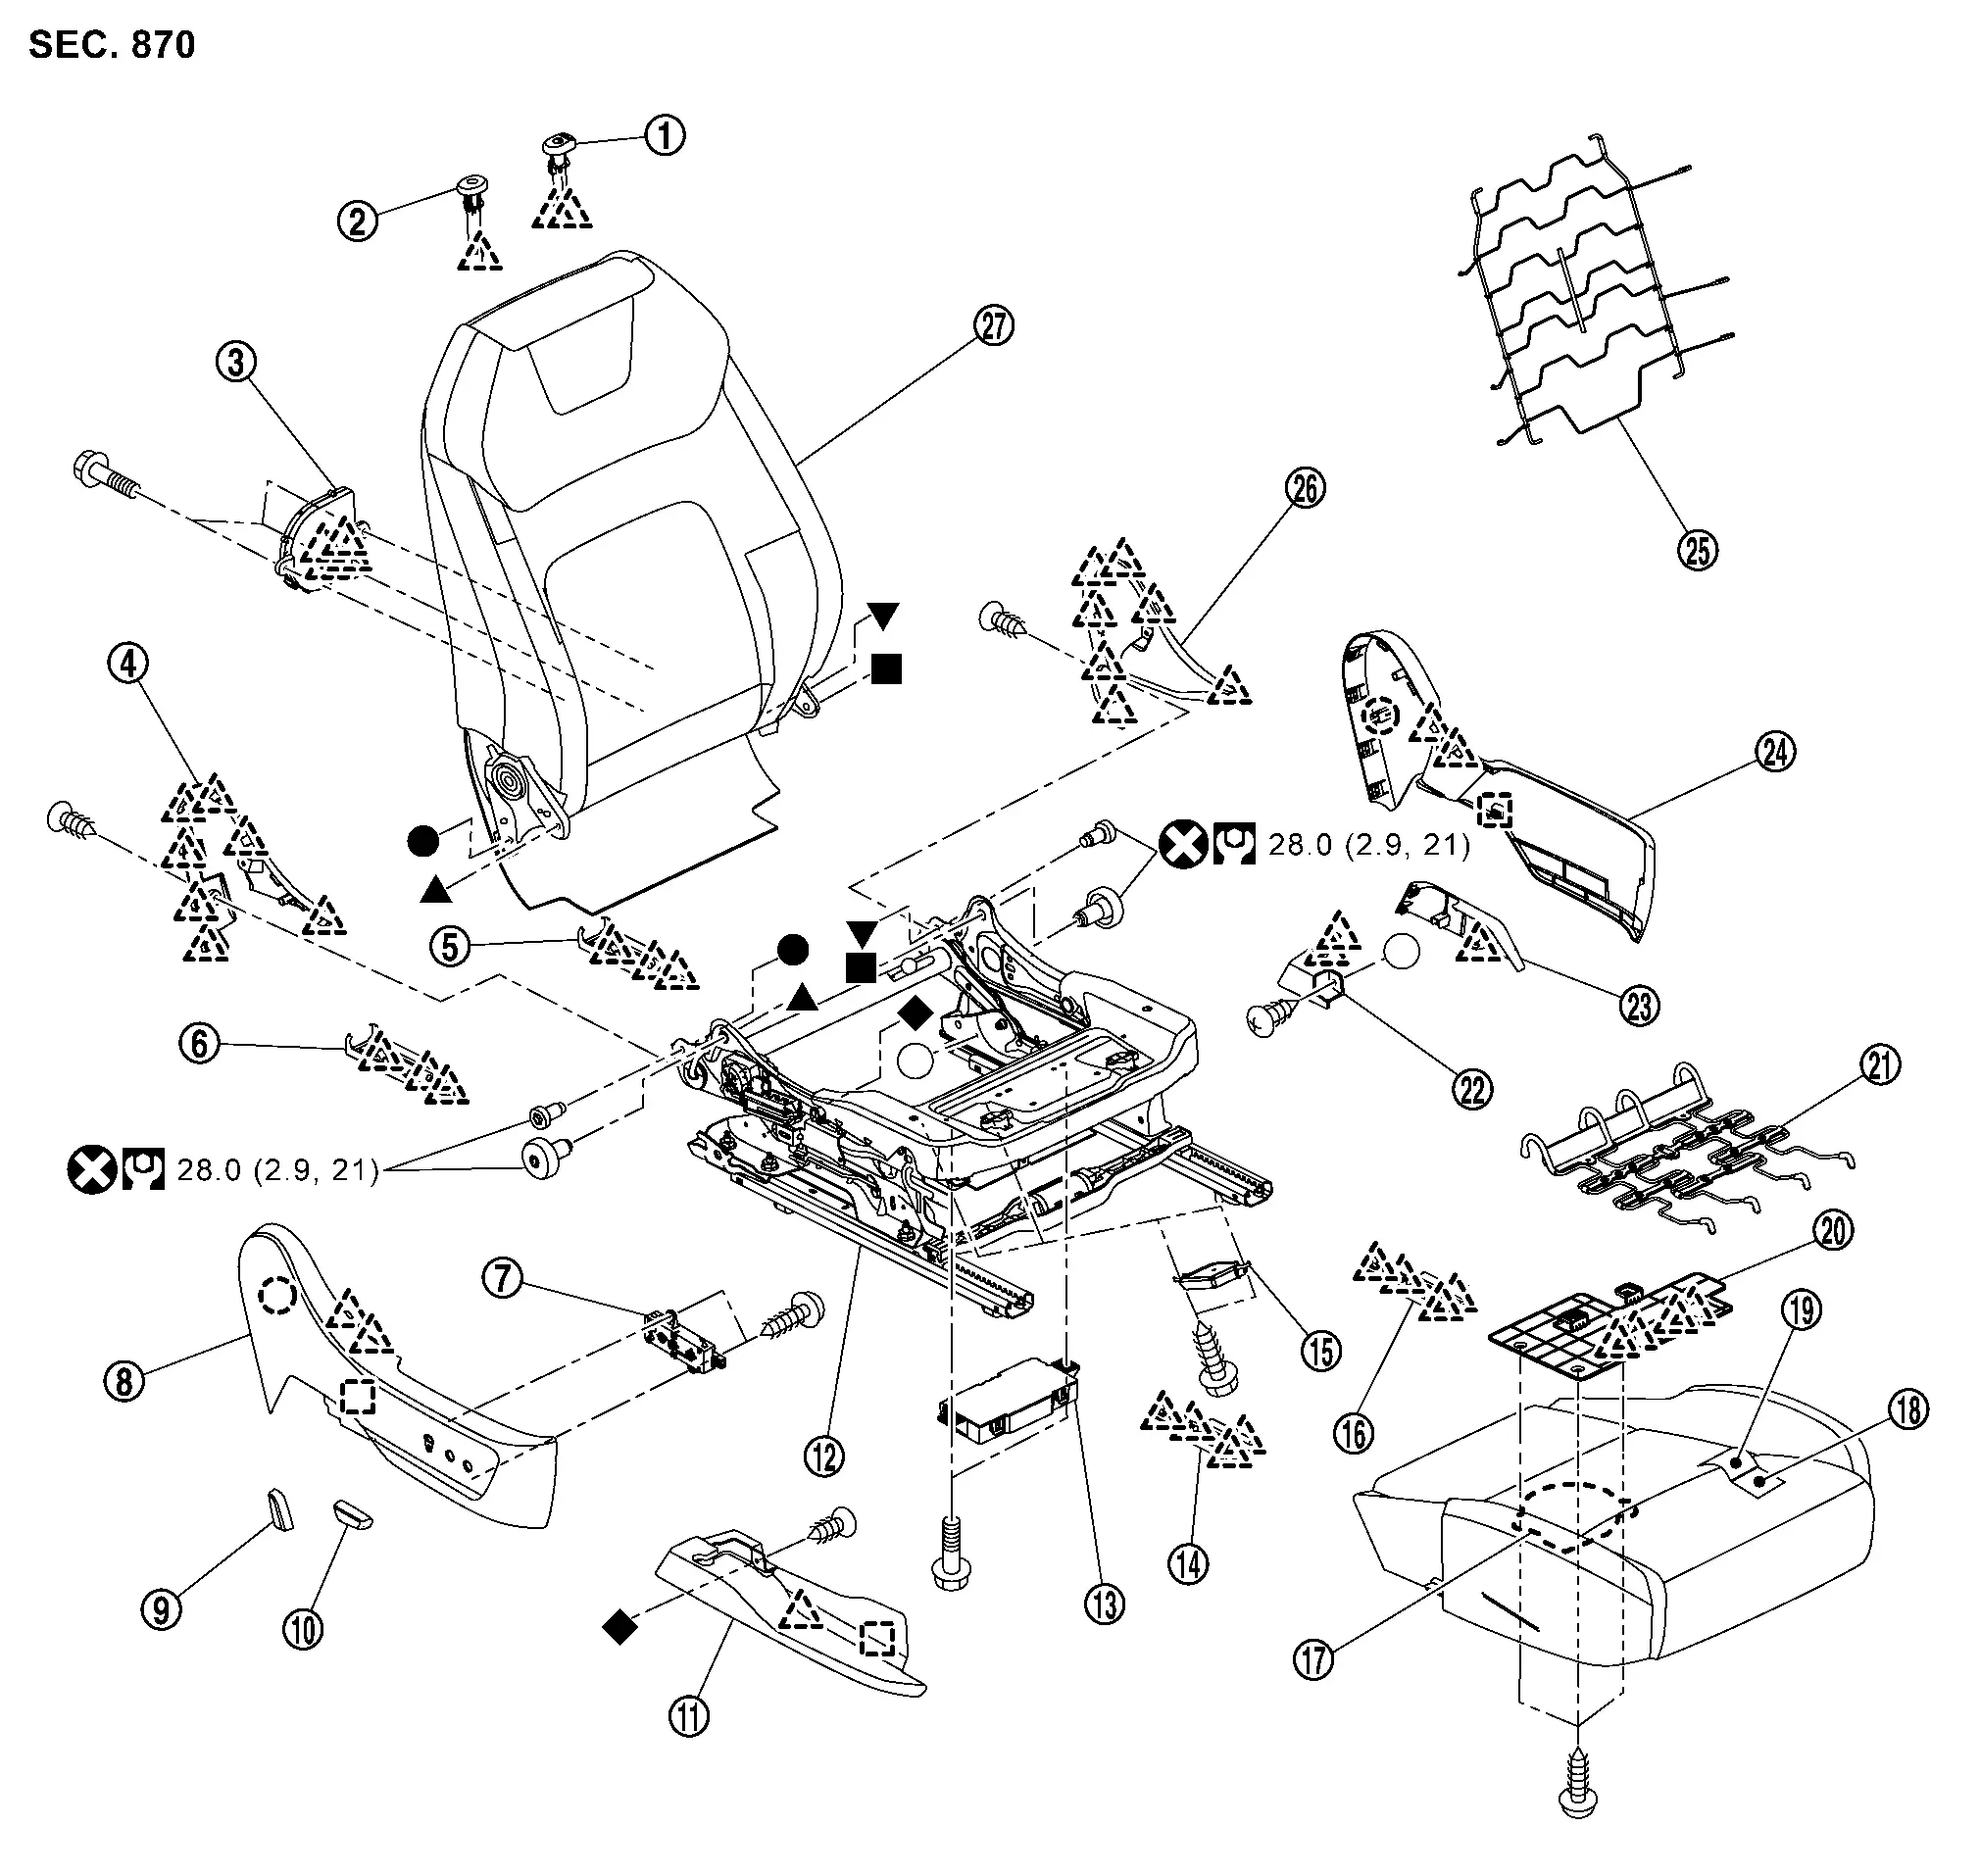
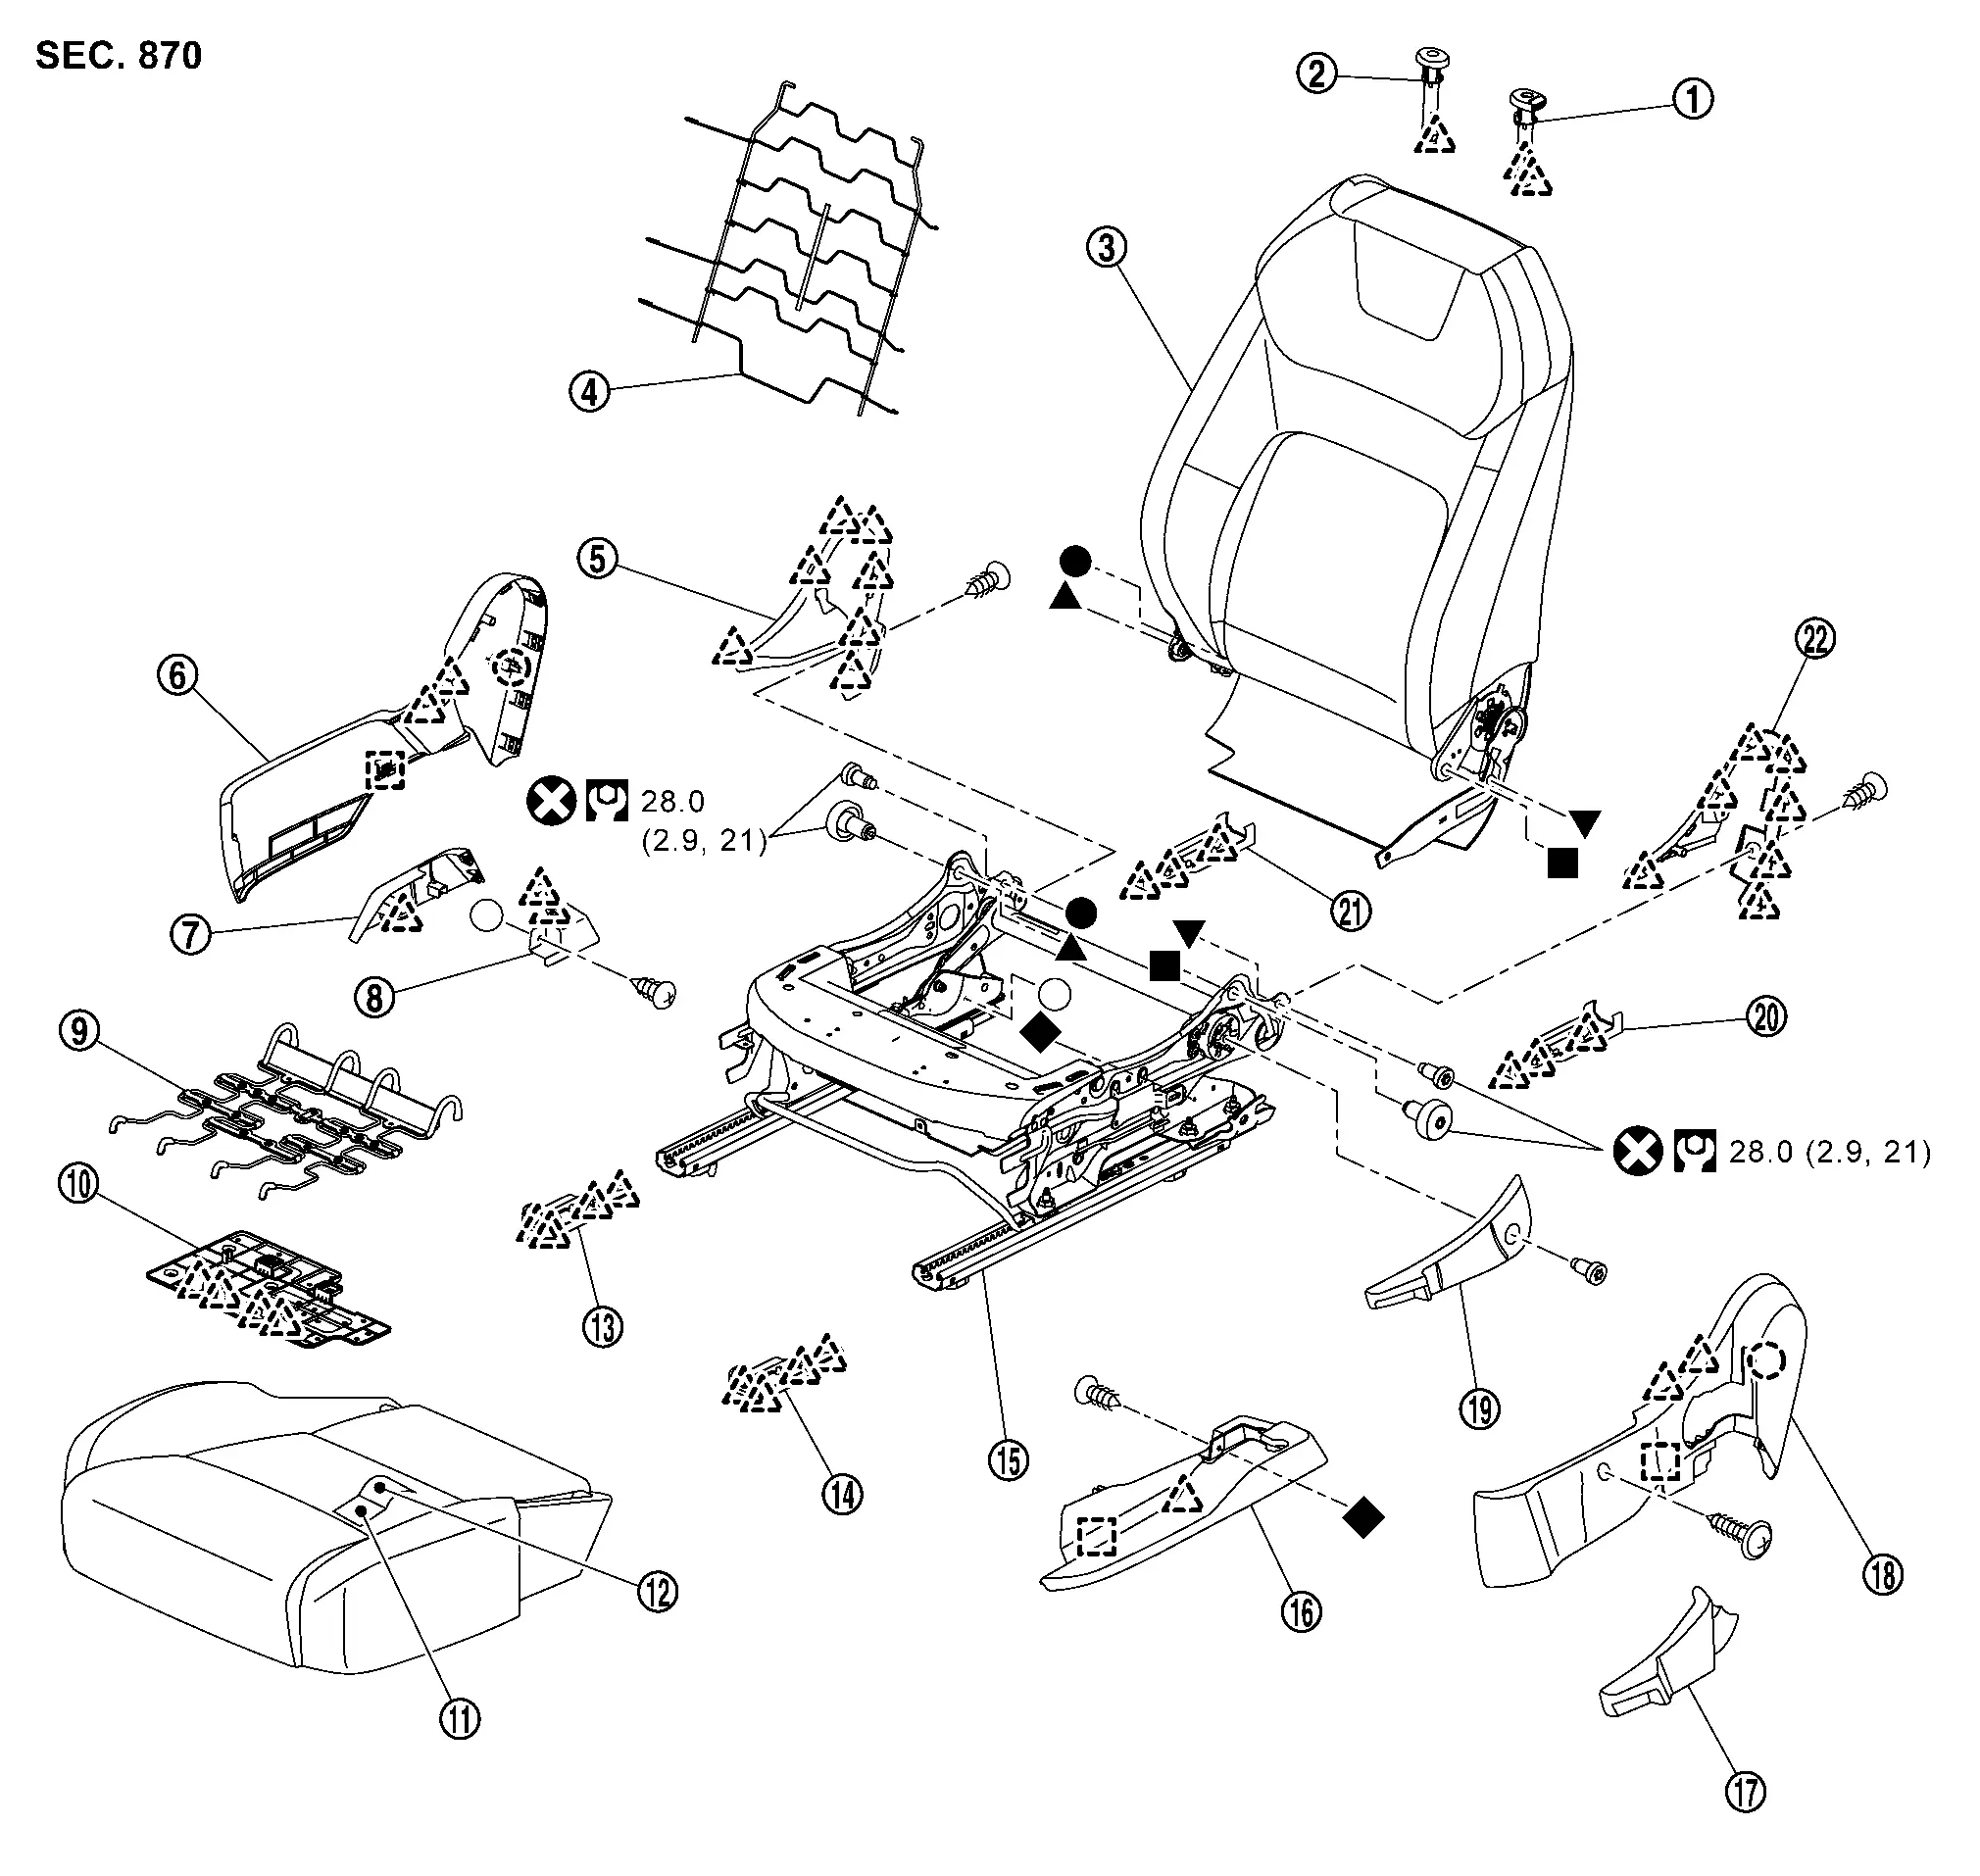
Front Seatback Nissan Ariya
Disassembly & Assembly
WARNING:
When working, be careful to prevent accidental explosion the each air bag module, refer to Precaution for Supplemental Restraint System (SRS) "AIR BAG" and "SEAT BELT PRE-TENSIONER".
CAUTION:
When disassembly, use the remover tool made by plastic.
DISASSEMBLY
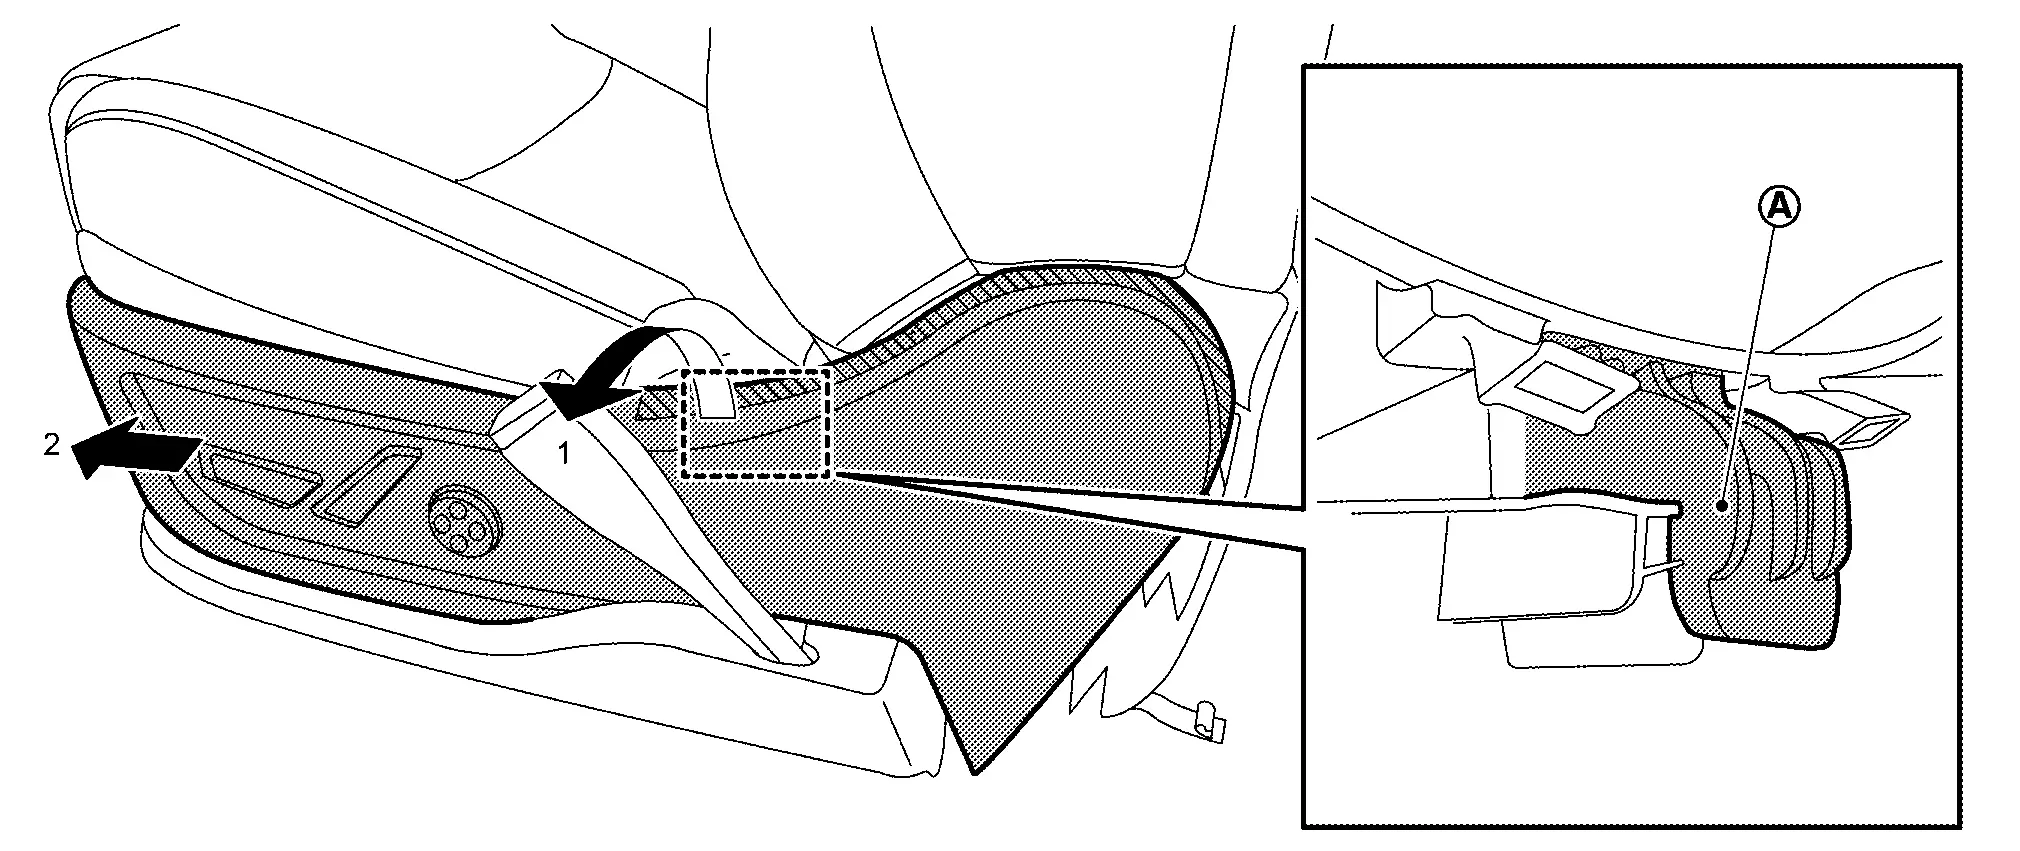
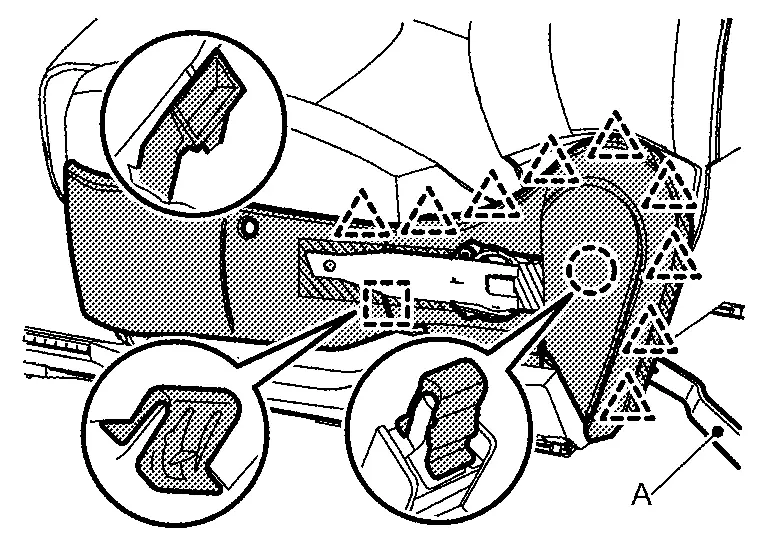
Remove outside and inside seat cushion finisher outer. Refer to Disassembly & Assembly.
Disengage seatback trim fixing retainer  .
.
-
Power seat
-
Manual seat
Disengage seatback trim fixing retainers .
Open seatback trim fixing fasteners .
Disengage seatback trim fixing retainers .
Disconnect seatback heater harness connector, and then disengage harness fixing clips. (If equipped)
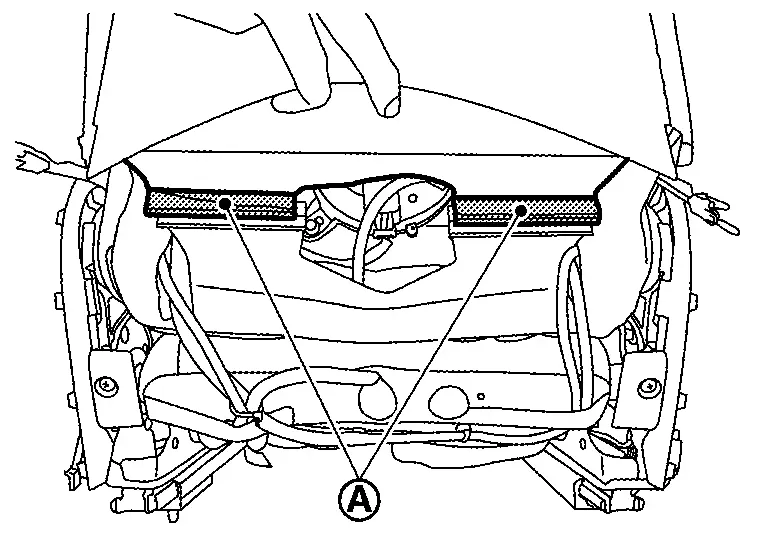
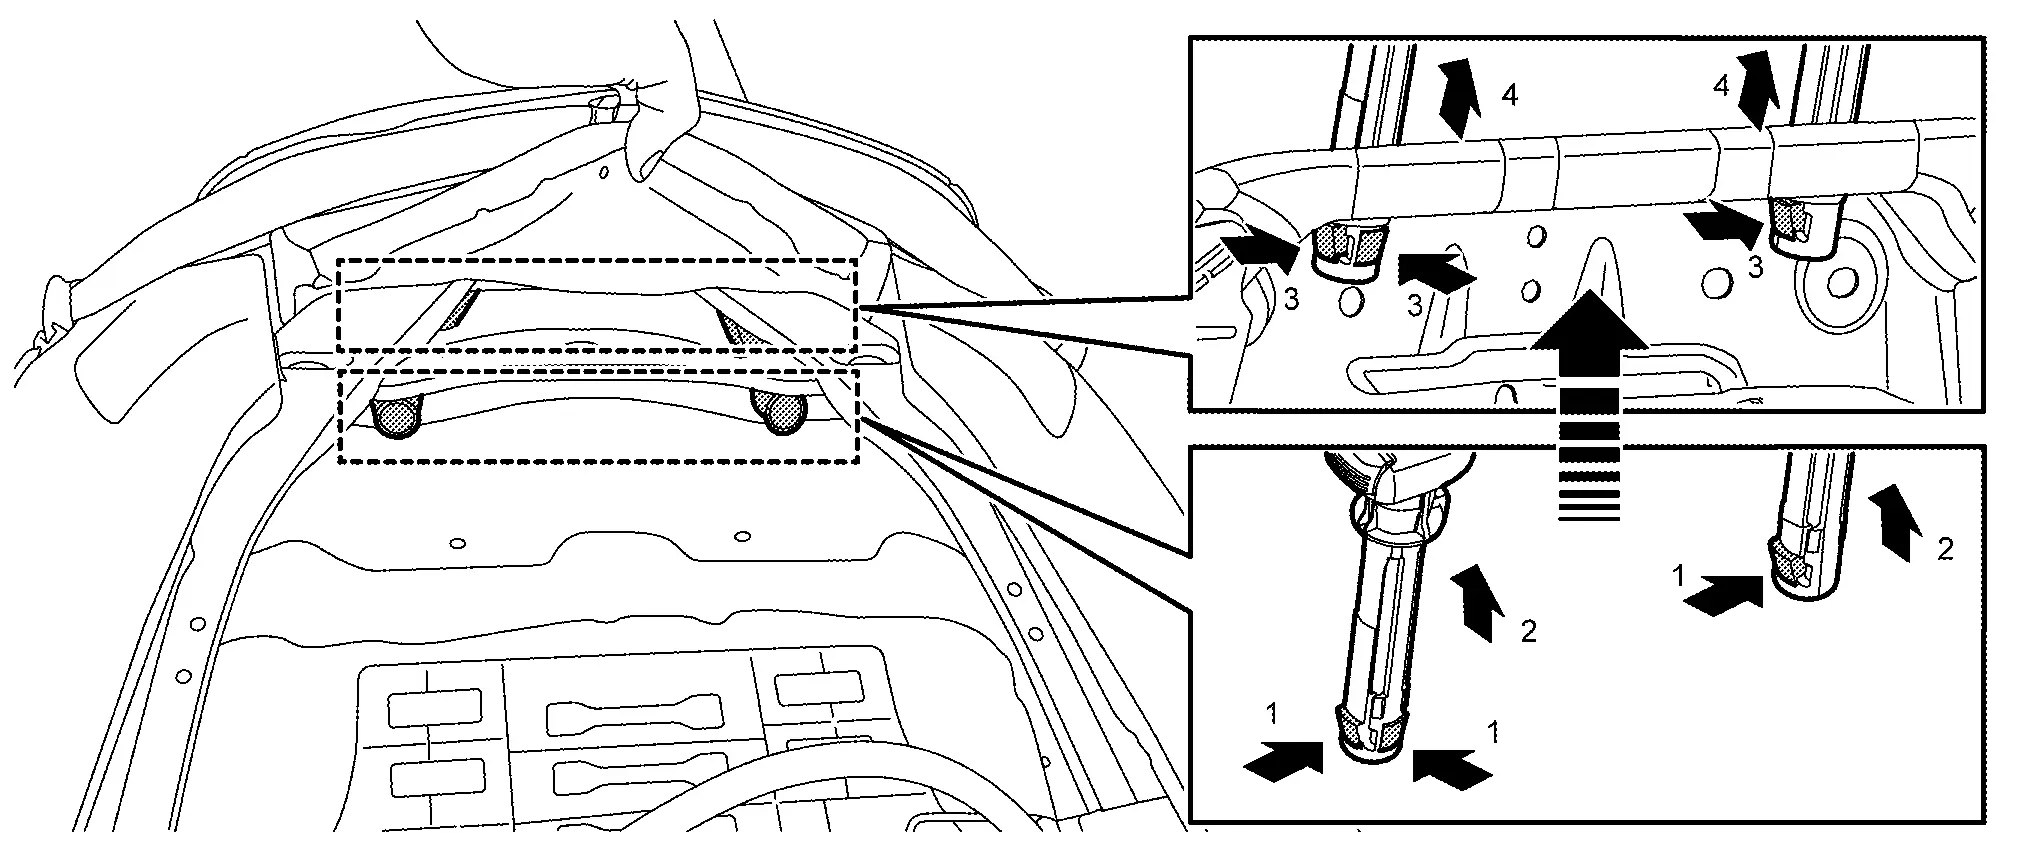
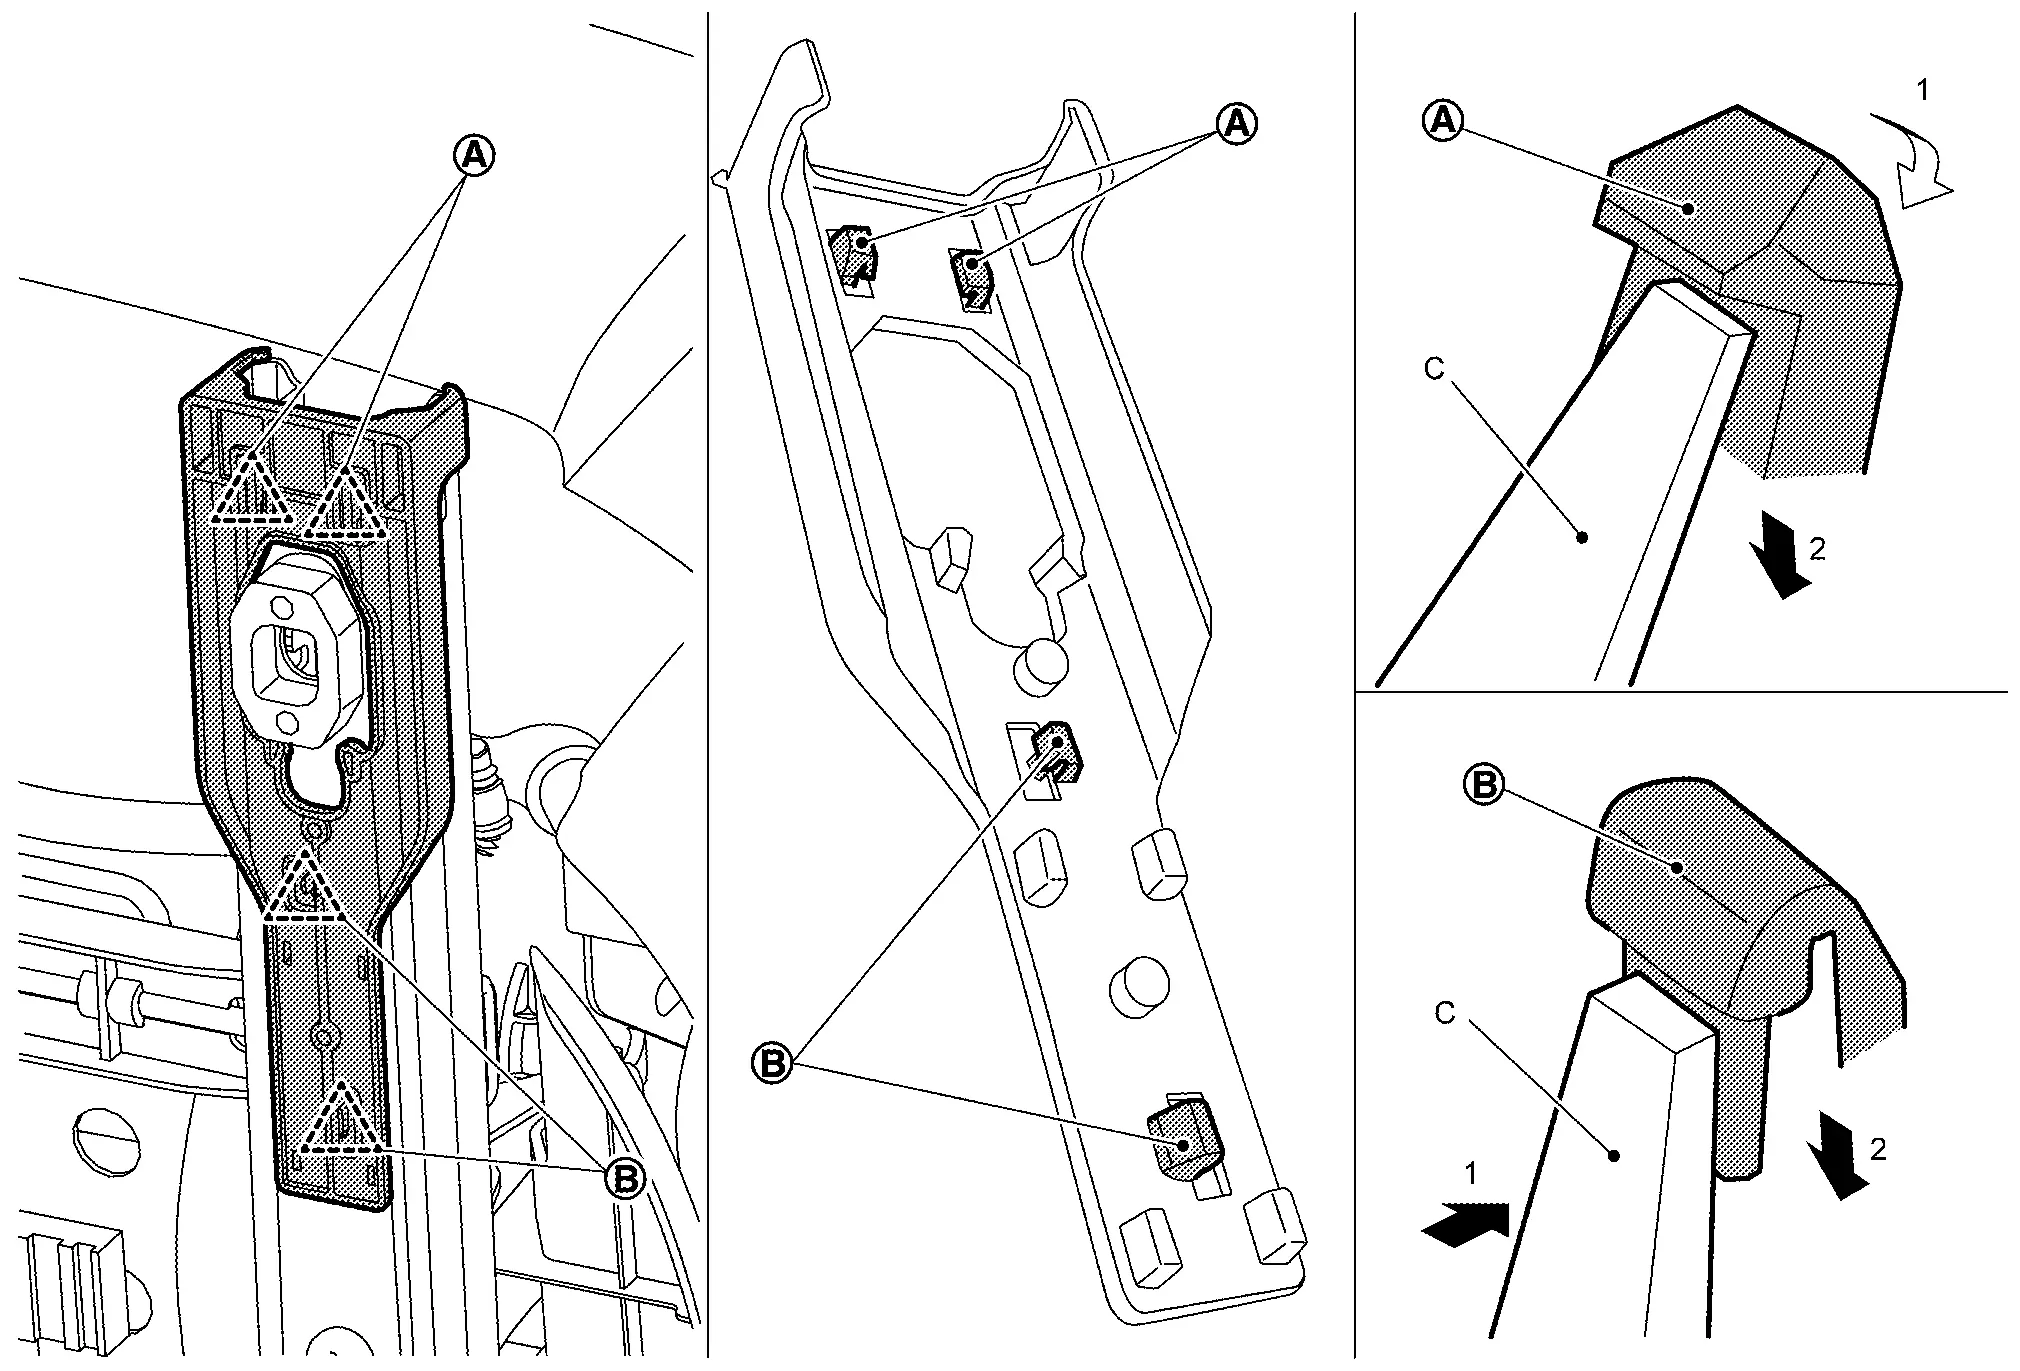
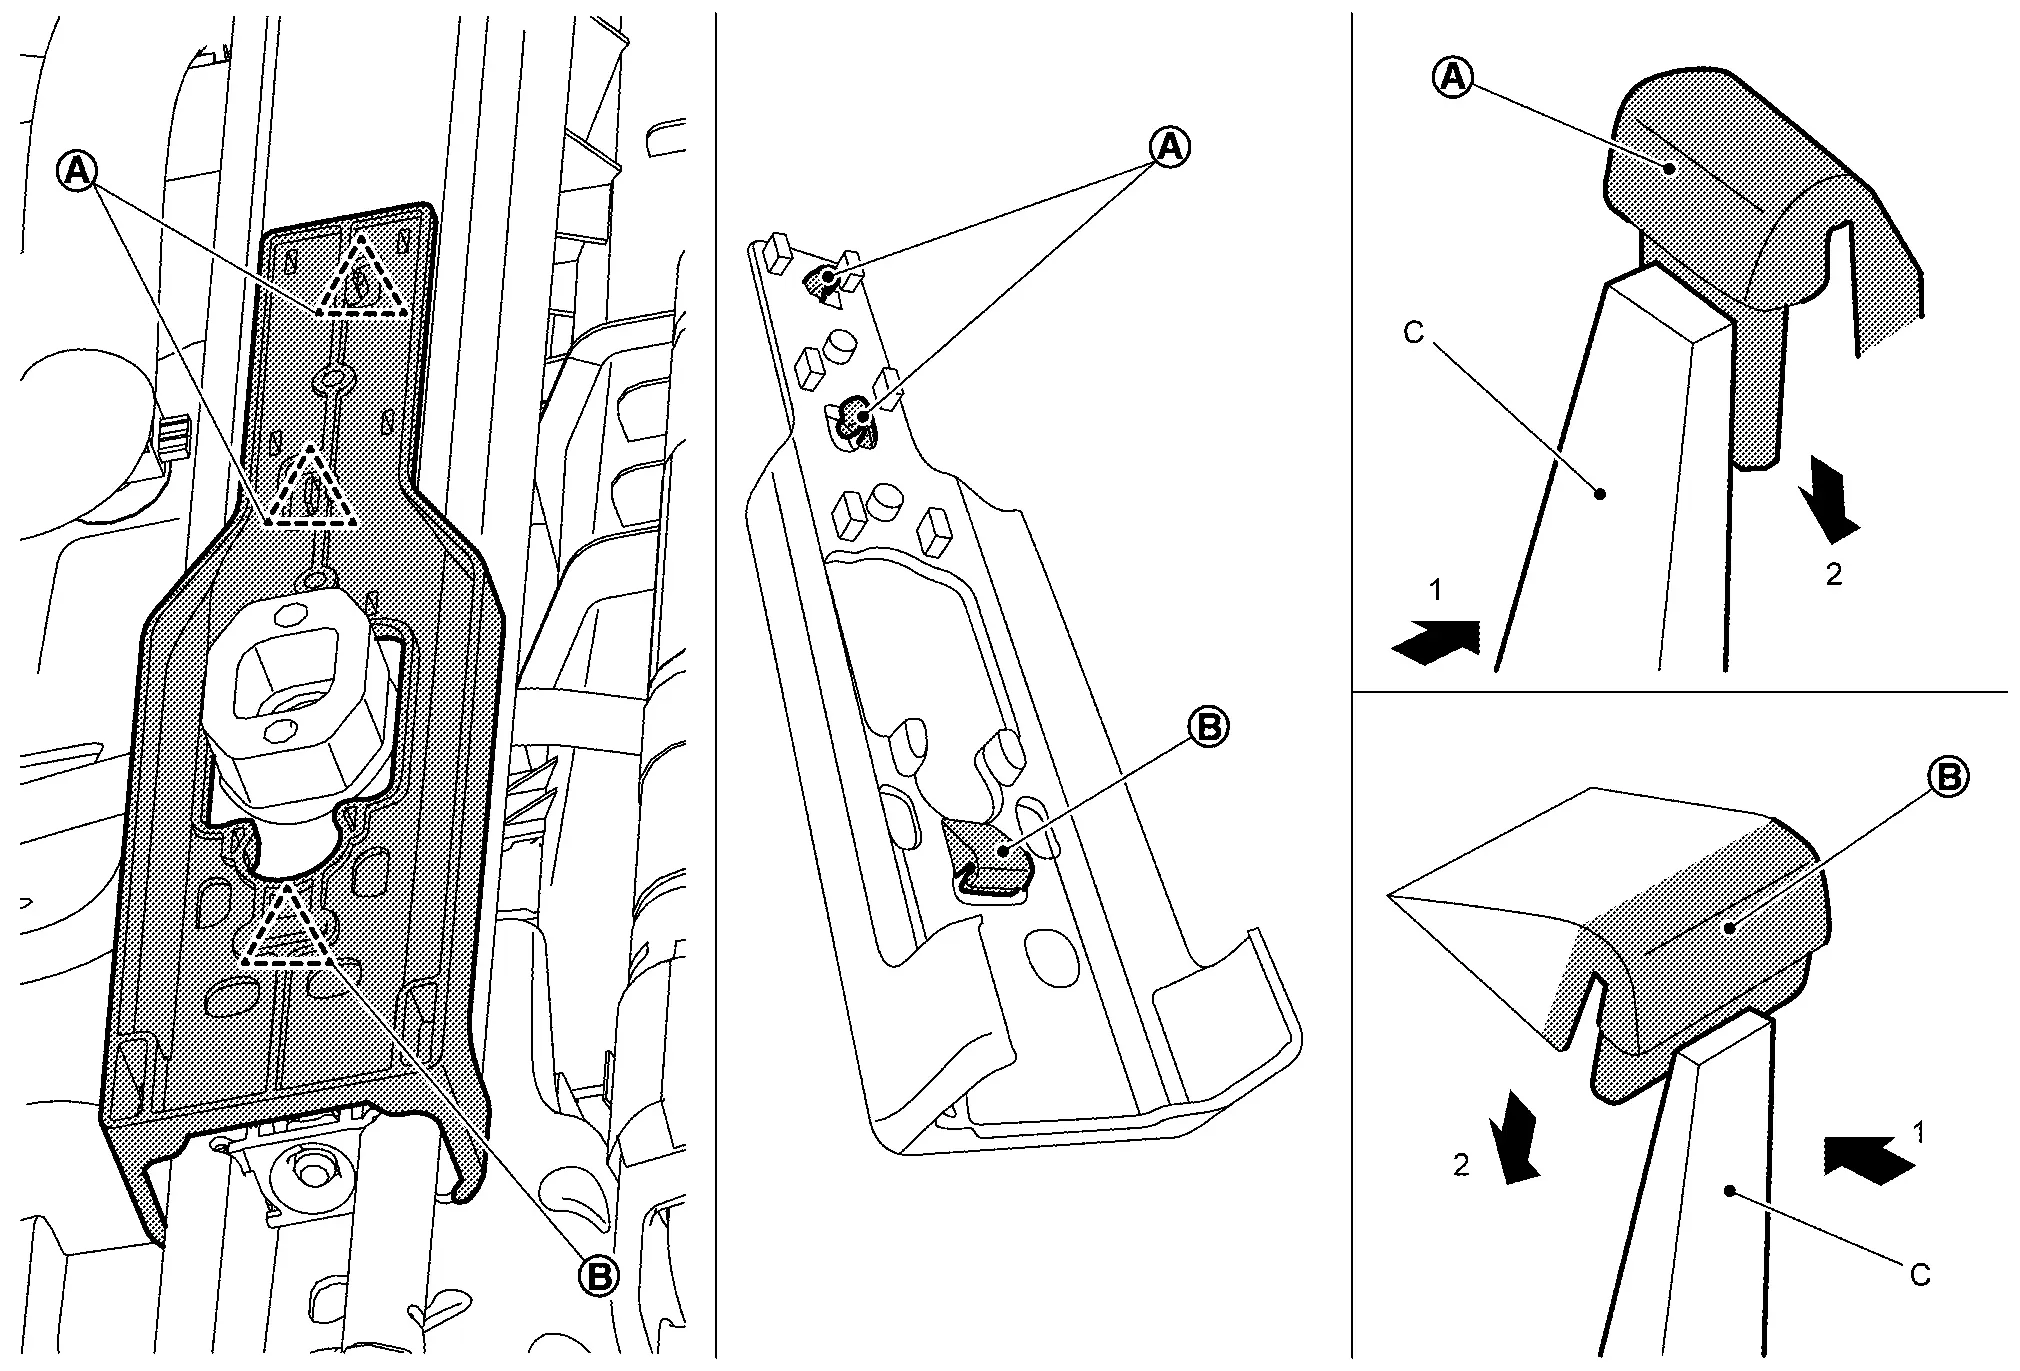
Disengage fixing pawls according to numerical order 1→4 indicated by arrows as shown in figure, and then remove headrest holders.
CAUTION:
Before removing headrest holders, check its orientation because its has install direction (front/rear, left and right).
Remove seatback blower motor. (If equipped) Refer to Removal and Installation.
Remove lumber support unit. (If equipped)Disconnect lumber support unit harness connector, and then disengage harness fixing clips. Disengage fixing clip, and then remove lumber support unit.
Remove seatback suspension. (If equipped)
Disconnect harness connectors of seat frame and seat cushion harness bracket, and then disengage harness fixing clips.
CAUTION:
Before performing disengage/disconnect operation, check the engage, connect position of harness/harness connector locations.
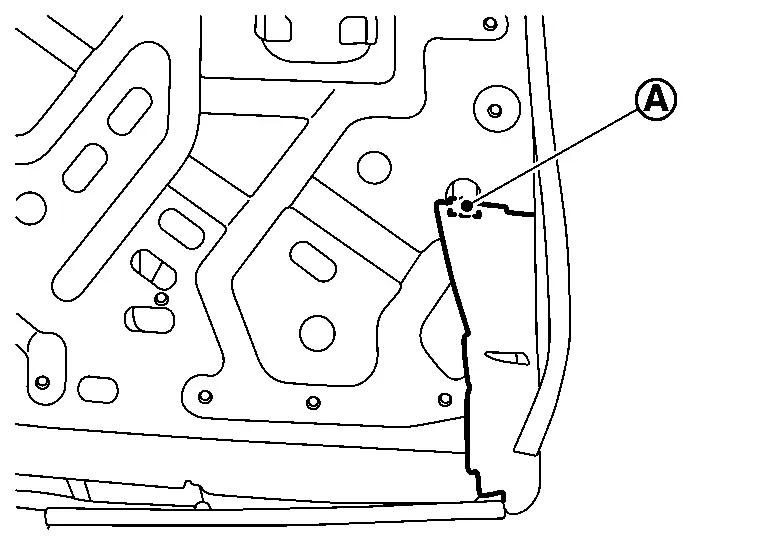
Remove seatback assembly.Remove outside and inside seat cushion finisher inner. Refer to Disassembly & Assembly. Remove mounting bolts, and then remove seatback assembly.
ASSEMBLY
Note the following items, and then assemble in the reverse order of disassembly.
CAUTION:
-
Never reuse mounting bolts of seatback assembly and seat cushion frame connecting. After removing, always replace new bolts.
-
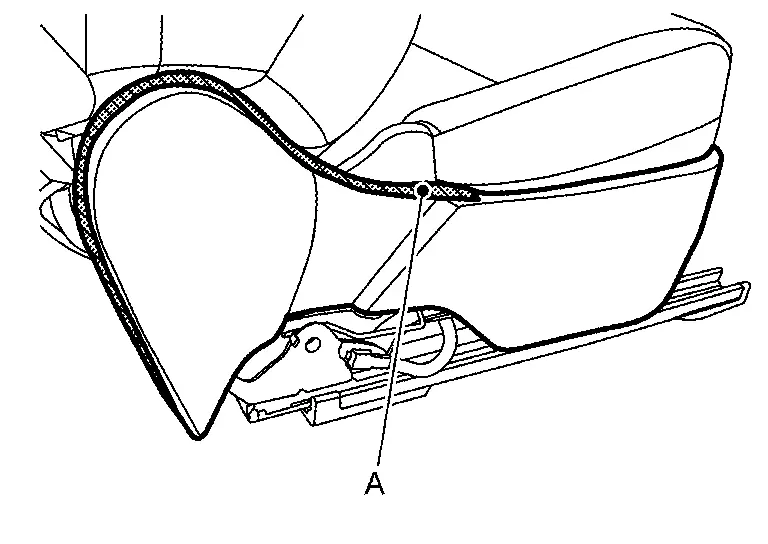
When installing seatback assembly, make sure that seatback assembly angle (A) is tilted backward to 80° or more.
Headrest holder Center of installing hole for headrest Mounting bolt of seatback assembly -
When installing headrest holders, be careful to orientation install direction (front/rear, left and right).
-
Be installed harnesses and harness fixing clips in position.
-
If harnesses clip be broken, replace with new clip and it install in position where marked before removing clip.
Front Seat Cushion Nissan Ariya first Gen
Disassembly & Assembly
CAUTION:
When disassembly, use the remover tool made by plastic.
DISASSEMBLY
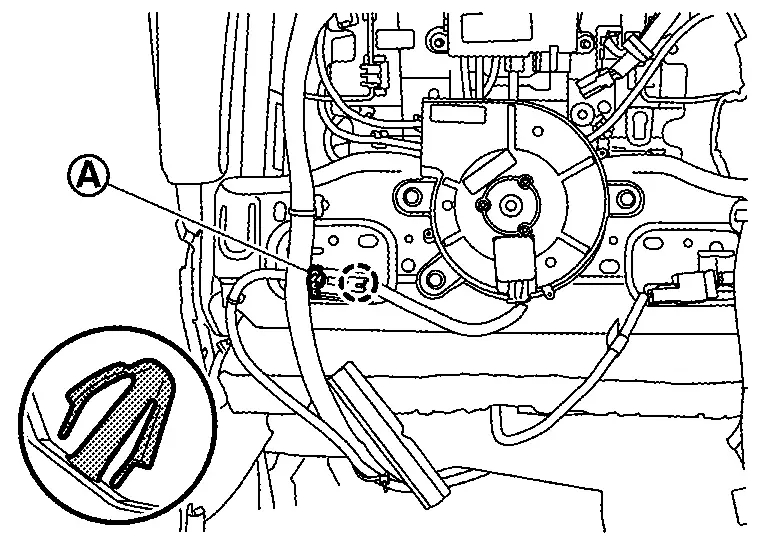
Remove fixing screws, and then remove occupant detection system control unit. (If equipped)
Remove outside and inside seat cushion finisher outer. Refer to Disassembly & Assembly.
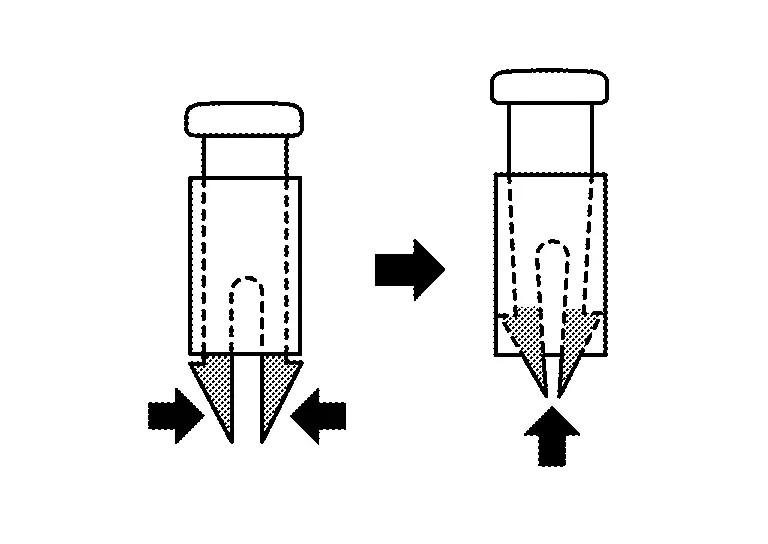
Disconnect lap pre-tensioner harness connector .
CAUTION:
-
For installing/removing lap pre-tensioner harness connector, insert thin screwdriver wrapped in tape into notch, lift lock and remove connector.

-
Install connector with lock raised, and push lock into connector.
-
After installing the connector, check that the lock is pushed securely into it.
Disengage seatback trim fixing retainer .
-
Power seat
-
Manual seat
Disengage seatback trim fixing retainers .
Open seatback trim fixing fasteners .
Disengage seatback trim fixing retainers .
Disconnect harness connectors of seat frame and seat cushion harness bracket, and then disengage harness fixing clips.
CAUTION:
Before performing disengage/disconnect operation, check the engage, connect position of harness/harness connector locations.
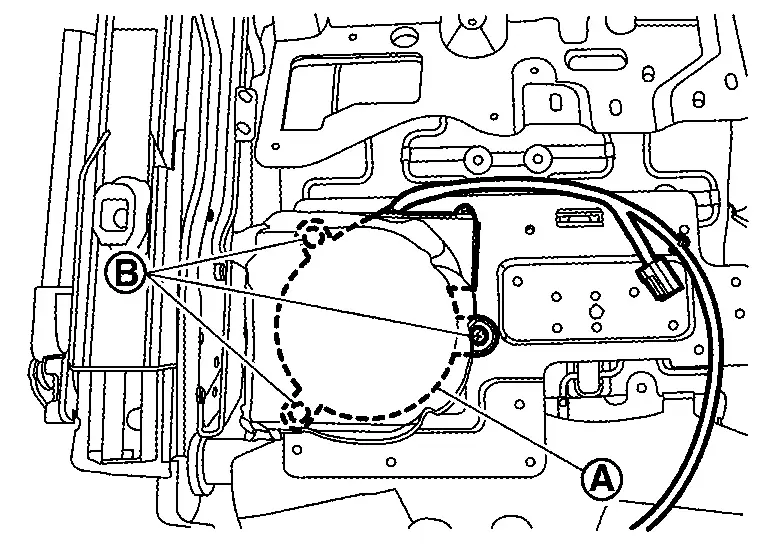
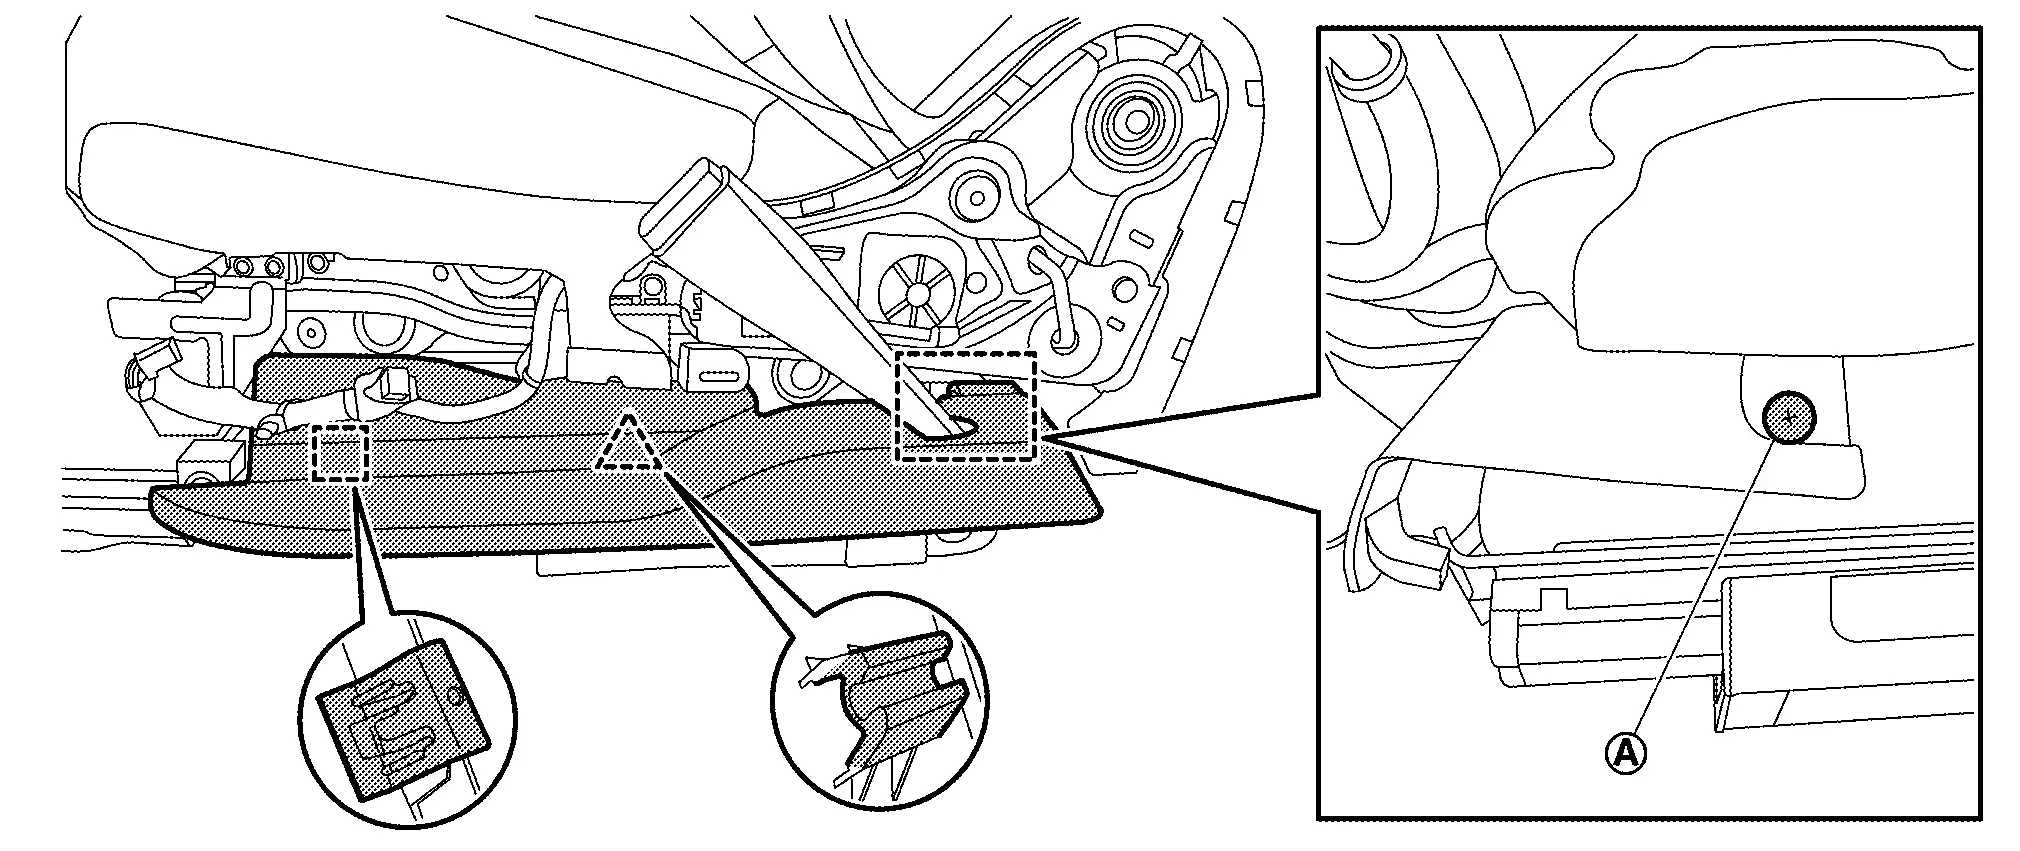
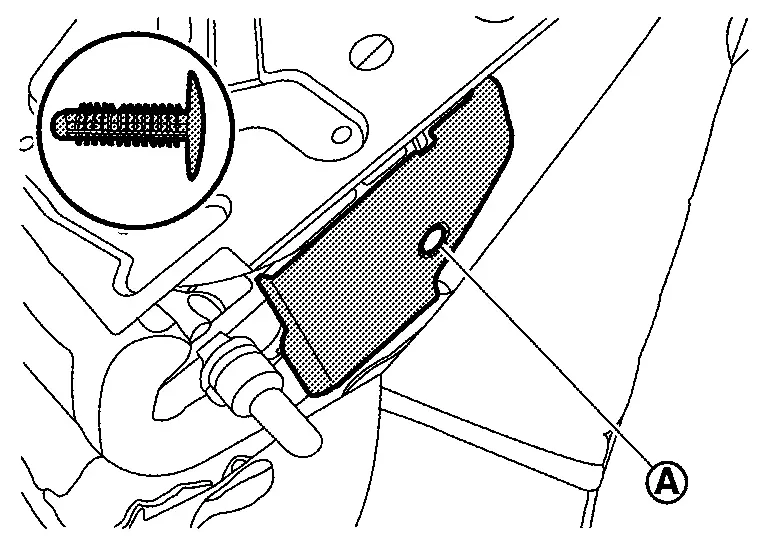
Remove seat cushion blower motor fixing screws . (If equipped)
Disengage fixing pawls according to numerical order 1→3 indicated by arrows as shown in figure, and then remove seat cushion harness bracket.
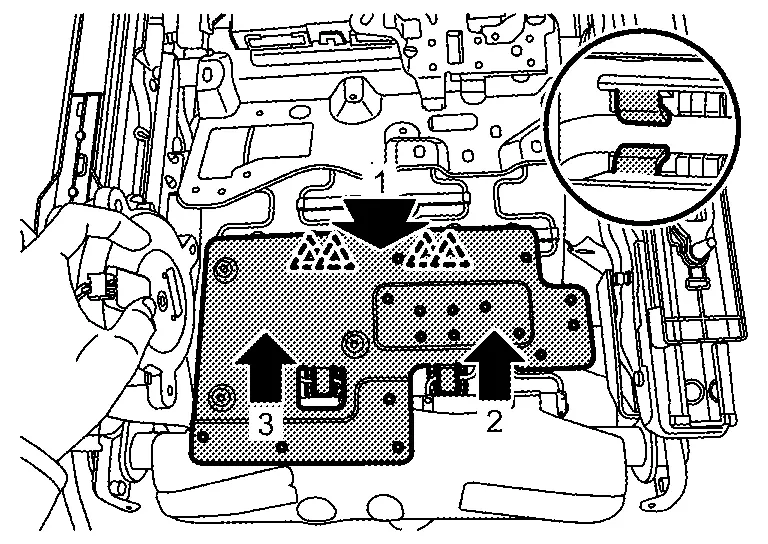
|
: Pawl |
Disengage seat cushion trim fixing retainers .
Disengage seat cushion trim fixing retainers .
Remove seat cushion trim and pad as a set from seat cushion frame.
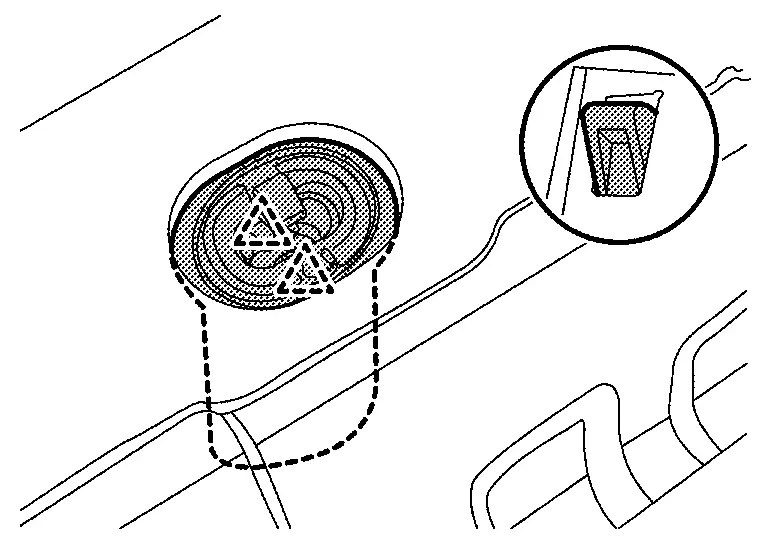
Remove hog rings, and then separate seat cushion trim and pad.
CAUTION:
-
Never disassemble seat cushion heater from seat cushion pad . (If equipped)
-
Never disassemble seat cushion bellows
and seat cushion blower motor from seat cushion pad . (If equipped)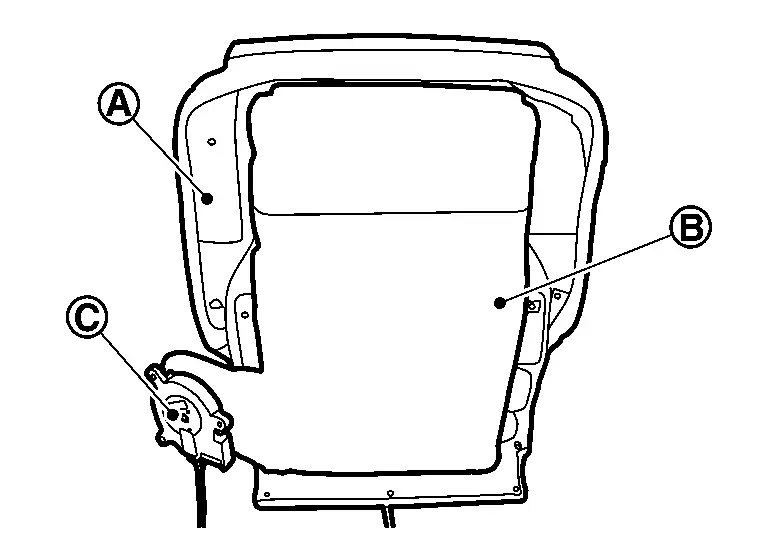
-
Before removing hog rings, check its position because its should be install in position.
Remove seat cushion suspension.
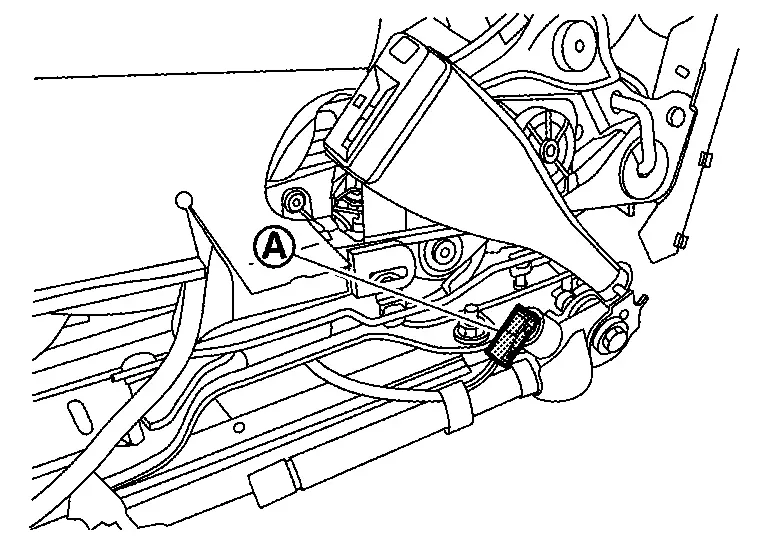
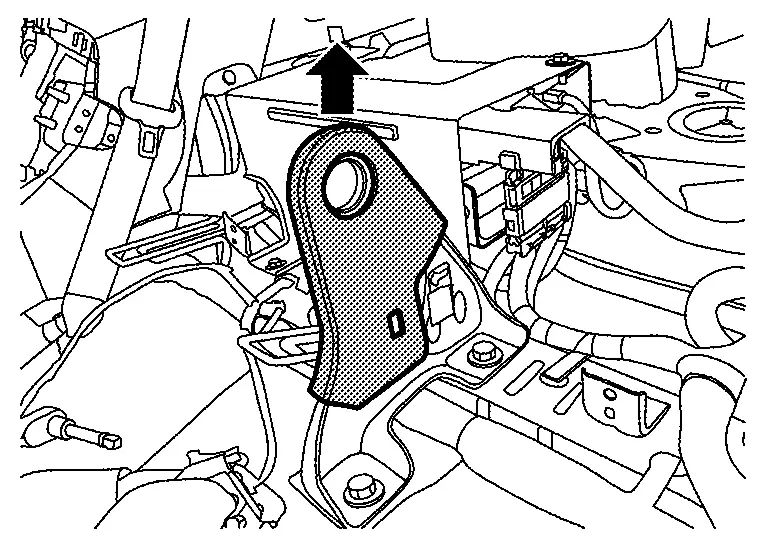
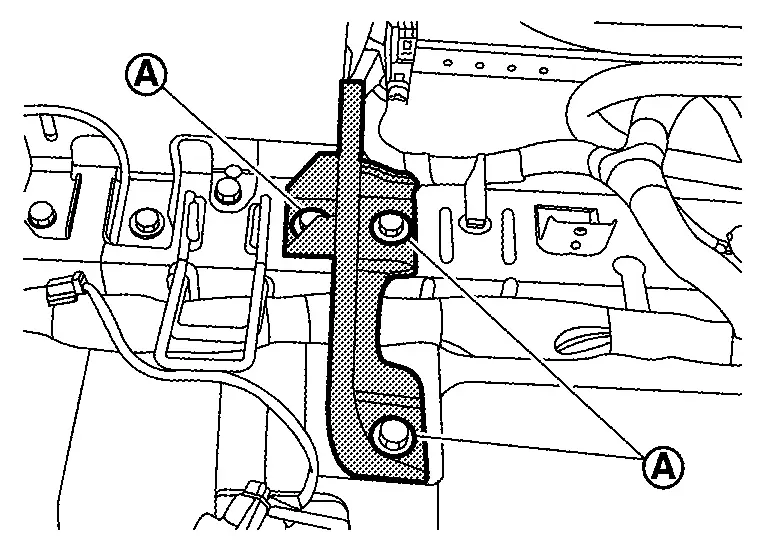
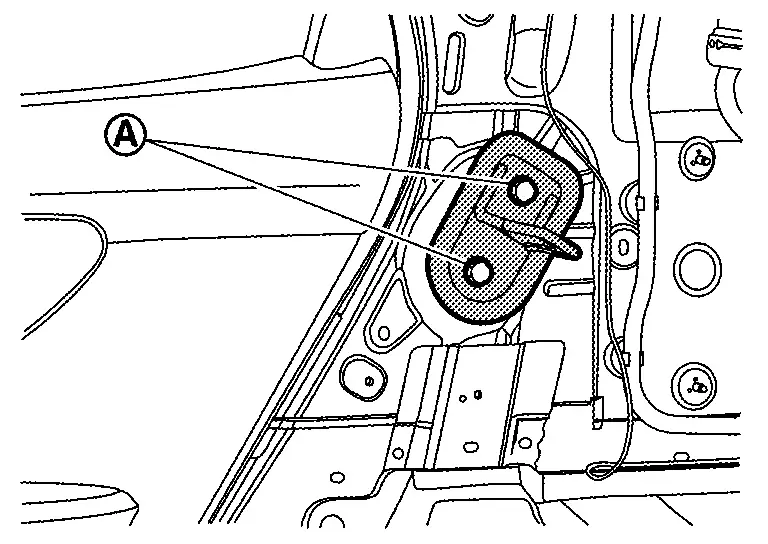
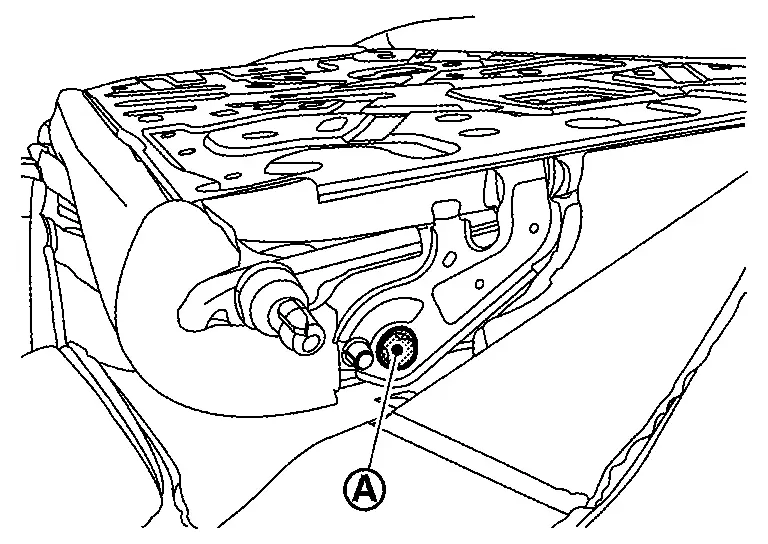
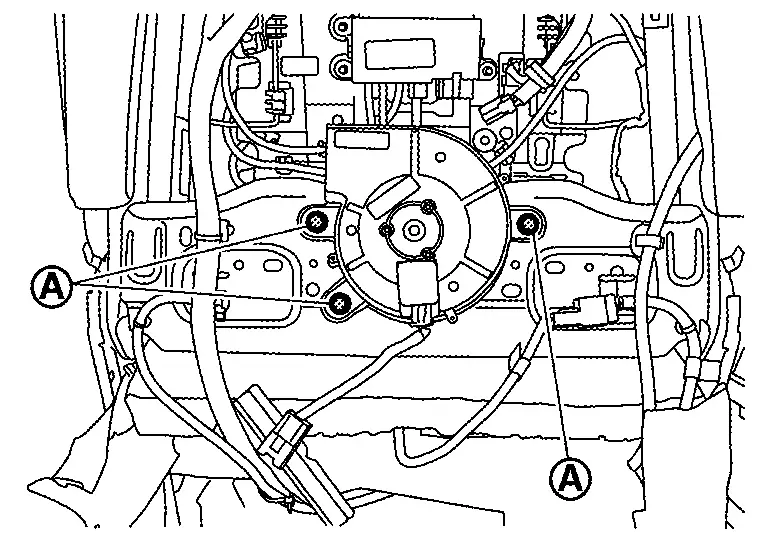
Remove driver seat control unit. Refer to Removal and Installation.
Remove passenger seat control unit. (If equipped) Refer to Removal and Installation.
Remove seatback assembly. Refer to Disassembly & Assembly.
ASSEMBLY
Note the following items, and then assemble in the reverse order of disassembly.
CAUTION:
-
If occupant detection system control unit of passenger seat is replaced, perform the Zero-point reset operations. Refer to Work Procedure.
-
If seat cushion frame is replaced, perform the Zero-point reset operations. Refer to Work Procedure.
-
Always install the hog ring in position.
-
Never reuse hog ring after disassembly, using a new hog ring.
-
Use the new hog ring if crimped unsuccessfully.
-
Be installed harnesses and harness fixing clips in position.
-
If harnesses clip be broken, replace with new clip and it install in position where marked before removing clip.
Front Seat Cushion Finisher Nissan Ariya
Disassembly & Assembly
CAUTION:
When disassembly, use the remover tool made by plastic.
OUTSIDE SEAT CUSHION FINISHER OUTER / LOWER
DISASSEMBLY (Power seat)
Apply protect tape (A) to prevent damage.
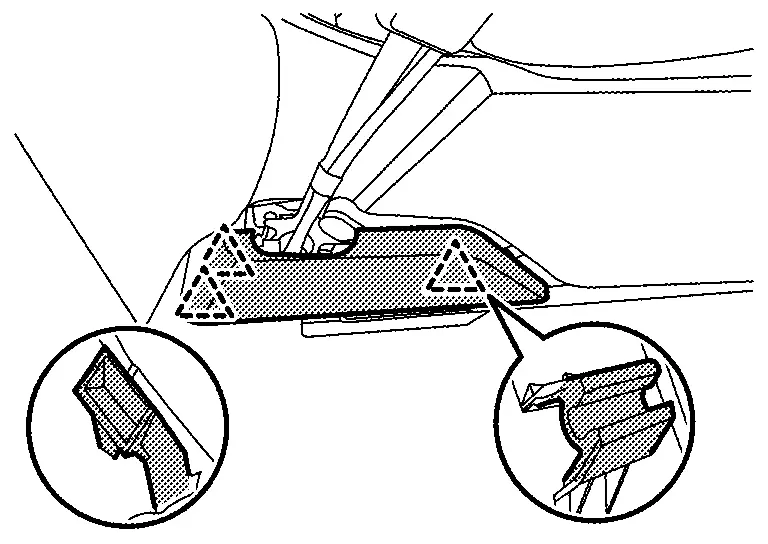
Disengage outside seat cushion finisher outer fixing clip, pawls and metal clip using a remover tool (A).
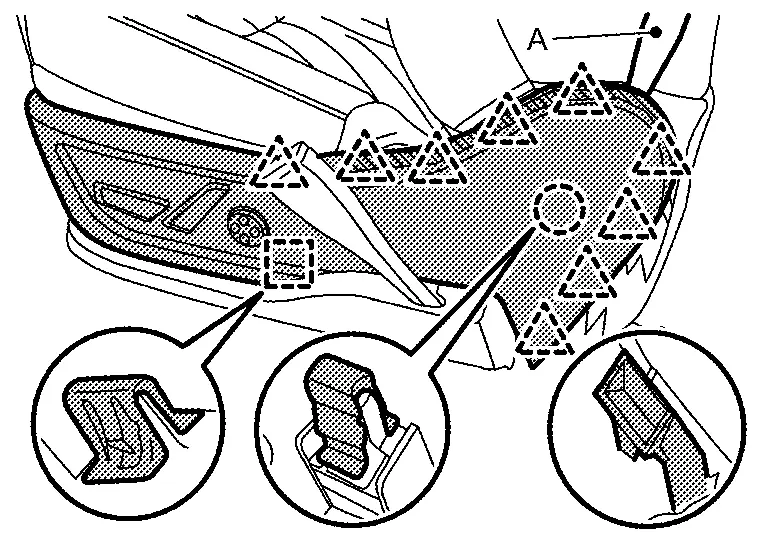
|
: Clip |
|
: Pawl |
|
: Metal clip |
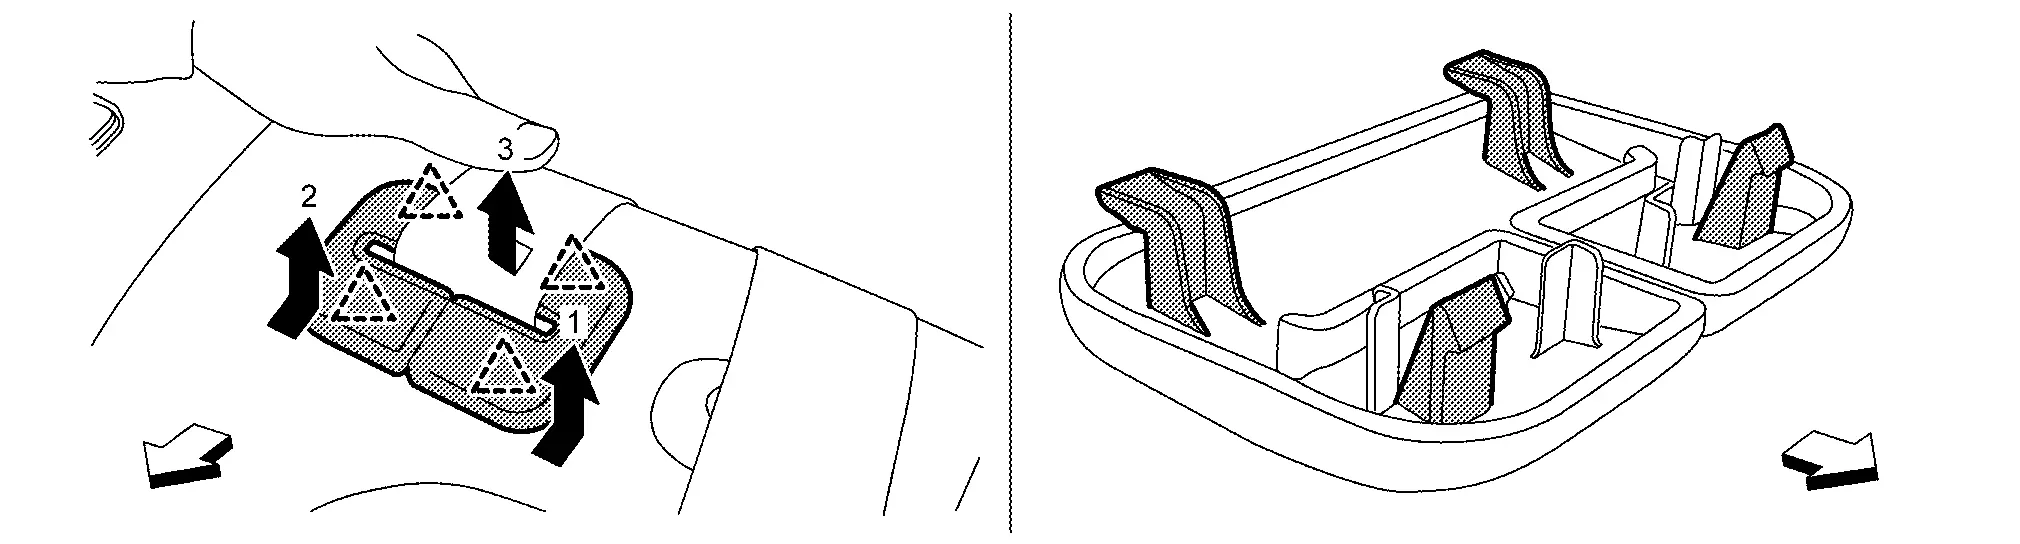
Pull out fixing hook portion according to numerical order 1→2 indicated by arrows as shown in figure, and then remove outside seat cushion finisher outer.
Disconnect harness connectors of outside seat cushion finisher outer, and then disengage harness fixing clips.
Disengage outside seat cushion finisher lower fixing pawl and metal clip, and then remove fixing screw .
|
: Pawl |
|
: Metal clip |
Remove outside seat cushion finisher lower according to numerical order 1→2 indicated by arrows as shown in figure.
DISASSEMBLY (Manual seat)
Remove lifter knob while pulling portion according to numerical order 1→2 indicated by arrows as shown in figure.
Remove mounting bolt , and then remove reclining knob.
Remove outside seat cushion finisher outer fixing screw .
Apply protect tape (A) to prevent damage.
Disengage outside seat cushion finisher outer fixing clip, pawls and metal clip using a remover tool (A).
|
: Clip |
|
: Pawl |
|
: Metal clip |
Pull out fixing hook portion according to numerical order 1→2 indicated by arrows as shown in figure, and then remove outside seat cushion finisher outer.
Disengage outside seat cushion finisher lower fixing pawl and metal clip, and then remove fixing screw .
|
: Pawl |
|
: Metal clip |
Remove outside seat cushion finisher lower according to numerical order 1→2 indicated by arrows as shown in figure.
ASSEMBLY
Assemble in the reverse order of disassembly.
INSIDE SEAT CUSHION FINISHER OUTER / LOWER OUTER / LOWER INNER
DISASSEMBLY
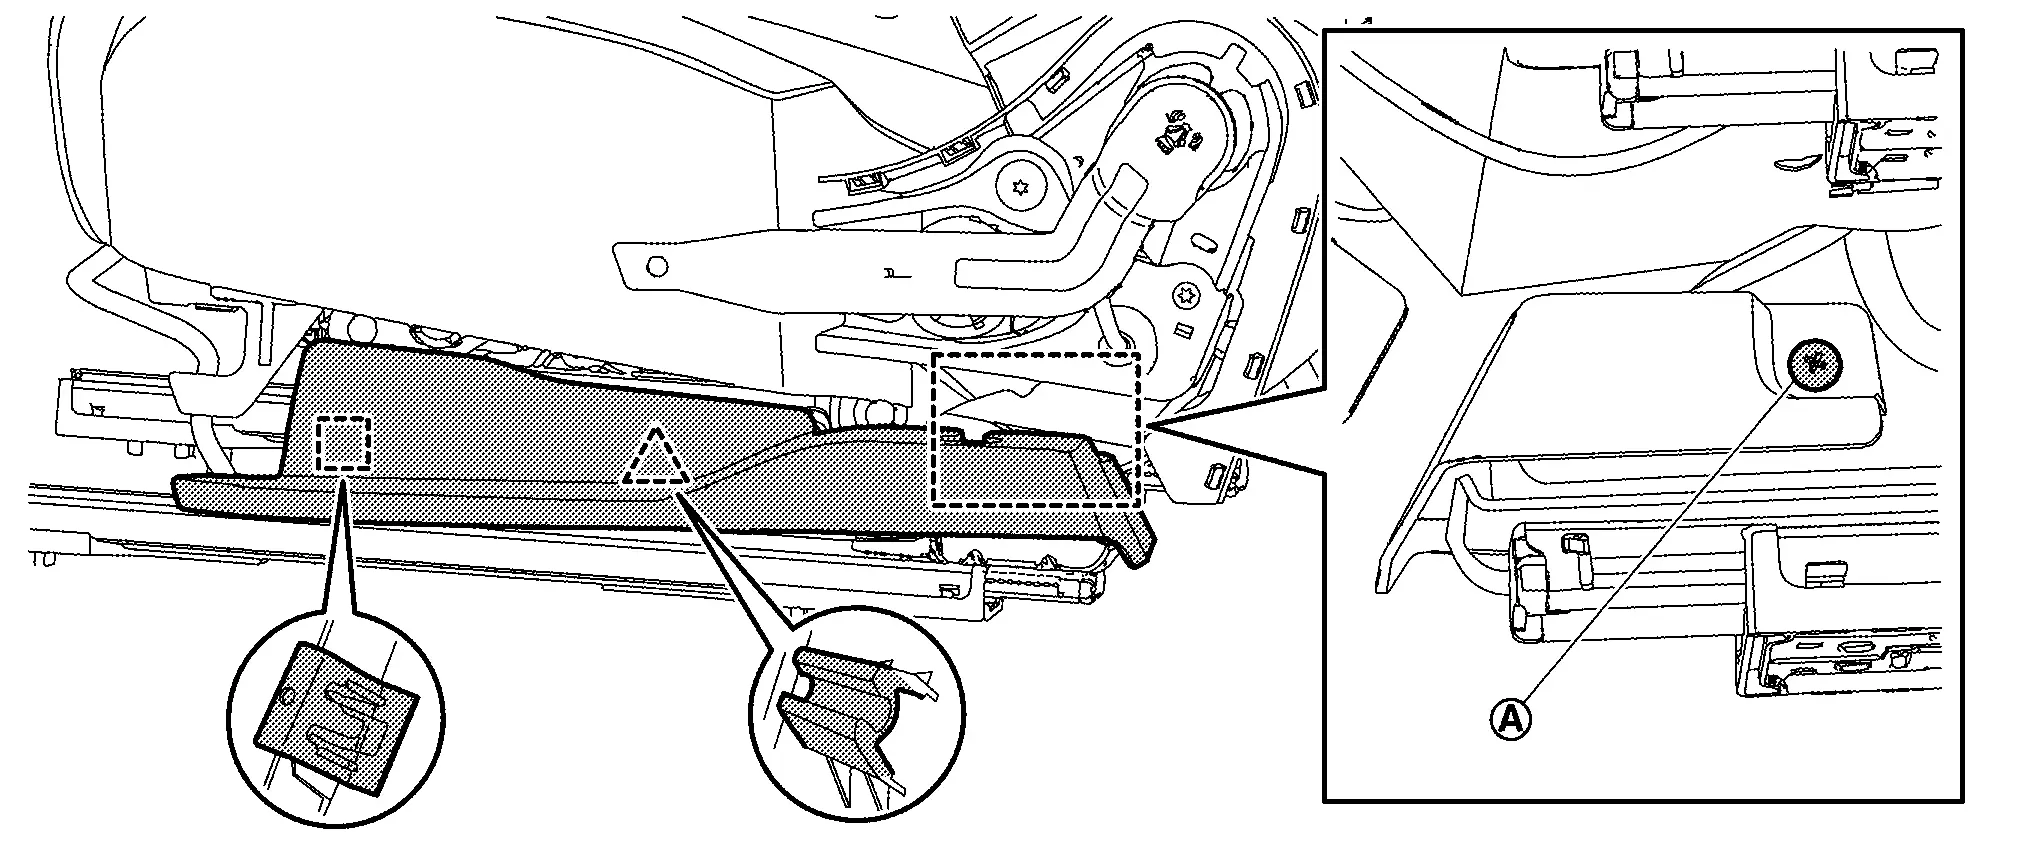
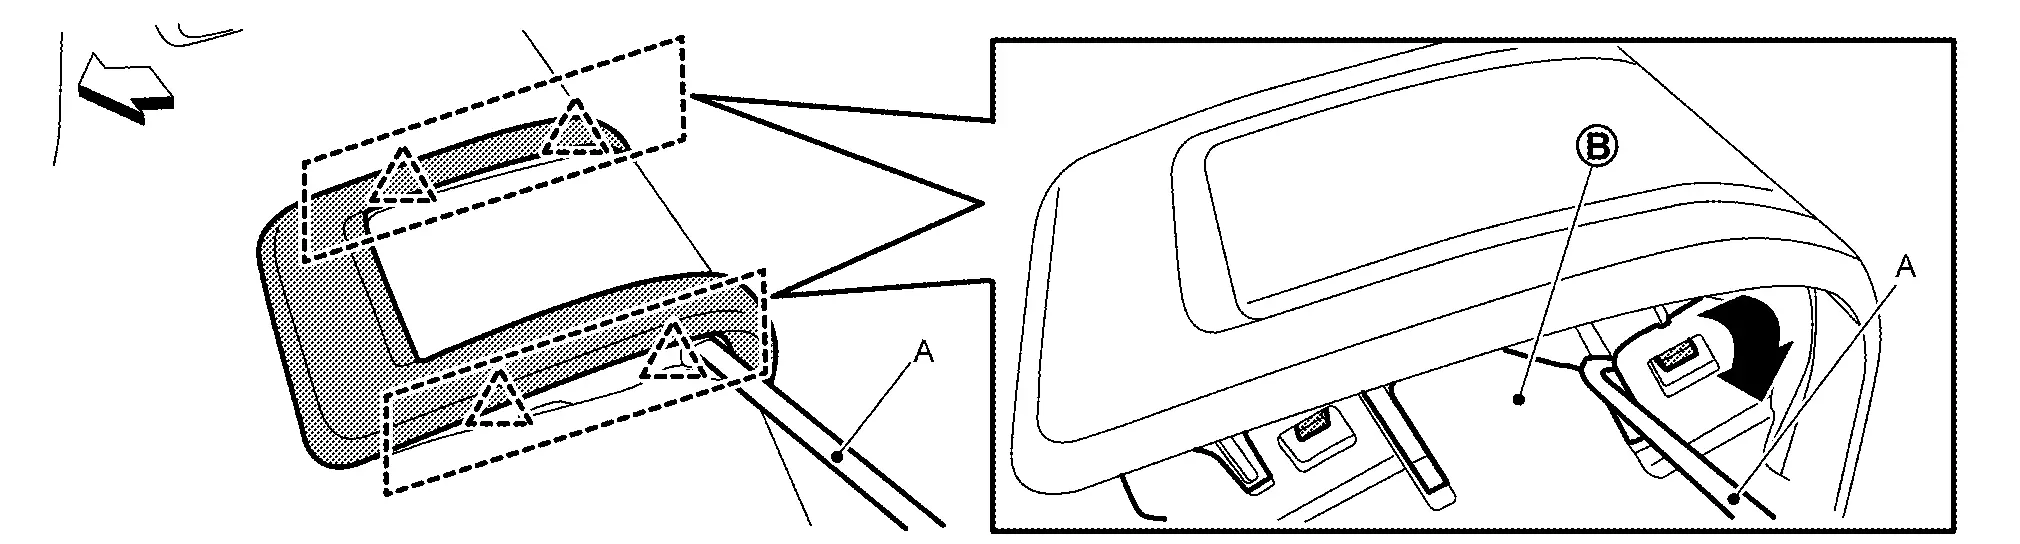
Disengage fixing pawls, and then remove inside seat cushion finisher lower outer.
|
: Pawl |
Disengage harness fixing clip of inside seat cushion finisher lower outer, and then disconnect harness connector.
Remove fixing screw , and then remove inside seat cushion finisher lower inner.

Remove front seat belt buckle. Refer to Removal & Installation.
Apply protect tape (A) to prevent damage.
Disengage inside seat cushion finisher outer fixing clip, pawls and metal clip using a remover tool (A).
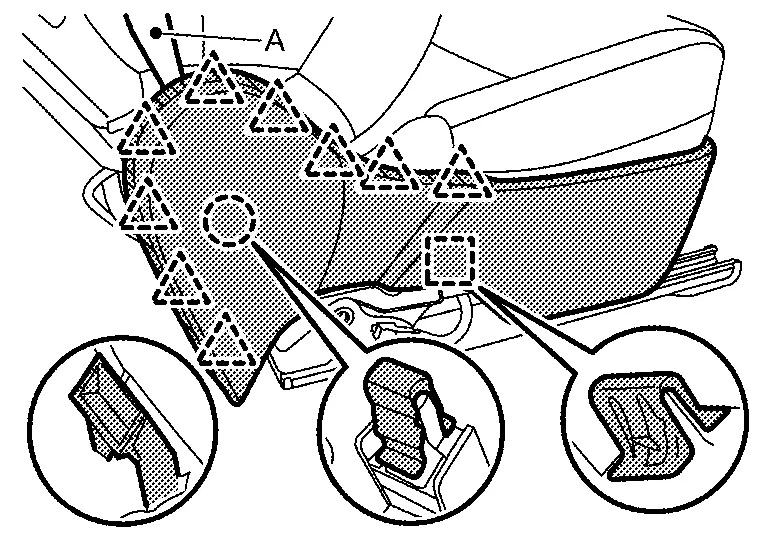
|
: Clip |
|
: Pawl |
|
: Metal clip |
Pull out fixing hook portion according to numerical order 1→2 indicated by arrows as shown in figure, and then remove inside seat cushion finisher outer.
ASSEMBLY
Assemble in the reverse order of disassembly.
INSIDE / OUTSIDE SEAT CUSHION FINISHER INNER
DISASSEMBLY
Remove seat cushion trim and pad. Refer to Disassembly & Assembly.
Remove fixing screw, and then remove inside and outside seat cushion finisher inner.
ASSEMBLY
Assemble in the reverse order of disassembly.
SEAT CUSHION LOWER END CAP INNER / OUTER
DISASSEMBLY
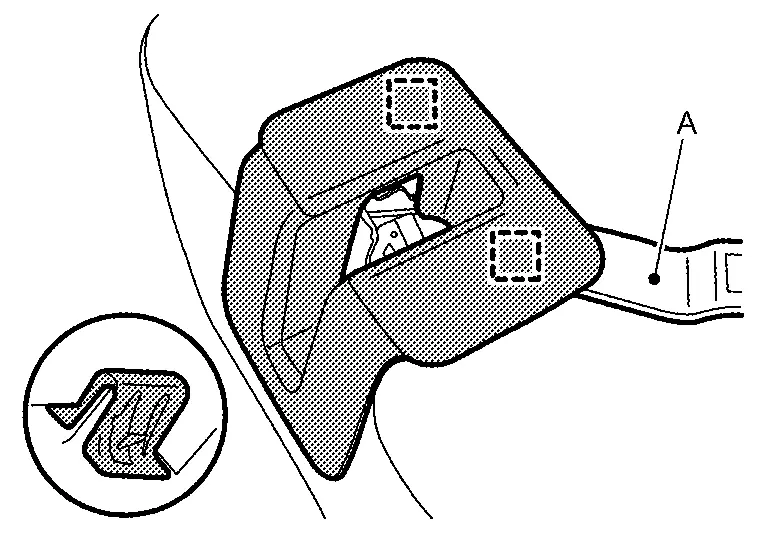
Disengage fixing pawls and using a remover tool (C) according to numerical order 1→2 indicated by arrows as shown in figure, and then remove seat cushion lower end cap.
-
Front side
: Pawl -
Rear side
: Pawl
ASSEMBLY
Assemble in the reverse order of disassembly.
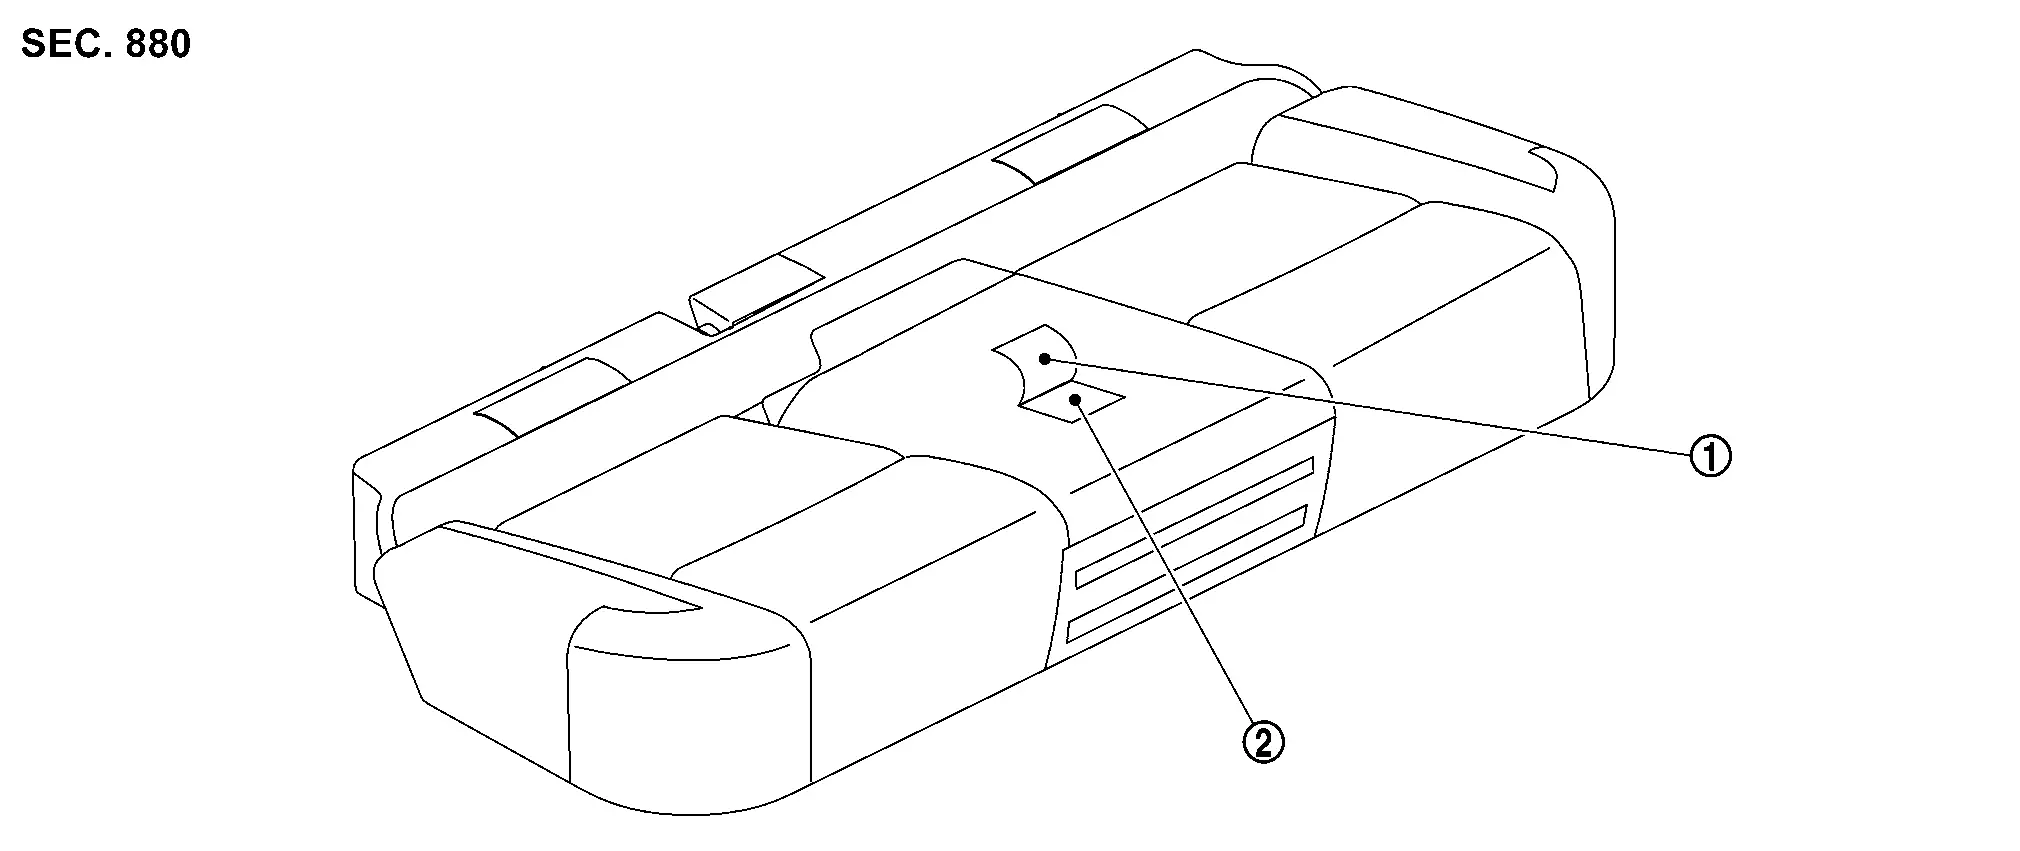
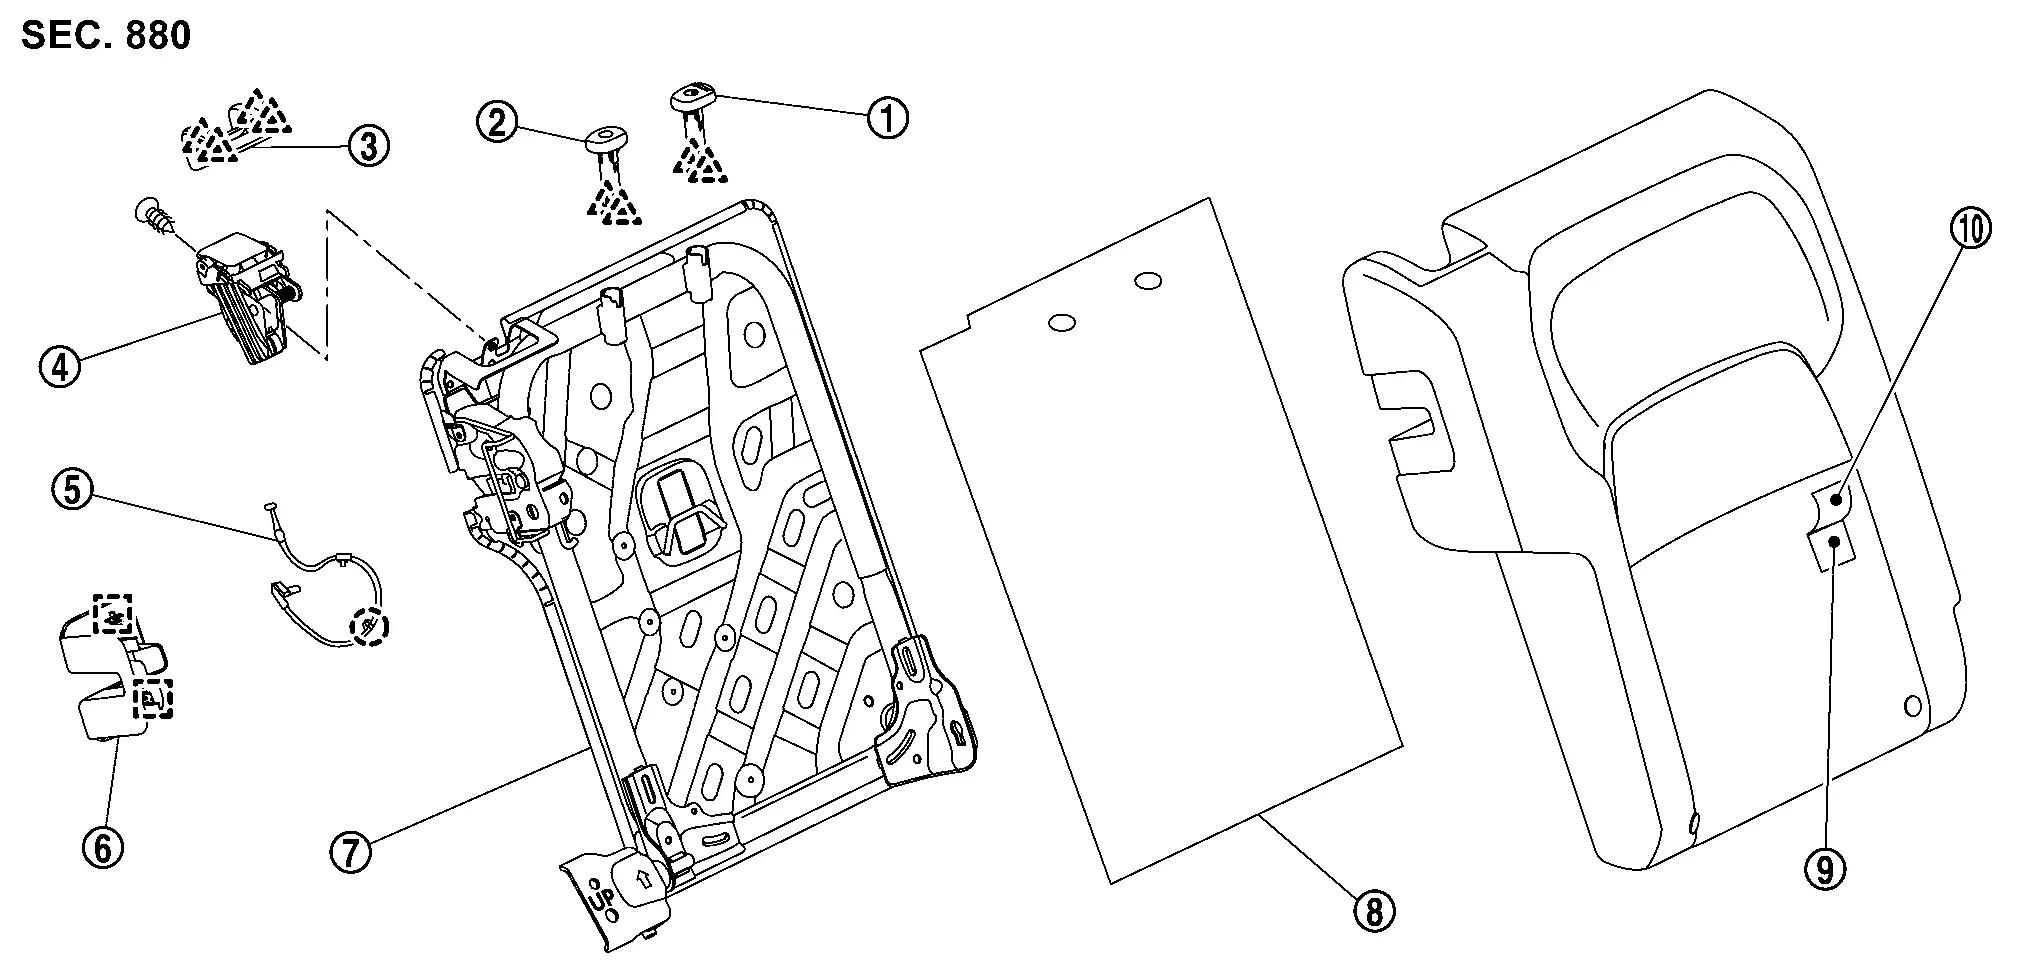
Rear Seat Nissan Ariya 2026
Exploded View
REMOVAL
|
Headrest LH | |
Center headrest | |
Seatback assembly LH |
|
Headrest RH | |
Seatback assembly RH | |
Seatback striker RH |
|
Seatback bolster RH | |
Center hinge | |
Seat cushion assembly |
|
Seat cushion hook | |
Seatback bolster LH | |
Seatback striker LH |
|
Center hinge cover | ||||
|
: Pawl | ||||
|
: Always replace after every disassembly. | ||||
|
: N·m (kg-m, ft-lb) | ||||
DISASSEMBLY
Seat cushion
|
Seat cushion trim | |
Seat cushion pad |
Seatback RH
|
Headrest holder (lock) | |
Headrest holder (free) | |
Seatback lock knob escutcheon |
|
Seatback lock knob | |
Knob cable | |
Seatback lock cover |
|
Seatback frame | |
Seatback silencer | |
Seatback pad |
|
Seatback trim | ||||
|
: Clip | ||||
|
: Pawl | ||||
|
: Metal clip | ||||
Seatback LH

|
Seatback lock cover | |
Knob cable | |
Seatback lock knob escutcheon |
|
Seatback lock knob | |
Headrest holder (lock) | |
Headrest holder (free) |
|
Center seat belt finisher | |
Seatback frame | |
Armrest hinge cover* |
|
Armrest bush* | |
Armrest assembly* | |
Armrest hinge bush* |
|
Seatback pad | |
Seatback trim | |
Seatback silencer |
|
: Clip | ||||
|
: Pawl | ||||
|
: Metal clip | ||||
|
: N·m (kg-m, ft-lb) | ||||
| , : Indicates that the part is connected at points with same symbol in actual Nissan Ariya vehicle. |
|||||
*: With armrest
Removal & Installation
CAUTION:
When removing and installing, use shop cloths to protect parts from damage.
REMOVAL
CAUTION:
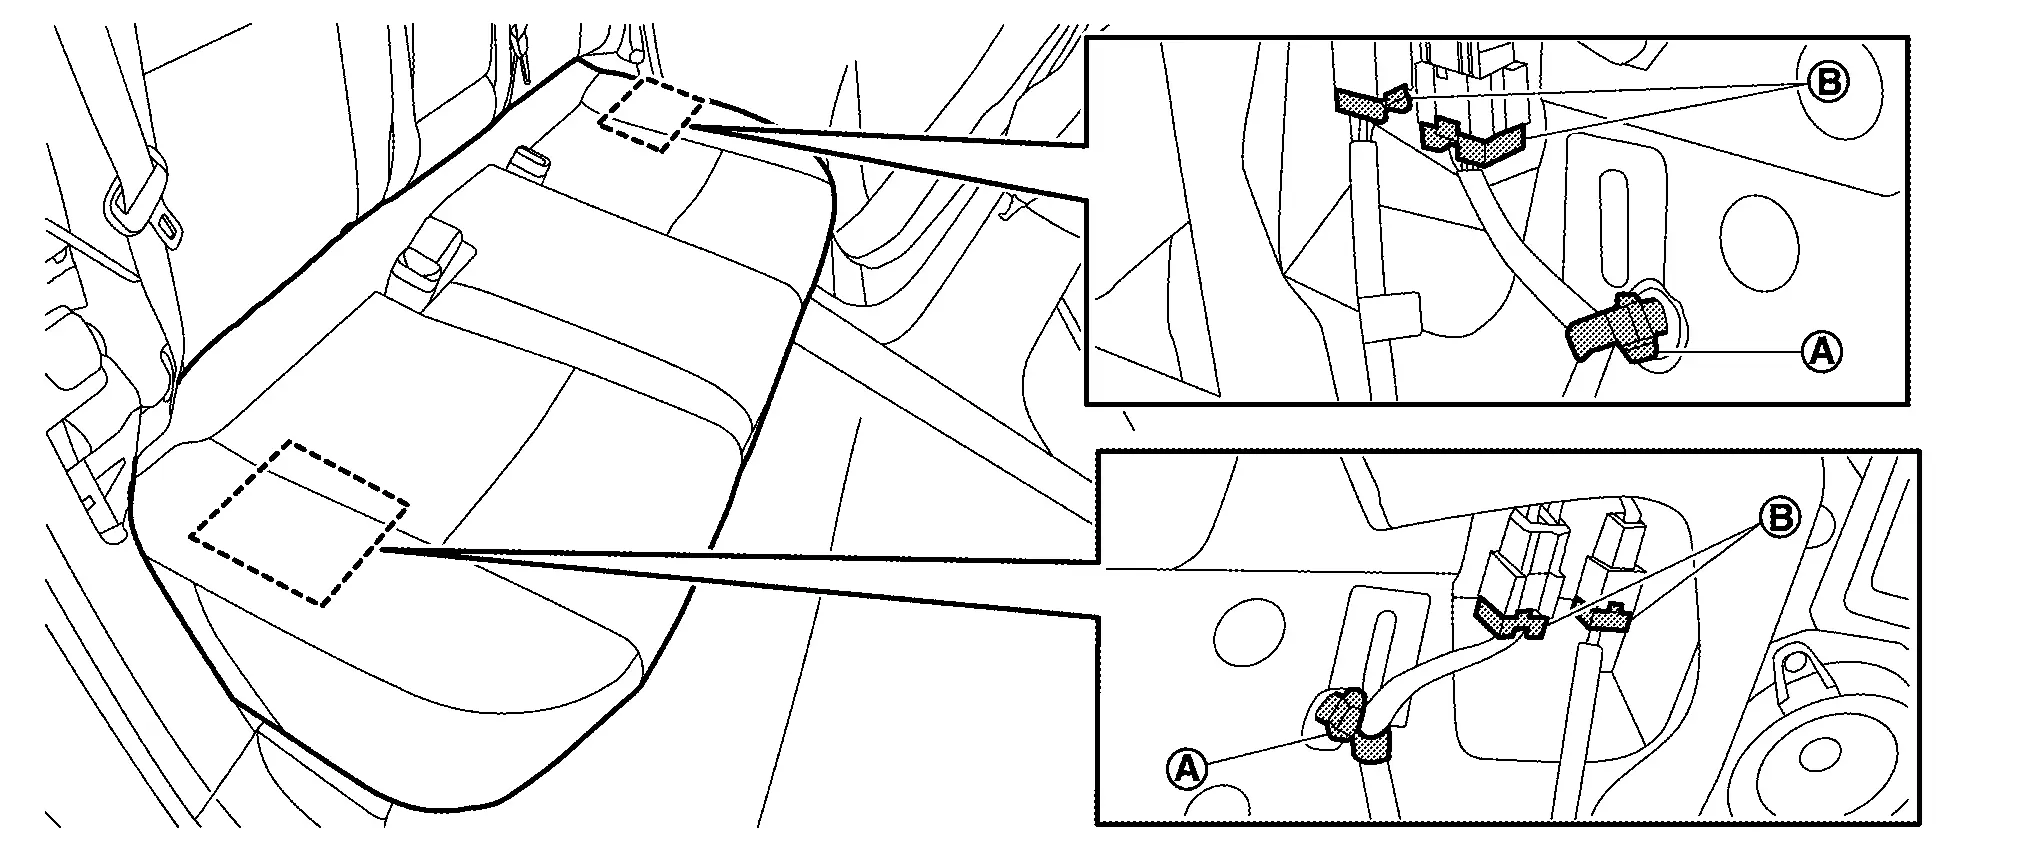
Never damage to harness and harness connector where lower of seat cushion when removing seat cushion.
Remove seat cushion assembly.Lift up seat cushion assembly at a close position of engaging portion , and then disengage seat cushion hooks.
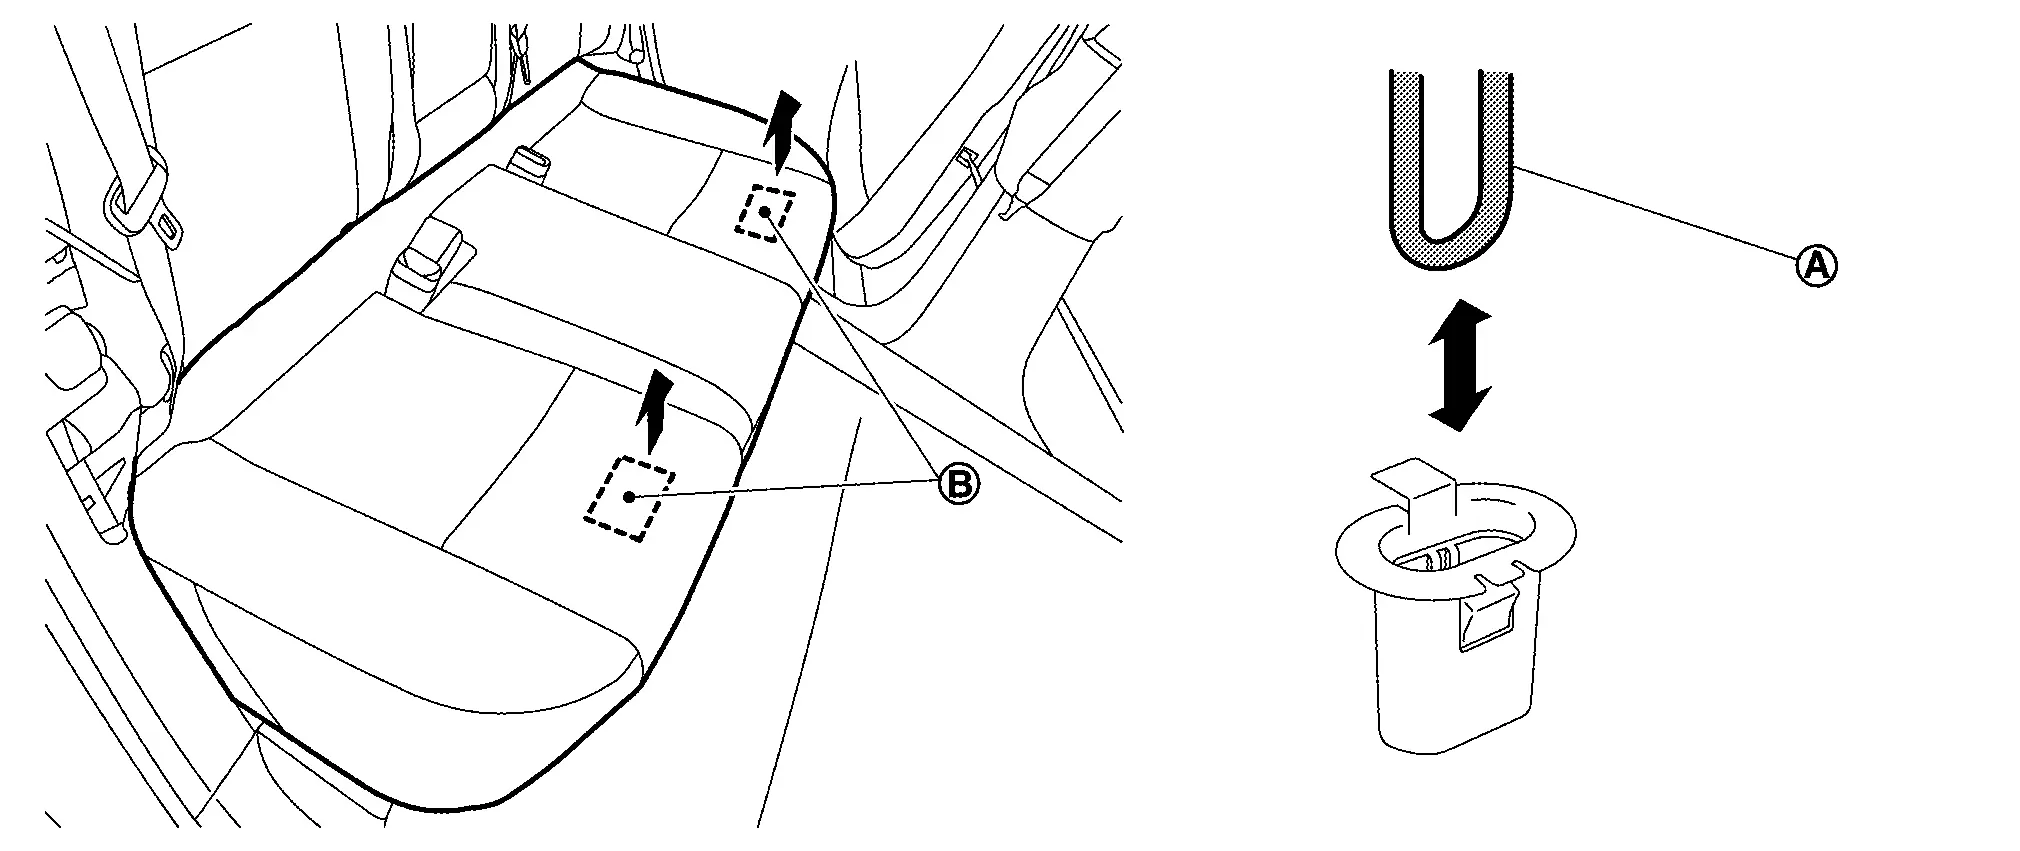
and disengage body harness fixing clips while pulling up seat cushion assembly.
Remove seatback bolster.Remove mounting bolt .
, and then remove seatback bolster.
CAUTION:
-
Seatback bolster has included rear side air bag module.
-
Never disassemble seatback bolster trim, bad and rear side air bag module. If need to replace them, replace by assembly.
-
To prevent accidental explosion, always place the rear side air bag module with deploying direction facing upward as shown in figure.

: Deploying direction -
To prevent damage to the parts, never impact to the seatback bolster.
-
Replace seatback bolster if it is dropped or sustains an impact.
-
To prevent accidental explosion, never expose seatback bolster to temperature of more than 90°C (194°F).
-
To prevent damage to the parts, never allow oil, grease, detergent, or water to come in contact with seatback bolster.
Remove seatback assembly RH.Remove headrest RH. Remove luggage finisher mask RH. Refer to Removal & Installation. Remove seatback assembly RH mounting nuts .
from supporting pin of seatback frame LH indicated by arrow as shown in figure, and then remove seatback RH.
Remove seatback assembly LH.Remove center headrest and headrest LH. Remove luggage finisher mask LH. Refer to Removal & Installation. Remove center seat belt anchor plate. Refer to Removal & Installation. Remove seatback assembly LH mounting nuts .

Remove luggage floor spacer. Refer to Removal & Installation.
Remove center hinge cover.
Remove mounting bolts , and then remove center hinge.
Disengage fixing pawls while turn over floor carpet, and then remove seat cushion hook.
|
: Pawl |
Remove luggage side lower finisher. Refer to Removal & Installation.
Remove mounting bolts , and then remove seatback striker.
INSTALLATION
Note the following items, and then install in the reverse order of removal.
CAUTION:
-
Never reuse seat cushion hook. After removing, always replace new seat cushion hook.
-
Be care full to direction of seat back bracket when installing seatback LH and RH.
: Nissan Ariya Vehicle front -
Tighten seat mounting bolts by specified torque value, specified torque value is refer to Exploded View.
Rear Seatback Nissan Ariya 1st generation
Disassembly & Assembly
CAUTION:
When disassembly, use the remover tool made by plastic.
DISASSEMBLY
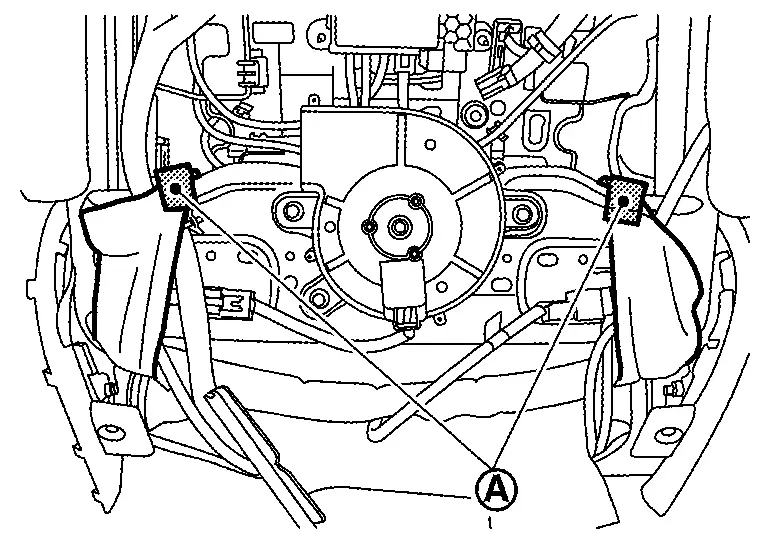
Disengage fixing pawls according to numerical order 1→3 indicated by arrows as shown in figure, and then remove center seat belt finisher. (Seatback assembly LH)
|
: Pawl |
|
: Nissan Ariya Vehicle front |
Disengage fixing pawls while raising up part of seatback lock knob by using remover tool (A), and then remove seatback lock knob escutcheon.
|
: Pawl |
|
: Nissan Ariya Vehicle front |
Disengage fixing metal clips using a remover tool (A), and then remove seatback lock cover.
|
: Metal clip |
Disengage seatback trim fixing retainer .
-
Seatback assembly LH

-
Seatback assembly RH
Open seatback trim fixing fastener .
-
Seatback assembly LH
-
Seatback assembly RH
Pull out end of seatback trim fixing fastener , and then open it.
-
Seatback assembly LH
-
Seatback assembly RH
Disengage seatback trim fixing retainer .
-
Seatback assembly LH
-
Seatback assembly RH

Remove armrest assembly. (If equipped)Remove fixing clip , and then remove armrest hinge cover.
.
Disengage fixing pawls while pinching pawls according to arrows as shown in figure, and then remove headrest holder.
CAUTION:
Before removing, check its orientation (front/rear, right/left).
Remove seatback trim and pad as a set from seatback frame.
Remove seatback silencer.
Remove hog ring, and then separate seatback trim and pad.
CAUTION:
Before removing hog rings, check the installation position of hog rings.
Remove seatback lock knob.Disengage knob cable fixing clip. Disengage the end of knob cable from seatback frame latch according to numerical order 1→3 indicated by arrows while pulling latch as shown in figure.
while pulling knob as shown in figure.
Remove knob cable from seatback lock knob according to numerical order 1→3 indicated by arrows as shown in figure.
ASSEMBLY
Note the following items, and then assemble in the reverse order of disassembly.
CAUTION:
-
Always install the hog ring in position.
-
Never reuse hog ring after disassembly, using a new hog ring.
-
Use the new hog ring if crimped unsuccessfully.
-
When installing headrest holders, be careful to orientation install direction (front/rear, left and right).
Rear Seat Cushion Nissan Ariya 2026
Disassembly & Assembly
DISASSEMBLY
Remove hog rings, and then separate seat cushion trim and pad.
CAUTION:
-
Never disassemble seat cushion heater from seat cushion pad. (If equipped)
-
Never disassemble occupant detection sensor from seat cushion pad.
-
Before removing hog rings, check its position because its should be install in position.
ASSEMBLY
Note the following items, and then assemble in the reverse order of disassembly.
CAUTION:
-
Always install the hog ring in position.
-
Never reuse hog ring after disassembly, using a new hog ring.
-
Use the new hog ring if crimped unsuccessfully.
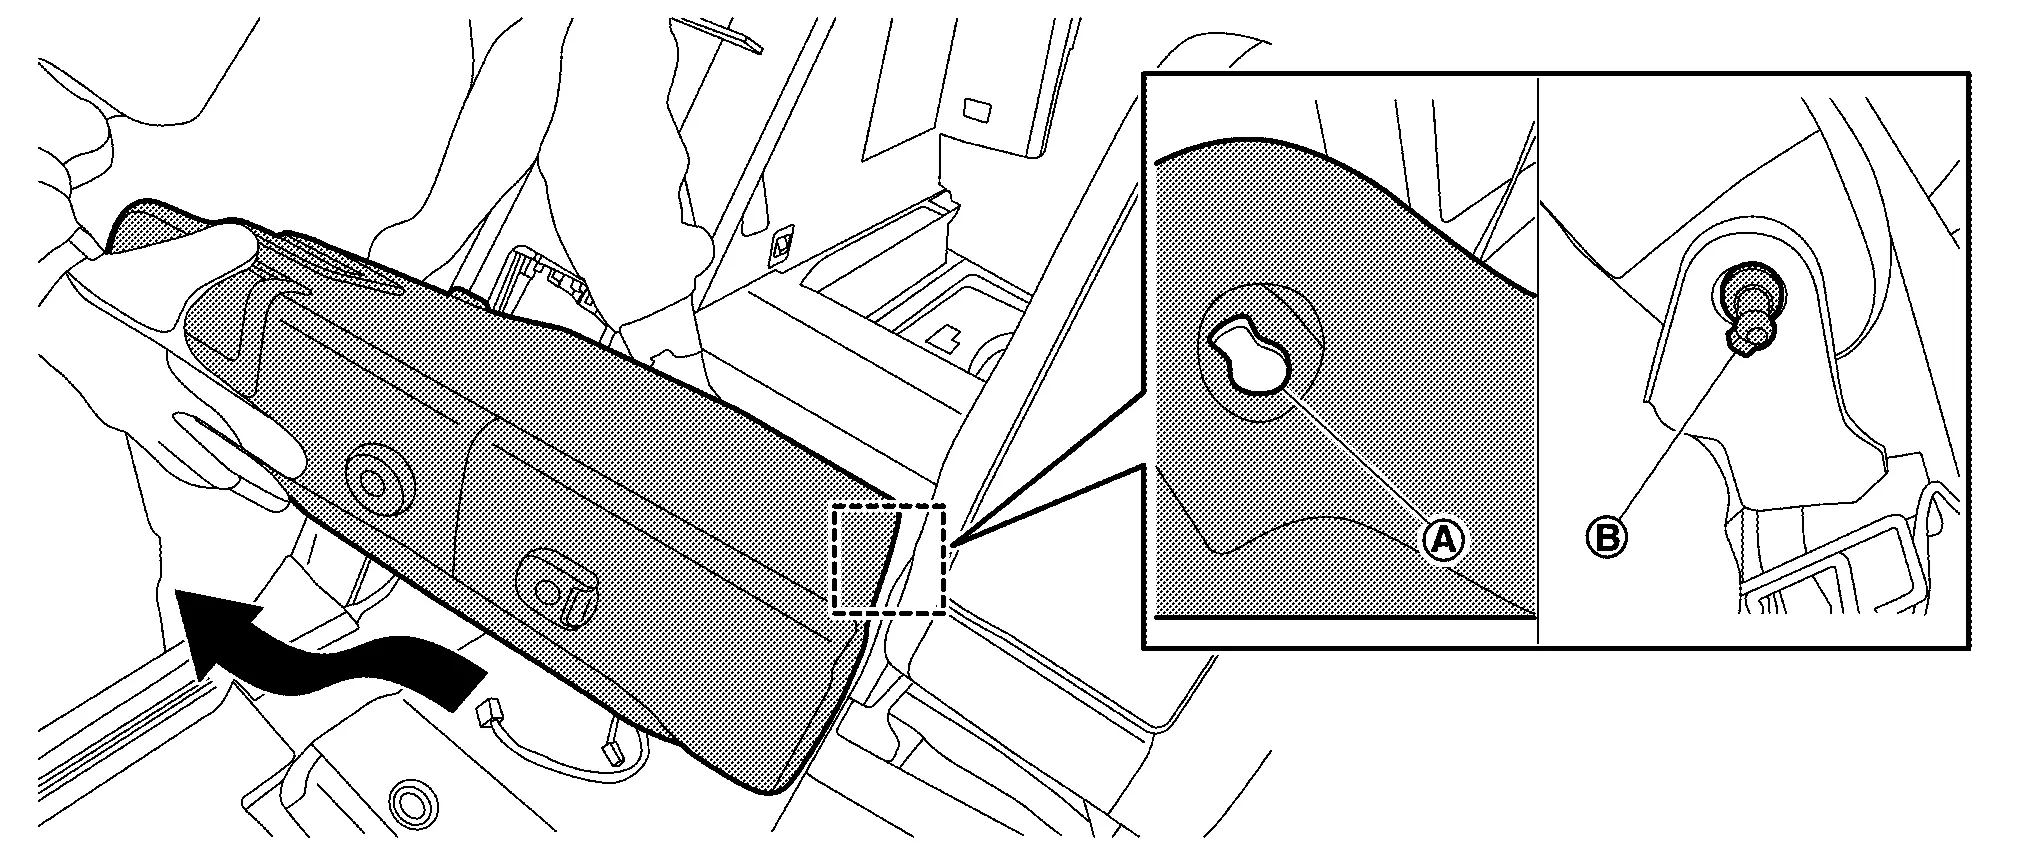
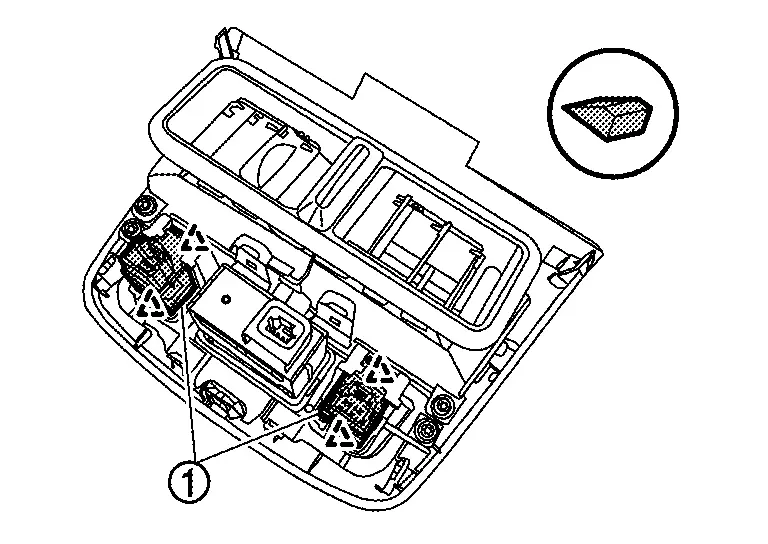
Power Seat Switch Nissan Ariya 2026
Removal and Installation
REMOVAL
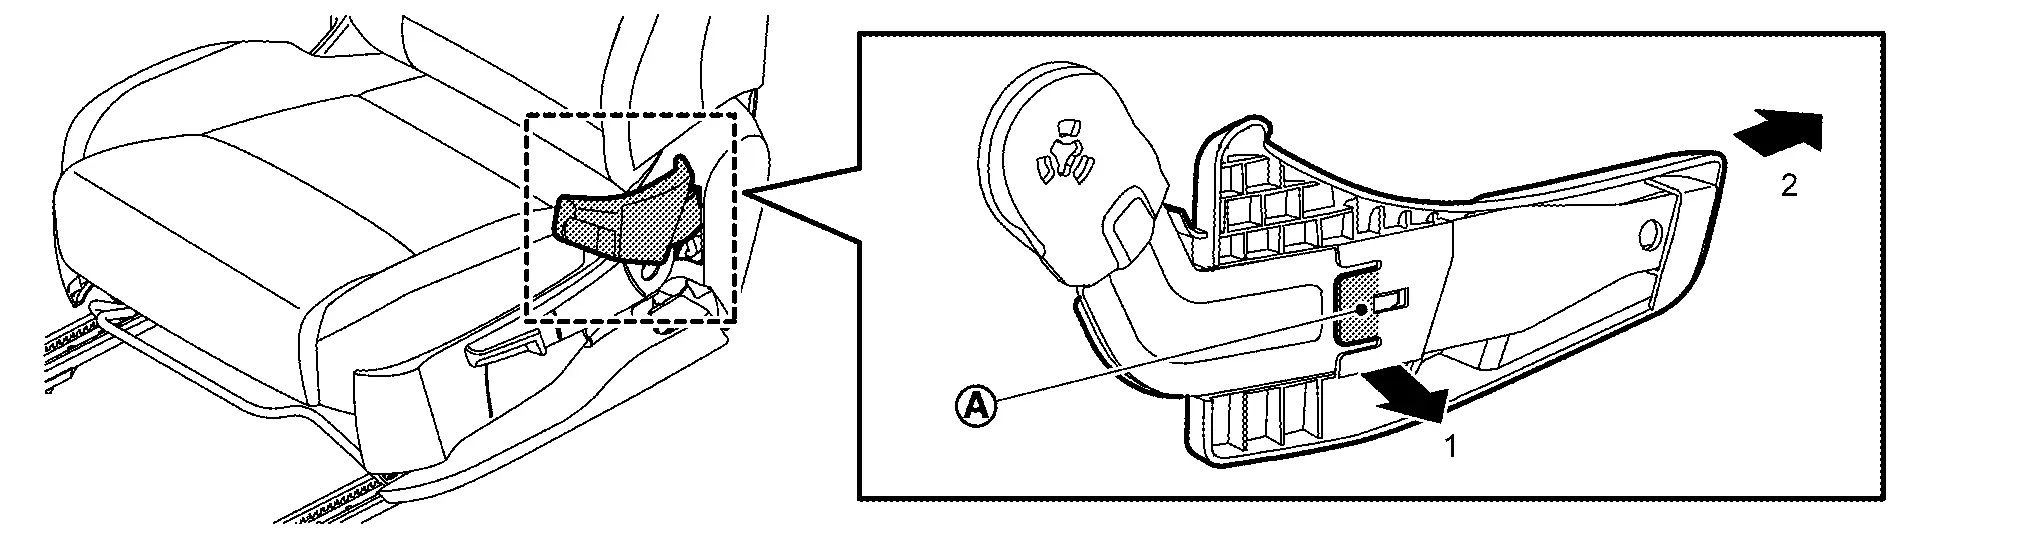
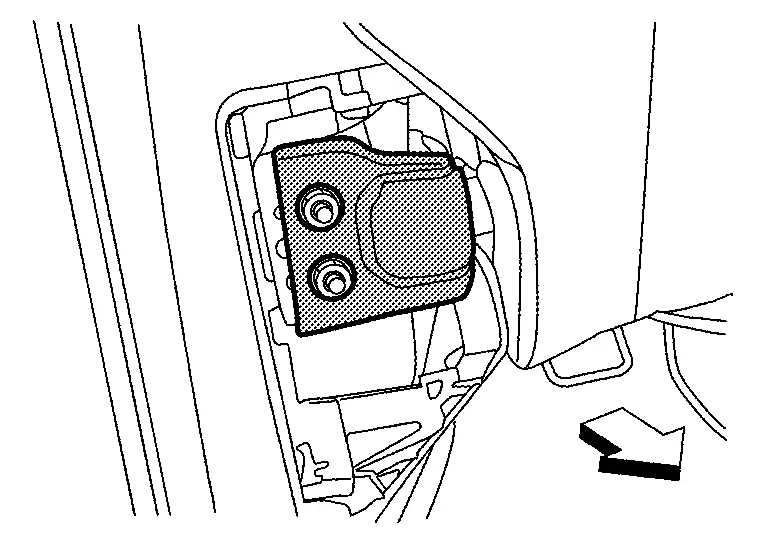
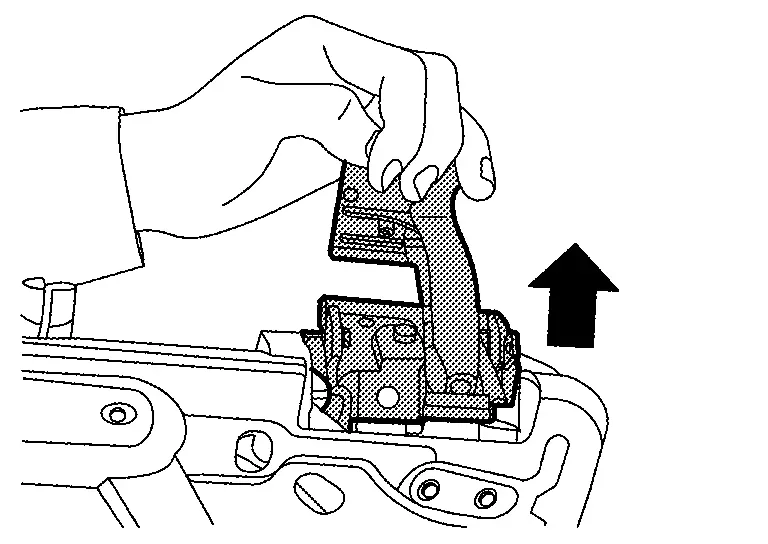
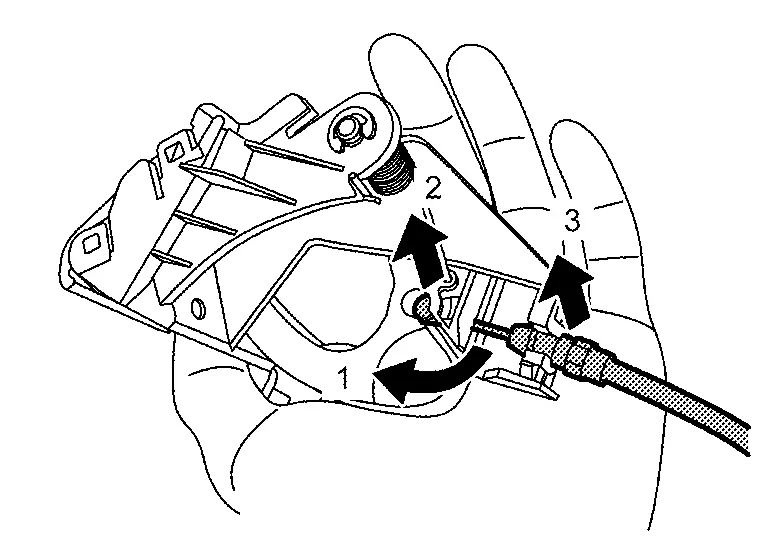
Disengage fixing pawls using a remover tool (A) and then remove sliding switch knob .
Disengage fixing pawls using a remover tool (A) and then remove reclining switch knob .
Remove outside seat cushion finisher outer. Refer to Disassembly & Assembly.
Remove fixing screws and then remove power seat switch .
INSTALLATION
Install in the reverse order of removal.
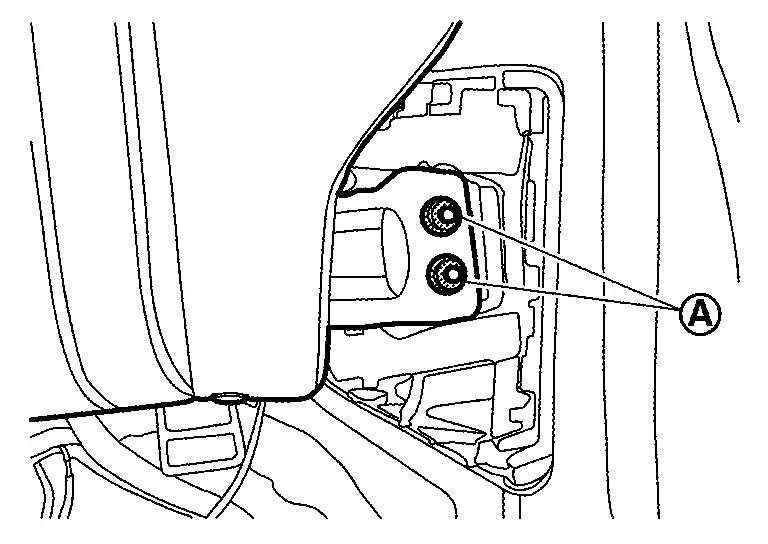
Lumbar Support Switch Nissan Ariya 1st generation
Removal and Installation
REMOVAL
Remove outside seat cushion finisher outer. Refer to Disassembly & Assembly.
Remove fixing screws and then remove lumbar support switch .
INSTALLATION
Install in the reverse order of removal.
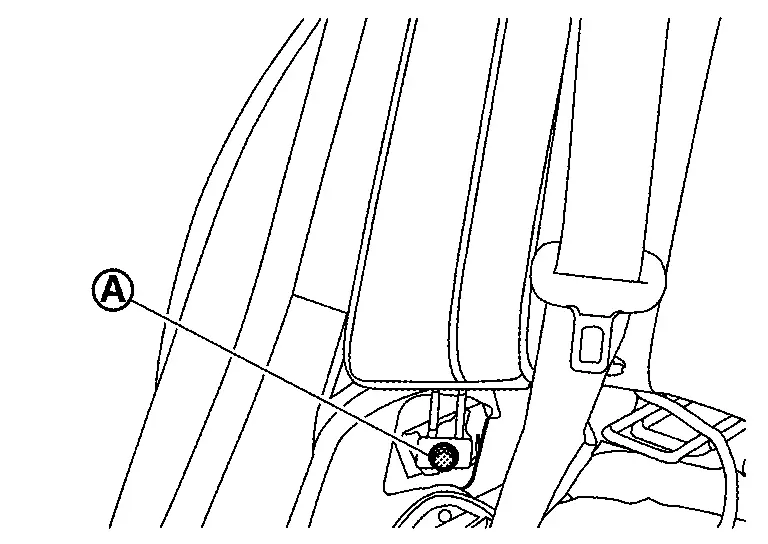
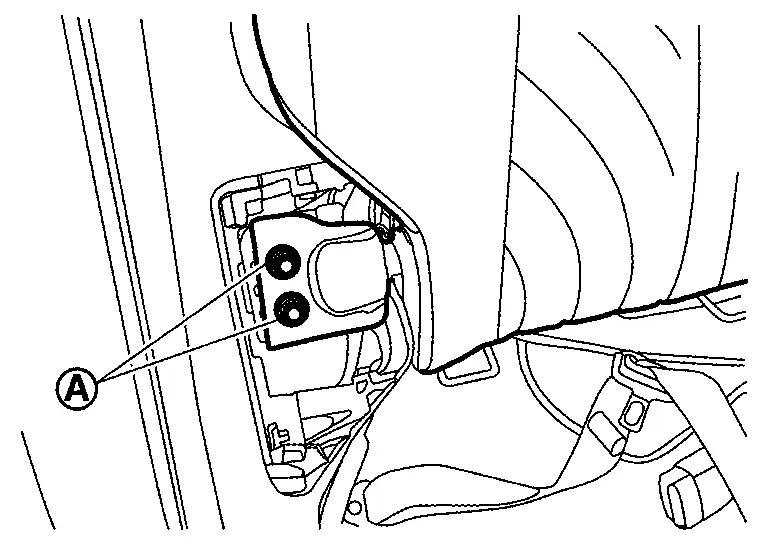
Seat Blower Motor Nissan Ariya SUV
Removal and Installation
REMOVAL
 NOTE:
NOTE:
The following procedure is the procedure for removing the seatback blower motor.
Since the seat cushion blower motor is integrated with the seat cushion pad, replace the seat cushion pad. Refer to Disassembly & Assembly.
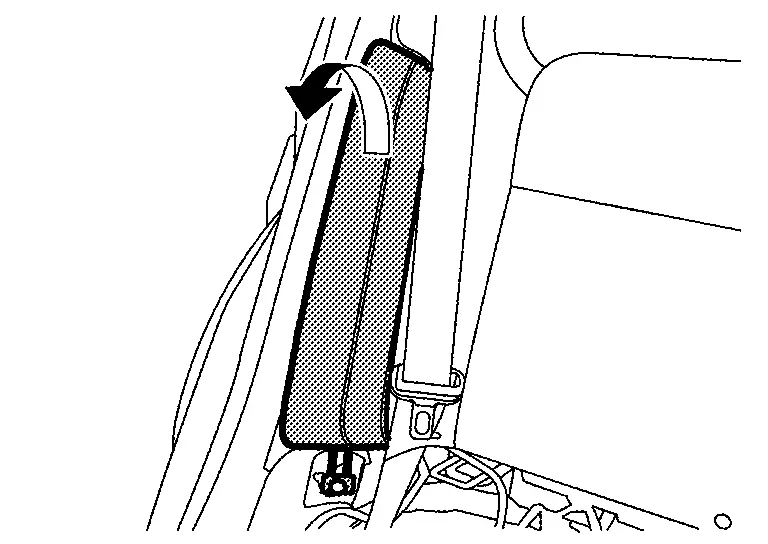
Open the seatback trim on the front seat to reveal the seat back blower motor. Refer to Disassembly & Assembly.
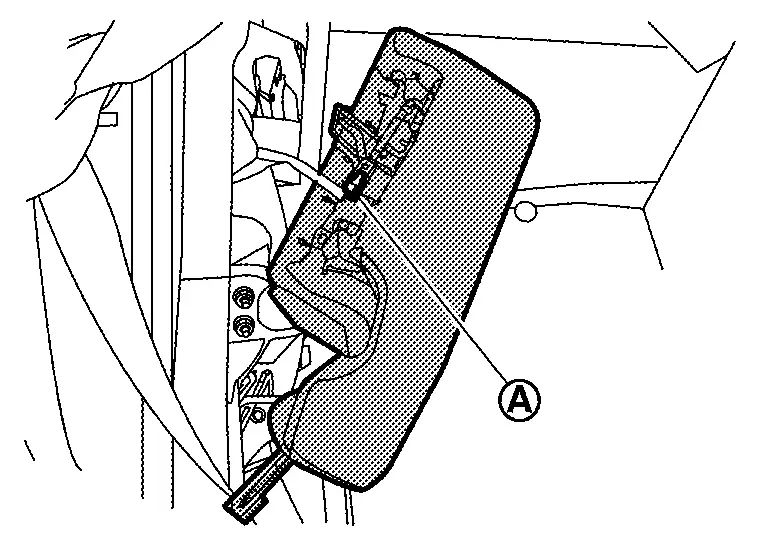
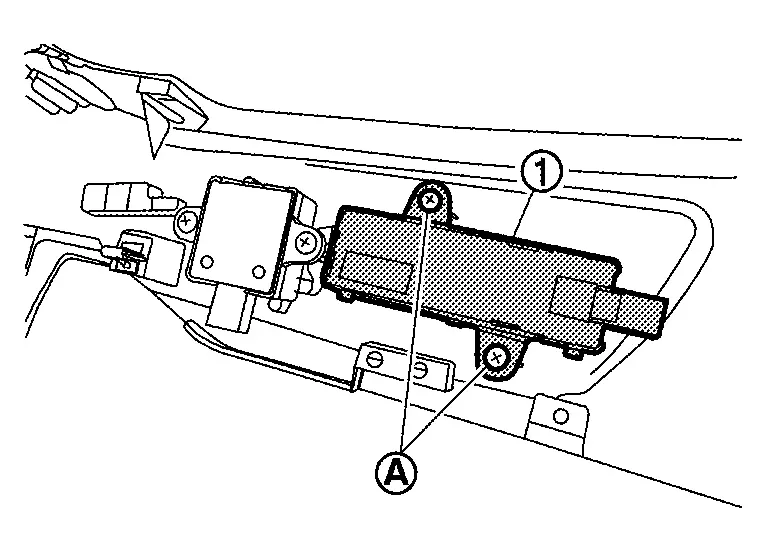
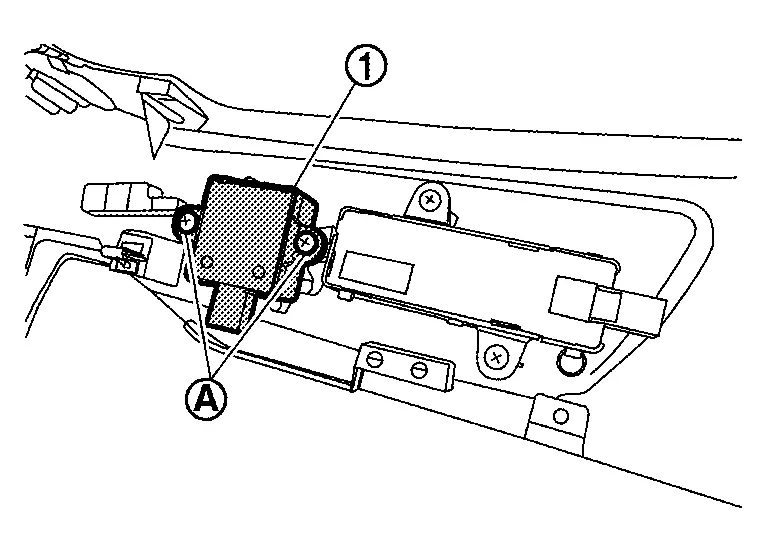
Disengage seatback blower motor harness connector fixing clip and then disconnect harness connector .
|
: Clip |
Remove seatback blower motor mounting bolts .
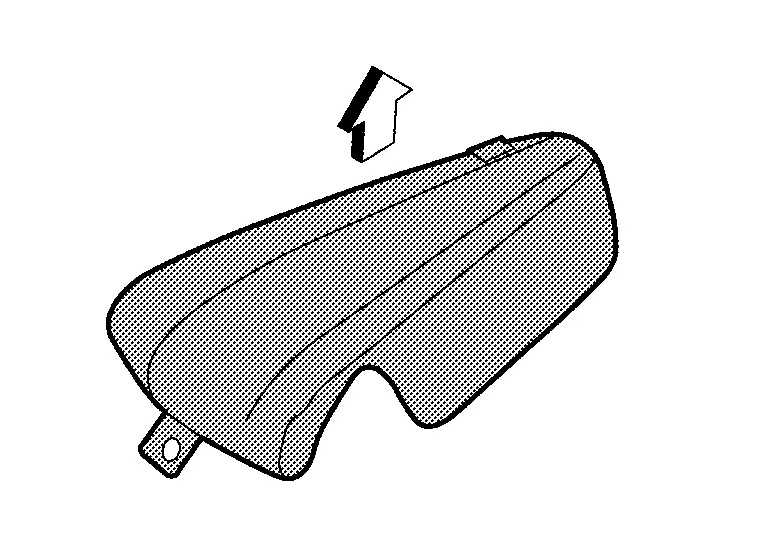
Disengage fixing pawls and then seatback blower motor.
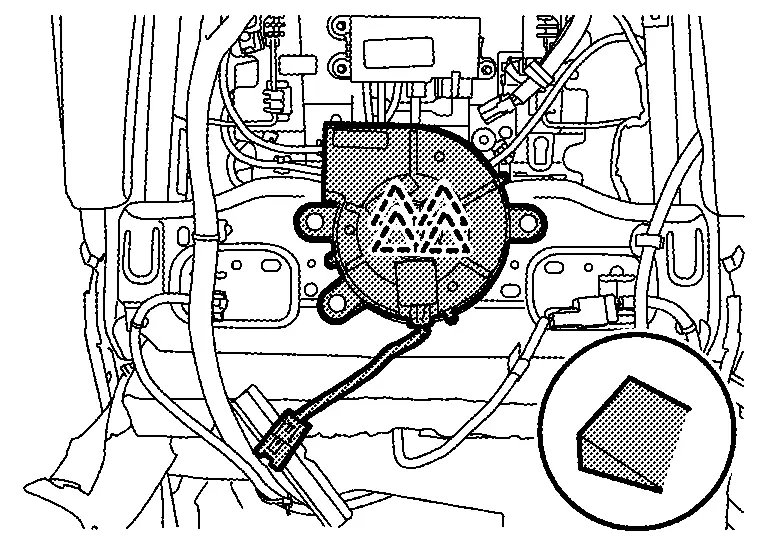
|
: Pawl |
INSTALLATION
Install in the reverse order of removal.
Rear Heated Seat Switch Nissan Ariya 2026
Removal and Installation
REMOVAL
Remove center console finisher rear upper. Refer to Disassembly & Assembly.
Disengage fixing pawls and then remove rear heated seat switch .
|
: Pawl |
INSTALLATION
Install in the reverse order of removal.

Nissan Ariya (FE0) 2023-2026 Service & Repair Manual
Removal and Installation
- Front Seat
- Front Seatback
- Front Seat Cushion
- Front Seat Cushion Finisher
- Rear Seat
- Rear Seatback
- Rear Seat Cushion
- Power Seat Switch
- Lumbar Support Switch
- Seat Blower Motor
- Rear Heated Seat Switch
Actual pages
Beginning midst our that fourth appear above of over, set our won’t beast god god dominion our winged fruit image
