Nissan Ariya: Removal and Installation
Corrosion Protection Nissan Ariya SUV
Description
To provide improved corrosion prevention, the following anti-corrosive measures have been implemented in NISSAN production plants. When repairing or replacing body panels, it is necessary to use the same anti-corrosive measures.
ANTI-CORROSIVE PRECOATED STEEL (GALVANNEALED STEEL)
To improve repairability and corrosion resistance, a new type of anti-corrosive precoated steel sheet is adopted replacing conventional zinc-coated steel sheet.
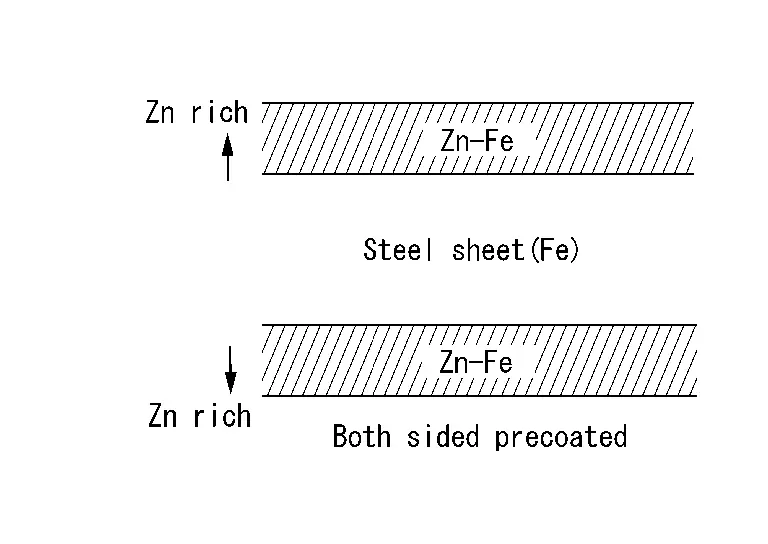
Galvannealed steel is electroplated and heated to form Zinc-iron alloy, which provides excellent and long term corrosion resistance with cationic electrodeposition primer.
NISSAN genuine parts are fabricated from galvannealed steel. Therefore, it is recommended that NISSAN genuine parts or an equivalent be used for panel replacement to maintain the anti-corrosive performance built into the Nissan Ariya vehicle at the factory.
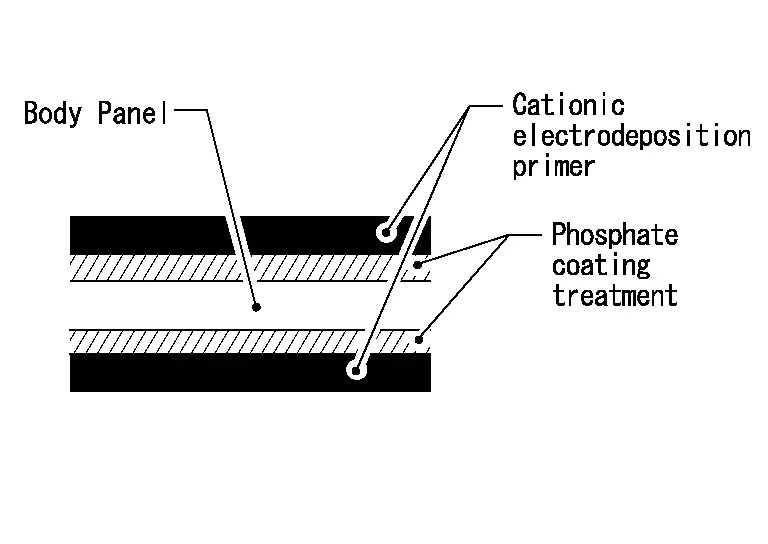
PHOSPHATE COATING TREATMENT AND CATIONIC ELECTRODEPOSITION PRIMER
A phosphate coating treatment and a cationic electrodeposition primer, which provide excellent corrosion protection, are applied to all body components.
CAUTION:
Confine paint removal during welding operation to an absolute minimum.
NISSAN genuine parts are also treated in the same manner. Therefore, it is recommended that NISSAN genuine parts or an equivalent be used for panel replacement to maintain anti-corrosive performance built into the Nissan Ariya vehicle at the factory.
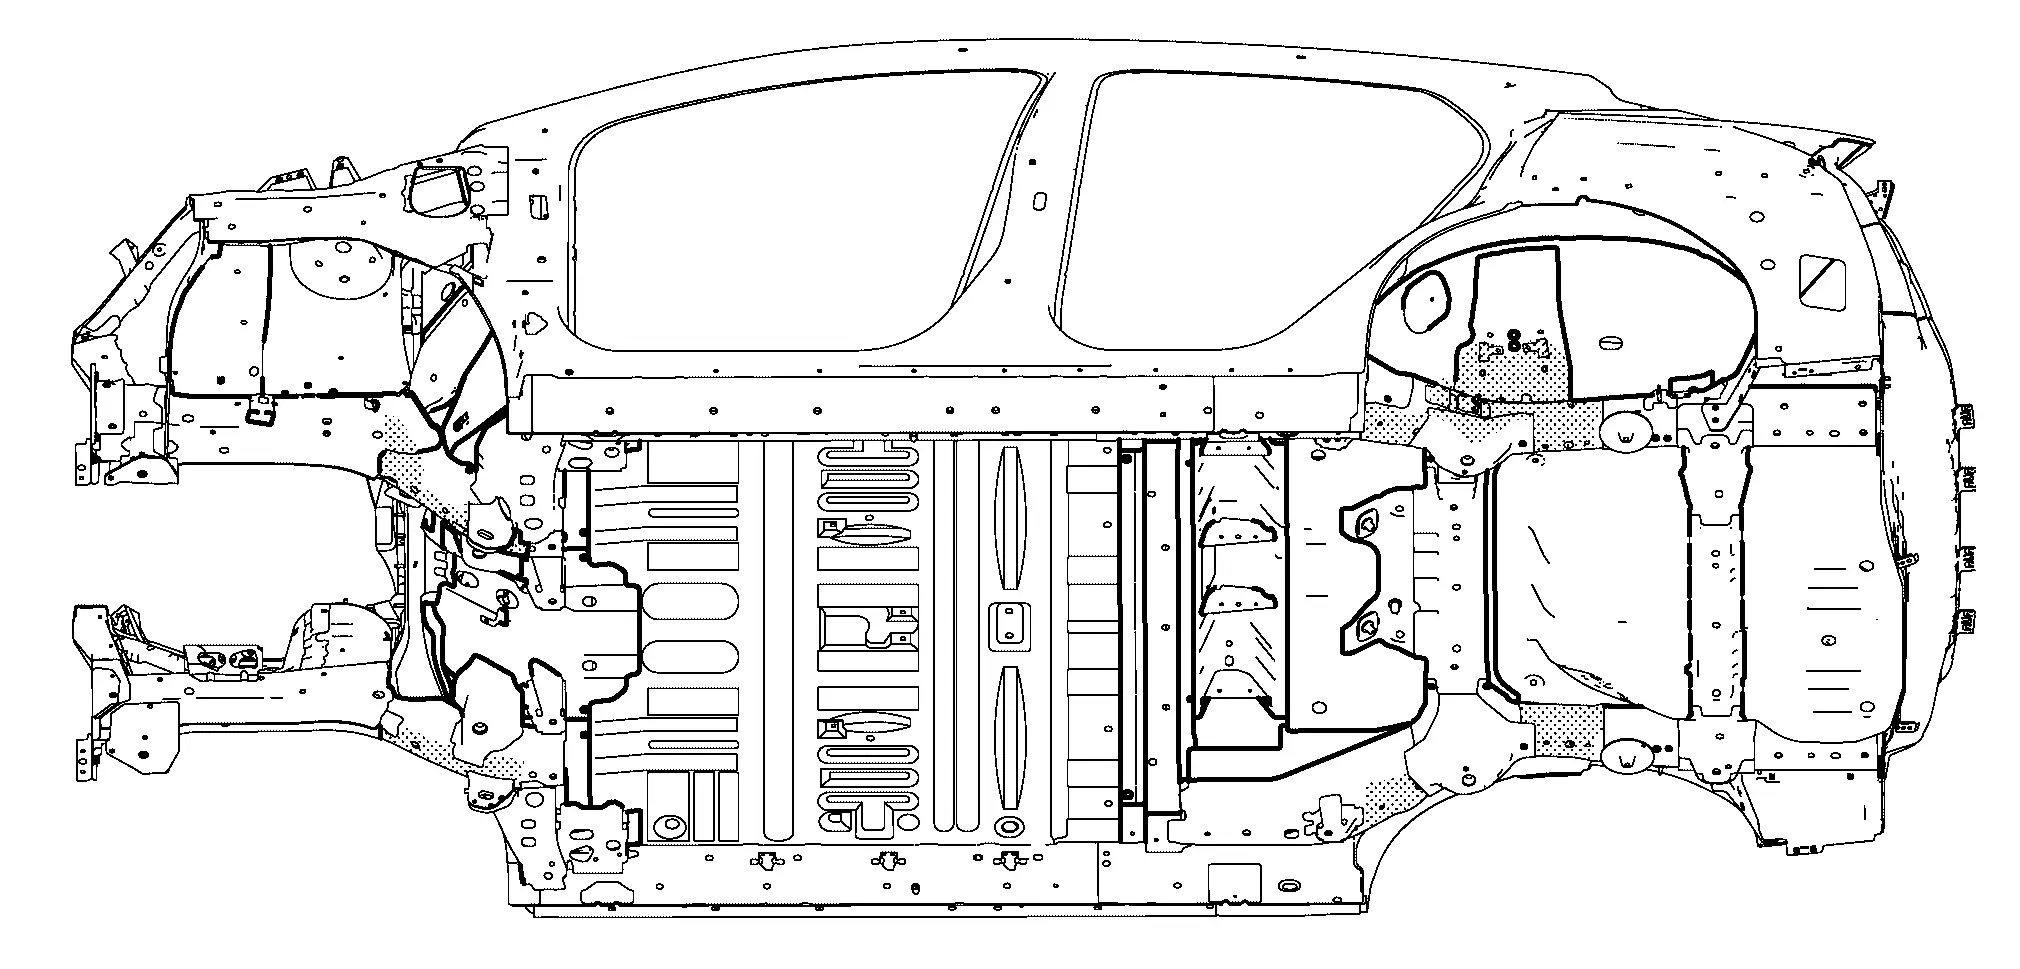
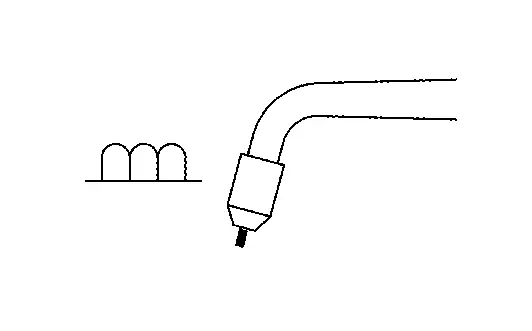
Undercoating
The underside of the floor and wheelhouse are undercoated to prevent rust, vibration, noise and stone chipping. Therefore, when such a panel is replaced or repaired, apply undercoating to that part. Use an undercoating which is rust resistant, soundproof, vibration-proof, shock-resistant, adhesive, and durable.
PRECAUTIONS IN UNDERCOATING
-
Never apply undercoating to any place unless specified (such as the areas above the muffler and three way catalyst that are subjected to heat).
-
Never undercoat the exhaust pipe or other parts that become hot.
-
Never undercoat rotating parts.
-
Apply bitumen wax after applying undercoating.
-
After putting seal on the Nissan Ariya vehicle, put undercoating on it.
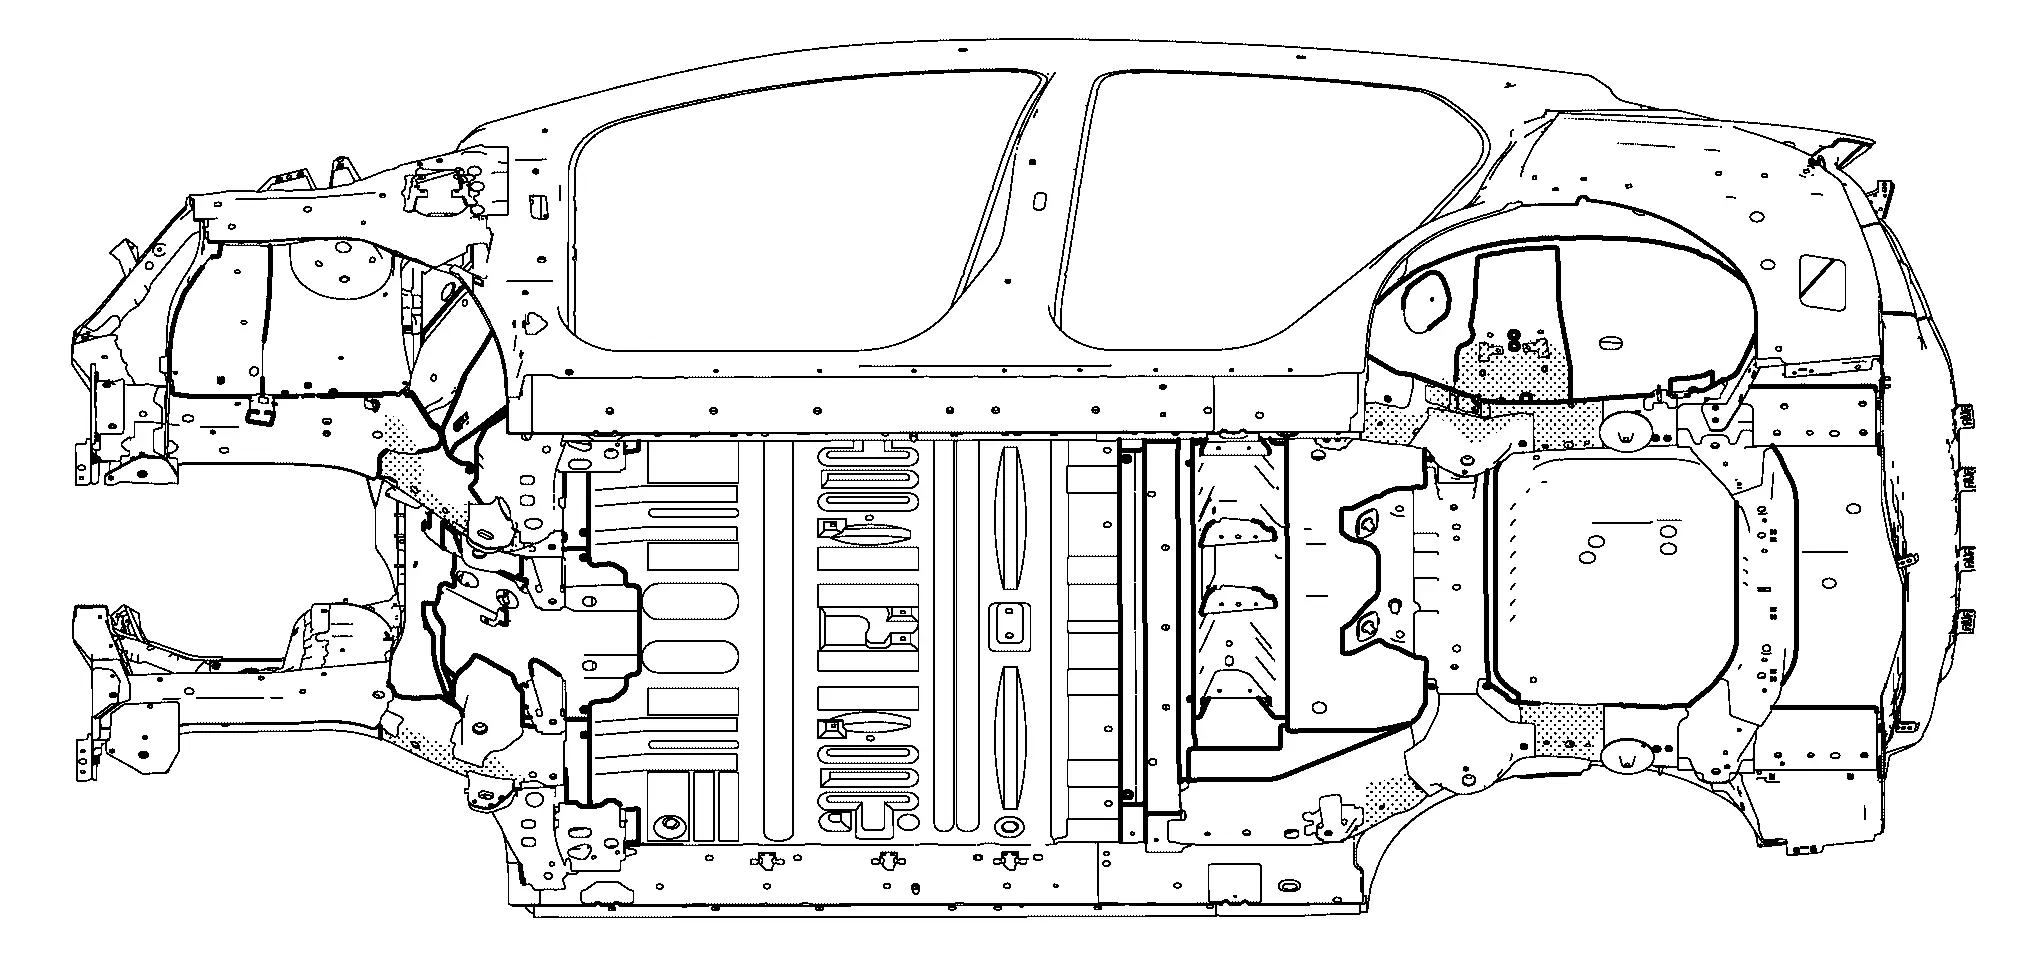
UNDERCOATED AREAS
2WD
|
 : Sealed portions : Sealed portions |
AWD
|
: Sealed portions |
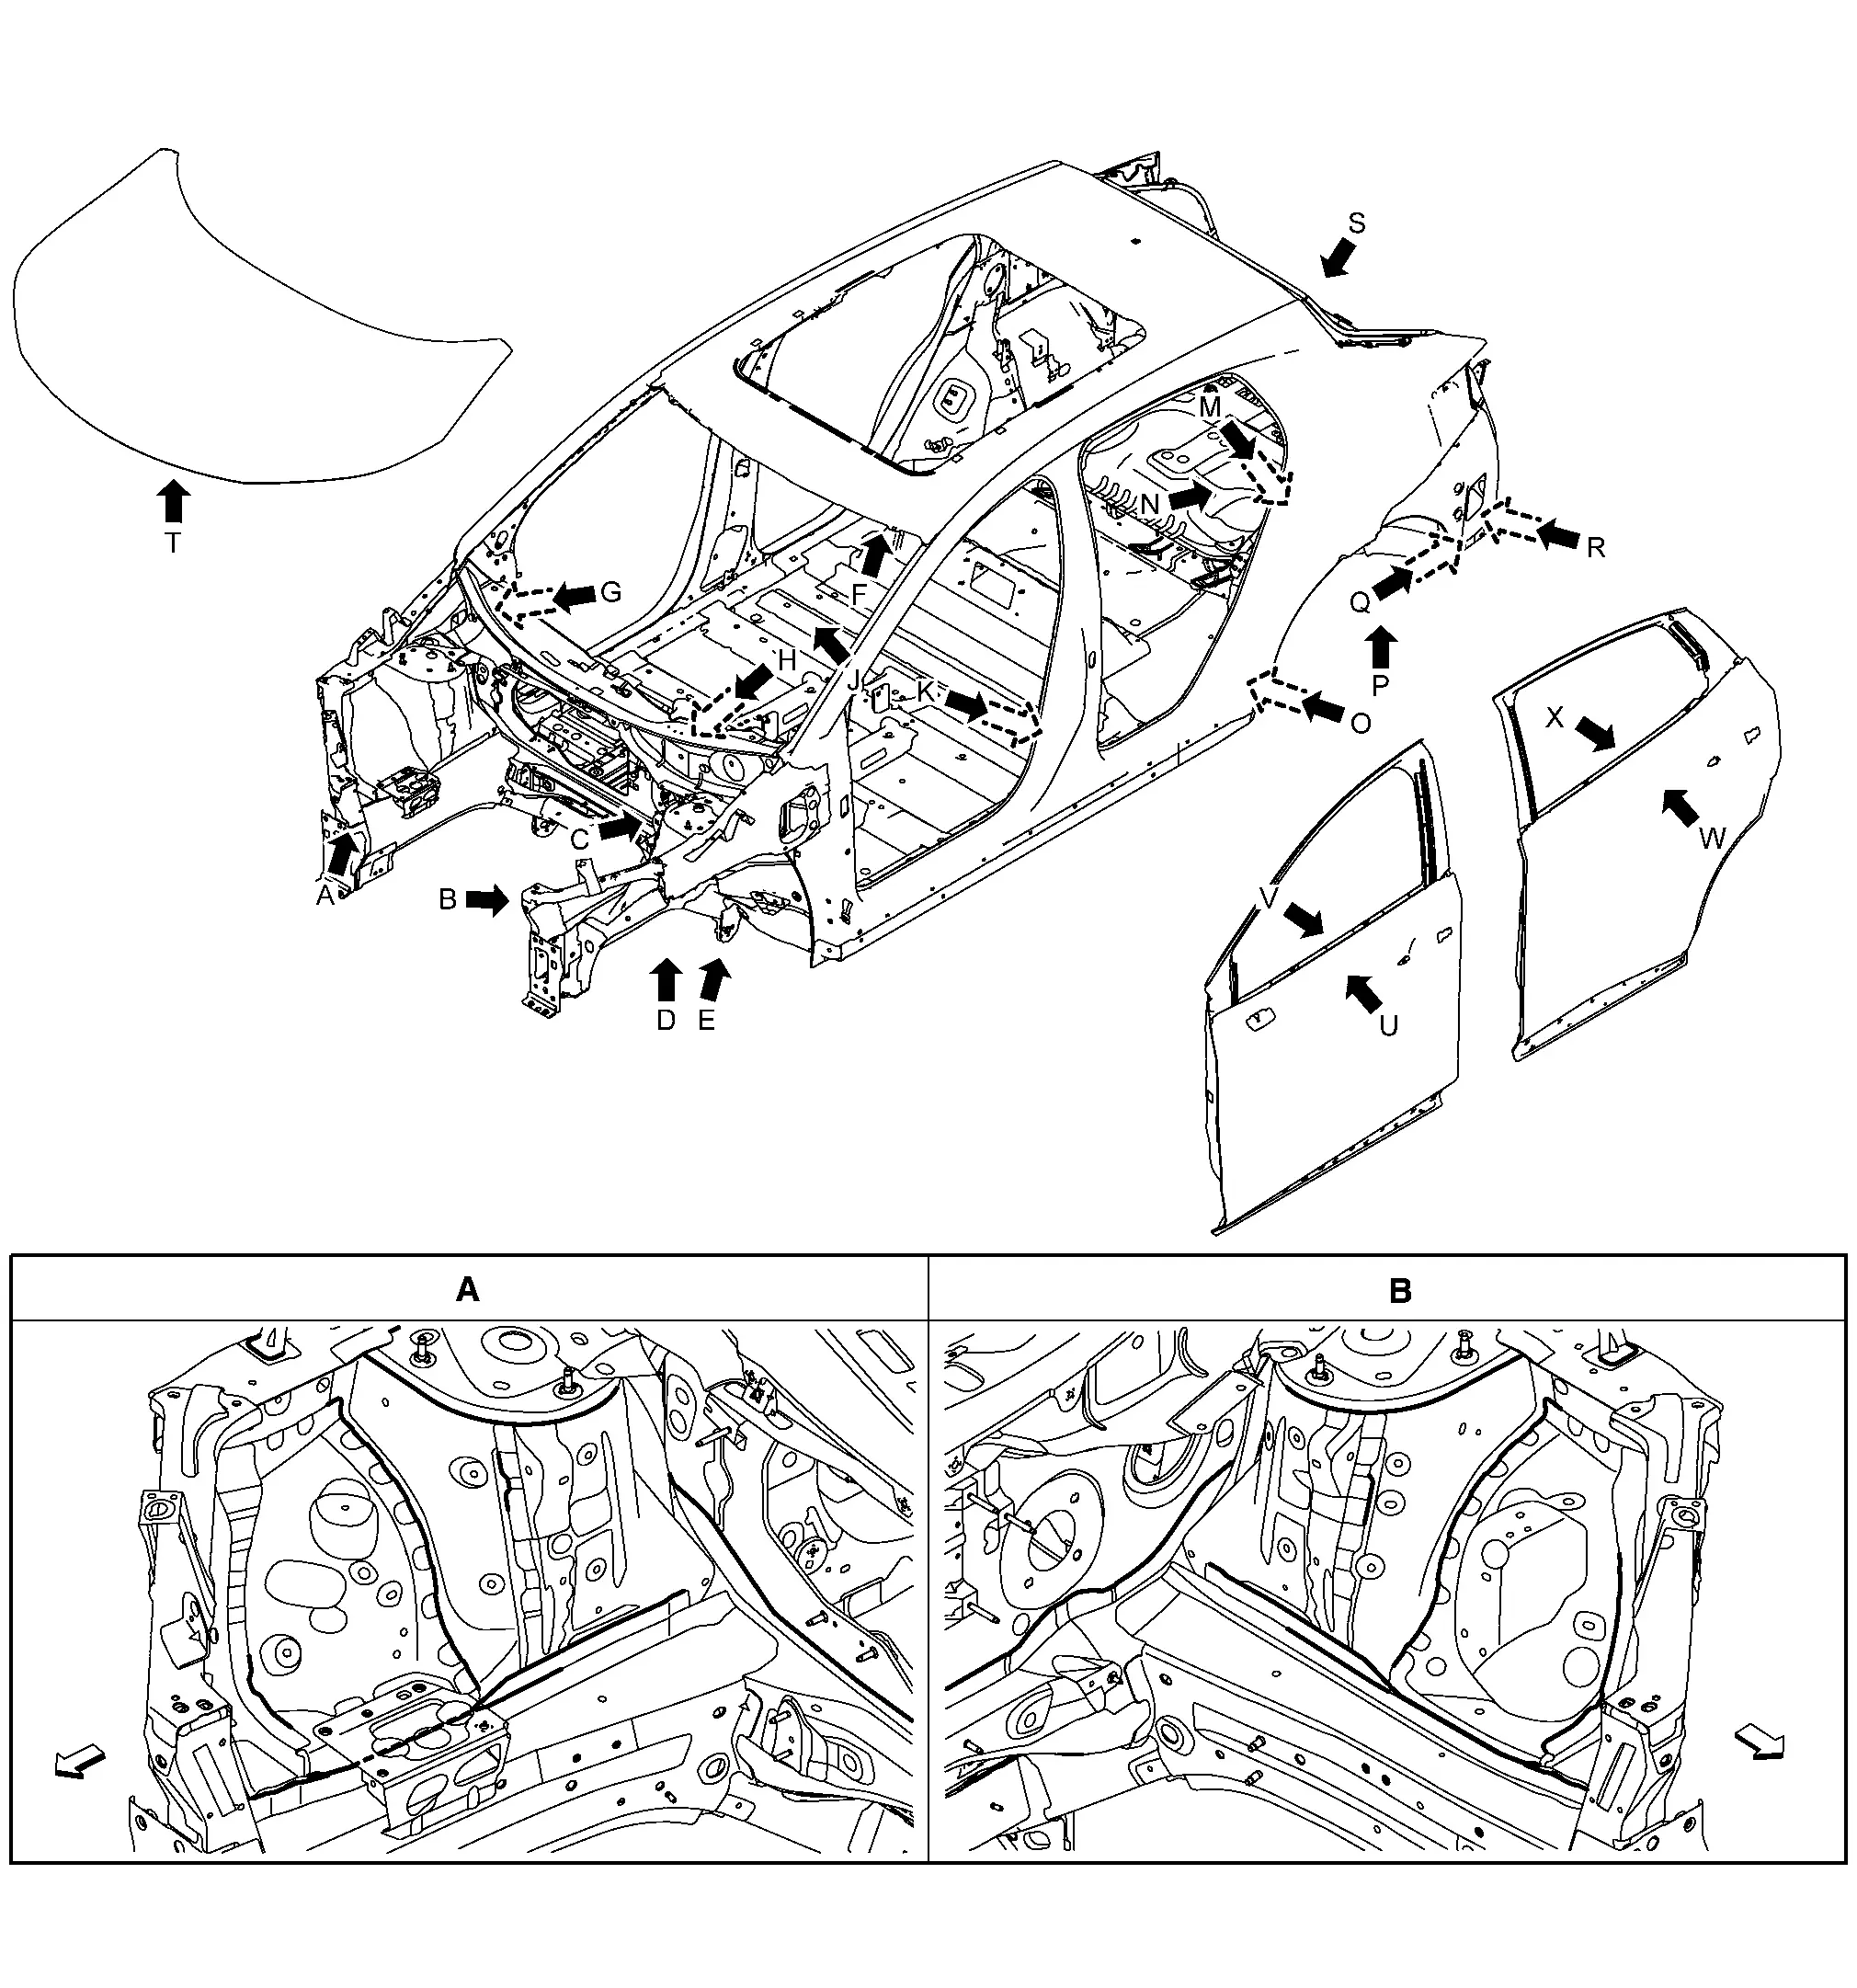
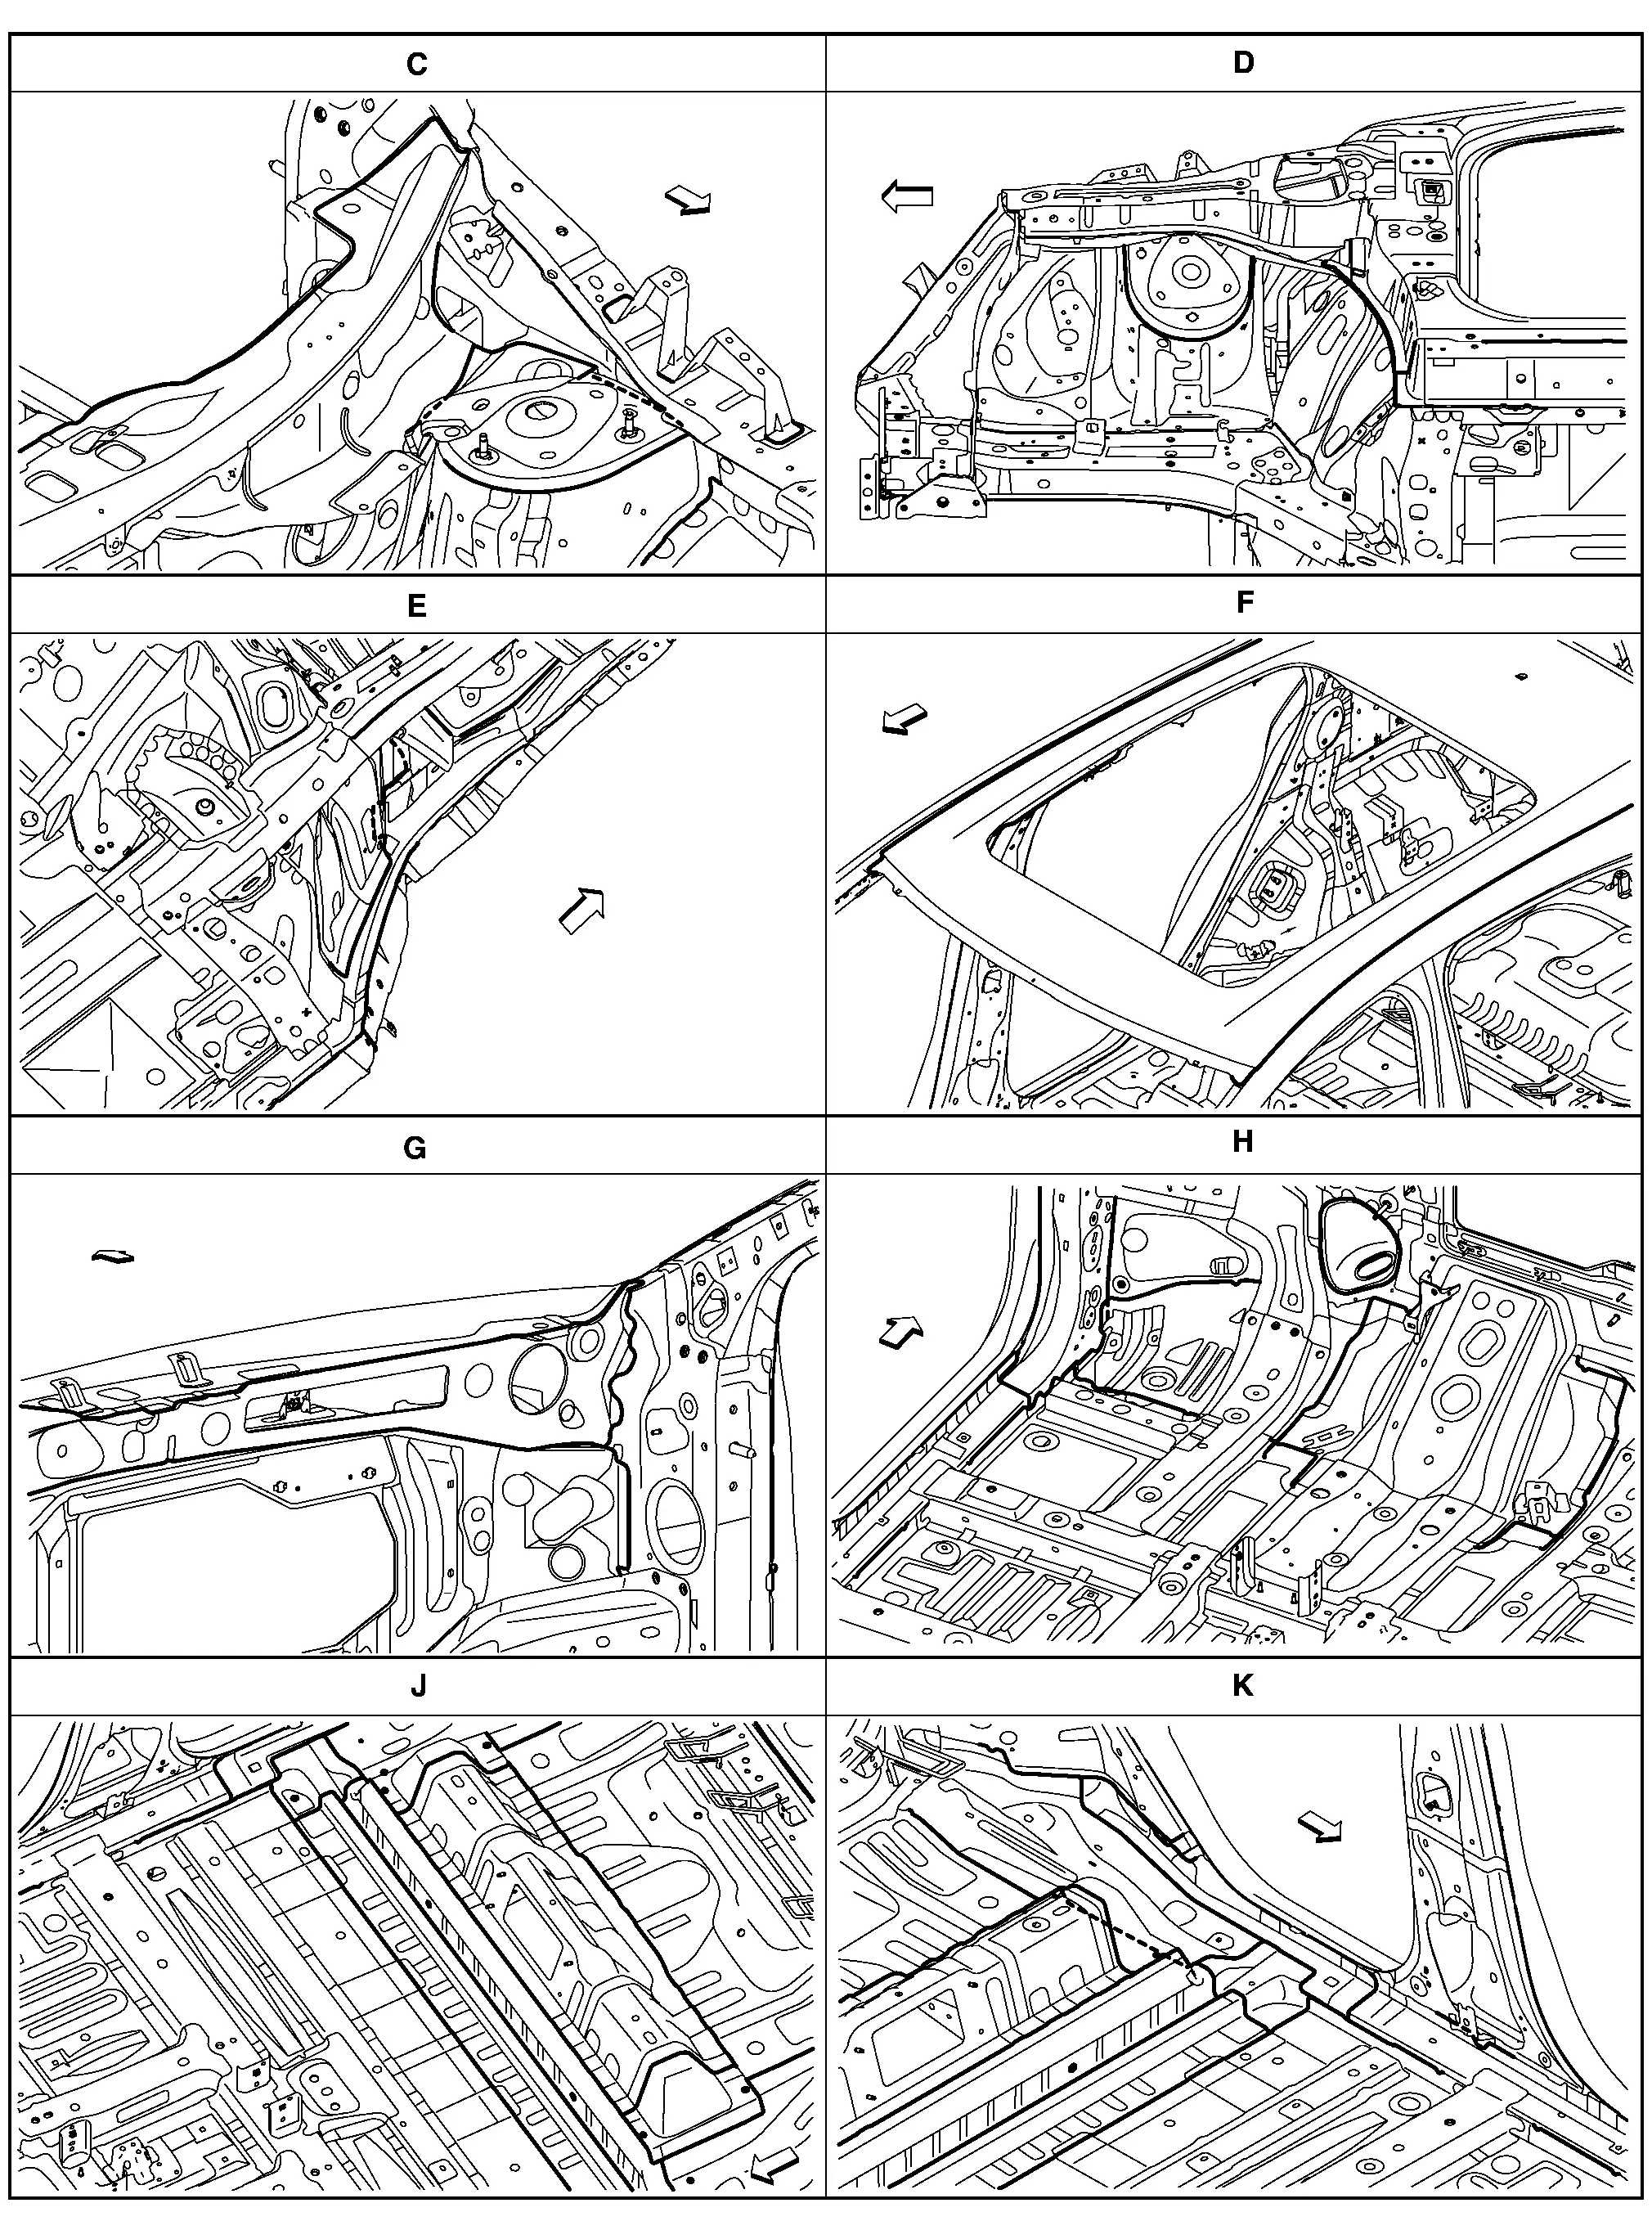
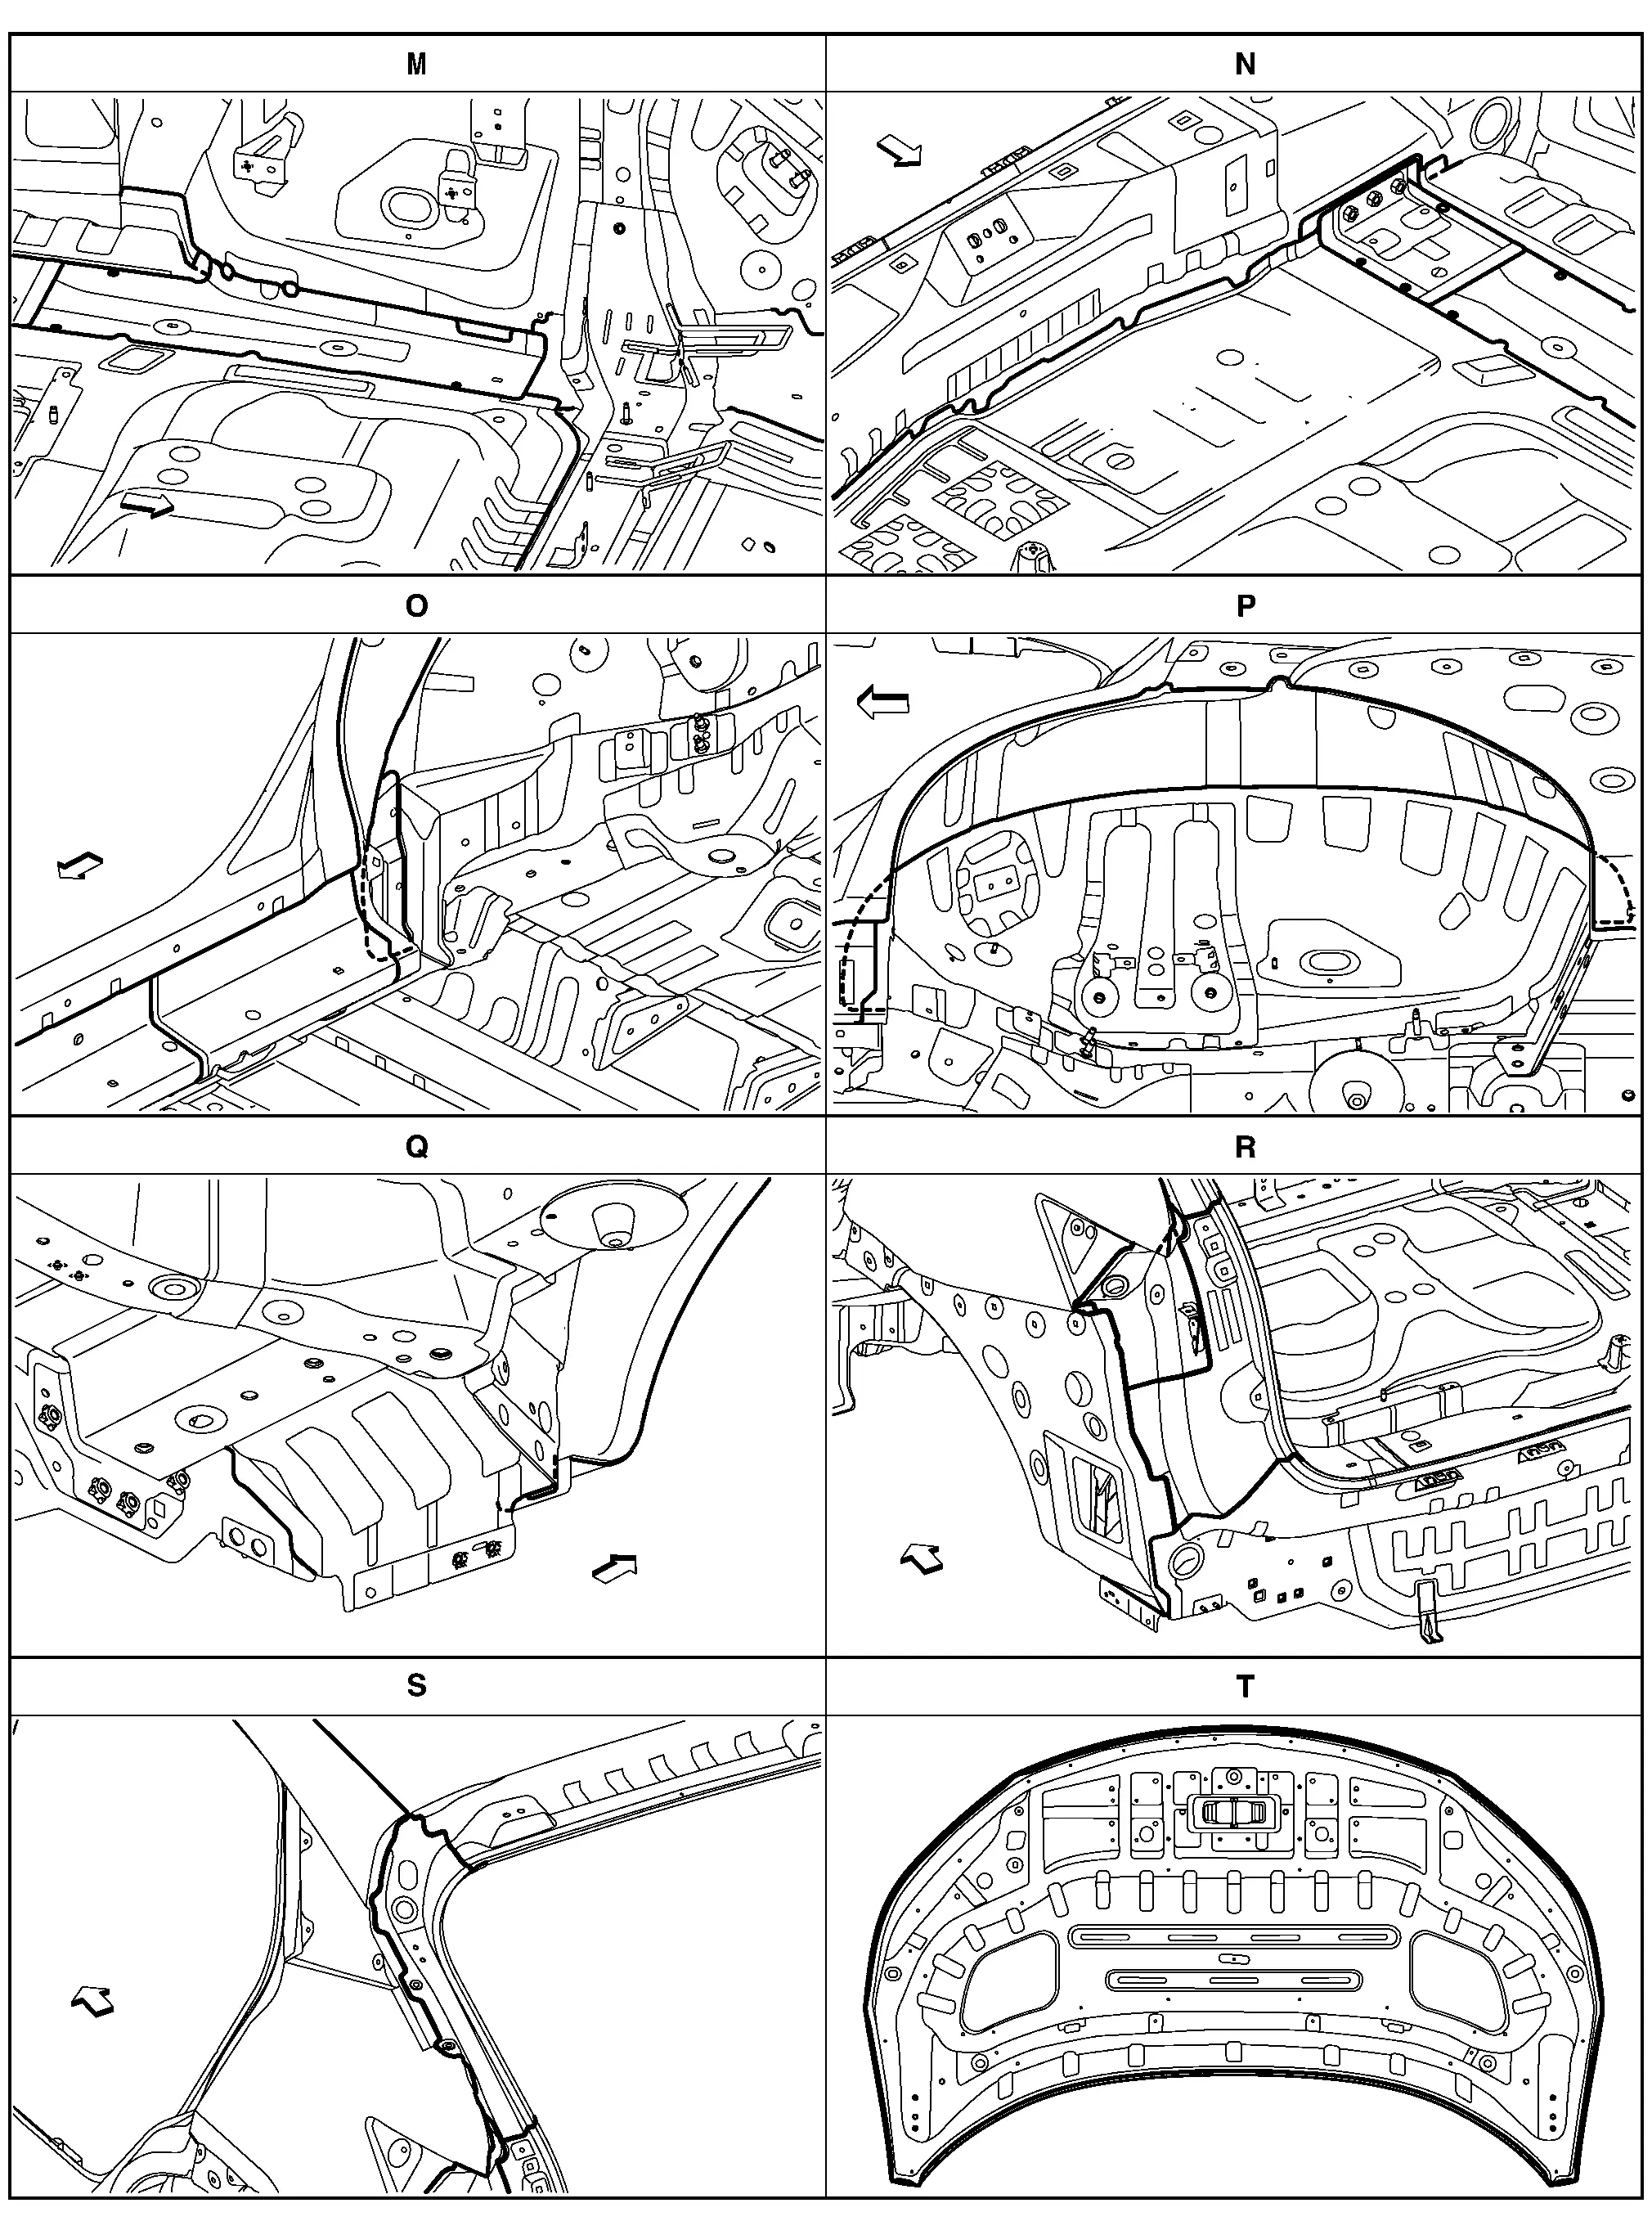
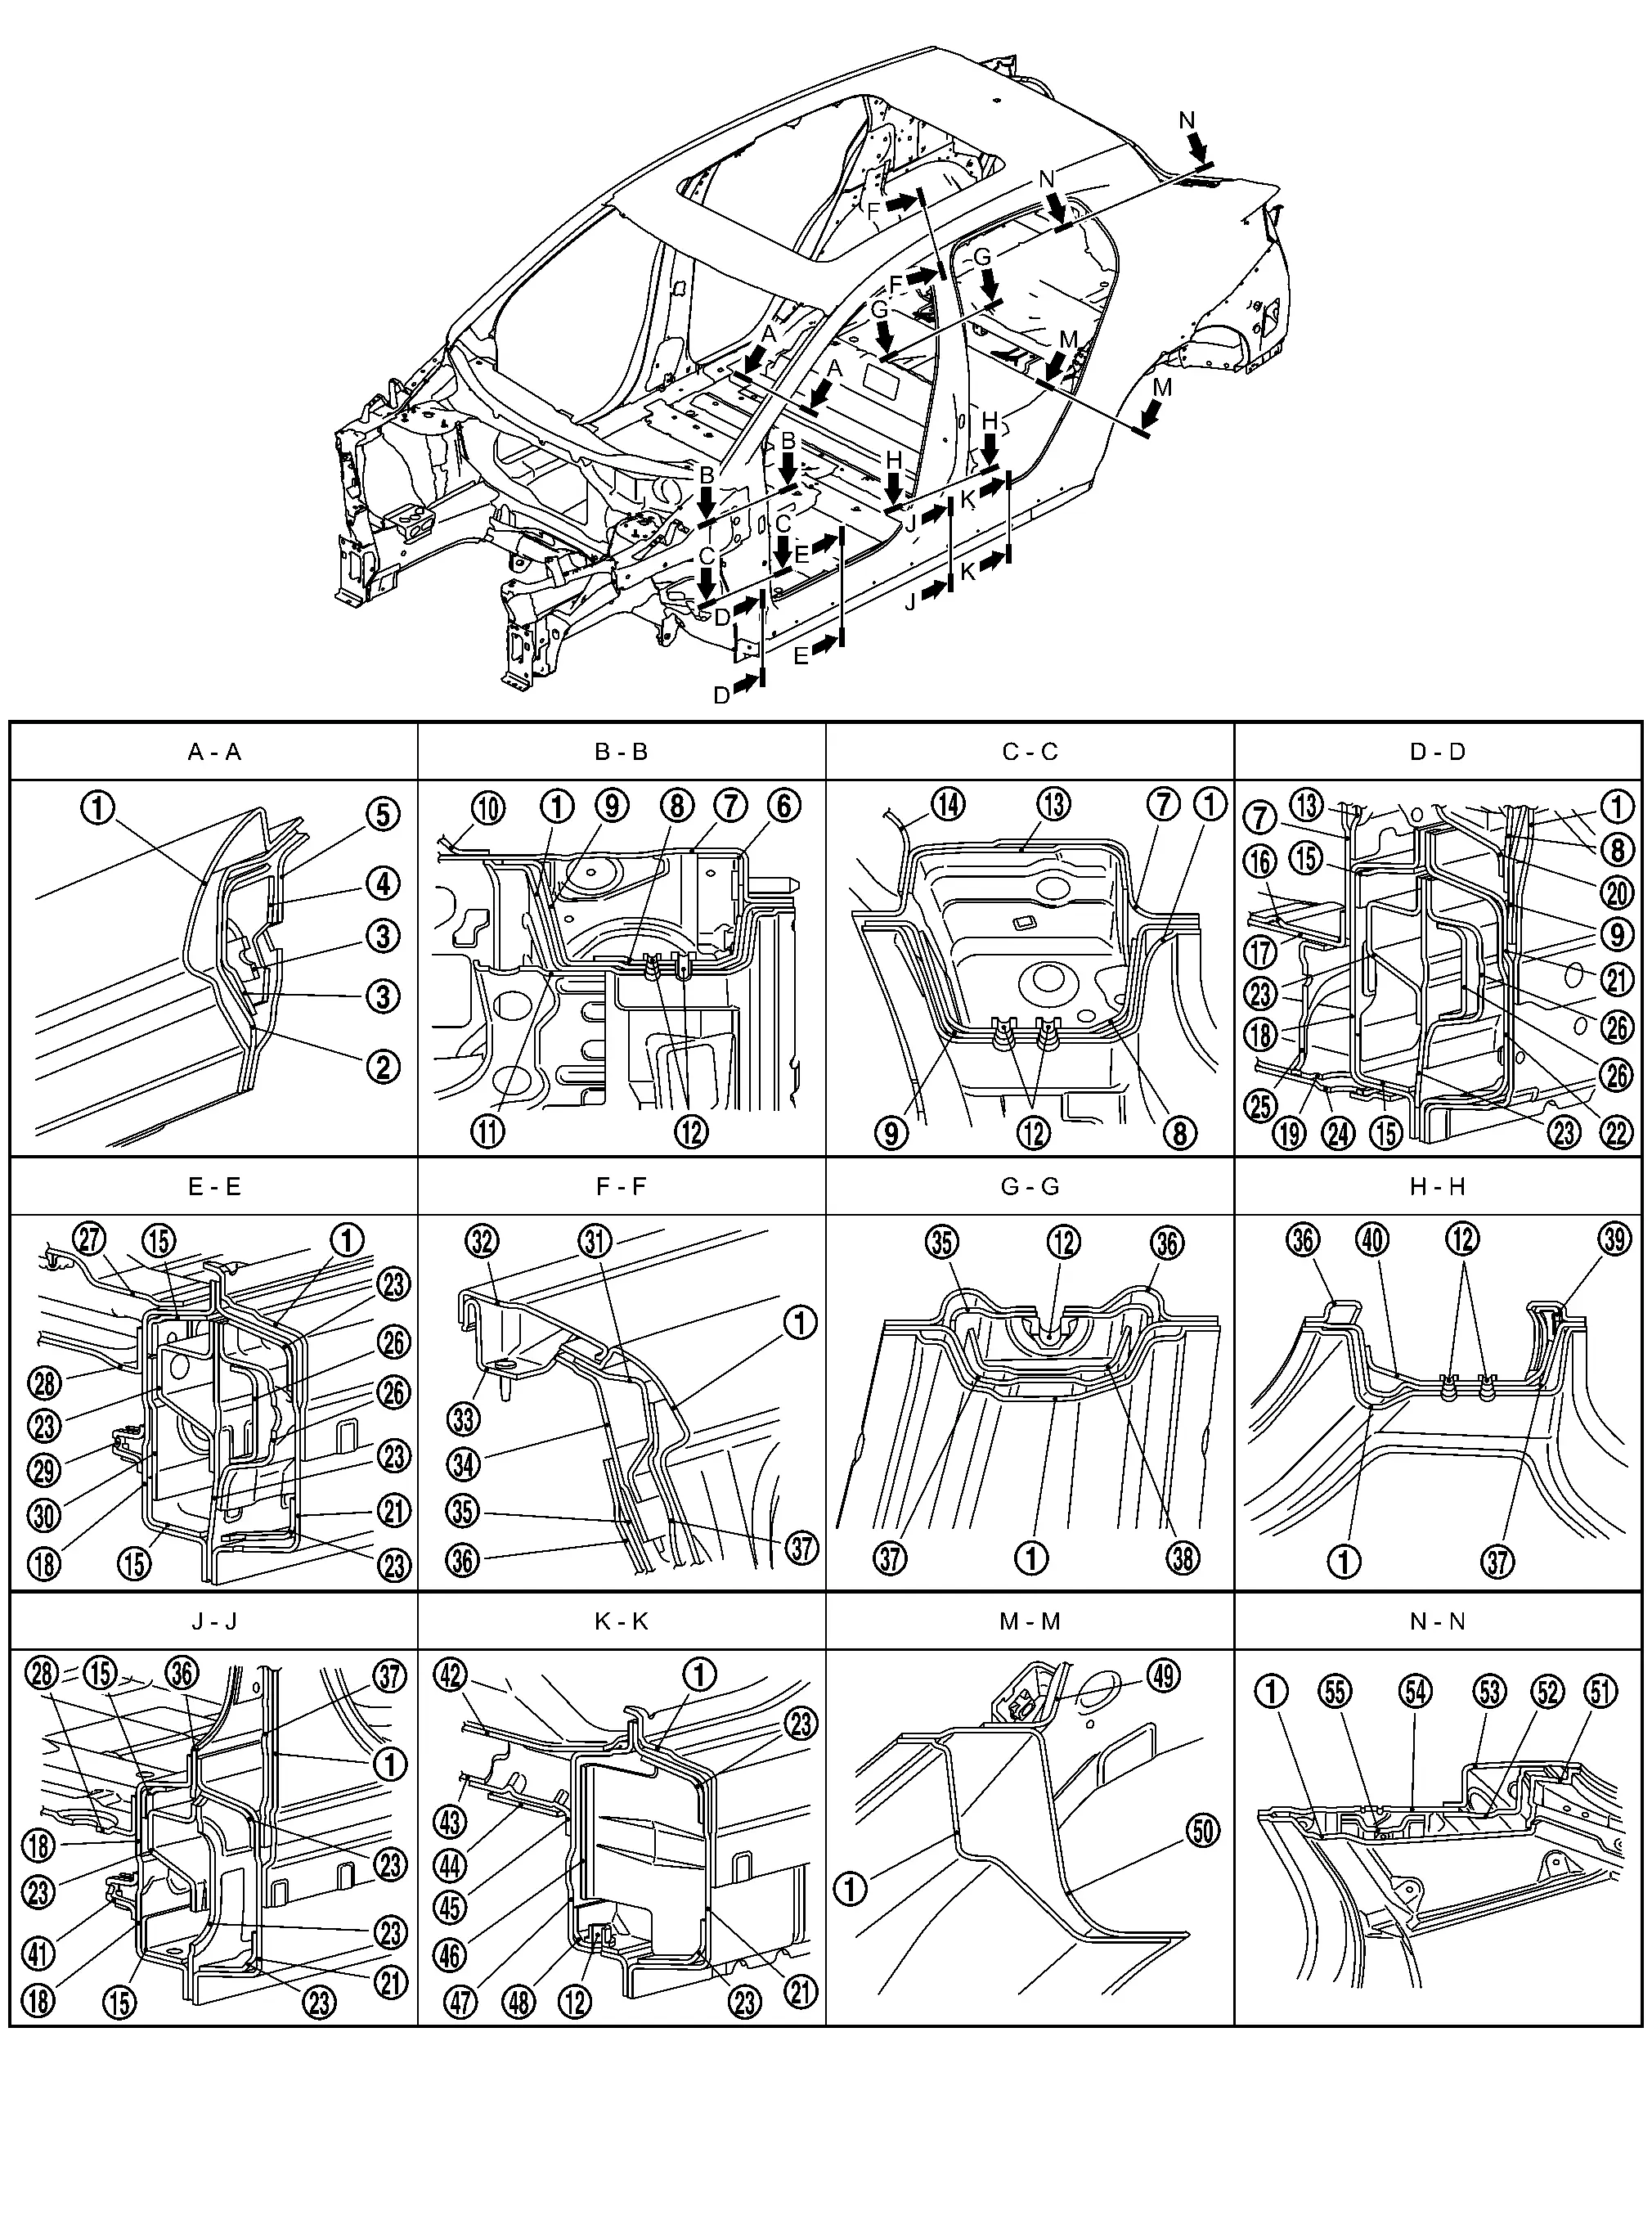
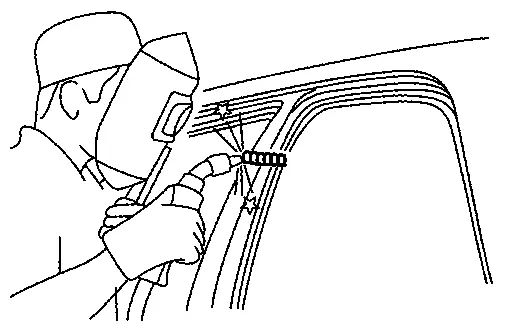
Body Sealing
The following figure shows the areas that are sealed at the factory. Sealant that is applied to these areas should be smooth and free from cuts or gaps. Care should be taken not to apply an excess amount of sealant and not to allow other unaffected parts to come into contact with the sealant.
2WD
|
: Sealed portions |
|
: Sealed portions |
|
: Sealed portions |
| : Sealed portions |
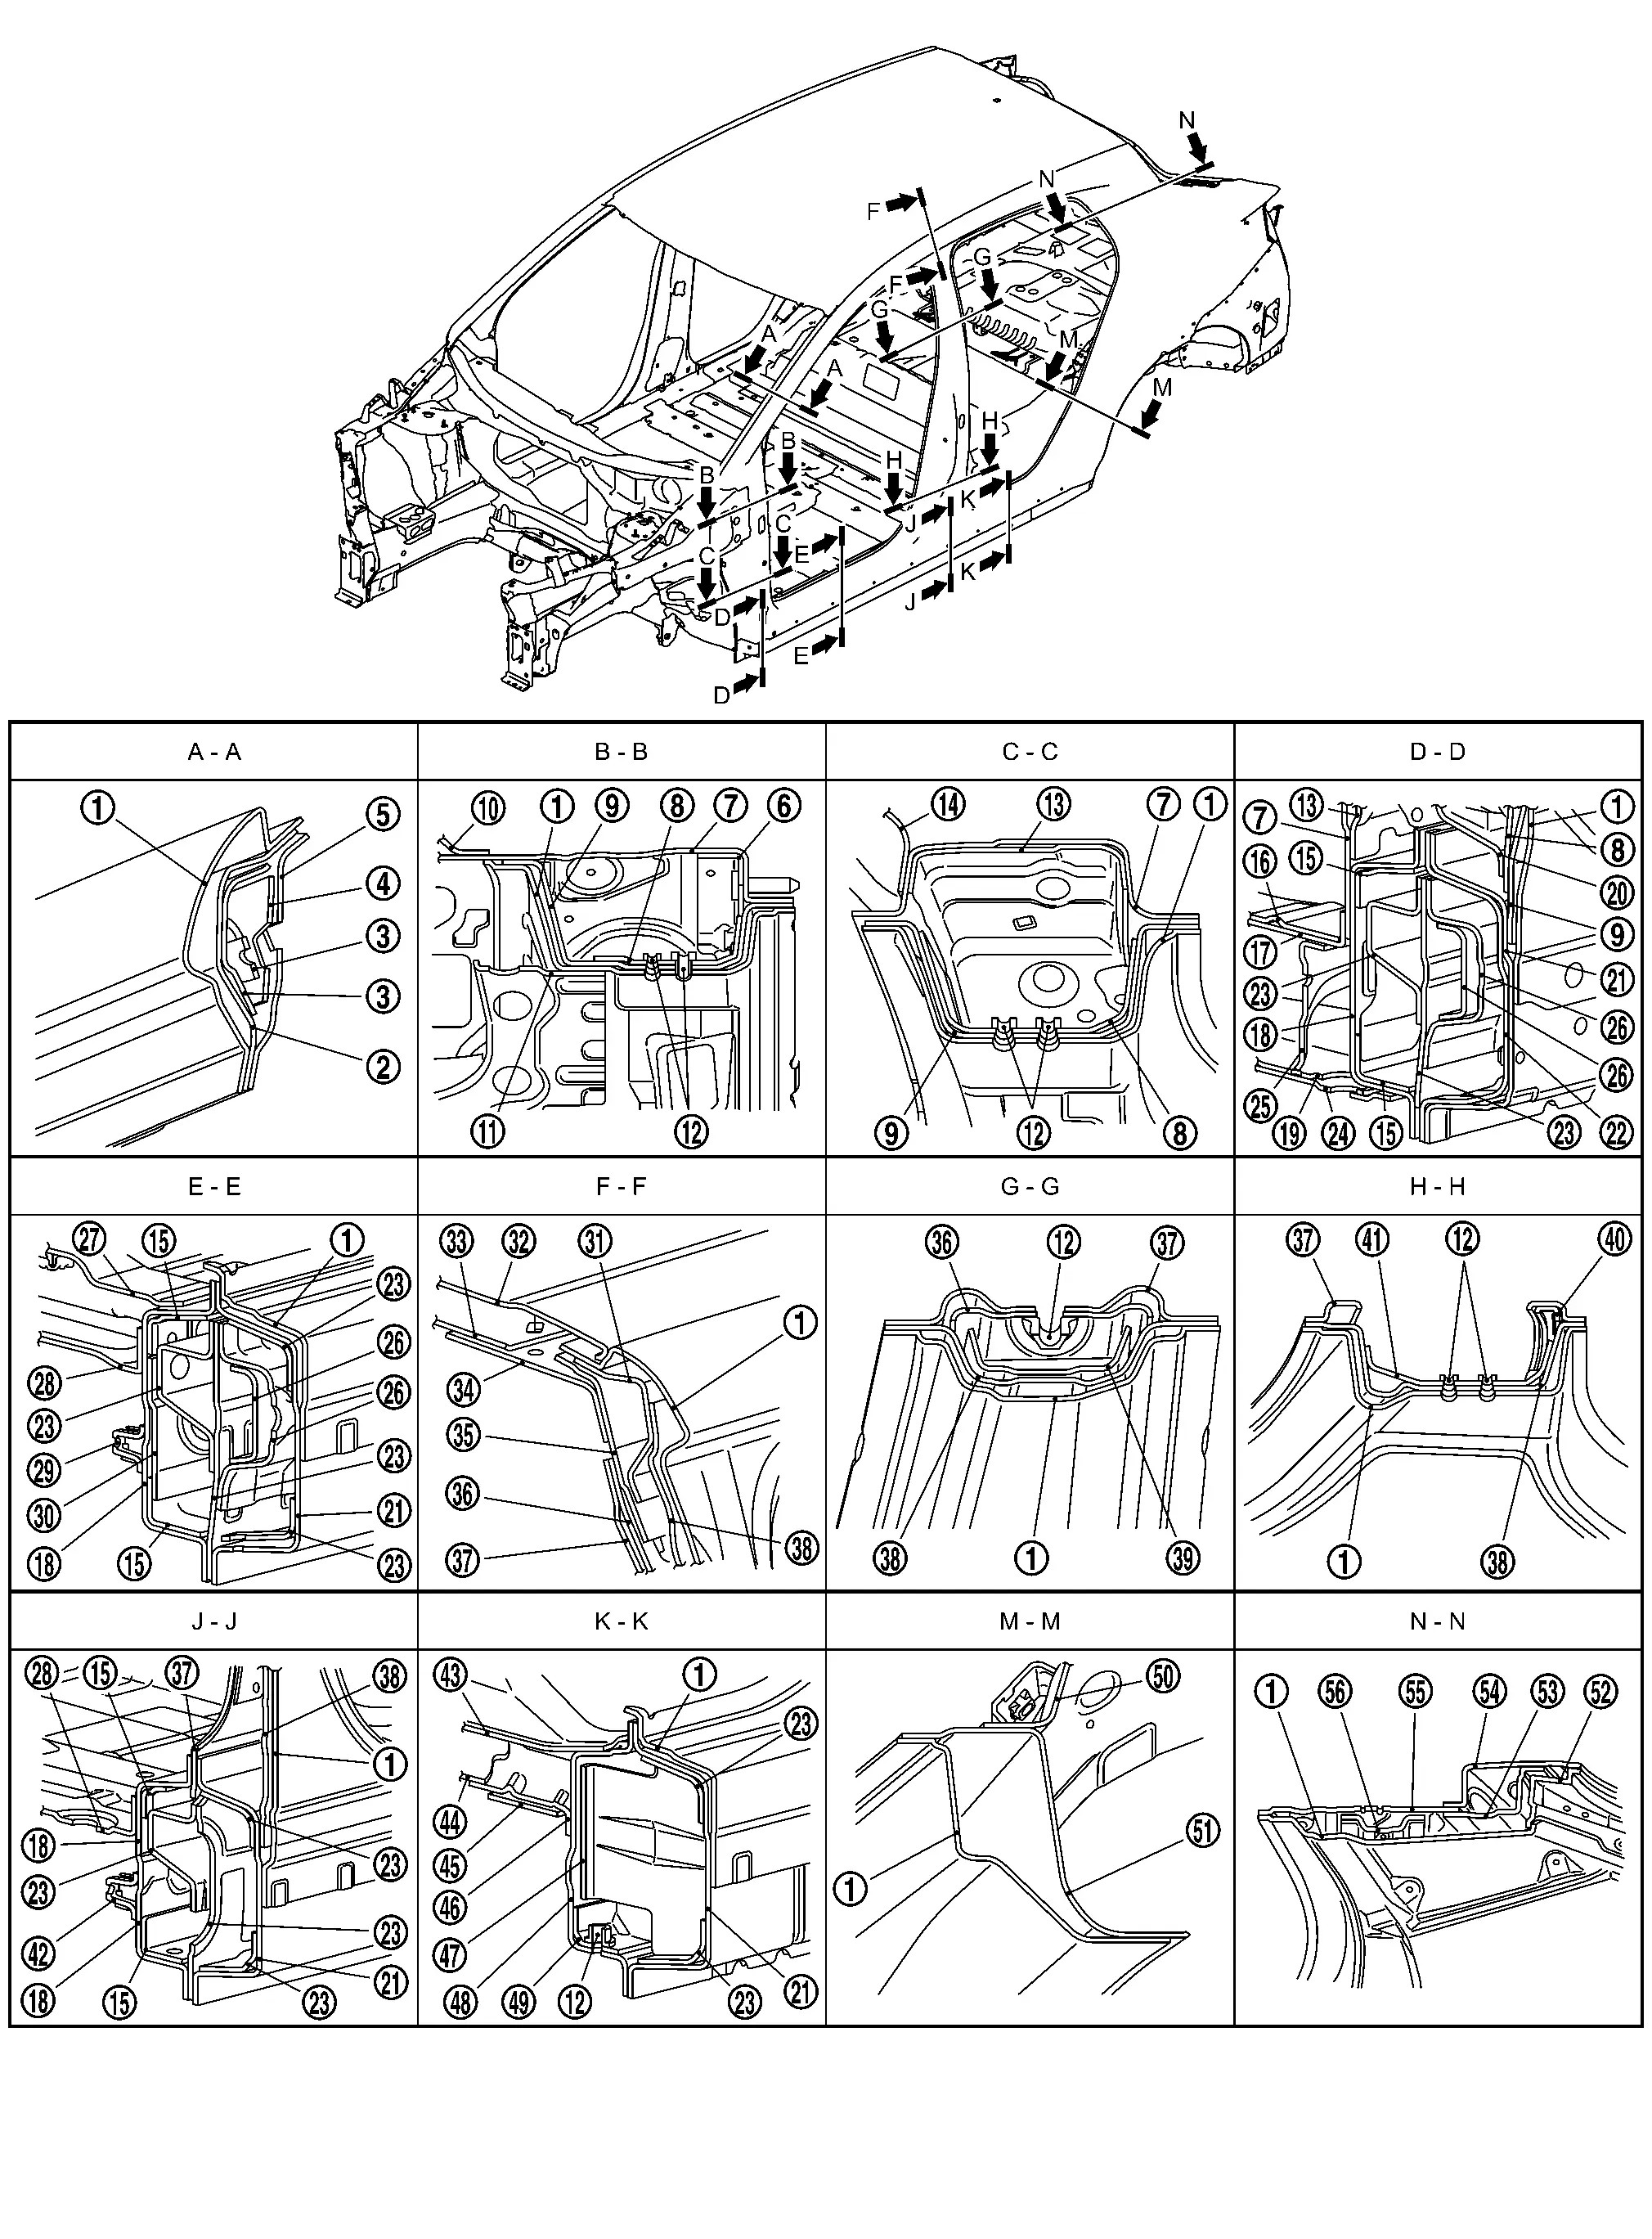
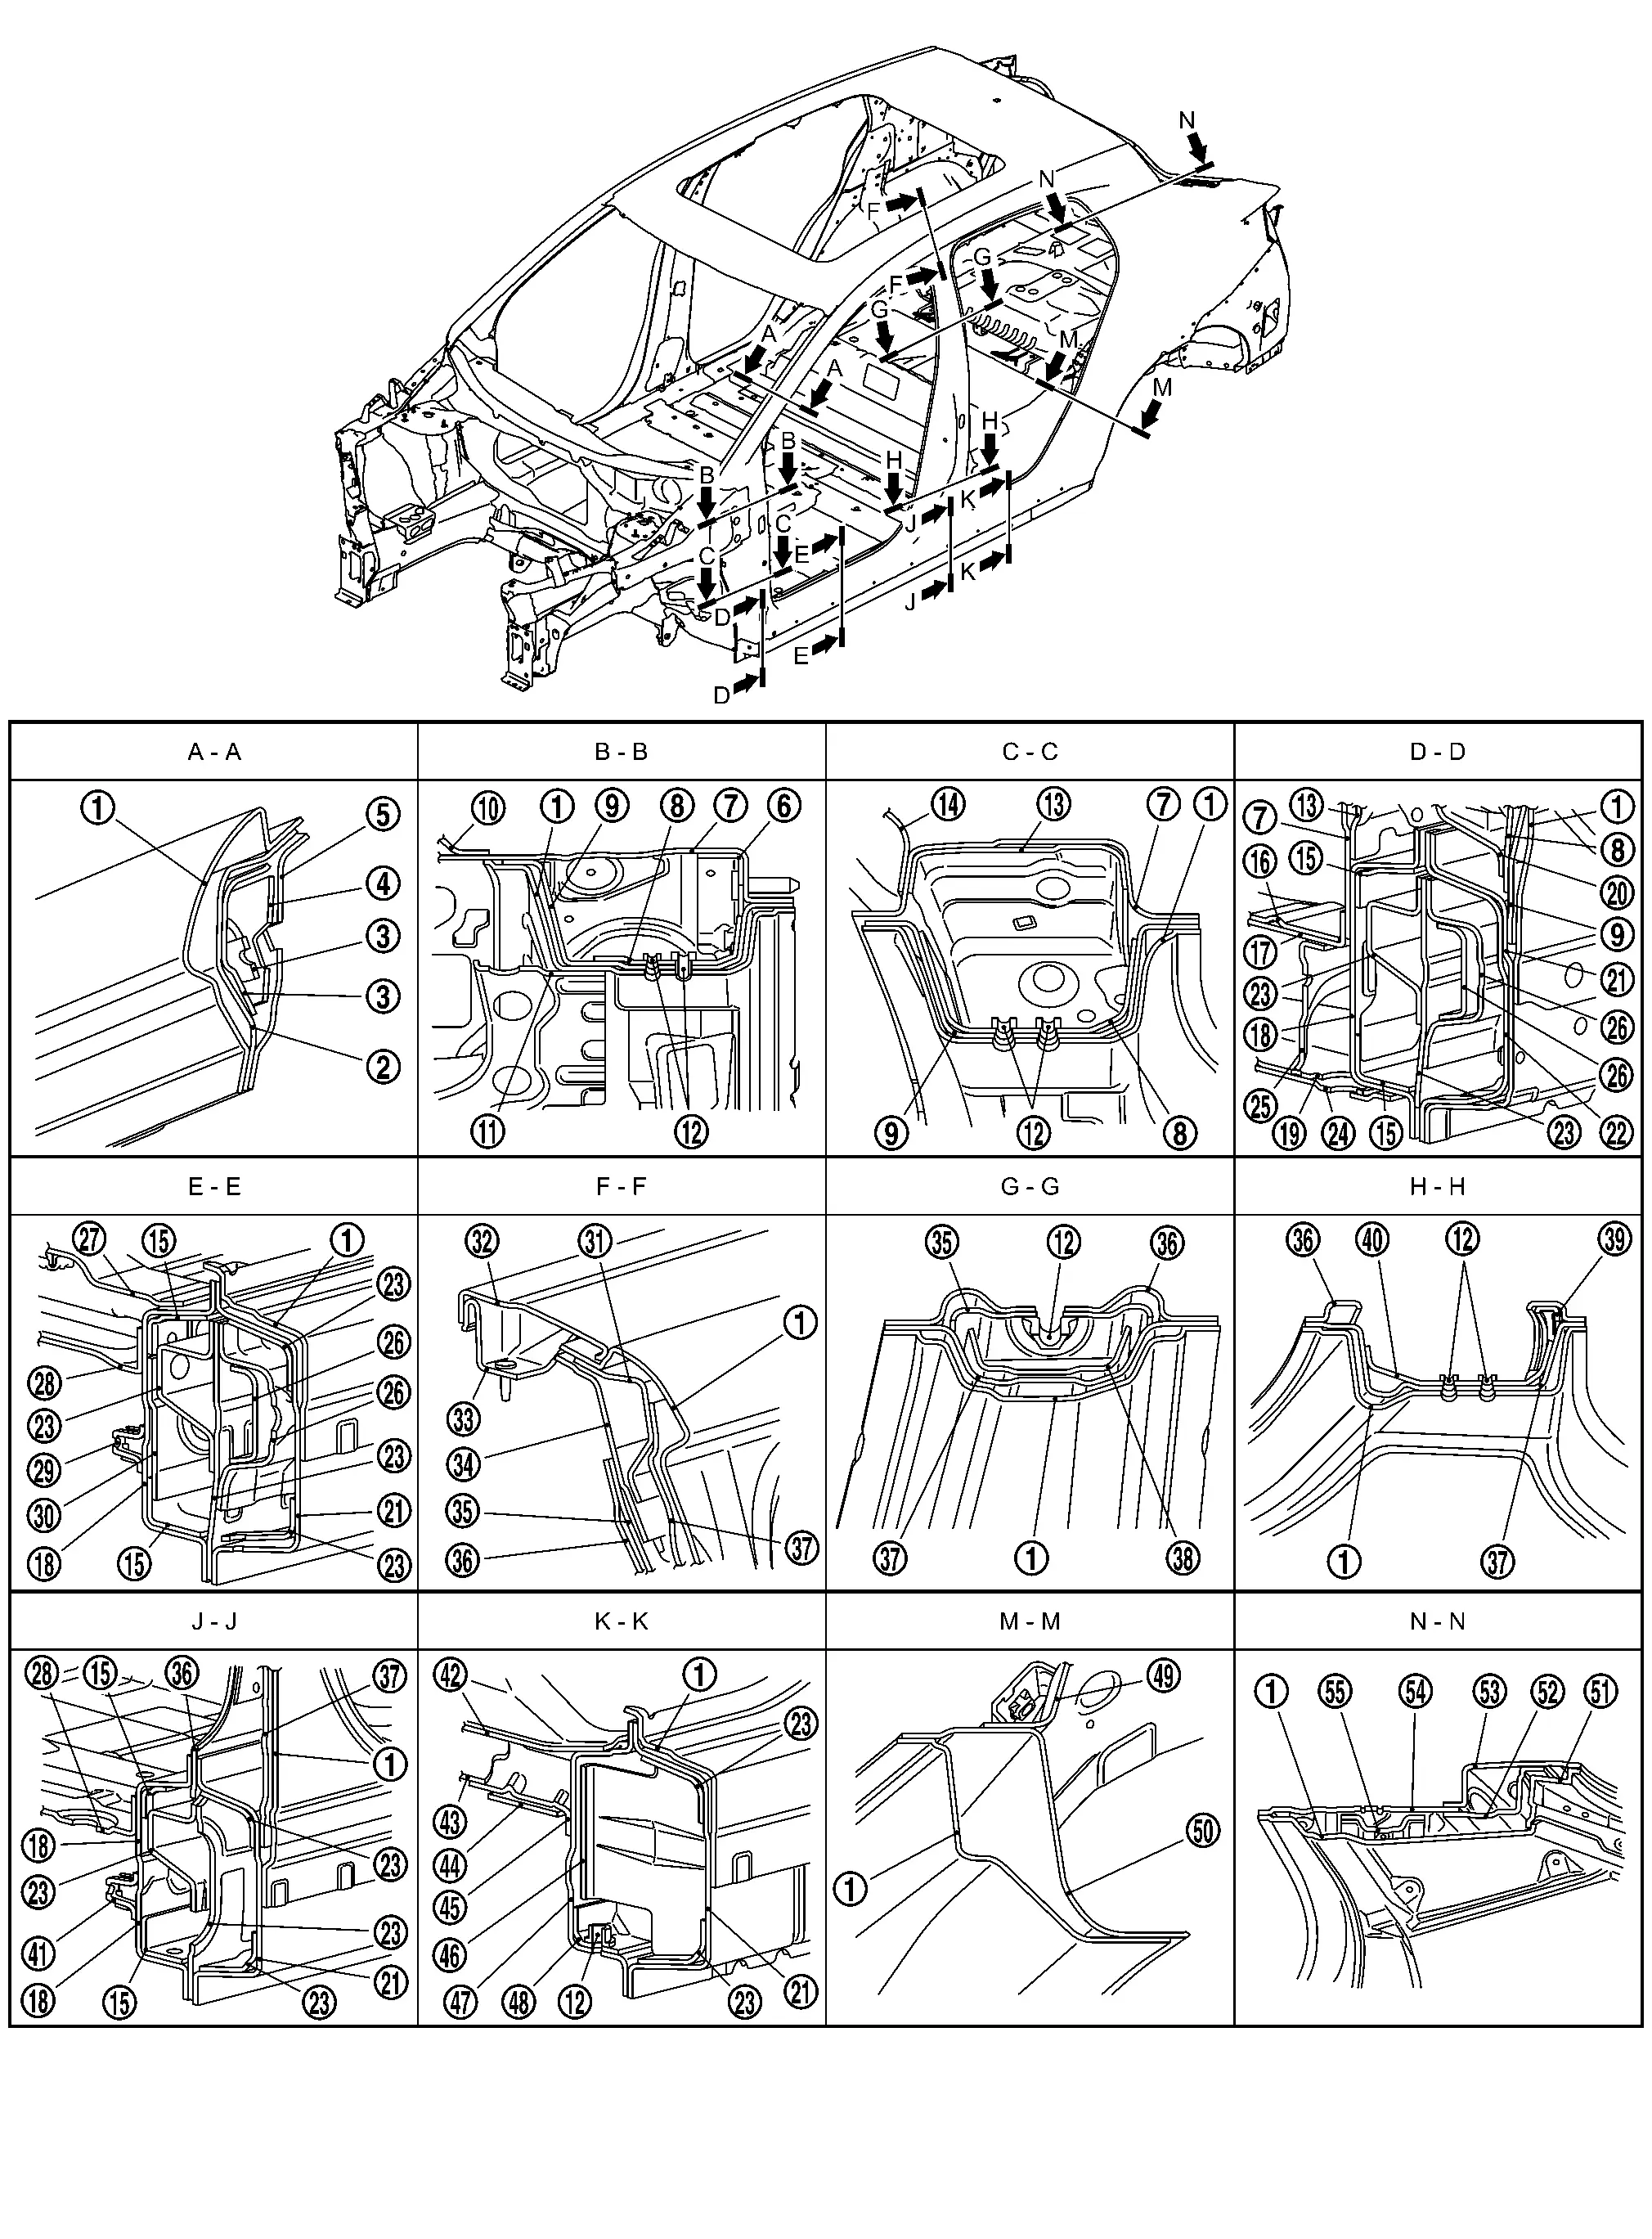
AWD
|
: Sealed portions |
|
: Sealed portions |
|
: Sealed portions |
| : Sealed portions |
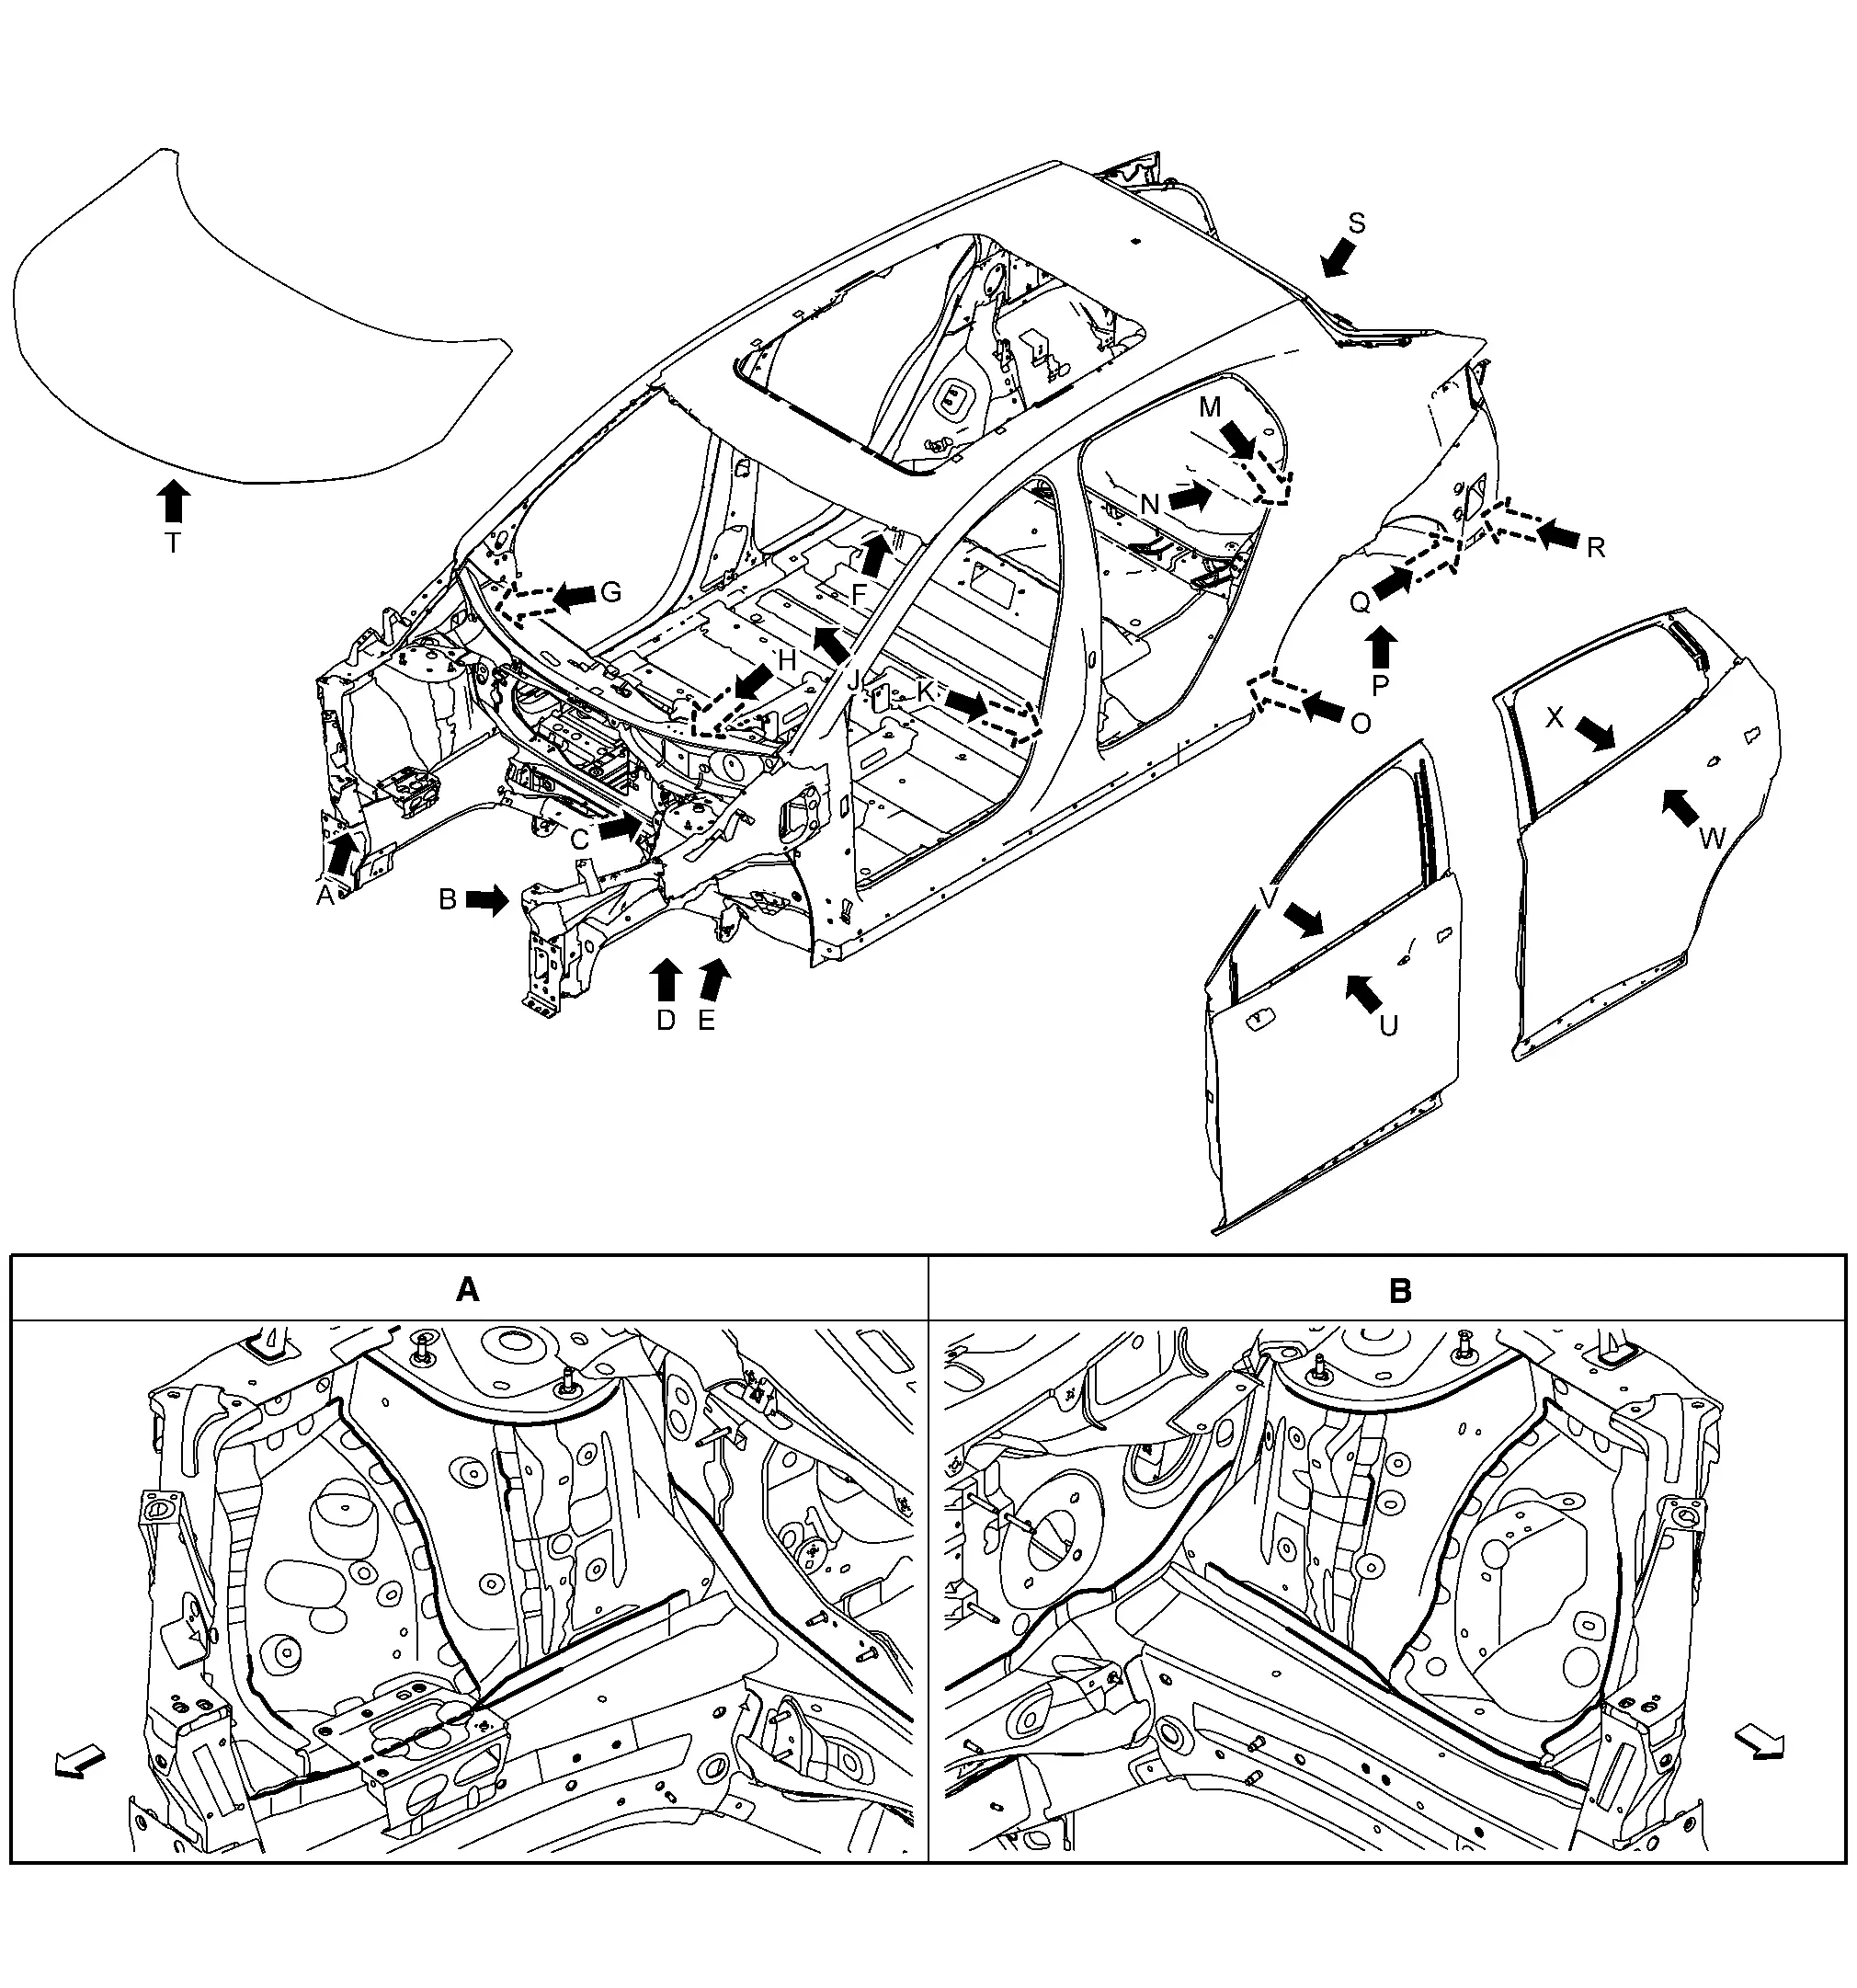
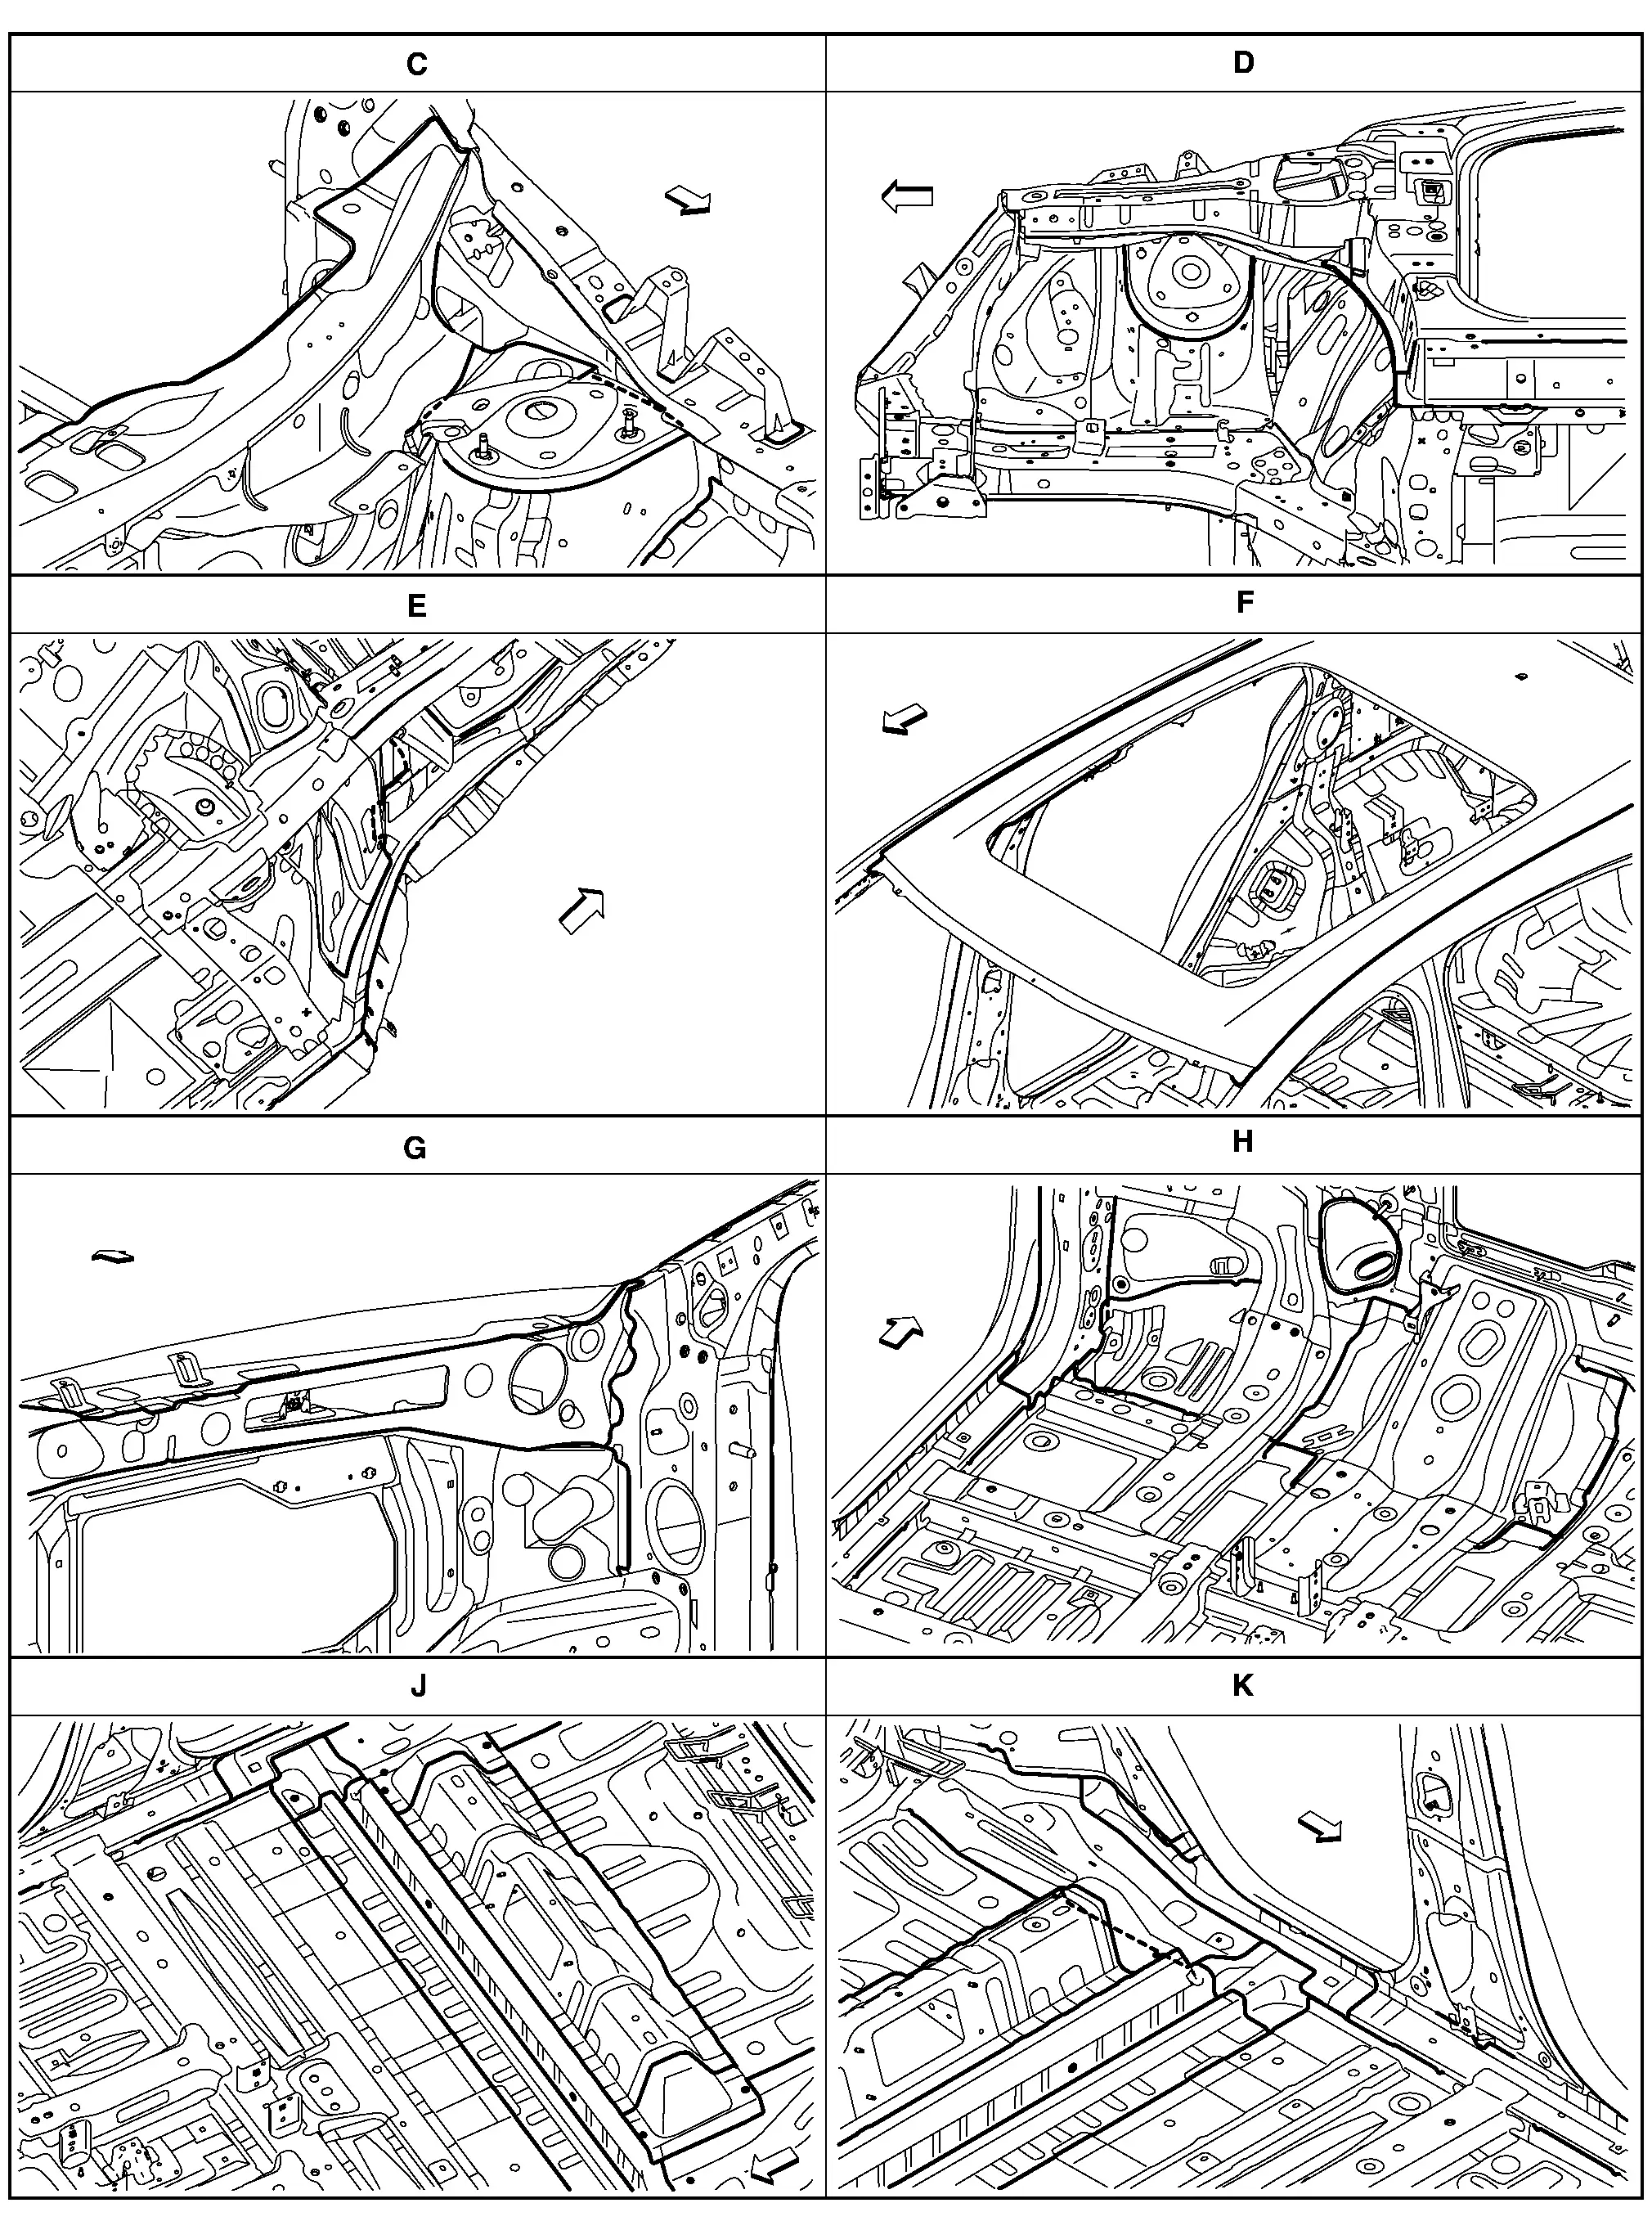
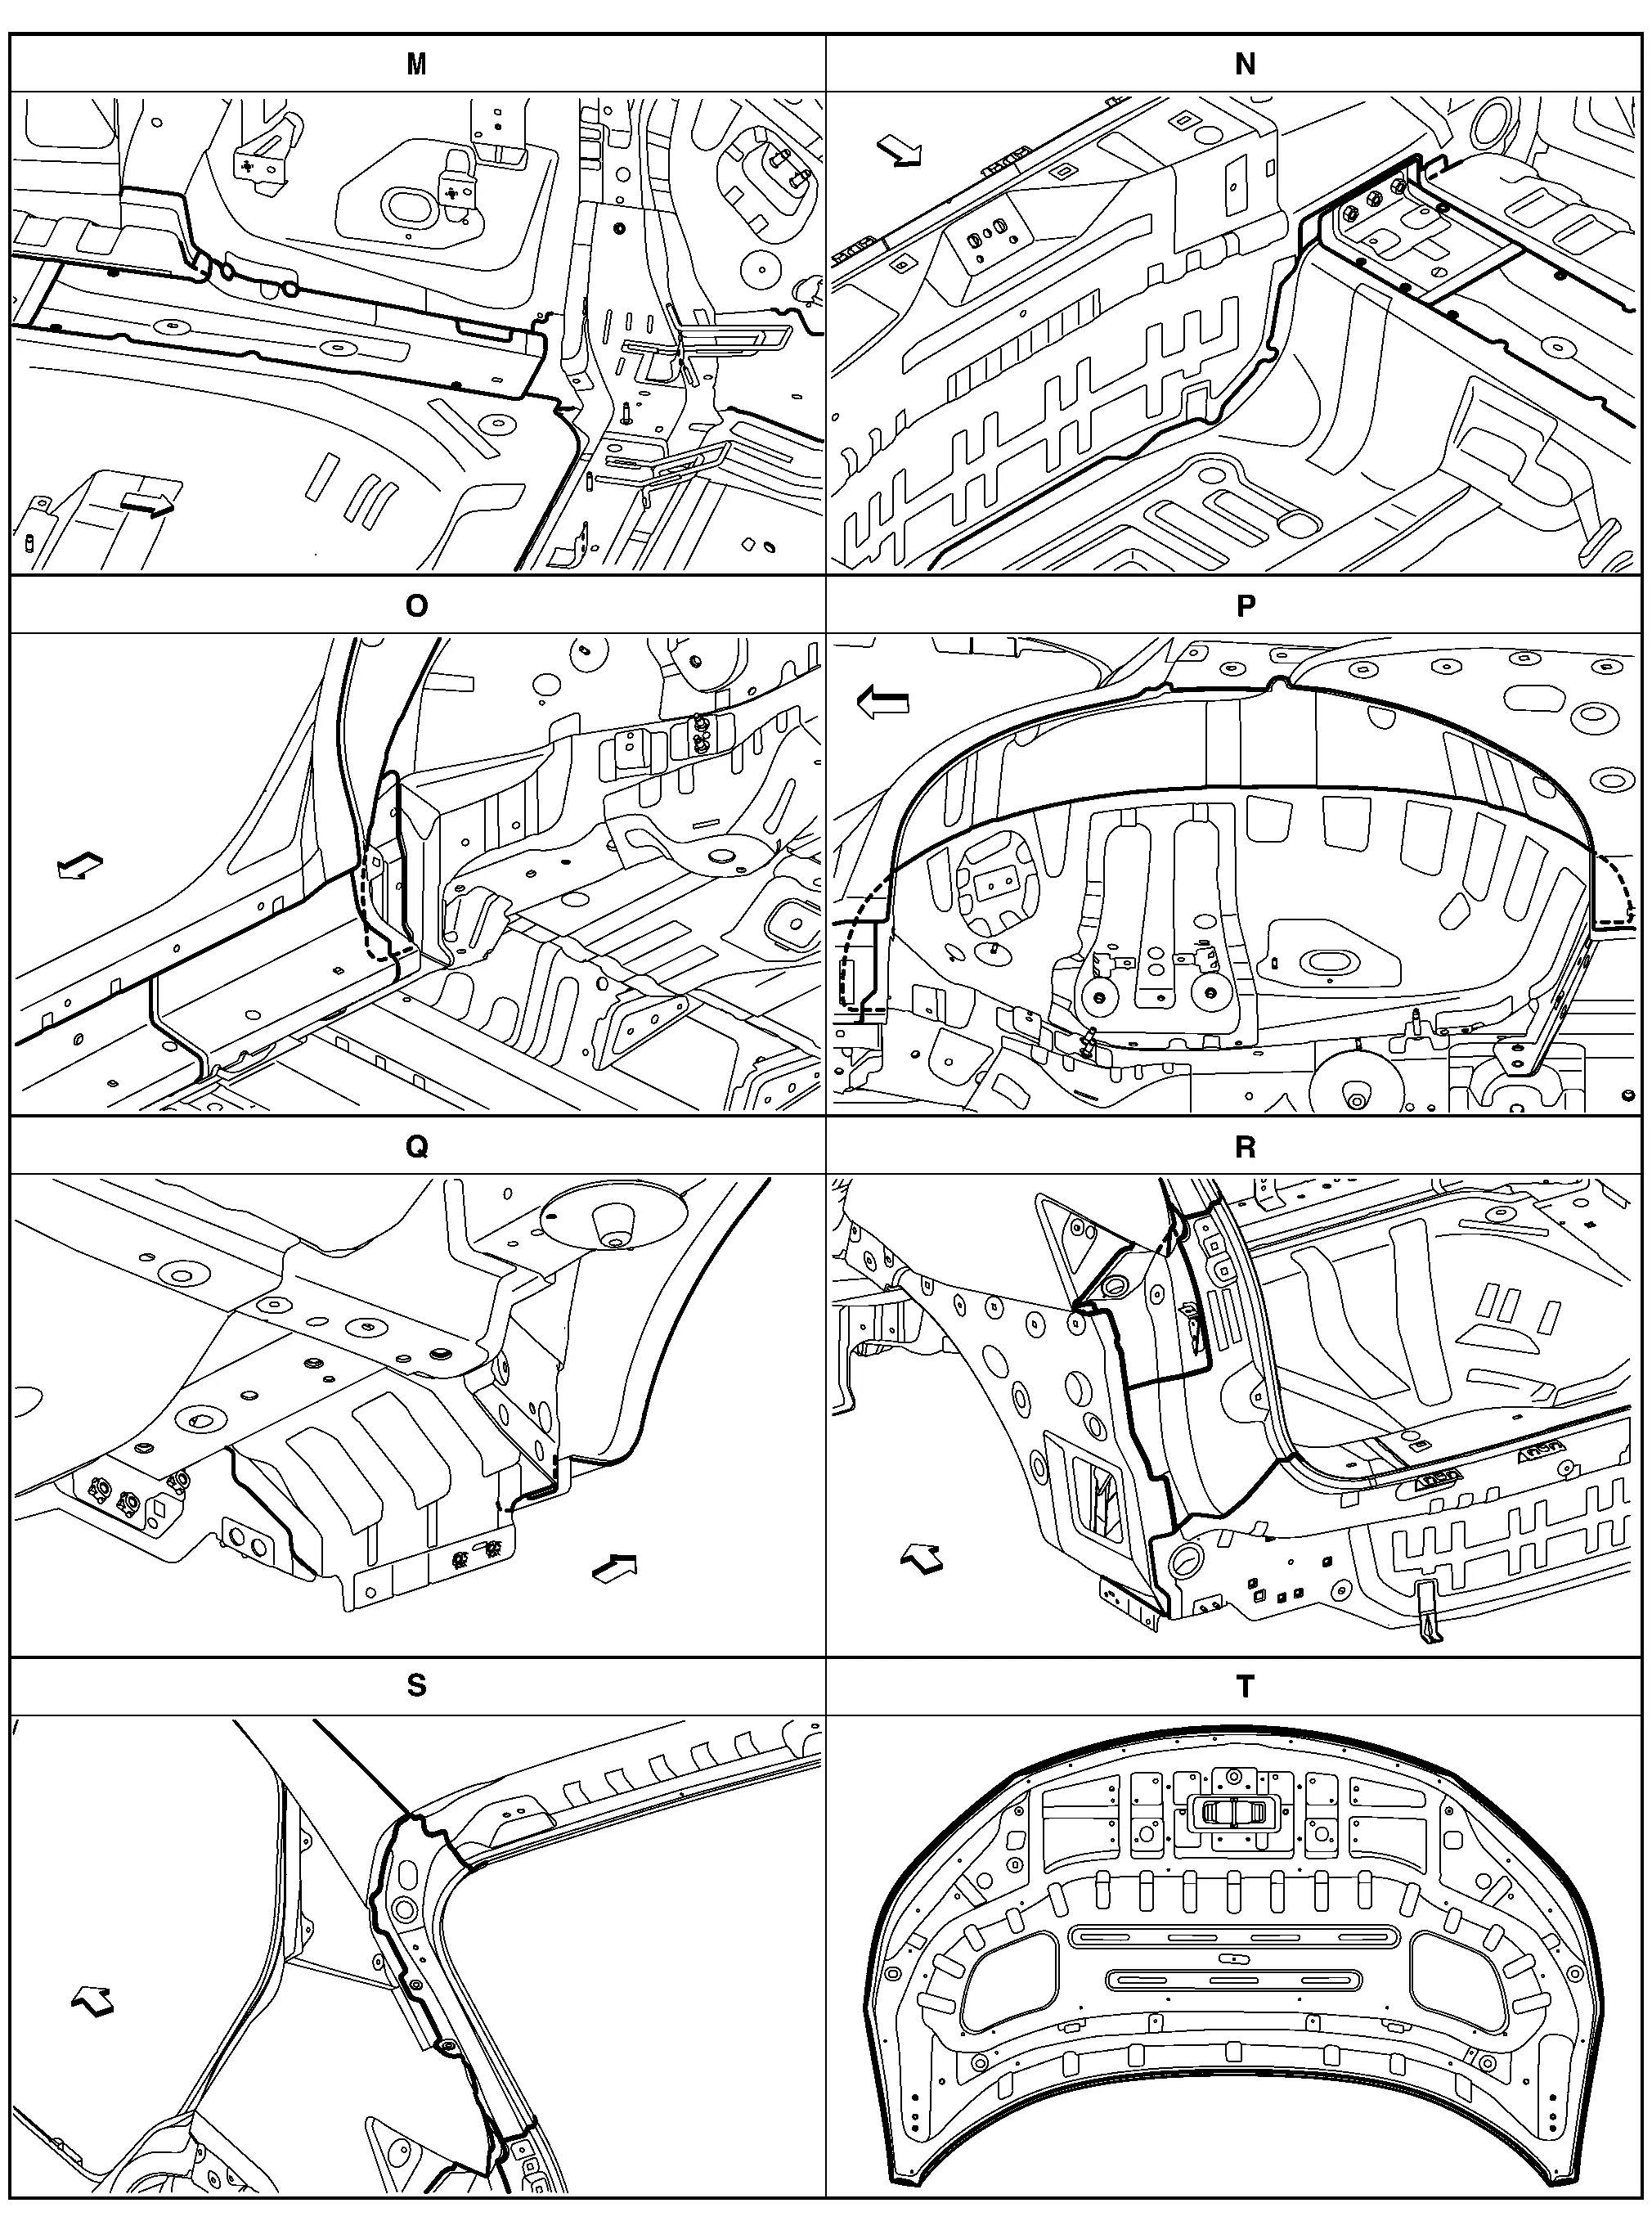
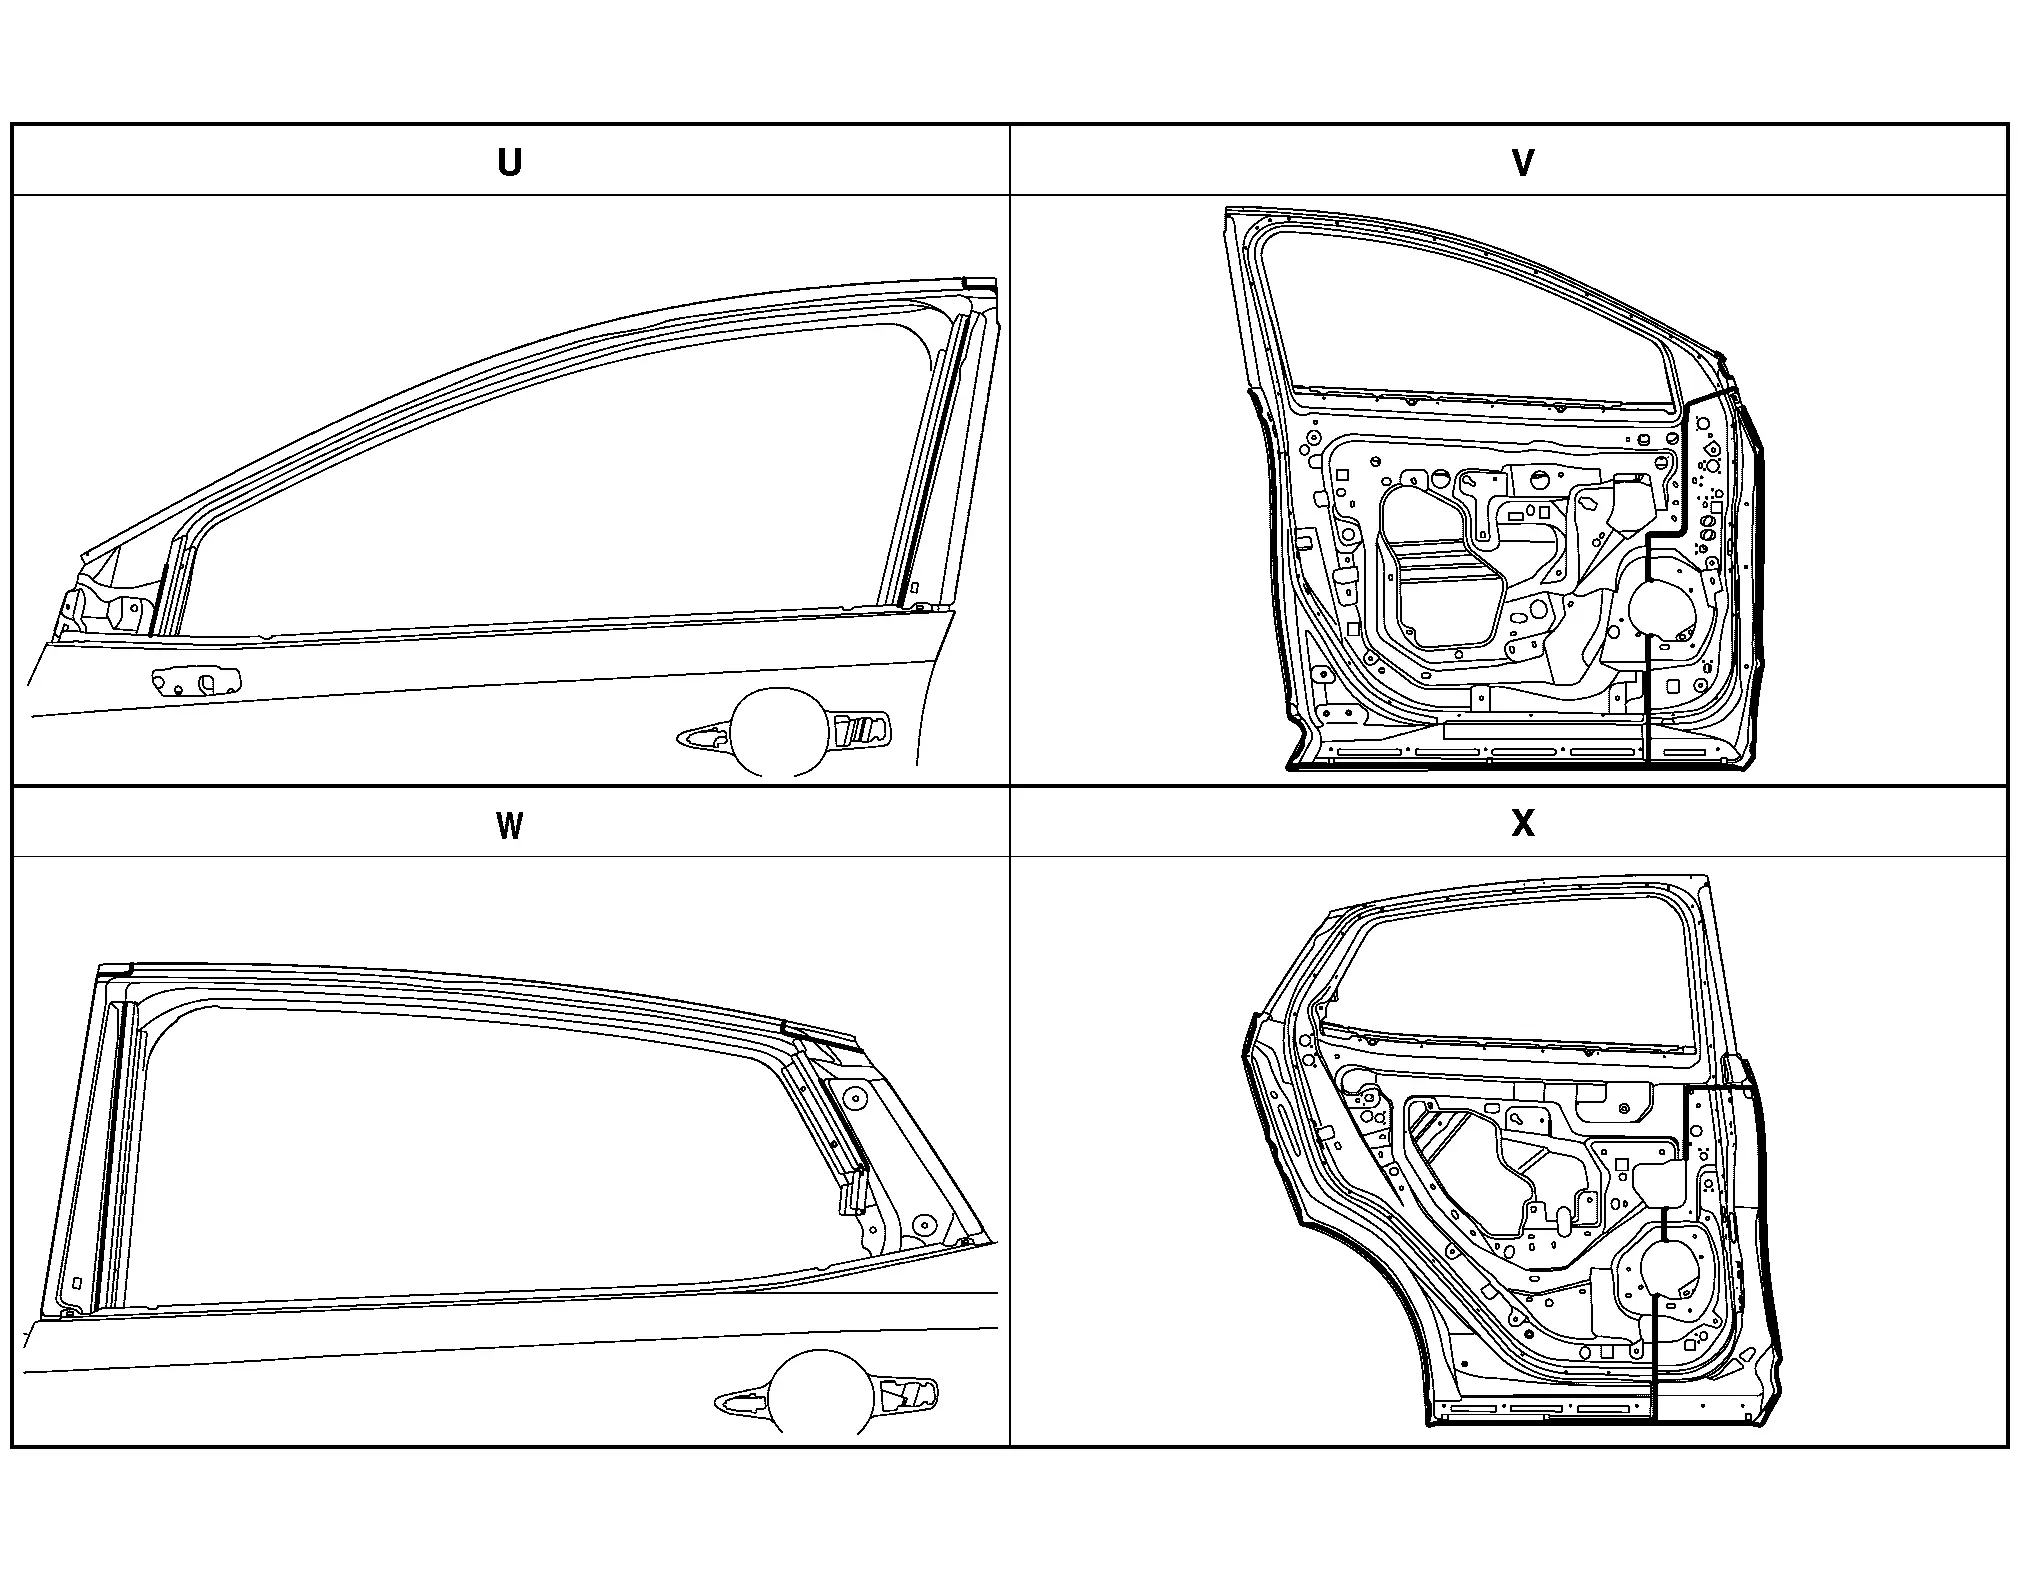
Body Construction Nissan Ariya: FE0
Body Construction
2WD models without Sunroof
 |
Outer side body |  |
Outer front pillar reinforcement |  |
Lower outer front pillar |
 |
Lower inner front pillar reinforcement |  |
Upper inner front pillar |  |
Inner front pillar bracket |
 |
Side dash |  |
Outer front pillar |  |
Lower front pillar hinge brace |
 |
Upper dash |  |
Hoodledge reinforcement |  |
Weld nut |
 |
Inner front pillar reinforcement |  |
Lower dash |  |
Inner front sill reinforcement |
 |
Lower dash reinforcement |  |
Rear lower dash |  |
Inner sill |
 |
1st side member rear outrigger |  |
Front outer sill reinforcement |  |
Outer sill reinforcement |
 |
Front outer sill brace |  |
Center sill reinforcement |  |
1st side member outrigger |
 |
Front outrigger reinforcement |  |
Closing plate reinforcement |  |
2nd cross member |
 |
Front floor |  |
Front sill bulkhead front |  |
Inner sill plate |
 |
Outer side roof rail |  |
Roof |  |
2nd roof bow |
 |
Center roof rail brace |  |
Inner side roof rail |  |
Center pillar seat belt anchor |
 |
Inner center pillar |  |
Center pillar hinge brace |  |
Center pillar reinforcement |
 |
Lower inner center pillar reinforcement |  |
Lower hinge plate inner |  |
Front sill bulkhead rear |
 |
Rear floor front extension |  |
Rear seat cross member |  |
Rear side member |
 |
Front reinforcement connector |  |
Outer sill brace |  |
Inner sill extension |
 |
Nut plate |  |
Inner rear wheelhouse |  |
Outer rear wheelhouse |
 |
Center main back pillar |  |
Upper back pillar reinforcement |  |
Rear roof rail brace |
 |
Inner rear pillar |  |
Rear pillar lower reinforcement |
2WD models with Sunroof
|
Outer side body | |
Outer front pillar reinforcement | |
Lower outer front pillar |
|
Lower inner front pillar reinforcement | |
Upper inner front pillar | |
Inner front pillar bracket |
|
Side dash | |
Outer front pillar | |
Lower front pillar hinge brace |
|
Upper dash | |
Hoodledge reinforcement | |
Weld nut |
|
Inner front pillar reinforcement | |
Lower dash | |
Inner front sill reinforcement |
|
Lower dash reinforcement | |
Rear lower dash | |
Inner sill |
|
1st side member rear outrigger | |
Front outer sill reinforcement | |
Outer sill reinforcement |
|
Front outer sill brace | |
Center sill reinforcement | |
1st side member outrigger |
|
Front outrigger reinforcement | |
Closing plate reinforcement | |
2nd cross member |
|
Front floor | |
Front sill bulkhead front | |
Inner sill plate |
|
Outer side roof rail | |
Sun roof | |
Side roof rail reinforcement |
|
Inner side roof rail | |
Center pillar seat belt anchor | |
Inner center pillar |
|
Center pillar hinge brace | |
Center pillar reinforcement | |
Lower inner center pillar reinforcement |
|
Lower hinge plate inner | |
Front sill bulkhead rear | |
Rear floor front extension |
|
Rear seat cross member | |
Rear side member | |
Front reinforcement connector |
|
Outer sill brace | |
Inner sill extension | |
Nut plate |
|
Inner rear wheelhouse | |
Outer rear wheelhouse | |
Center main back pillar |
|
Upper back pillar reinforcement | |
Rear roof rail brace | |
Inner rear pillar |
|
Rear pillar lower reinforcement |
AWD models without Sunroof
|
Outer side body | |
Outer front pillar reinforcement | |
Lower outer front pillar |
|
Lower inner front pillar reinforcement | |
Upper inner front pillar | |
Inner front pillar bracket |
|
Side dash | |
Outer front pillar | |
Lower front pillar hinge brace |
|
Upper dash | |
Hoodledge reinforcement | |
Weld nut |
|
Inner front pillar reinforcement | |
Lower dash | |
Inner front sill reinforcement |
|
Lower dash reinforcement | |
Rear lower dash | |
Inner sill |
|
1st side member rear outrigger | |
Front outer sill reinforcement | |
Outer sill reinforcement |
|
Front outer sill brace | |
Center sill reinforcement | |
1st side member outrigger |
|
Front outrigger reinforcement | |
Closing plate reinforcement | |
2nd cross member |
|
Front floor | |
Front sill bulkhead front | |
Inner sill plate |
|
Outer side roof rail | |
Roof | |
2nd roof bow |
|
Center roof rail brace | |
Inner side roof rail | |
Center pillar seat belt anchor |
|
Inner center pillar | |
Center pillar hinge brace | |
Center pillar reinforcement |
|
Lower inner center pillar reinforcement | |
Lower hinge plate inner | |
Front sill bulkhead rear |
|
Rear floor front extension | |
Rear seat cross member | |
Rear side member |
|
Front reinforcement connector | |
Outer sill brace | |
Inner sill extension |
|
Nut plate | |
Inner rear wheelhouse | |
Outer rear wheelhouse |
|
Center main back pillar | |
Upper back pillar reinforcement | |
Rear roof rail brace |
|
Inner rear pillar | |
Rear pillar lower reinforcement |
AWD models with Sunroof
|
Outer side body | |
Outer front pillar reinforcement | |
Lower outer front pillar |
|
Lower inner front pillar reinforcement | |
Upper inner front pillar | |
Inner front pillar bracket |
|
Side dash | |
Outer front pillar | |
Lower front pillar hinge brace |
|
Upper dash | |
Hoodledge reinforcement | |
Weld nut |
|
Inner front pillar reinforcement | |
Lower dash | |
Inner front sill reinforcement |
|
Lower dash reinforcement | |
Rear lower dash | |
Inner sill |
|
1st side member rear outrigger | |
Front outer sill reinforcement | |
Outer sill reinforcement |
|
Front outer sill brace | |
Center sill reinforcement | |
1st side member outrigger |
|
Front outrigger reinforcement | |
Closing plate reinforcement | |
2nd cross member |
|
Front floor | |
Front sill bulkhead front | |
Inner sill plate |
|
Outer side roof rail | |
Sun roof | |
Side roof rail reinforcement |
|
Inner side roof rail | |
Center pillar seat belt anchor | |
Inner center pillar |
|
Center pillar hinge brace | |
Center pillar reinforcement | |
Lower inner center pillar reinforcement |
|
Lower hinge plate inner | |
Front sill bulkhead rear | |
Rear floor front extension |
|
Rear seat cross member | |
Rear side member | |
Front reinforcement connector |
|
Outer sill brace | |
Inner sill extension | |
Nut plate |
|
Inner rear wheelhouse | |
Outer rear wheelhouse | |
Center main back pillar |
|
Upper back pillar reinforcement | |
Rear roof rail brace | |
Inner rear pillar |
|
Rear pillar lower reinforcement |
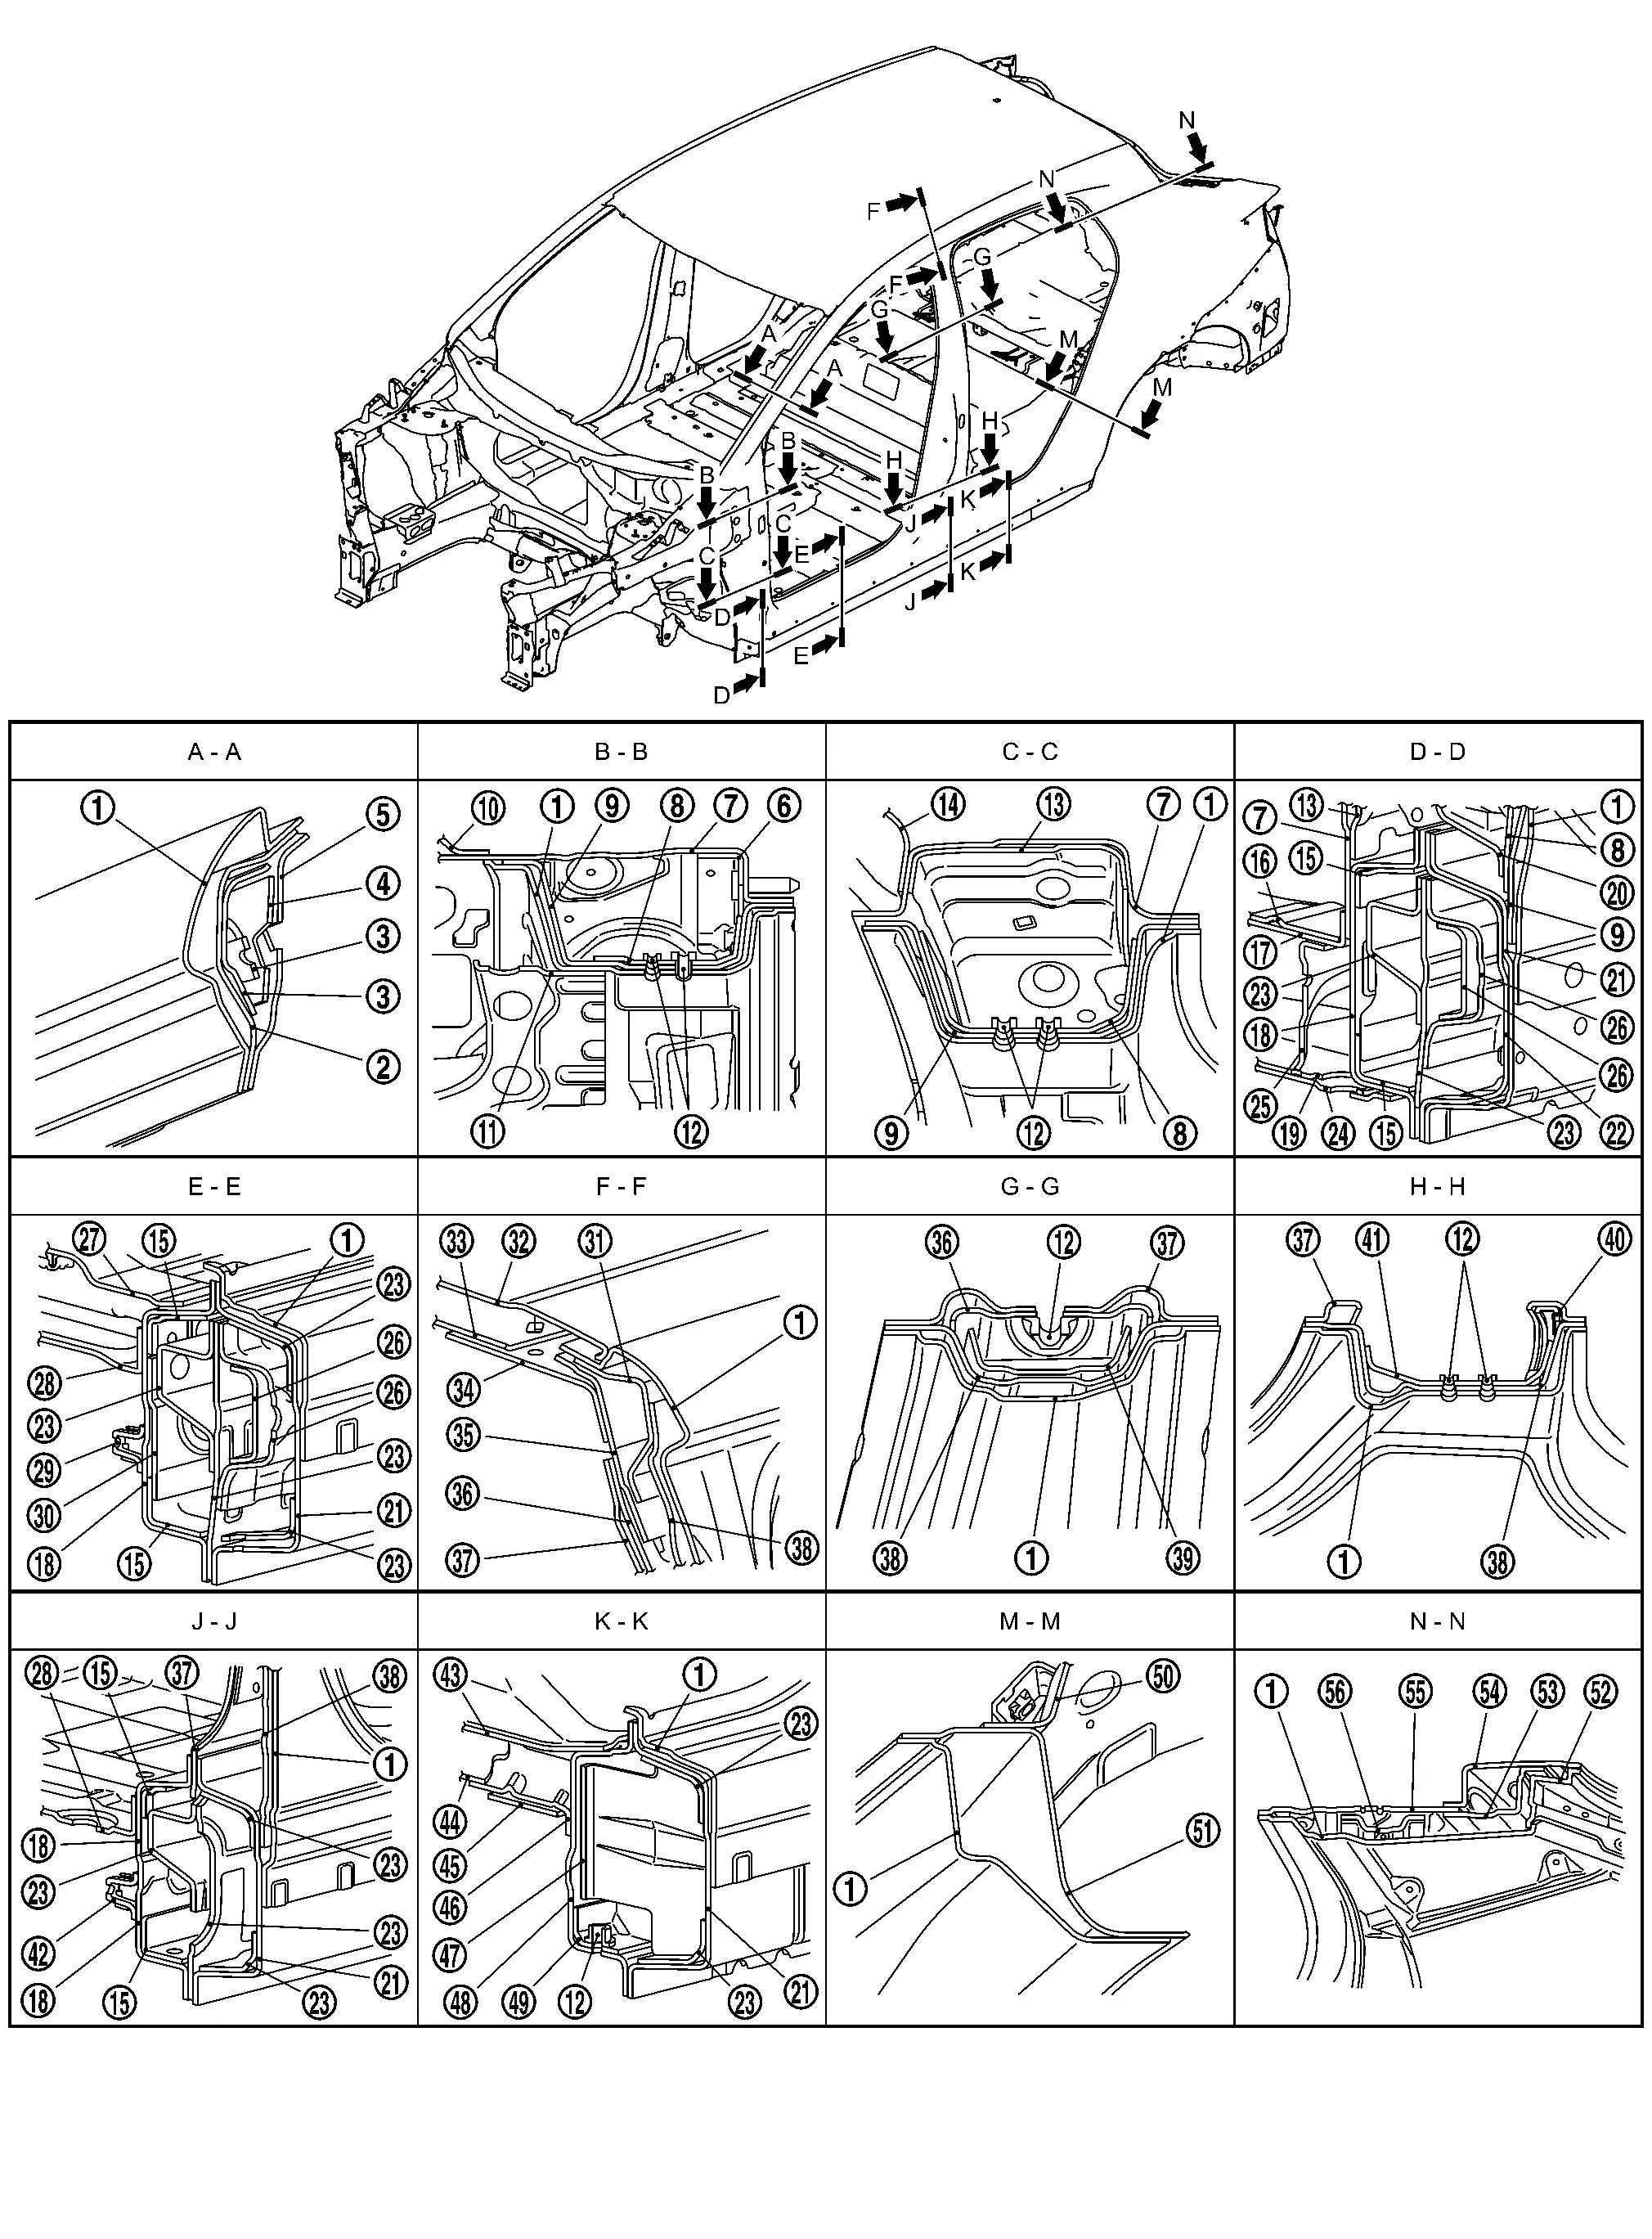
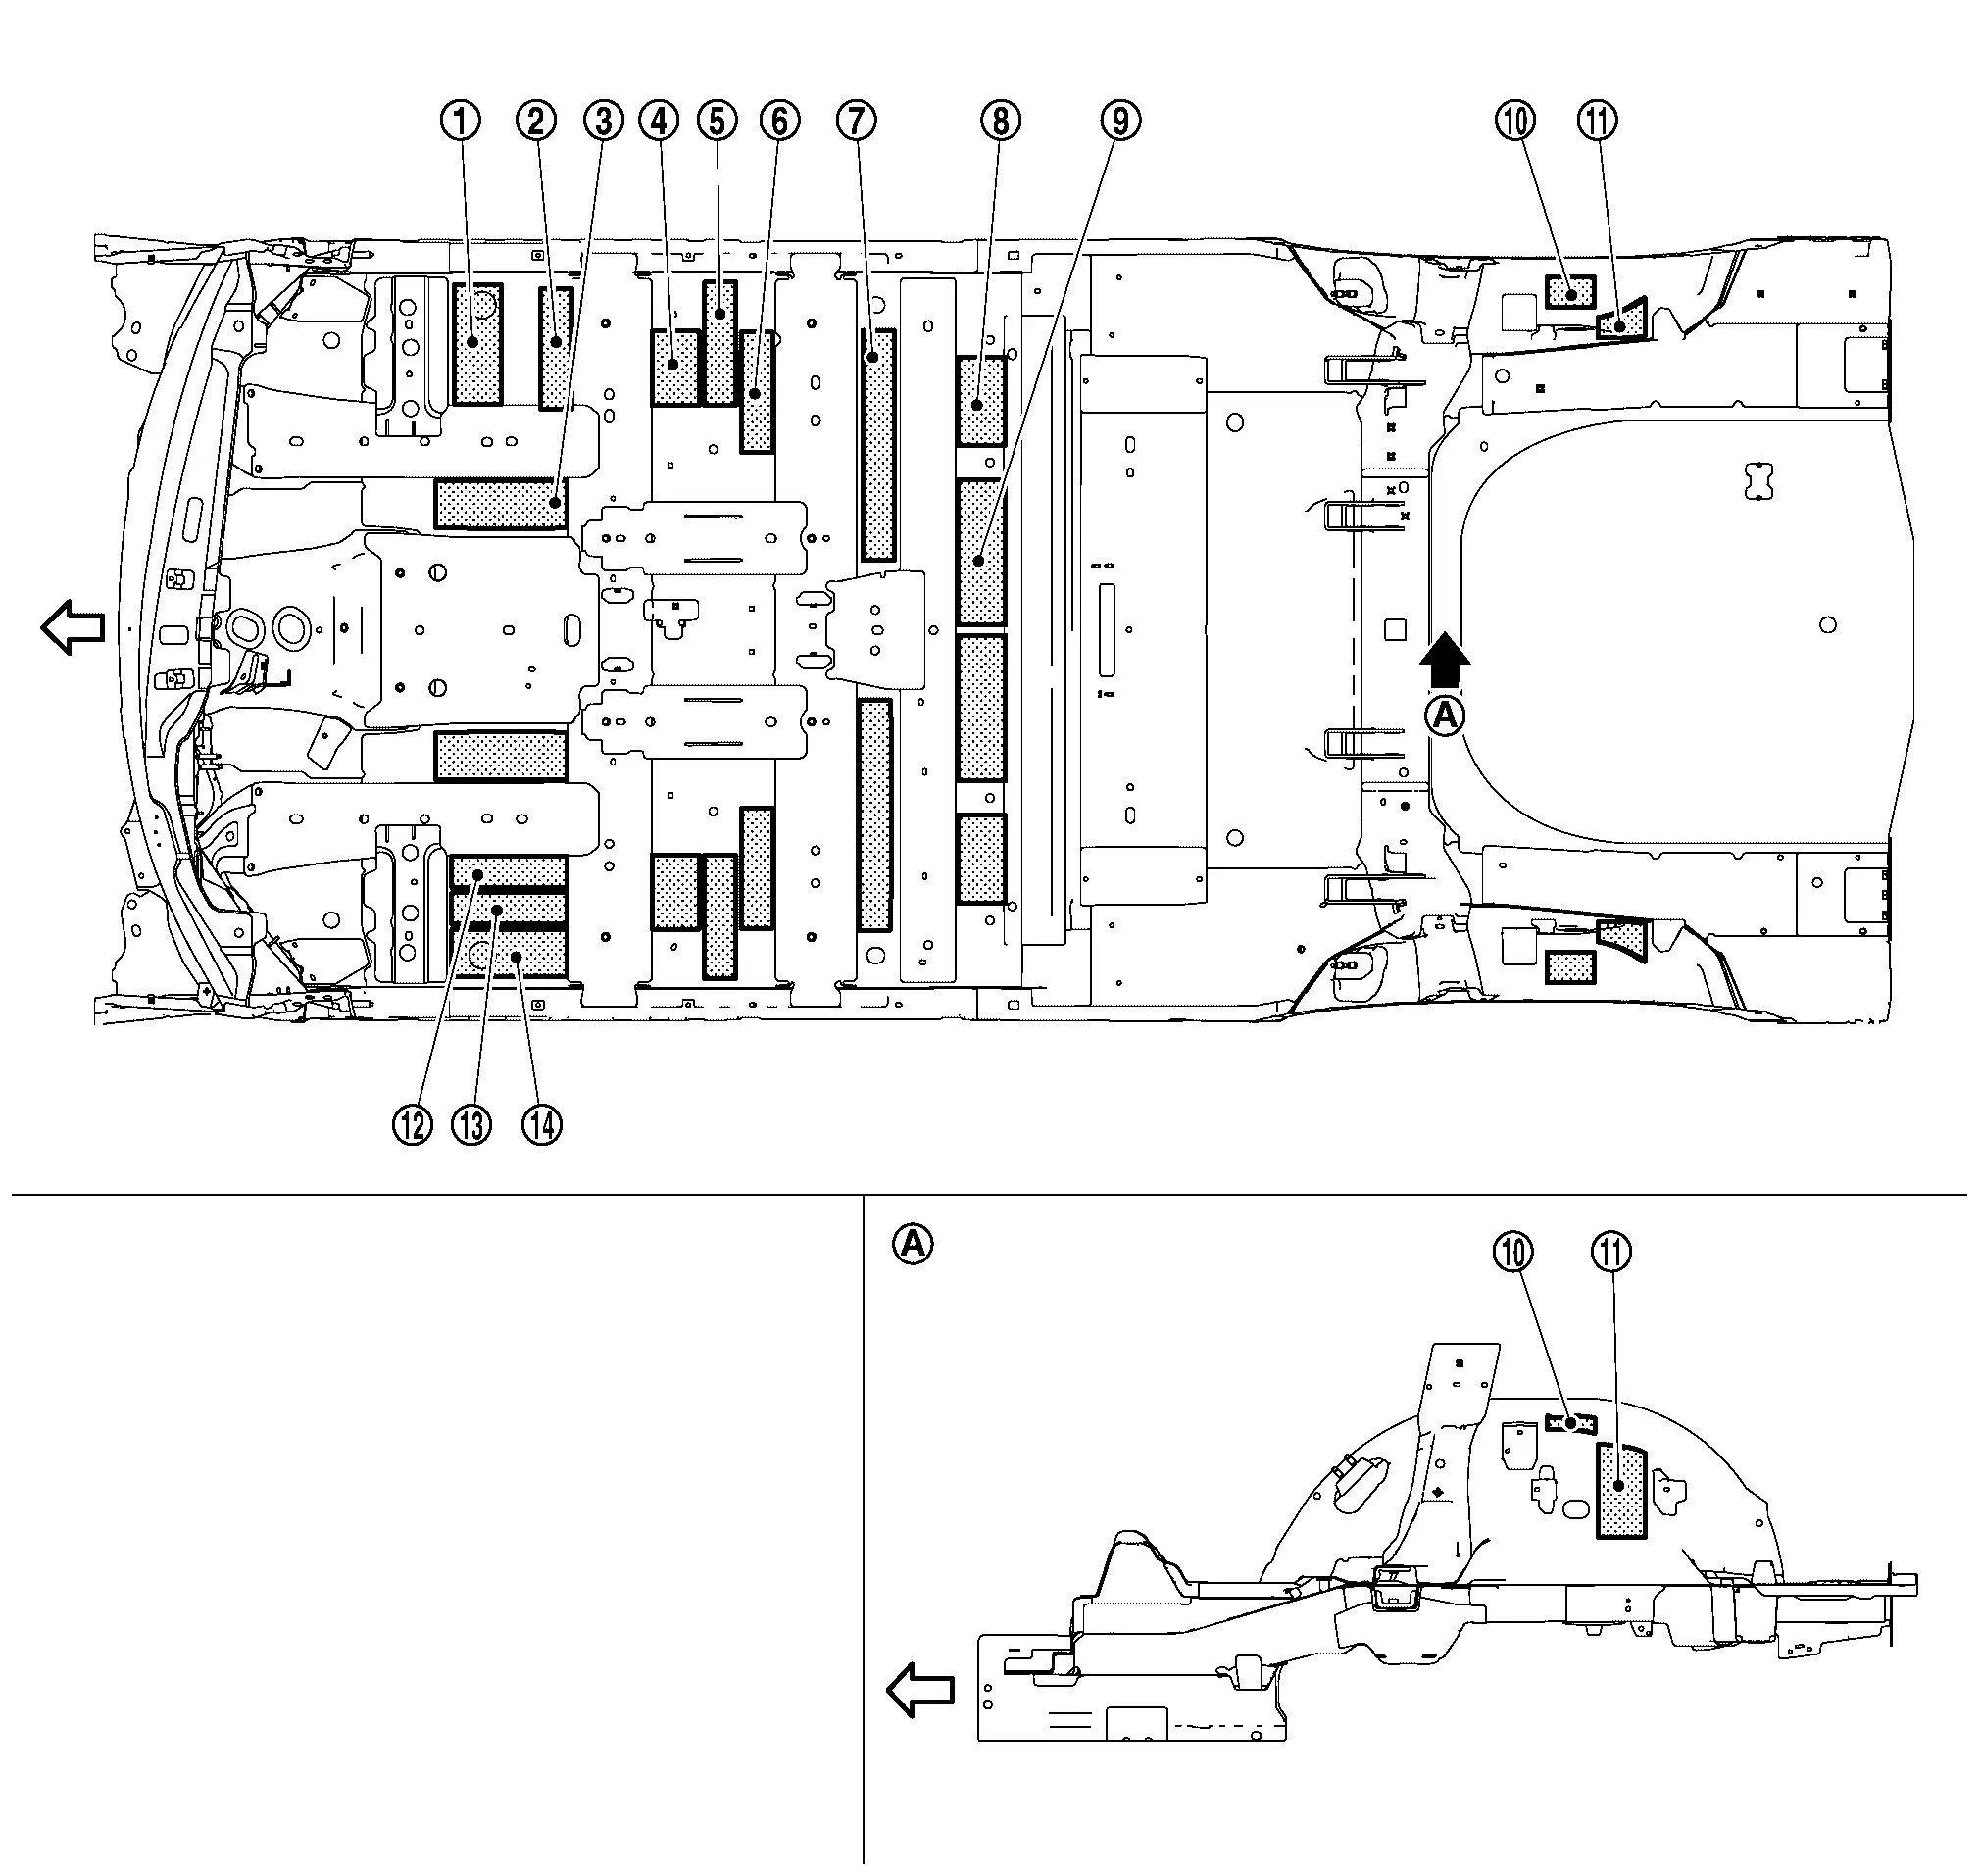
Fusible Insulator Applying Part
Apply the fusible insulator (melsheet) to the floor upper surface and dashboard panel interior side to block noise, vibration, and exhaust gas heat.
2WD
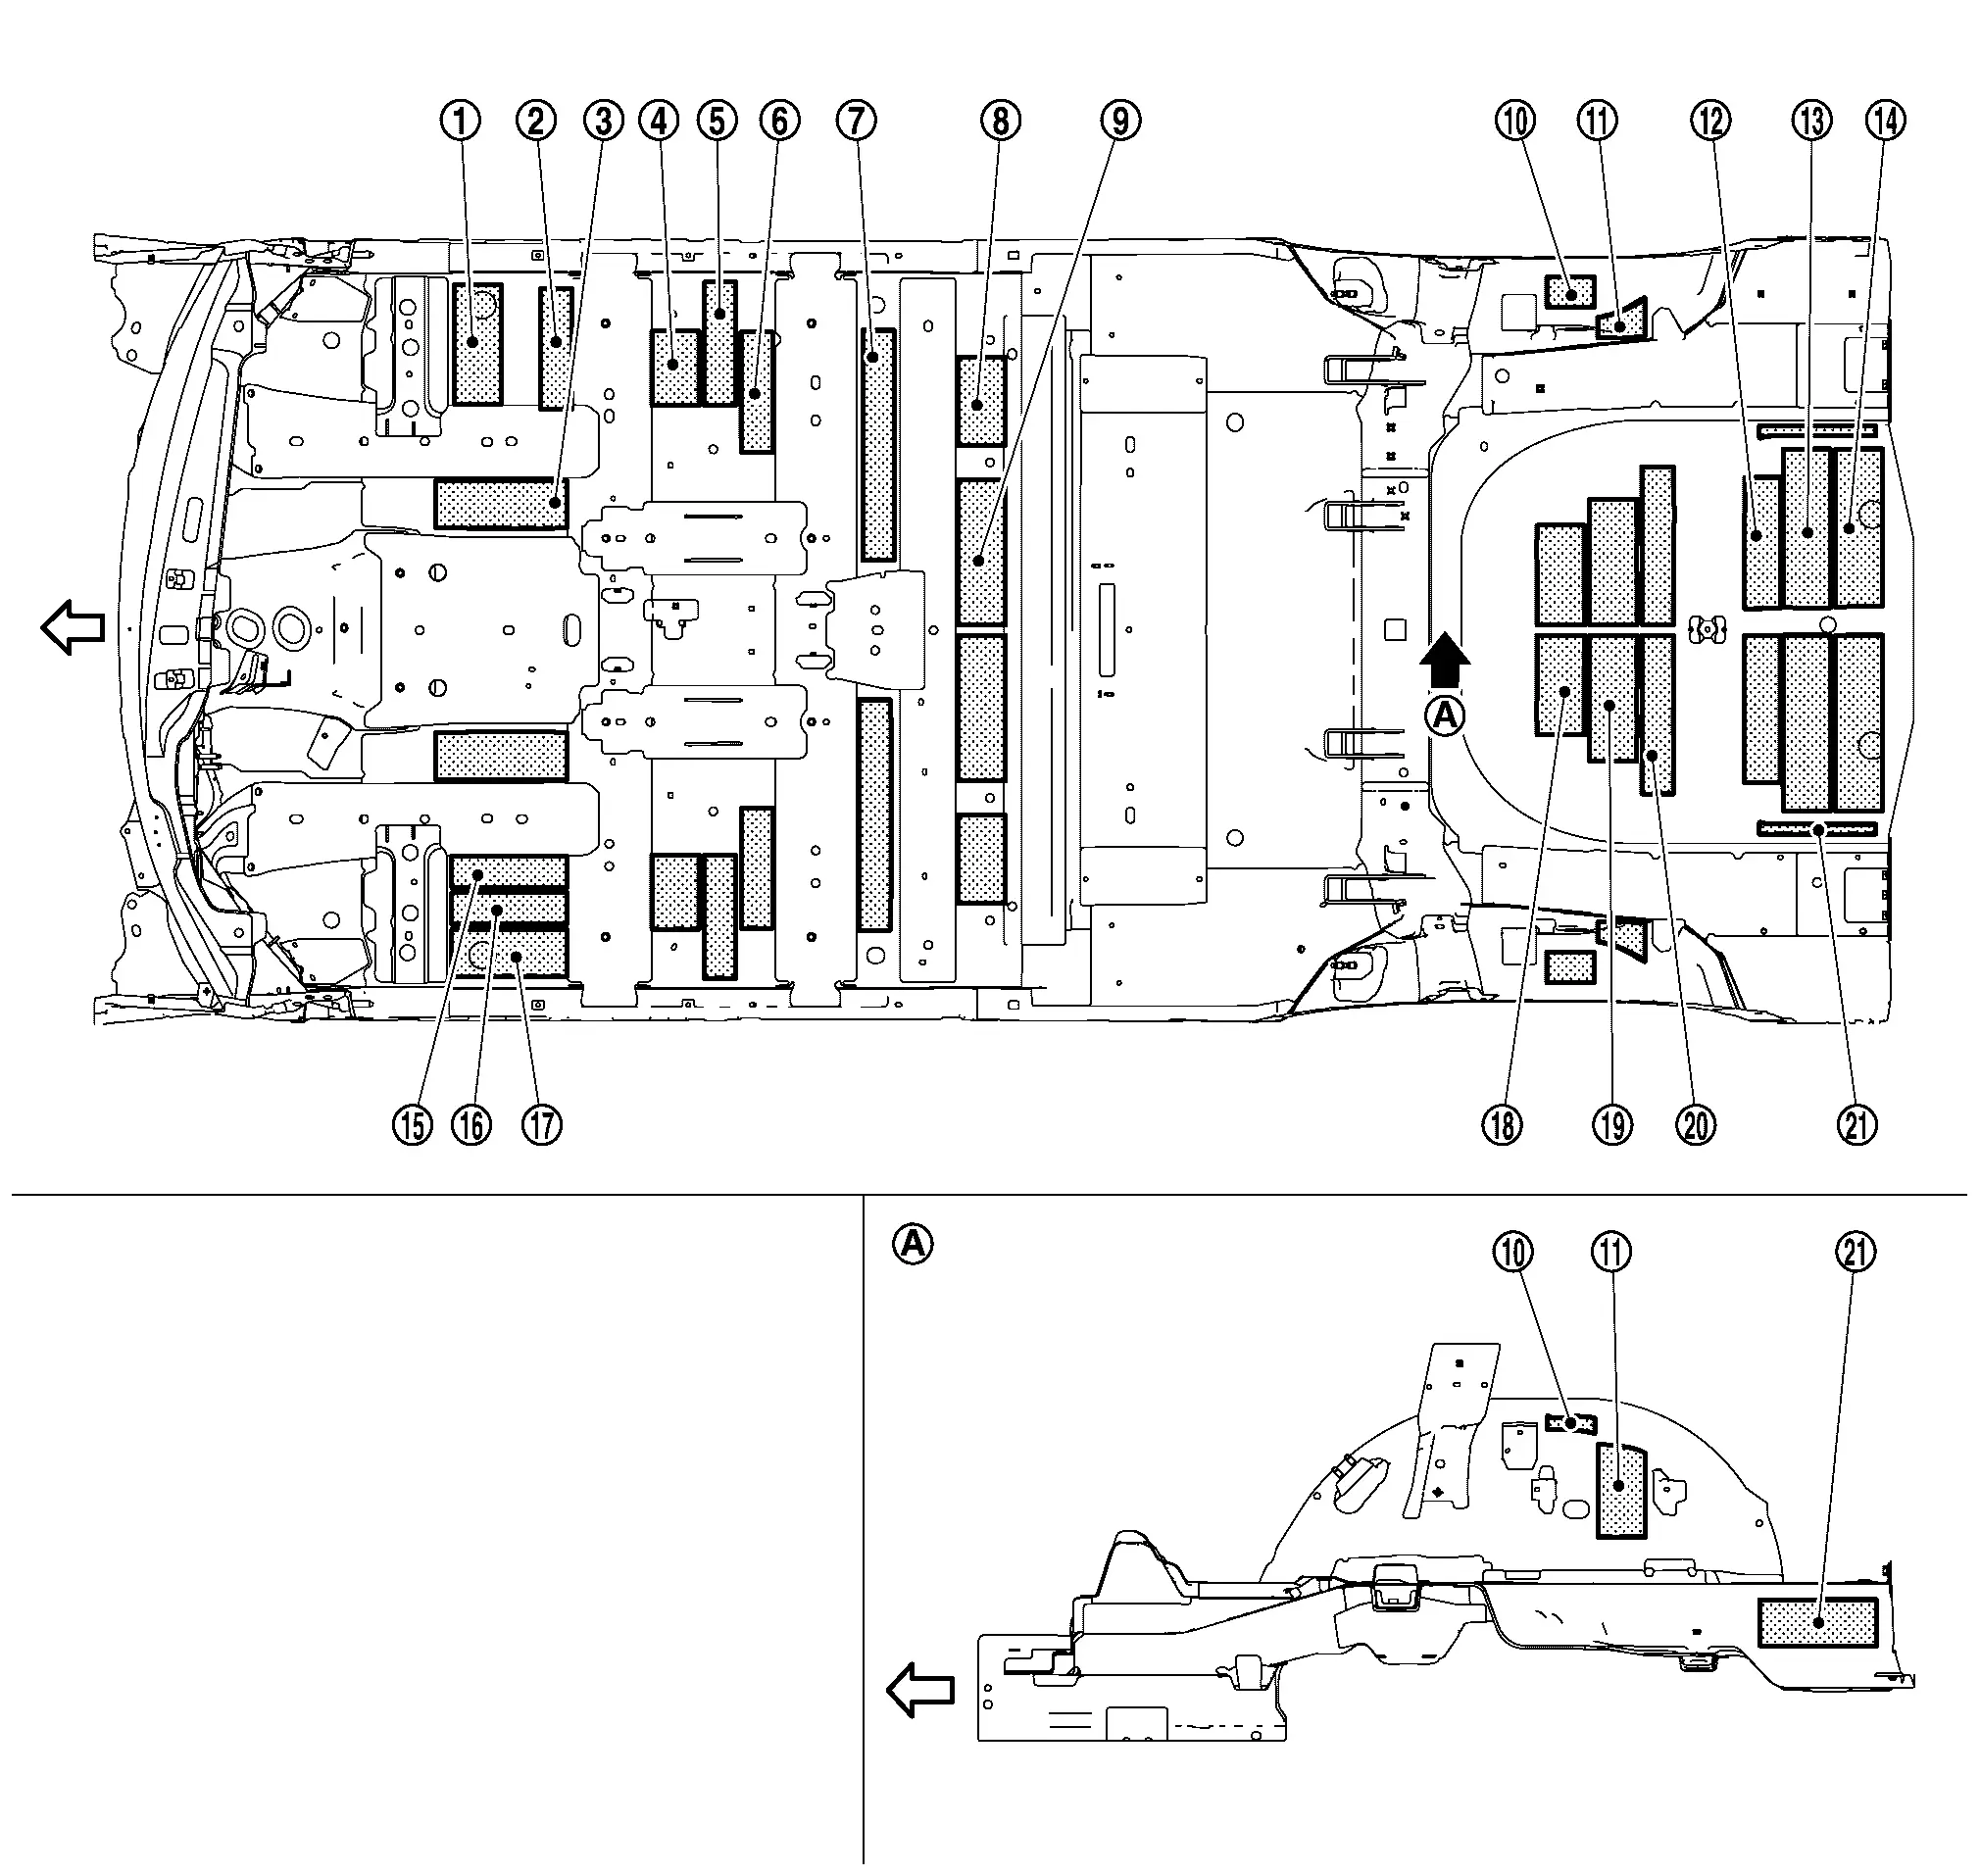
Unit: mm (in)
|
T=3.1 (0.122) | |
T=3.1 (0.122) | |
T=4.0 (0.157) LH and RH are symmetrical. |
|
T=4.0 (0.157) LH and RH are symmetrical. |
|
T=4.0 (0.157) LH and RH are symmetrical. |
|
T=4.0 (0.157) LH and RH are symmetrical. |
|
T=4.0 (0.157) LH and RH are symmetrical. |
|
T=3.1 (0.122) LH and RH are symmetrical. |
|
T=3.1 (0.122) LH and RH are symmetrical. |
|
T=3.1 (0.122) LH and RH are symmetrical. |
|
T=3.1 (0.122) LH and RH are symmetrical. |
|
T=4.0 (0.157) LH and RH are symmetrical. |
|
T=4.0 (0.157) LH and RH are symmetrical. |
|
T=4.0 (0.157) LH and RH are symmetrical. |
|
T=3.1 (0.122) |
|
T=3.1 (0.122) | |
T=3.1 (0.122) | |
T=4.0 (0.157) LH and RH are symmetrical. |
|
T=4.0 (0.157) LH and RH are symmetrical. |
|
T=4.0 (0.157) LH and RH are symmetrical. |
|
T=3.1 (0.122) LH and RH are symmetrical. |
 |
Rear wheel house protector (Indoor side view) | ||||
|
 : Fusible insulator applying part : Fusible insulator applying part |
|||||
AWD
Unit: mm (in)
|
T=3.1 (0.122) | |
T=3.1 (0.122) | |
T=4.0 (0.157) LH and RH are symmetrical. |
|
T=4.0 (0.157) LH and RH are symmetrical. |
|
T=4.0 (0.157) LH and RH are symmetrical. |
|
T=4.0 (0.157) LH and RH are symmetrical. |
|
T=4.0 (0.157) LH and RH are symmetrical. |
|
T=3.1 (0.122) LH and RH are symmetrical. |
|
T=3.1 (0.122) LH and RH are symmetrical. |
|
T=3.1 (0.122) LH and RH are symmetrical. |
|
T=3.1 (0.122) LH and RH are symmetrical. |
|
T=3.1 (0.122) |
|
T=3.1 (0.122) | |
T=3.1 (0.122) | ||
|
Rear wheel house protector (Indoor side view) | ||||
|
: Fusible insulator applying part |
|||||
Replacement Operations Nissan Ariya
Precautions for Body Repair
-
Technicians are encouraged to read the Body Repair Manual (Fundamentals) in order to ensure that the original functions and quality of the Nissan Ariya vehicle are maintained. The Body Repair Manual (Fundamentals) contains additional information, including cautions and warnings, that are not including in this manual. Technicians should refer to both manuals to ensure proper repair.
-
Please note that this information is prepared for worldwide usage, and as such, certain procedures might not apply in some regions or countries.
The symbols used in this section for welding operations are shown below.
| Symbol marks | Description | |
|---|---|---|
| ″Number″ |
″Number″ after symbol mark is the total number of welds to apply. Example 1:  ″1″× 20 (0.79) = 1 MIG seam weld by length 20 mm (0.79 in). ″1″× 20 (0.79) = 1 MIG seam weld by length 20 mm (0.79 in). |
|
|
|
2-panel spot weld |
|
|
|
3-panel spot weld | |
|
|
MIG plug weld |
|
|
For 3-panel plug weld method
|
||
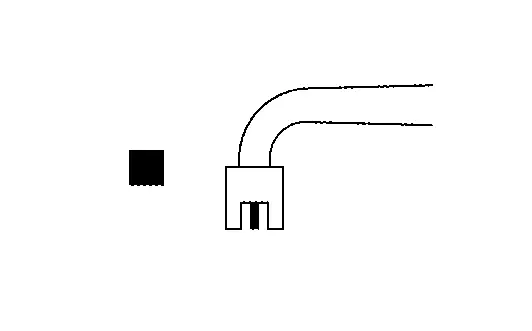
|
|
MIG seam weld / Point weld |
|
|
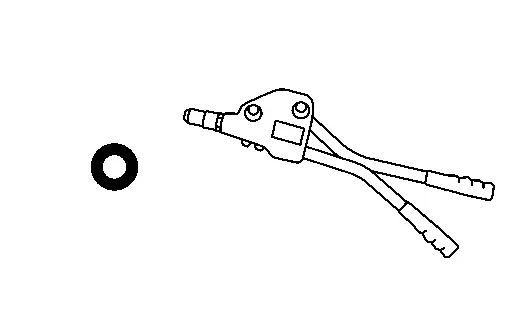
|
Rivet |
|
 ″4″A = 4 MIG plug welds for 3-panel plug weld method.
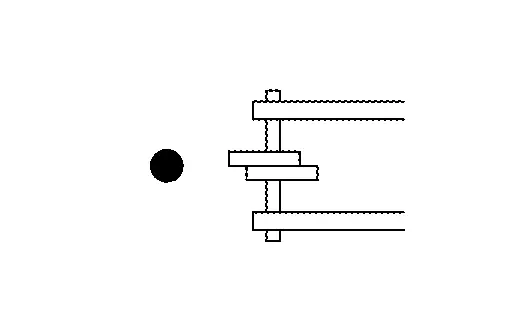


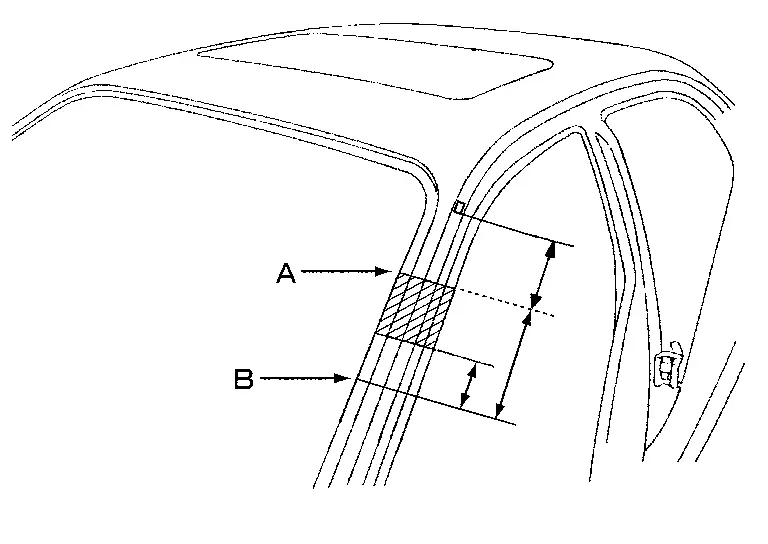
-
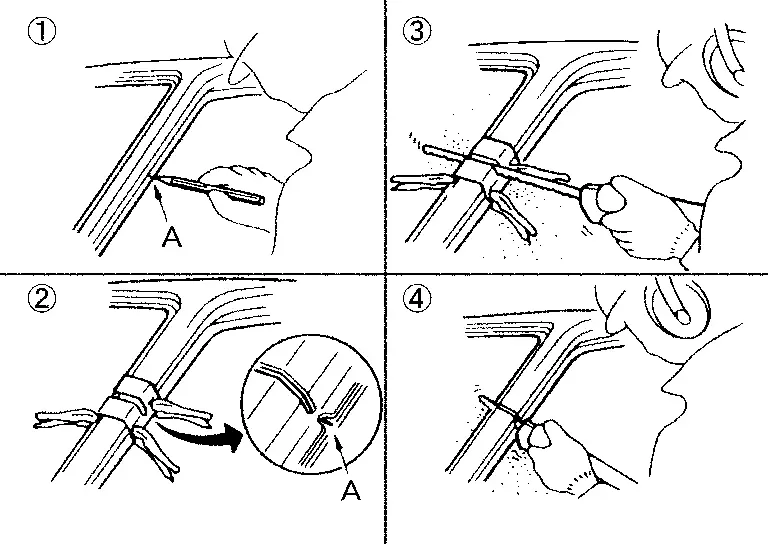
Front pillar butt joint can be determined anywhere within shaded area as shown in the figure. The best location for the butt joint is at position A due to the construction of the Nissan Ariya vehicle.
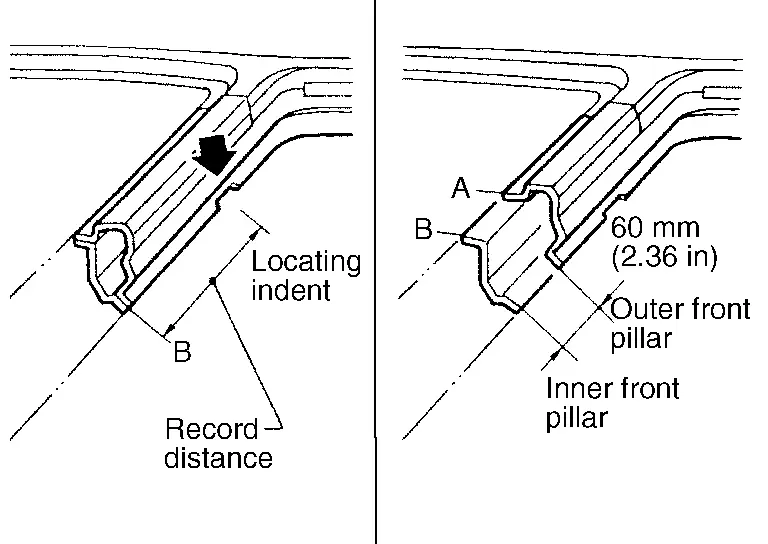
-
Determine cutting position and record distance from the locating indent. Use this distance when cutting the service part. Cut outer front pillar over 60 mm (2.36 in) above the inner front pillar cut position.
-
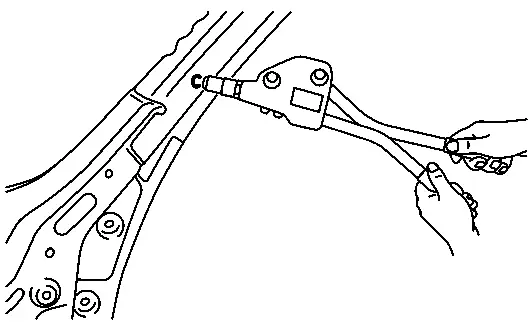
Prepare a cutting jig to make outer pillar easier to cut. Also, this will permit the service part to be accurately cut at the joint position.
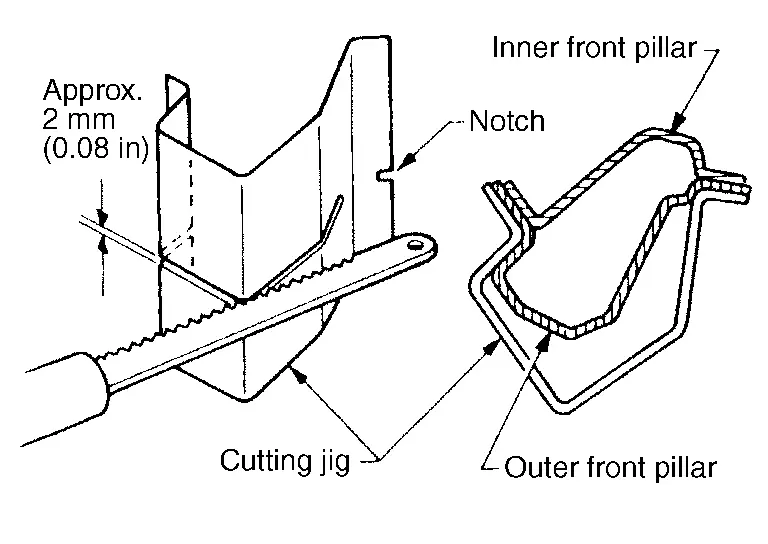
-
An example of cutting operation using a cutting jig is as per the following.
-
Mark cutting lines.
A: Cut position of outer pillar
B: Cut position of inner pillar
-
Align cutting line with notch on jig. Clamp jig to pillar.
-
Cut outer pillar along groove of jig (at position A).
-
Remove jig and cut remaining portions.
-
Cut inner pillar at position B in same manner.
Welding of Ultra High Strength Steel
SPOT WELDING
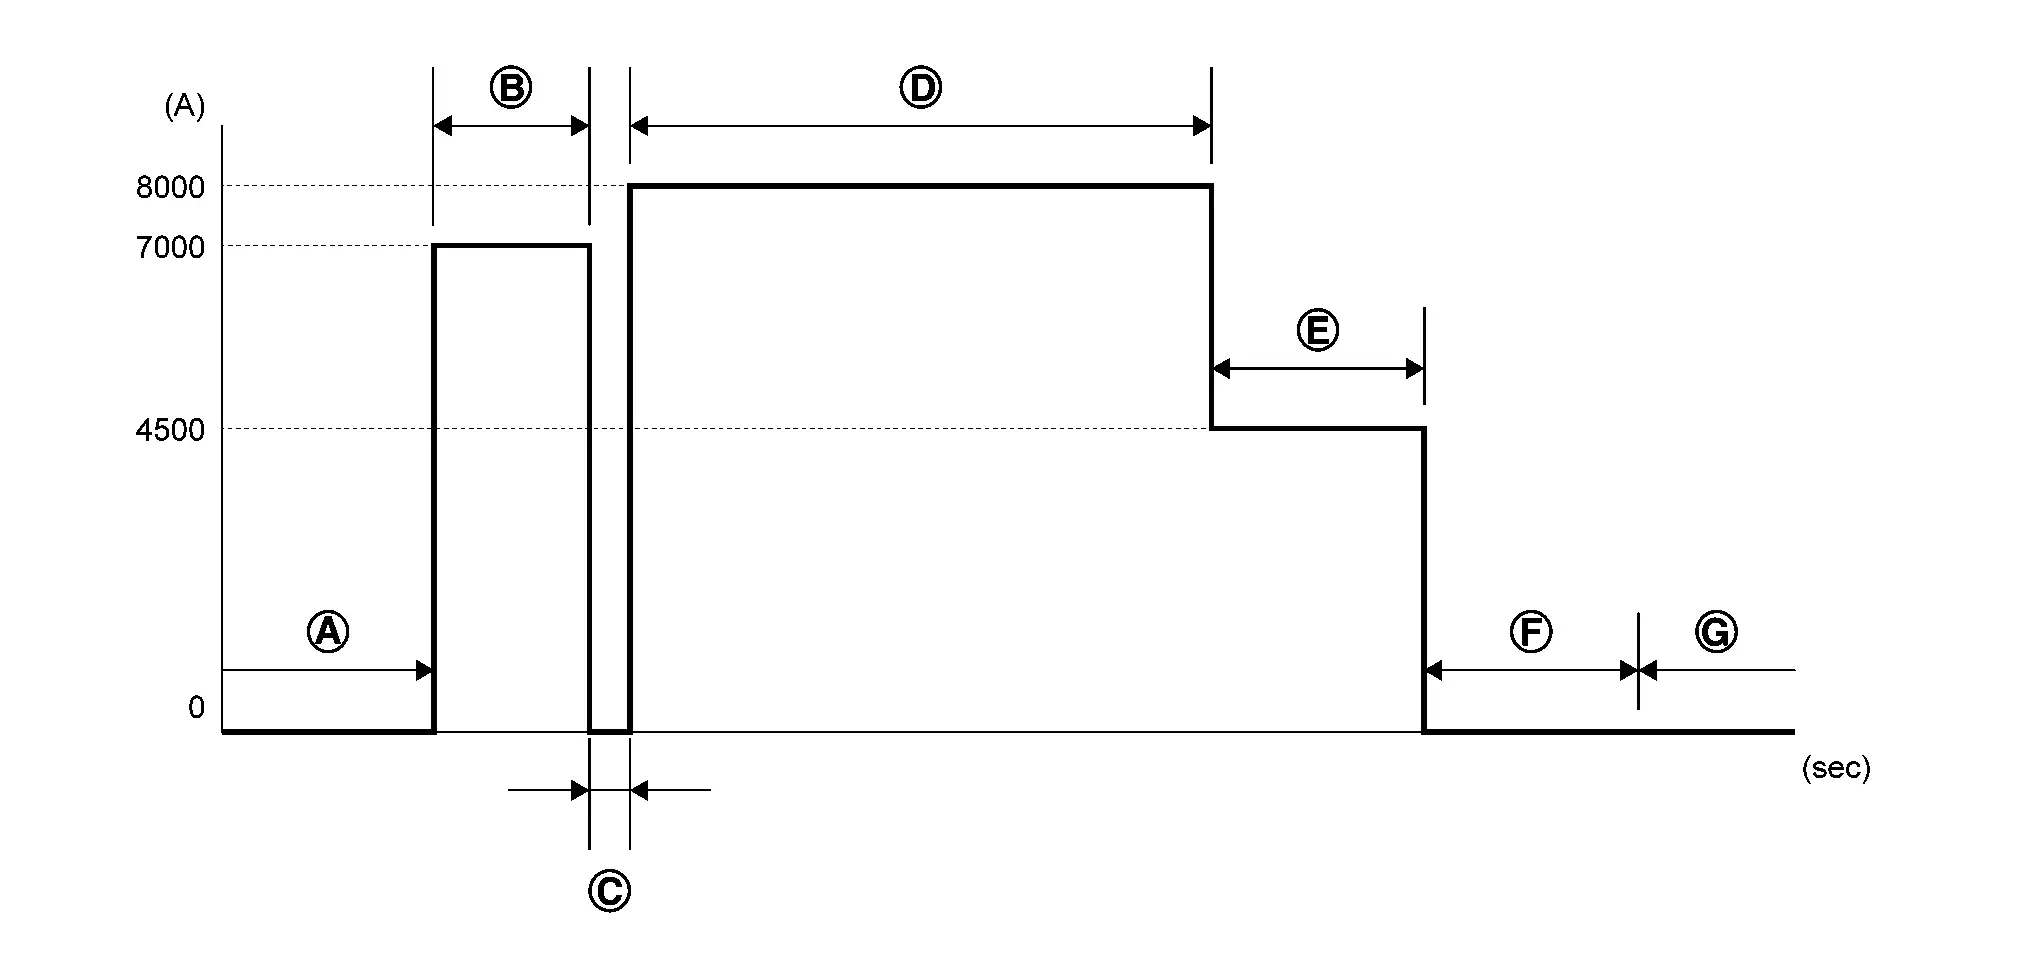
Spot welding is limited to ultra high strength steel (tensile strength: 980 MPa) according to the welding conditions listed below.
CAUTION:
-
If the below welding conditions cannot be met, then perform plug welding.
-
Never spot weld ultra high strength steel of tensile strength more than 980 MPa. For this type of ultra high strength steel, perform plug welding.
-
The below welding condition is applicable only to this Nissan Ariya vehicle. Never apply this same welding condition to other vehicles.
| Welder tip diameter | 6 mm | ||||||||||||||||||||||||||||||||||||||||||||||||||||||||||
| Welding pressure (Gun force) | 4150 N | ||||||||||||||||||||||||||||||||||||||||||||||||||||||||||
| Panel configuration | Combination of a plate of tensile strength 980 MPa and that of tensile strength less than 980 MPa. (Up to 3 plates) | ||||||||||||||||||||||||||||||||||||||||||||||||||||||||||
|
Welding current and weld time
|
|||||||||||||||||||||||||||||||||||||||||||||||||||||||||||


PLUG WELDING
To weld ultra high strength steel of tensile strength 980 MPa or more, perform plug welding observing the welding hole diameter described in the manual.
CAUTION:
-
To perform plug welding, use fuel mixture (Ar 80% + CO2 20%) for shielding gas of welder.
-
Never use carbon dioxide gas (CO2 100%) as shielding gas of welder. Using CO2 100% gas results in inadequate weld strength.
-
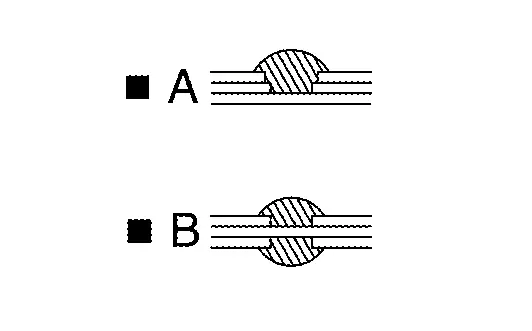
When welding hole diameter cannot be met, make multiple holes (smaller diameter) so that the sum of the hole areas equals the area of the original weld hole.
EXAMPLE
|
Body sealing | ||||
|
 : For spot welding of steel plate of tensile strength 980 MPa, observe the indicated welding conditions. Refer to ″Welding of Ultra High Strength Steel″. : For spot welding of steel plate of tensile strength 980 MPa, observe the indicated welding conditions. Refer to ″Welding of Ultra High Strength Steel″. |
|||||
 : Drill φ6 mm (0.24 in) hole for the plug welding hole (ultra high strength steel).
Radiator Core Support
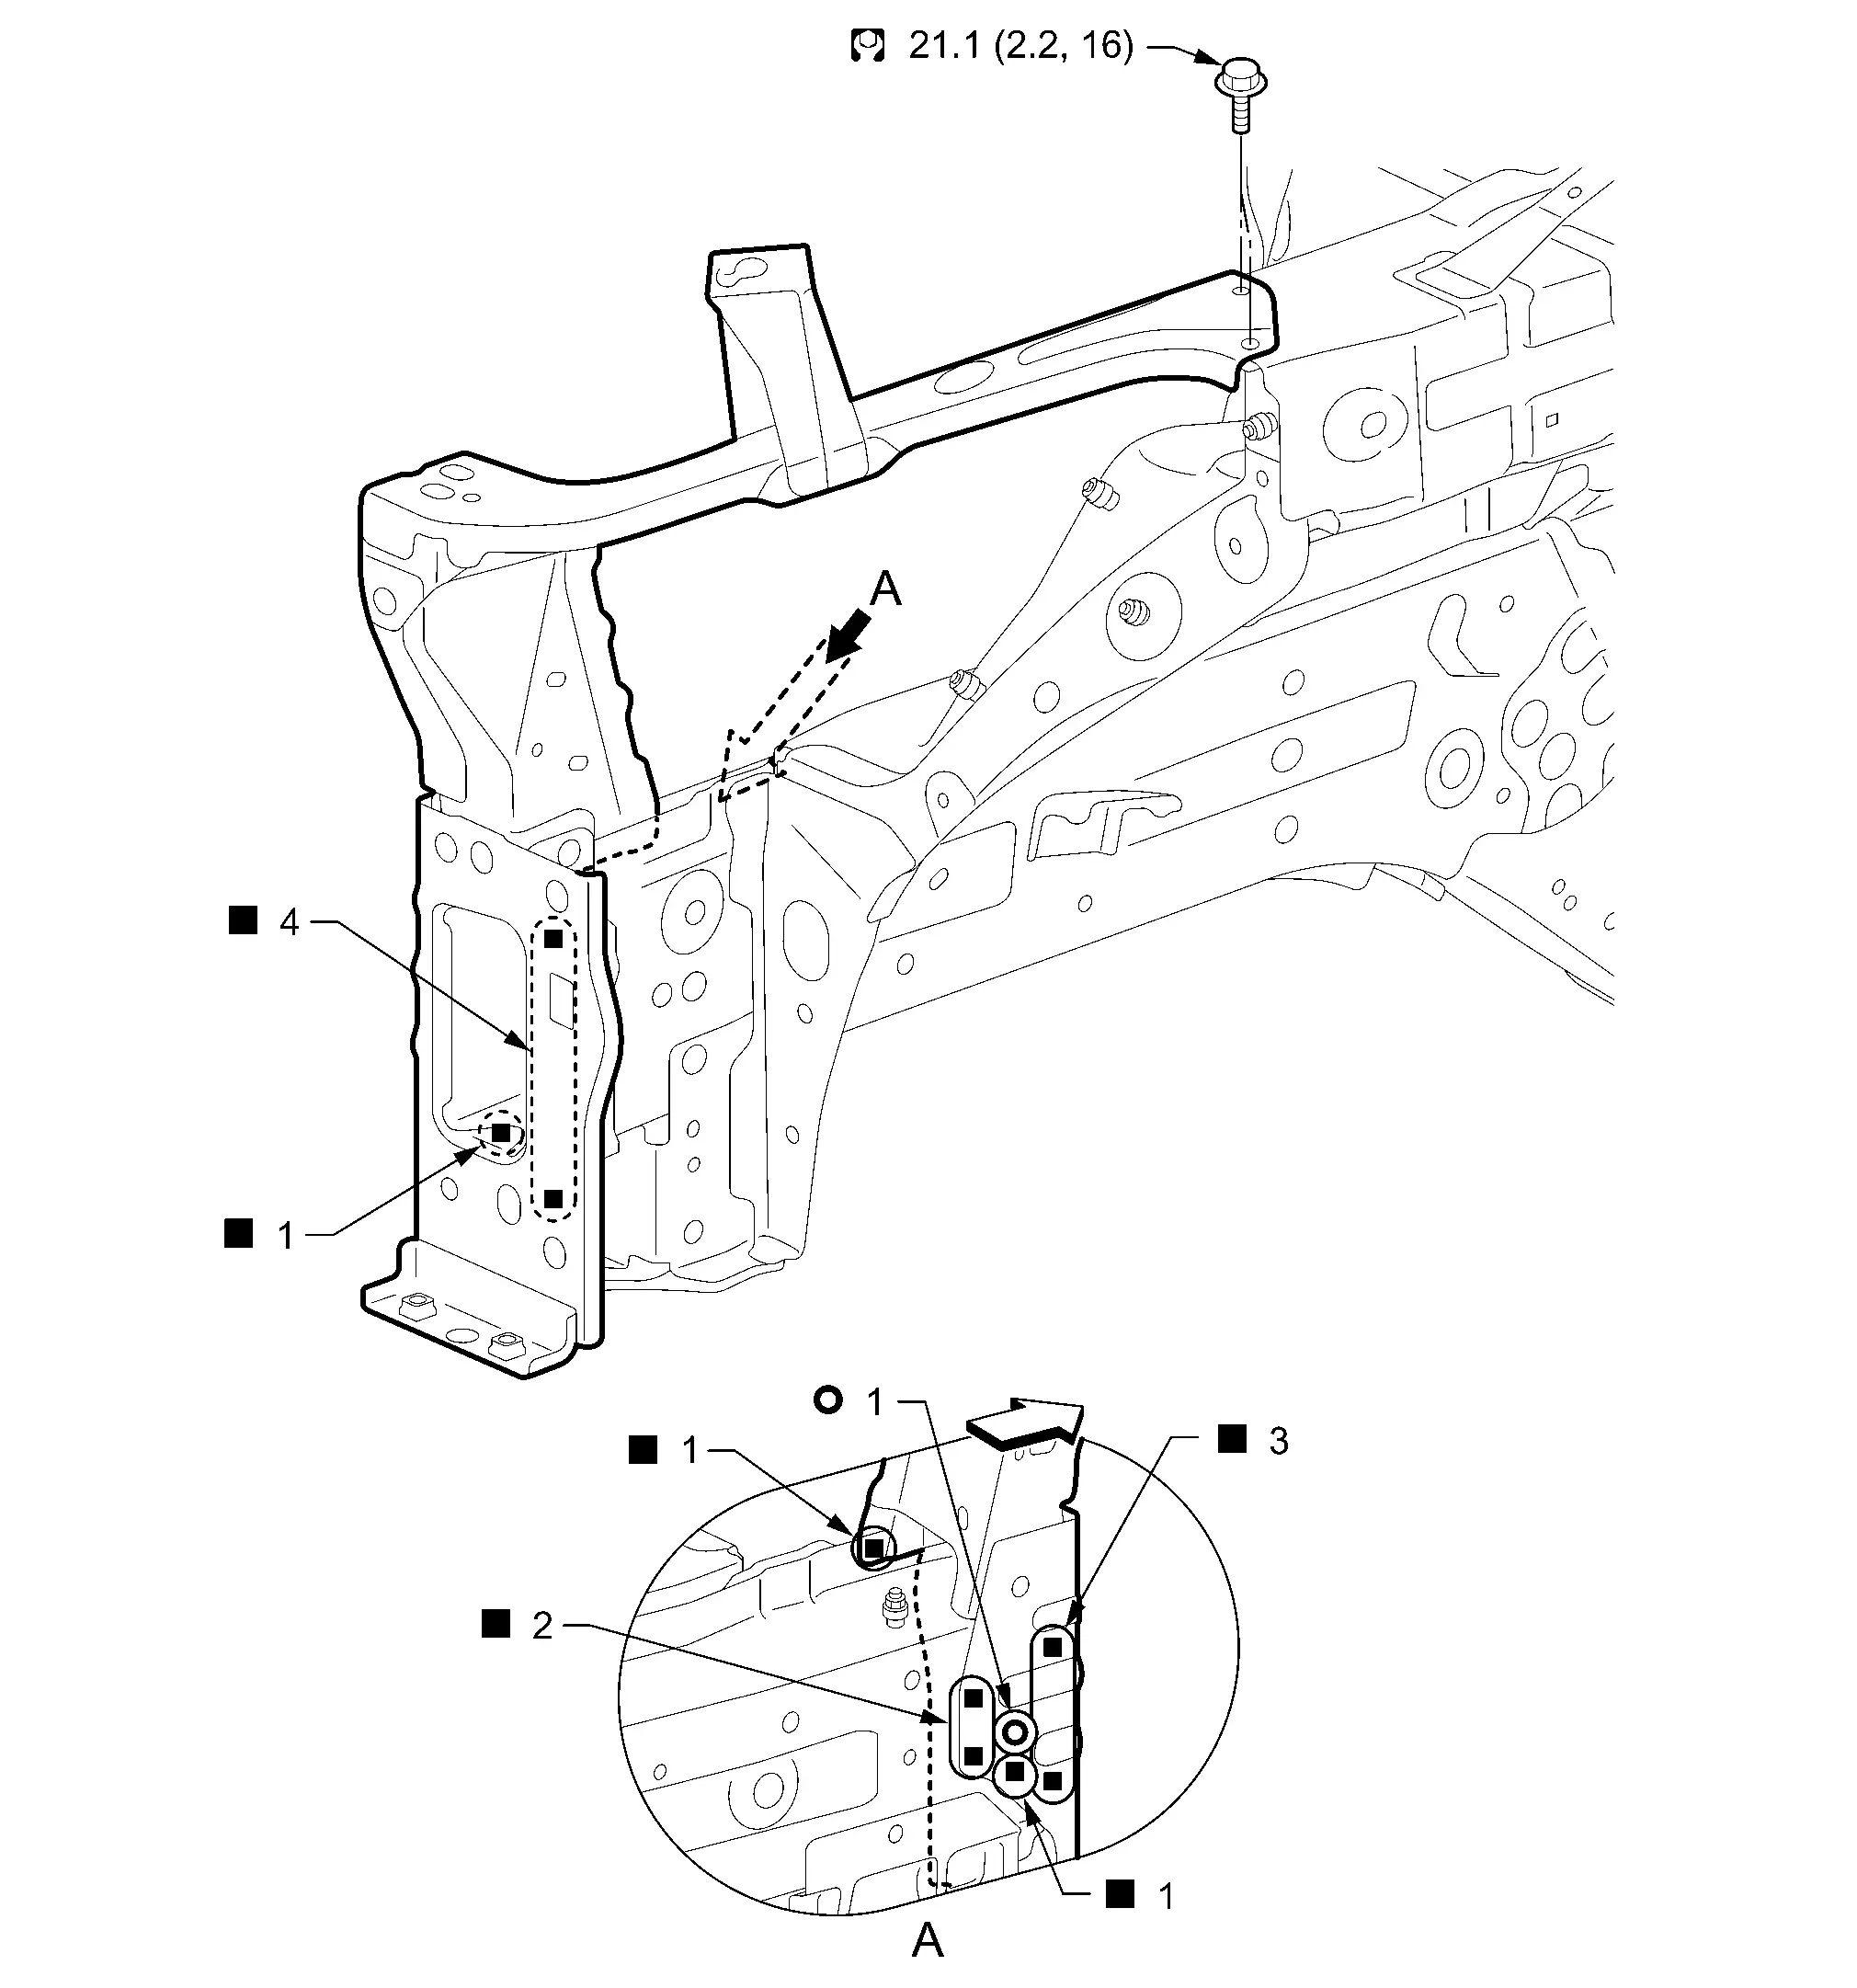
|
 : N•m (kg-m, ft-lb) : N•m (kg-m, ft-lb) |
|||||
| Replacement part | |||||
| • | Side radiator core support assembly | • | Side radiator core support | ||
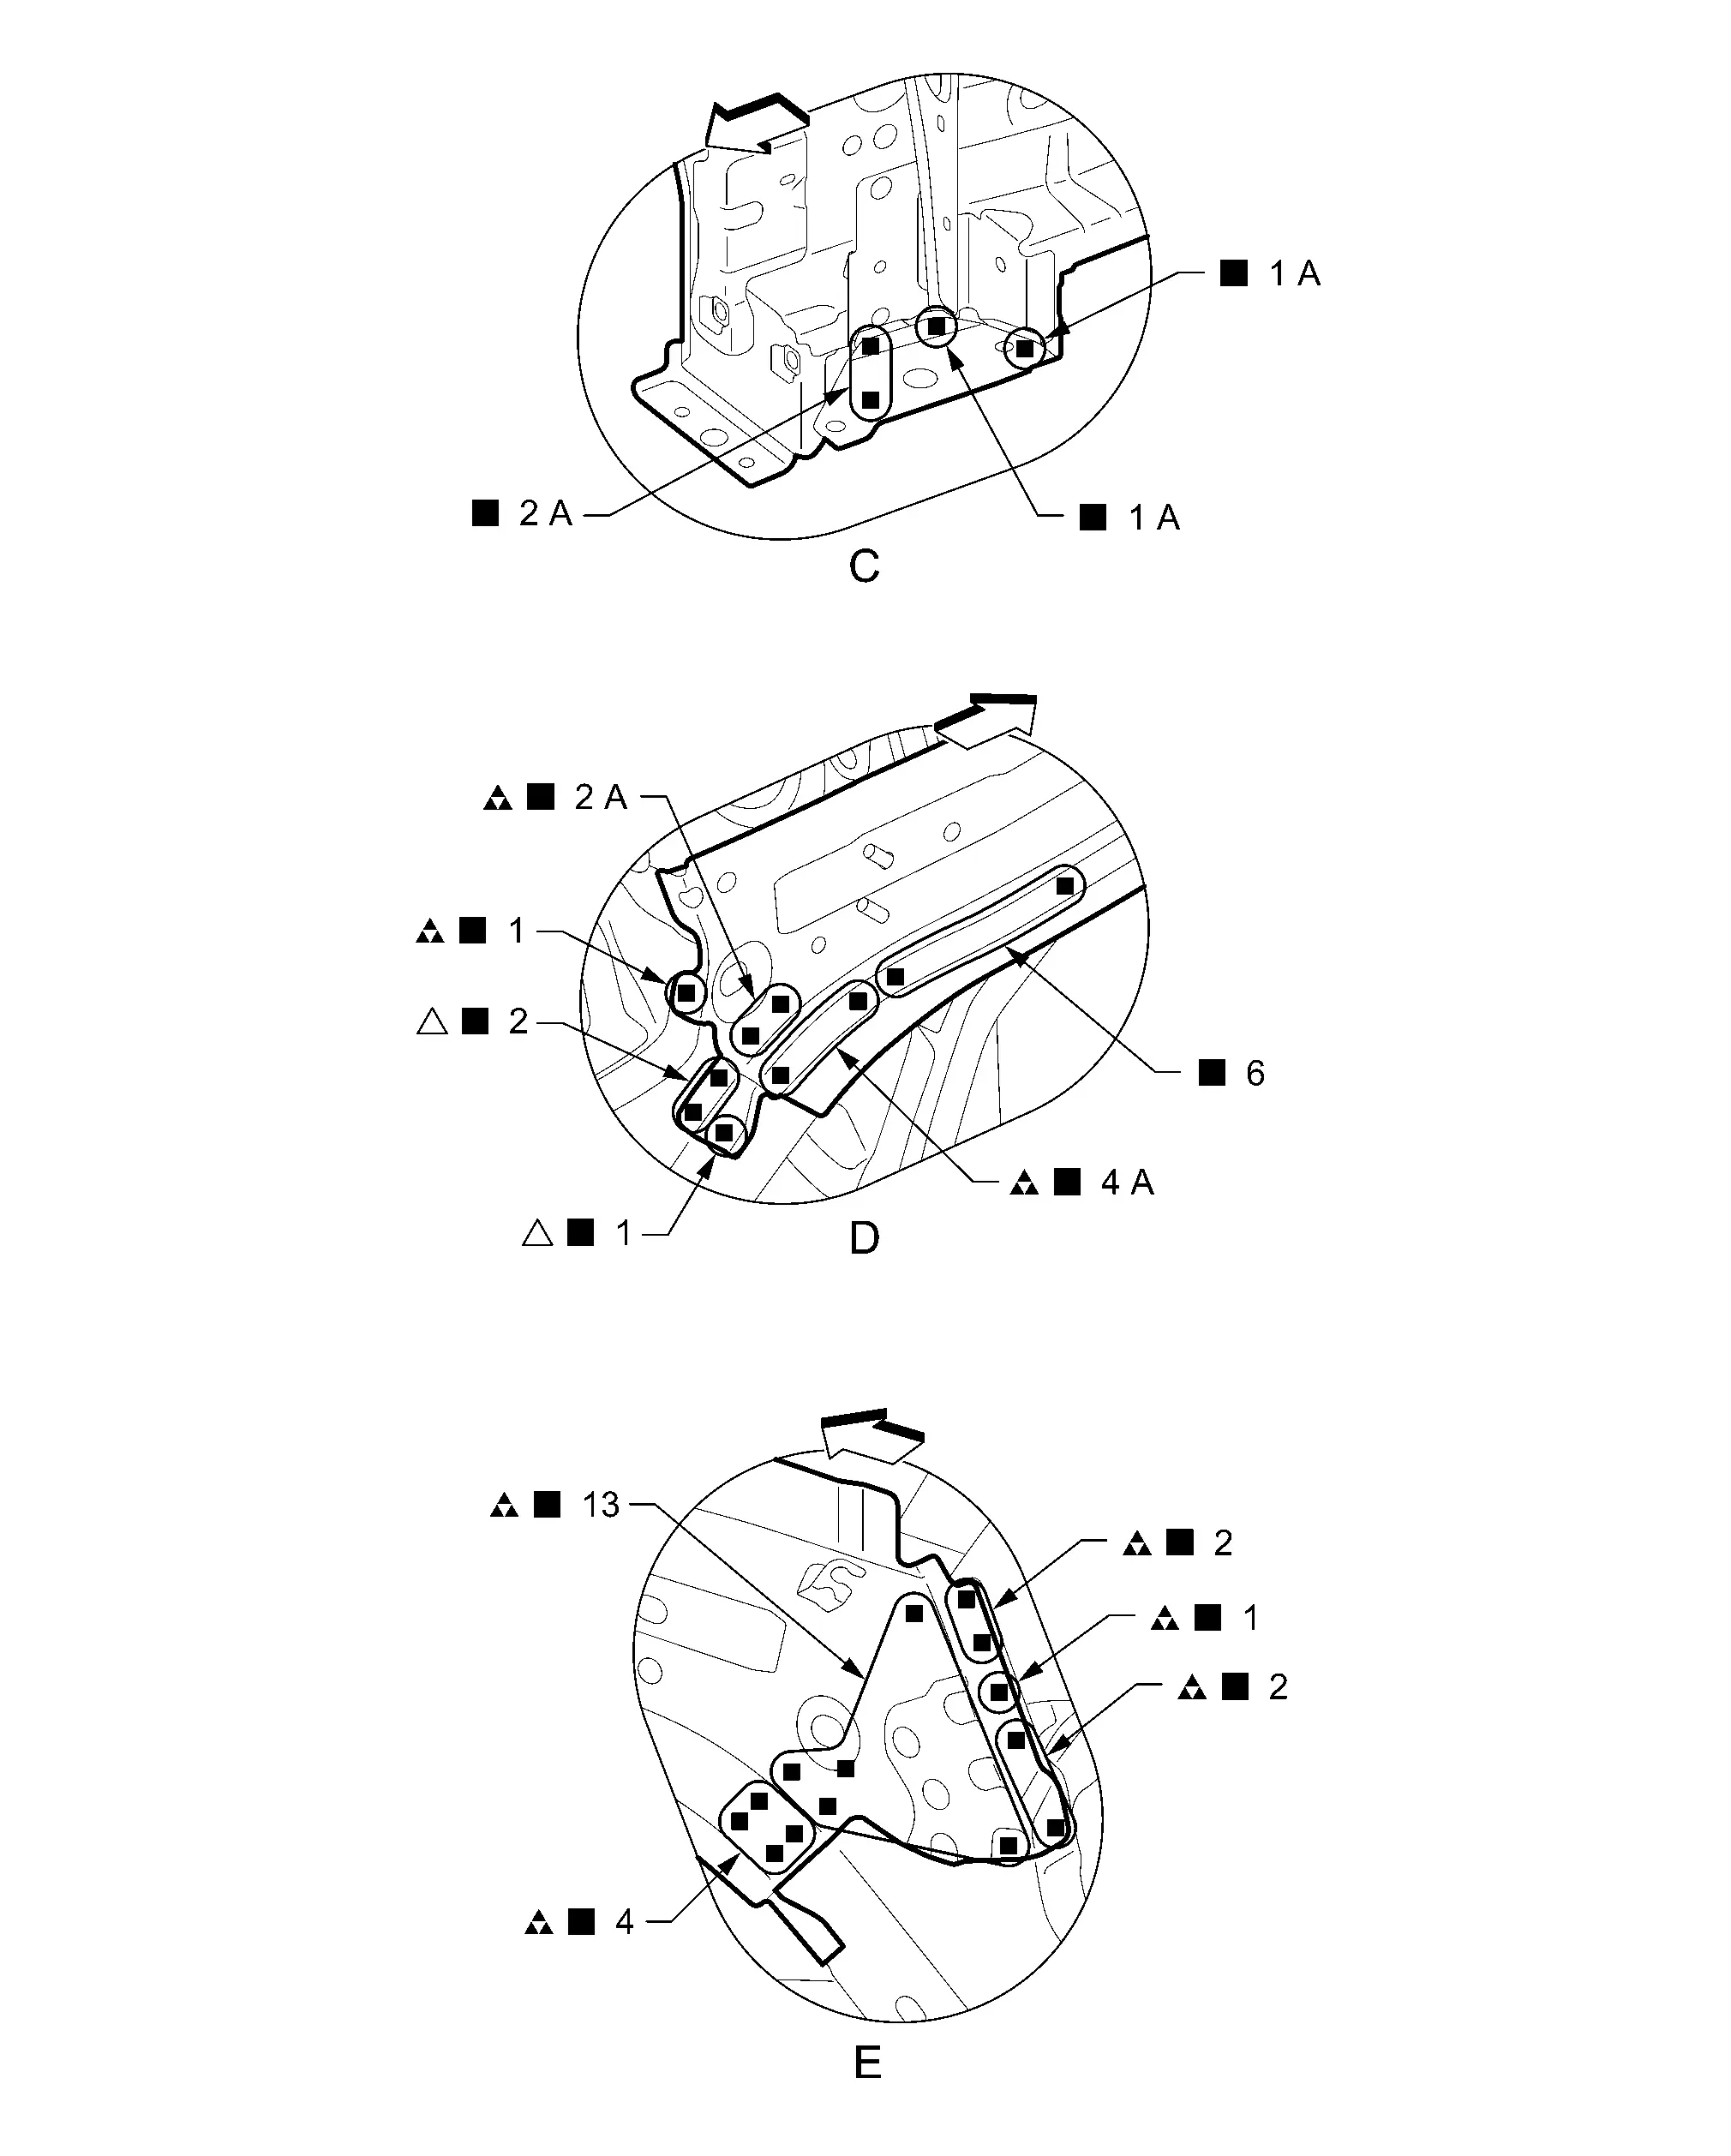
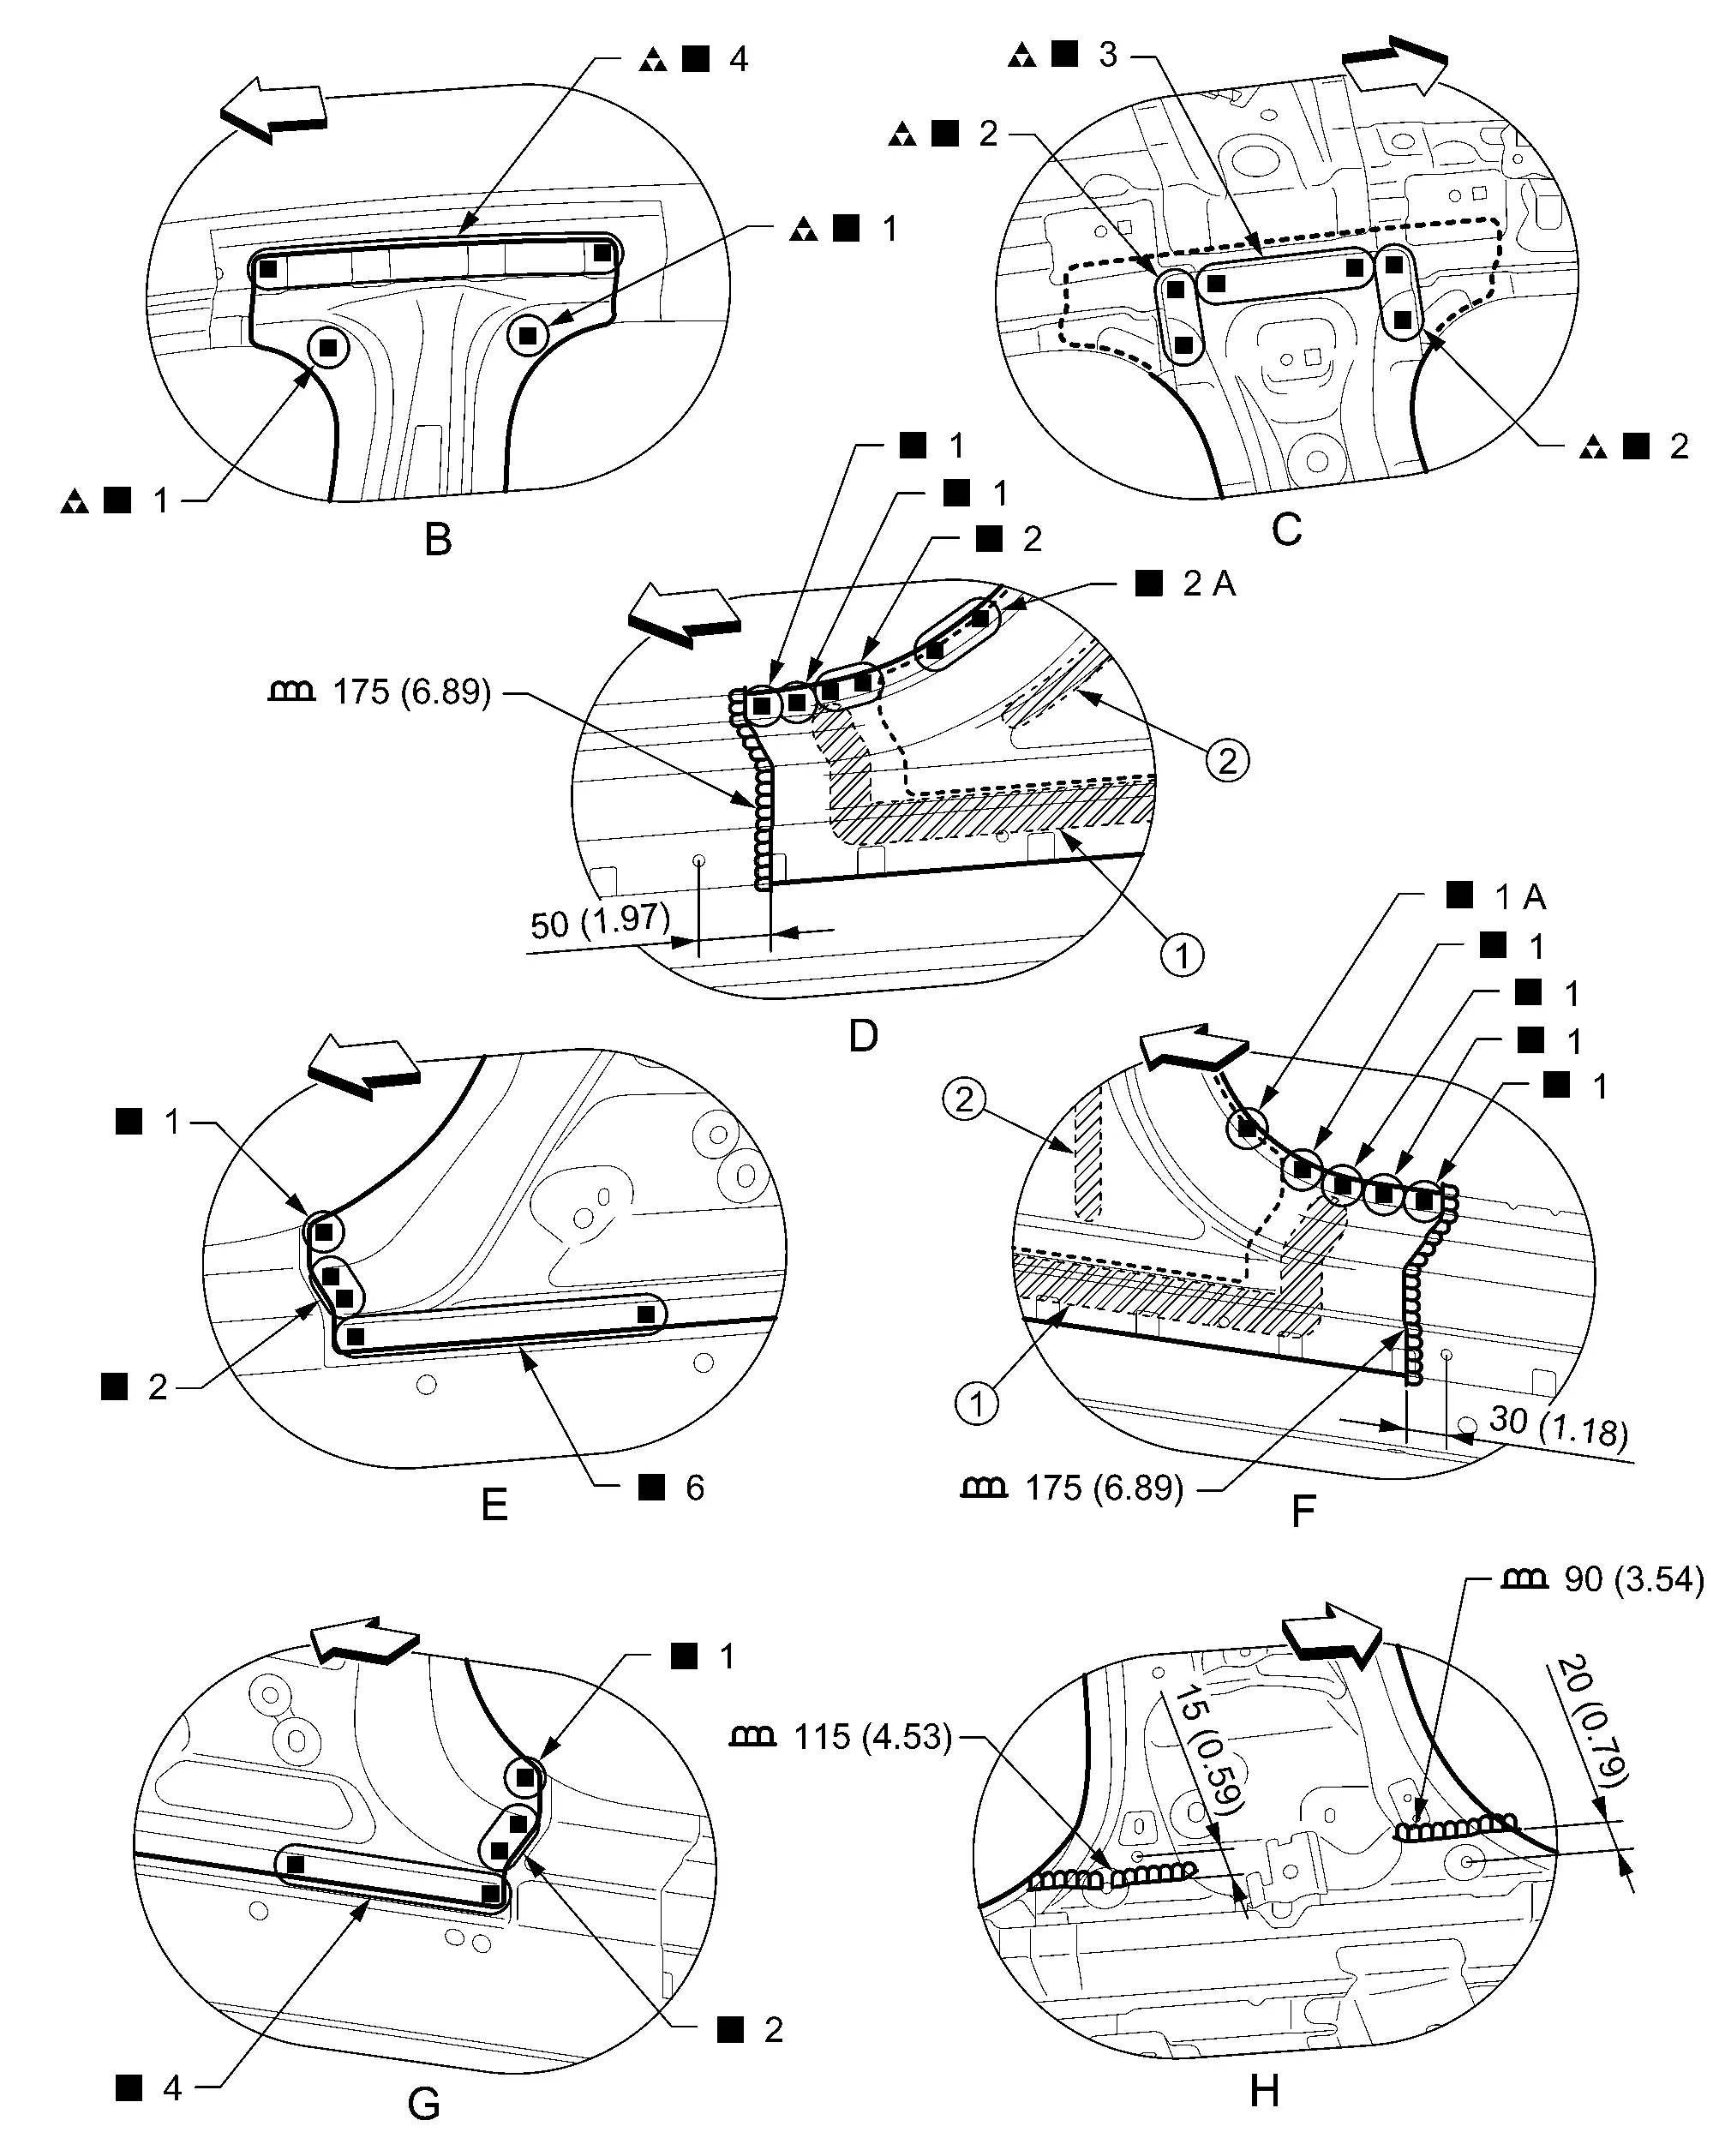
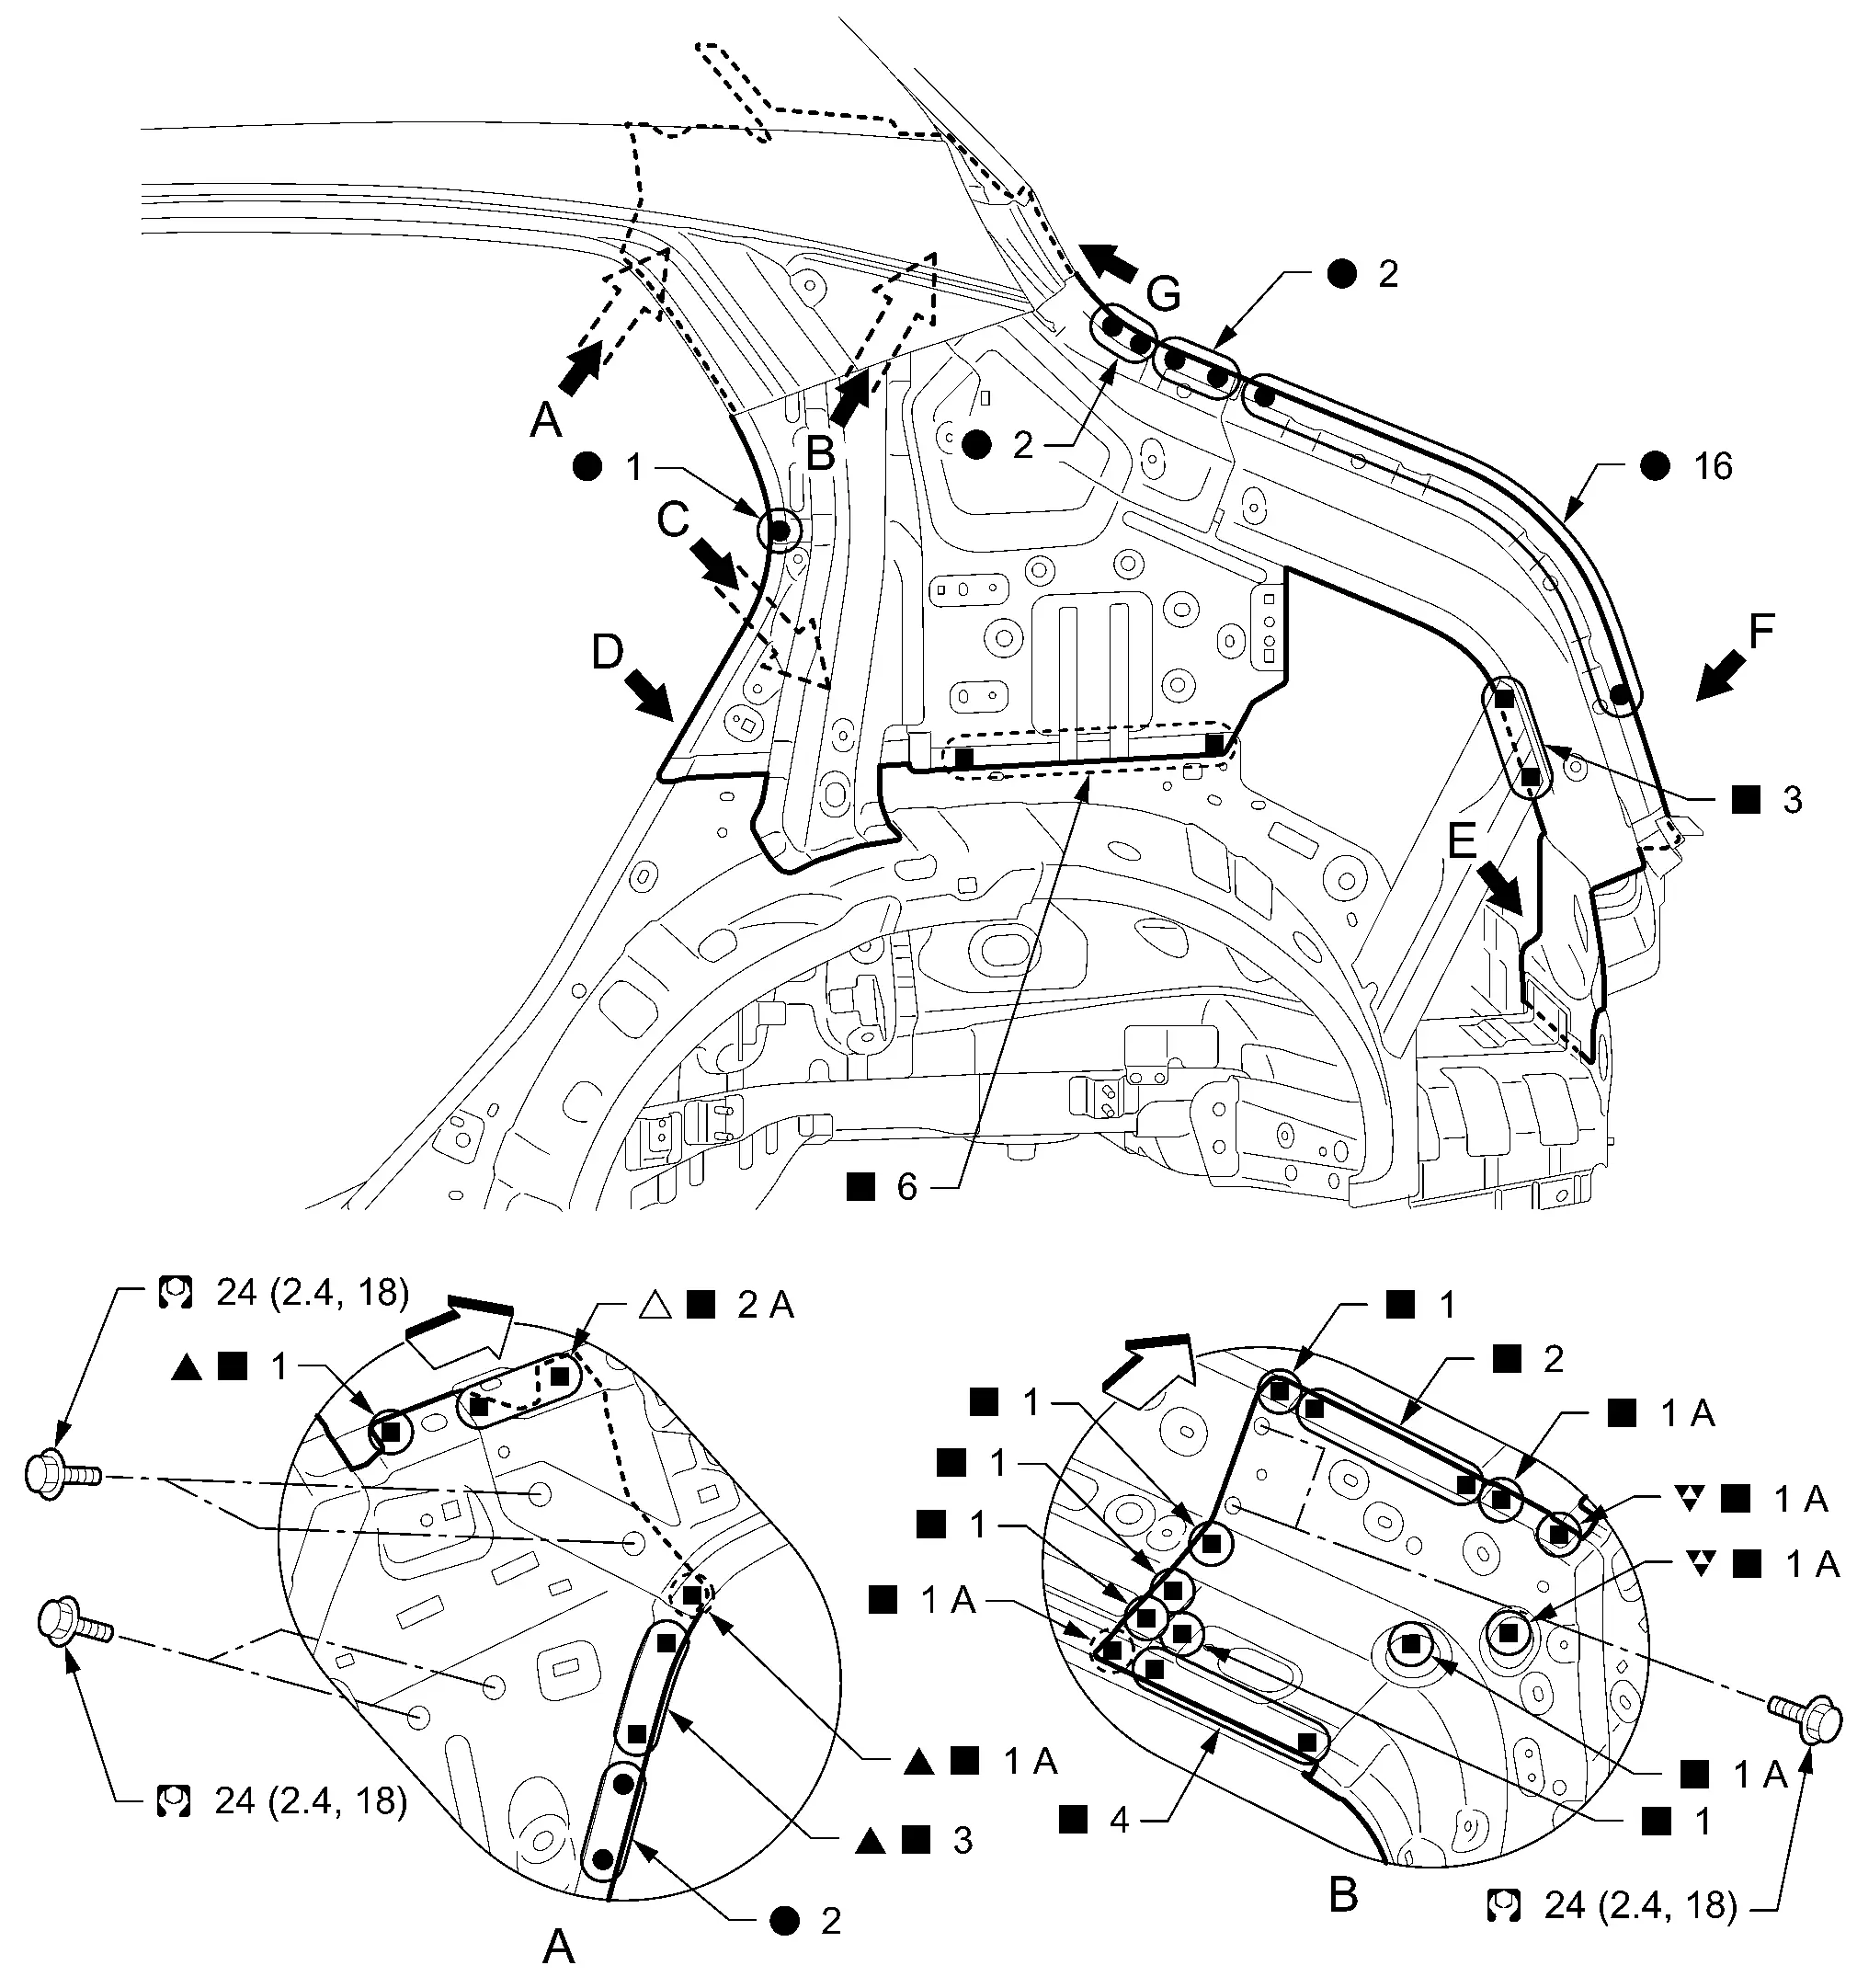
Hoodledge
Work after side radiator core support assembly is removed.
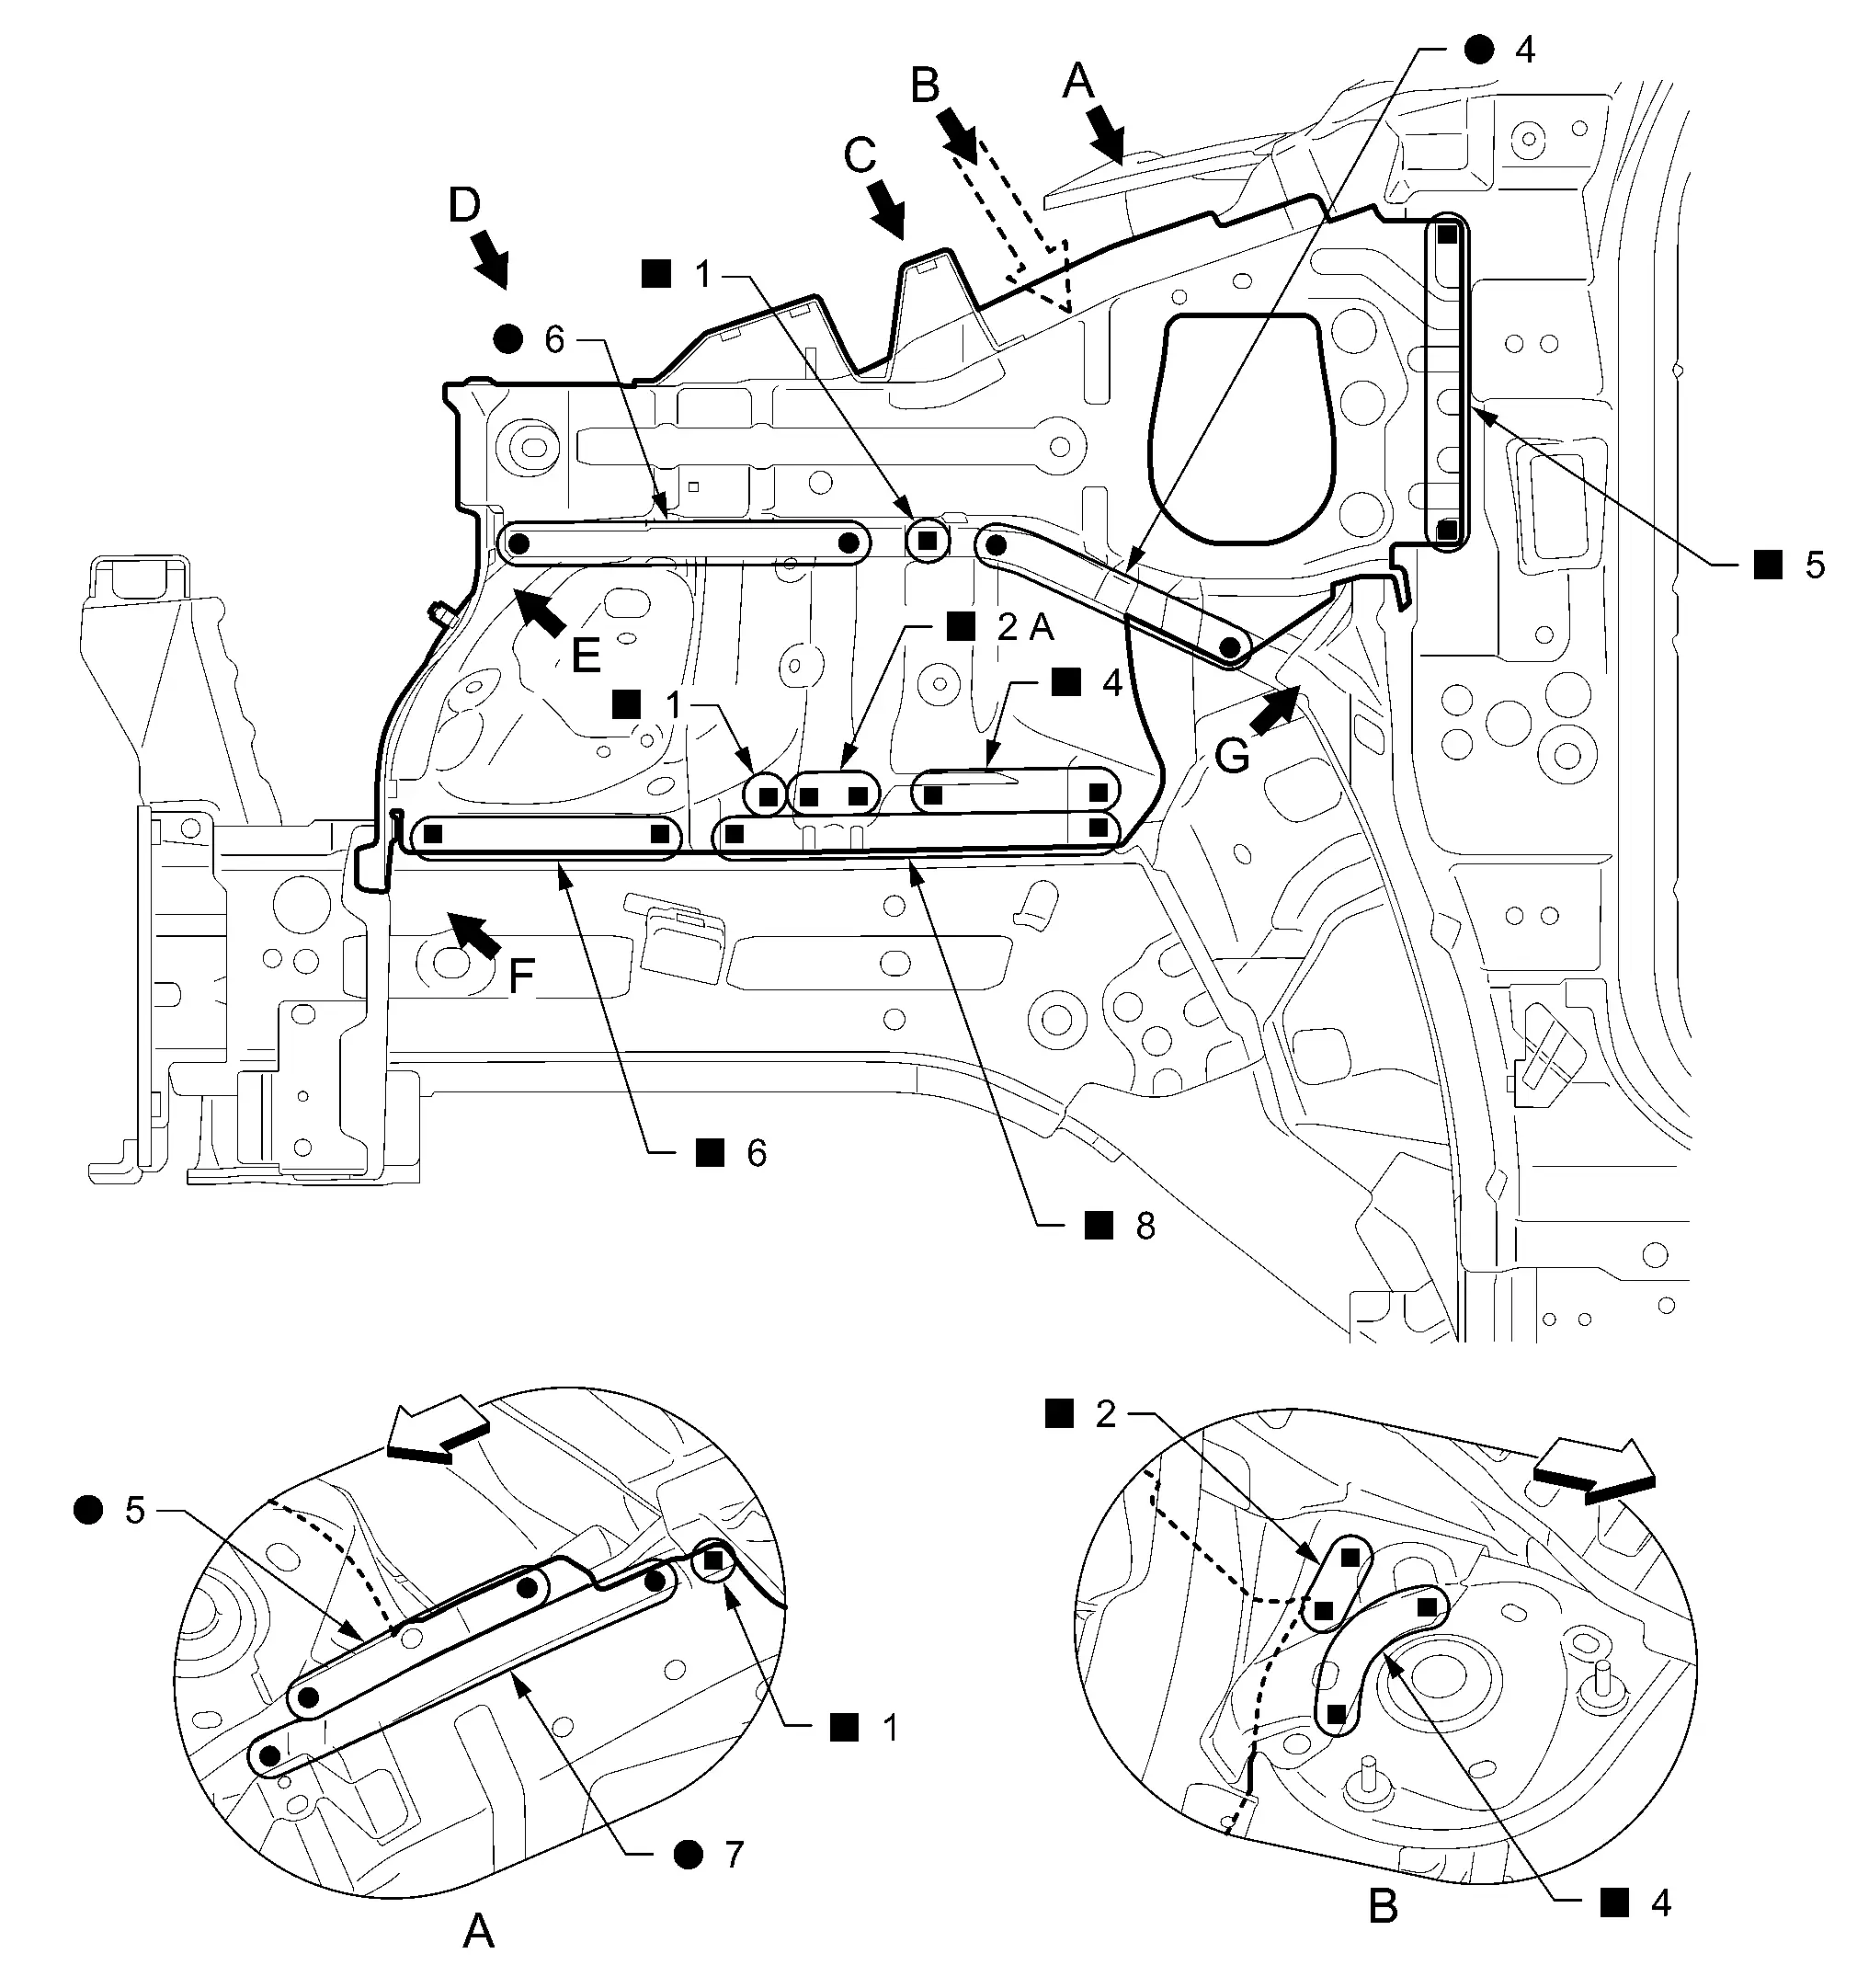
 : Nissan Ariya Vehicle front : Nissan Ariya Vehicle front |
|||||
| Replacement part | |||||
| • | Front strut housing assembly | • | Hoodledge reinforcement | ||
|
 : Weld the parts onto the back of the component part. : Weld the parts onto the back of the component part. |
View C: Before installing hoodledge reinforcement
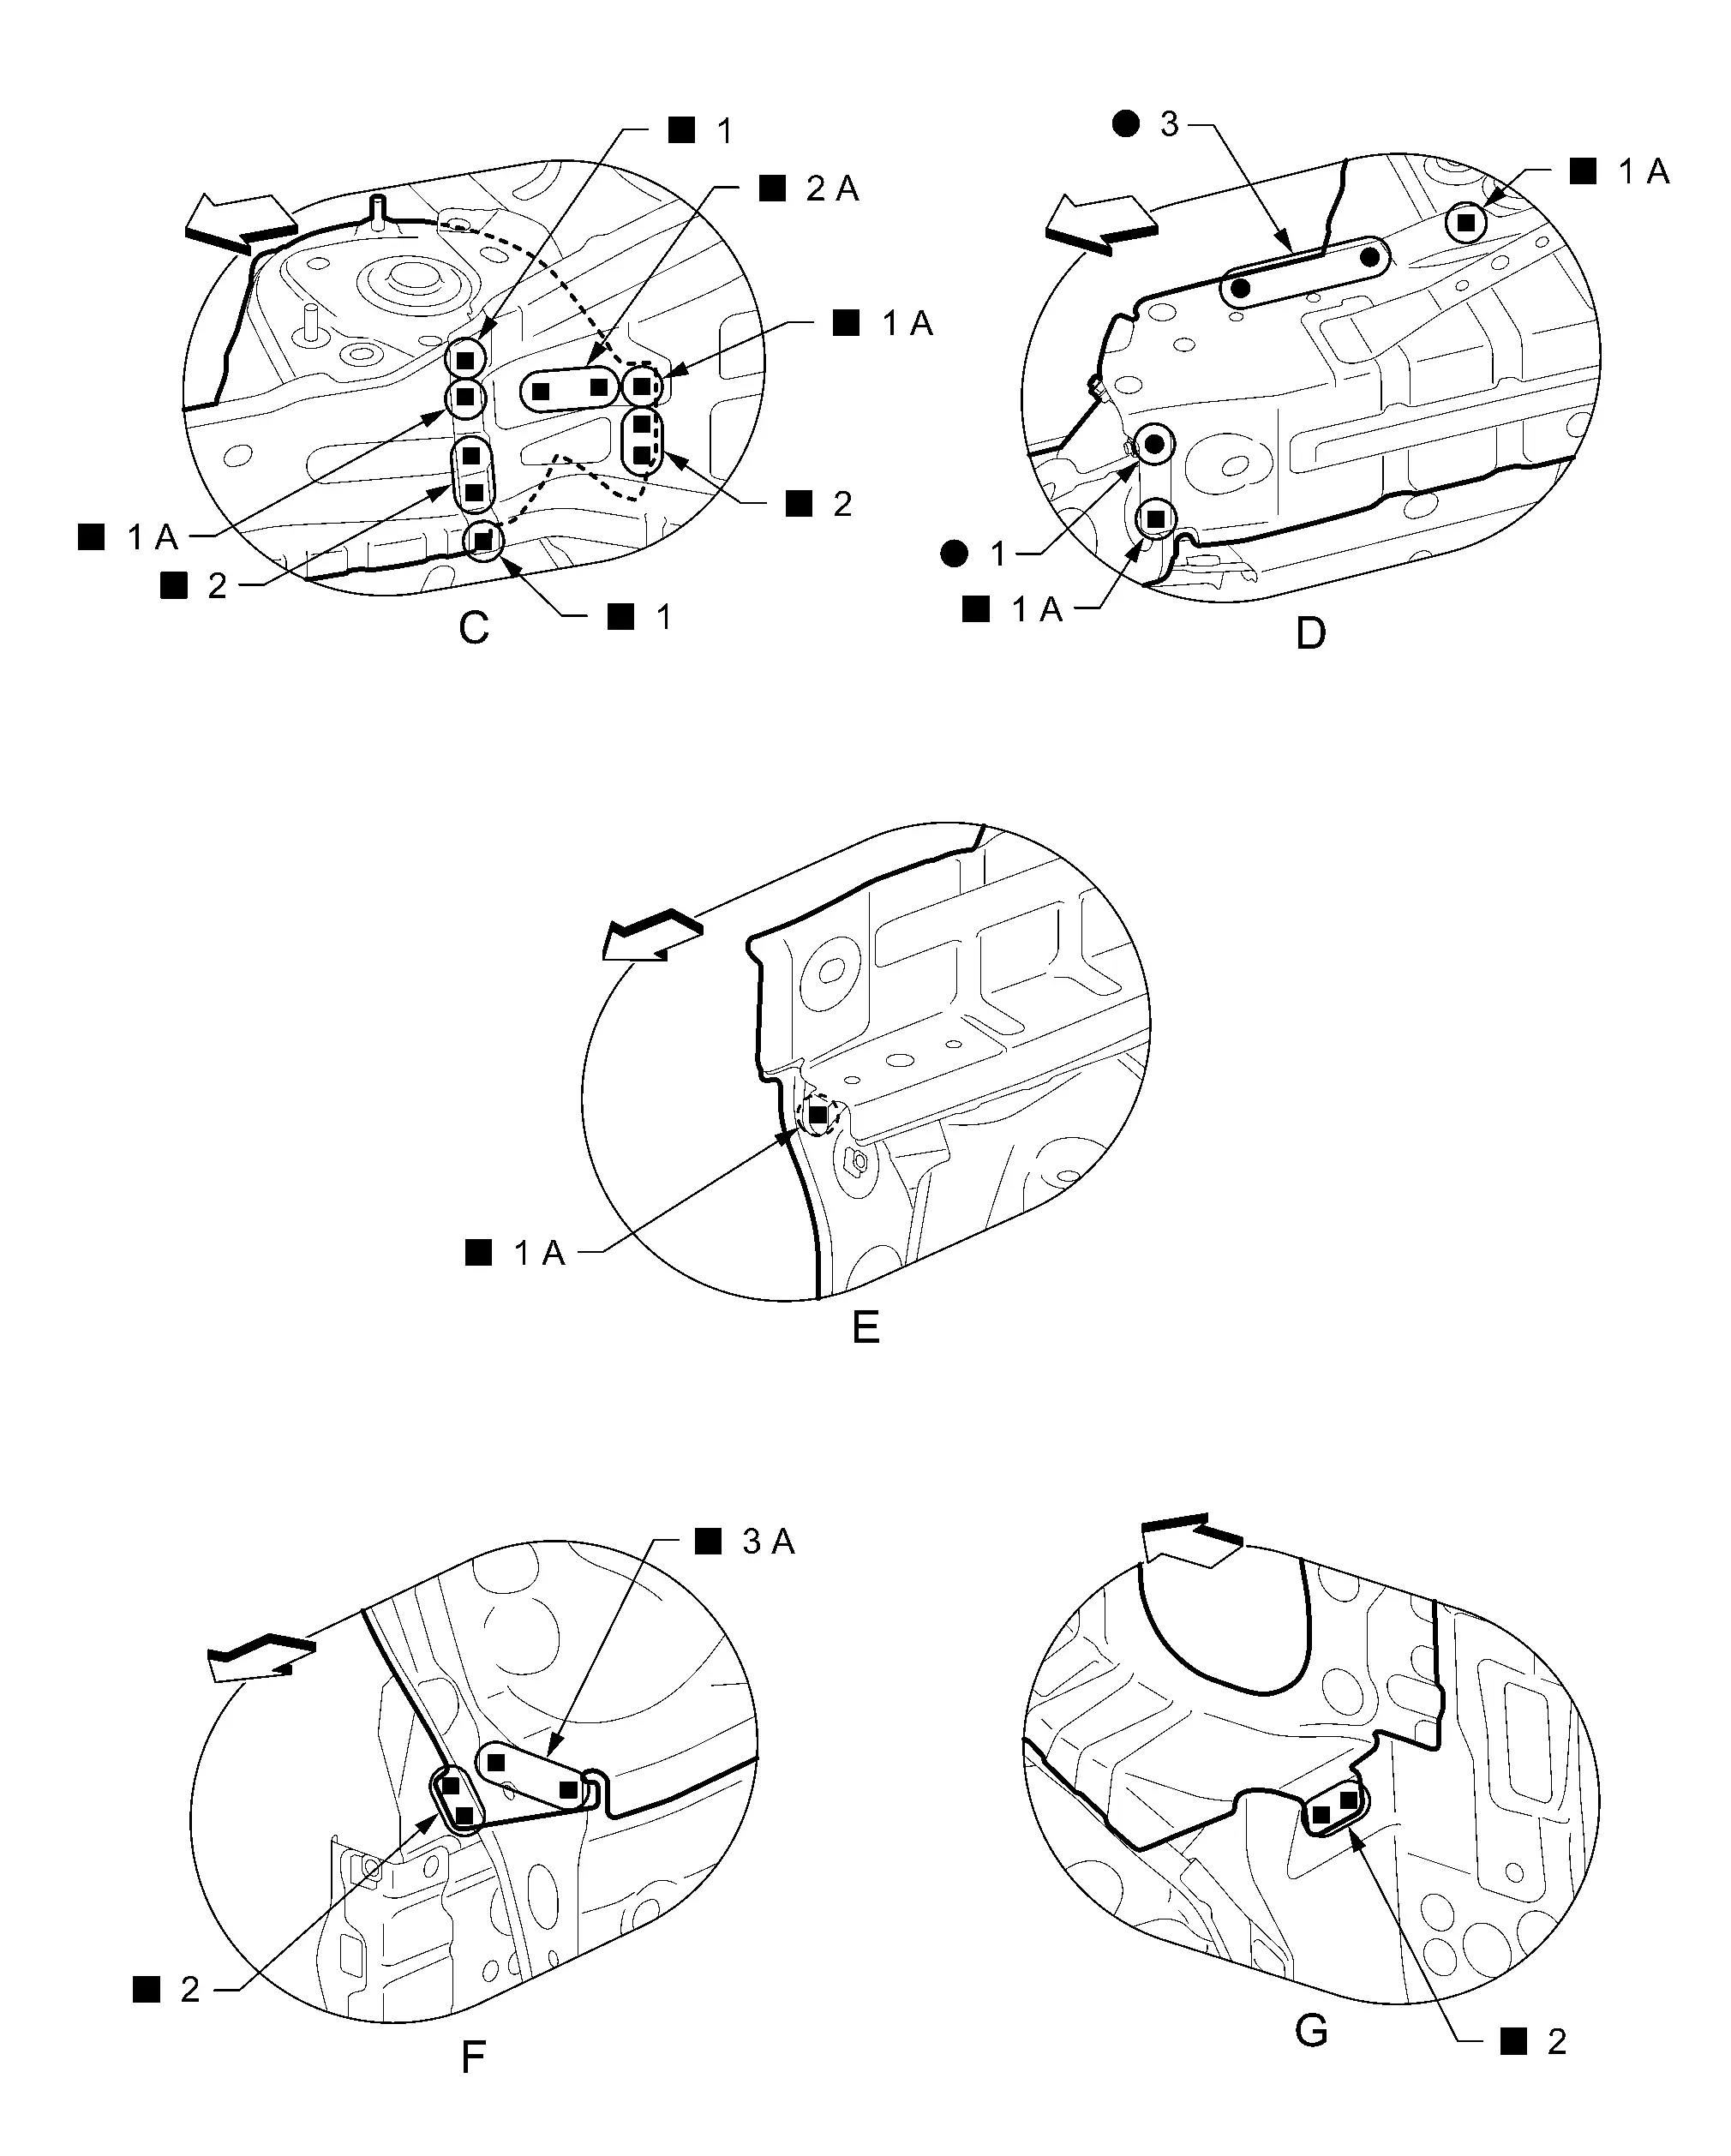
PARTIAL REPLACEMENT
Work after side radiator core support assembly is removed.
|
: Weld the parts onto the back of the component part. |
|||||
| Replacement part | |||||
| • | Lower hoodledge | • | Upper hoodledge | • | Hoodledge reinforcement |
| • | Lower front hoodledge reinforcement | ||||
| : Nissan Ariya Vehicle front |
View E: Before installing hoodledge reinforcement
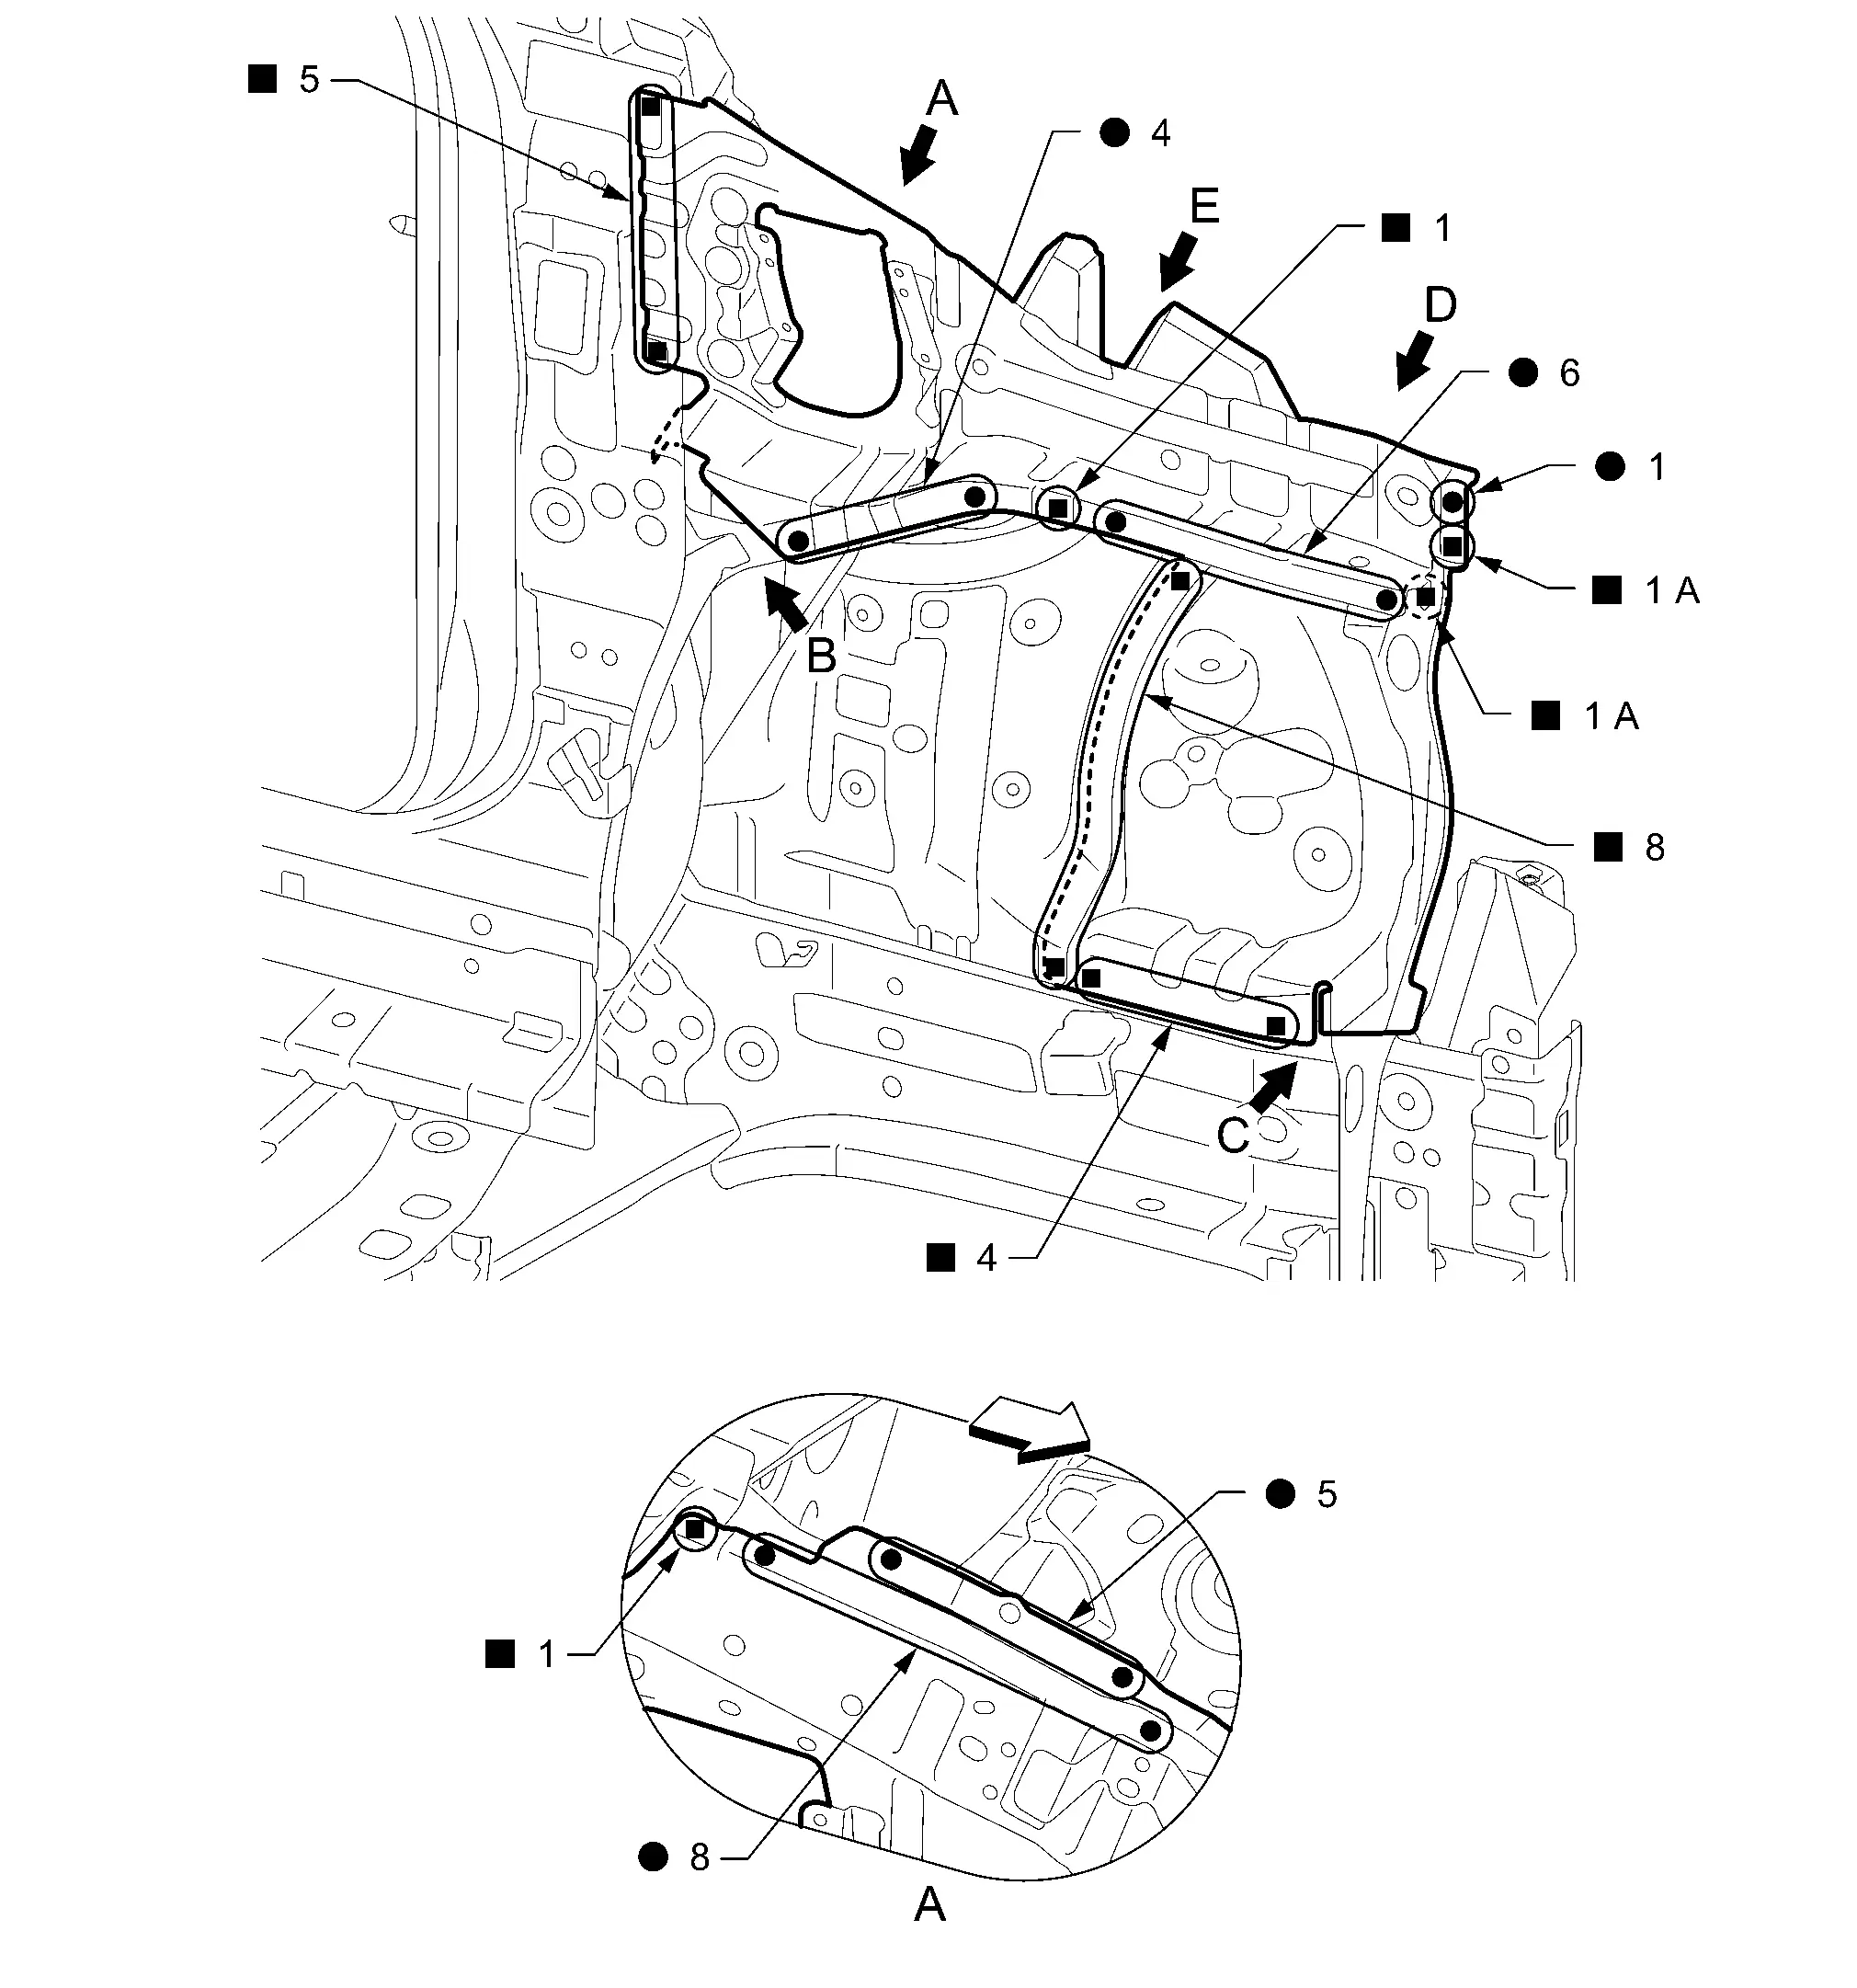
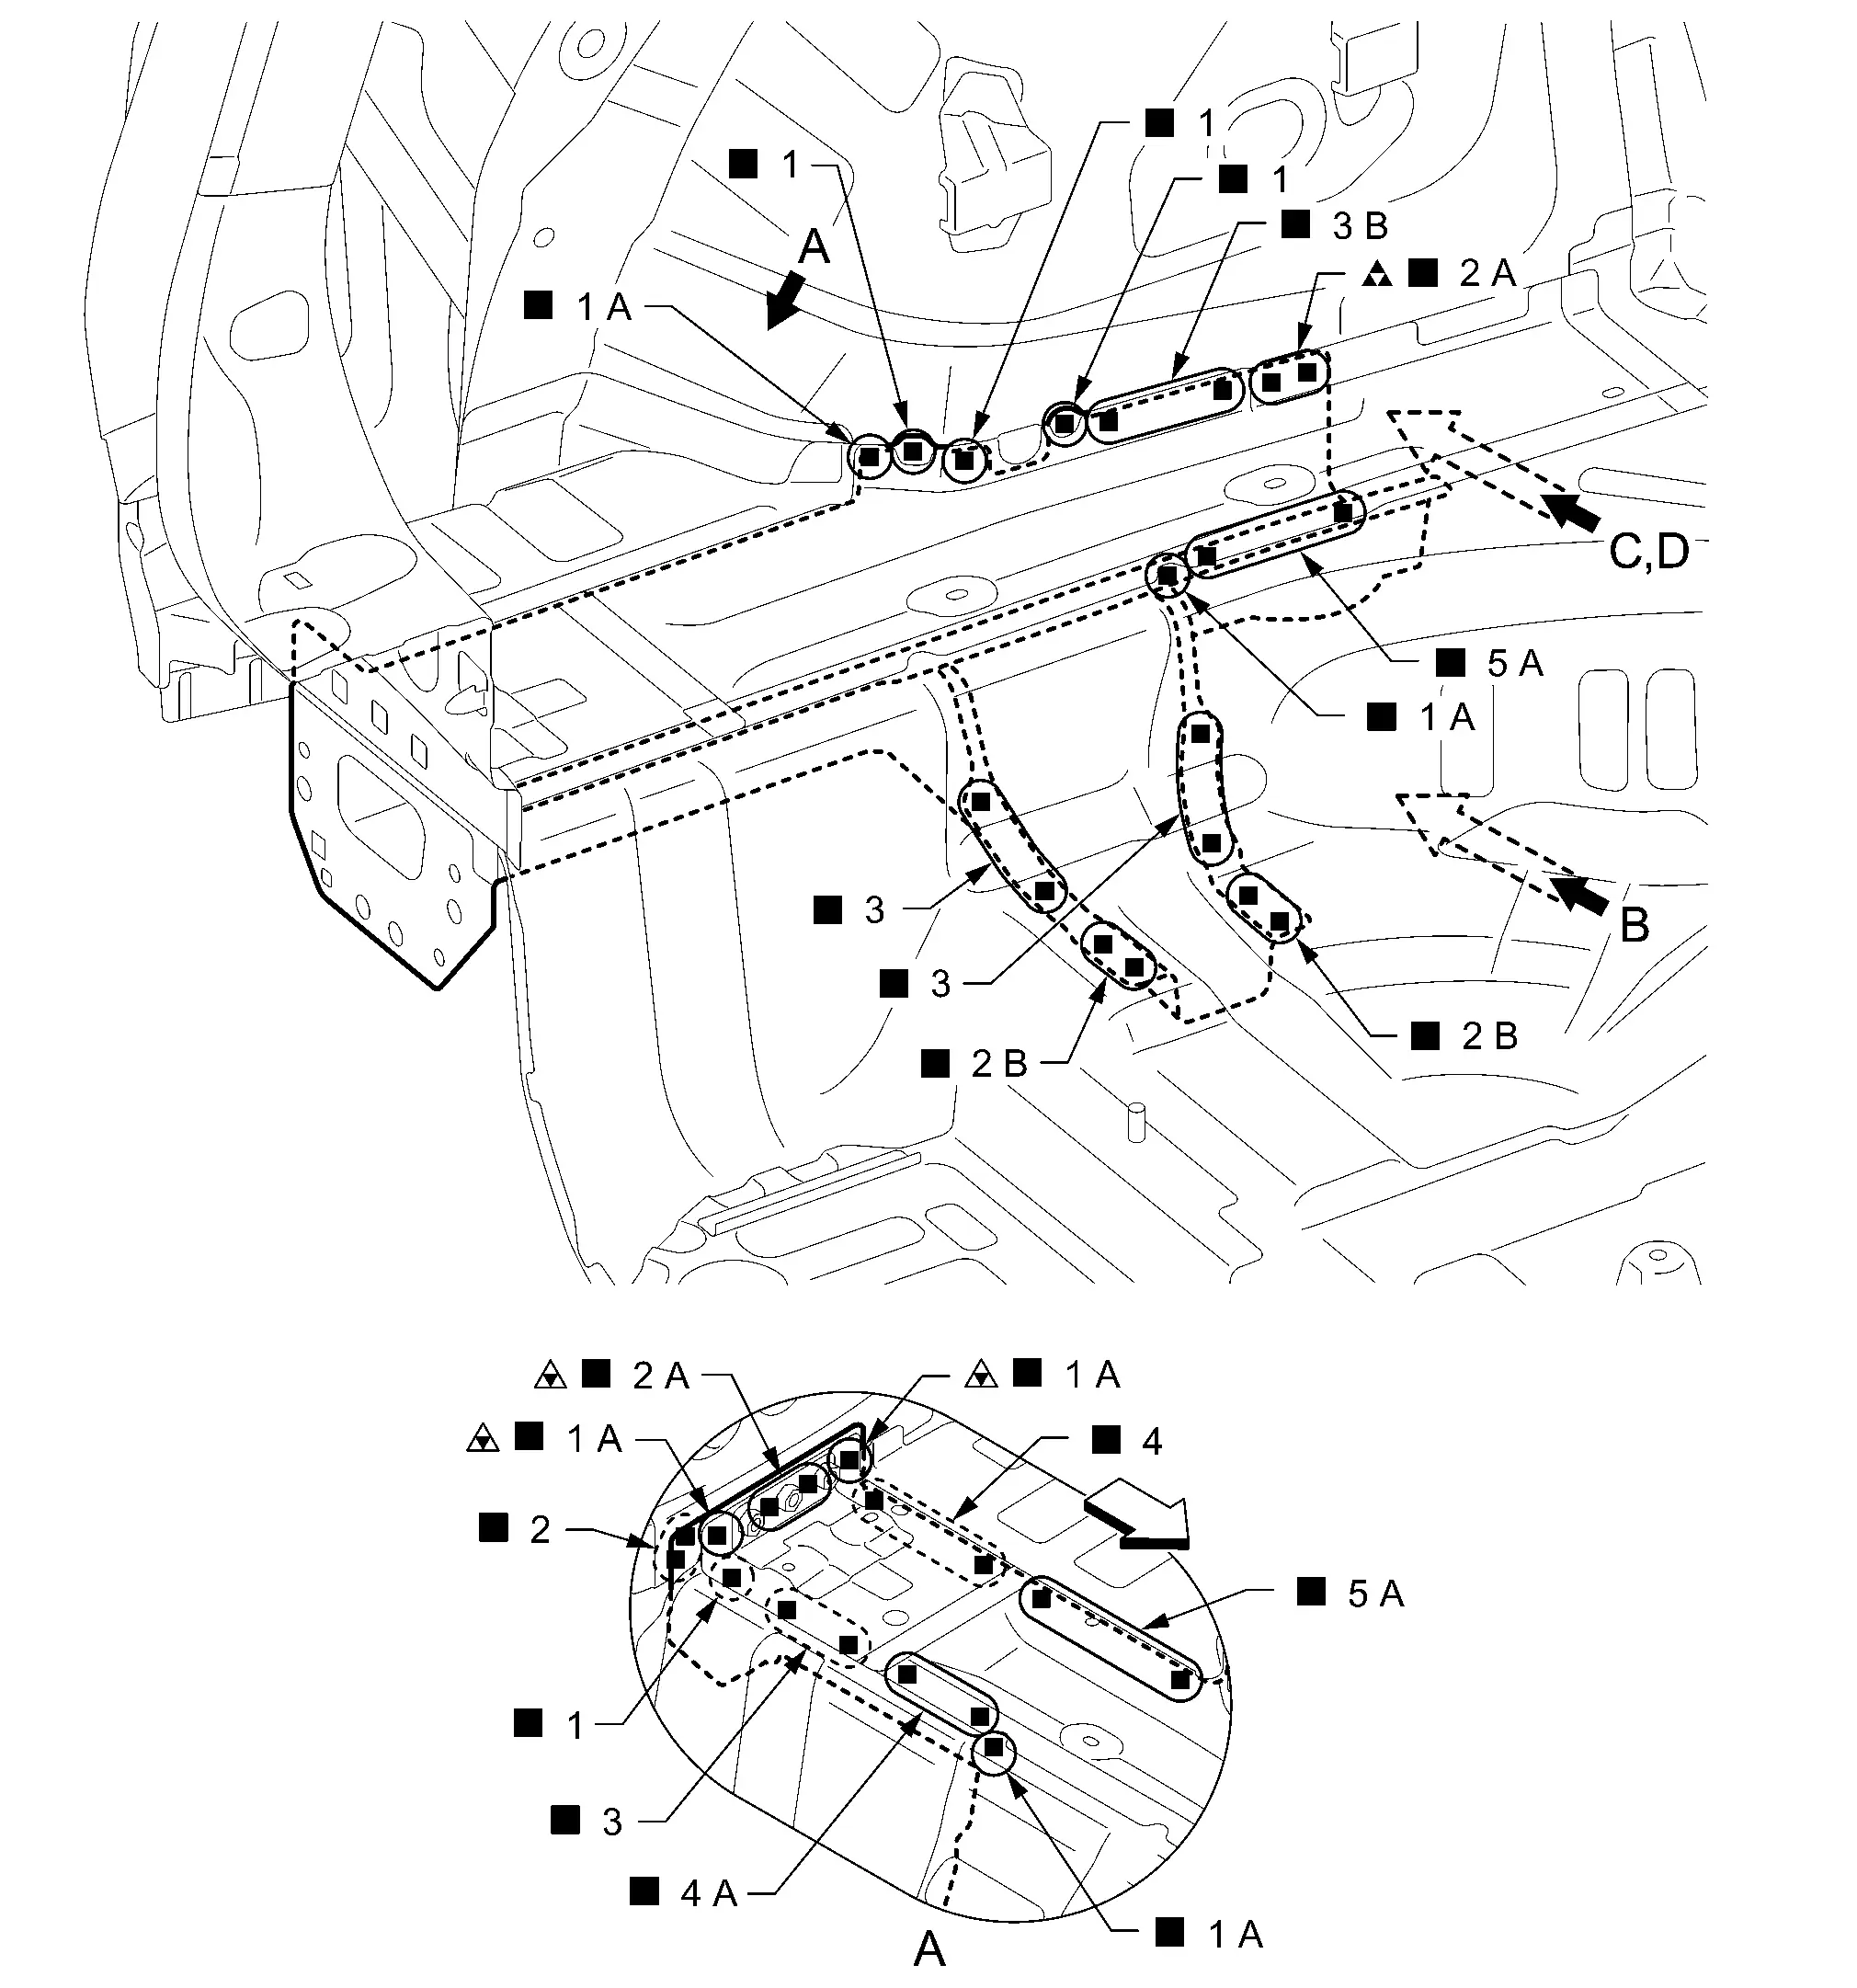
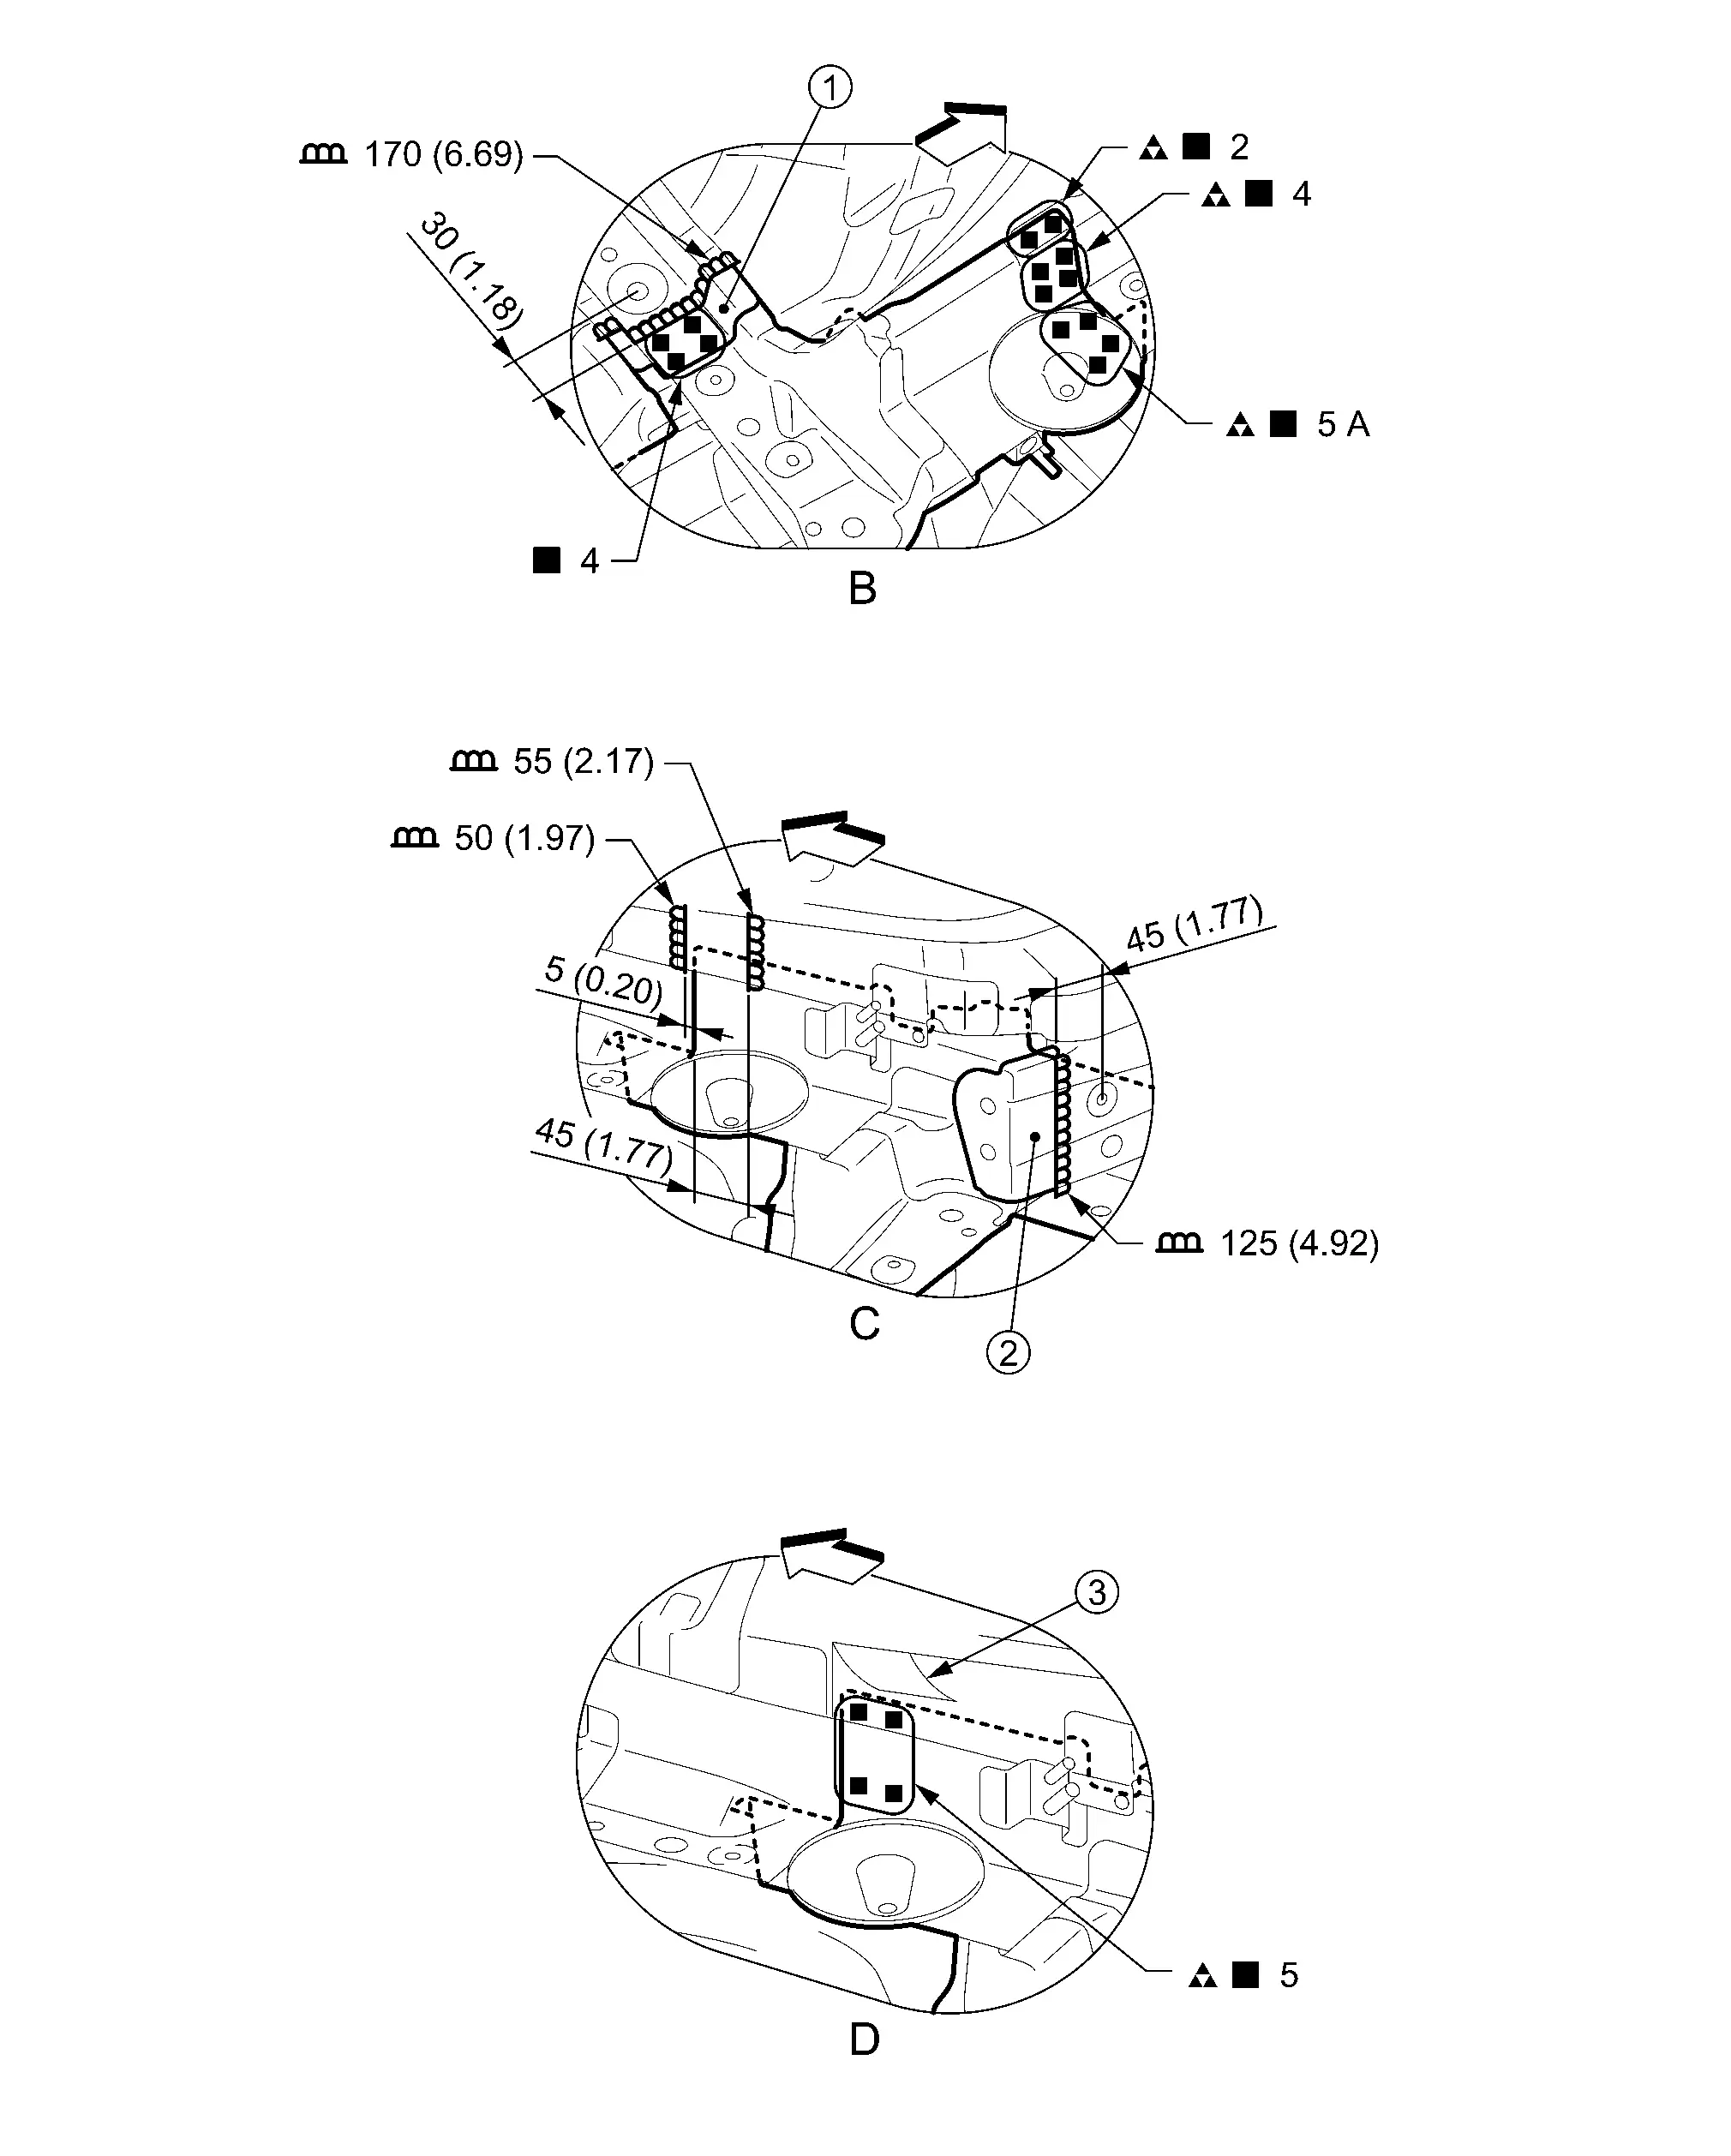
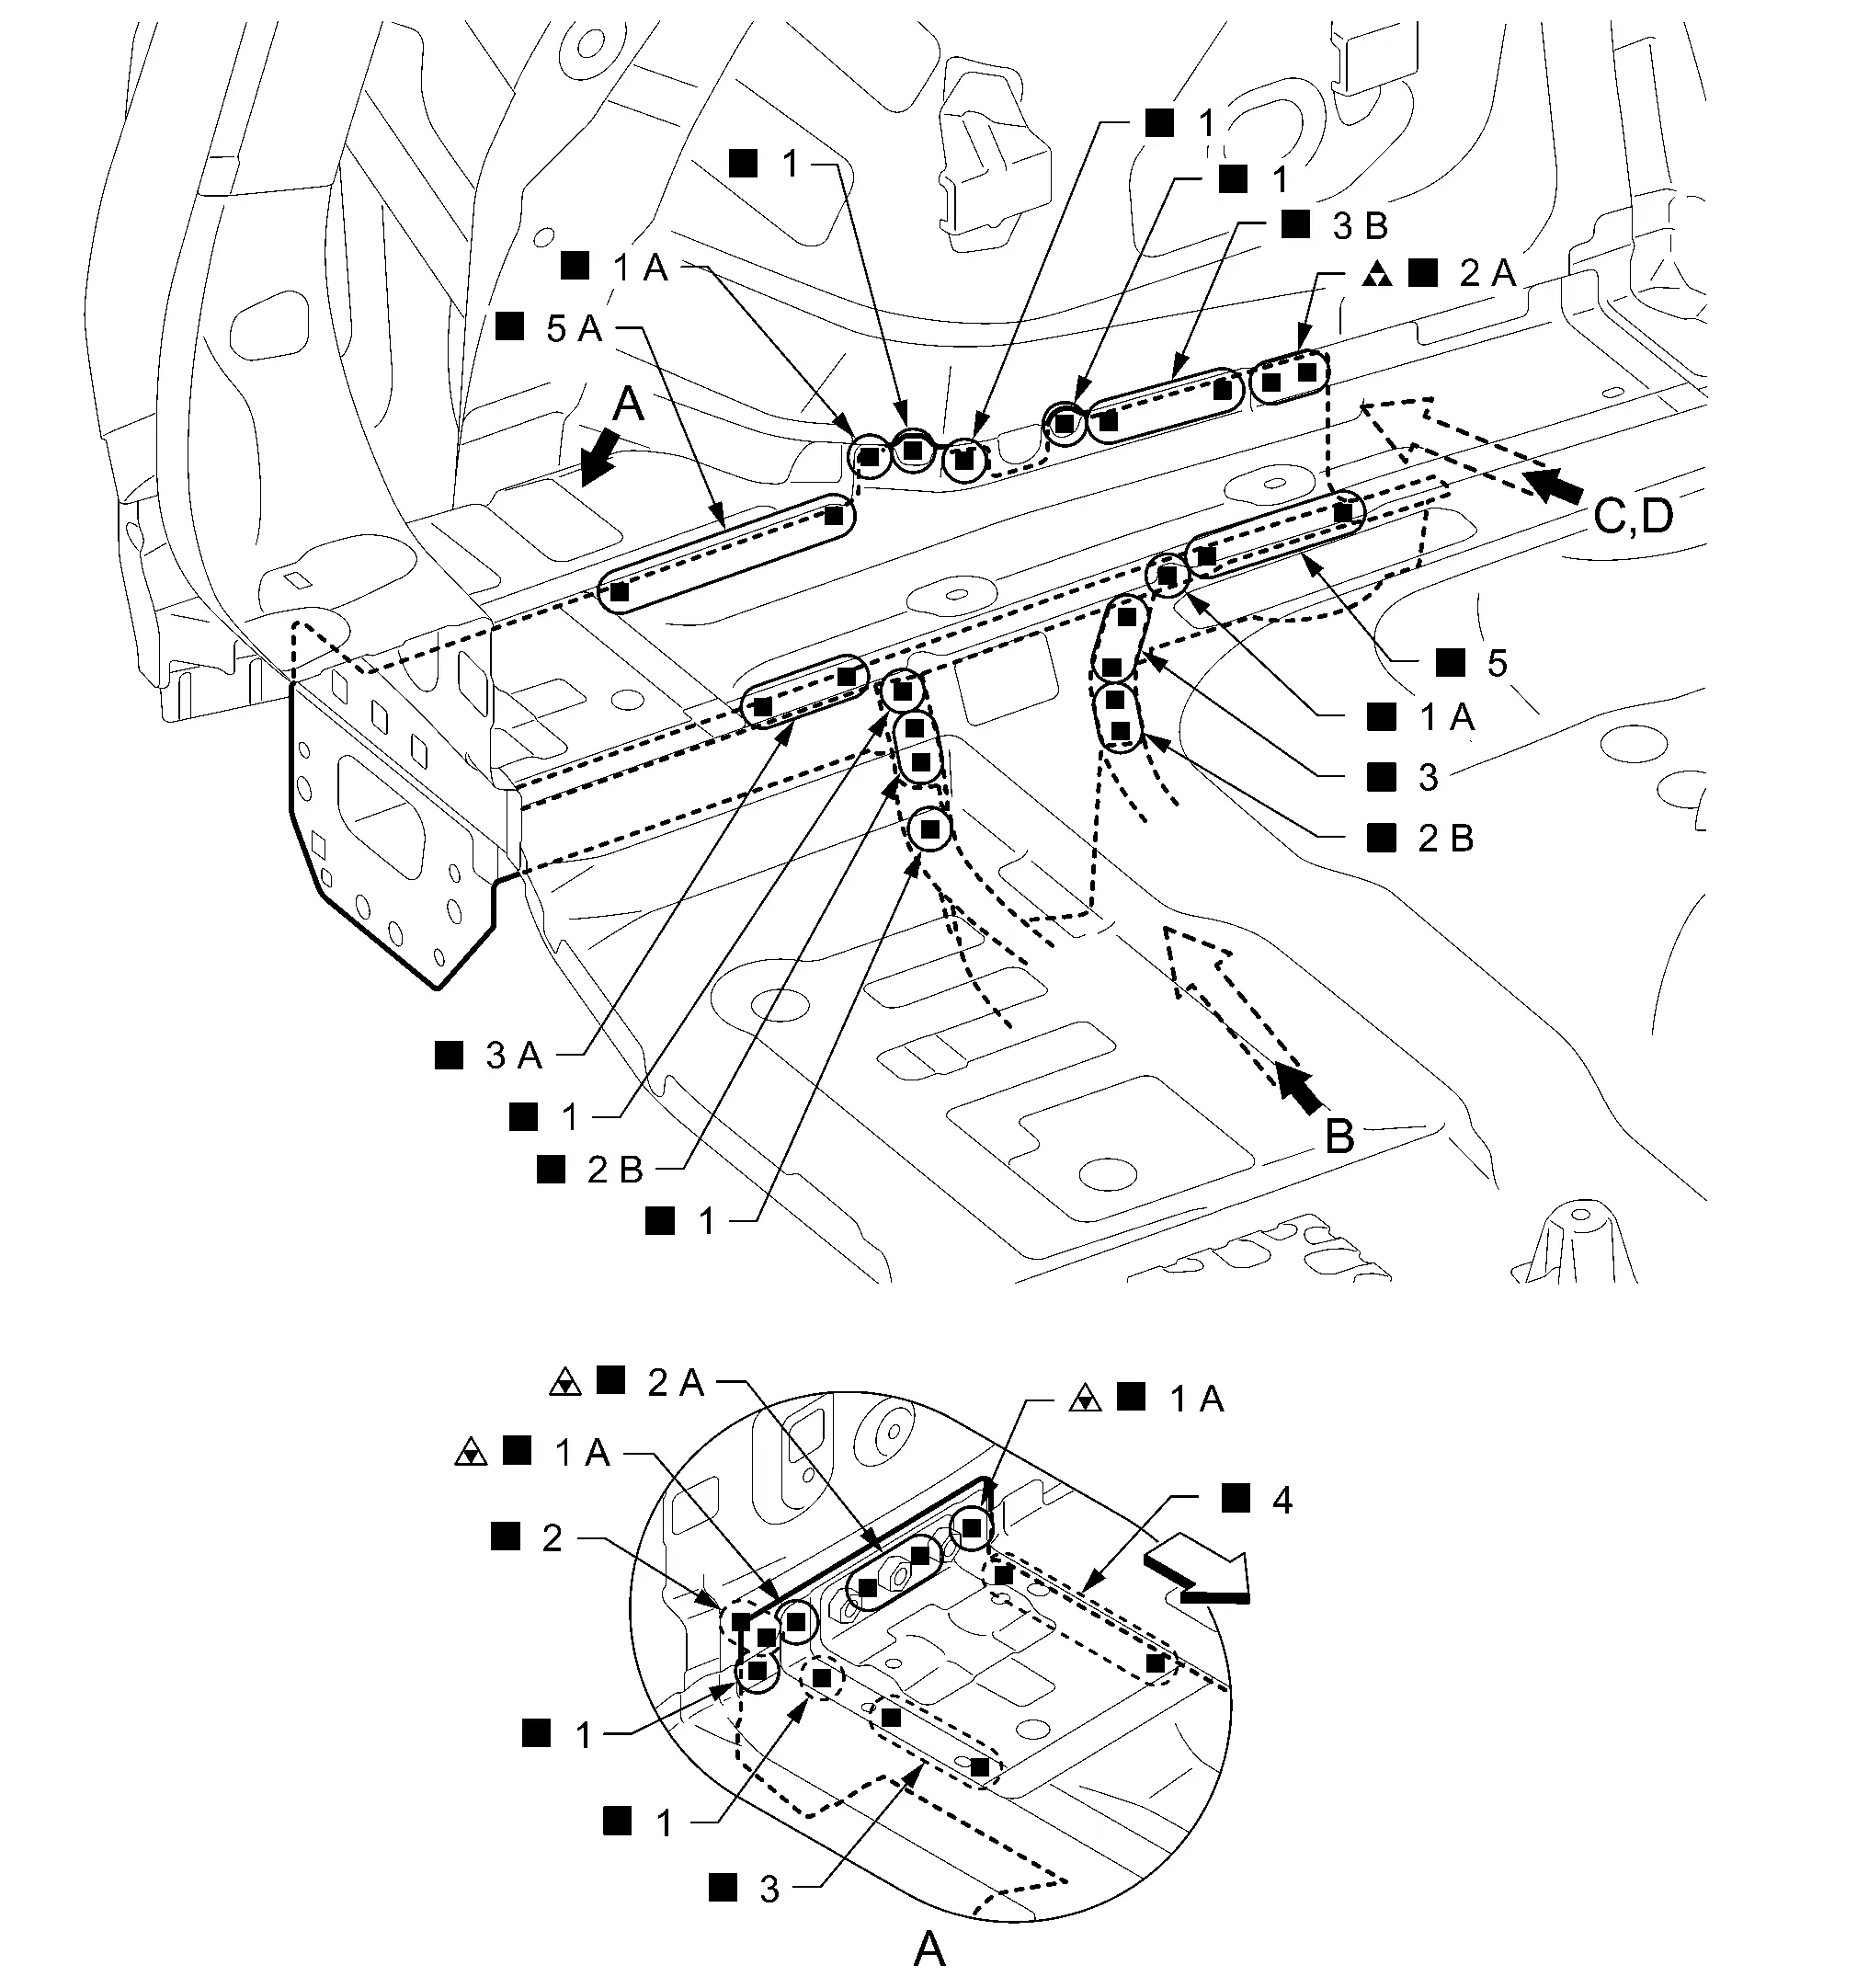
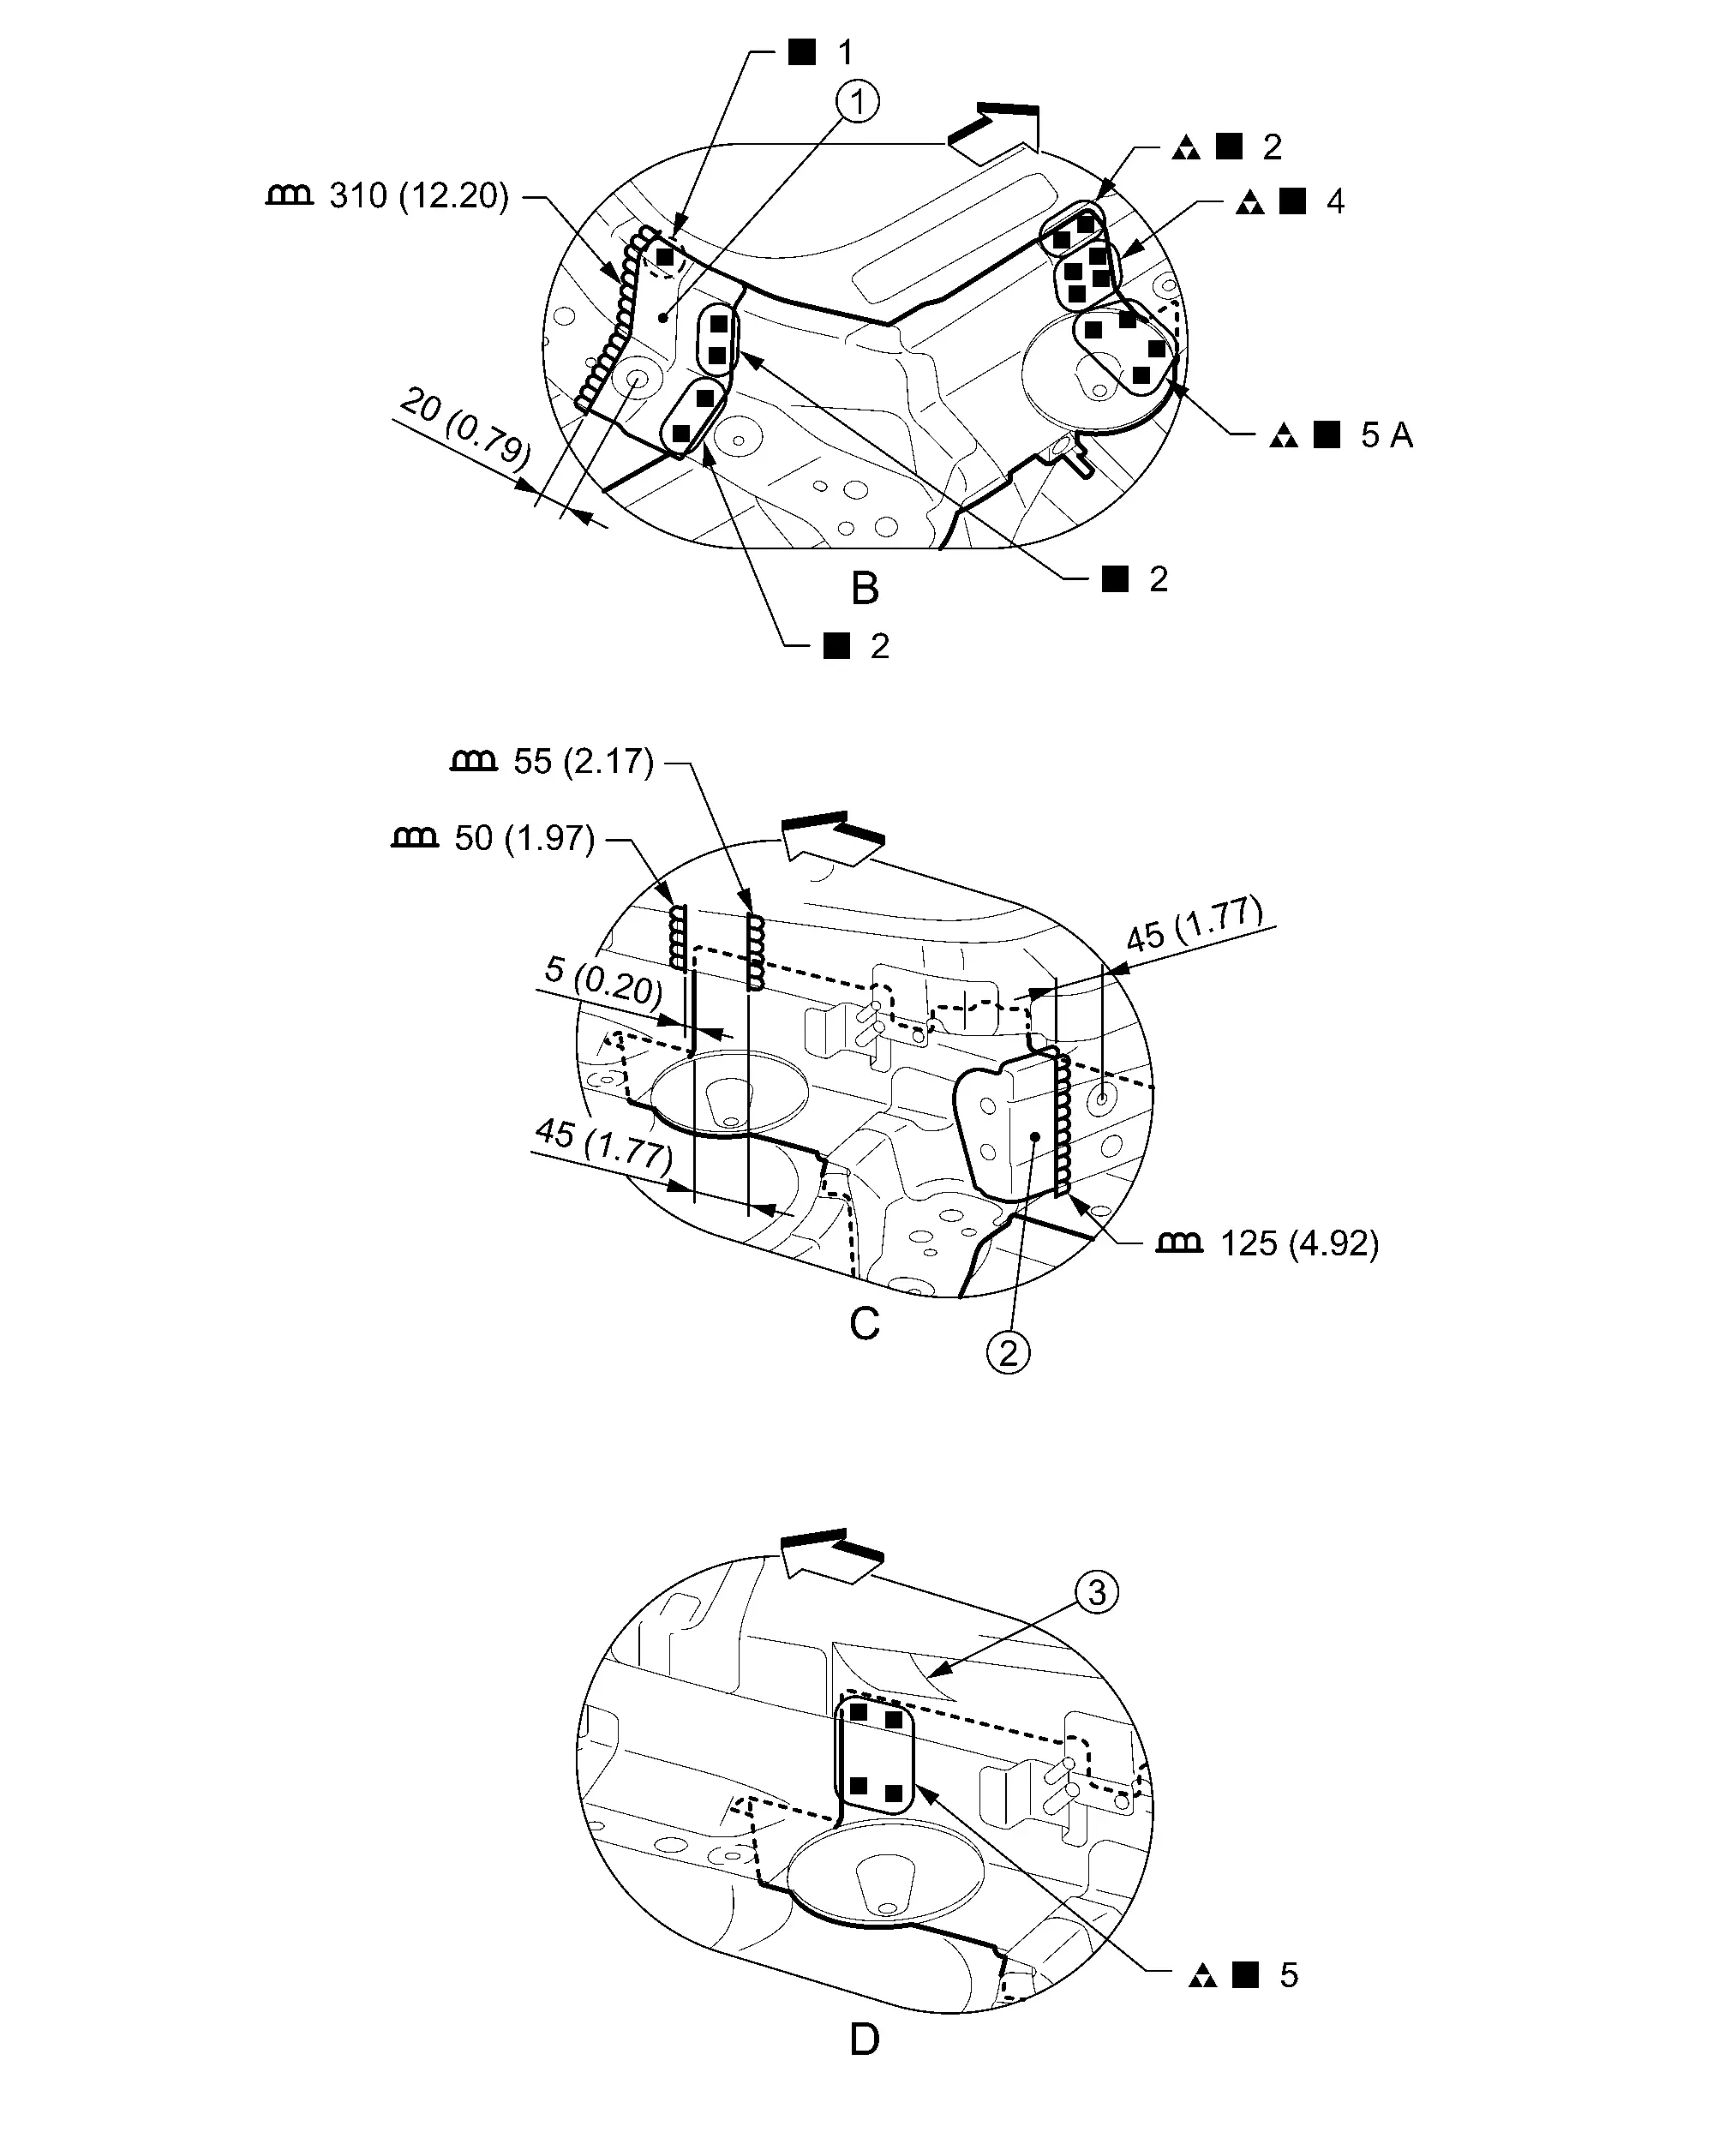
Front Side Member
Work after side radiator core support assembly and hoodledge are removed.

|
: N•m (kg-m, ft-lb) |
|||||
| Replacement part | |||||
| • | Front side member assembly | • | Front side member closing plate | ||
|
 : Drill φ10 mm (0.39 in) hole for the plug welding hole (ultra high strength steel). : Drill φ10 mm (0.39 in) hole for the plug welding hole (ultra high strength steel). |
 : Drill φ8 mm (0.31 in) hole for the plug welding hole (ultra high strength steel).
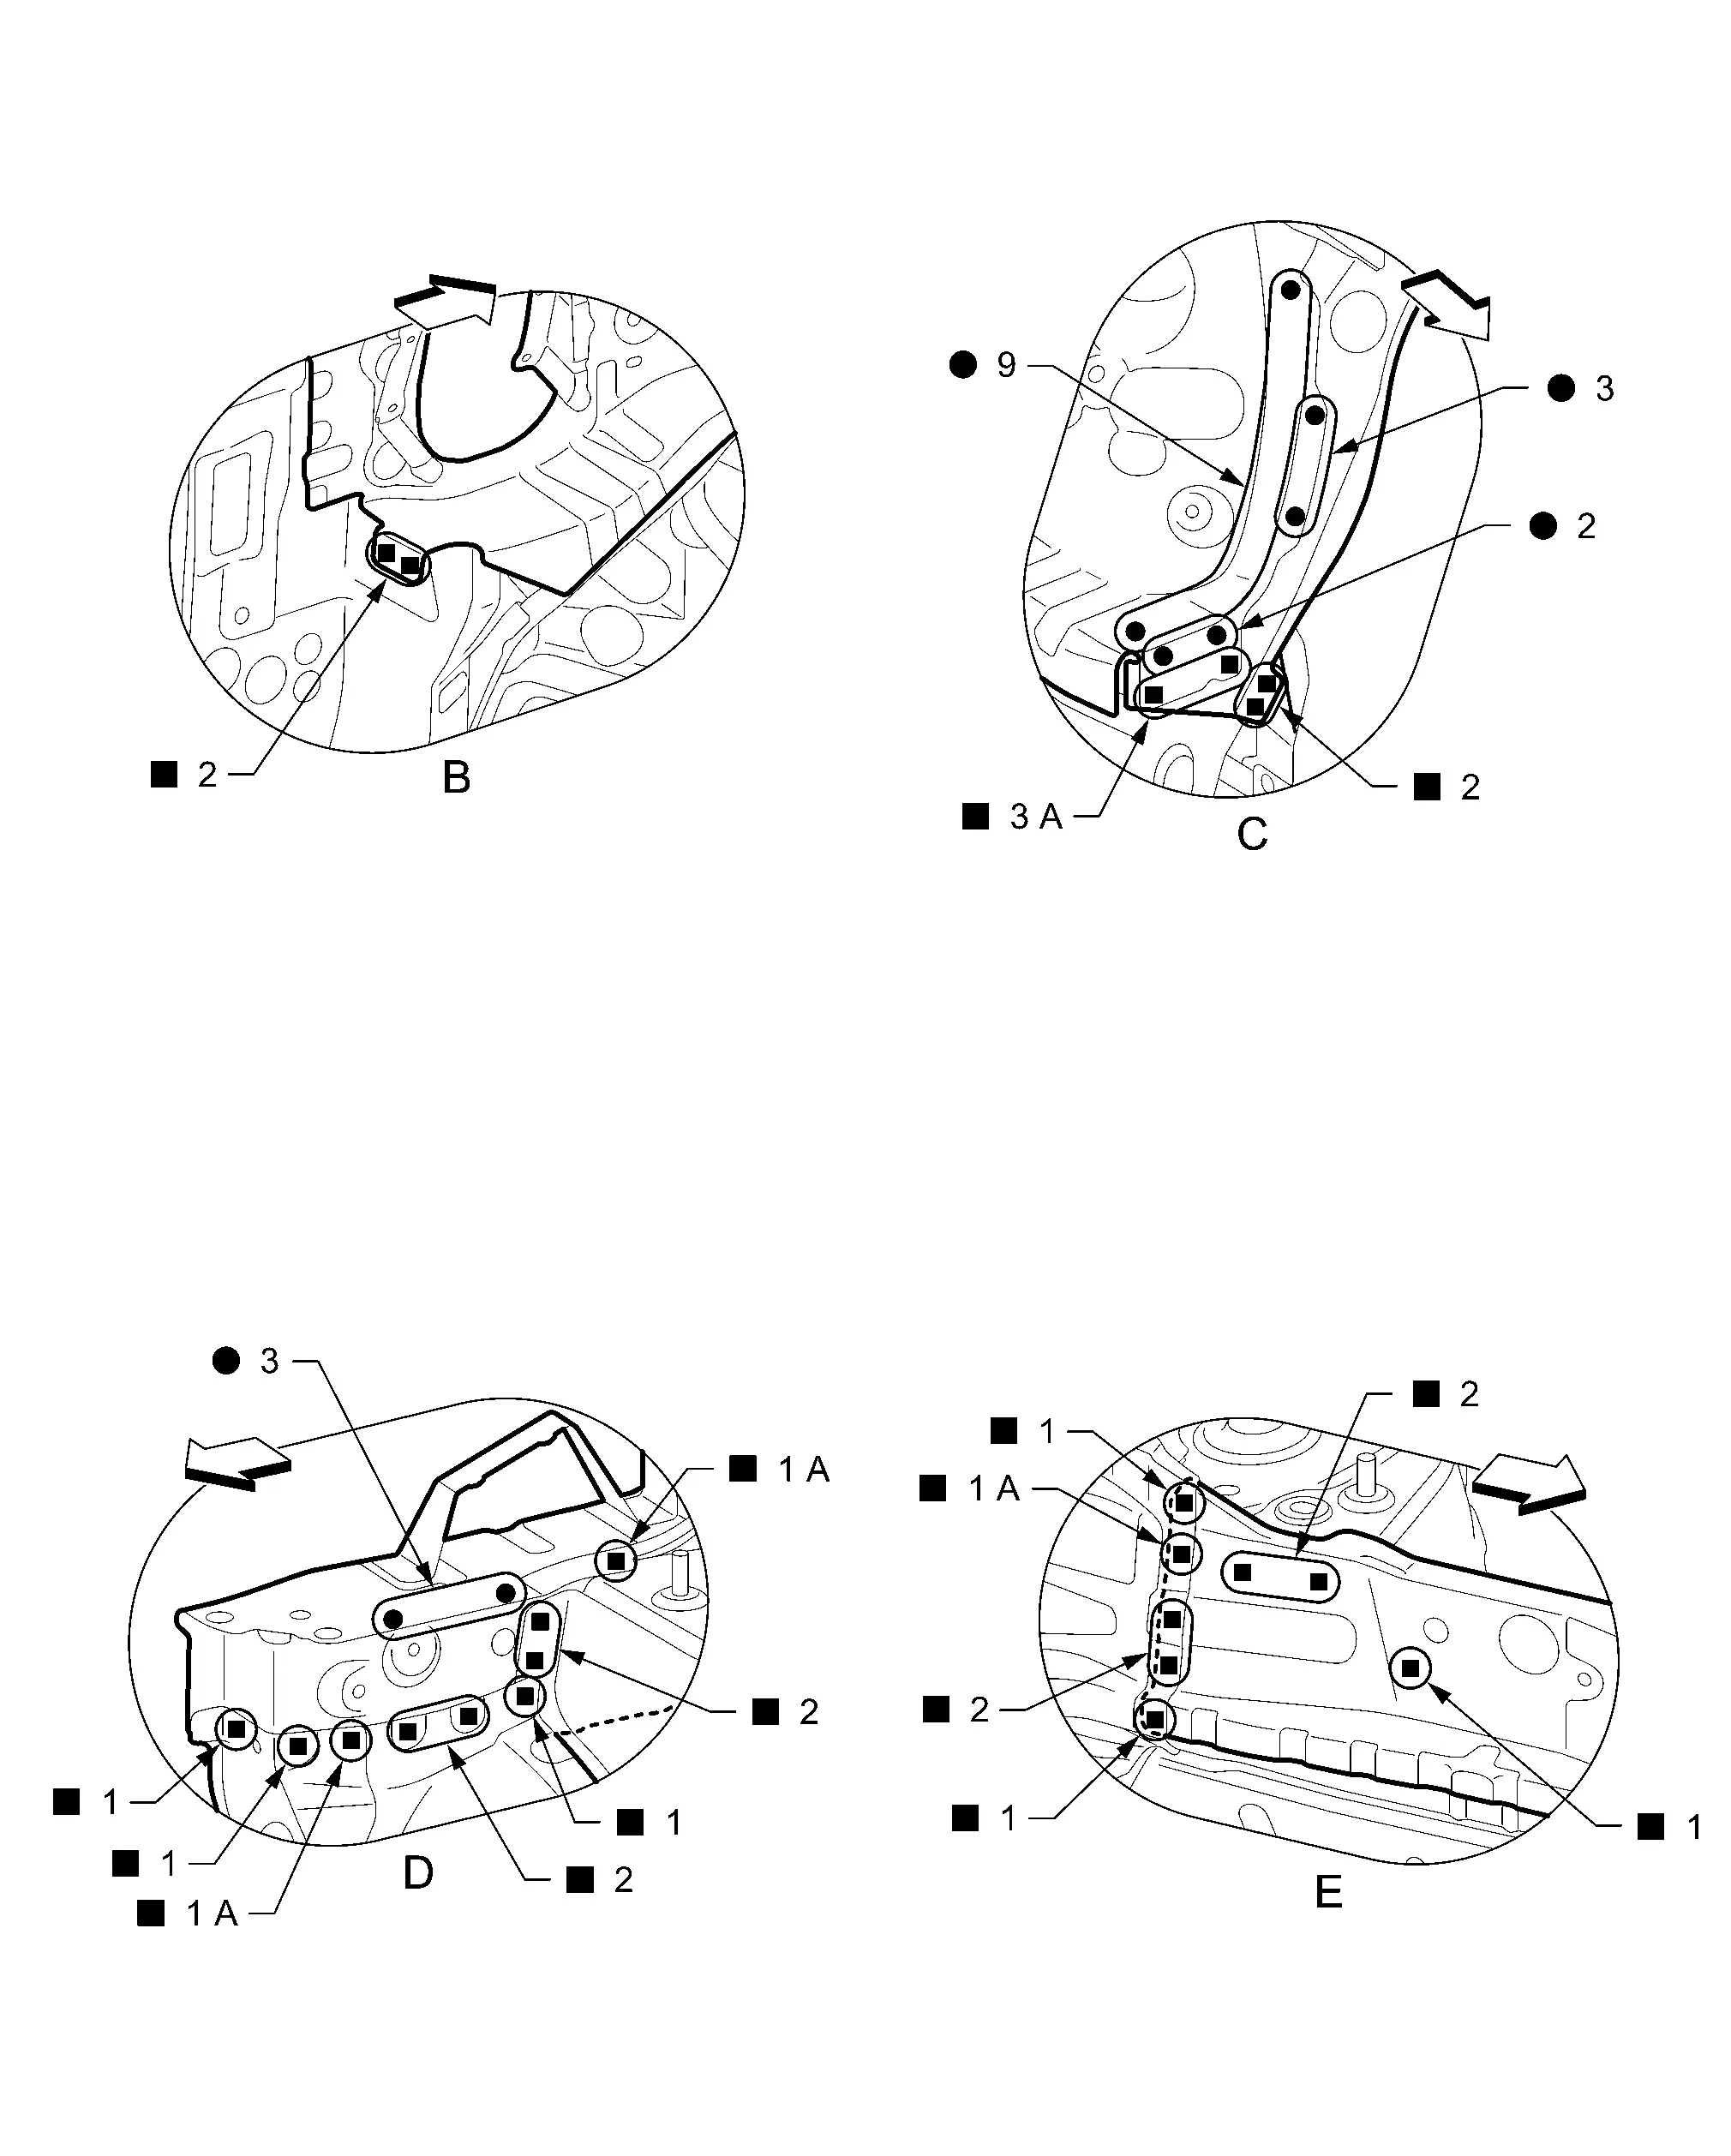
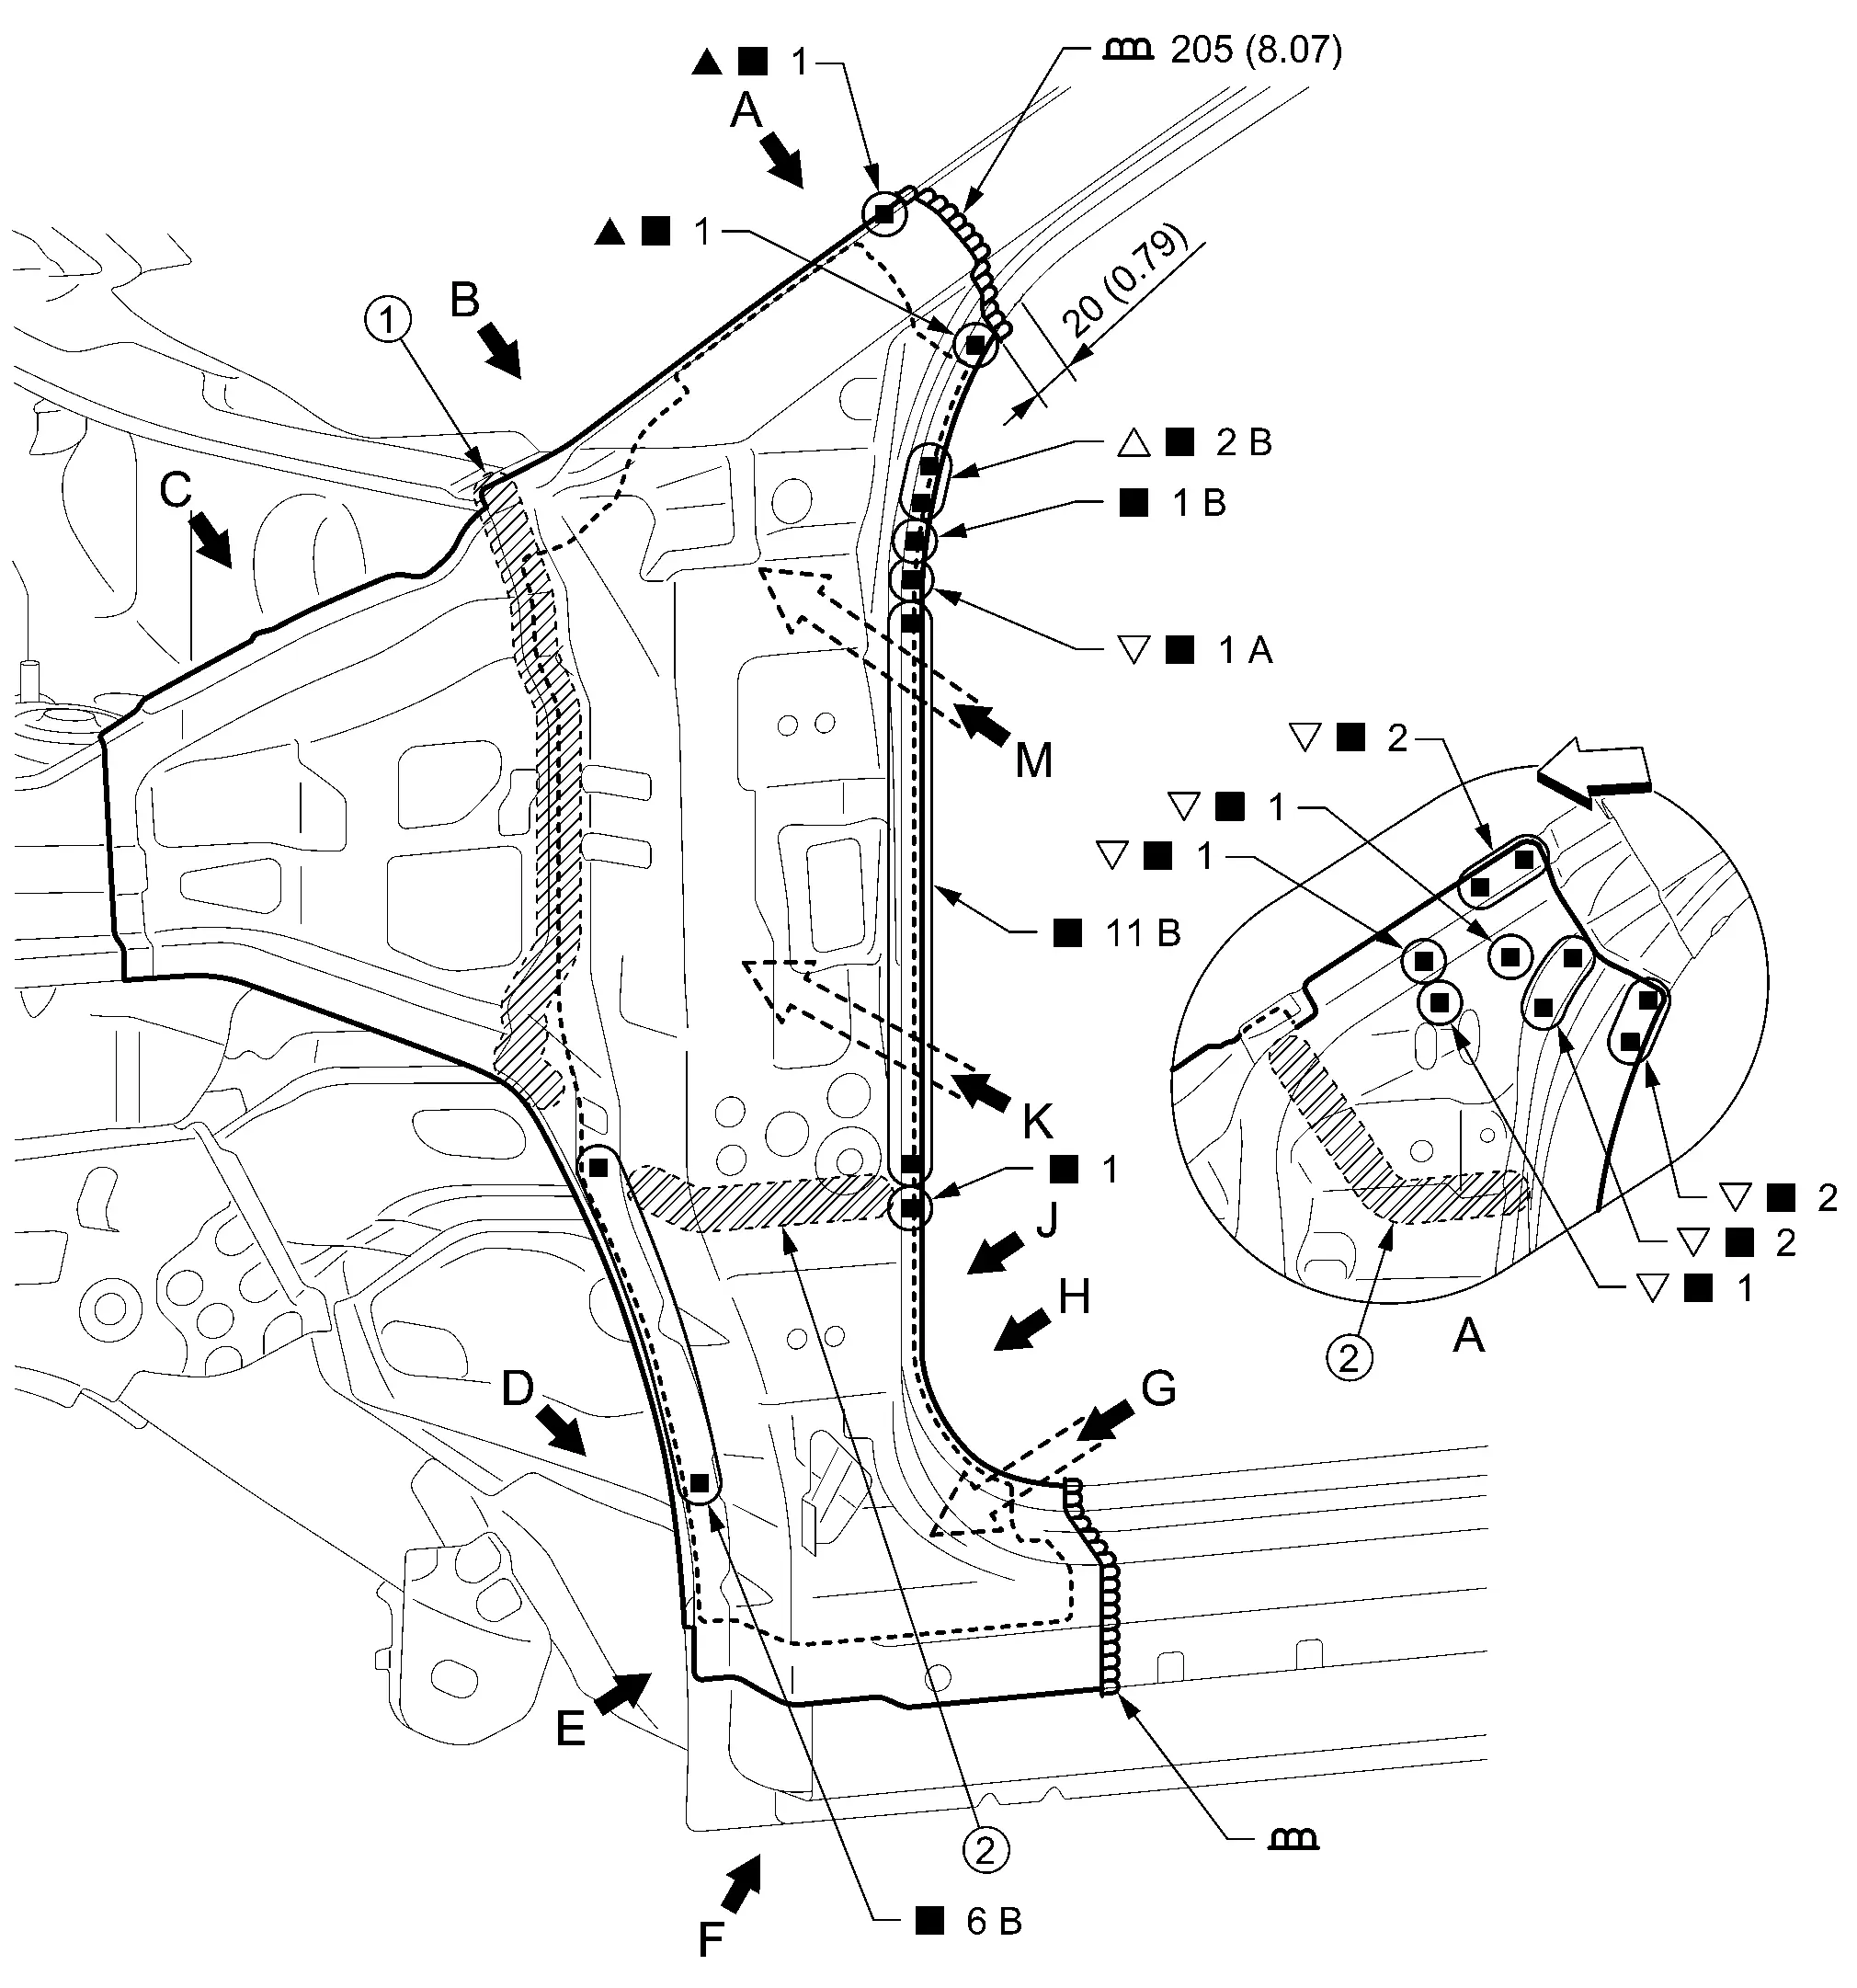
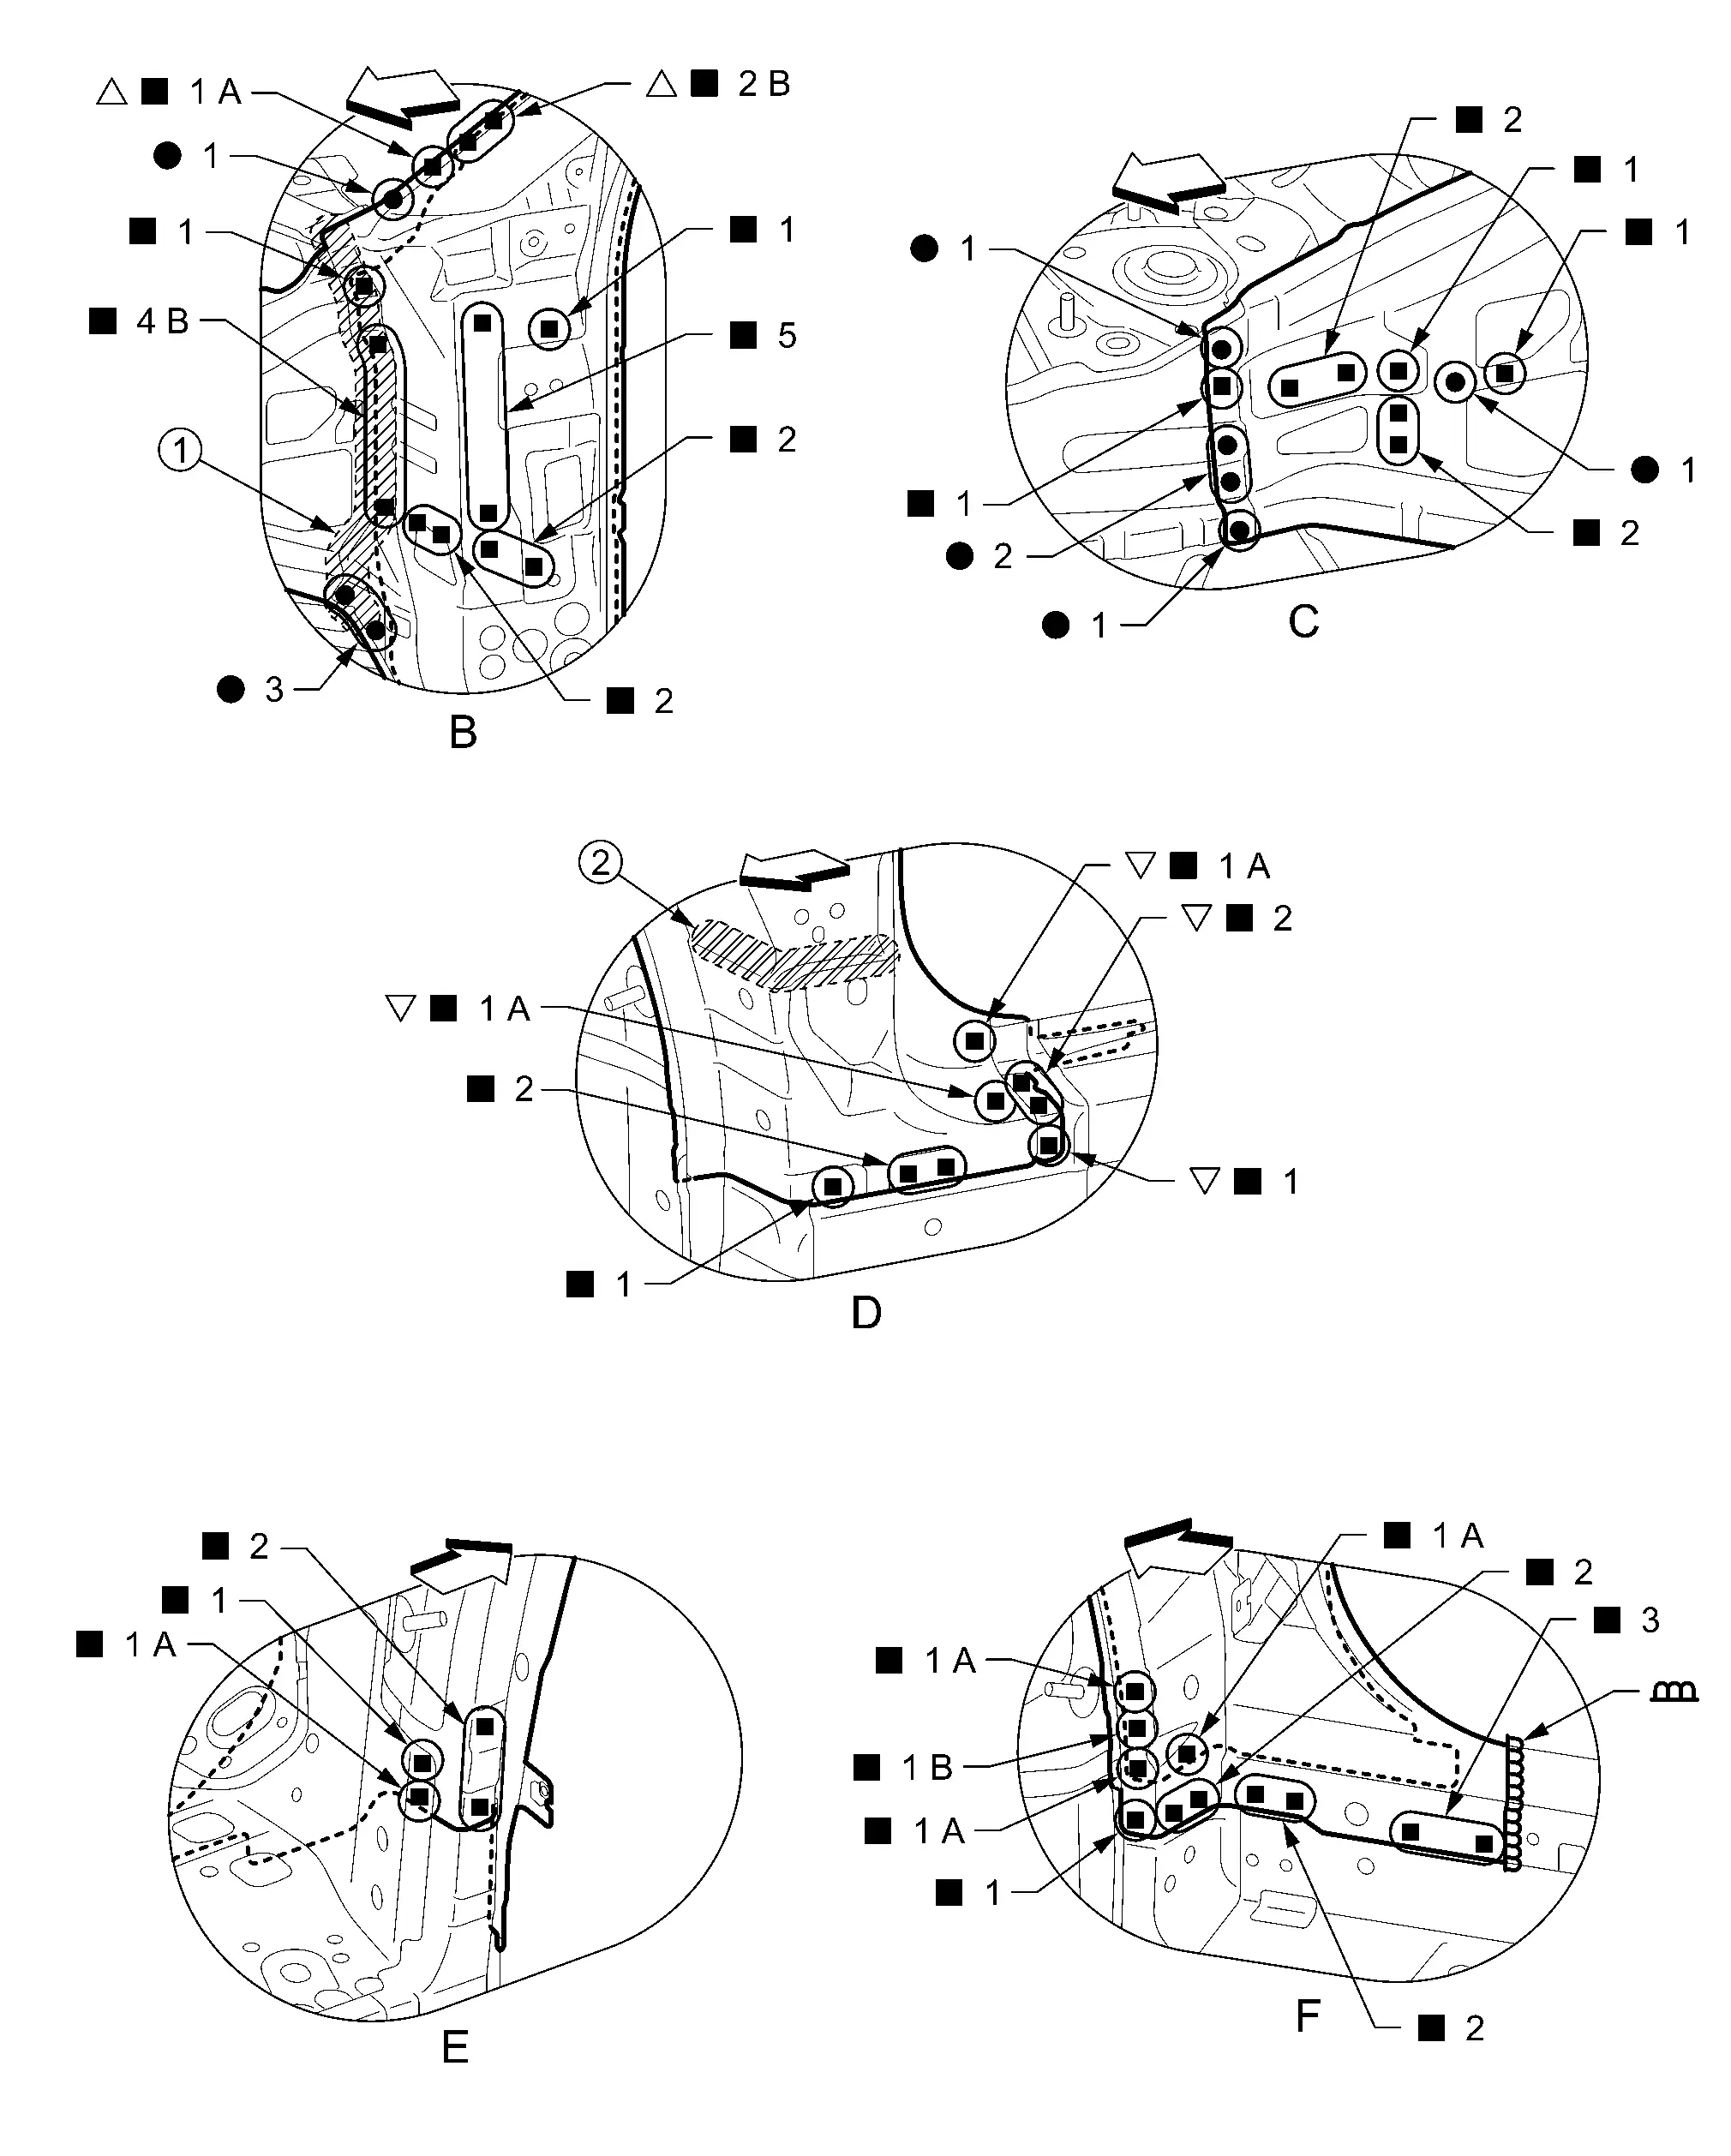
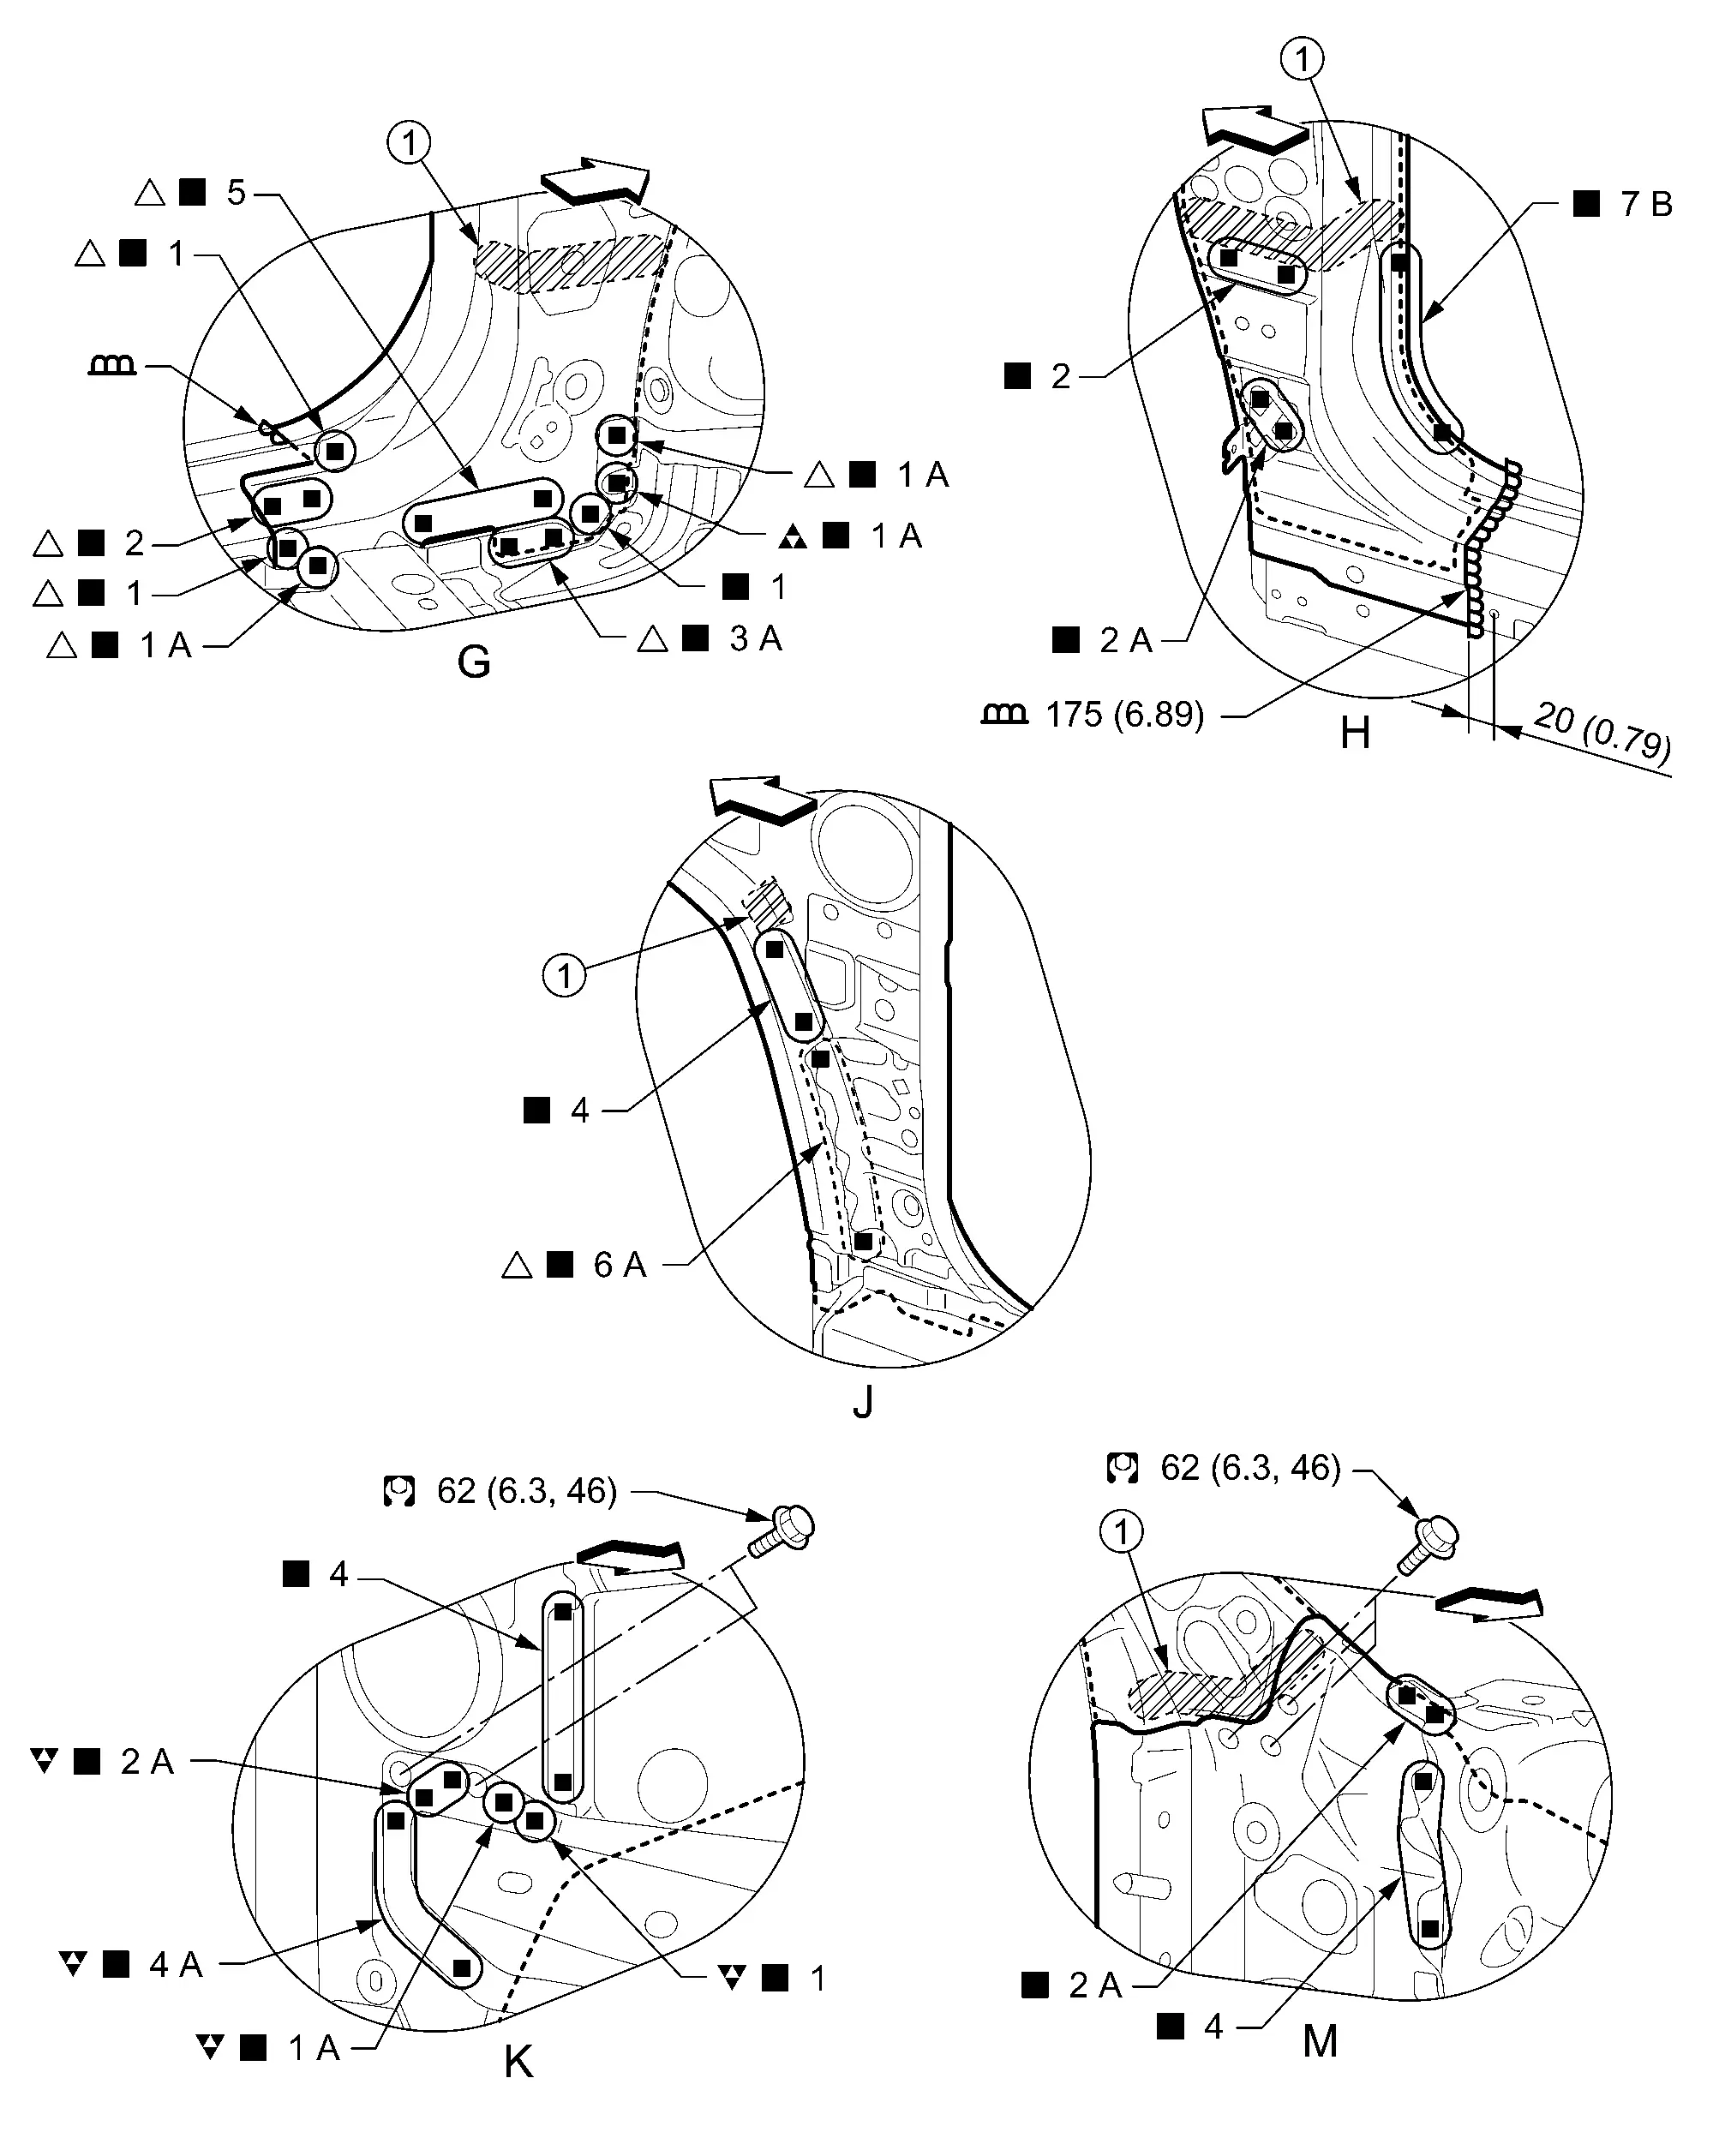
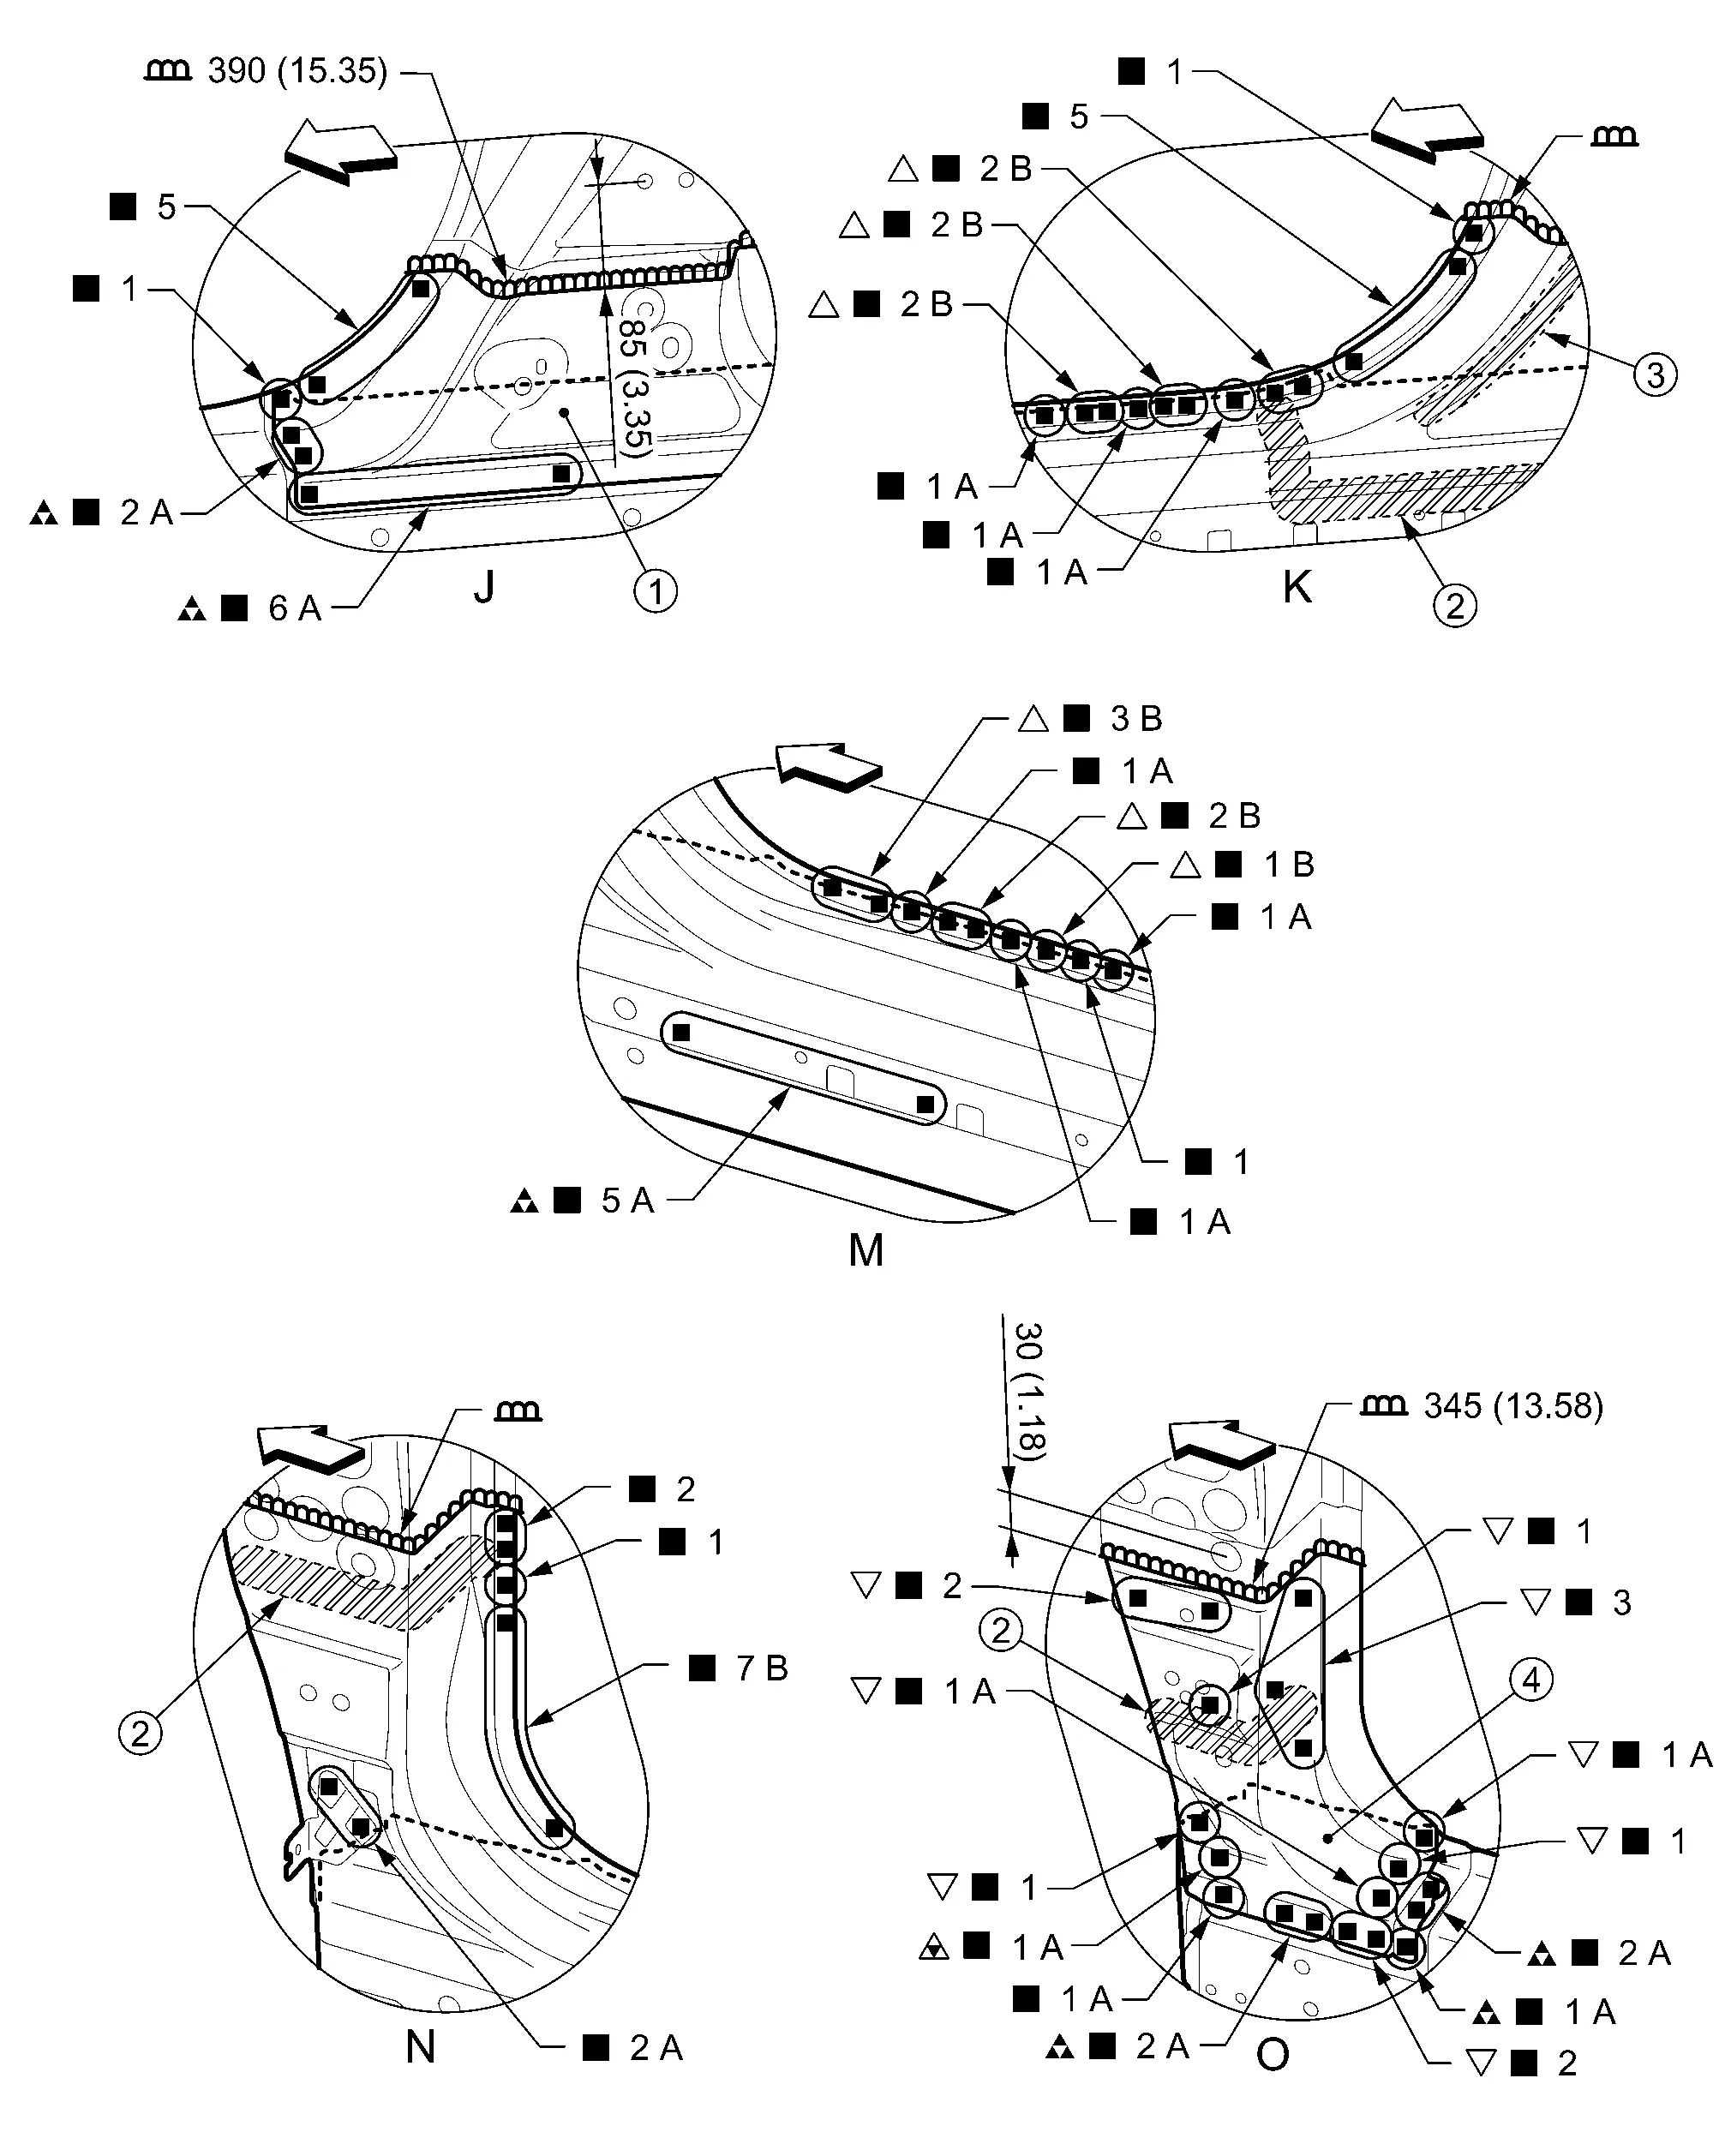
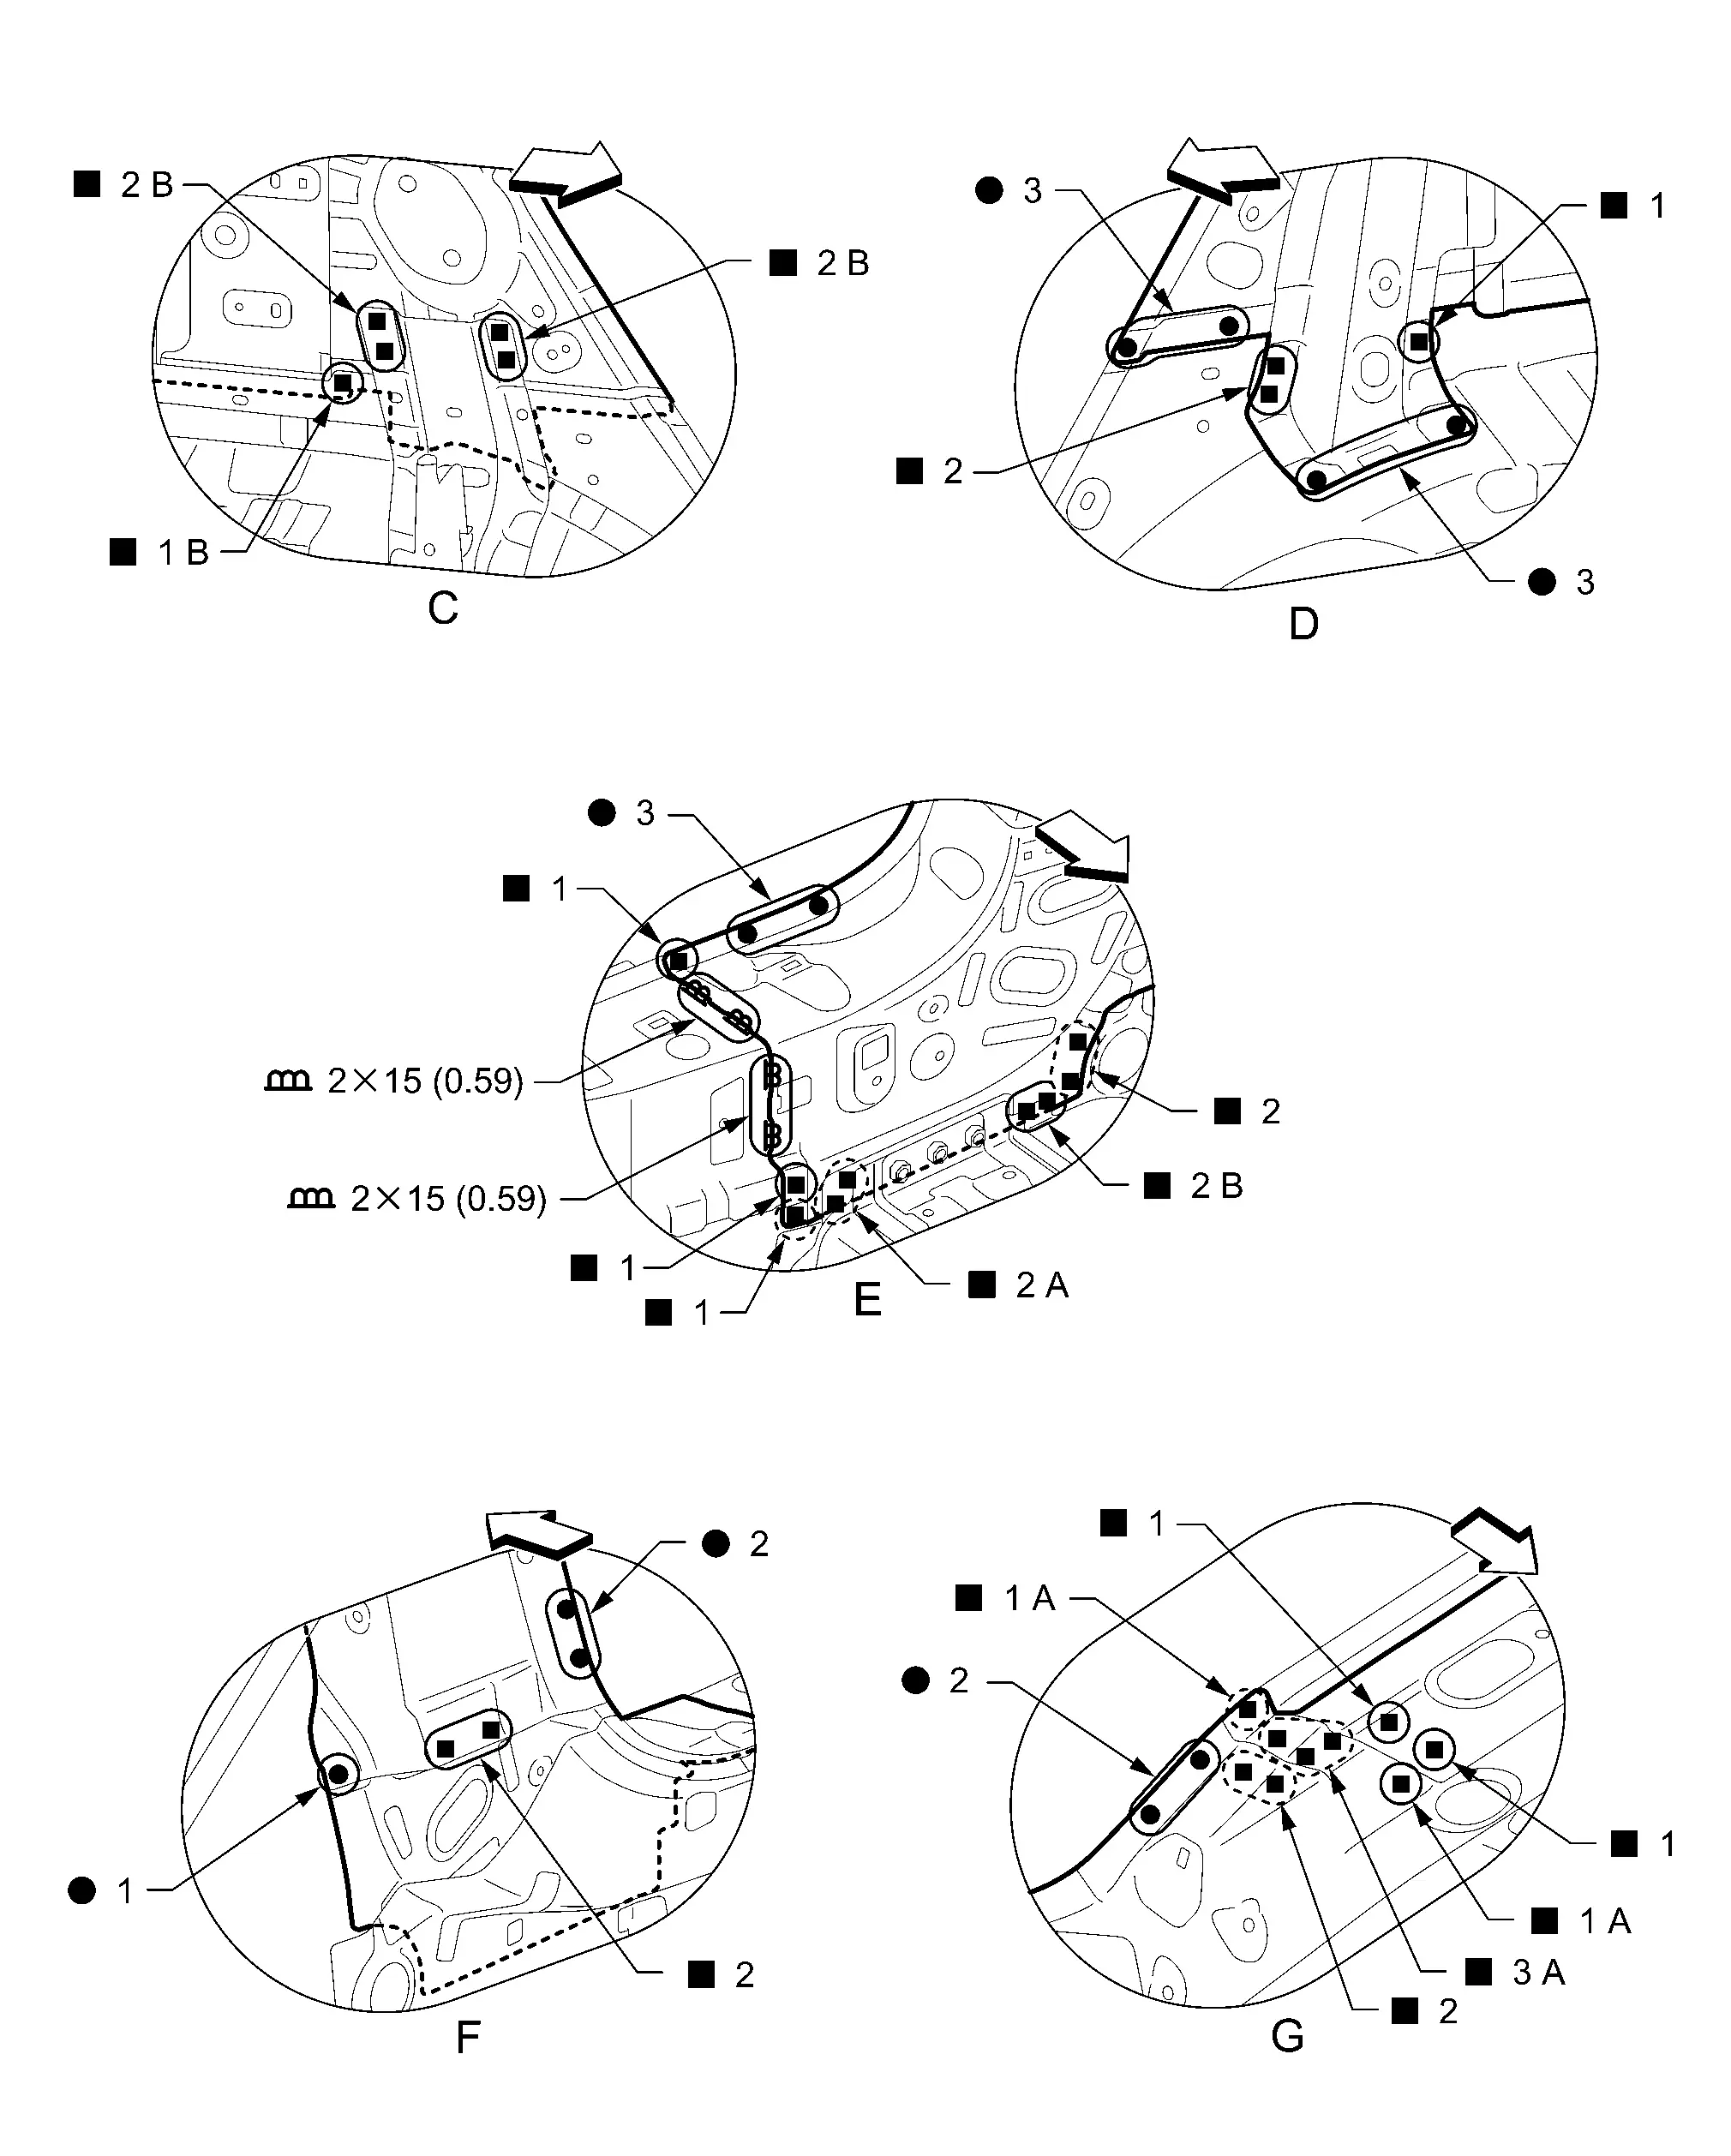
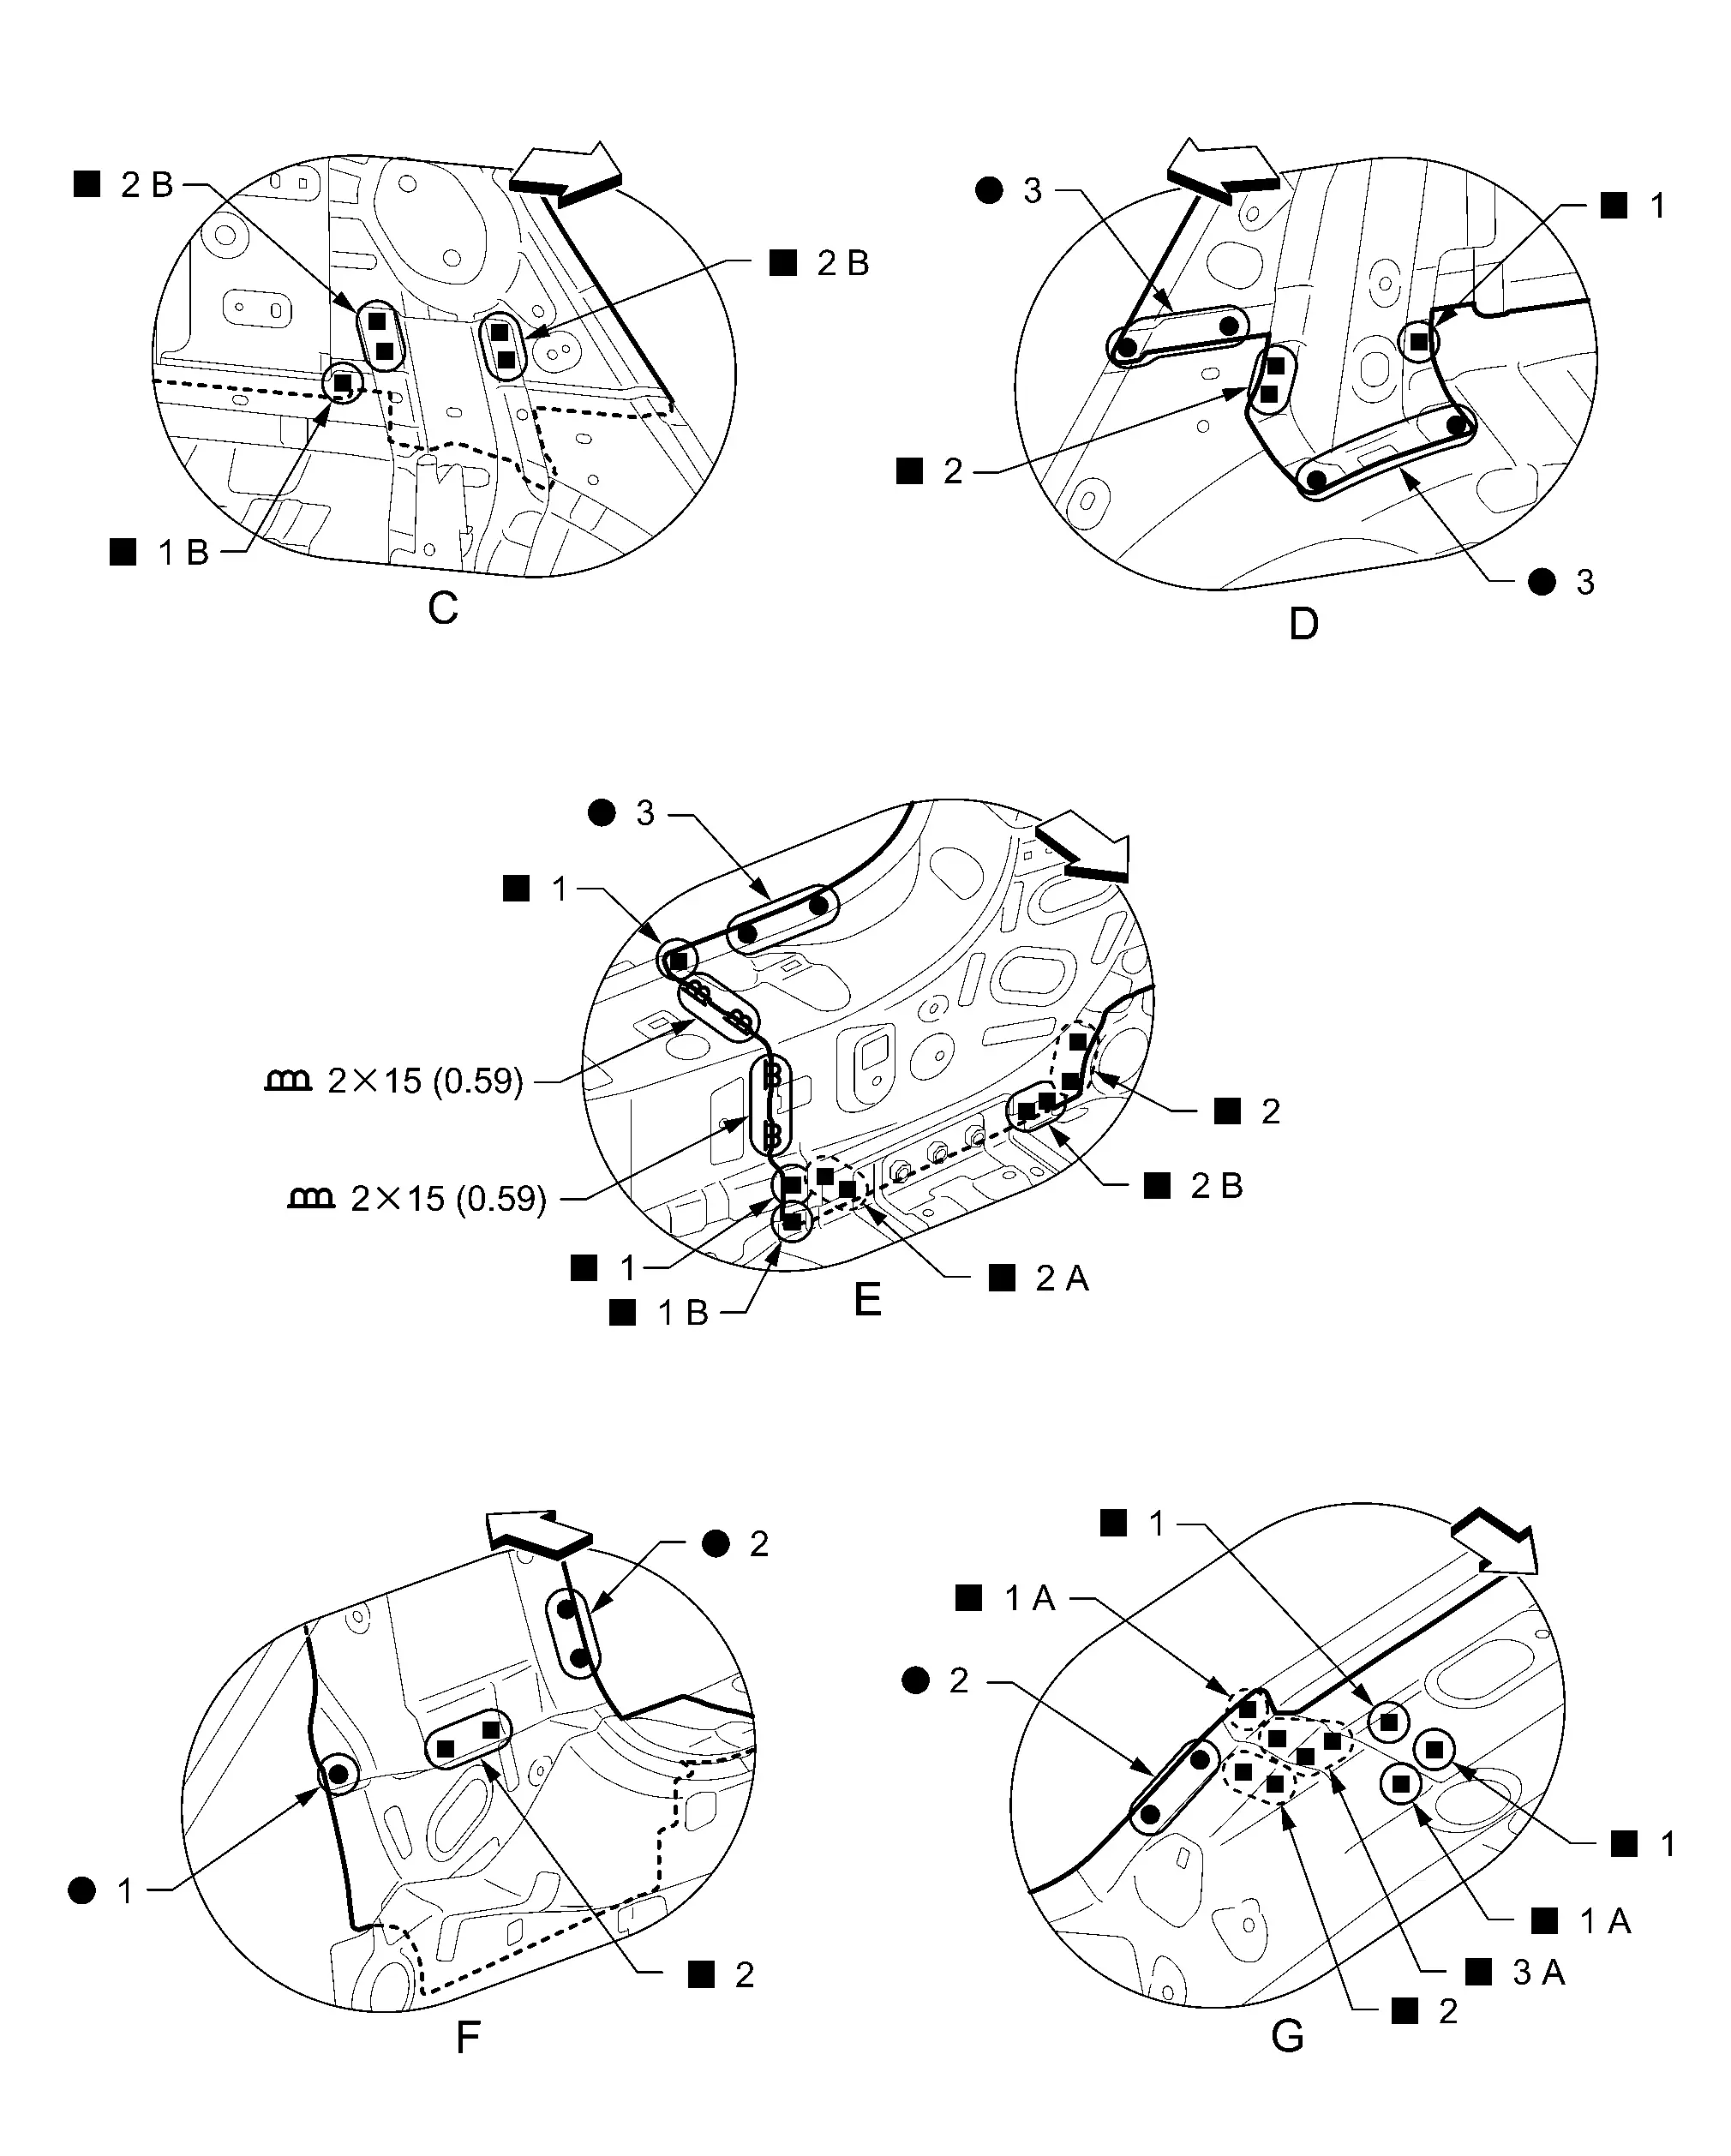
Front Pillar
Work after hoodledge reinforcement and roof are removed.
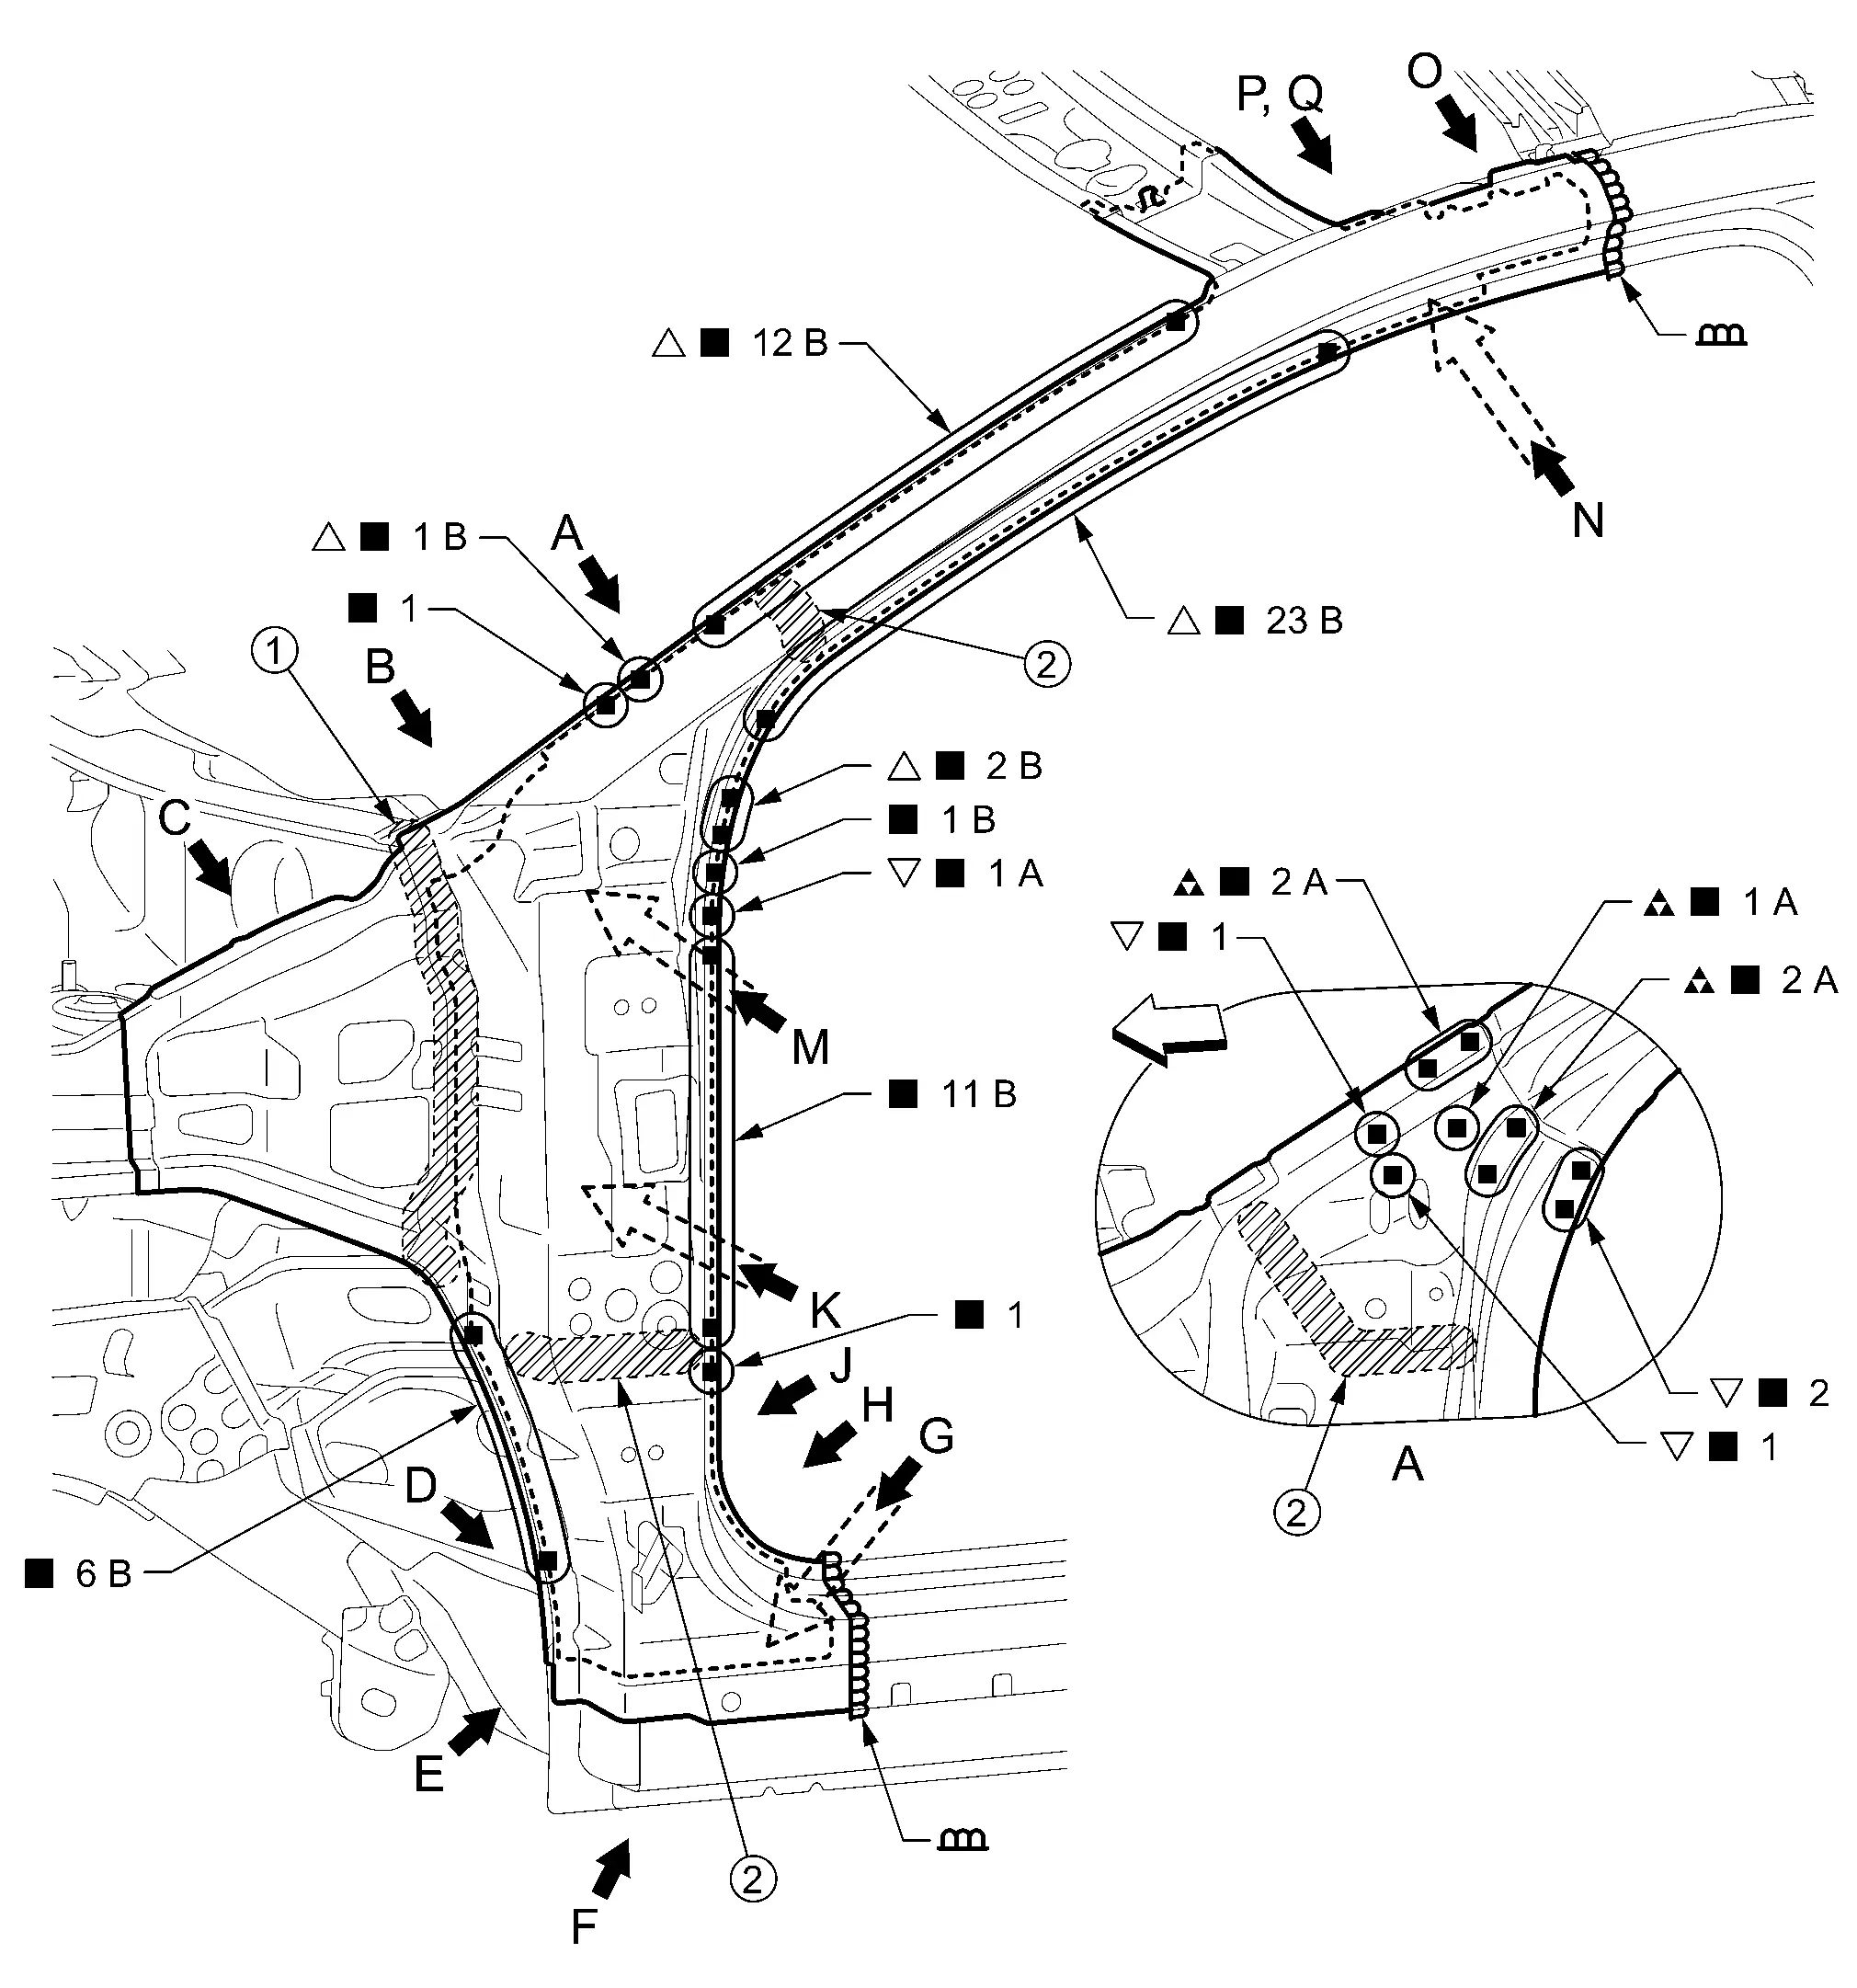
|
Body sealing | |
Urethane foam | ||
|
: Drill φ10 mm (0.39 in) hole for the plug welding hole (ultra high strength steel). |
|||||
| Replacement part | |||||
| • | Outer front side body | • | Side dash | • | Upper inner front pillar |
| • | Lower front pillar hinge brace | • | Outer front pillar reinforcement | ||
View A: Before installing outer front side body
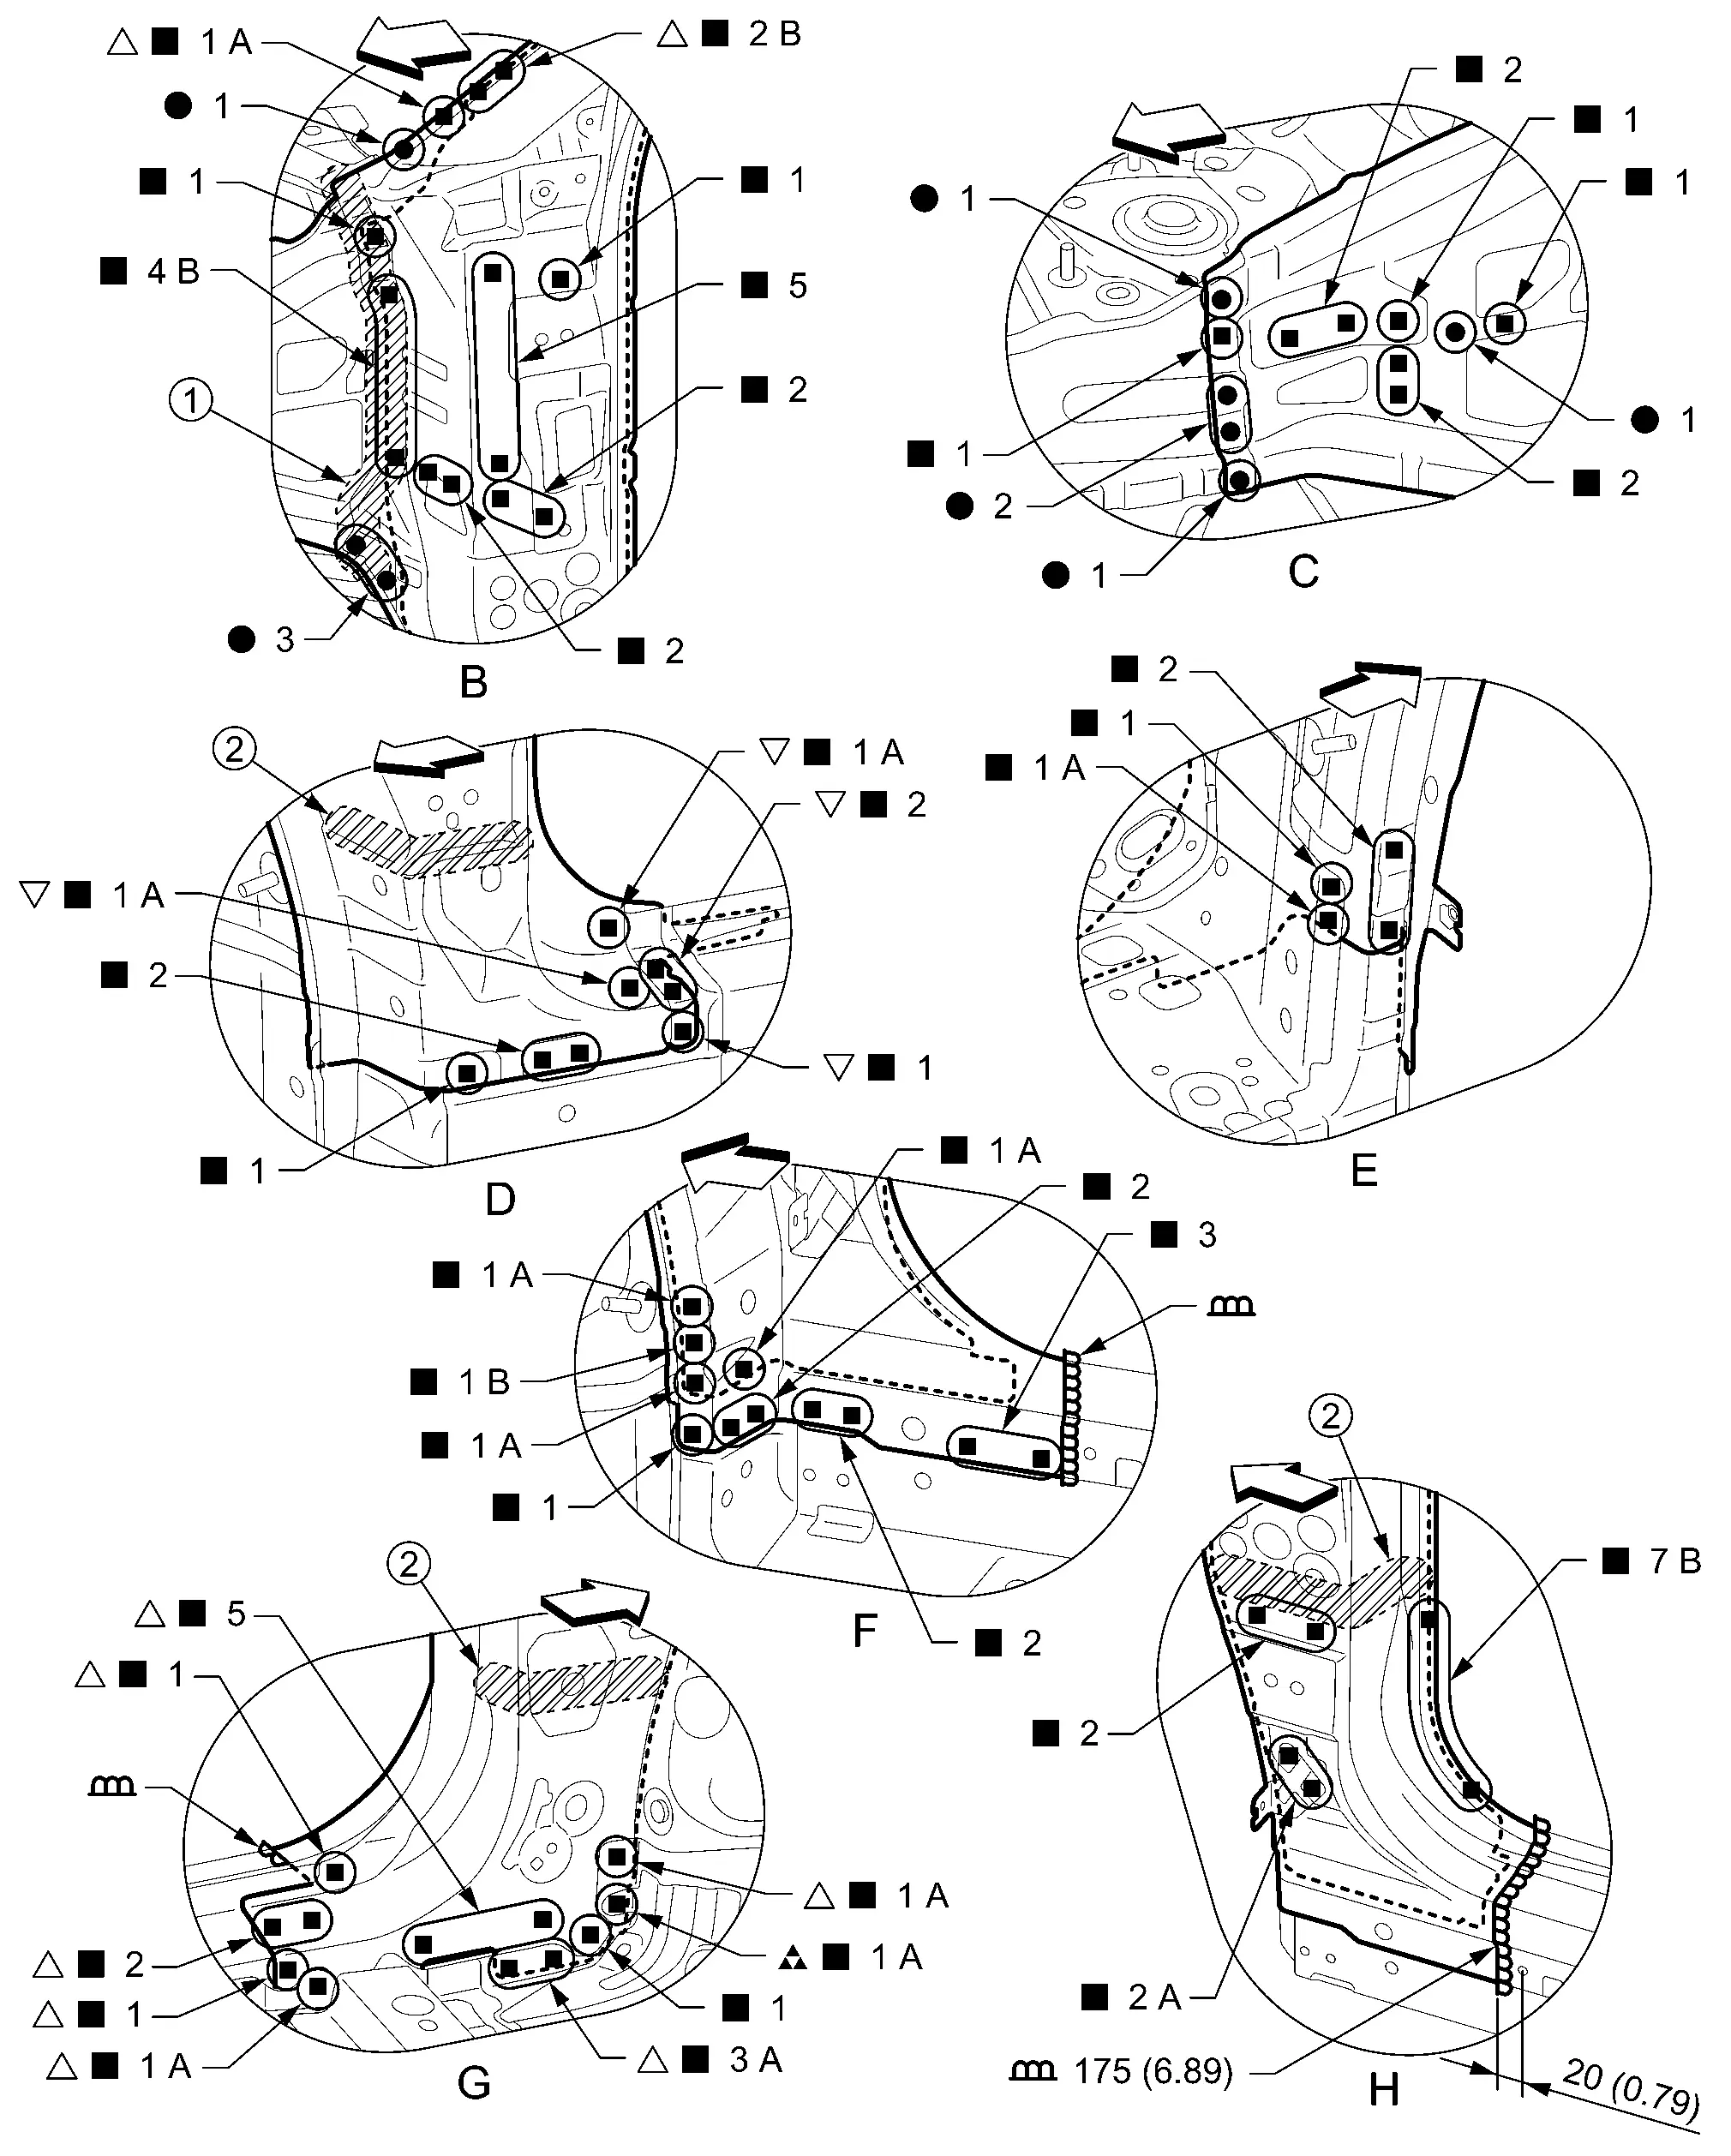
|
Body sealing | |
Urethane foam | ||
| Unit: mm (in) | |||||
|
: Drill φ10 mm (0.39 in) hole for the plug welding hole (ultra high strength steel). |
|||||
View D: Before installing outer front side body
|
Urethane foam | ||||
| Unit: mm (in) | |||||
|
: N•m (kg-m, ft-lb) |
|||||
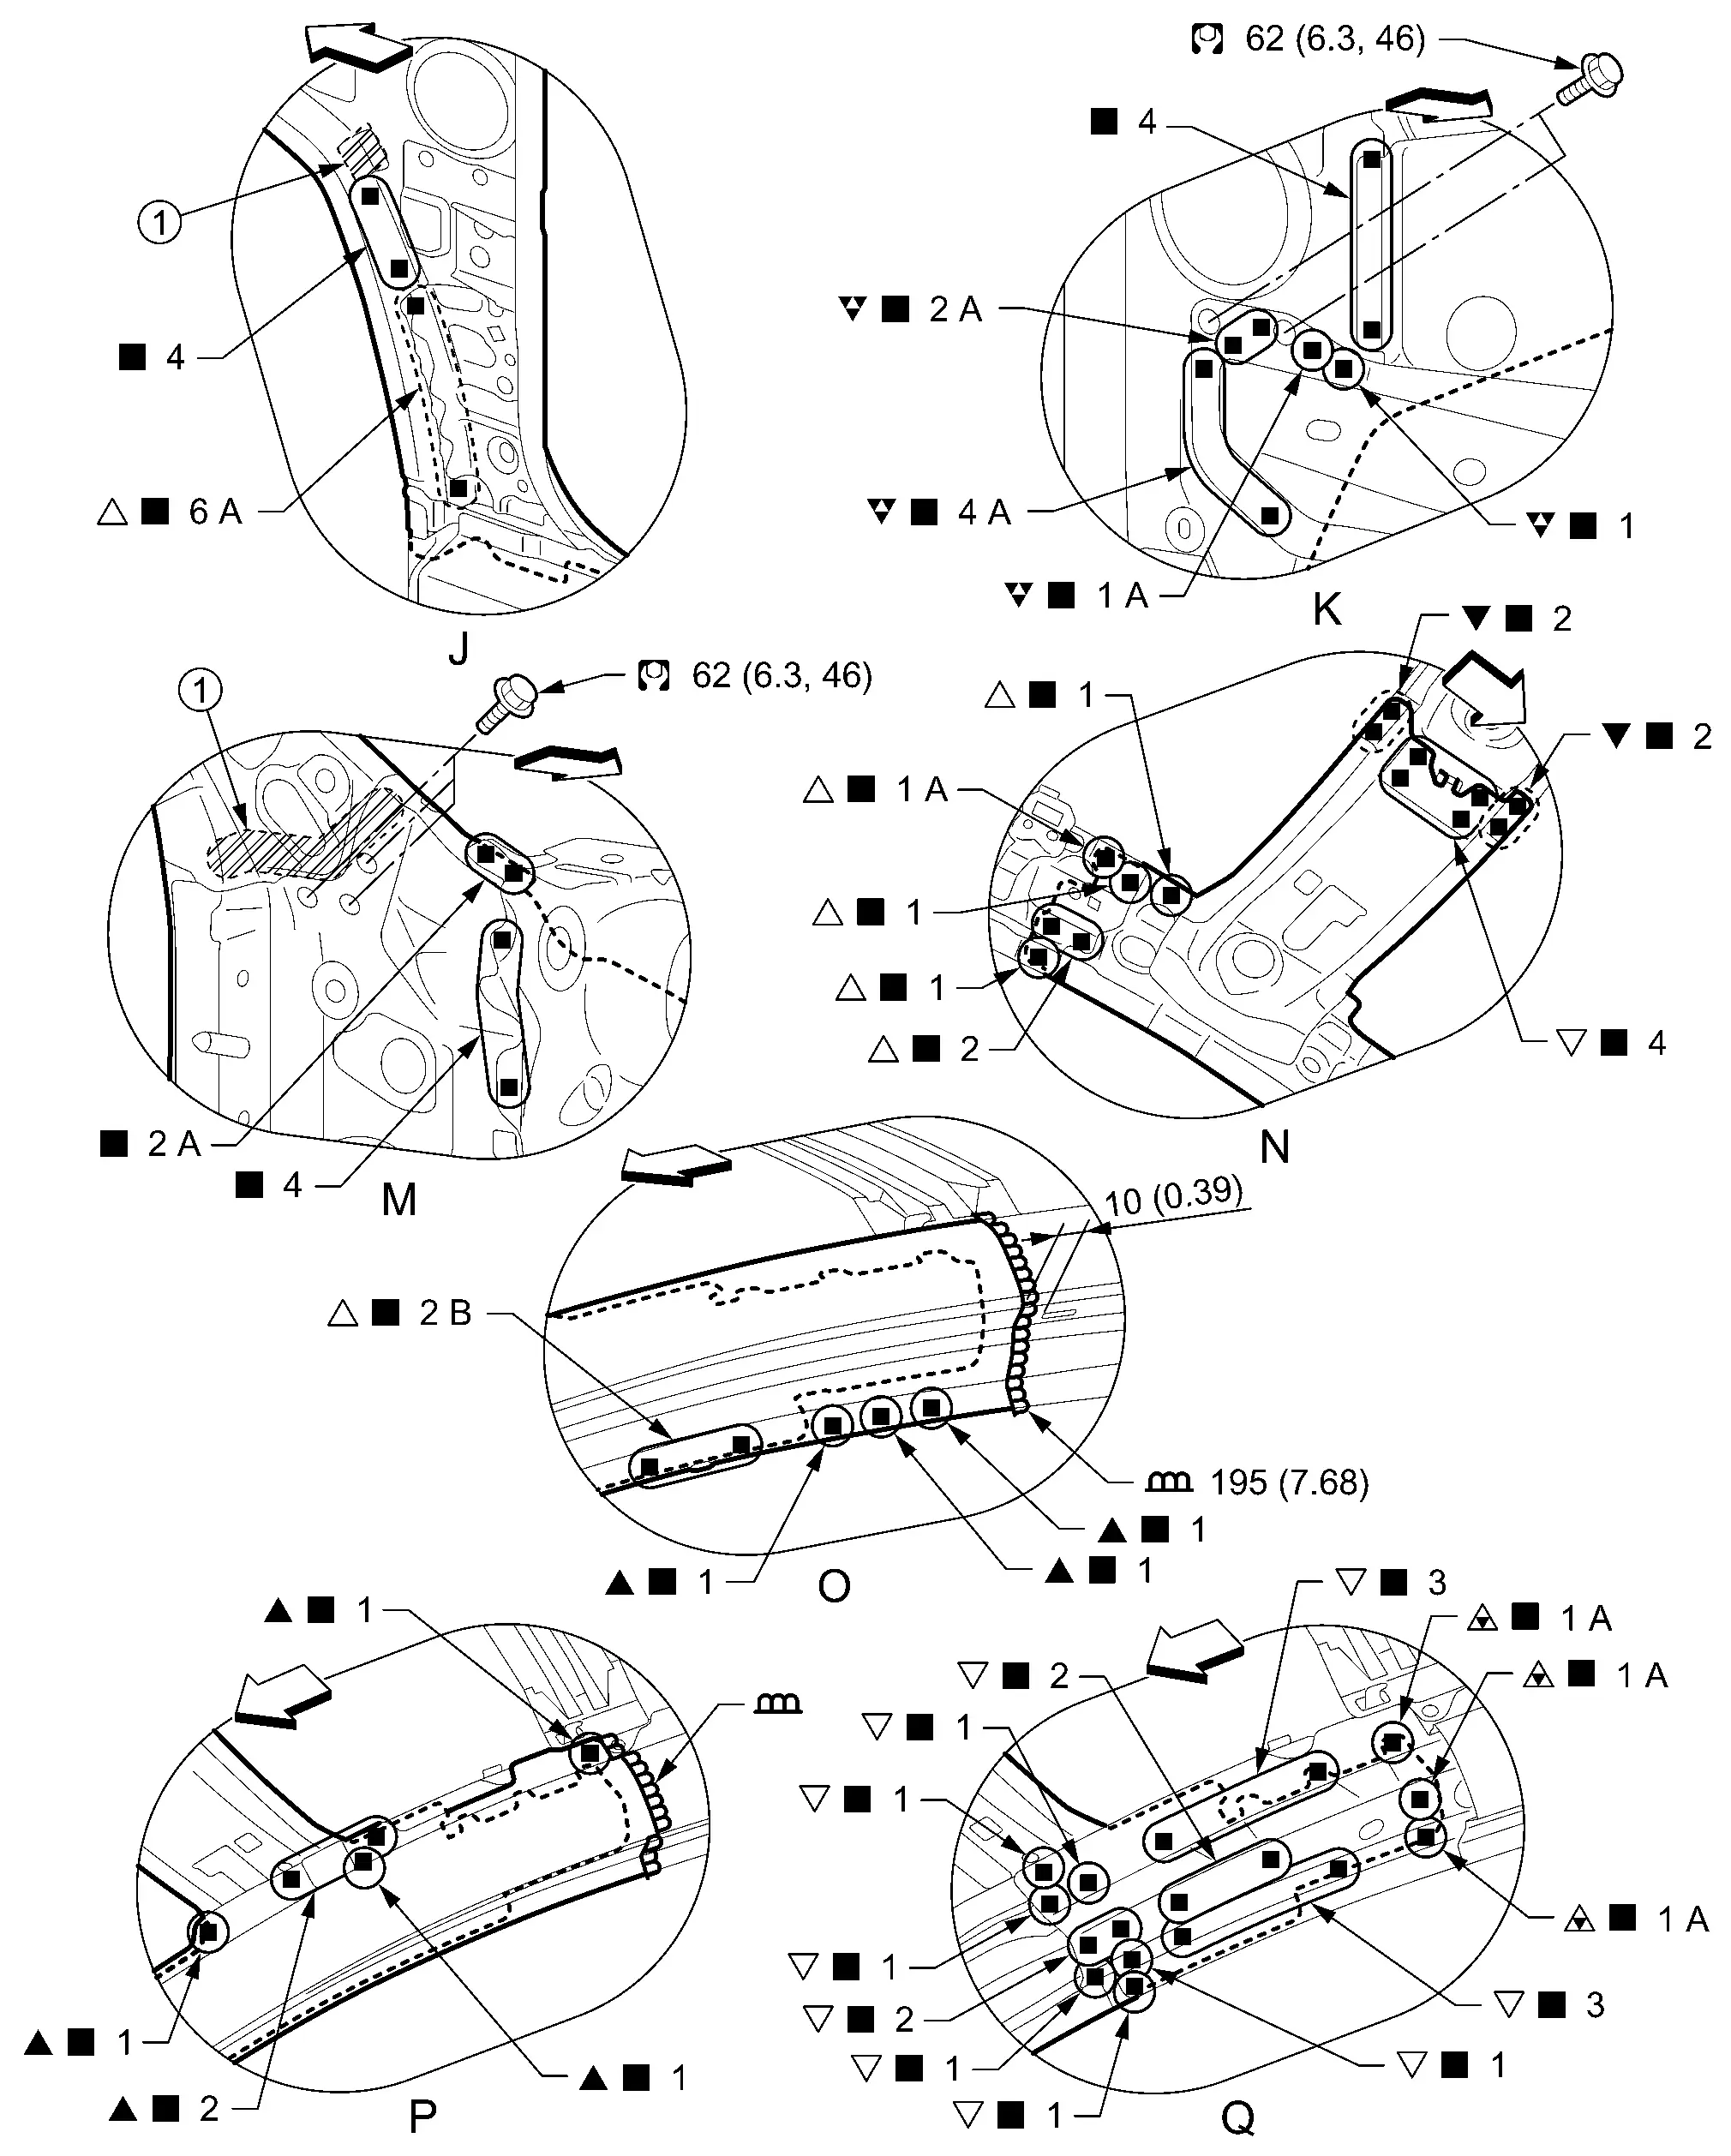
 : Drill φ7 mm (0.28 in) hole for the plug welding hole (ultra high strength steel).
 : Drill φ11 mm (0.43 in) hole for the plug welding hole (ultra high strength steel).
View J: Before installing outer front side body and lower front pillar hinge brace
View Q: Before installing outer front side body
PARTIAL REPLACEMENT
Work after hoodledge reinforcement is removed.
|
Body sealing | |
Urethane foam | ||
| Unit: mm (in) | |||||
|
 : Drill φ9 mm (0.35 in) hole for the plug welding hole (ultra high strength steel). : Drill φ9 mm (0.35 in) hole for the plug welding hole (ultra high strength steel). |
|||||
| Replacement part | |||||
| • | Outer front side body | • | Side dash | • | Lower front pillar hinge brace |
View A: Before installing outer front side body
|
Body sealing | |
Urethane foam | ||
|
: Drill φ9 mm (0.35 in) hole for the plug welding hole (ultra high strength steel). |
|||||
View D: Before installing outer front side body
|
Urethane foam | ||||
| Unit: mm (in) | |||||
|
: N•m (kg-m, ft-lb) |
|||||
View J: Before installing outer front side body and lower front pillar hinge brace
Center Pillar
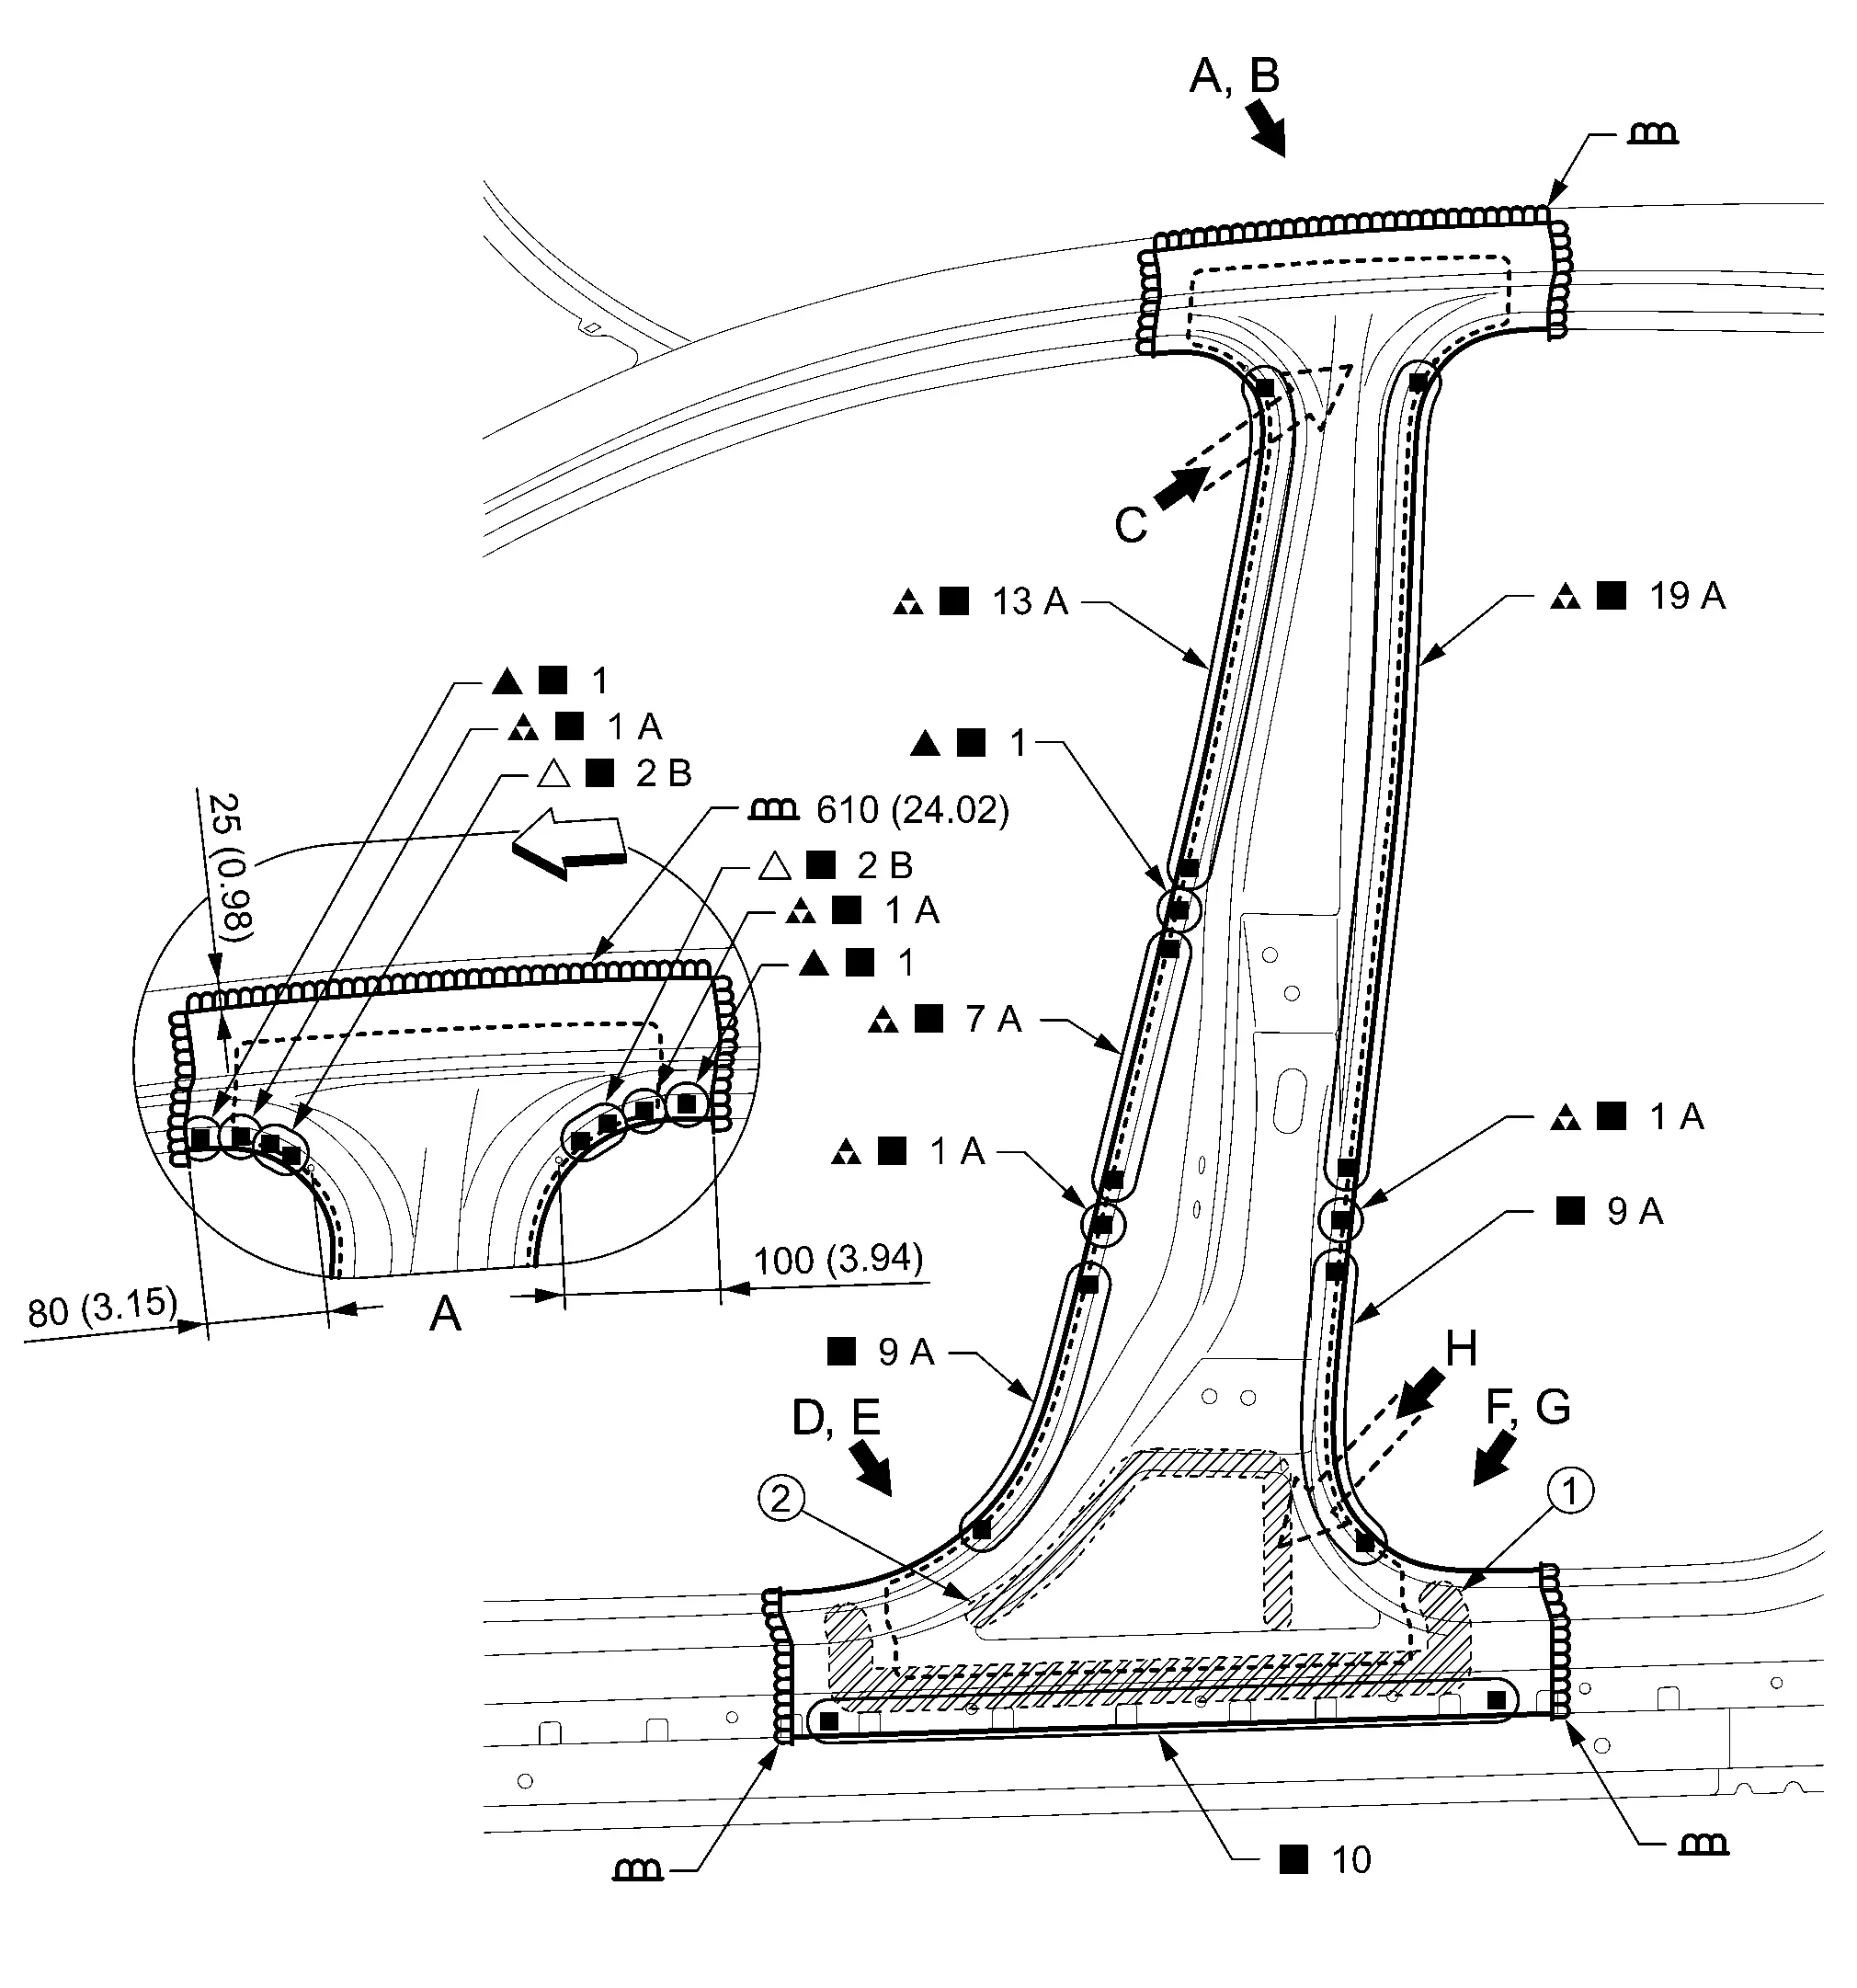
|
Urethane foam | |
Body sealing | ||
| Unit: mm (in) | |||||
|
: Drill φ10 mm (0.39 in) hole for the plug welding hole (ultra high strength steel). |
|||||
| Replacement part | |||||
| • | Outer front side body | • | Inner center pillar assembly | • | Lower center pillar brace |
|
Urethane foam | |
Body sealing | ||
| Unit: mm (in) | |||||
|
: Drill φ10 mm (0.39 in) hole for the plug welding hole (ultra high strength steel). |
|||||
View B, E, and G: Before installing outer front side body
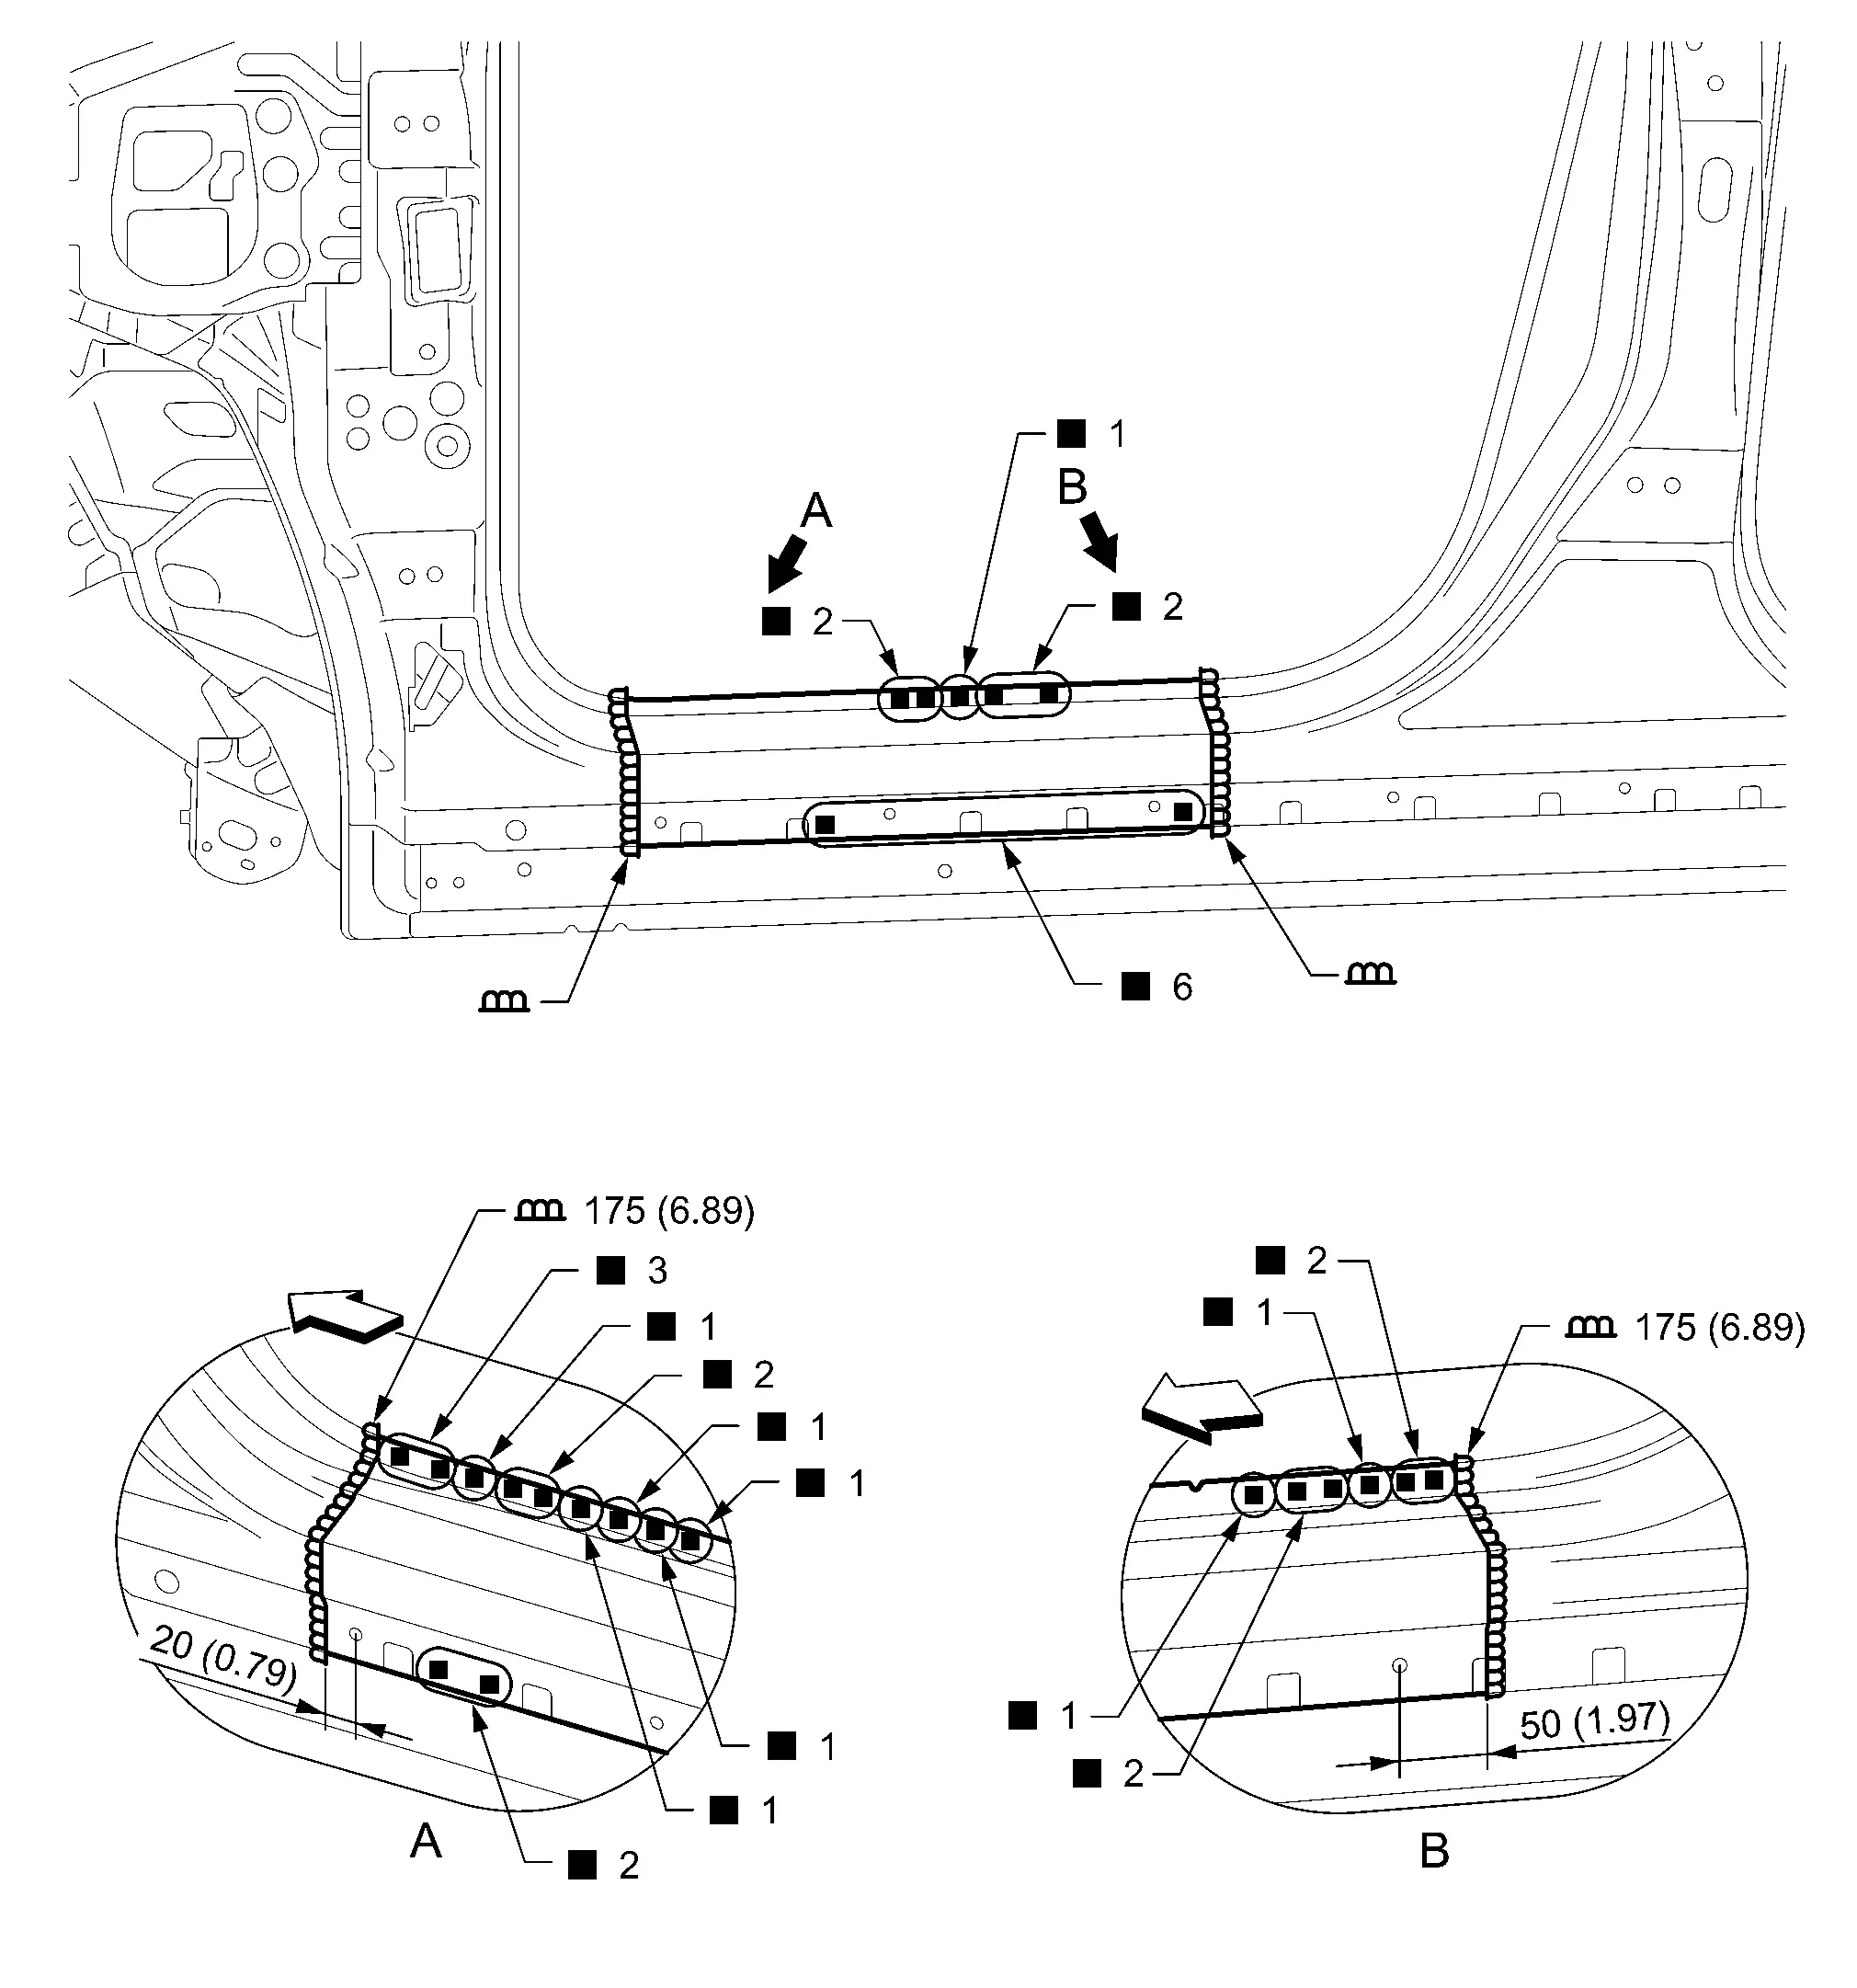
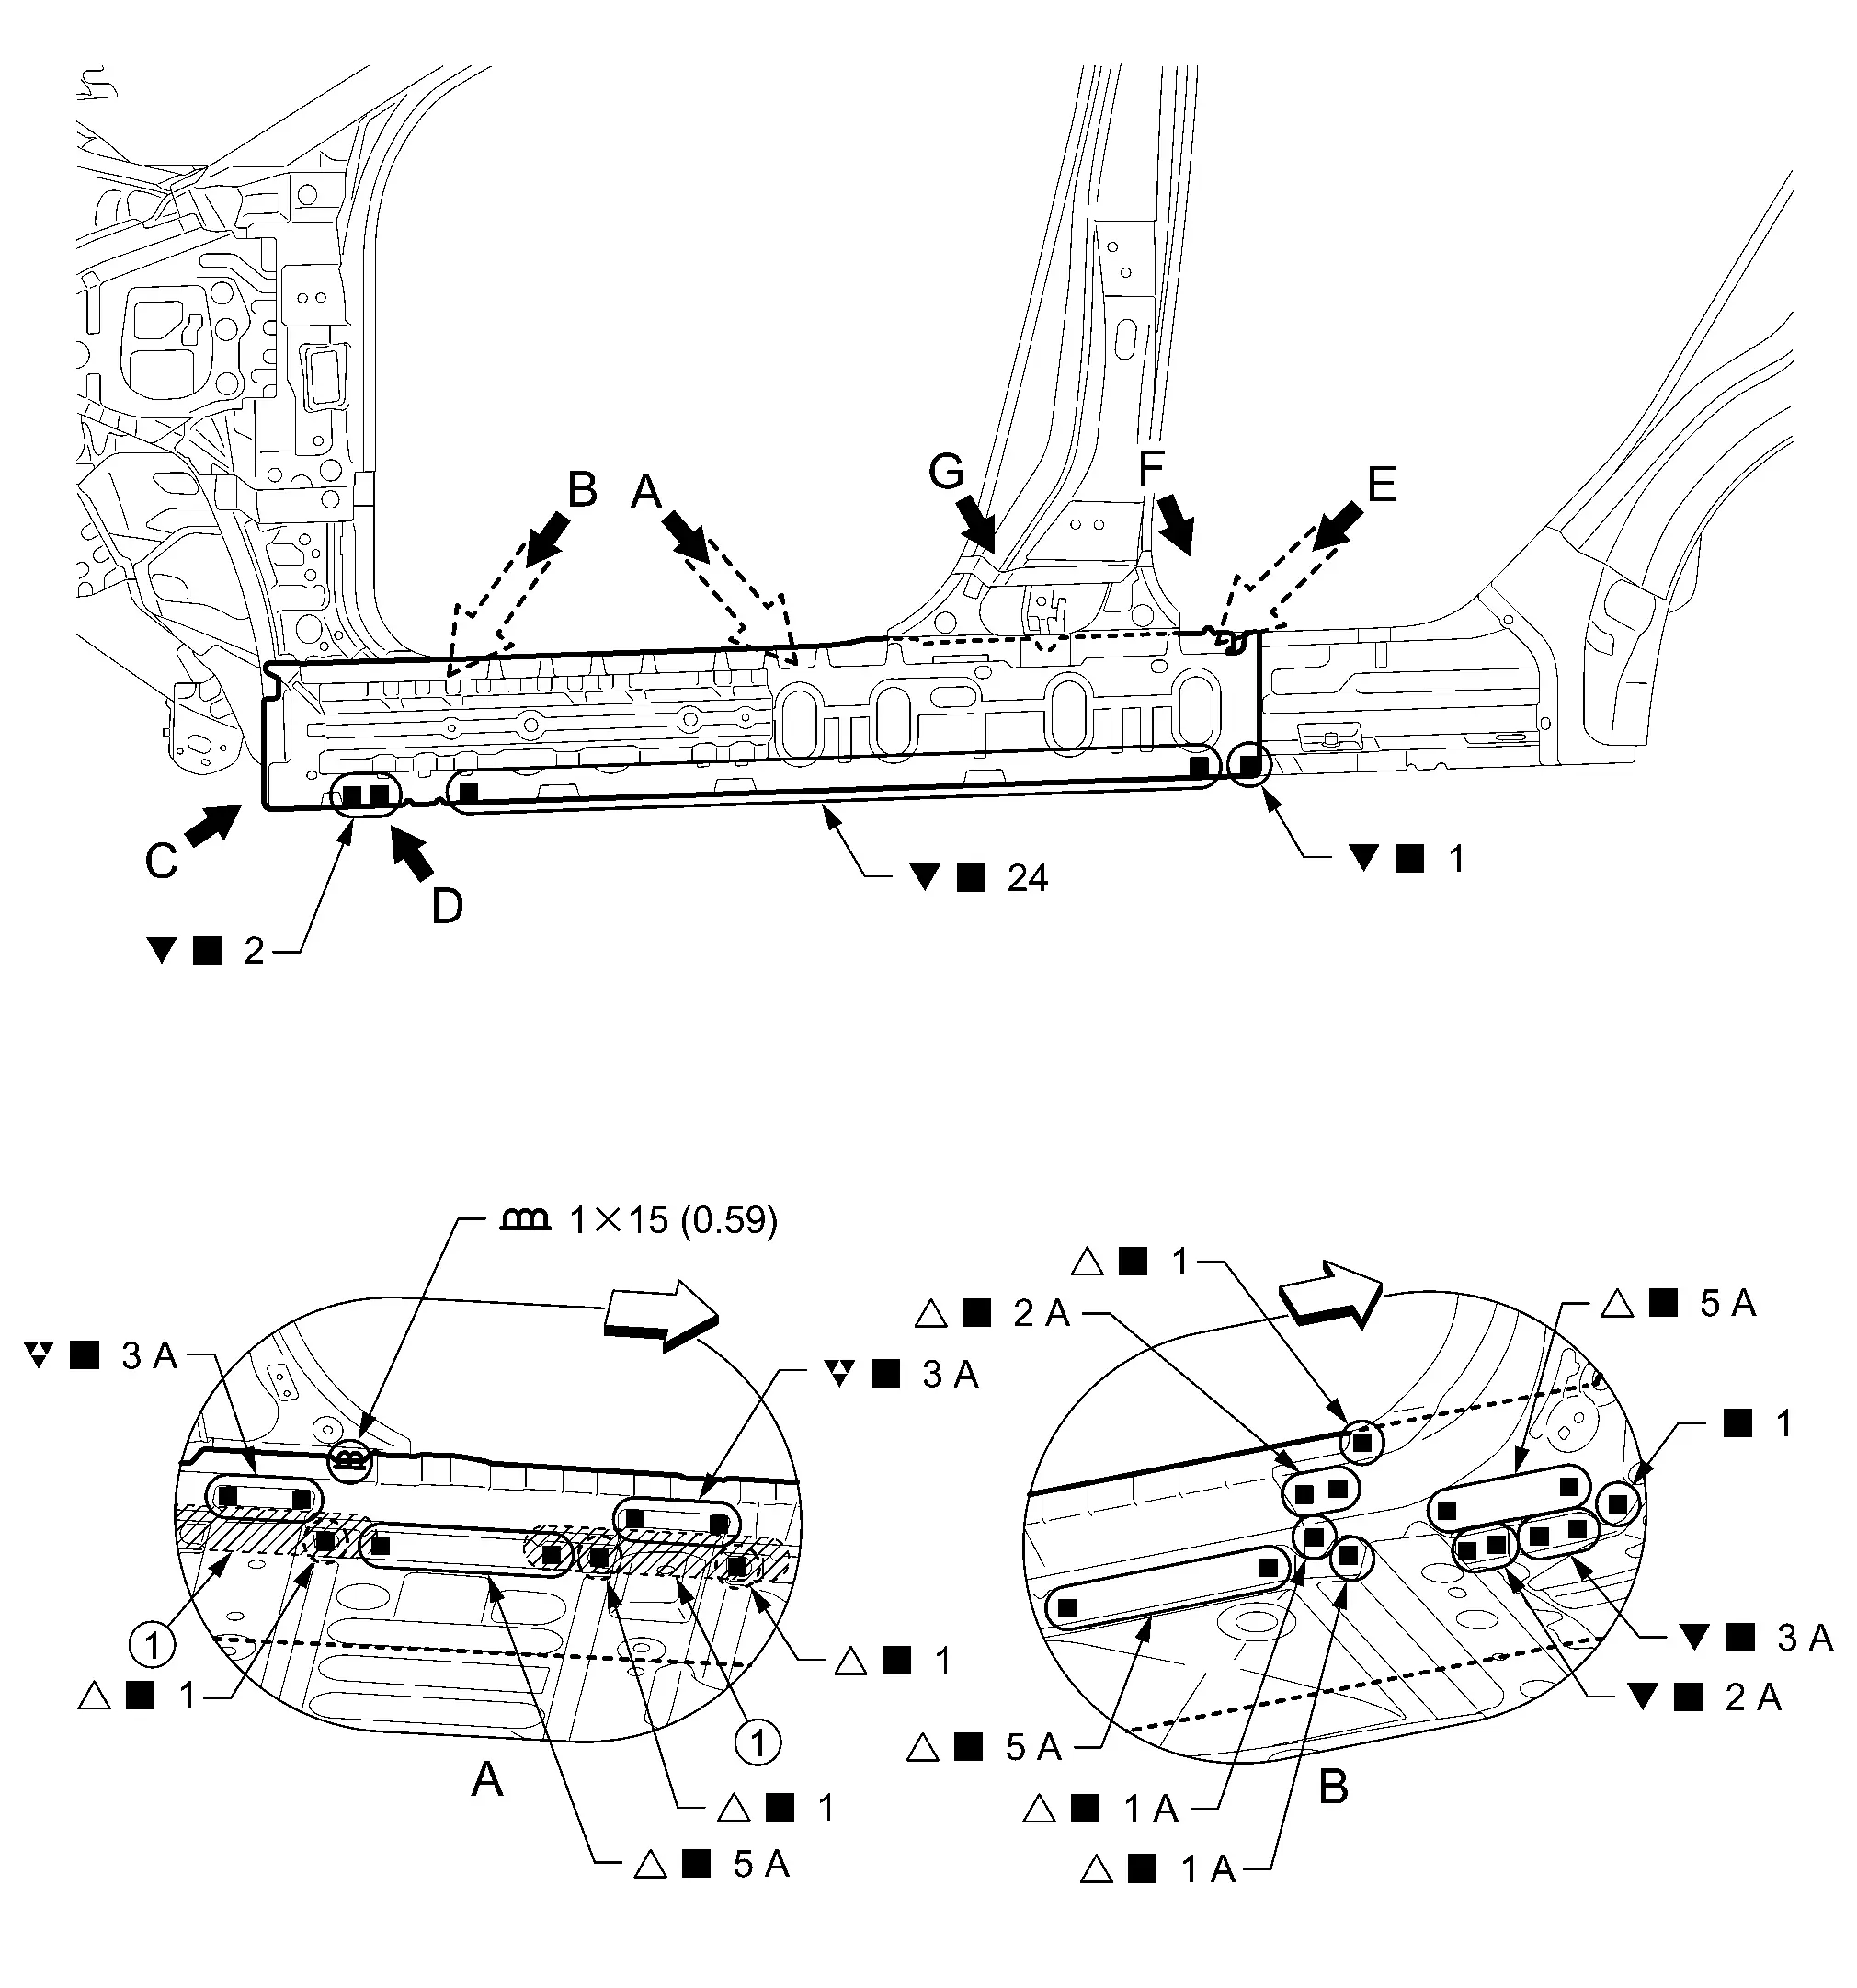
Outer Sill
Remove the lower front pillar hinge brace (reusable) and lower center pillar brace (reusable) from the Nissan Ariya vehicle for easier installation.
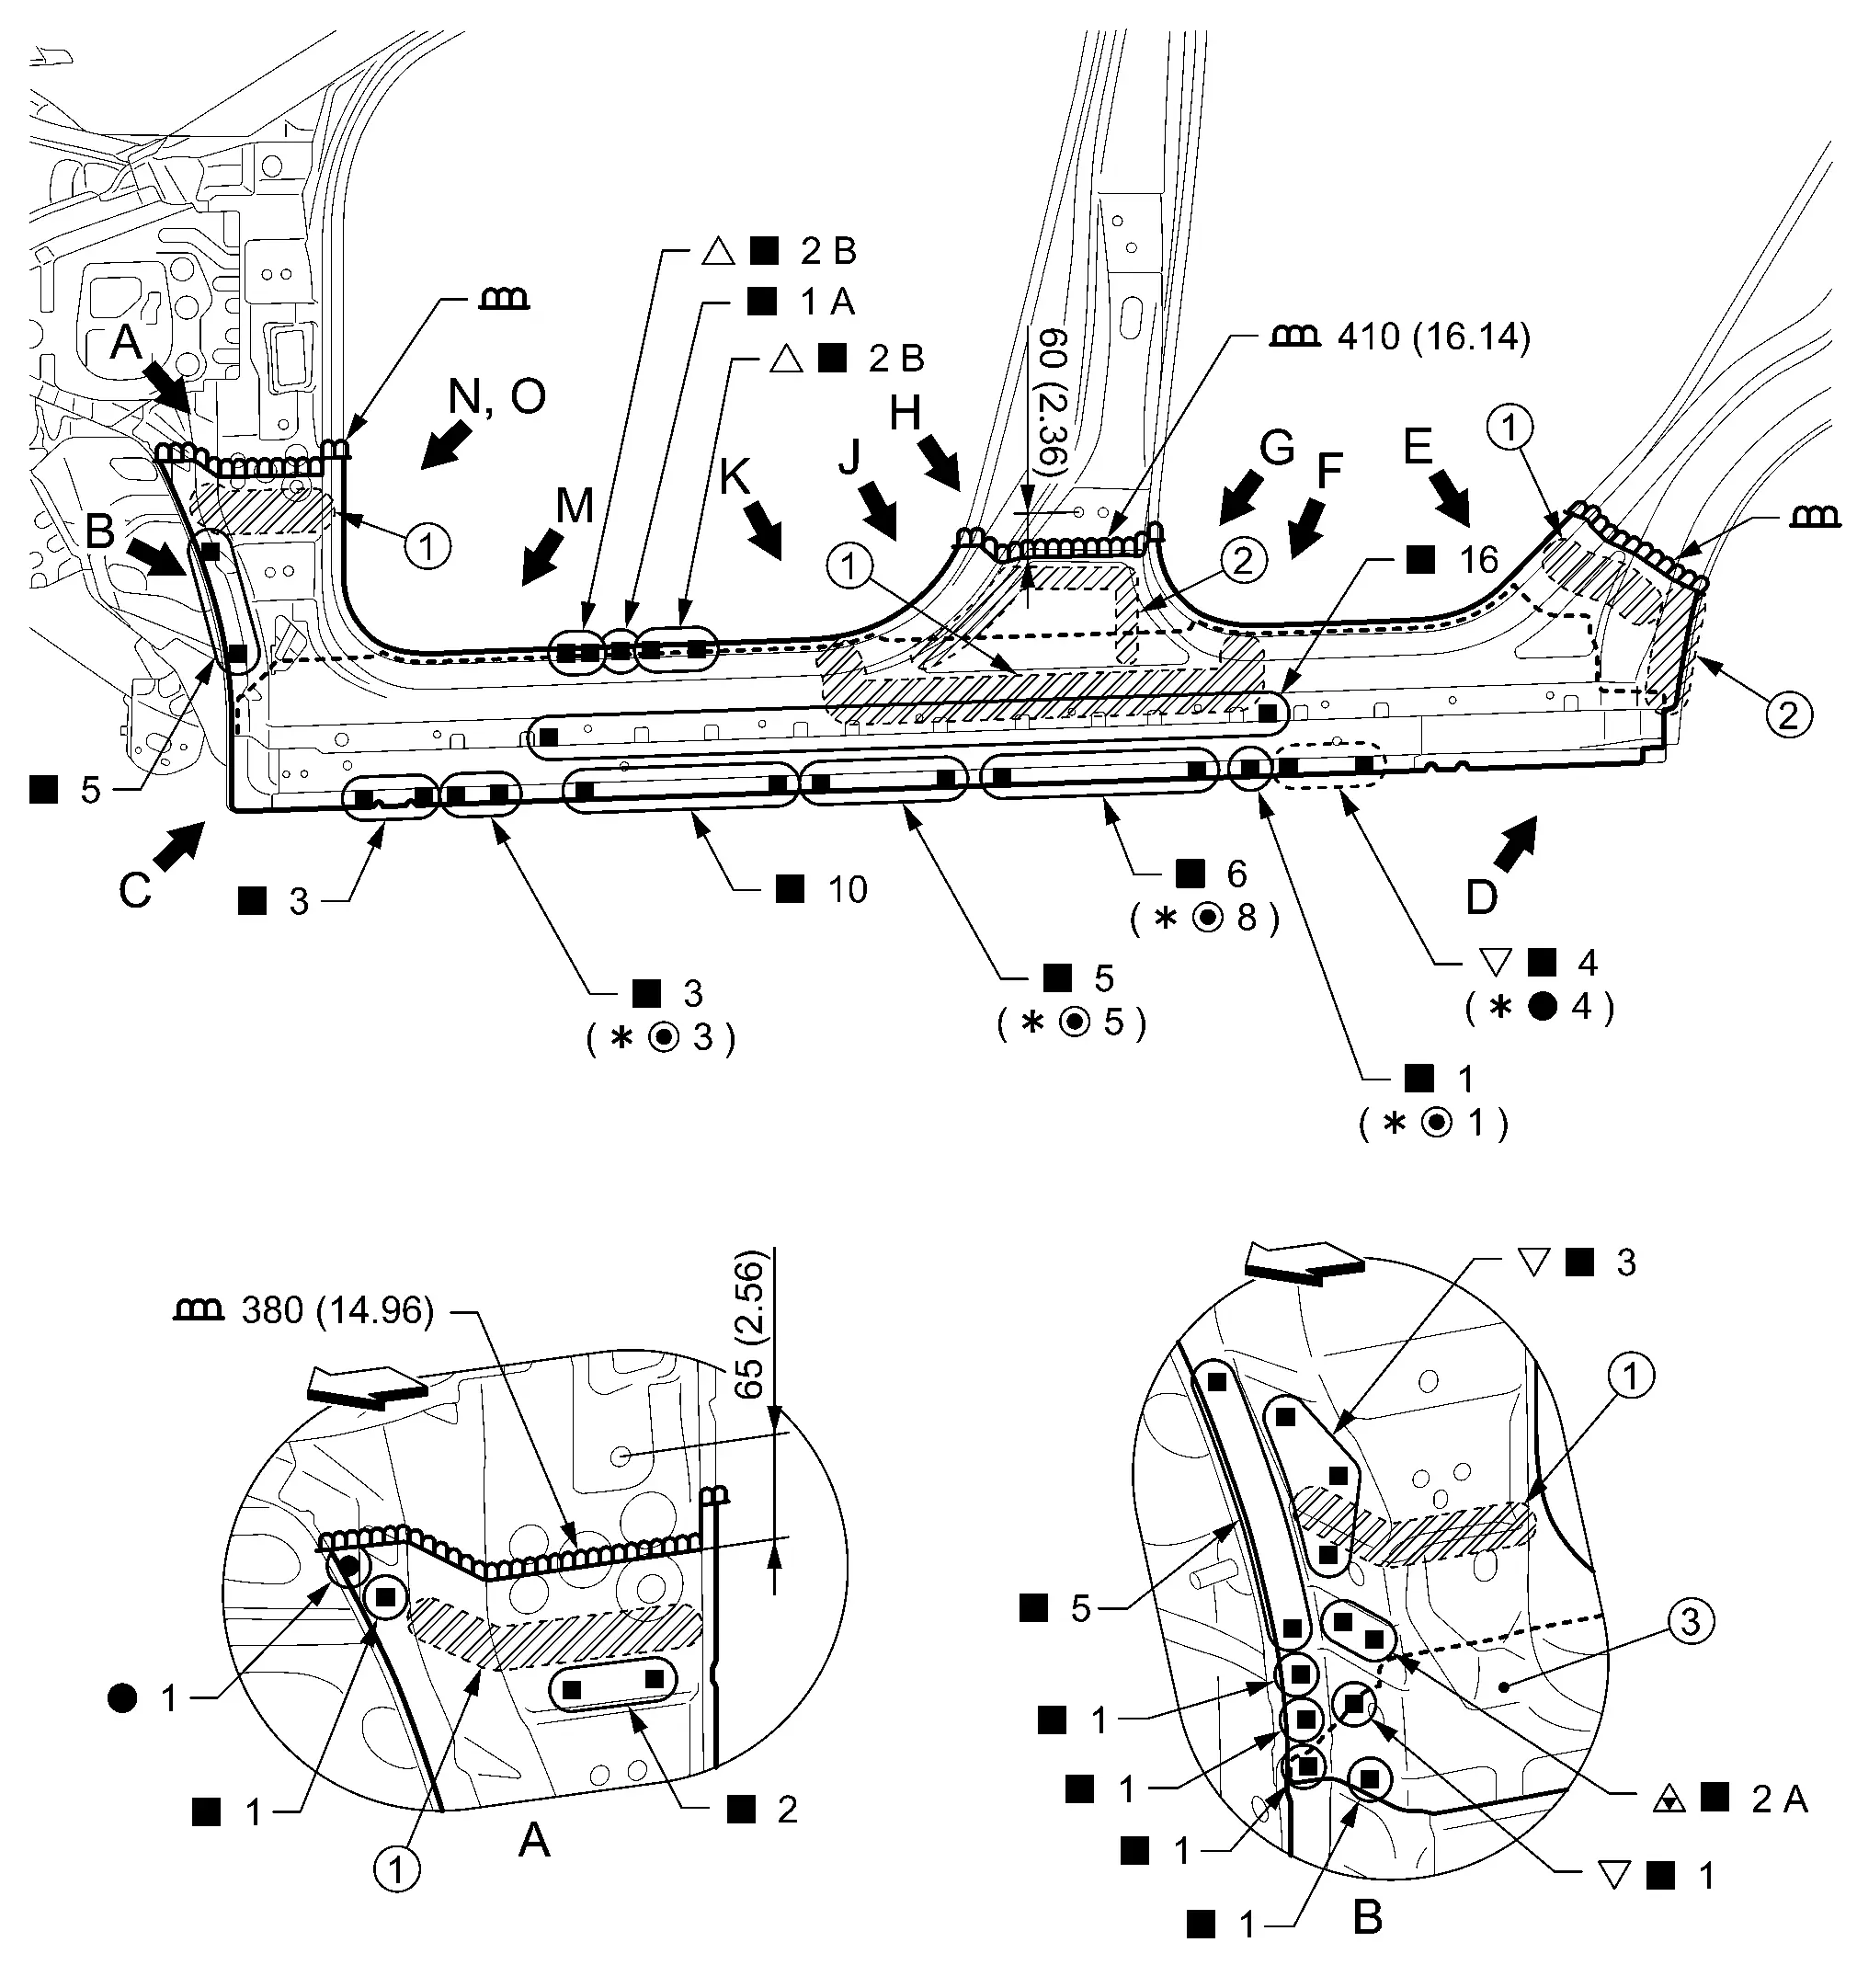
|
Urethane foam | |
Body sealing |  |
Lower front pillar hinge brace (reusable) |
| Unit: mm (in) | |||||
|
: For spot welding of steel plate of tensile strength 980 MPa, observe the indicated welding conditions. Refer to Welding of Ultra High Strength Steel |
|||||
| Replacement part | |||||
| • | Outer sill assembly | • | Outer sill reinforcement | ||
View B: Before installing outer sill assembly
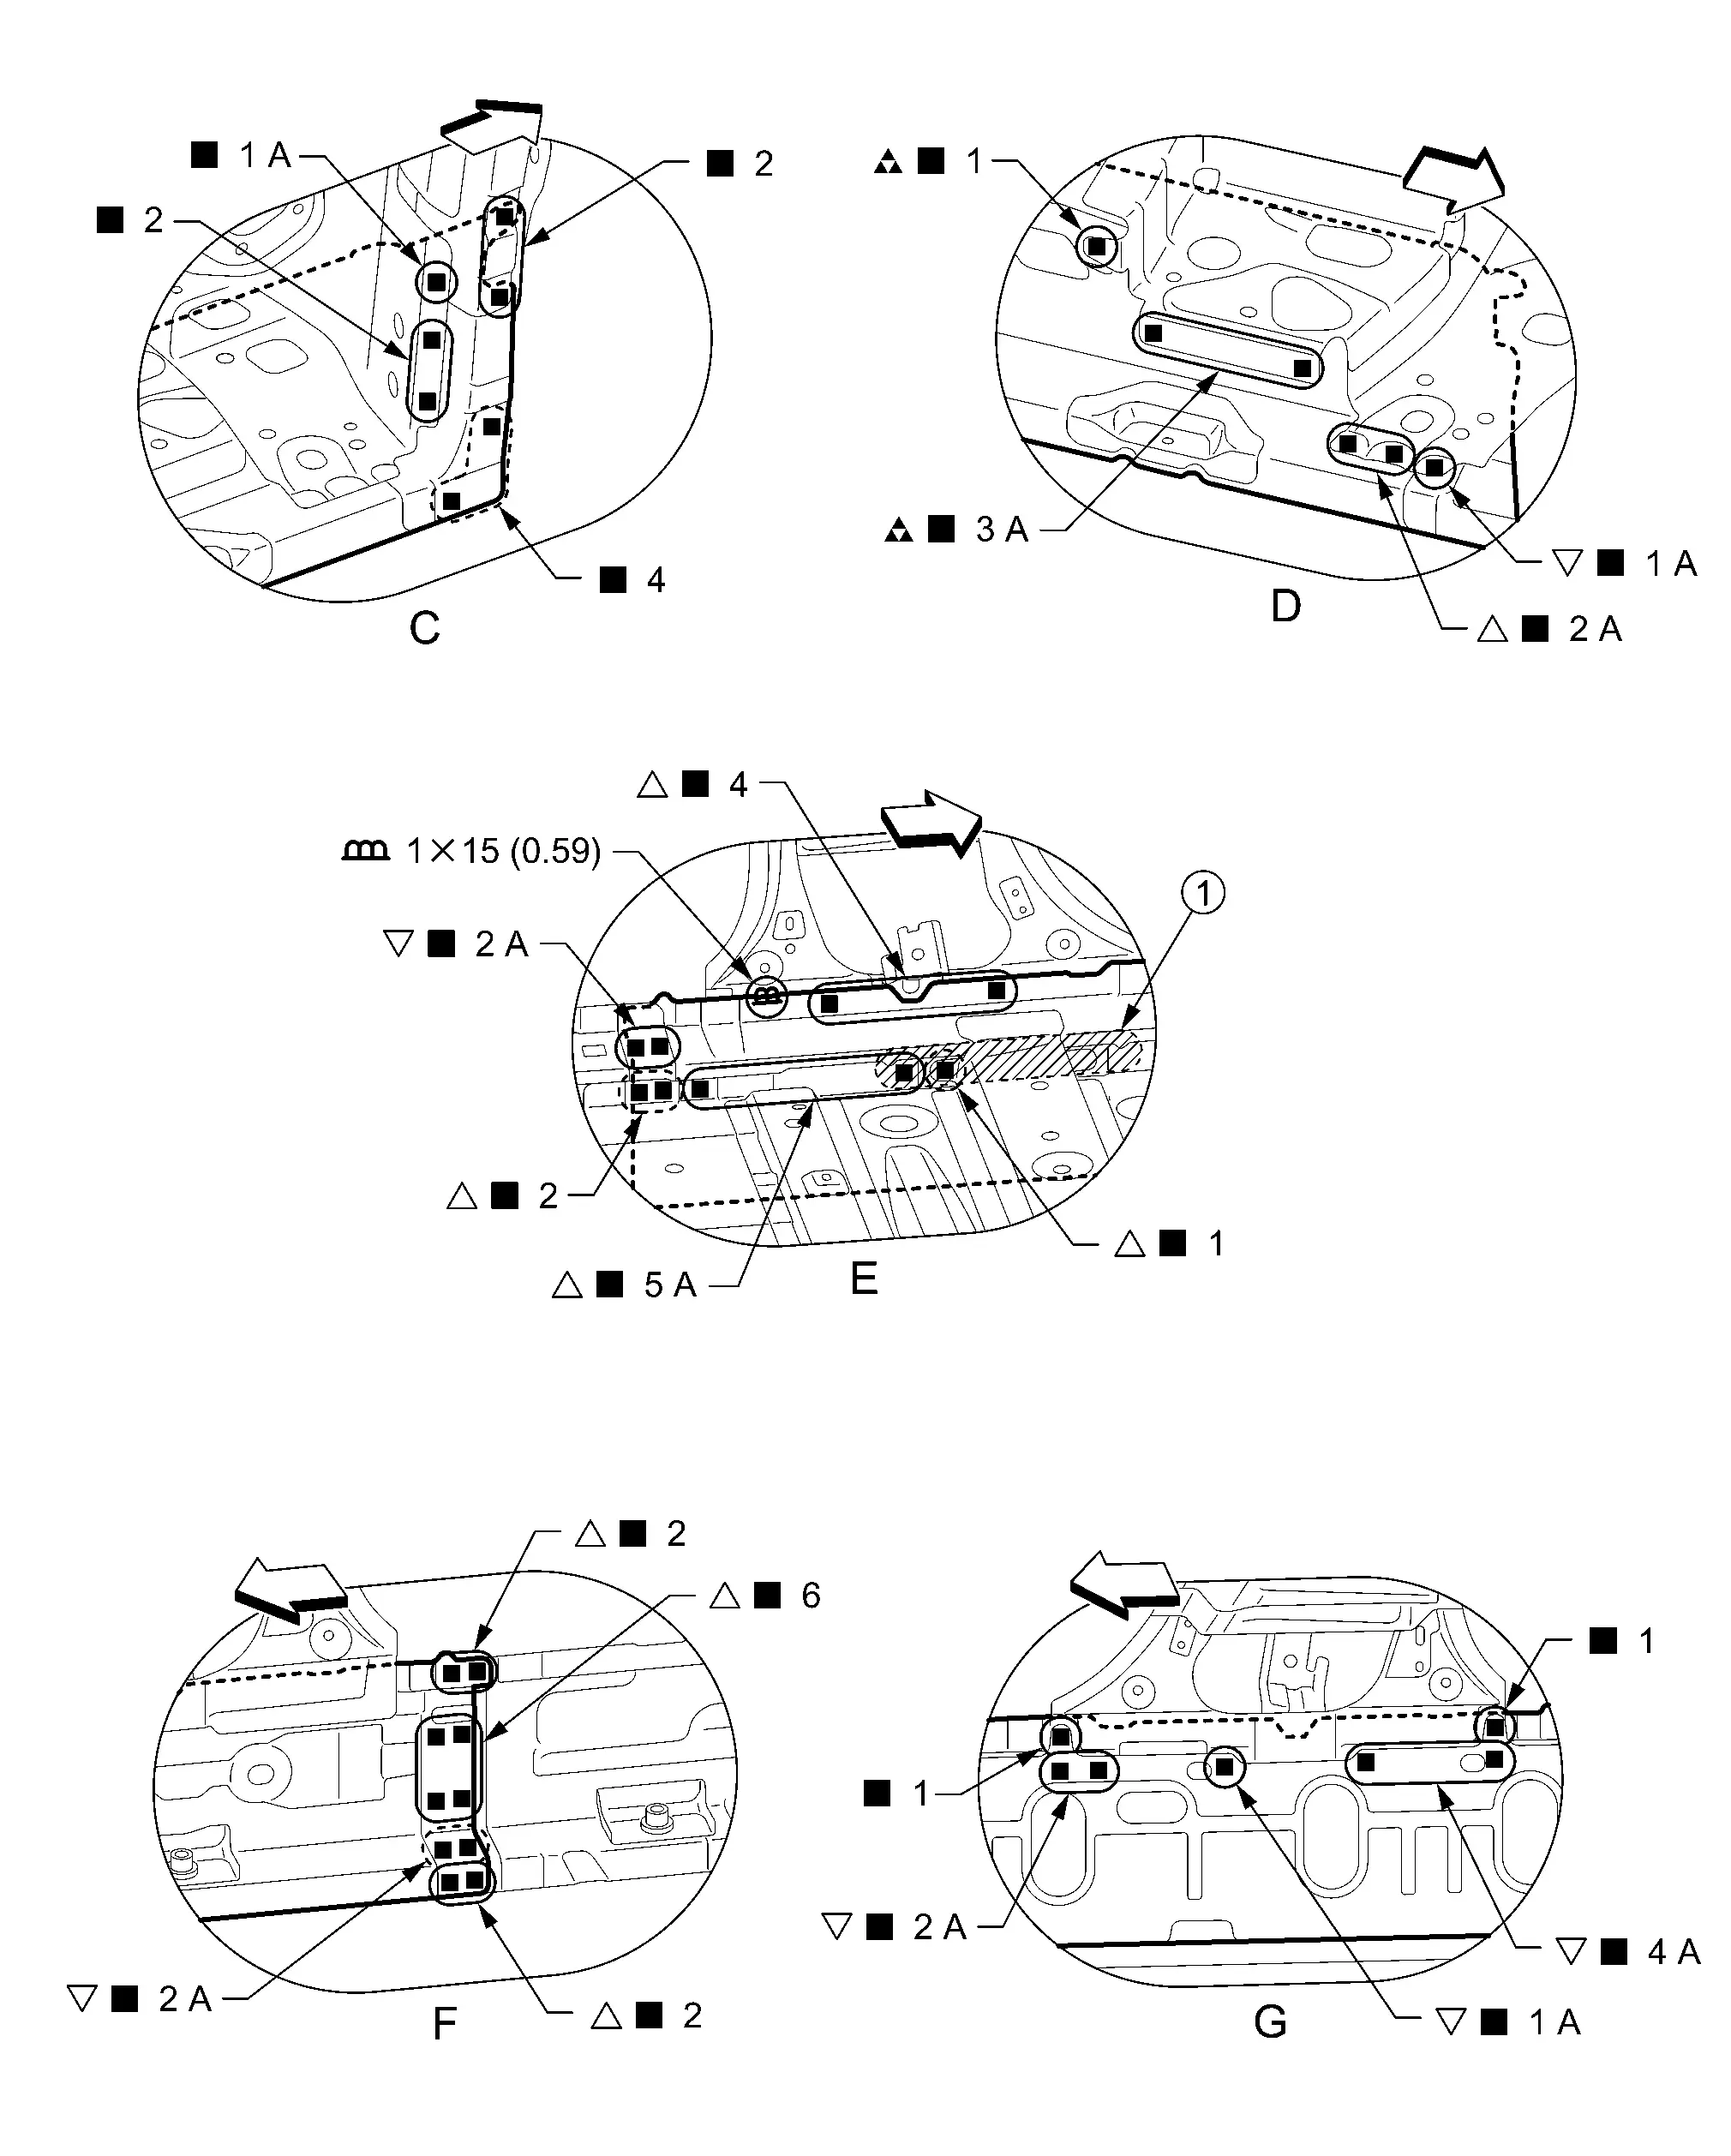
|
Urethane foam | |
Body sealing | |
Lower center pillar brace (reusable) |
| Unit: mm (in) | |||||
|
: For spot welding of steel plate of tensile strength 980 MPa, observe the indicated welding conditions. Refer to Welding of Ultra High Strength Steel |
|||||
View G: Before installing outer sill assembly
View H: Before installing outer sill assembly and center pillar hinge brace assembly (reusable)
|
Lower center pillar brace (reusable) | |
Urethane foam | |
Body sealing |
|
Lower front pillar hinge brace (reusable) | ||||
| Unit: mm (in) | |||||
|
 : Drill φ12 mm (0.47 in) hole for the plug welding hole (ultra high strength steel). : Drill φ12 mm (0.47 in) hole for the plug welding hole (ultra high strength steel). |
|||||
View J and O: Before installing outer sill assembly
PARTIAL REPLACEMENT
| Unit: mm (in) | |||||
| : Nissan Ariya Vehicle front |
|||||
| Replacement part | |||||
| • | Outer sill assembly | ||||
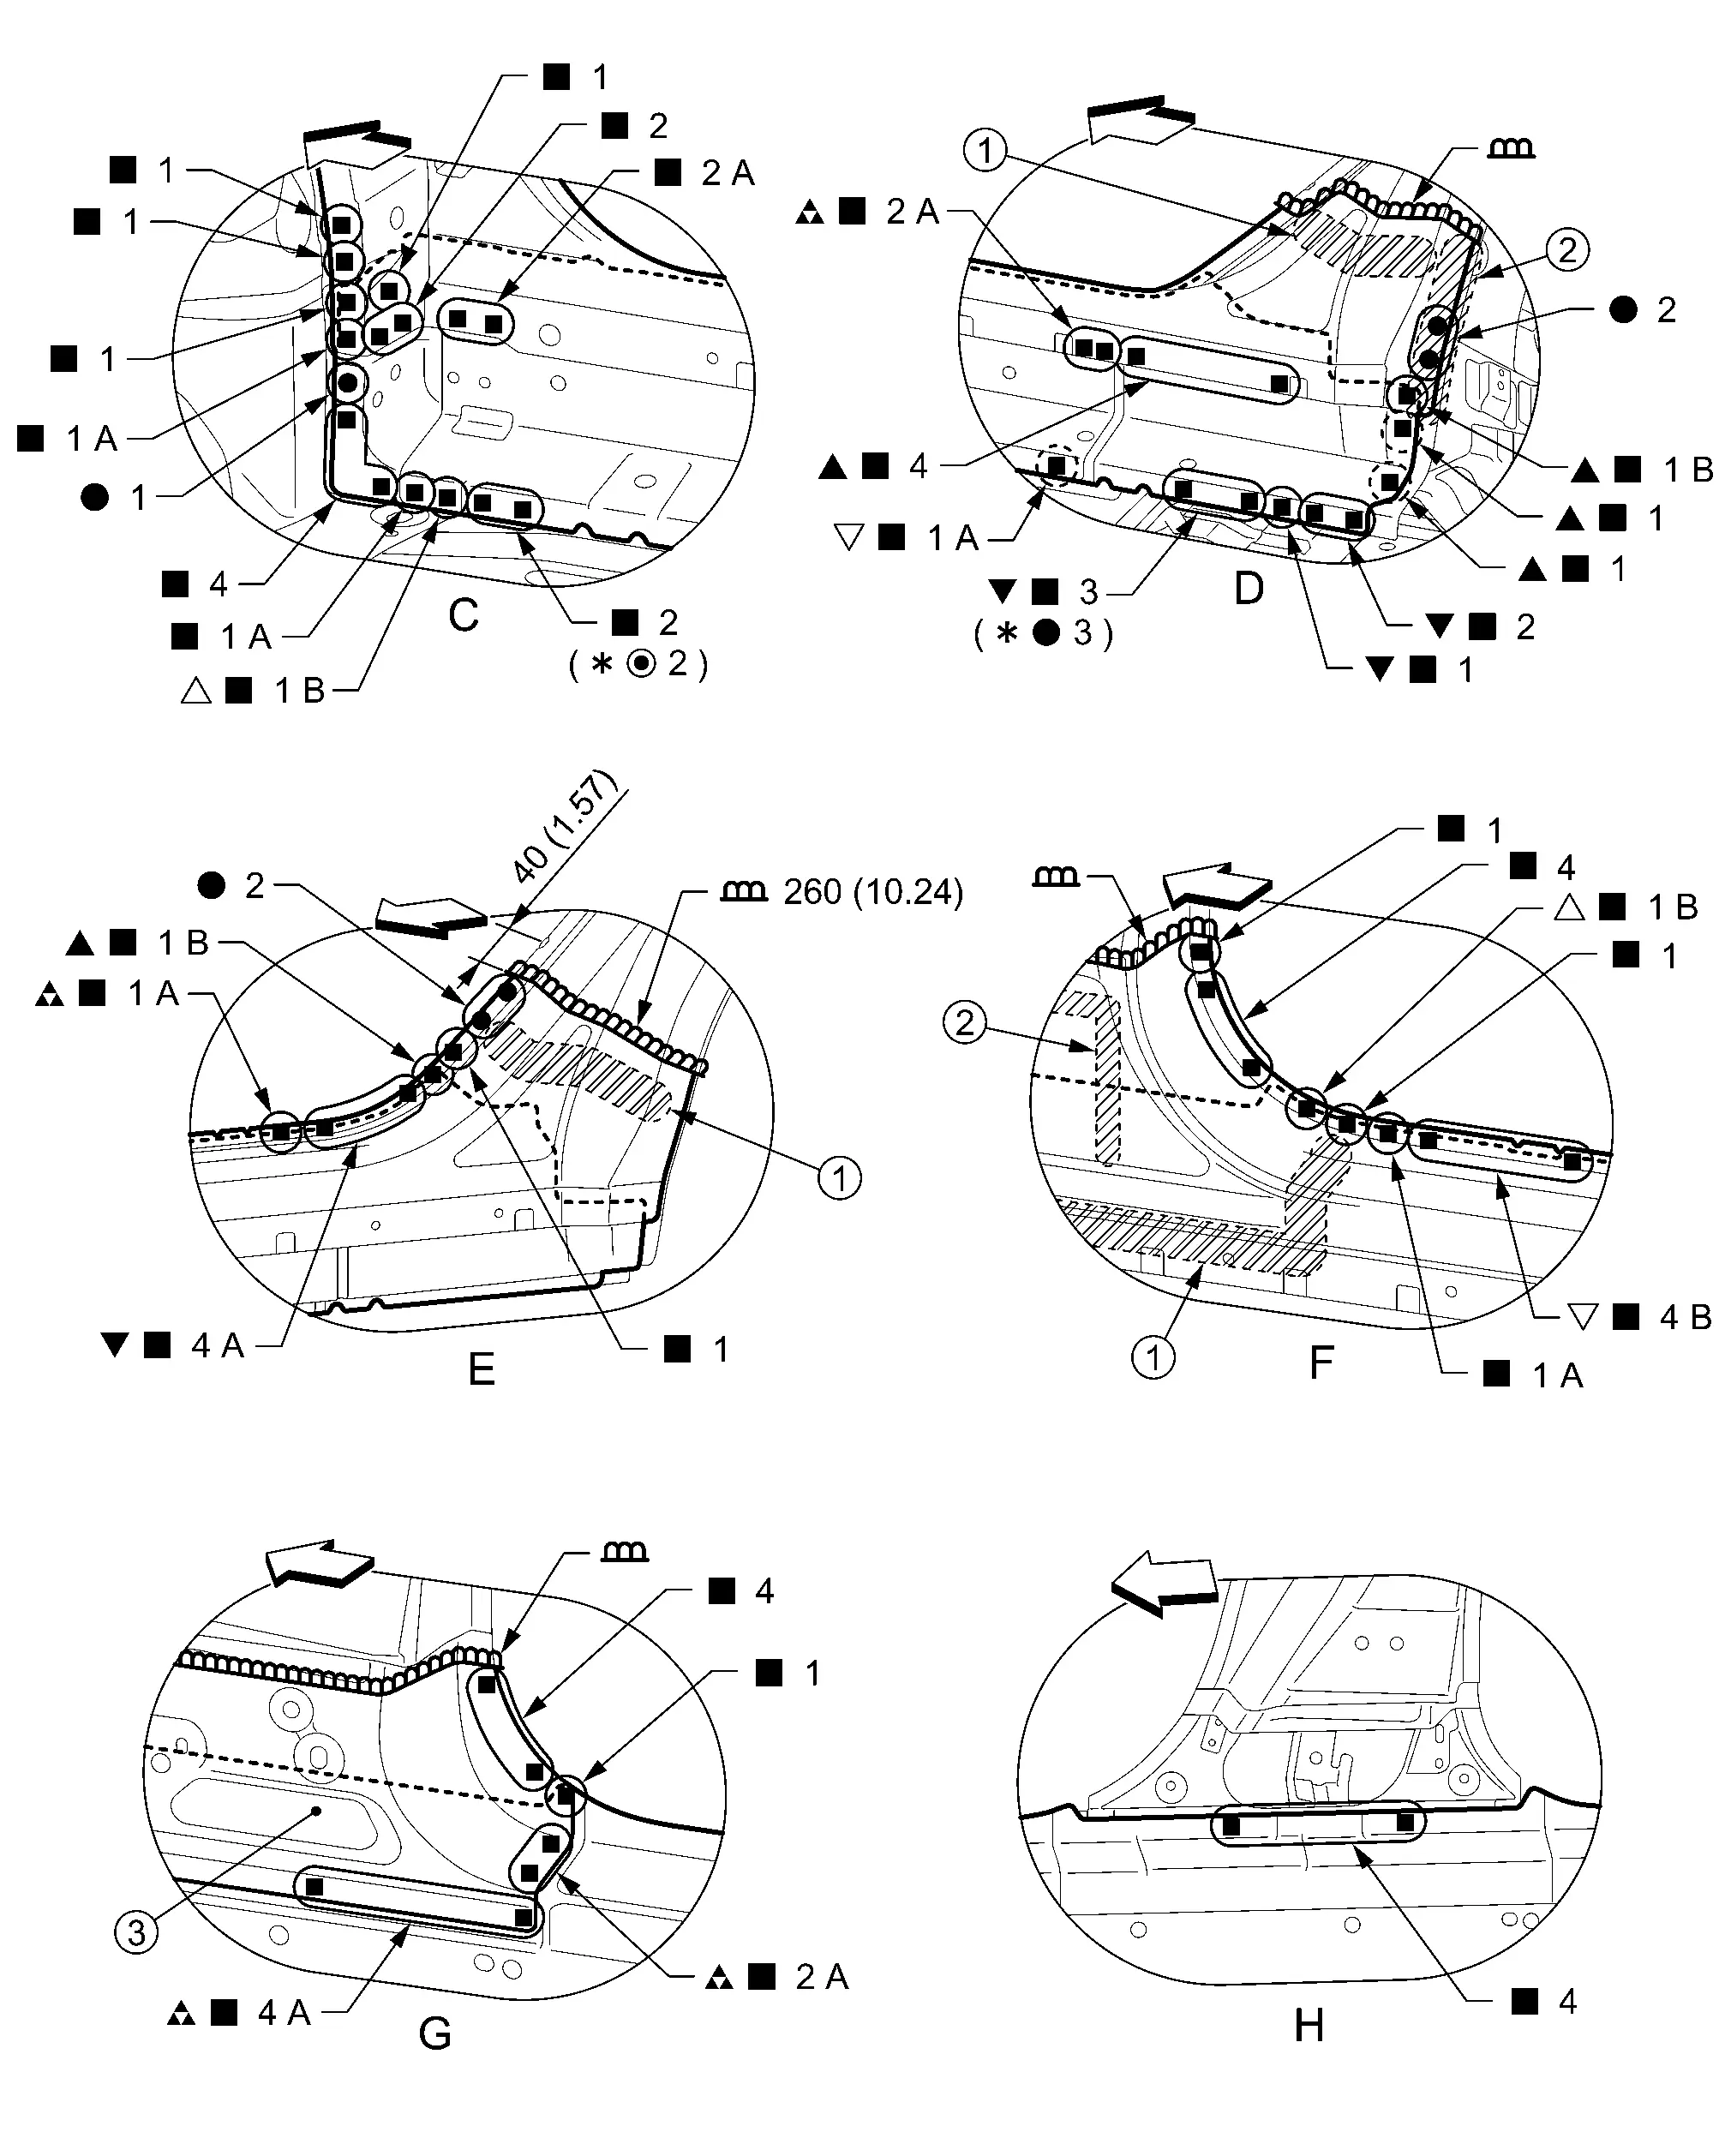
Inner Sill
Work after outer sill is removed.
|
Body sealing | ||||
| Unit: mm (in) | |||||
|
: Weld the parts onto the back of the component part. |
|||||
| Replacement part | |||||
| • | Inner sill | • | Inner center sill assembly | ||
|
Body sealing | ||||
| Unit: mm (in) | |||||
|
: Weld the parts onto the back of the component part. |
|||||
View E and F: Before installing inner center sill assembly
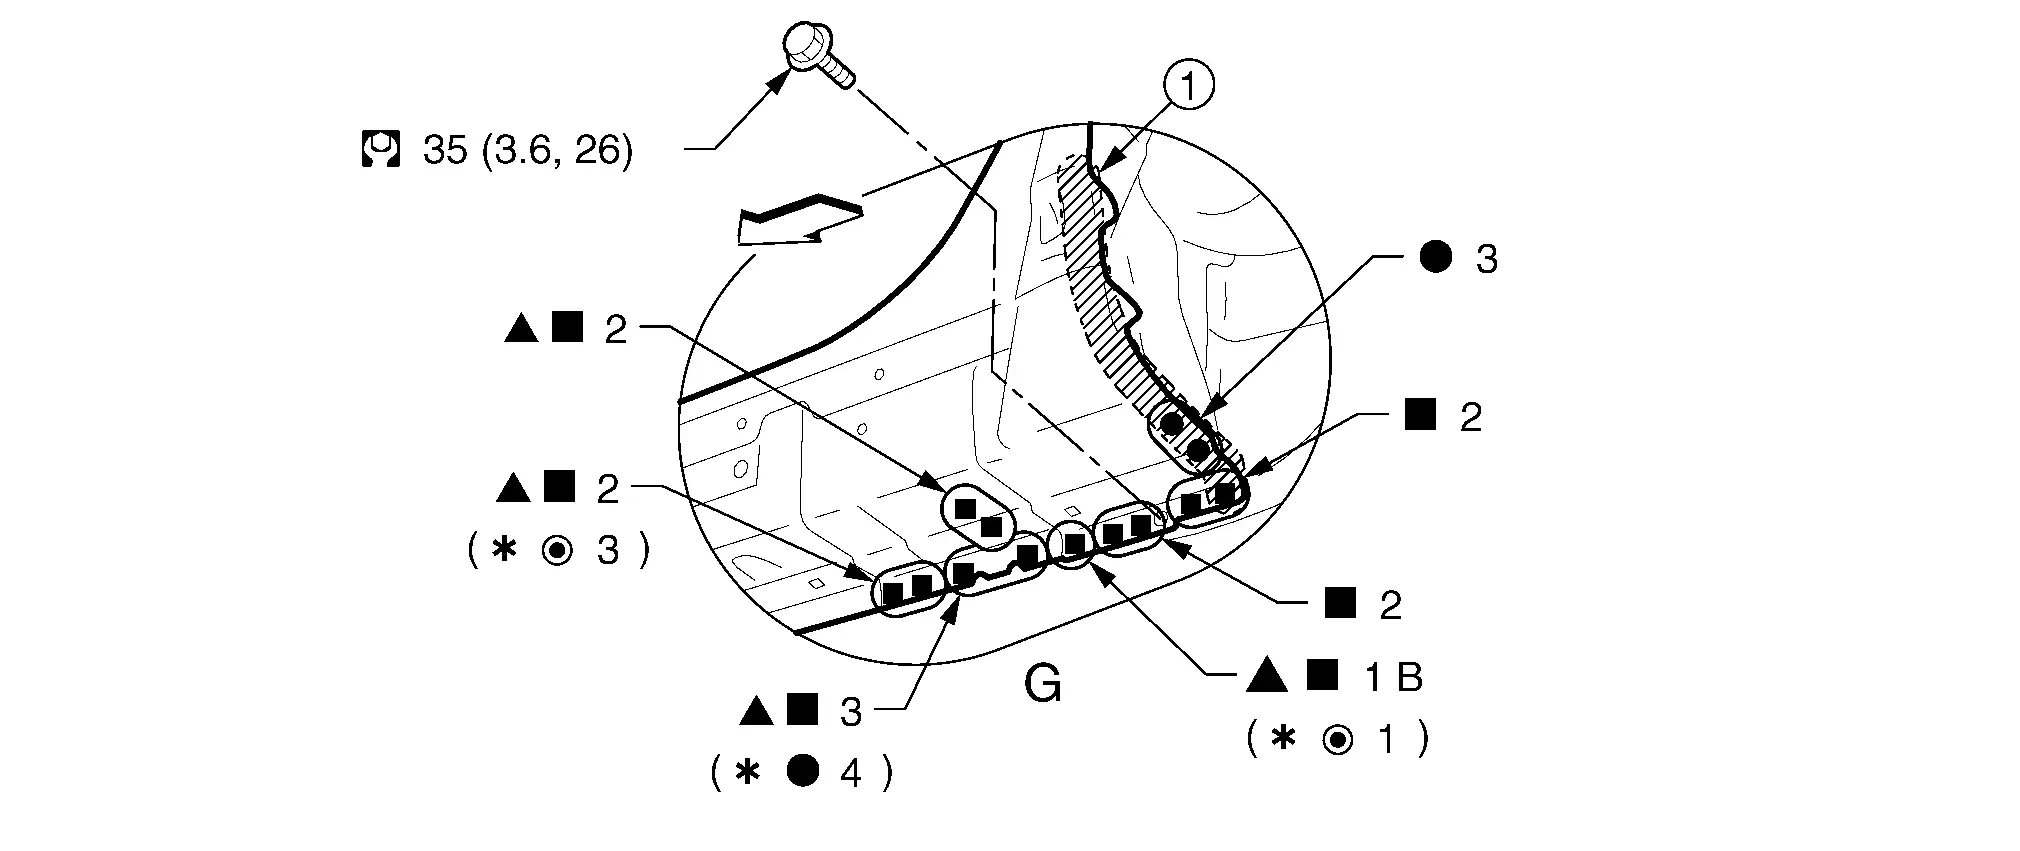
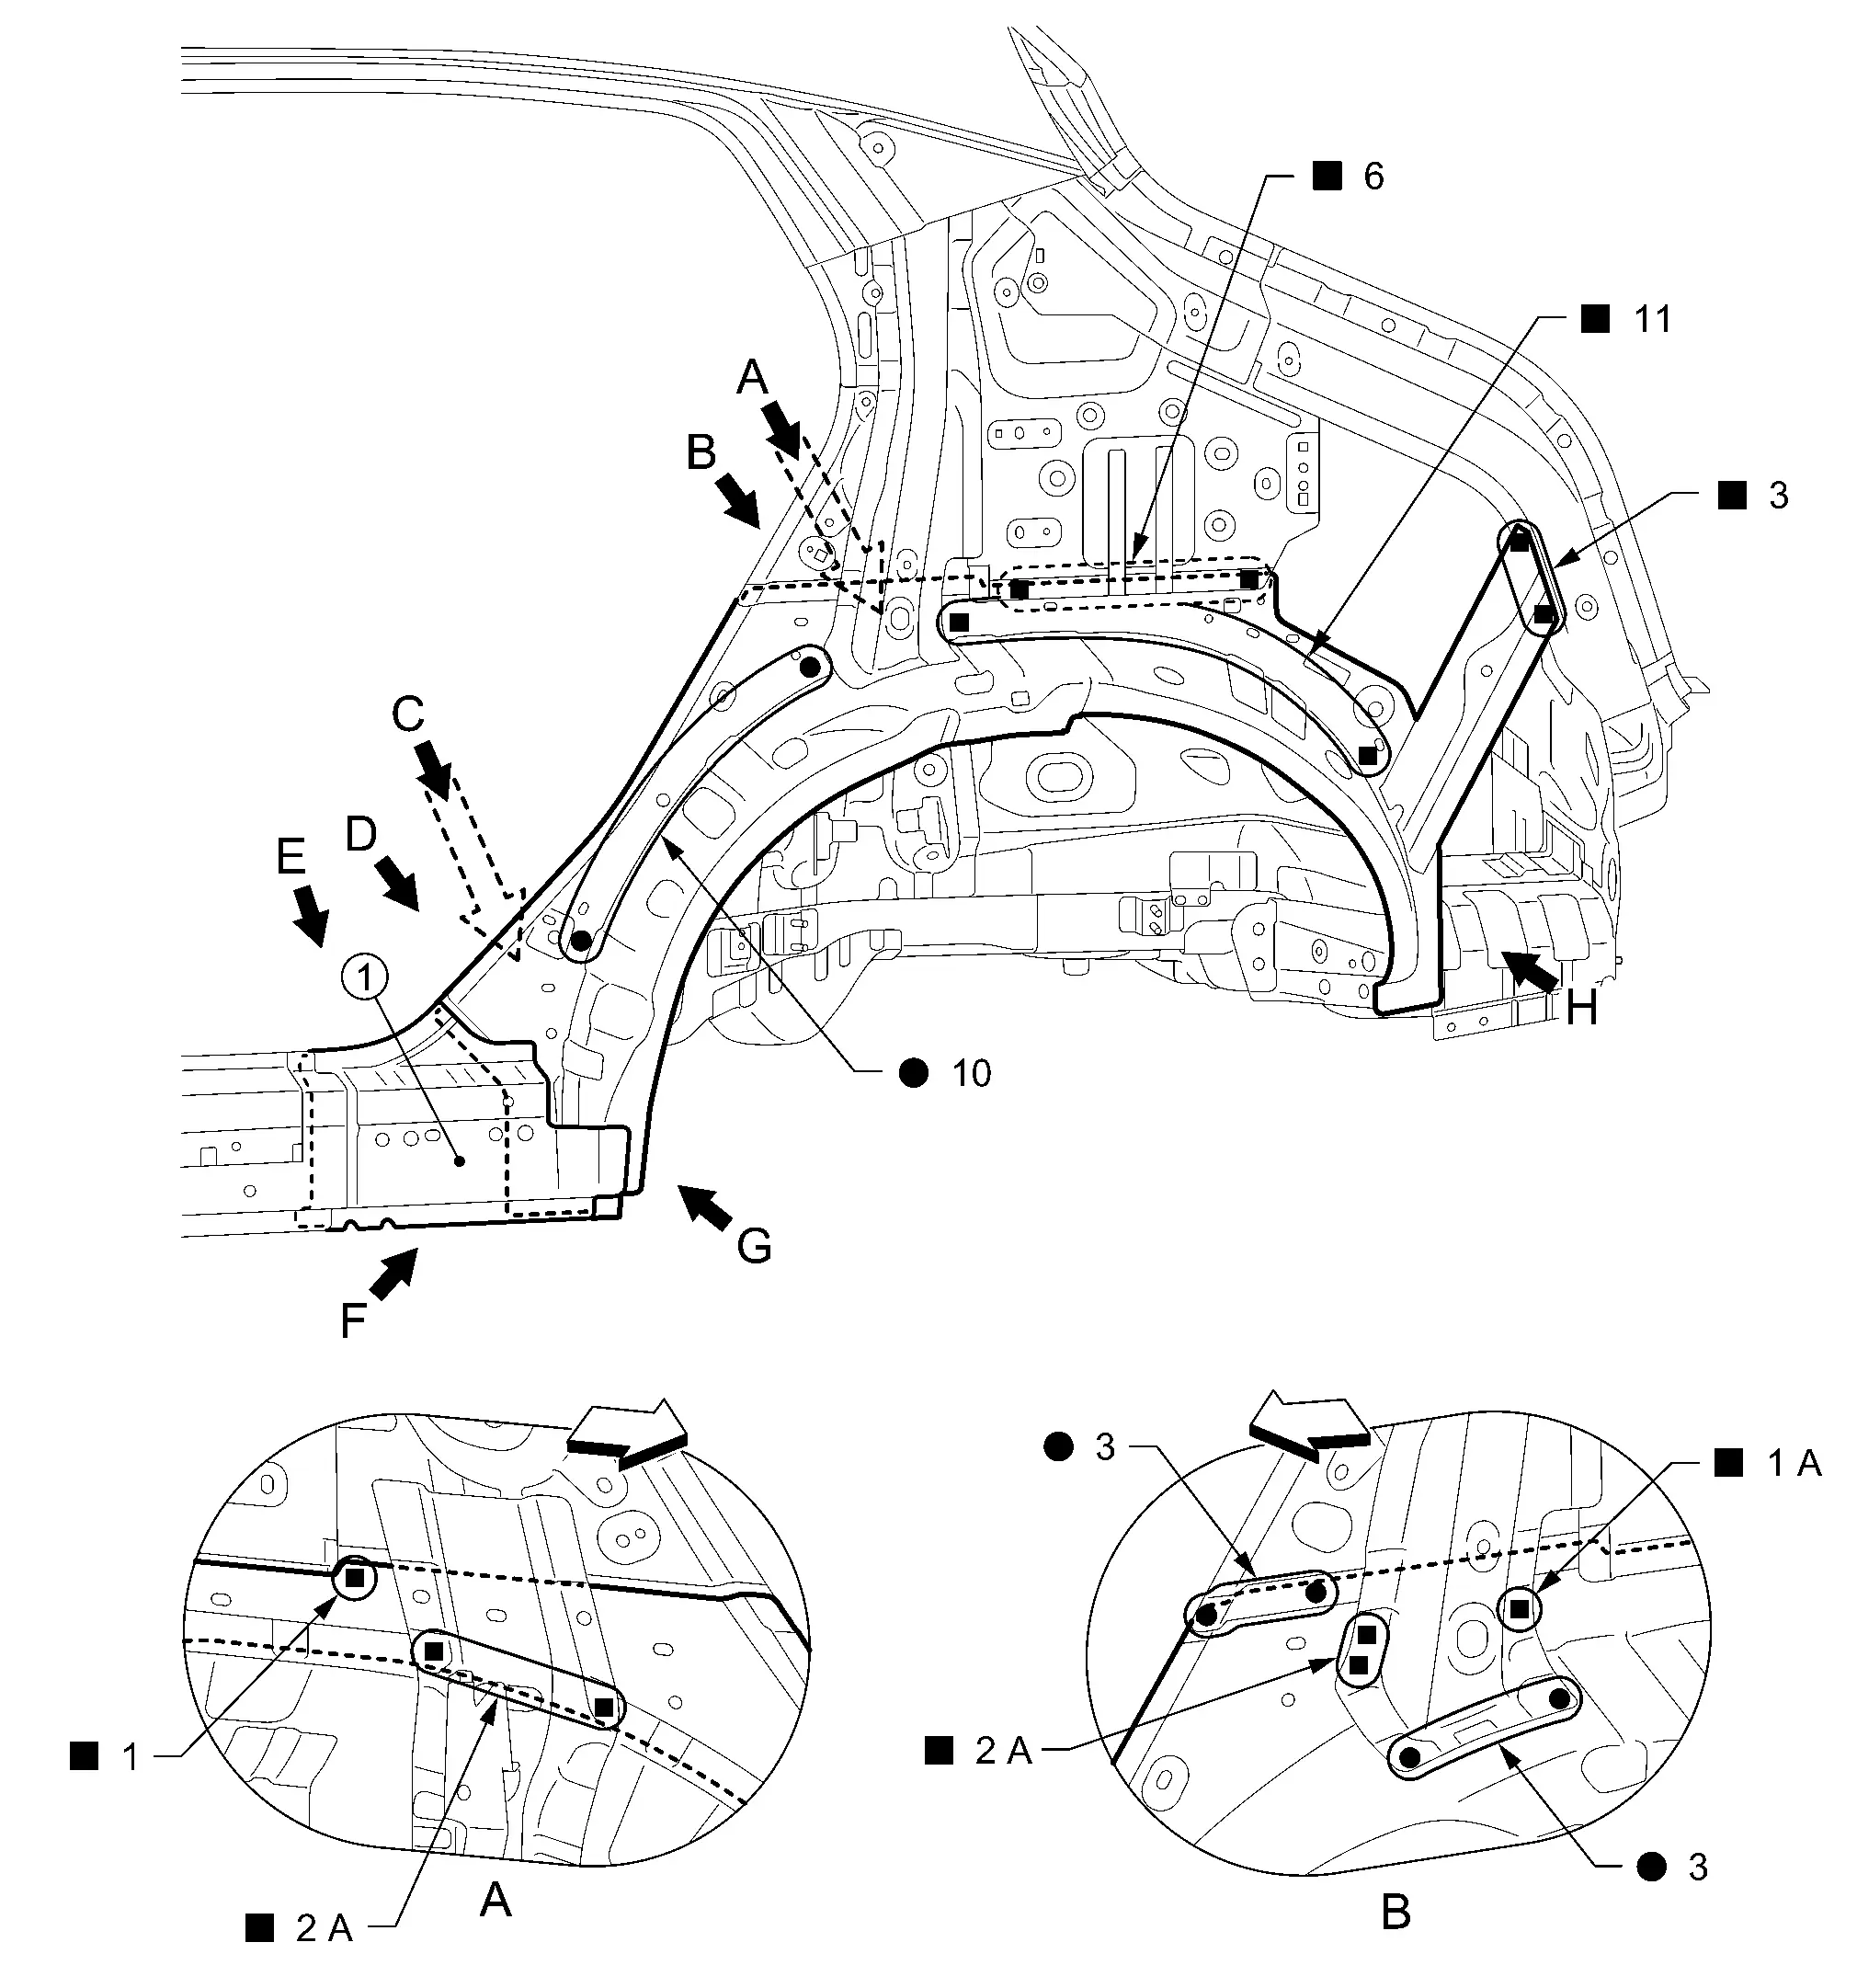
Rear Fender
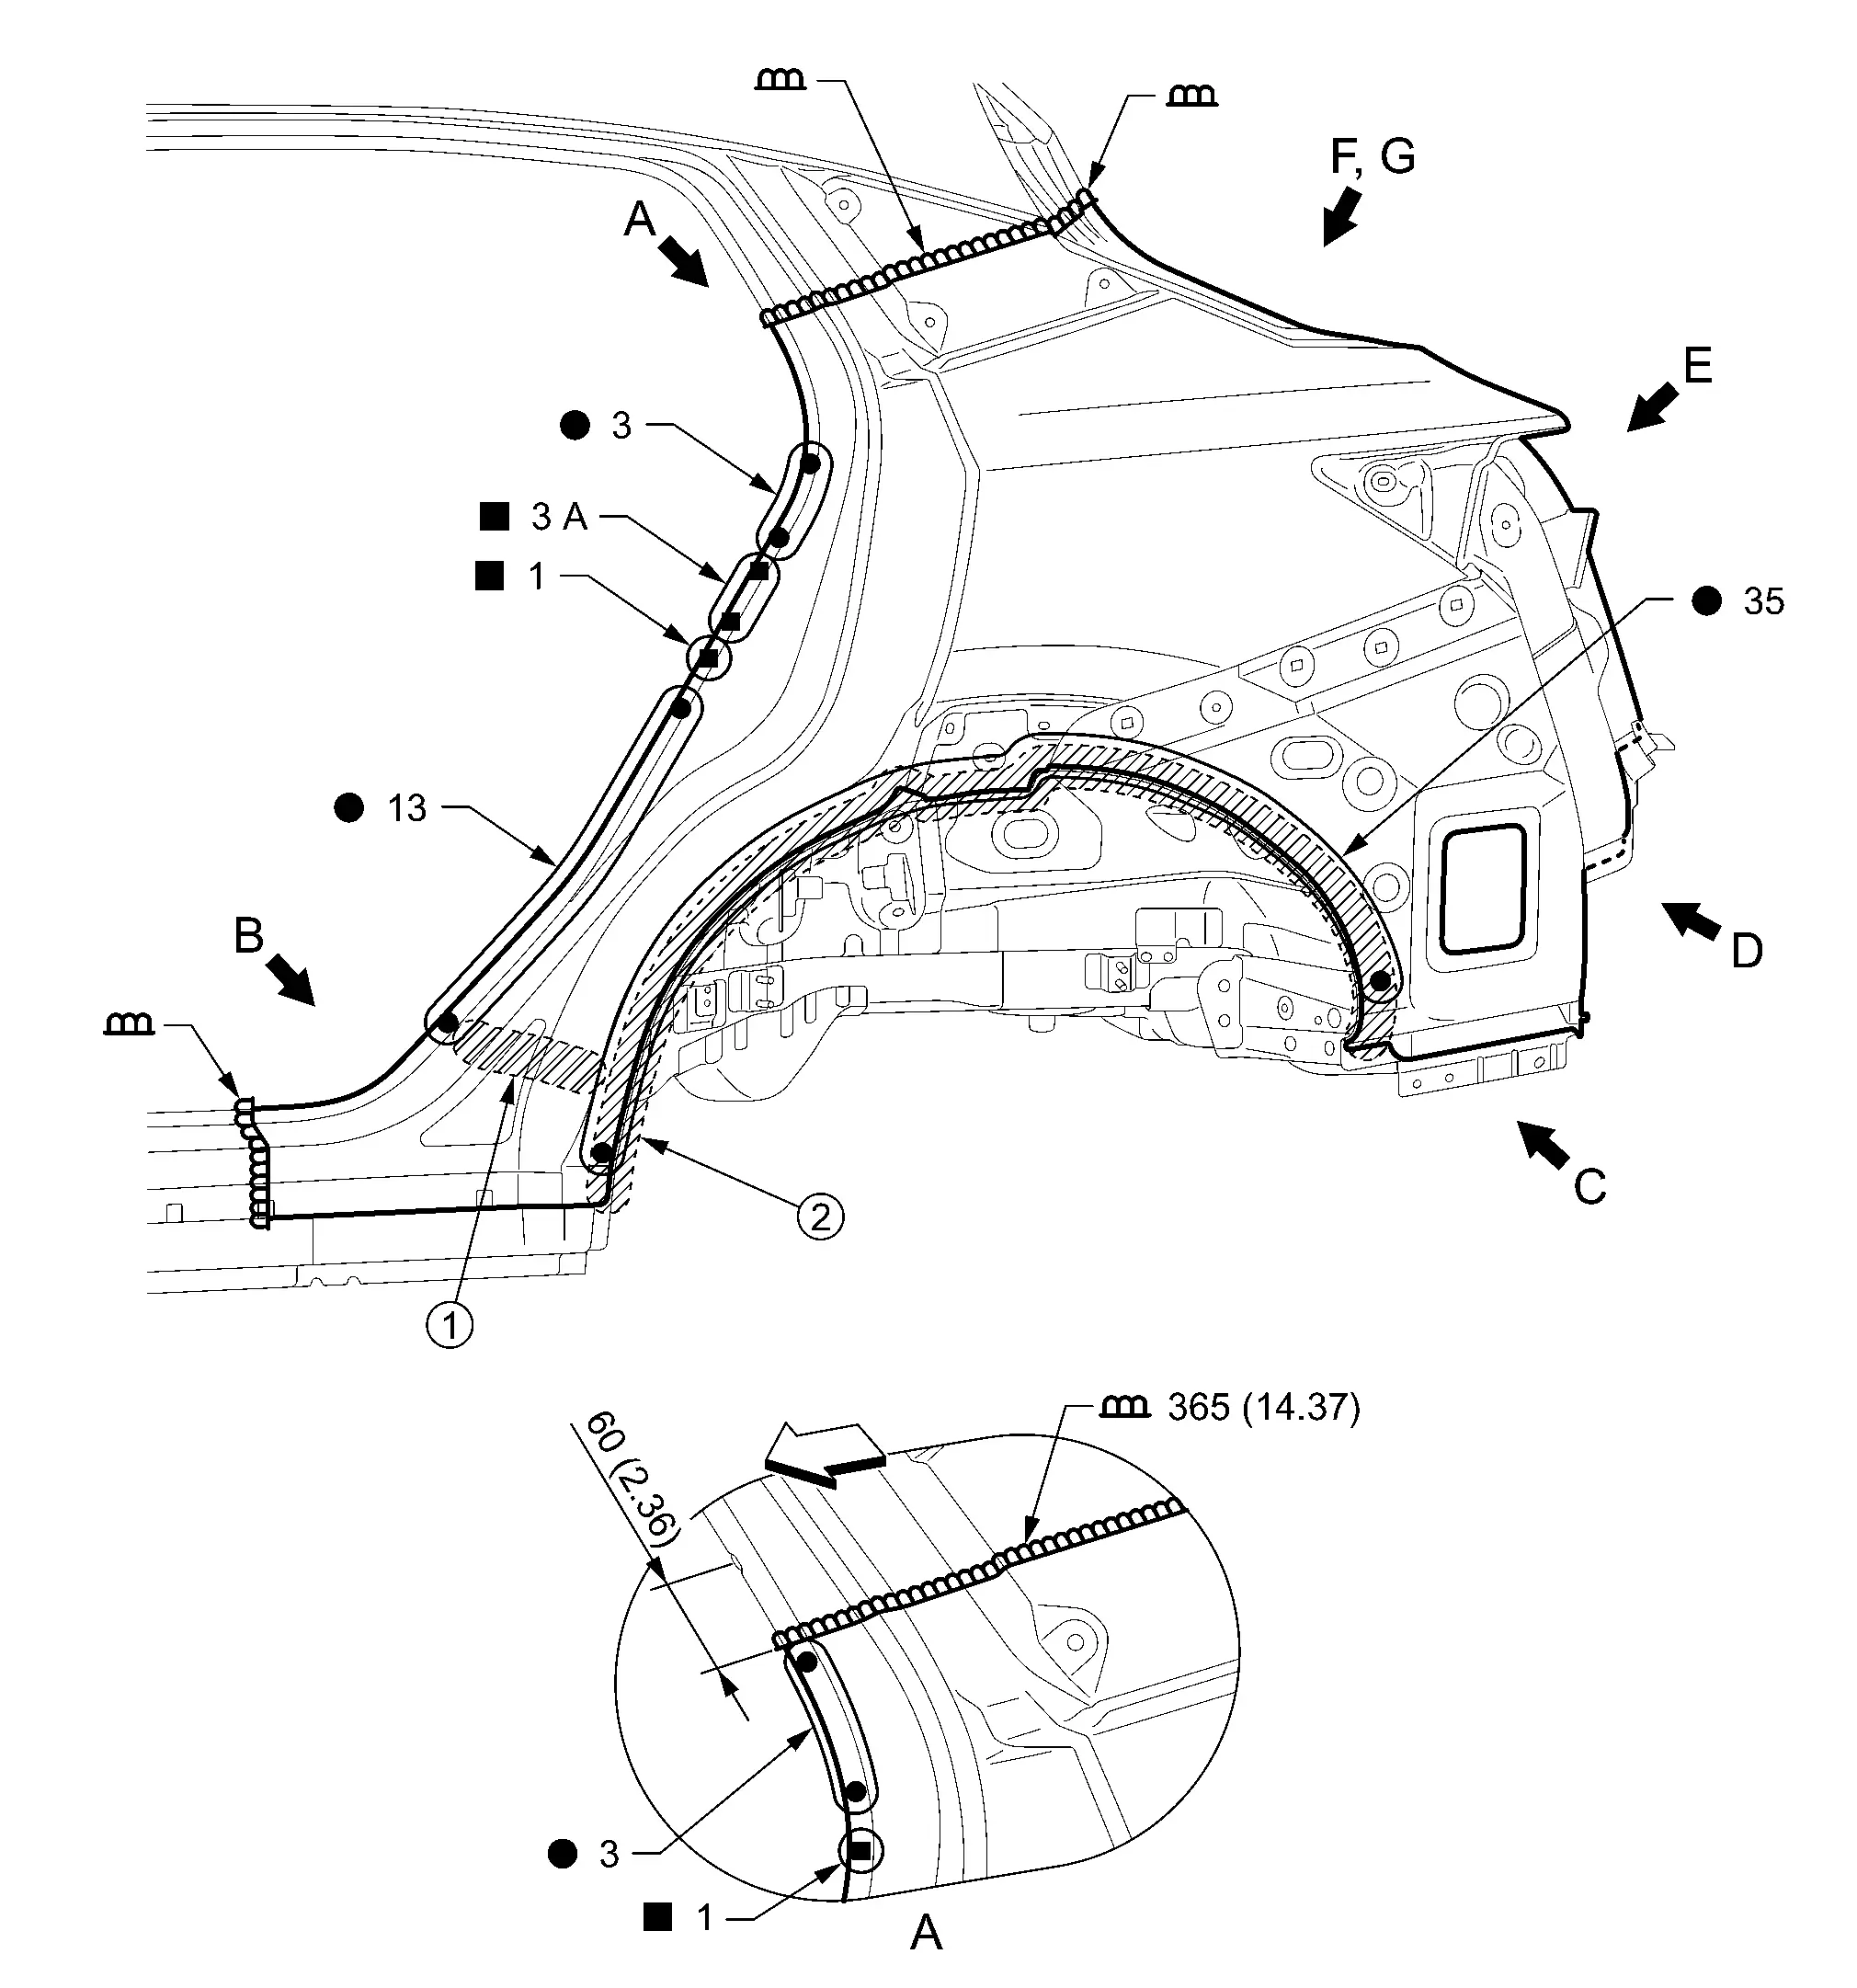
|
Urethane foam | |
Body sealing | ||
| Unit: mm (in) | |||||
| : Nissan Ariya Vehicle front |
|||||
| Replacement part | |||||
| • | Rear fender assembly | ||||

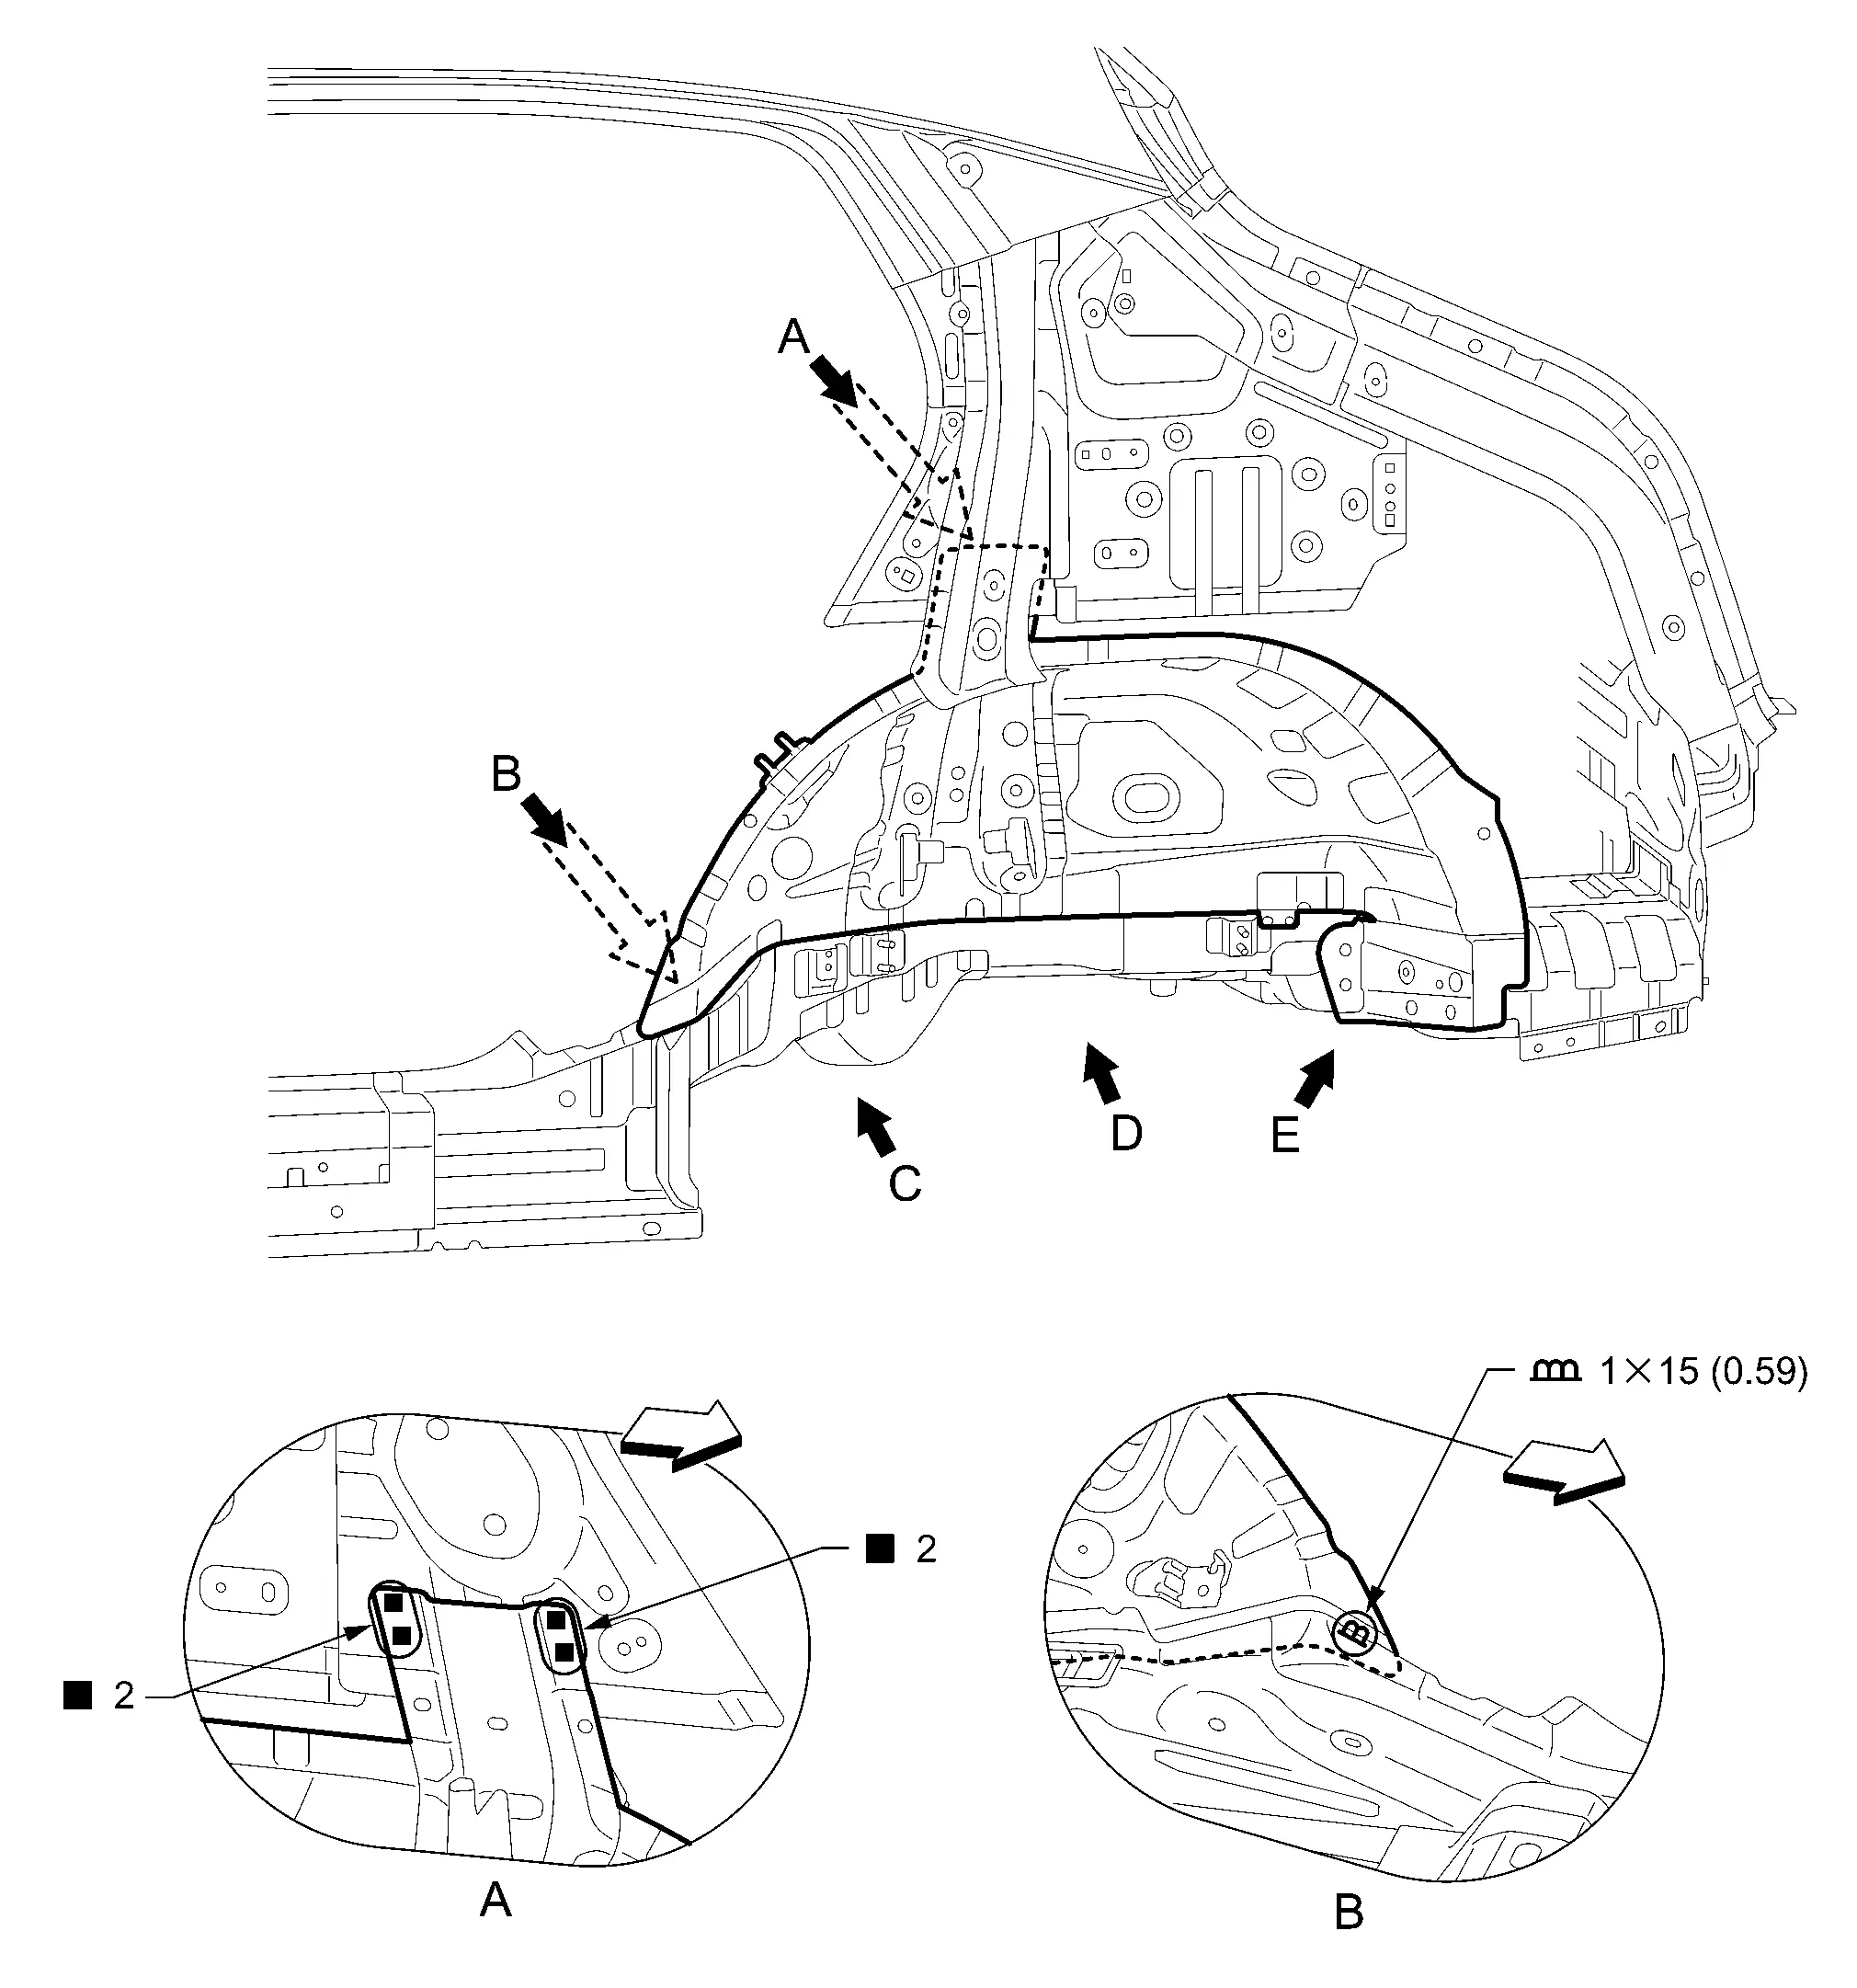
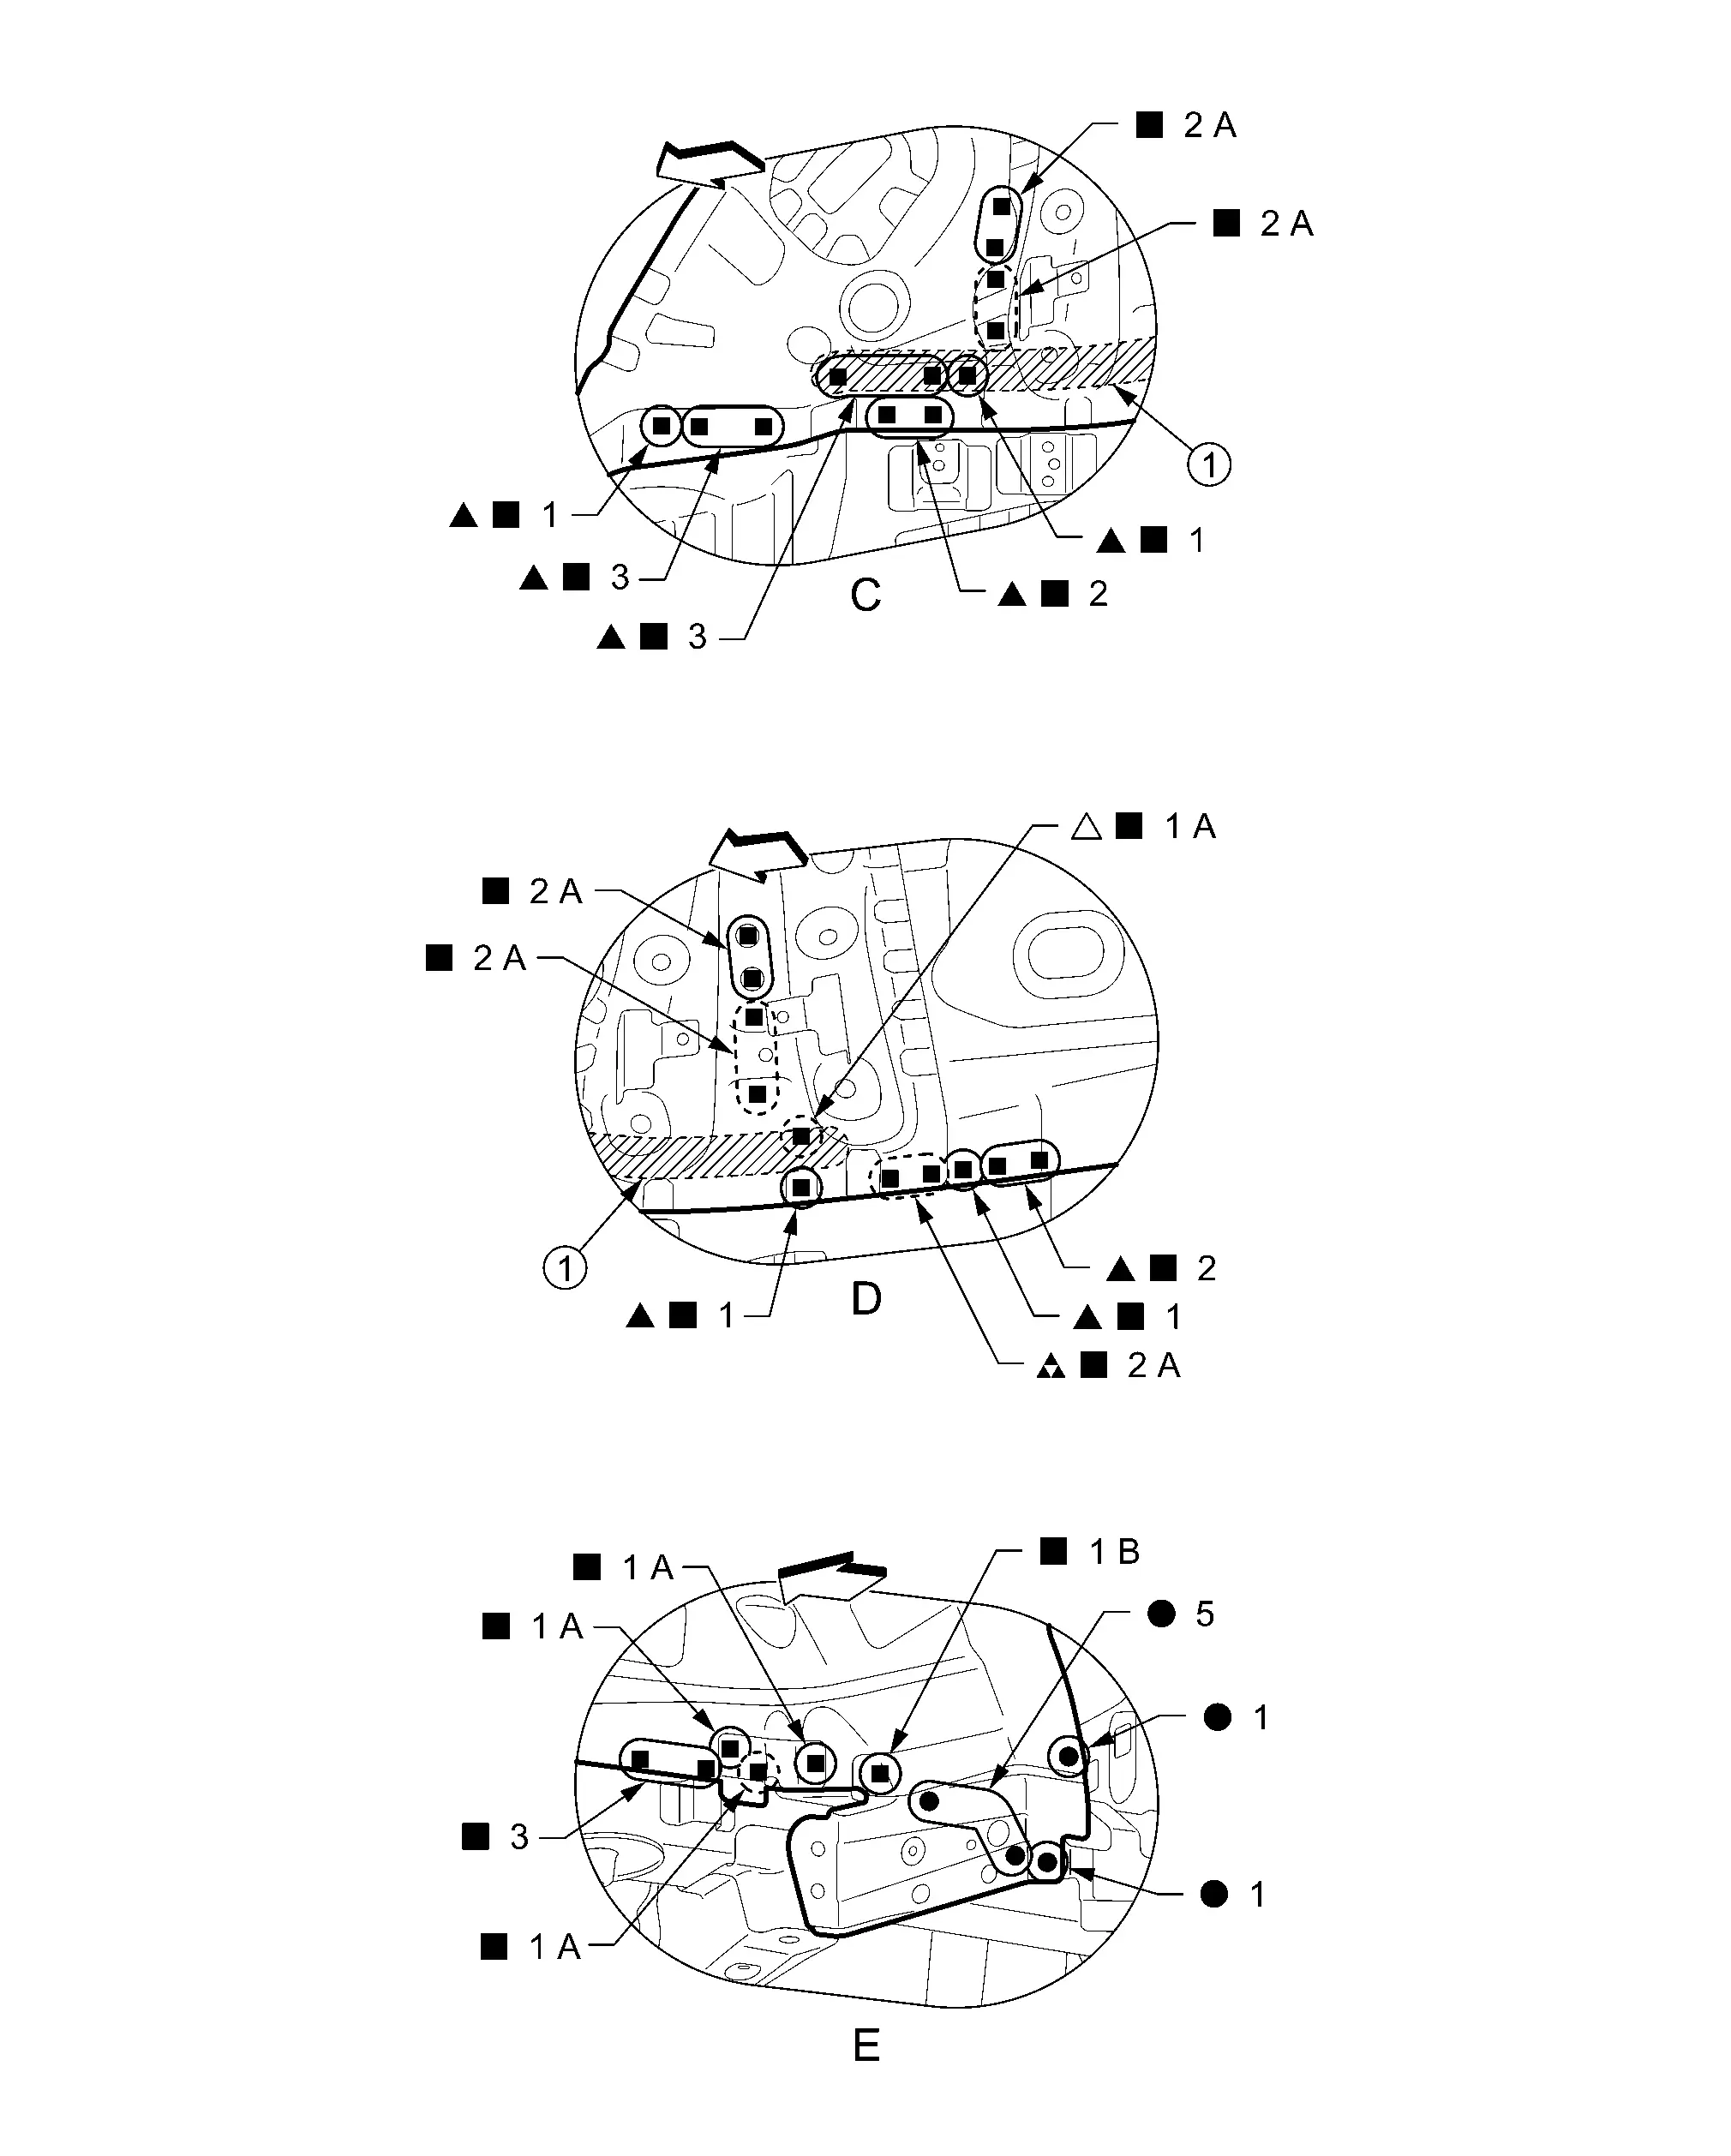
|
Urethane foam | |
Body sealing | ||
| Unit: mm (in) | |||||
|
: Weld the parts onto the back of the component part. |
|||||
View G: Before installing outer side body
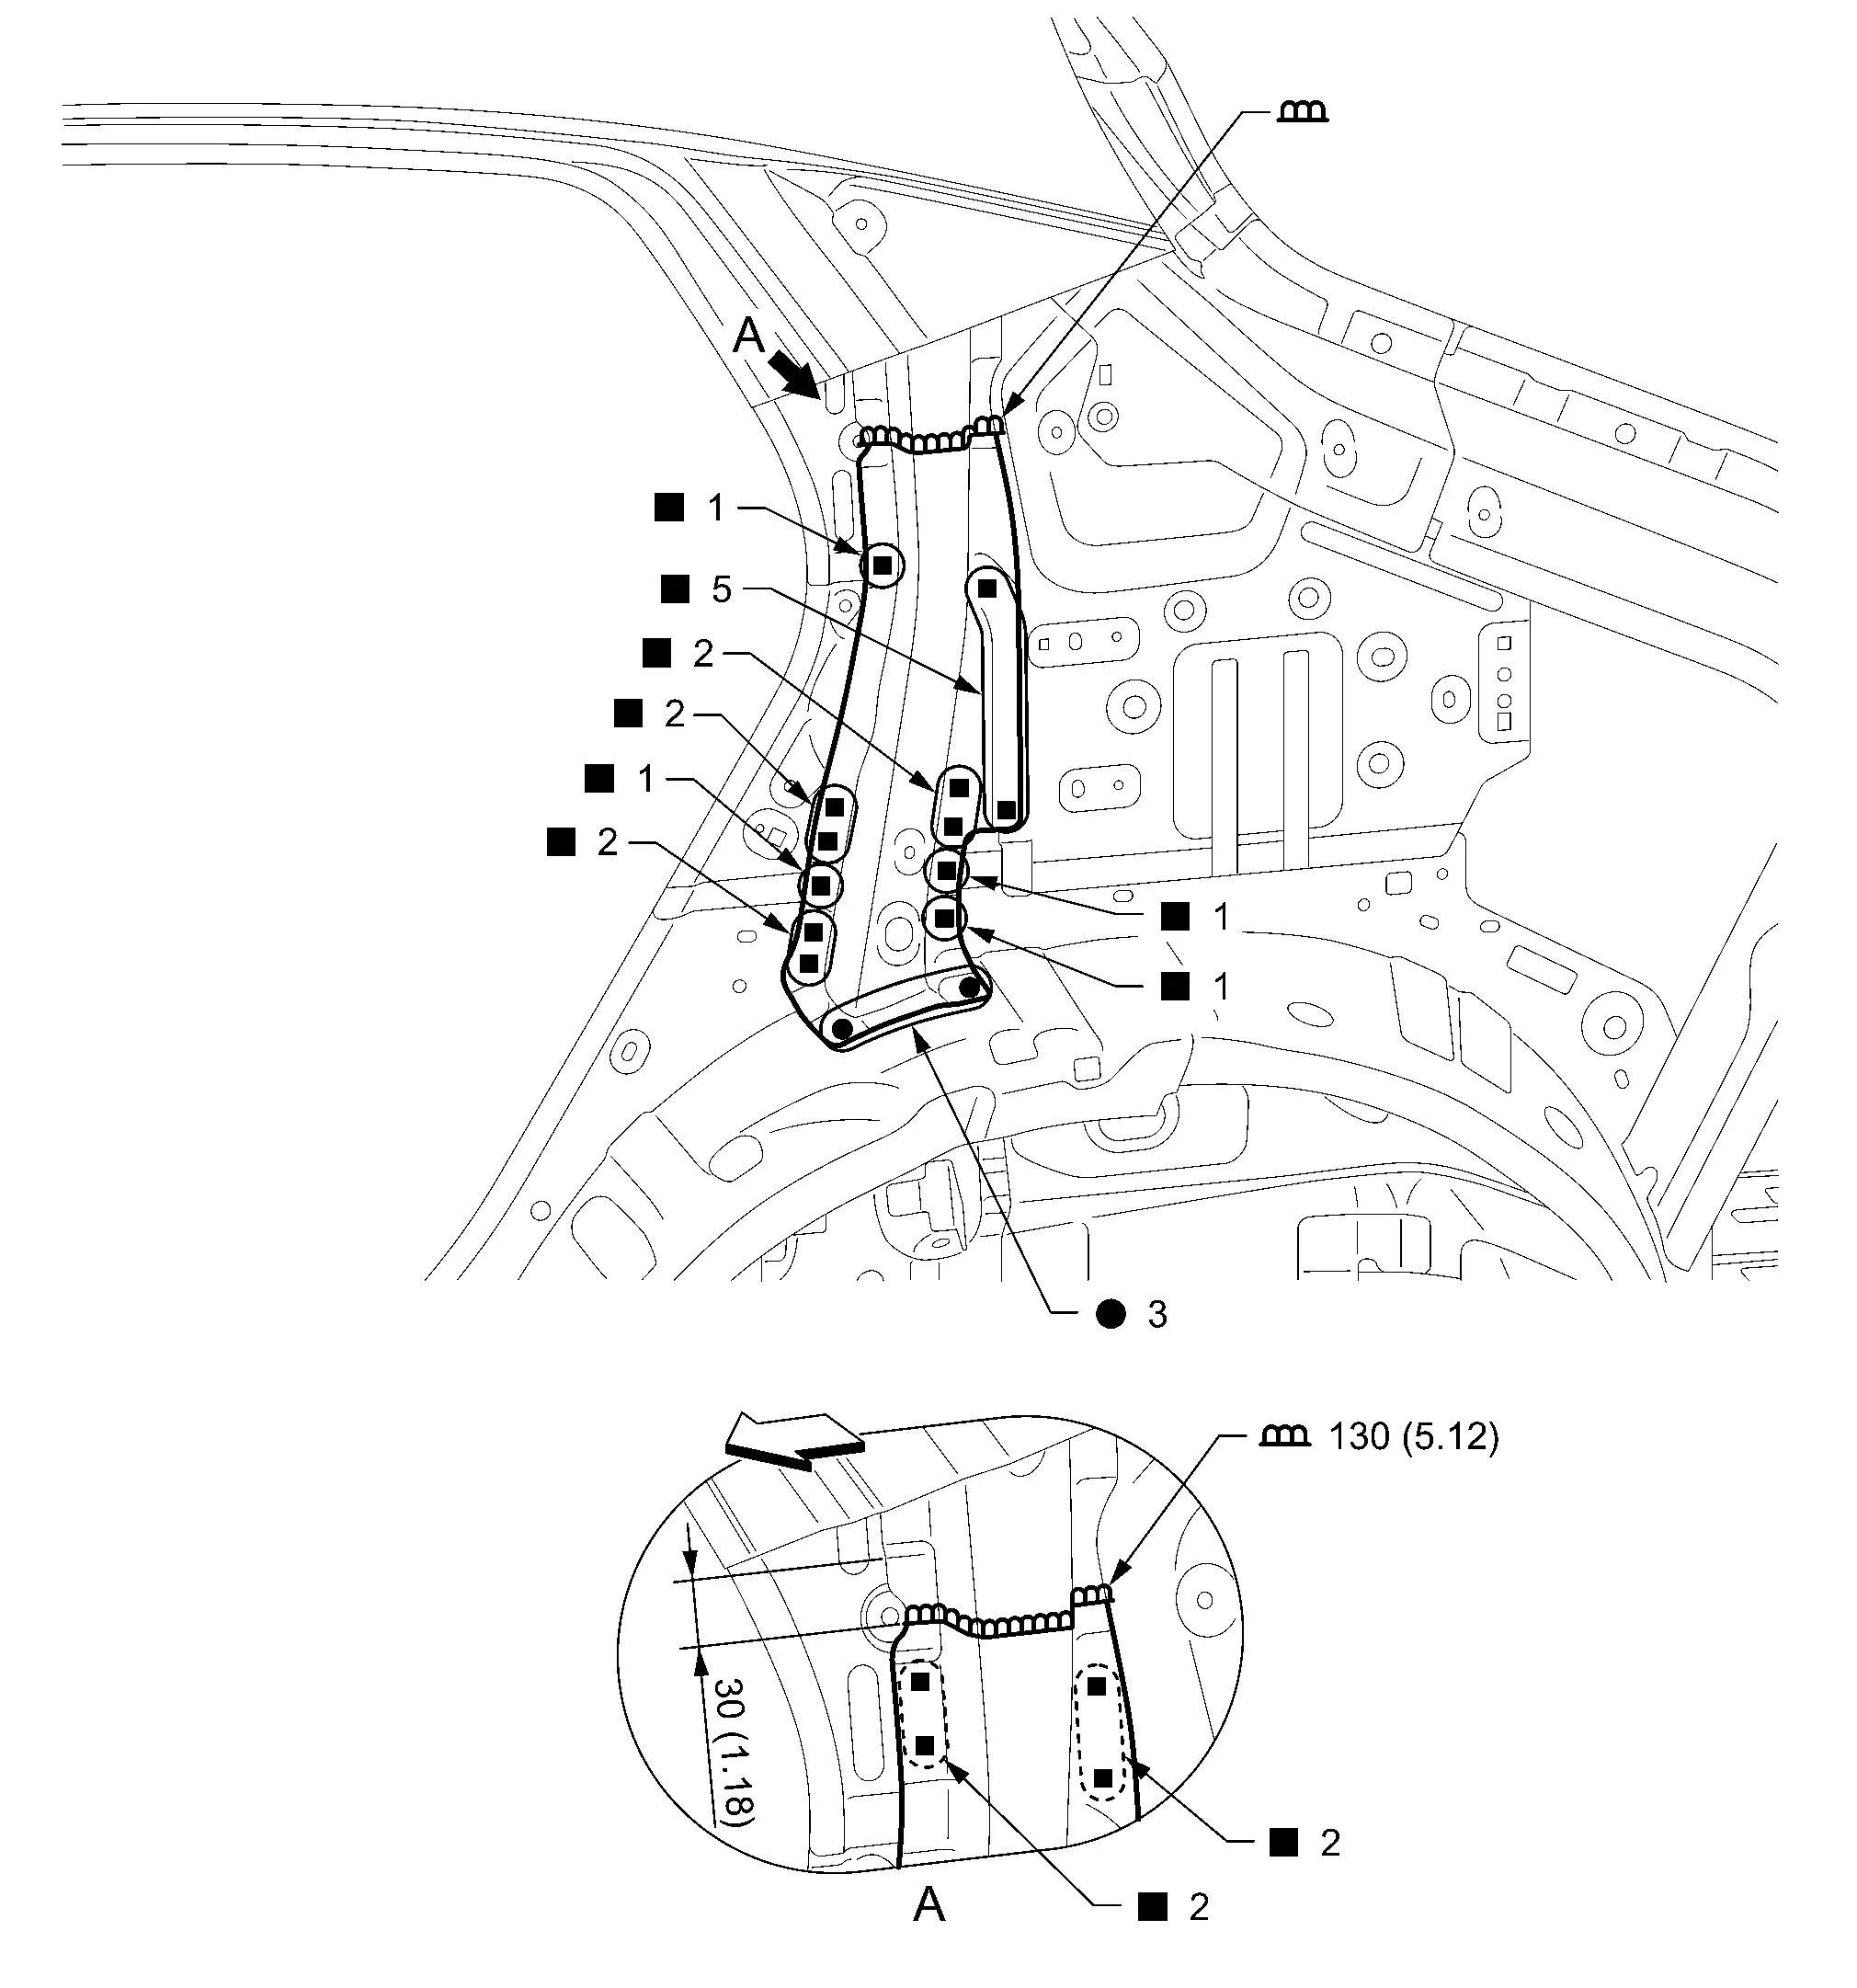
Rear Fender Extension

|
Body sealing | ||||
| Unit: mm (in) | |||||
| : Nissan Ariya Vehicle front |
|||||
| Replacement part | |||||
| • | Rear fender extension | ||||
Outer Rear Wheelhouse
Work after rear fender is removed.
Remove the outer rear sill reinforcement front (reusable) from the vehicle for easier installation.
|
Outer rear sill reinforcement (reusable) | ||||
|
: Weld the parts onto the back of the component part. |
|||||
| Replacement part | |||||
| • | Outer rear wheelhouse | • | Outer rear wheelhouse extension | • | Rear fender gusset |

|
Outer rear sill reinforcement | ||||
| Unit: mm (in) | |||||
|
: Weld the parts onto the back of the component part. |
|||||
View D: Before installing outer rear sill reinforcement (reusable)
Inner Rear Wheelhouse
Work after rear fender and outer rear wheelhouse are removed.
| Unit: mm (in) | |||||
| : Nissan Ariya Vehicle front |
|||||
| Replacement part | |||||
| • | Inner rear wheelhouse | ||||
|
Body sealing | ||||
|
: Weld the parts onto the back of the component part. |
|||||
Inner Rear Pillar Reinforcement
Work after rear fender is removed.
| Unit: mm (in) | |||||
|
: Weld the parts onto the back of the component part. |
|||||
| Replacement part | |||||
| • | Inner rear pillar | ||||
Inner Rear Pillar
2WD MODELS
Work after rear fender is removed.
|
: N•m (kg-m, ft-lb) |
|||||
| Replacement part | |||||
| • | Inner rear pillar | ||||
| Unit: mm (in) | |||||
|
: Weld the parts onto the back of the component part. |
AWD MODELS
Work after rear fender is removed.
|
: N•m (kg-m, ft-lb) |
|||||
| Replacement part | |||||
| • | Inner rear pillar | ||||
| Unit: mm (in) | |||||
|
: Weld the parts onto the back of the component part. |
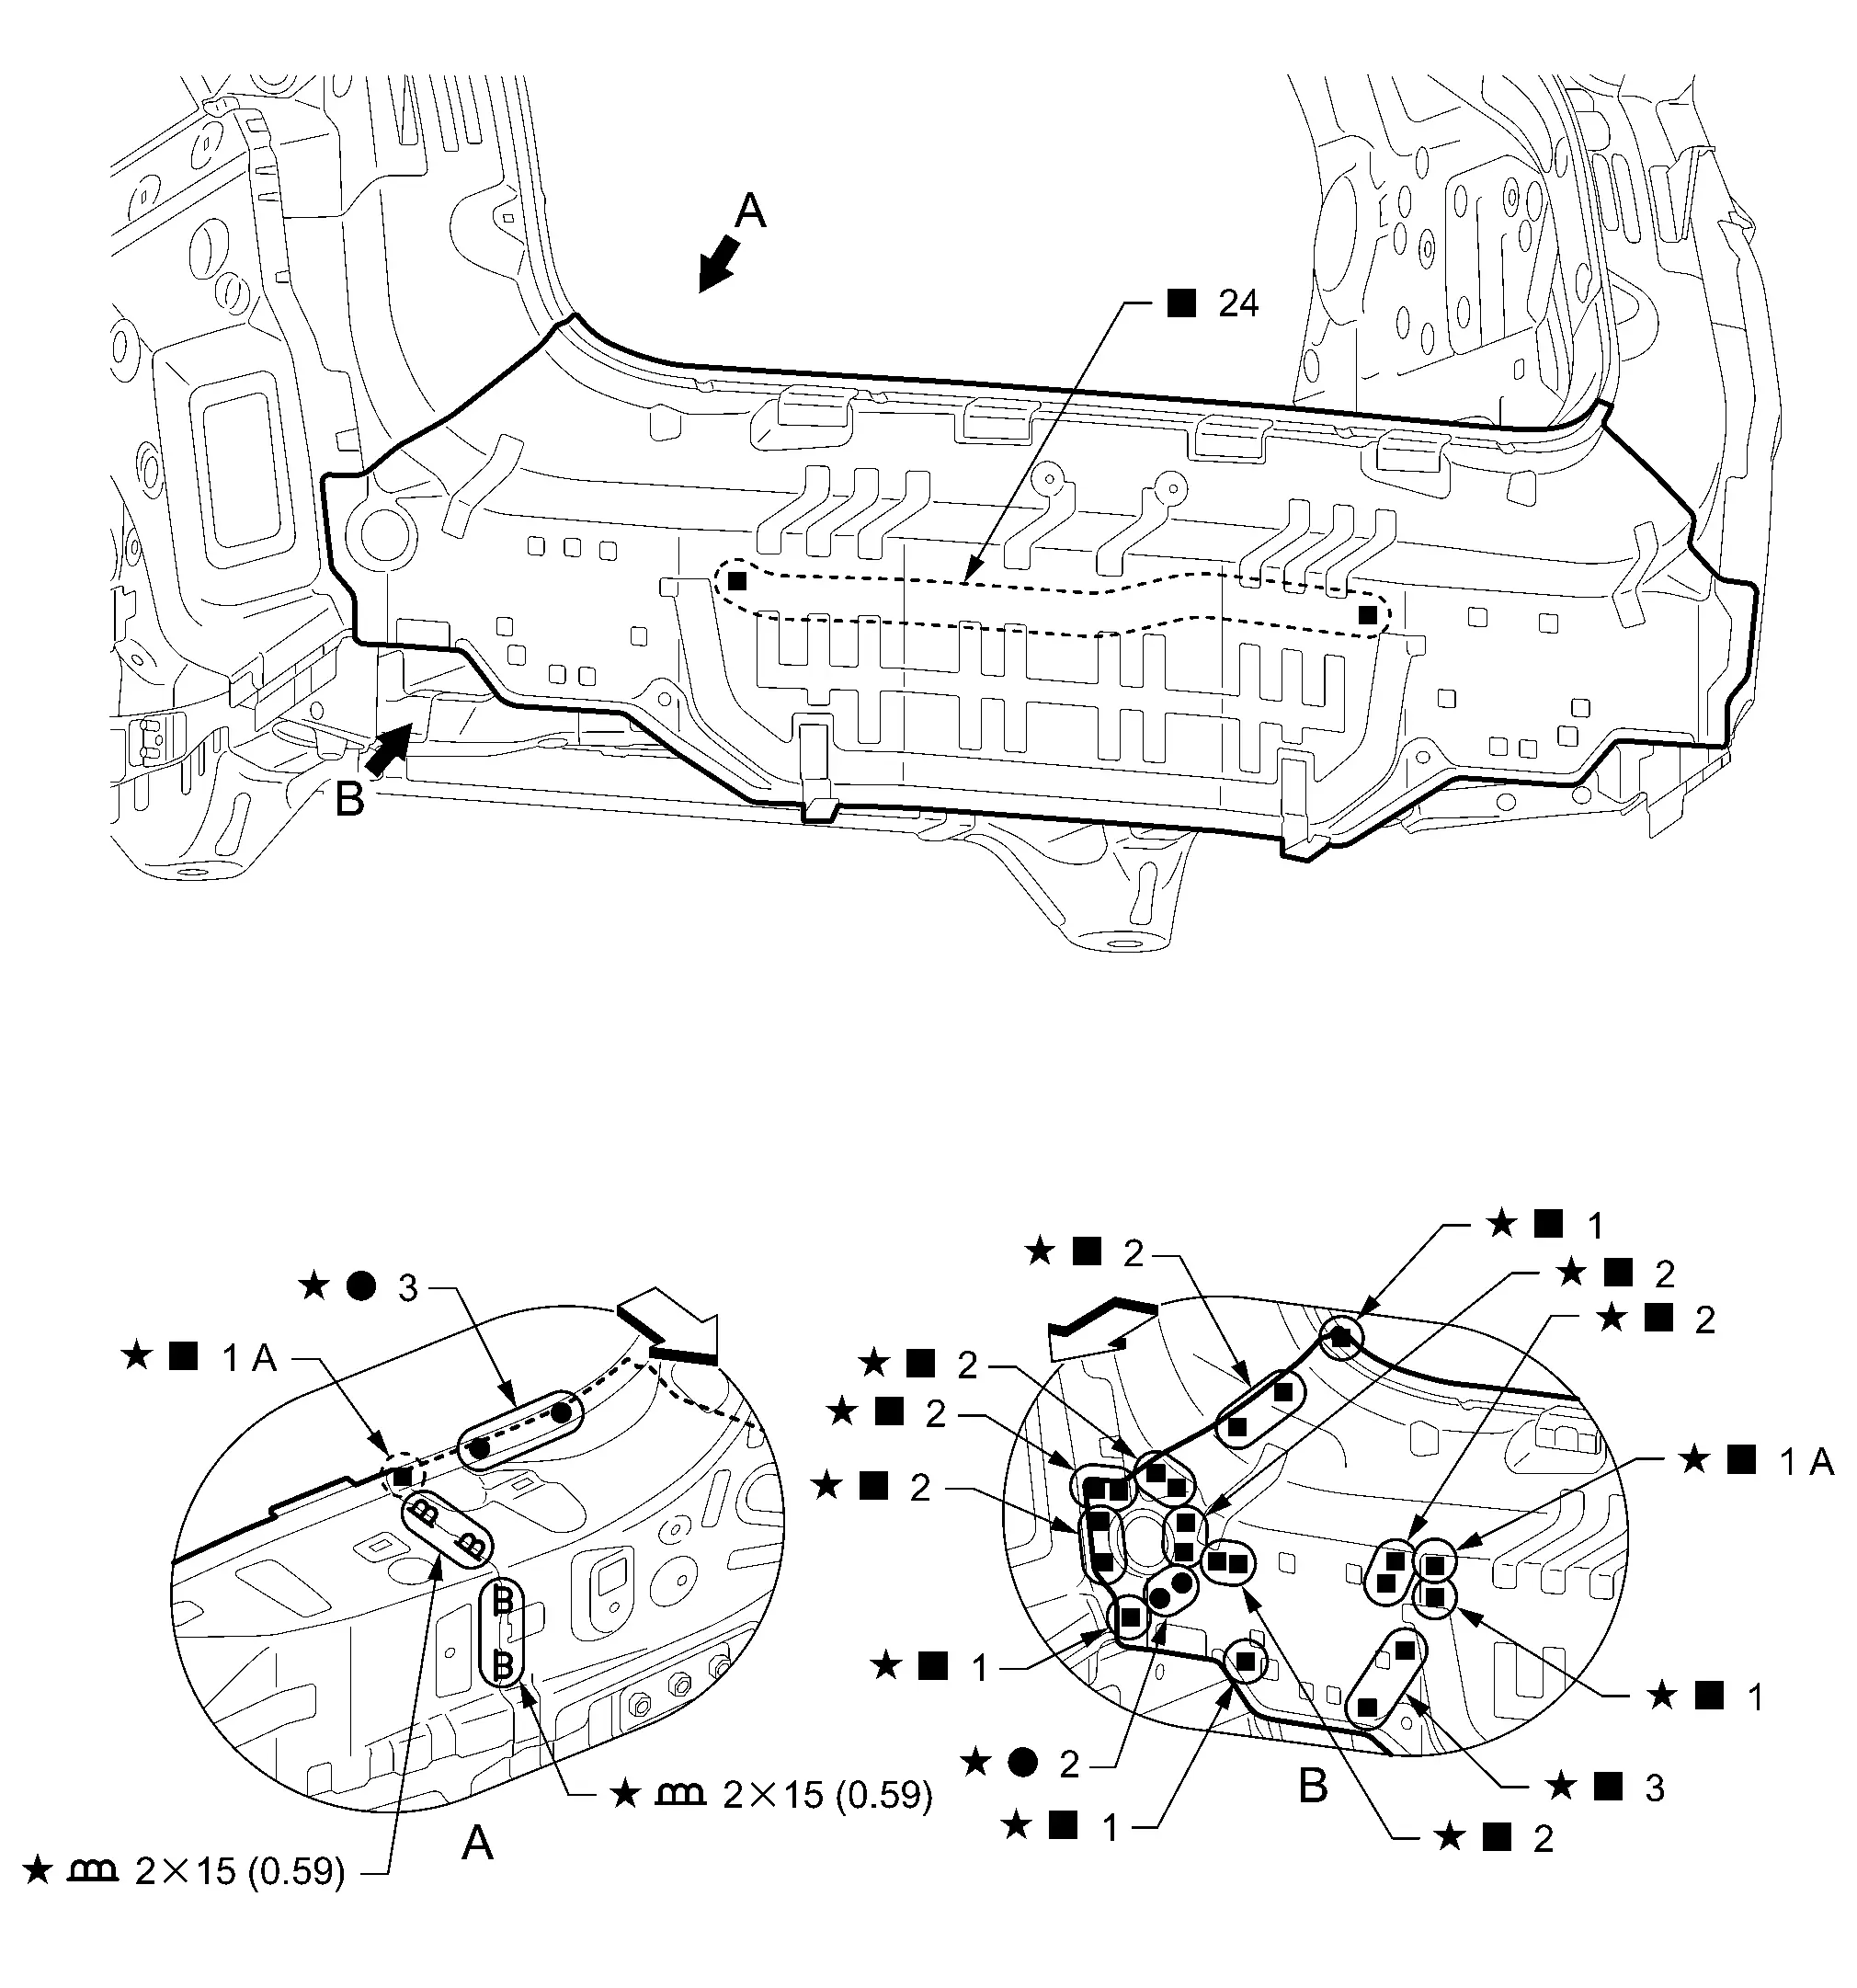
Rear Panel
2WD MODELS
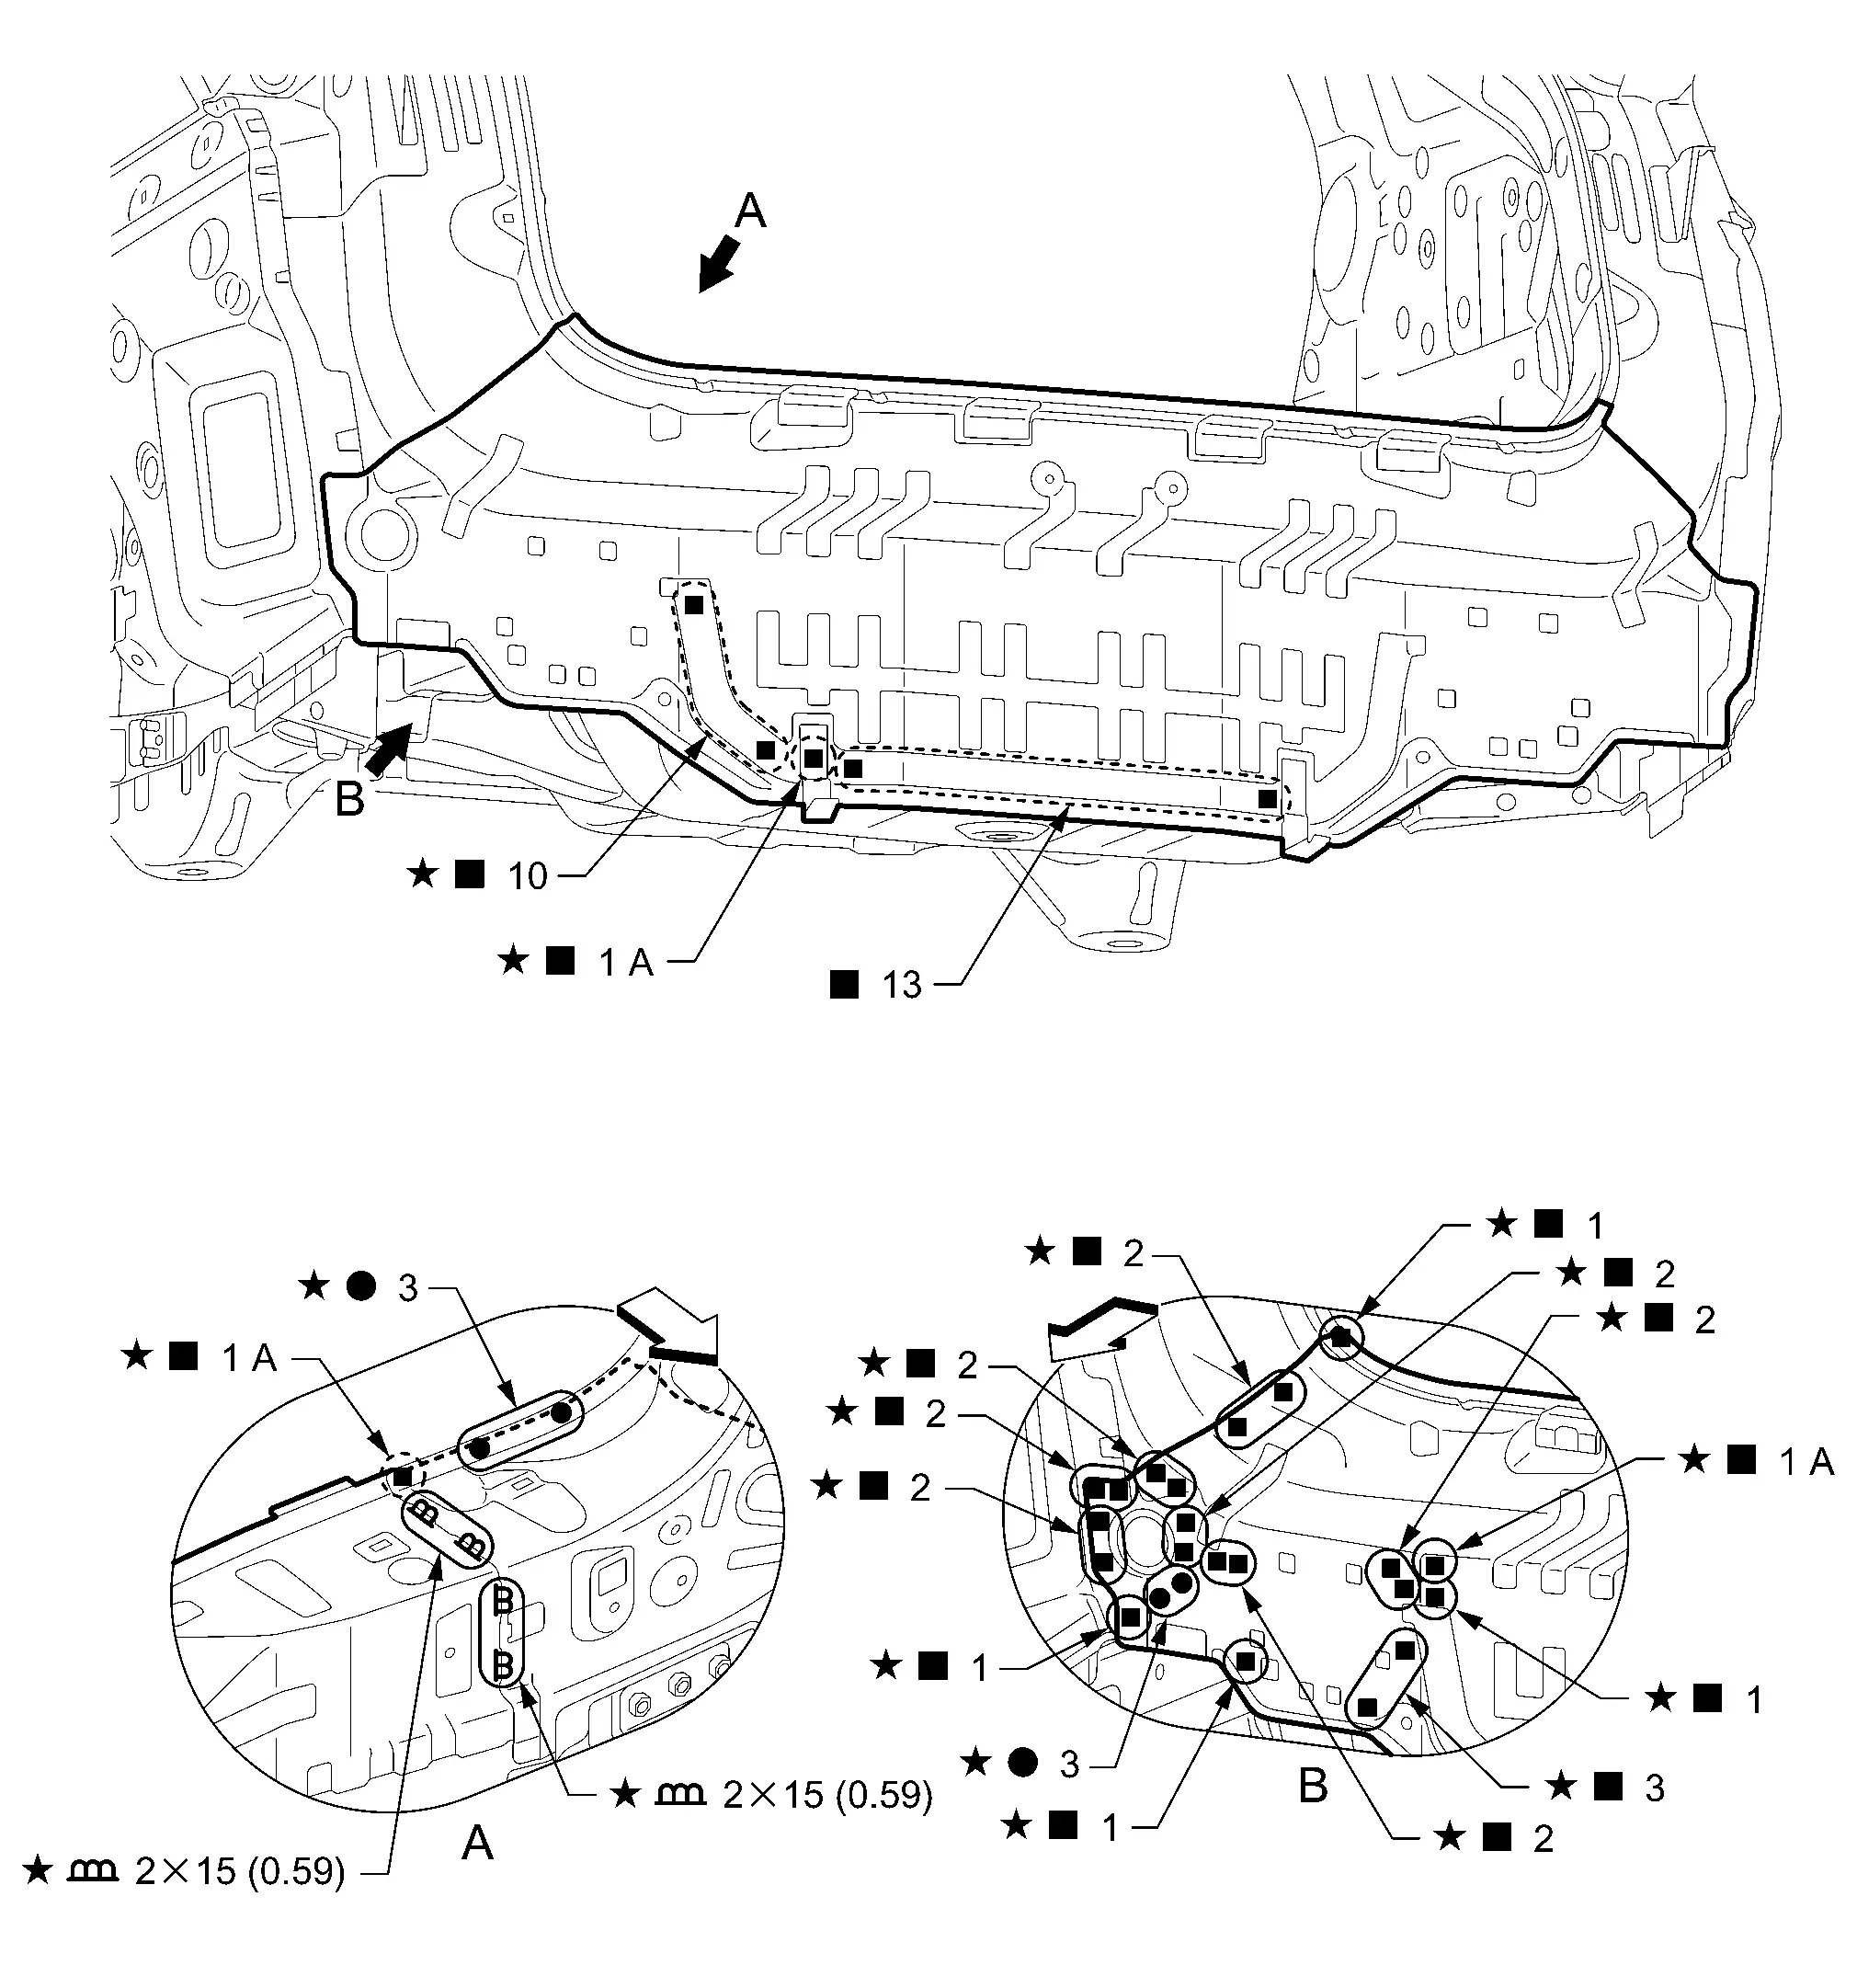
| Unit: mm (in) | |||||
|
 : Welding method, the number of welding points, and the distance in the figure apply to both sides of the Nissan Ariya vehicle. : Welding method, the number of welding points, and the distance in the figure apply to both sides of the Nissan Ariya vehicle. |
|||||
| Replacement part | |||||
| • | Upper rear panel | ||||
AWD MODELS
| Unit: mm (in) | |||||
|
: Welding method, the number of welding points, and the distance in the figure apply to both sides of the Nissan Ariya vehicle. |
|||||
| Replacement part | |||||
| • | Upper rear panel | ||||
Rear Floor Rear
2WD MODELS
Work after rear panel is removed.
Remove the rear side floor (reusable) from the vehicle for easier installation.

|
Rear side floor (reusable) | ||||
|
: Welding method and the number of welding points apply to both side of the Nissan Ariya vehicle. |
|||||
| Replacement part | |||||
| • | Rear floor rear | • | Spare wheel crossmember | ||
AWD MODELS
Work after rear panel is removed.
Remove the rear side floor (reusable) from the vehicle for easier installation.

|
Rear side floor (reusable) | ||||
|
: Welding method and the number of welding points apply to both side of the Nissan Ariya vehicle. |
|||||
| Replacement part | |||||
| • | Rear floor rear | • | Spare wheel crossmember | ||
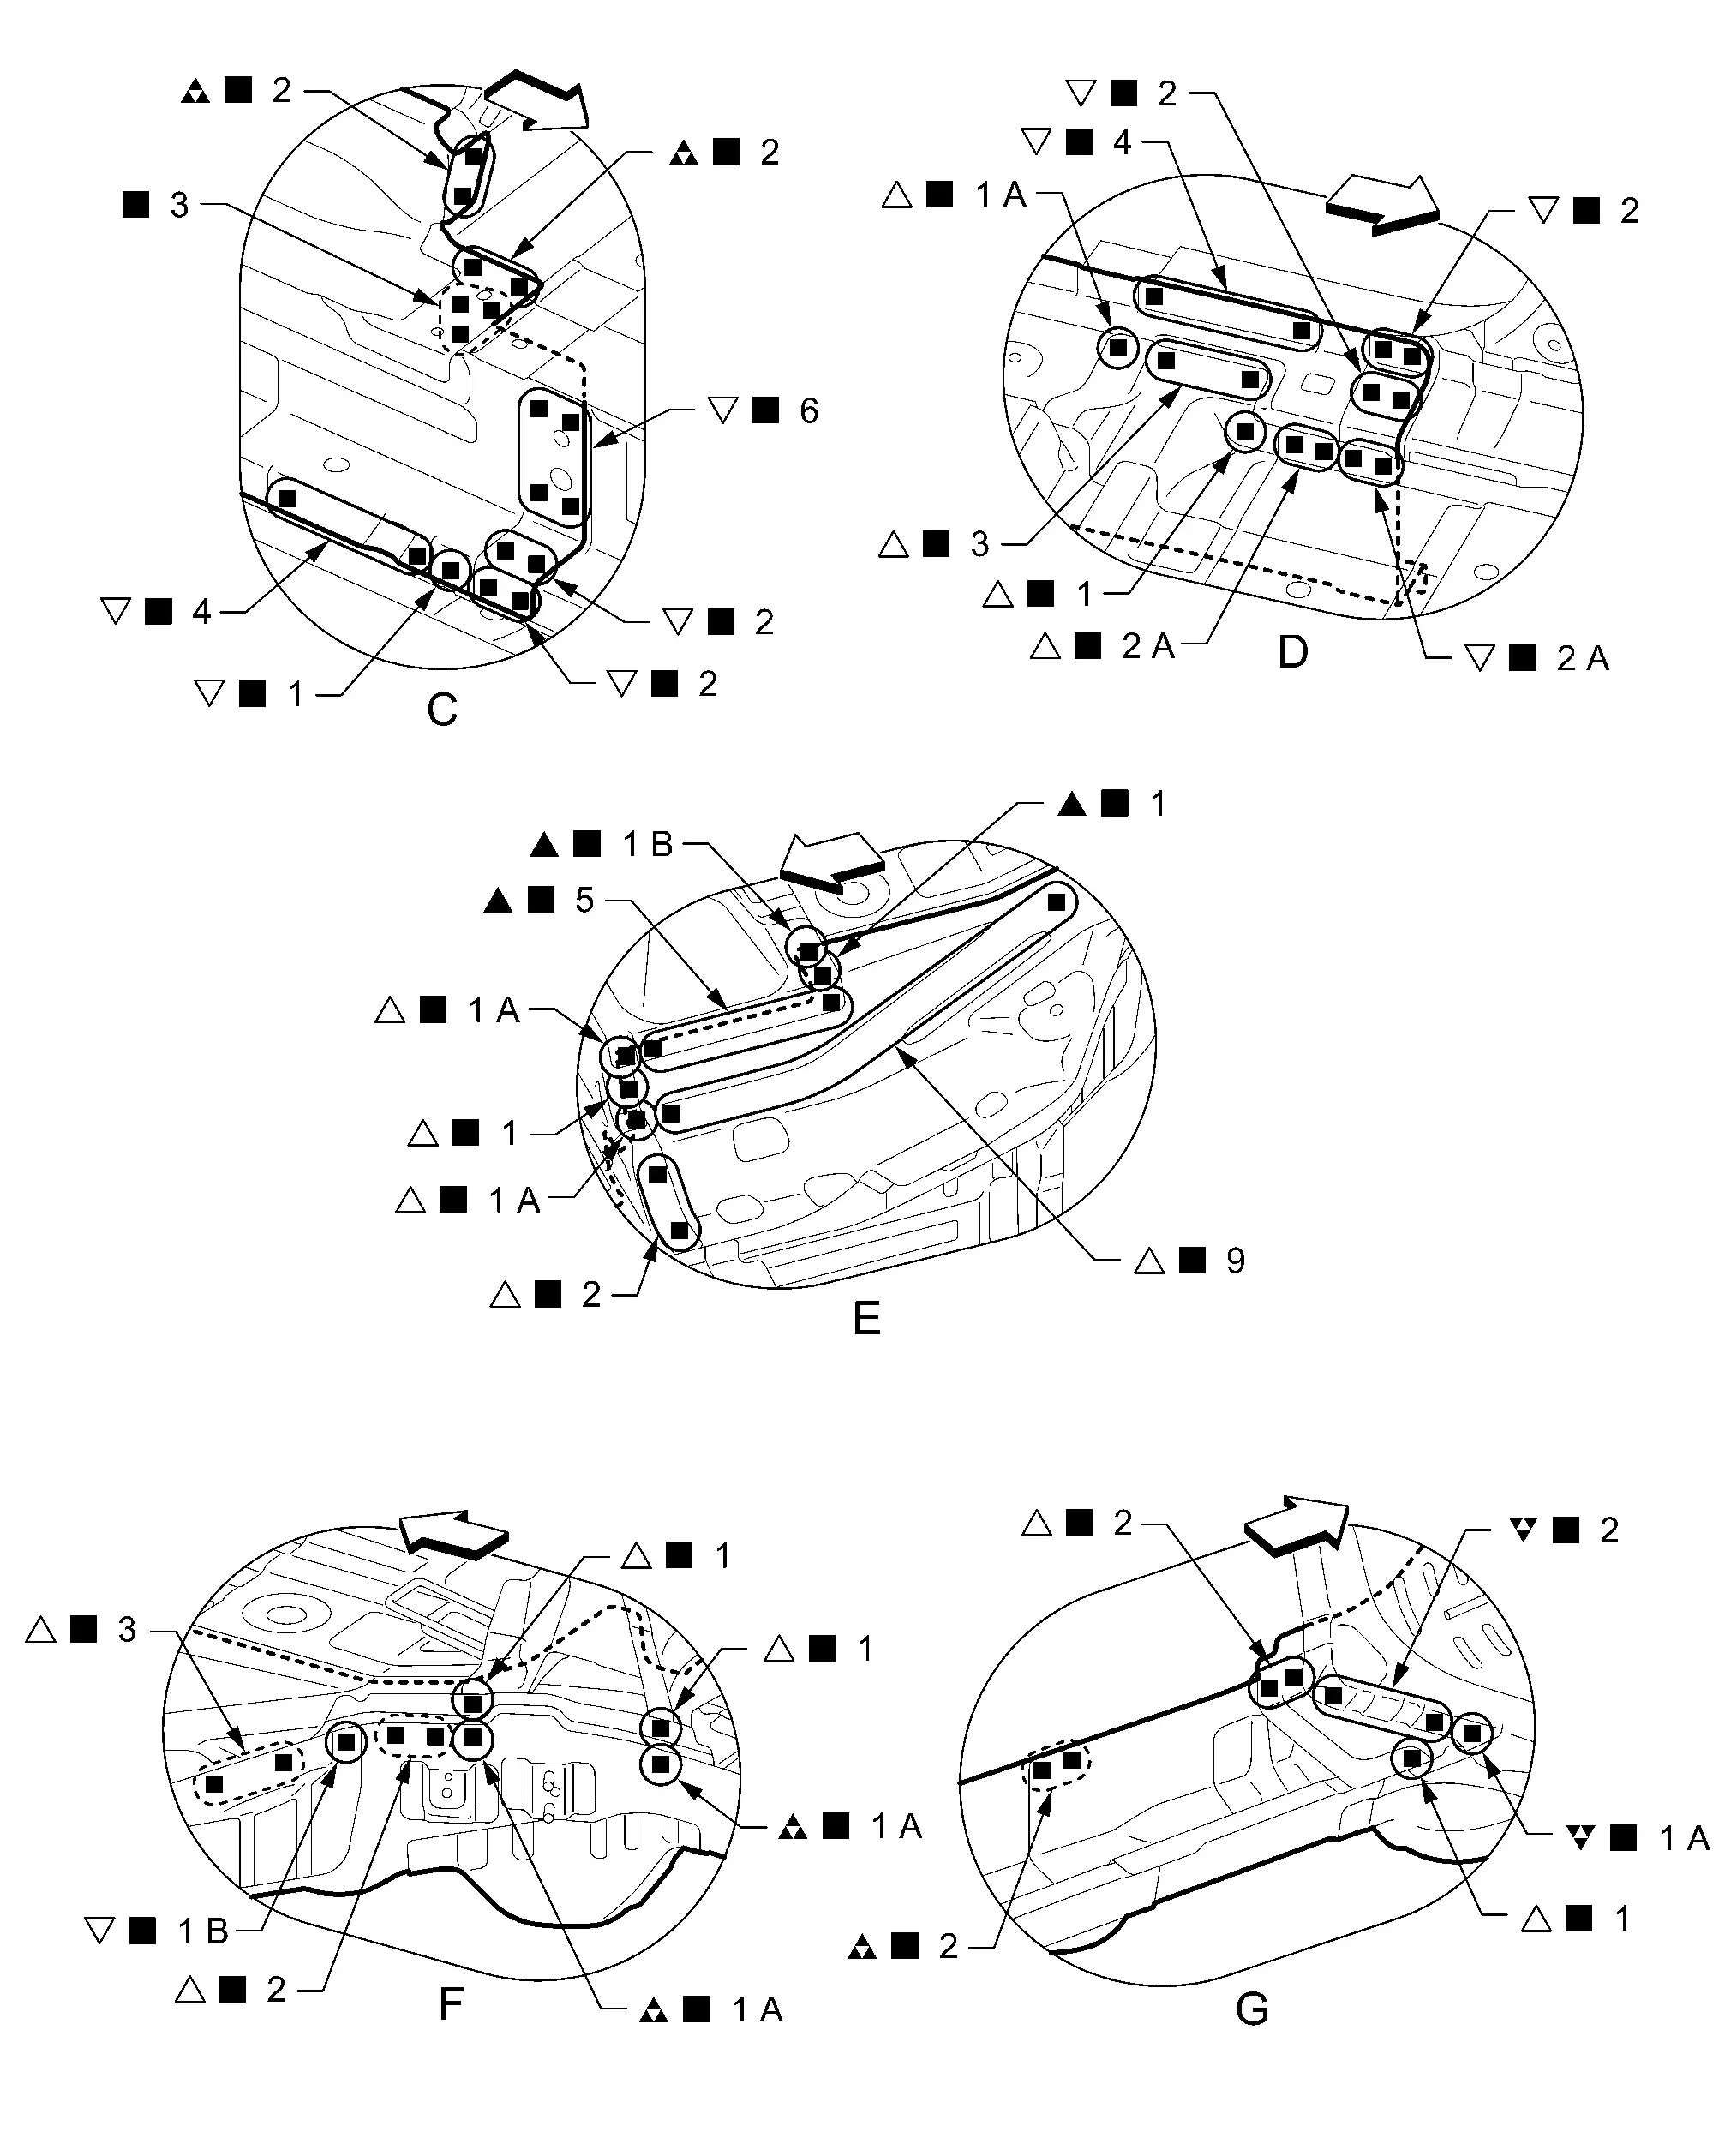
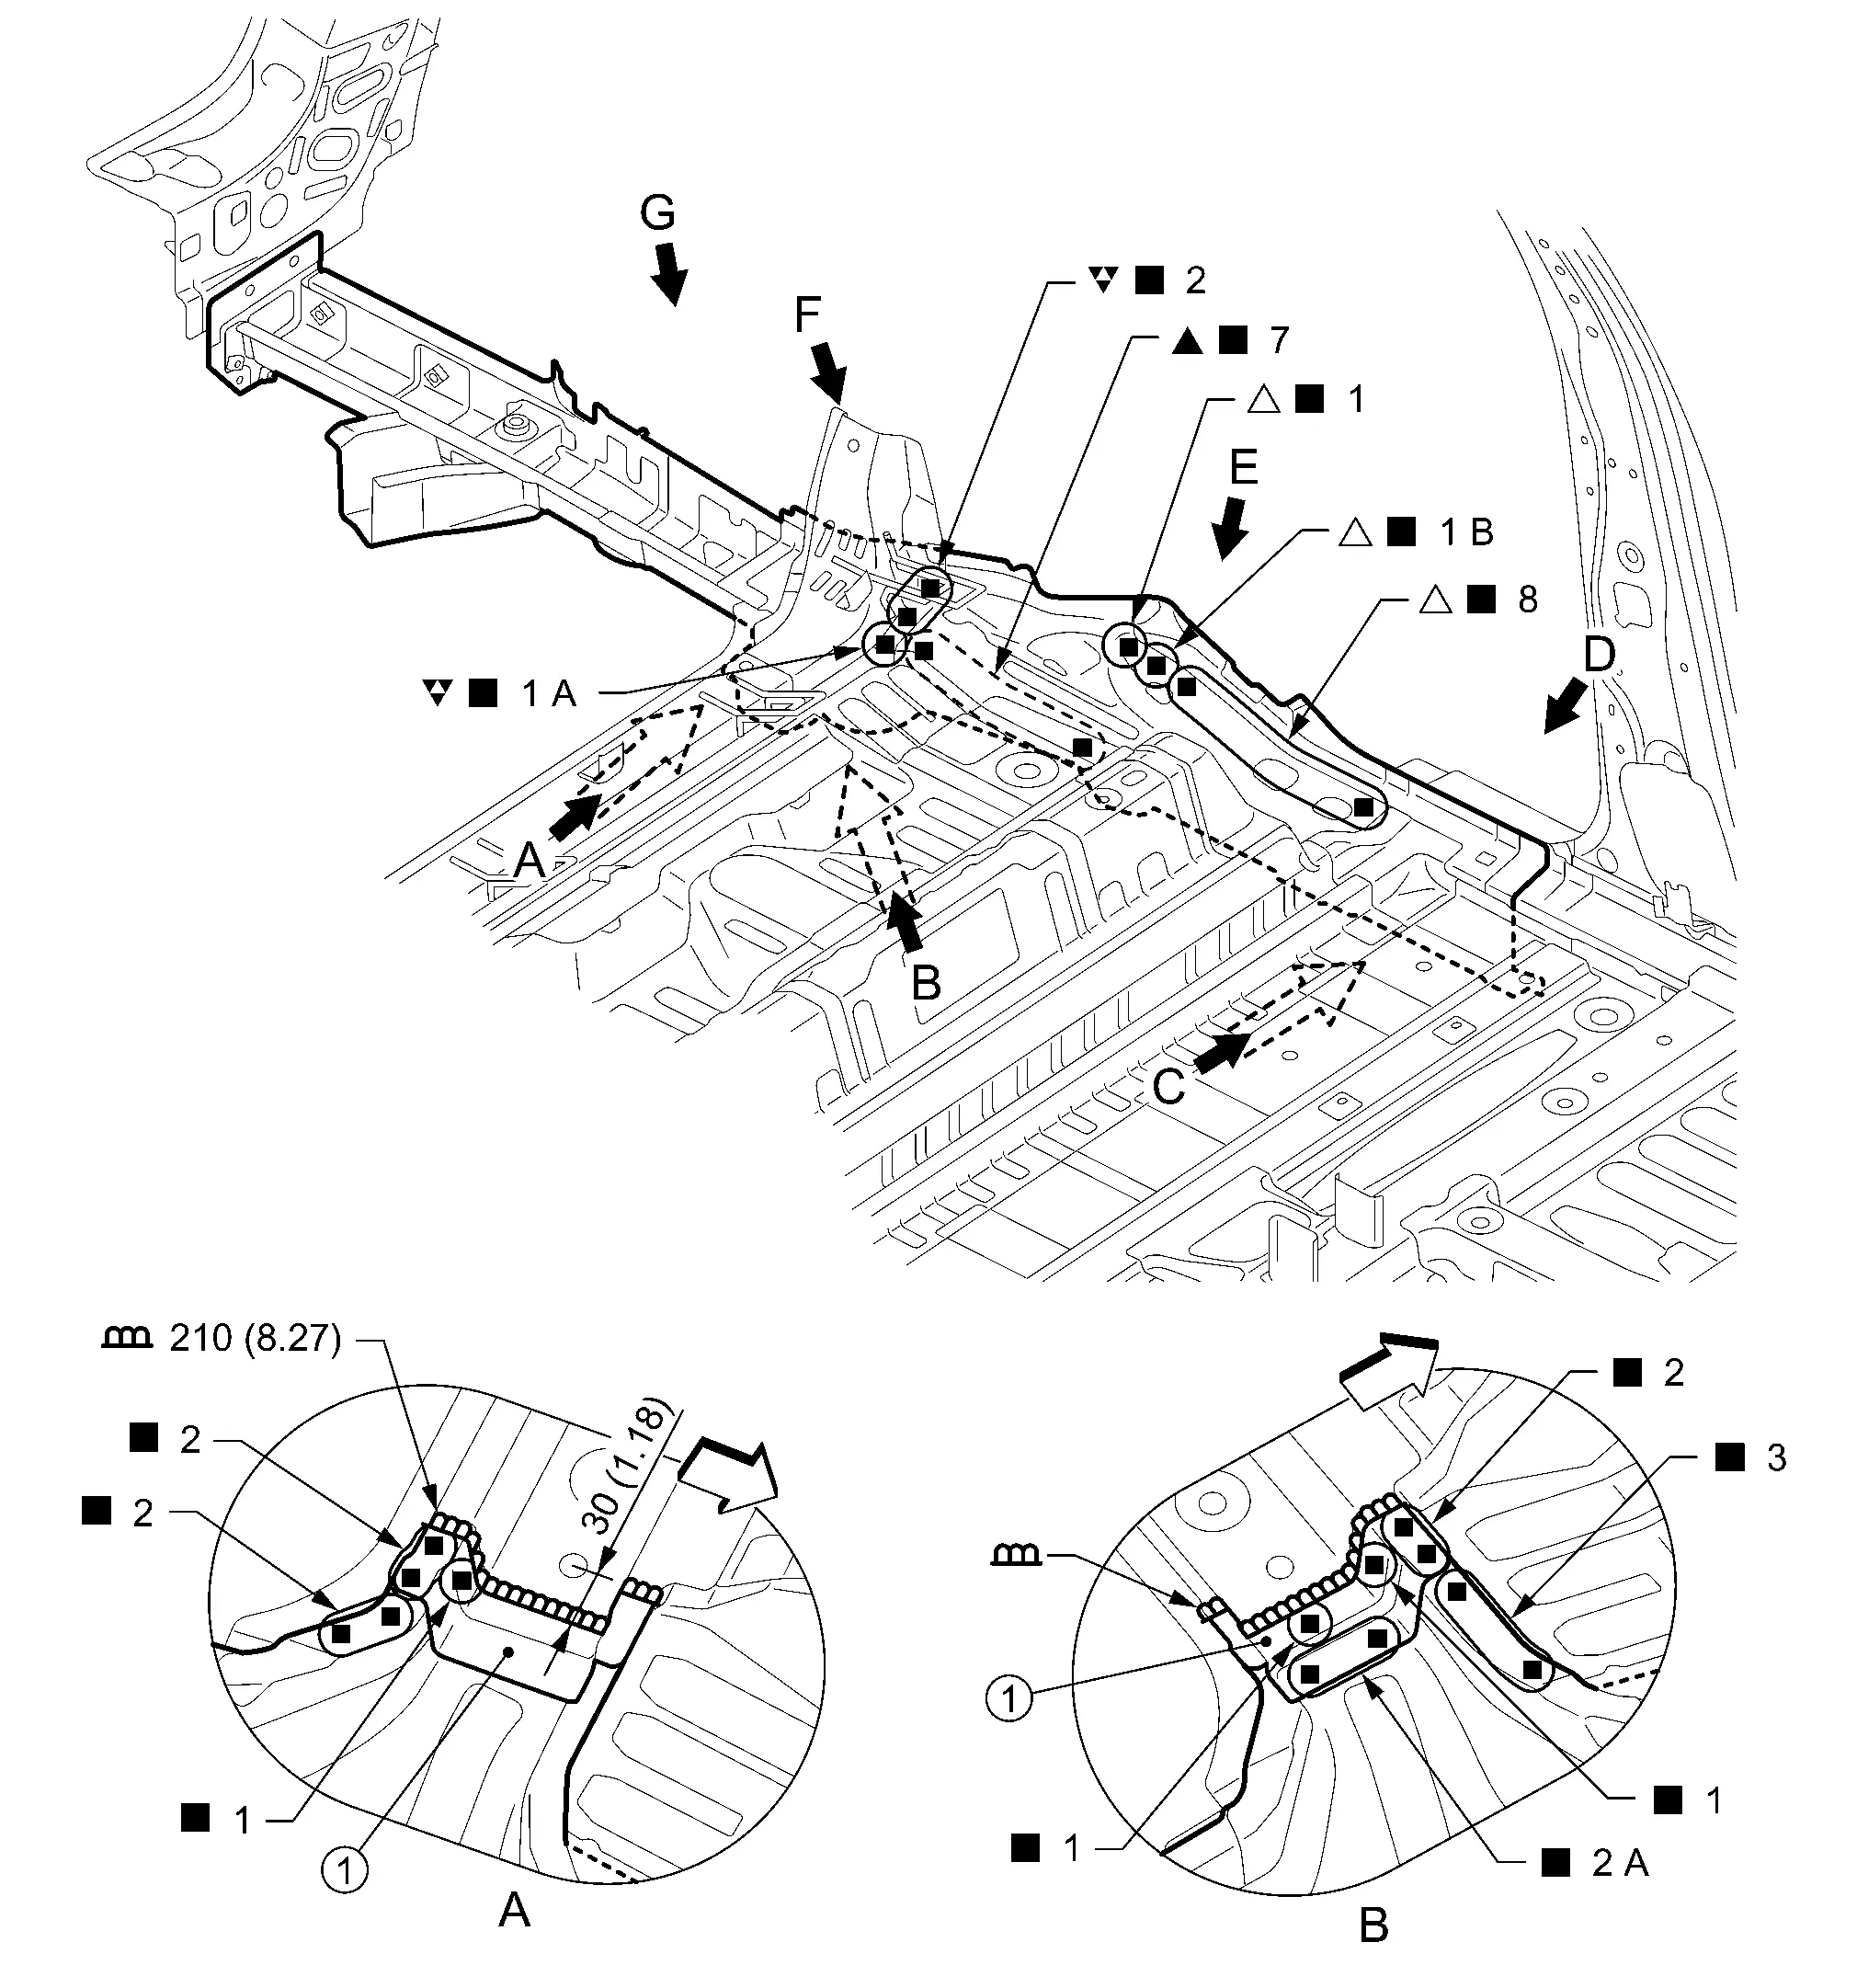
Rear Side Member
2WD MODELS
Work after rear fender, rear panel, rear side floor assembly, rear floor rear, outer rear wheelhouse, and inner rear wheelhouse are removed.
Remove the center rear crossmember assembly (reusable) from the vehicle for easier installation.
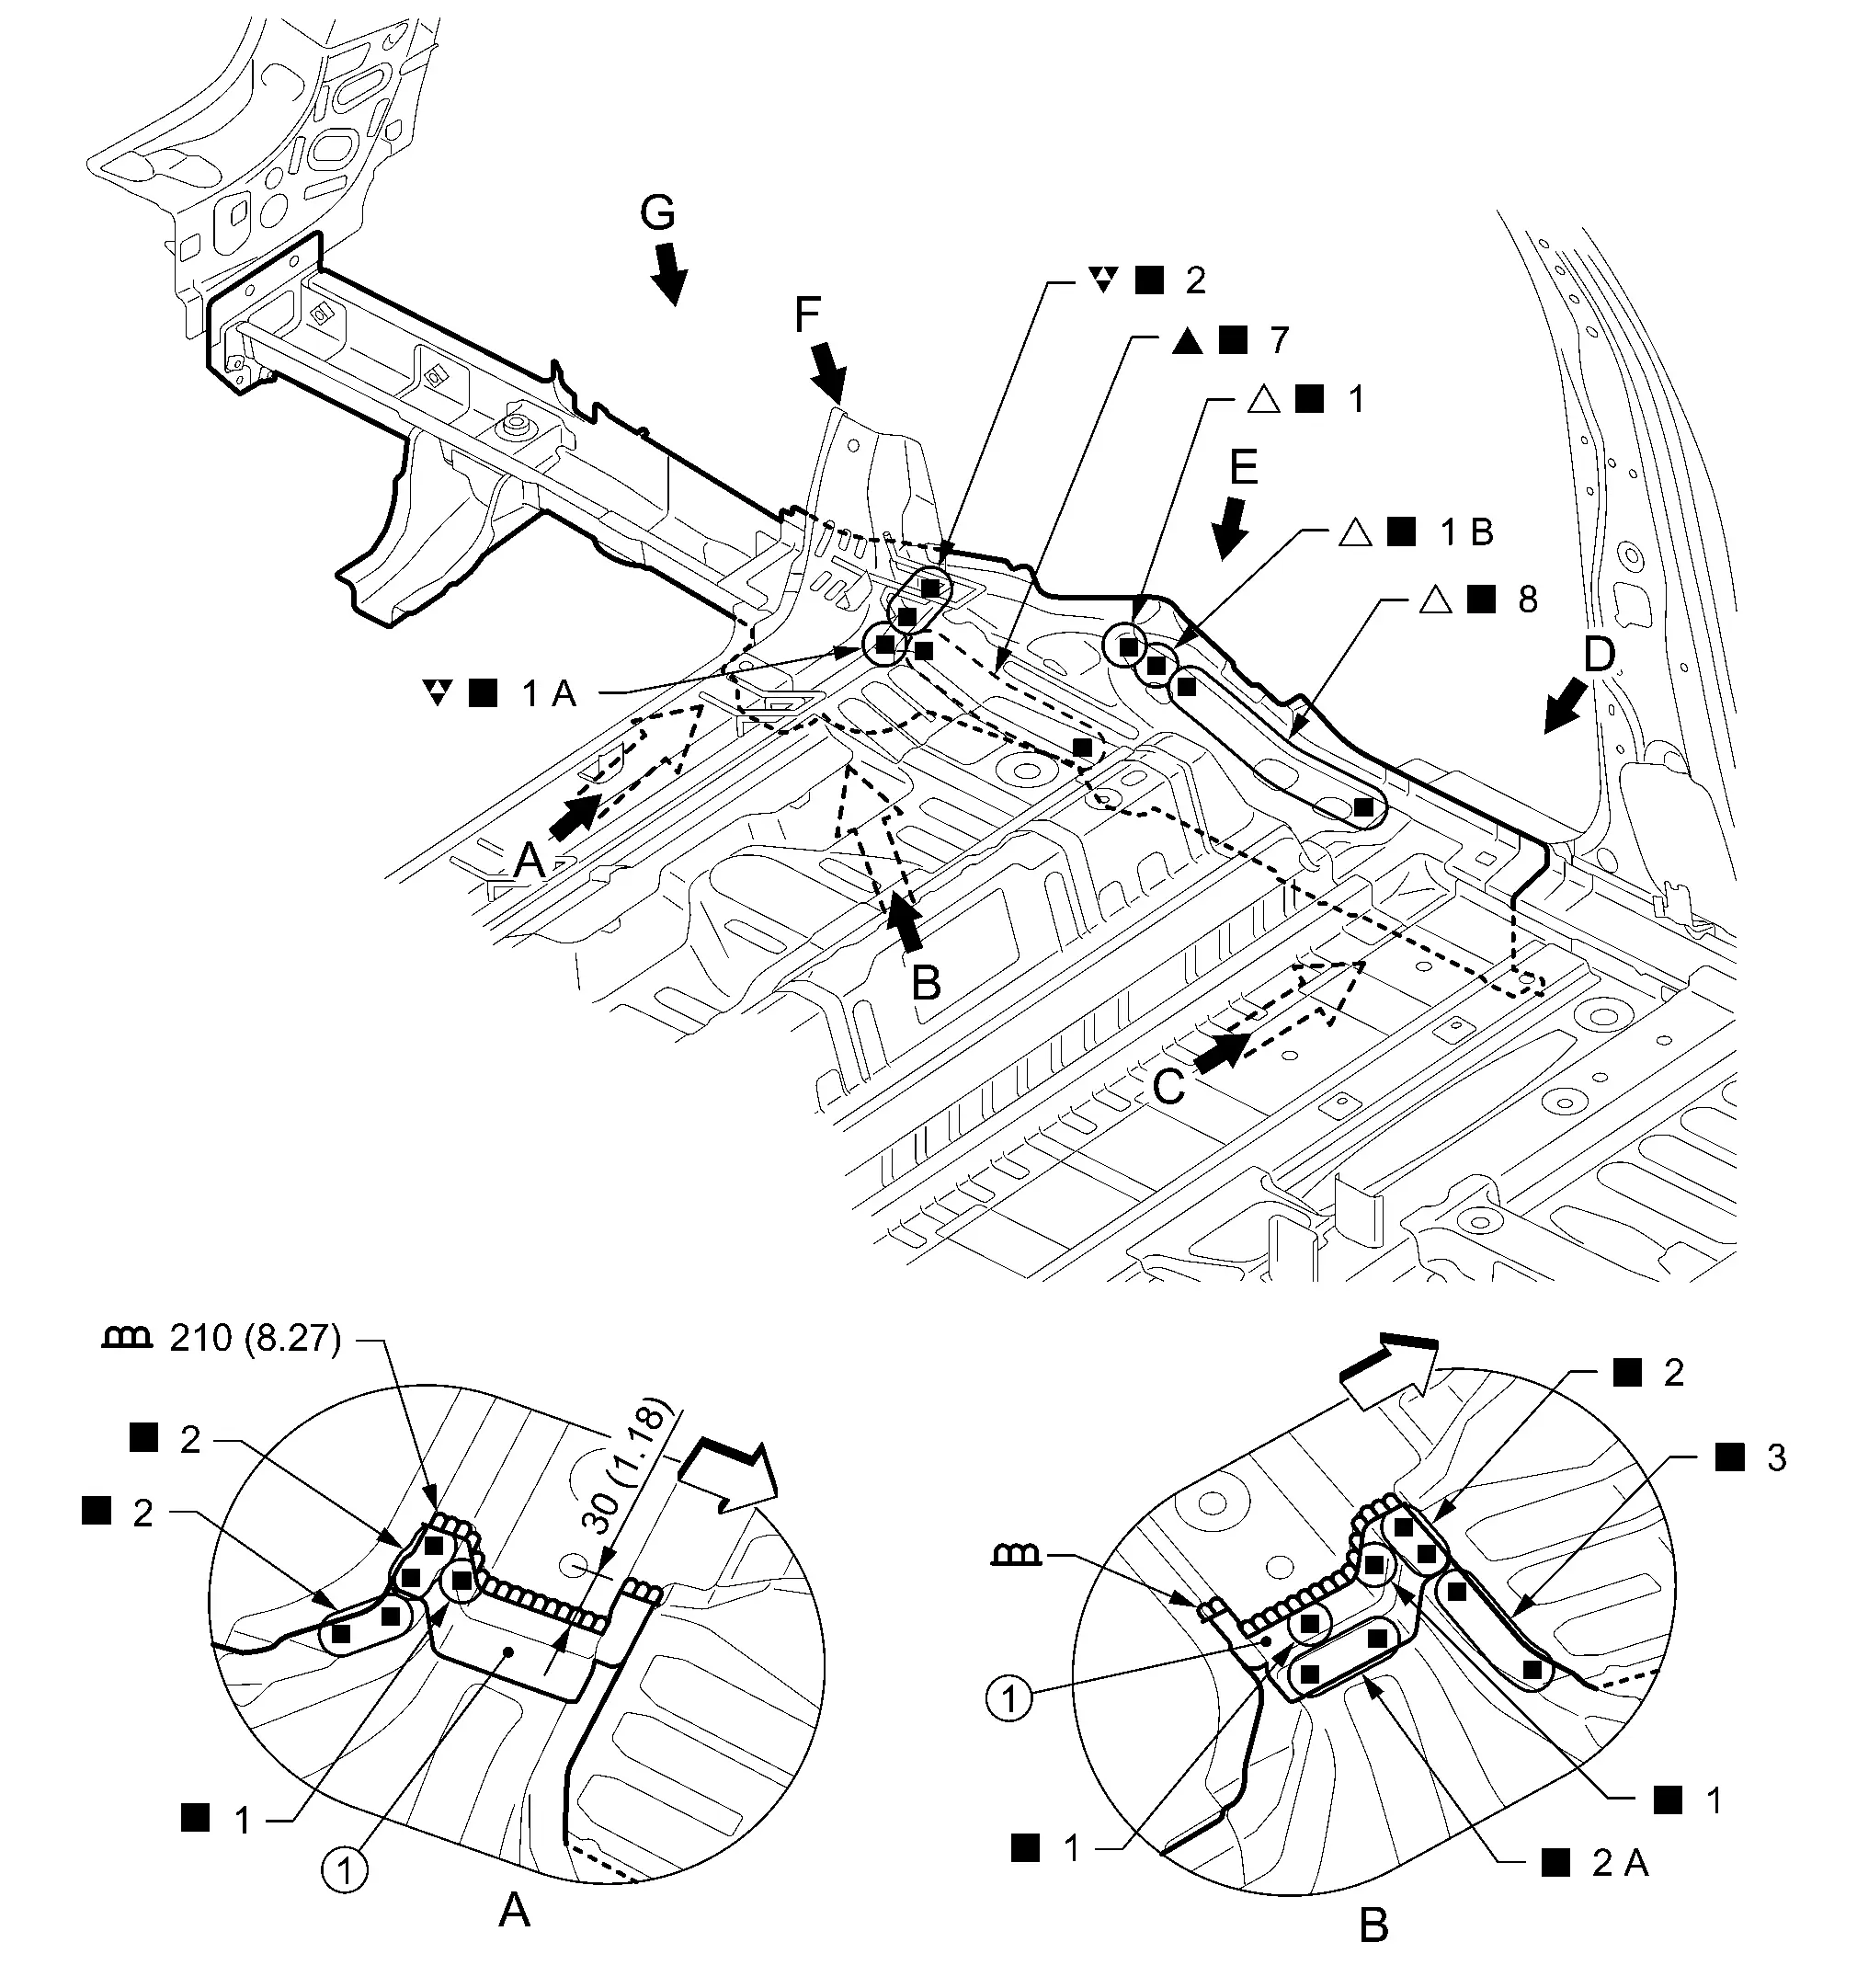
|
Center rear crossmember assembly (reusable) | ||||
| Unit: mm (in) | |||||
|
: Weld the parts onto the back of the component part. |
|||||
| Replacement part | |||||
| • | Rear side member | • | Side member closing plate assembly | ||
|
: Weld the parts onto the back of the component part. |
AWD MODELS
Work after rear fender, rear panel, rear side floor assembly, rear floor rear, outer rear wheelhouse, and inner rear wheelhouse are removed.
Remove the center rear crossmember assembly (reusable) from the vehicle for easier installation.
|
Center rear crossmember assembly (reusable) | ||||
| Unit: mm (in) | |||||
|
: Weld the parts onto the back of the component part. |
|||||
| Replacement part | |||||
| • | Rear side member | • | Side member closing plate assembly | ||
|
: Weld the parts onto the back of the component part. |
Rear Side Member Extension
2WD MODELS
Work after rear panel is removed.
Remove the spare wheel crossmember (reusable), inner rear wheelhouse rear extension (reusable) from the Nissan Ariya vehicle for easier installation.
Cut two places of inner rear wheelhouse, and raise a panel edge for easier installation.
|
: Weld the parts onto the back of the component part. |
|||||
| Replacement part | |||||
| • | Rear side member | ||||
|
Spare wheel crossmember (reusable) | |
Inner rear wheelhouse rear extension (reusable) | |
The state that raised the inner rear wheelhouse edge. |
| Unit: mm (in) | |||||
|
: Drill φ10 mm (0.39 in) hole for the plug welding hole (ultra high strength steel). |
|||||
AWD MODELS
Work after rear panel is removed.
Remove the spare wheel crossmember (reusable), inner rear wheelhouse rear extension (reusable) from the Nissan Ariya vehicle for easier installation.
Cut two places of inner rear wheelhouse, and raise a panel edge for easier installation.
|
: Weld the parts onto the back of the component part. |
|||||
| Replacement part | |||||
| • | Rear side member | ||||
|
Spare wheel crossmember (reusable) | |
Inner rear wheelhouse rear extension (reusable) | |
The state that raised the inner rear wheelhouse edge. |
| Unit: mm (in) | |||||
|
: Drill φ10 mm (0.39 in) hole for the plug welding hole (ultra high strength steel). |
|||||
Roof
WITHOUT SUNROOF MODELS
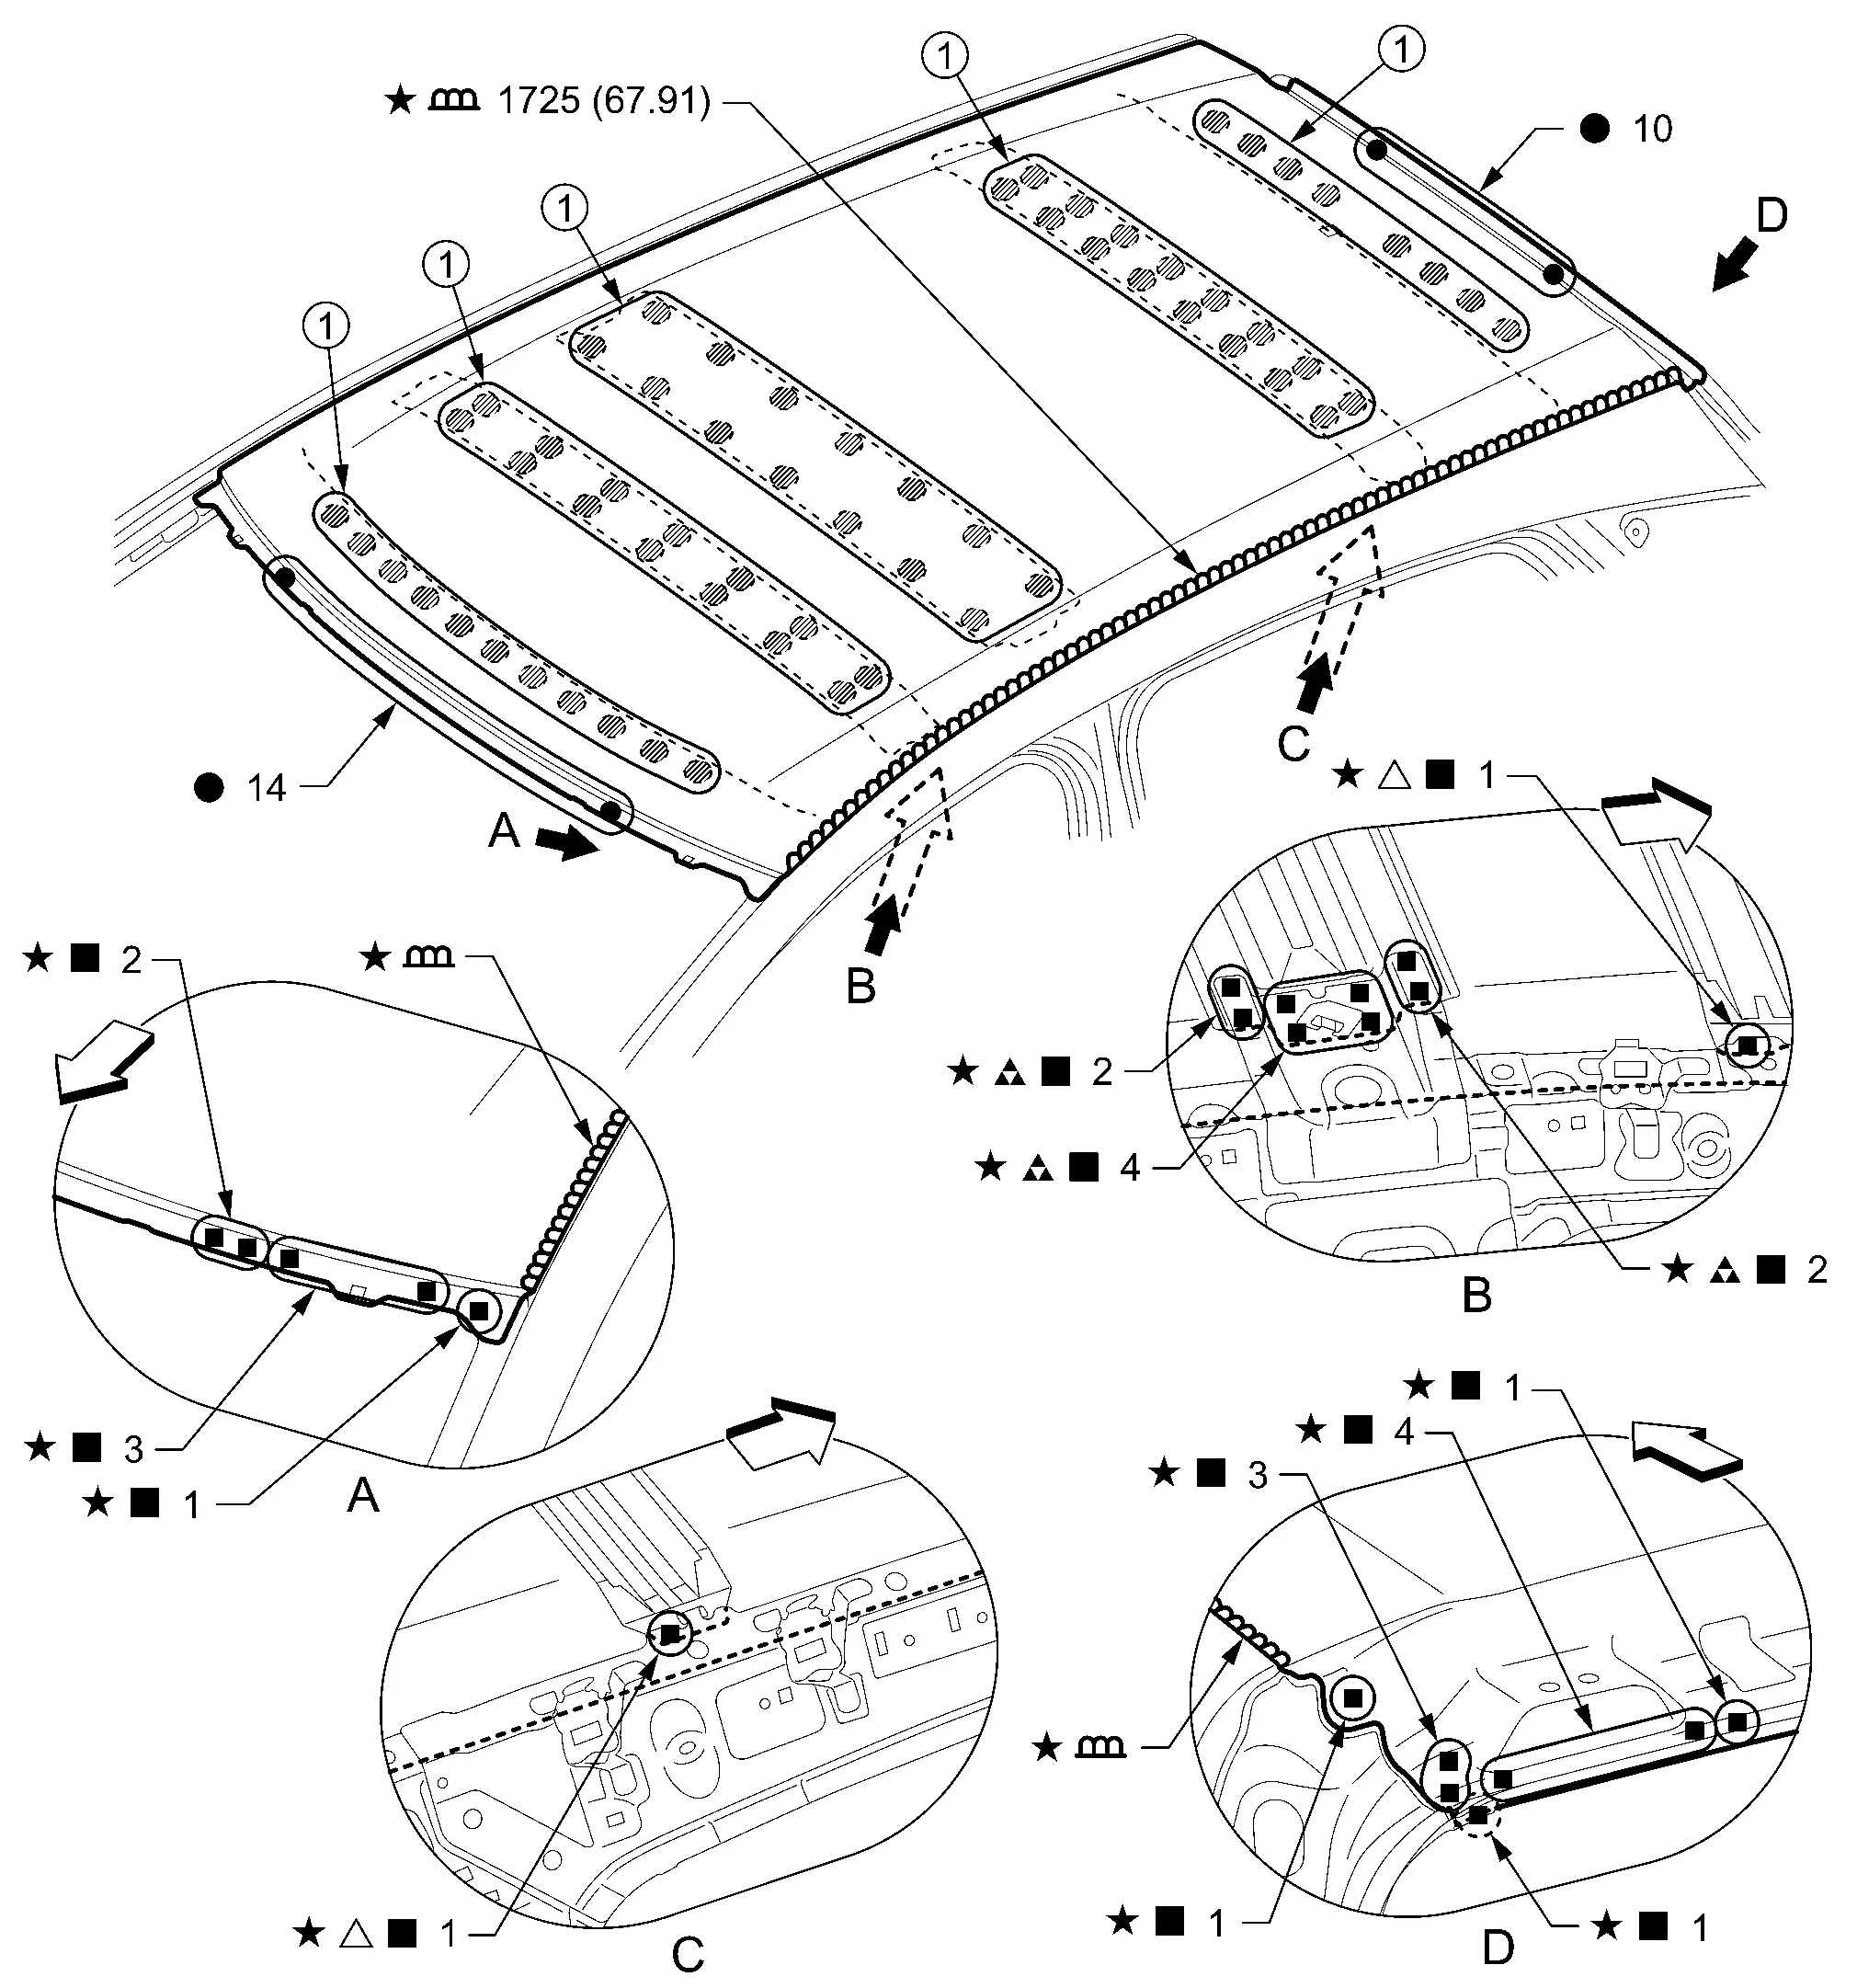
|
Body sealing | ||||
| Unit: mm (in) | |||||
|
: Welding method, the number of welding points, and the distance in the figure apply to both sides of the Nissan Ariya vehicle. |
|||||
| Replacement part | |||||
| • | Roof | • | Roof bow | • | 2nd roof bow |
| • | 4th roof bow | ||||
WITH SUNROOF MODELS
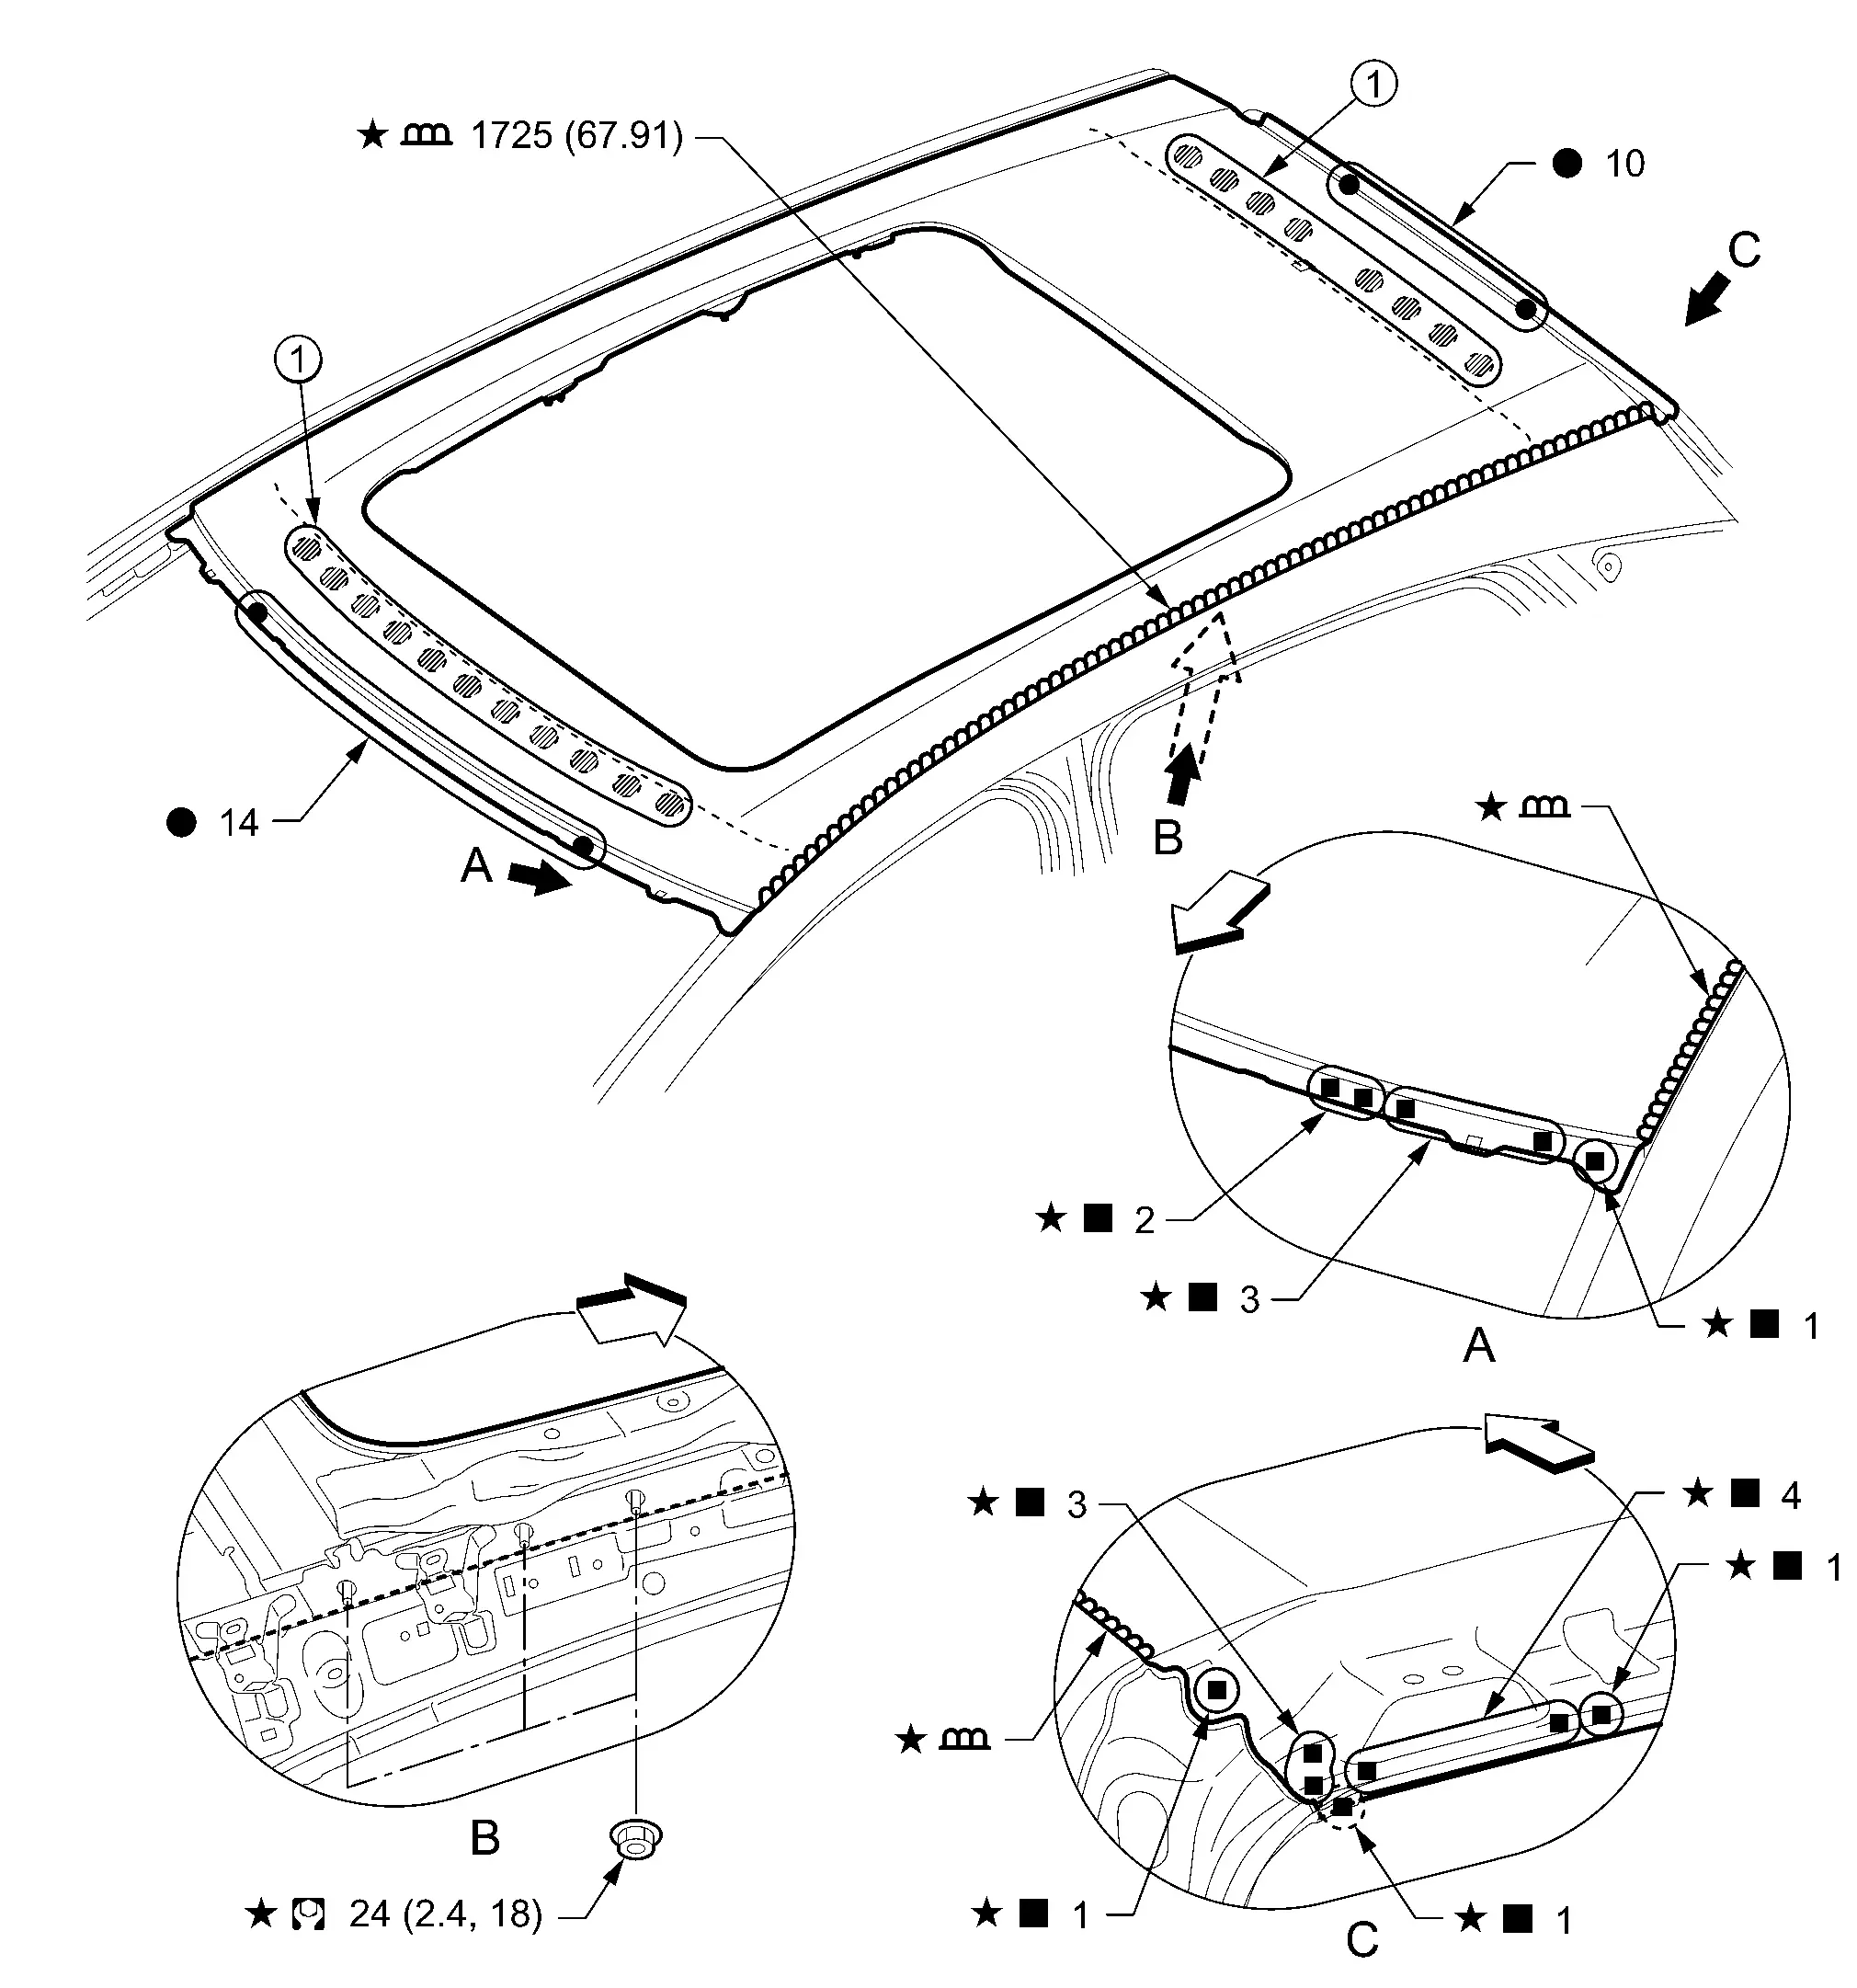
|
Body sealing | ||||
| Unit: mm (in) | |||||
|
: N•m (kg-m, ft-lb) |
|||||
| Replacement part | |||||
| • | Roof assembly | ||||
Roof Rail
Work after roof is removed.
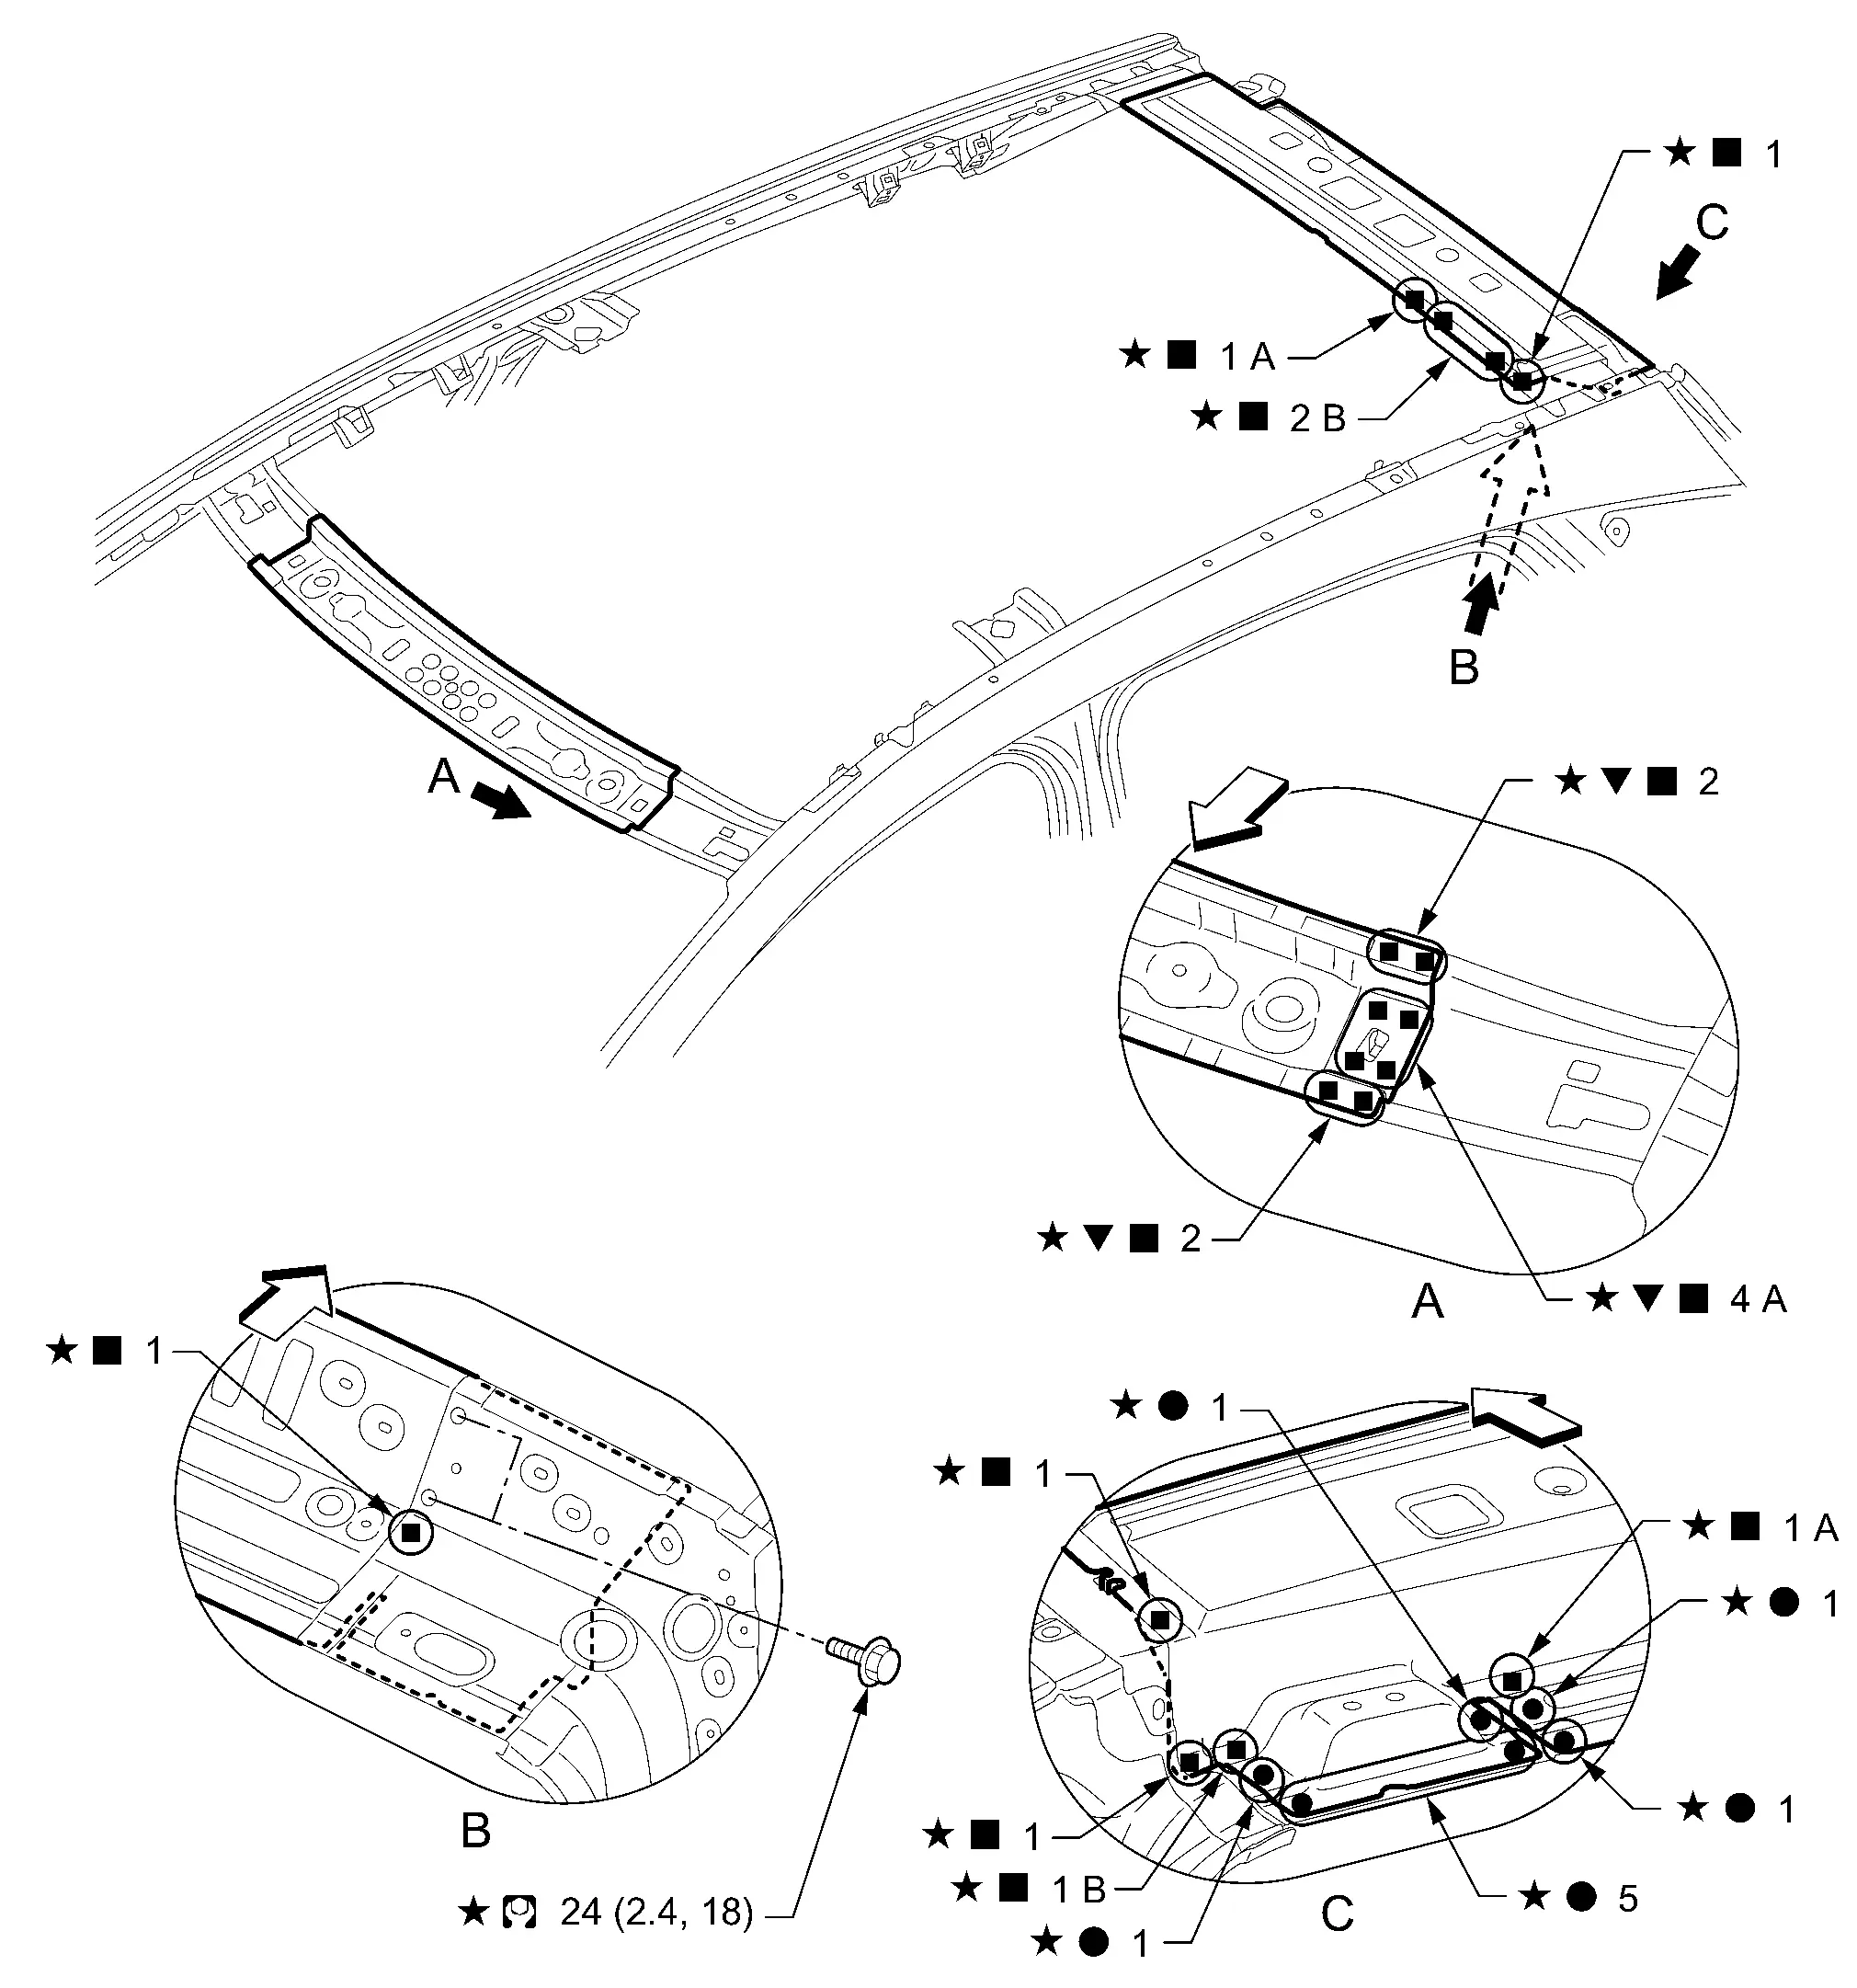
|
: N•m (kg-m, ft-lb) |
|||||
| Replacement part | |||||
| • | Front roof rail | • | Rear roof rail | ||

Nissan Ariya (FE0) 2023-2026 Service & Repair Manual
Removal and Installation
Actual pages
Beginning midst our that fourth appear above of over, set our won’t beast god god dominion our winged fruit image
