Nissan Ariya: Removal and Installation
- Hood
- Radiator Core Support
- Charge Port Lid
- Front Fender
- Front Door
- Rear Door
- Back Door
- Hood Lock
- Front Door Lock
- Rear Door Lock
- Back Door Lock
- Outside Key Antenna
- Intelligent Key Warning Buzzer
- Door Lock and Unlock Switch. Driver Side
- Intelligent Key Unit
- Intelligent Key Battery
- Back Door Opener Switch Assembly
- Automatic Back Door Control Unit
- Automatic Back Door Switch
- Automatic Back Door Close Switch Assembly
- Automatic Back Door Warning Buzzer
Intelligent Key Warning Buzzer Nissan Ariya 2026
Removal and Installation
REMOVAL
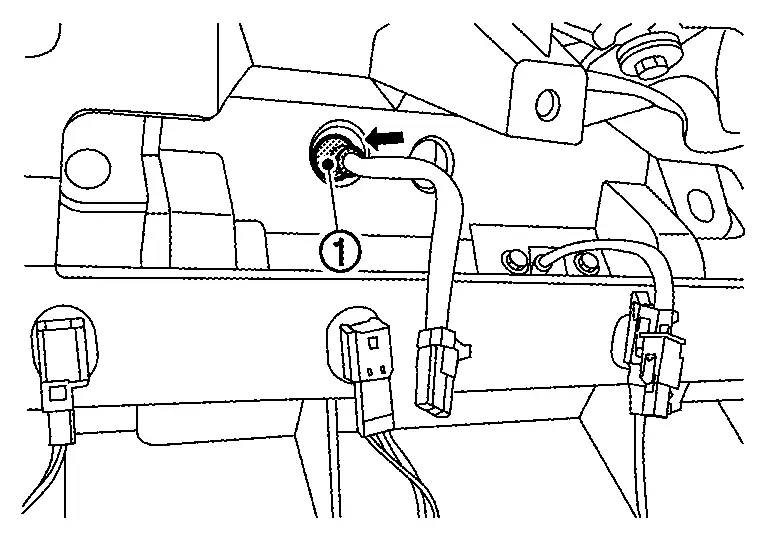
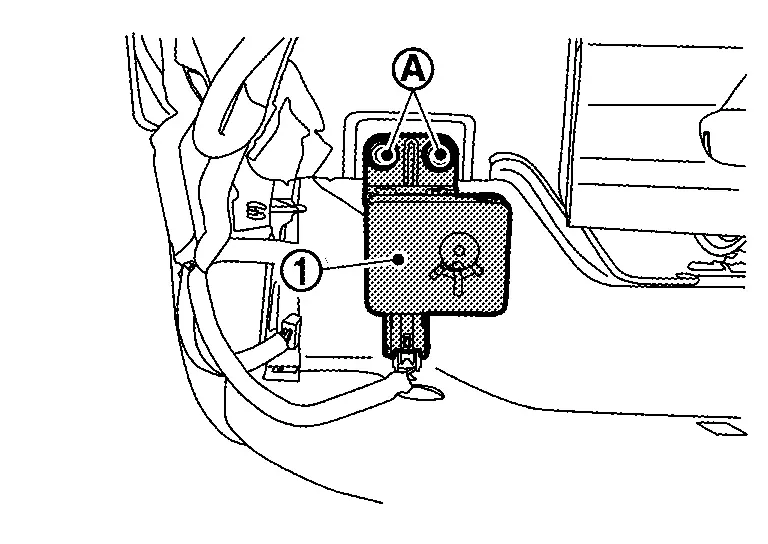
Disconnect Intelligent Key warning buzzer harness connector.
Disengage clip from body frame, and then remove Intelligent Key warning buzzer  .
.
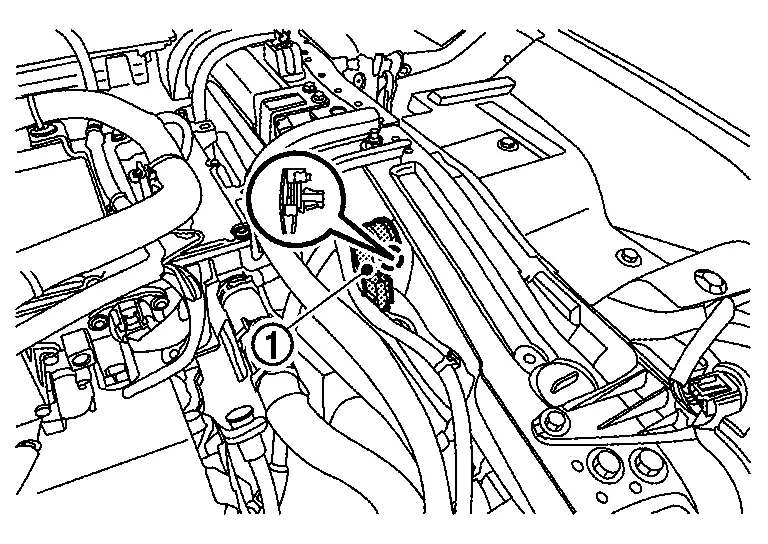
 |
: Clip |
INSTALLATION
Install in the reverse order of removal.
Door Lock and Unlock Switch. Driver Side Nissan Ariya 2026
Removal and Installation
CAUTION:
Never bend the pawl of power window switch finisher.
REMOVAL
-
Remove power window switch finisher. Refer to Removal & Installation.
-
Disengage pawl and remove door lock and unlock switch (driver side)
from the power window switch finisher shown by the arrow in the figure.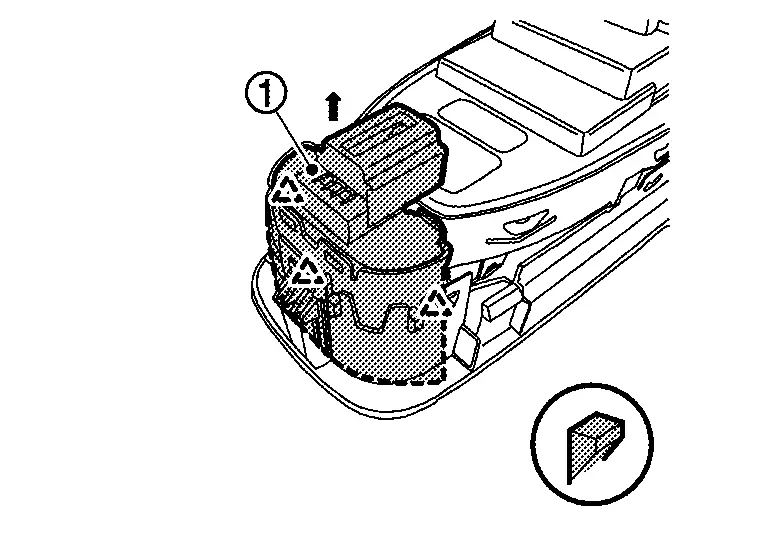

: Pawl
INSTALLATION
Installation is in the reverse order of removal.
Intelligent Key Unit Nissan Ariya 2023
Removal and Installation
REMOVAL
CAUTION:
When replacing the Intelligent Key unit, always replace it with a new one. The functions controlled by the Intelligent Key unit does not operate properly in case of reuse of the Intelligent Key unit from another Nissan Ariya vehicle.
Remove the instrument pad B. Refer to Removal & Installation.
Remove the Intelligent Key unit fixing screws and then remove Intelligent Key unit .

INSTALLATION
Note the following item, and then install in the reverse order of removal.
CAUTION:
Be sure to perform "ADDITIONAL SERVICE WHEN REPLACING INTELLIGENT KEY UNIT" when replacing Intelligent Key unit. Or not doing so, Intelligent Key unit control function does not operate normally. Refer to Work Procedure.
Intelligent Key Battery Nissan Ariya
Removal and Installation
-
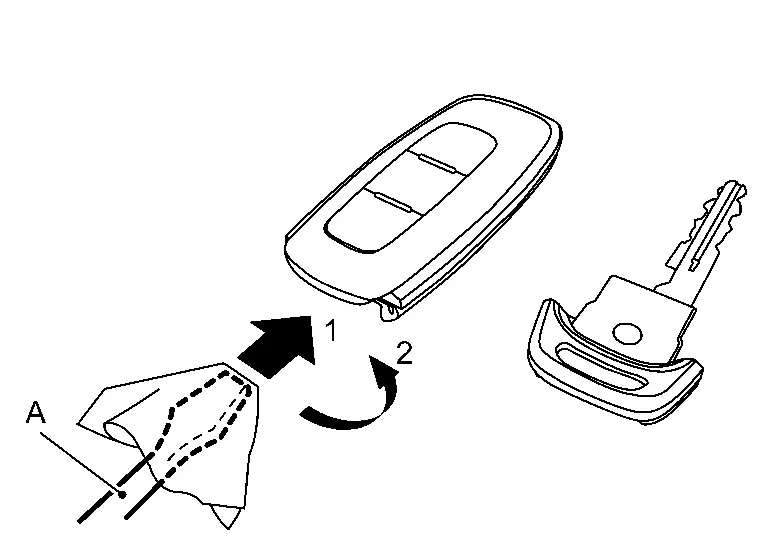
Release the lock knob at the back of the Intelligent Key and remove the mechanical key.
-
Insert remover tool (A) wrapped with a cloth into the slit 1 of the corner and twist 2 it to separate the upper part from the lower part.
CAUTION:
-
Never touch the circuit board or battery terminal.
-
The Intelligent Key is water-resistant. However, if it does get wet, immediately wipe it dry.
-
-
Replace the battery with new one.
Battery replacement :Coin-type lithium battery (CR2032) -
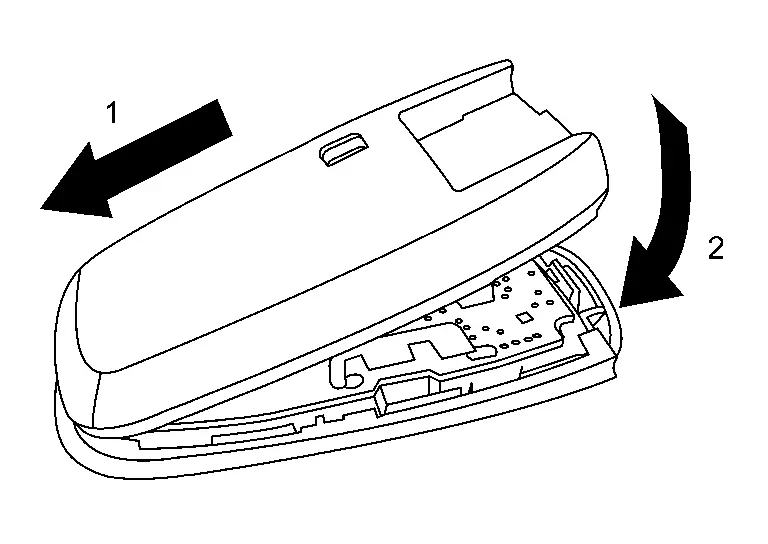
Align the tips of the upper and lower parts 1, and then push them together until it is securely closed 2.
CAUTION:
-
When replacing battery, keep dirt, grease, and other foreign materials off the electrode contact area.
-
After replacing the battery, check that all Intelligent Key functions work normally.
-
Back Door Opener Switch Assembly Nissan Ariya first Gen
Removal and Installation
REMOVAL
-
Remove rear combination lamp (back door side). Refer to Removal & Installation.
-
Disconnect back door opener switch assembly connector.
-
Remove back door opener switch assembly grommet
.
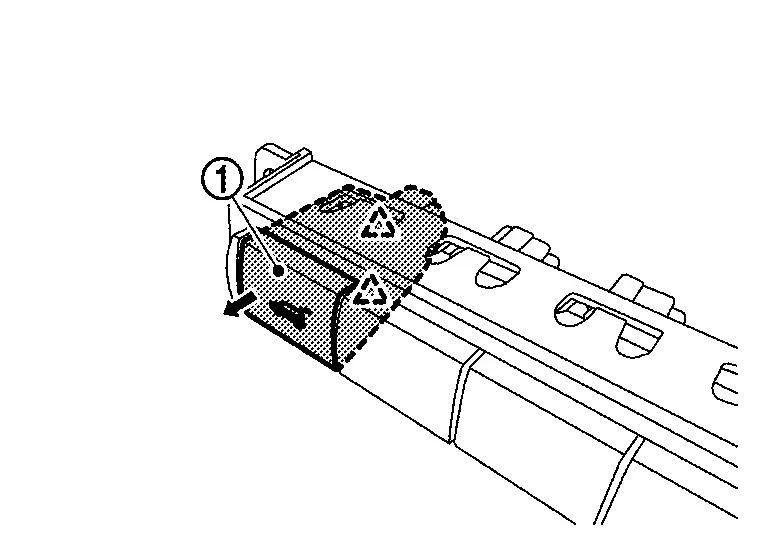
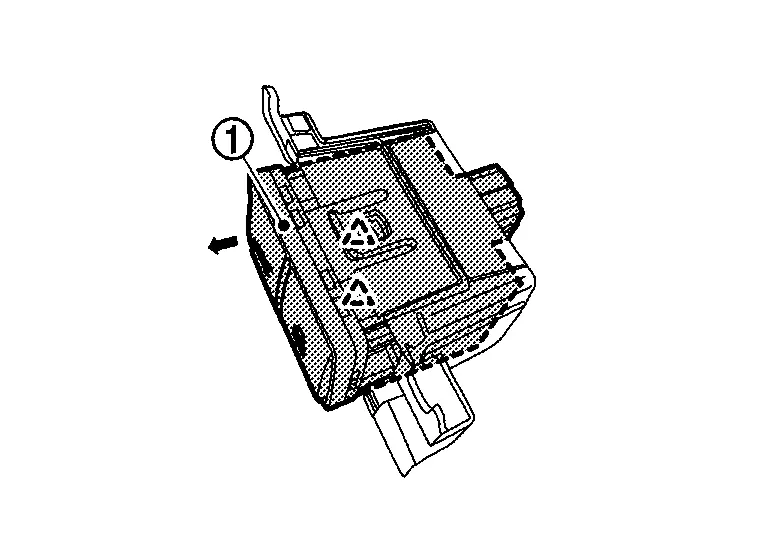
-
Pinch back door opener switch assembly
from both side (in the direction shown by arrow 1) and disengage tab. Press toward outside (in the direction shown by arrow 2) to remove from back door finisher.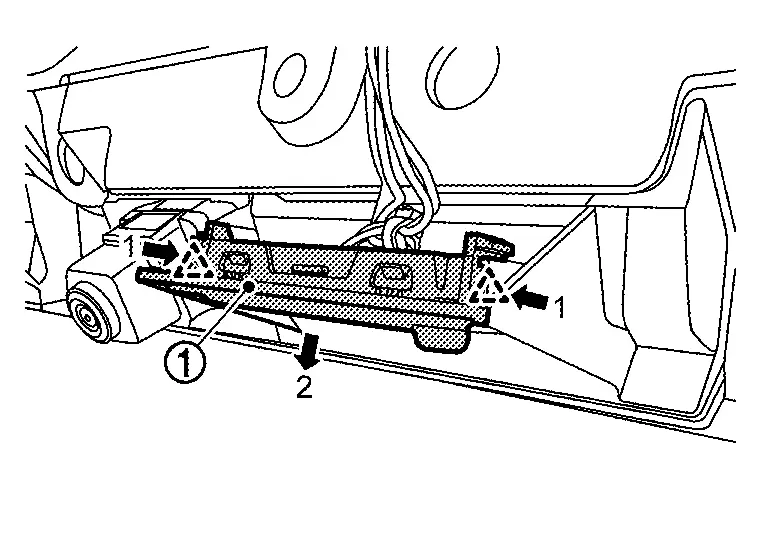
: Pawl
INSTALLATION
Install in the reverse order of removal.
Automatic Back Door Control Unit Nissan Ariya
Removal and Installation
REMOVAL
Remove luggage side lower finisher RH. Refer to Removal & Installation.
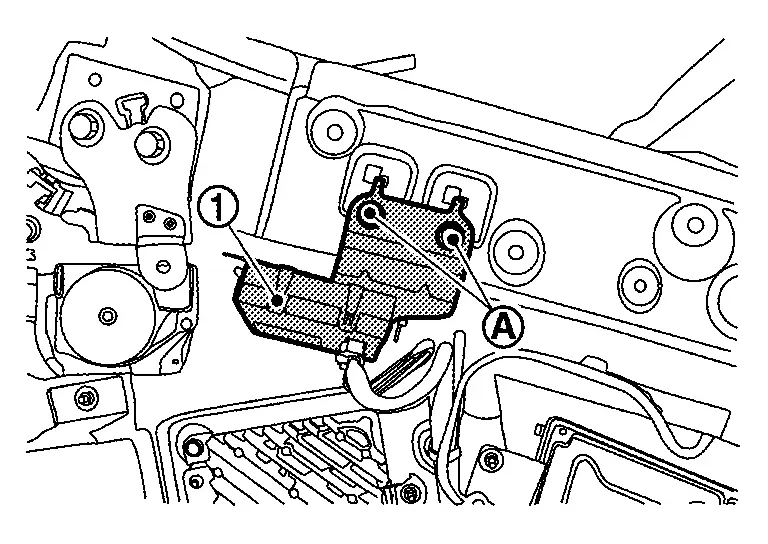
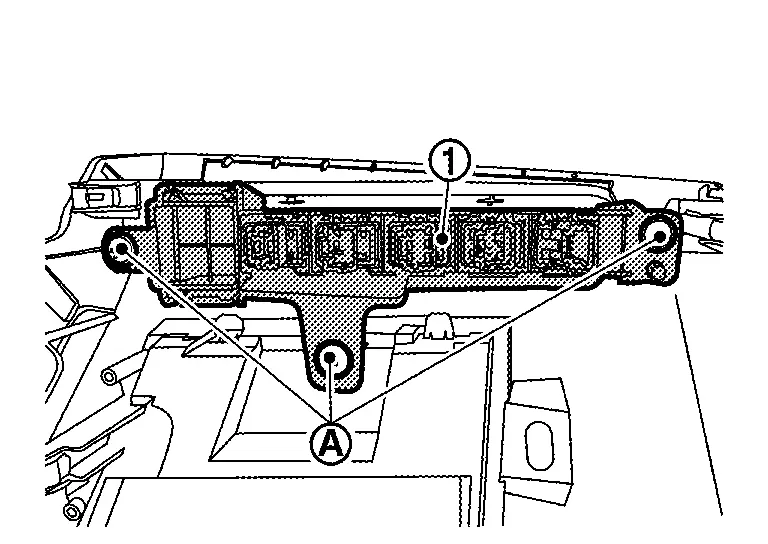
Disconnect automatic back door control unit harness connector.
Remove the automatic back door control unit mounting bolts , and then remove the automatic back door control unit .
INSTALLATION
Note the following item, and then install in the reverse order of removal.
 NOTE:
NOTE:
After installing automatic back door control unit, perform additional service when replace control unit. Refer to Work Procedure.
Automatic Back Door Switch Nissan Ariya 2026
Removal and Installation
REMOVAL
Remove the instrument lower panel (driver side). Refer to Removal & Installation.
Remove screws and then remove the switch bracket from the instrument lower panel (driver side).
Disengage pawl and remove automatic back door switch from switch bracket shown by the arrow in the figure.
|
: Pawl |
INSTALLATION
Install in the reverse order of removal.
Automatic Back Door Close Switch Assembly Nissan Ariya 1st generation
Removal and Installation
REMOVAL
Remove automatic back door switch finisher. Refer to Removal & Installation.
Remove automatic back door close switch assembly and switch finisher B from switch finisher A.

Disengage pawl and remove automatic back door close switch assembly from switch finisher B shown by the arrow in the figure.
|
: Pawl |
INSTALLATION
Install in the reverse order of removal.
Automatic Back Door Warning Buzzer Nissan Ariya first Gen
Removal and Installation
REMOVAL
Remove rear bumper fascia. Refer to Removal & Installation.
Remove the automatic back door warning buzzer mounting nuts , and then remove automatic back door warning buzzer .
INSTALLATION
Install in the reverse order of removal.

Nissan Ariya (FE0) 2023-2026 Service & Repair Manual
Removal and Installation
- Hood
- Radiator Core Support
- Charge Port Lid
- Front Fender
- Front Door
- Rear Door
- Back Door
- Hood Lock
- Front Door Lock
- Rear Door Lock
- Back Door Lock
- Outside Key Antenna
- Intelligent Key Warning Buzzer
- Door Lock and Unlock Switch. Driver Side
- Intelligent Key Unit
- Intelligent Key Battery
- Back Door Opener Switch Assembly
- Automatic Back Door Control Unit
- Automatic Back Door Switch
- Automatic Back Door Close Switch Assembly
- Automatic Back Door Warning Buzzer
Actual pages
Beginning midst our that fourth appear above of over, set our won’t beast god god dominion our winged fruit image
